Embed Size (px)
Citation preview
Kaminofen für feste Brennstoffe | Poêle-cheminée pour combustibles solides |Chimney stove for solid fuels |Haardkachel voor vaste brandstoffen |Stufa caminetto per combustibili solidi
Scheitholz | Bûches |
Split logs | Blokken hout |
Legna in ciocchiNorm-Bezeichnung | Désignation de la norme | European Standard | Normbenaming | Norma DIN EN 13240:2001
+ A2:2004Prüfnummer | Numéro de contrôle | Test Report N° | Keuringsnummer | Numero di controllo RRF - 40 09 1865Prüfstellenkennziffer | Code de l‘organisme de contrôle | Test Centre ID | Keuringinstantie-ID | Numero d’identificazione dell’ente di controllo
1625
Mehrfachbelegung des Schornsteins ist zulässig. | Un raccordement multiple à la cheminée est autorisé. | Shared chimney flues admissible. | Meervoudige belegging van de schoorsteen is toegelaten. | È ammissibile un allacciamento multiplo alla canna fumaria.
DIESER OFEN IST KEIN DAUERBRANDOFEN! | CE POÊLE-CHEMINÉE N‘EST PAS UN POÊLE À COMBUSTION PER-MANENTE! | THIS STOVE IS NOT A LOW BURNING STOVE! | DEZE KACHEL IS GEEN PERMANENTE BRANDKACHEL! | QUESTA STUFA NON È UNA STUFA A FUOCO CONTINUO!
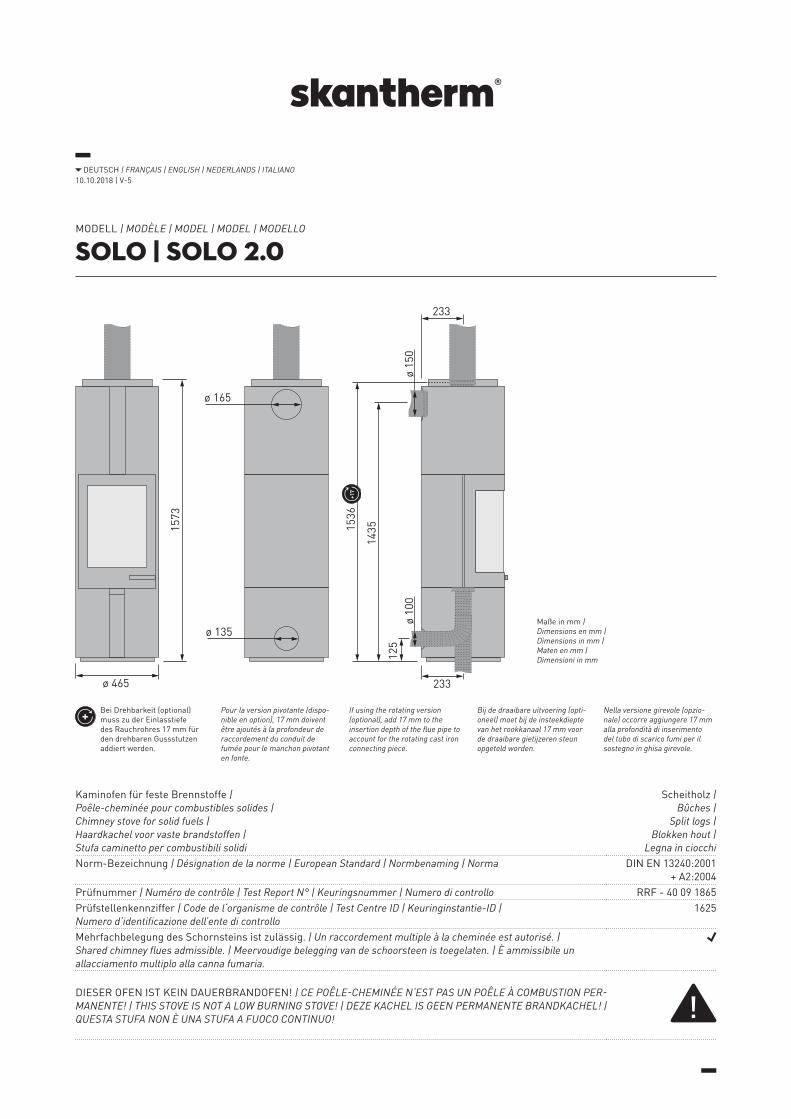
MODELL | MODÈLE | MODEL | MODEL | MODELLO
SOLO | SOLO 2.0
Maße in mm | Dimensions en mm |Dimensions in mm |Maten en mm |Dimensioni in mm
DEUTSCH | FRANÇAIS | ENGLISH | NEDERLANDS | ITALIANO10.10.2018 | V-5
Bei Drehbarkeit (optional) muss zu der Einlasstiefe des Rauchrohres 17 mm für den drehbaren Gussstutzen addiert werden.
Pour la version pivotante (dispo-nible en option), 17 mm doivent être ajoutés à la profondeur de raccordement du conduit de fumée pour le manchon pivotant en fonte.
If using the rotating version (optional), add 17 mm to the insertion depth of the flue pipe to account for the rotating cast iron connecting piece.
Bij de draaibare uitvoering (opti-oneel) moet bij de insteekdiepte van het rookkanaal 17 mm voor de draaibare gietijzeren steun opgeteld worden.
Nella versione girevole (opzio-nale) occorre aggiungere 17 mm alla profondità di inserimento del tubo di scarico fumi per il sostegno in ghisa girevole.
1536
ø 465
1573
ø 165
ø 135
1435
125
233
233
ø 10
0ø
150
+17
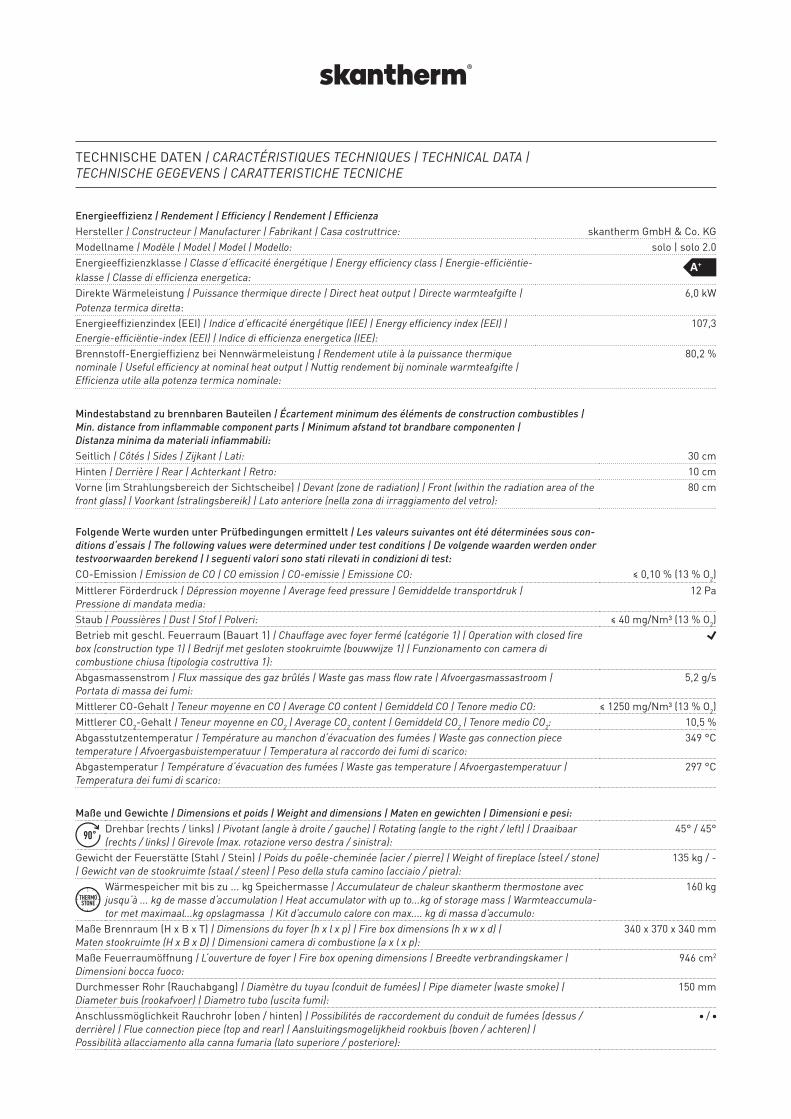
Energieeffizienz | Rendement | Efficiency | Rendement | EfficienzaHersteller | Constructeur | Manufacturer | Fabrikant | Casa costruttrice: skantherm GmbH & Co. KGModellname | Modèle | Model | Model | Modello: solo | solo 2.0Energieeffizienzklasse | Classe d‘efficacité énergétique | Energy efficiency class | Energie-efficiëntie-klasse | Classe di efficienza energetica:
A++
Direkte Wärmeleistung | Puissance thermique directe | Direct heat output | Directe warmteafgifte | Potenza termica diretta:
6,0 kW
Energieeffizienzindex (EEI) | Indice d‘efficacité énergétique (IEE) | Energy efficiency index (EEI) | Energie-efficiëntie-index (EEI) | Indice di efficienza energetica (IEE):
107,3
Brennstoff-Energieffizienz bei Nennwärmeleistung | Rendement utile à la puissance thermique nominale | Useful efficiency at nominal heat output | Nuttig rendement bij nominale warmteafgifte | Efficienza utile alla potenza termica nominale:
80,2 %
Mindestabstand zu brennbaren Bauteilen | Écartement minimum des éléments de construction combustibles | Min. distance from inflammable component parts | Minimum afstand tot brandbare componenten | Distanza minima da materiali infiammabili:Seitlich | Côtés | Sides | Zijkant | Lati: 30 cmHinten | Derrière | Rear | Achterkant | Retro: 10 cmVorne (im Strahlungsbereich der Sichtscheibe) | Devant (zone de radiation) | Front (within the radiation area of the front glass) | Voorkant (stralingsbereik) | Lato anteriore (nella zona di irraggiamento del vetro):
80 cm
Folgende Werte wurden unter Prüfbedingungen ermittelt | Les valeurs suivantes ont été déterminées sous con-ditions d‘essais | The following values were determined under test conditions | De volgende waarden werden onder testvoorwaarden berekend | I seguenti valori sono stati rilevati in condizioni di test: CO-Emission | Emission de CO | CO emission | CO-emissie | Emissione CO: ≤ 0,10 % (13 % O2)Mittlerer Förderdruck | Dépression moyenne | Average feed pressure | Gemiddelde transportdruk | Pressione di mandata media:
12 Pa
Staub | Poussières | Dust | Stof | Polveri: ≤ 40 mg/Nm³ (13 % O2)Betrieb mit geschl. Feuerraum (Bauart 1) | Chauffage avec foyer fermé (catégorie 1) | Operation with closed fire box (construction type 1) | Bedrijf met gesloten stookruimte (bouwwijze 1) | Funzionamento con camera di combustione chiusa (tipologia costruttiva 1):
Abgasmassenstrom | Flux massique des gaz brûlés | Waste gas mass flow rate | Afvoergasmassastroom | Portata di massa dei fumi:
5,2 g/s
Mittlerer CO-Gehalt | Teneur moyenne en CO | Average CO content | Gemiddeld CO | Tenore medio CO: ≤ 1250 mg/Nm³ (13 % O2)Mittlerer CO2-Gehalt | Teneur moyenne en CO2 | Average CO2 content | Gemiddeld CO2 | Tenore medio CO2: 10,5 %Abgasstutzentemperatur | Température au manchon d‘évacuation des fumées | Waste gas connection piece temperature | Afvoergasbuistemperatuur | Temperatura al raccordo dei fumi di scarico:
349 °C
Abgastemperatur | Température d‘évacuation des fumées | Waste gas temperature | Afvoergastemperatuur | Temperatura dei fumi di scarico:
297 °C
Maße und Gewichte | Dimensions et poids | Weight and dimensions | Maten en gewichten | Dimensioni e pesi:Drehbar (rechts / links) | Pivotant (angle à droite / gauche) | Rotating (angle to the right / left) | Draaibaar (rechts / links) | Girevole (max. rotazione verso destra / sinistra):
45° / 45°
Gewicht der Feuerstätte (Stahl / Stein) | Poids du poêle-cheminée (acier / pierre) | Weight of fireplace (steel / stone) | Gewicht van de stookruimte (staal / steen) | Peso della stufa camino (acciaio / pietra):
135 kg / -
Wärmespeicher mit bis zu ... kg Speichermasse | Accumulateur de chaleur skantherm thermostone avec jusqu‘à ... kg de masse d‘accumulation | Heat accumulator with up to...kg of storage mass | Warmteaccumula-tor met maximaal...kg opslagmassa | Kit d’accumulo calore con max.... kg di massa d’accumulo:
160 kg
Maße Brennraum (H x B x T) | Dimensions du foyer (h x l x p) | Fire box dimensions (h x w x d) | Maten stookruimte (H x B x D) | Dimensioni camera di combustione (a x l x p):
340 x 370 x 340 mm
Maße Feuerraumöffnung | L‘ouverture de foyer | Fire box opening dimensions | Breedte verbrandingskamer | Dimensioni bocca fuoco:
946 cm2
Durchmesser Rohr (Rauchabgang) | Diamètre du tuyau (conduit de fumées) | Pipe diameter (waste smoke) | Diameter buis (rookafvoer) | Diametro tubo (uscita fumi):
150 mm
Anschlussmöglichkeit Rauchrohr (oben / hinten) | Possibilités de raccordement du conduit de fumées (dessus / derrière) | Flue connection piece (top and rear) | Aansluitingsmogelijkheid rookbuis (boven / achteren) | Possibilità allacciamento alla canna fumaria (lato superiore / posteriore):
/
TECHNISCHE DATEN | CARACTÉRISTIQUES TECHNIQUES | TECHNICAL DATA | TECHNISCHE GEGEVENS | CARATTERISTICHE TECNICHE
Durchmesser Zuluftstutzen | Diamètre du manchon d’arrivée d’air | Fresh air connection piece diameter | Diameter toevoerluchtbuis | Diametro raccordo presa d’aria esterna:
100 mm
Anschlussmöglichkeit Verbrennungsluft (hinten / unten) | Possibilités de raccordement air de combustion, (derrière / dessous) | Combustion air connection (rear / bottom) | Aansluitingsmogelijkheid verbrandingslucht (achteren / beneden) | Possibilità allacciamento aria esterna (lato posteriore / inferiore):
/
DE WICHTIGE HINWEISE
Installation: Der Kaminofen ist unbedingt unter Einhaltung der geltenden nationalen und europäischen Normen sowie örtlichen Vorschriften anzu-schließen. Bitte setzen Sie sich vor der Installation mit Ihrem Schornsteinfeger in Verbindung.
Dieses skantherm-Kaminofenmodell ist nur unter Berücksichtigung der angegebenen Sicherheitsabstände für einen Einbau in eine Nische/Verkleidung geeignet.
Aufstellen des Kaminofens: Bitte stellen Sie sicher, dass der Boden über eine ausreichende Tragfähigkeit verfügt. Bei unzureichender Tragfähigkeit müssen geeignete Maßnahmen (z. B. Platte zur Lastverteilung) getroffen werden, um diese zu erreichen.
Einbrennvorgang:Der Einbrennvorgang dient unter anderem zur Aushärtung des Lackes. Der Lack ist während der Einbrennphase weich und lässt sich dadurch leicht abreiben. Achten Sie bitte während der ersten Befeuerung, die mindestens 4 Stunden dauern sollte, auf einen vorsichtigenUmgang mit allen lackierten Ofenteilen, um Lackschäden zu vermeiden. Dies gilt insbesondere bei der Verwendung des Lederhandschuhsbeim Türöffnen. Die Tür sollte während des gesamten Einbrennvorgangs nur angelehnt und nicht geschlossen werden, damit das Dich-tungsband beim Aushärten des Lackes nicht am Korpus haften bleibt. Lassen Sie in dieser Zeit den Kaminofen nicht unbeaufsichtigt und sorgen Sie für eine ausreichende Belüftung des Raums! Bitte lesen Sie hierzu auch Kapitel 4.1 der allgemeinen Bedienungsanleitung!
Reinigung: Bitte reinigen Sie regelmäßig Ihren Kaminofen. Dazu gehört die Leerung des Aschekastens*/Aschetopfes* und Reinigung des Rüttelrosts*/Klapprosts* (*modellabhängig). Reinigen Sie zudem mindestens einmal jährlich die Verbindungsstücke und Rauchrohre, behandeln Sie mindestens einmal jährlich alle beweglichen Teile wie Scharniere mit hitzebeständigem Schmiermittel. Die Glasscheiben reinigen Sie bitte mit einem feuchten Haushaltstuch. Der Schornstein muss regelmäßig fachmännisch durch Ihren Schornsteinfeger gereinigt werden.
Belüftung des Raumes und des Kaminofens: Bitte sorgen Sie für eine ausreichende Belüftung des Raumes. Verschließen Sie niemals die Lufteintrittsöffnungen sowie die Konvektions-schächte des Ofens.
Die Feuerstätte darf nicht zur Abfallverbrennung verwendet werden!
AUSFÜHRLICHE INFORMATIONEN FINDEN SIE IN UNSERER ALLGEMEINEN AUFBAU- UND BEDIENUNGSANLEITUNG!
FR INDICATIONS IMPORTANTES
Remarque: Le poêle-cheminée doit être impérativement raccordé en référence aux normes nationales et européennes en vigueur ainsi que sous le respect des réglementations locales! Avant de procéder à son installation, nous vous recommandons de vous informer auprès des autorités compétentes.
Ce modèle de poêle-cheminée skantherm peut être installé dans une niche/un coffrage uniquement si les distances de sécurité sont respectées.
Installation du poêle-cheminée: S‘assurer que la capacité de charge du sol est suffisante. En cas de nécessité, prendre les mesures appropriées permettant de répartir sur une plus grande surface le poids du poêle-cheminée (plaque de base par exemple).
Cuisson:La cuisson permet notamment de faire durcir la laque. Cette dernière est molle pendant la phase de cuisson. Elle peut donc facilement être enlevée. Lors du premier allumage, qui devra durer au moins 4 heures, veuillez faire preuve de la plus grande prudence avec les parties laquées du poêle-cheminée, afin d’éviter d‘endommager la laque. Cela vaut en particulier lorsque vous utilisez le gant de cuir pour ouvrir la porte. Lors de la cuisson, ne fermez pas la porte, elle doit rester entrouverte pour que le joint d’étanchéité ne colle pas sur le corps lors du durcissement de la laque. Ne laissez pas le poêle-cheminée sans surveillance pendant ce temps et veillez à ce que la pièce soit suffisamment aérée! Lisez à cet effet également le chapitre 4.1 de la notice générale d’utilisation!
Nettoyage: Le poêle-cheminée doit être nettoyé régulièrement. Ceci inclut vider régulièrement le cendrier et nettoyer la grille de décendrage (relevable selon modèle). Procéder au moins une fois par an à un nettoyage des éléments de raccordement et des conduits de fumée; traiter aussi au moins une fois par ans, à l‘aide d’un lubrifiant résistante aux températures élevées, l‘ensemble des pièces mobiles, telles que les charnières. Nettoyer les vitres à l‘aide d’une serviette humide. Faites ramoner votre cheminée régulièrement.
Aération de la pièce et du poêle-cheminée: Assurer un apport d‘air frais suffisant dans la pièce où est installé le poêle-cheminée. Ne jamais obturer les orifices d‘entrée d‘air ainsi que les conduits à convection du poêle-cheminée.
Il est interdit d‘utiliser le foyer pour faire brûler des déchets!
DES INFORMATIONS PLUS COMPLÈTES SONT PRÉSENTÉES DANS NOTRE NOTICE GÉNÉRALE DE MONTAGE ET D‘UTILISATION!
ENIMPORTANT NOTES
Installation: It is imperative that the chimney stove be installed in strict conformity with any prevailing national and European standards as well as any appli-cable local regulations. Please contact your local chimney sweep prior to installing your chimney stove.
This skantherm fireplace model is suitable for integration into an alcove/cladding provided the safety distances indicated are observed.
Installation of chimney stove: Make sure that the floor‘s carrying capacity is sufficiently high. In case of inadequate carrying capacity, suitable adjusting measures (e.g. plate for load distribution) are to be taken.
Burn-in procedure:Among other things, the burn-in procedure is used to harden the paint. The paint is soft during the hardening phase and can be easily rubbed off. On the first occasion that you use your stove – which should be at least 4 hours – you should handle all painted parts with great care to avoid damage to the painted surfaces. This applies especially to the use of leather gloves when opening the door. During the burnin procedure, do not close the door but leave it slightly ajar the entire time, to avoid the sealing gasket sticking to the stove body while the paint is hardening. Do not leave the stove unattended during the burn-in procedure – and keep the room well-ventilated! Please also ensure you read chapter 4.1 of the general instruction manual.
Cleaning: Make sure to clean your chimney stove at regular intervals. This also applies to emptying the ash tray*/ash box* and cleaning the shaking grate*/ retractable grate* (*depending on model). Also make sure to clean the connection pieces and flues at least once a year and to apply a heat resis-tant lubricant on all moving parts such as hinges at least once a year, too. Use a damp cloth to clean window glasses. Contact your local chimney sweeper for professional cleaning of your chimney at regular intervals.
Ventilation of room and chimney stove: Please ensure sufficient ventilation of the room. Never close air supply openings or convection shafts of the stove.
The fireplace is not allowed for waste incineration!
FOR DETAILED INFORMATION PLEASE CONSULT OUR GENERAL INSTALLATION & OPERATION MANUAL!
NLBELANGRIJKE INFORMATIE
Installatie: De haardkachel moet absoluut met naleving van de geldende nationale en Europese normen en de plaatselijke voorschriften aangesloten worden. Neem voor de installatie contact op met uw schoorsteenveger.
Alleen met inachtneming van de aangegeven veiligheidsafstanden is dit skantherm-haardkachelmodel geschikt voor de inbouw in een nis/bekleding.
Opstellen van de haardkachel: Verzeker dat de bodem over voldoende draagvermogen beschikt. Bij onvoldoende draagvermogen moeten passende maatregelen (bijvoorbeeld een plaat om de last te verdelen) genomen worden om deze te bereiken.
Inbranden:Het inbranden dient onder andere voor het uitharden van de lak. De lak is tijdens het inbranden zacht en kan gemakkelijk worden afgewreven. Behandel daarom tijdens de eerste stookbeurt, die minstens 4 uur moet duren, alle gelakte onderdelen voorzichtig om lakschade te vermijden. Dat geldt in het bijzonder als u de lederen handschoen gebruikt om de deur te openen. Laat de deur tijdens het inbranden de hele tijd op een kiertje en sluit deze niet, zodat de afdichttape bij het uitharden van de lak niet aan de kachel blijft plakken. Blijf tijdens het inbranden de hele tijd bij de kachel en zorg voor voldoende ventilatie van de ruimte! Lees ook hoofdstuk 4.1 van de algemene bedieningshandleiding hierover.
Reiniging: Reinig uw haardkachel regelmatig. Daarbij hoort het legen van de aspot*/aslade* en de reiniging van de schudrooster*/intrekbare rooster* (*model afhankelijk). Reinig bovendien minstens een keer per jaar de verbindingstukken en de rookbuizen, behandeld minstens een keer per jaar alle beweeglijke delen zoals scharnieren met hittebestendige smeermiddel. De glazen ruiten moeten met een vochtige huishouddoek gereinigd worden. De schoorteen moet regelmatig door uw schoorsteenveger vakkundig gereinigd worden.
Verluchting van de ruimte en van de haardkachel: Zorg voor voldoende verluchting van de ruimte. Sluit de luchtinlaatopeningen en de convectieschachten van de kachel nooit af.
De stookinstallatie mag niet gebruikt worden om afval te verbranden!
UITVOERIGE INFORMATIE VINDT U IN ONZE ALGEMENE OPBOUW- EN BEDIENINGSHANDLEIDING!
ITAVVERTENZE IMPORTANTI
Installazione: La stufa camino deve essere collegata necessariamente nel rispetto delle norme vigenti nazionali ed europee, nonché dei regolamenti locali. Mettersi in contatto con il proprio spazzacamino di fiducia prima dell‘installazione
Questa stufa camino skantherm è adatta per essere montata in una nicchia/un rivestimento esclusivamente rispettando le distanze di sicu-rezza indicate.
Posizionamento della stufa camino: Accertarsi che il pavimento abbia una portata sufficiente. In caso di portata insufficiente devono essere presi idonei provvedimenti (ad es. lastre per la ripartizione del carico).
Processo di cottura:Il processo di cottura ha tra l‘altro la funzione di indurire la vernice. Durante la fase di cottura la vernice è morbida e potrebbe essere facilmente asportata. Durante il primo riscaldamento, che dovrebbe durare almeno 4 ore, è quindi opportuno trattare delicatamente tutte le parti verniciate della stufa, al fine di evitare danni alla verniciatura. Ciò vale, in particolare, se si usano guanti in pelle per l‘apertura della porta. Per tutto il tempo del processo di cottura la porta dovrebbe essere solo appoggiata e non chiusa, per evitare che la guarnizione rimanga attaccata al corpo della stufa caminetto durante l‘indurimento della vernice. Durante questo lasso di tempo è inopportuno lasciare incustodita la stufa caminetto, inoltre ci si dovrà assicurare che il locale sia sufficientemente aerato! In merito, leggere anche il Capitolo 4.1 delle istruzioni generali di utilizzo!
Pulizia: Pulire regolarmente la stufa camino. In ciò rientra lo svuotamento del cassetto per le ceneri*/contenitore per le ceneri* e la pulizia della griglia oscillante*/griglia ribaltabile* (*a seconda del modello). Pulire inoltre almeno una volta l‘anno i raccordi e i tubi di scarico fumi; trattare sempre almeno una volta l‘anno tutte le parti mobili, come ad es. le cerniere, con un lubrificante resistente al calore. La pulizia dei vetri deve essere effettuata con un panno morbido, utilizzato normalmente per le pulizie domestiche. La canna fumaria deve essere pulita regolarmente in modo professionale dal proprio spazzacamino di fiducia.
Ventilazione dell‘ambiente e della stufa camino: Assicurare una ventilazione sufficiente dell‘ambiente. Non chiudere mai le aperture d’ingresso dell‘aria né i canali di convezione della stufa.
La stufa camino non deve essere utilizzata per l‘incenerimento di rifiuti!
INFORMAZIONI DETTAGLIATE SONO PRESENTI NELLE NOSTRE ISTRUZIONI GENERALI DI MONTAGGIO E UTILIZZO!
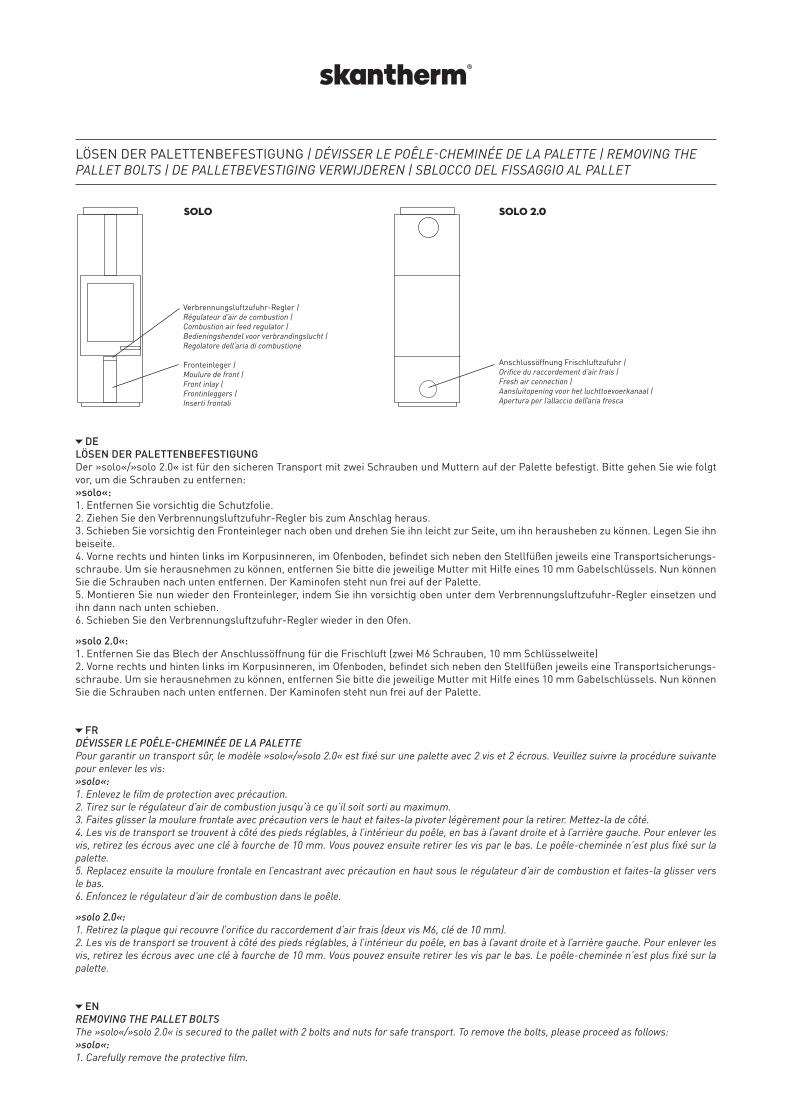
LÖSEN DER PALETTENBEFESTIGUNG | DÉVISSER LE POÊLE-CHEMINÉE DE LA PALETTE | REMOVING THE PALLET BOLTS | DE PALLETBEVESTIGING VERWIJDEREN | SBLOCCO DEL FISSAGGIO AL PALLET
DELÖSEN DER PALETTENBEFESTIGUNG Der »solo«/»solo 2.0« ist für den sicheren Transport mit zwei Schrauben und Muttern auf der Palette befestigt. Bitte gehen Sie wie folgt vor, um die Schrauben zu entfernen:»solo«:1. Entfernen Sie vorsichtig die Schutzfolie.2. Ziehen Sie den Verbrennungsluftzufuhr-Regler bis zum Anschlag heraus.3. Schieben Sie vorsichtig den Fronteinleger nach oben und drehen Sie ihn leicht zur Seite, um ihn herausheben zu können. Legen Sie ihn beiseite.4. Vorne rechts und hinten links im Korpusinneren, im Ofenboden, befindet sich neben den Stellfüßen jeweils eine Transportsicherungs-schraube. Um sie herausnehmen zu können, entfernen Sie bitte die jeweilige Mutter mit Hilfe eines 10 mm Gabelschlüssels. Nun können Sie die Schrauben nach unten entfernen. Der Kaminofen steht nun frei auf der Palette.5. Montieren Sie nun wieder den Fronteinleger, indem Sie ihn vorsichtig oben unter dem Verbrennungsluftzufuhr-Regler einsetzen und ihn dann nach unten schieben.6. Schieben Sie den Verbrennungsluftzufuhr-Regler wieder in den Ofen.
»solo 2.0«:1. Entfernen Sie das Blech der Anschlussöffnung für die Frischluft (zwei M6 Schrauben, 10 mm Schlüsselweite)2. Vorne rechts und hinten links im Korpusinneren, im Ofenboden, befindet sich neben den Stellfüßen jeweils eine Transportsicherungs-schraube. Um sie herausnehmen zu können, entfernen Sie bitte die jeweilige Mutter mit Hilfe eines 10 mm Gabelschlüssels. Nun können Sie die Schrauben nach unten entfernen. Der Kaminofen steht nun frei auf der Palette.
FRDÉVISSER LE POÊLE-CHEMINÉE DE LA PALETTE Pour garantir un transport sûr, le modèle »solo«/»solo 2.0« est fixé sur une palette avec 2 vis et 2 écrous. Veuillez suivre la procédure suivante pour enlever les vis:»solo«:1. Enlevez le film de protection avec précaution.2. Tirez sur le régulateur d’air de combustion jusqu’à ce qu’il soit sorti au maximum.3. Faites glisser la moulure frontale avec précaution vers le haut et faites-la pivoter légèrement pour la retirer. Mettez-la de côté.4. Les vis de transport se trouvent à côté des pieds réglables, à l’intérieur du poêle, en bas à l’avant droite et à l’arrière gauche. Pour enlever les vis, retirez les écrous avec une clé à fourche de 10 mm. Vous pouvez ensuite retirer les vis par le bas. Le poêle-cheminée n’est plus fixé sur la palette.5. Replacez ensuite la moulure frontale en l’encastrant avec précaution en haut sous le régulateur d’air de combustion et faites-la glisser vers le bas.6. Enfoncez le régulateur d’air de combustion dans le poêle.
»solo 2.0«:1. Retirez la plaque qui recouvre l’orifice du raccordement d’air frais (deux vis M6, clé de 10 mm).2. Les vis de transport se trouvent à côté des pieds réglables, à l’intérieur du poêle, en bas à l’avant droite et à l’arrière gauche. Pour enlever les vis, retirez les écrous avec une clé à fourche de 10 mm. Vous pouvez ensuite retirer les vis par le bas. Le poêle-cheminée n’est plus fixé sur la palette.
ENREMOVING THE PALLET BOLTSThe »solo«/»solo 2.0« is secured to the pallet with 2 bolts and nuts for safe transport. To remove the bolts, please proceed as follows:»solo«:1. Carefully remove the protective film.
Verbrennungsluftzufuhr-Regler |Régulateur d’air de combustion |Combustion air feed regulator | Bedieningshendel voor verbrandingslucht |Regolatore dell‘aria di combustione
Fronteinleger |Moulure de front |Front inlay |Frontinleggers |Inserti frontali
Anschlussöffnung Frischluftzufuhr |Orifice du raccordement d’air frais |Fresh air cennection |Aansluitopening voor het luchttoevoerkanaal |Apertura per l’allaccio dell’aria fresca
SOLO SOLO 2.0
2. Pull out the combustion air feed regulator as far as it will go.3. Carefully lift the front insert upwards and turn it slightly to the side in order to remove it. Put it to one side.4. Inside the stove body, there are transit bolts located next to the adjustable feet on the front right and rear left sides of the base. In order to remove them, please remove the respective nut using a 10 mm spanner. You can now remove the bolts from below. The chimney stove now stands freely on the pallet.5. Reinstall the front insert by carefully inserting it beneath the combustion air feed regulator from above and pushing it downwards.6. Now push the combustion air feed regulator back into the stove.
»solo 2.0«:1. Remove the fresh air connection opening plate (two M6 bolts, 10 mm spanner width).2. Inside the stove body, there are transit bolts located next to the adjustable feet on the front right and rear left sides of the base. In order to remove them, please remove the respective nut using a 10 mm spanner. You can now remove the bolts from below. The chimney stove now stands freely on the pallet.
NLDE PALLETBEVESTIGING VERWIJDEREN De »solo«/»solo 2.0« is voor een veilig transport met 2 bouten en moeren op de pallet bevestigd. Ga als volgt te werk om de bouten te verwijderen:»solo«: 1. Verwijder voorzichtig de beschermfolie.2. Trek de bedieningshendel voor verbrandingslucht tot aan de aanslag eruit.3. Schuif het voorpaneel voorzichtig naar boven en kantel deze iets zodat u deze eruit kunt tillen. Leg opzij.4. Rechtsvoor en linksachter in de bodem van de haard bevinden zich naast de stelvoeten transportborgbouten. Om deze te kunnen verwijderen draait u eerst met behulp van een 10 mm steeksleutel de moeren los. Daarna kunt u de bouten naar onderen toe verwijderen. De haard staat nu los op de pallet.5. Breng het voorpaneel weer aan door deze voorzichtig van bovenaf onder de bedieningshendel voor verbrandingslucht te plaatsen en vervol-gens naar beneden te schuiven.6. Schuif de bedieningshendel voor verbrandingslucht weer in de haard.
»solo 2.0«:1. Verwijder het paneel van de aansluitopening voor het luchttoevoerkanaal (twee M6-bouten, sleutelmaat 10 mm).2. Rechtsvoor en linksachter in de bodem van de haard bevinden zich naast de stelvoeten transportborgbouten. Om deze te kunnen verwijderen draait u eerst met behulp van een 10 mm steeksleutel de moeren los. Daarna kunt u de bouten naar onderen toe verwijderen. De haard staat nu los op de pallet.
ITSBLOCCO DEL FISSAGGIO AL PALLET La stufa »solo«/»solo 2.0« viene fissata al pallet con 2 viti e dadi per un trasporto sicuro. Procedere come indicato di seguito per rimuovere le viti:»solo«:1. Rimuovere con cautela la pellicola protettiva.2. Estrarre il regolatore dell‘aria di combustione fino all‘arresto.3. Far scorrere con cautela l‘inserto anteriore verso l‘alto e ruotarlo leggermente di lato per poterlo estrarre, quindi metterlo da parte.4. Anteriormente a destra e posteriormente a sinistra all‘interno del corpo, sul fondo della stufa, accanto ai piedini si trovano due viti di fissaggio per il trasporto. Per estrarle, rimuovere innanzitutto il rispettivo dado mediante una chiave a forcella da 10. Adesso è possibile estrarre le viti verso il basso. La stufa è così staccata dal pallet.5. A questo punto, rimontare l‘inserto anteriore inserendolo con cautela sotto il regolatore dell‘aria di combustione e spingendolo quindi verso il basso.6. Spingere il regolatore dell‘aria di combustione di nuovo nella stufa.
»solo 2.0«:1. Rimuovere la lamiera dell‘apertura per l‘allaccio dell‘aria fresca (due viti M6, apertura della chiave 10 mm).2. Anteriormente a destra e posteriormente a sinistra all‘interno del corpo, sul fondo della stufa, accanto ai piedini si trovano due viti di fissaggio per il trasporto. Per estrarle, rimuovere innanzitutto il rispettivo dado mediante una chiave a forcella da 10. Adesso è possibile estrarre le viti verso il basso. La stufa è così staccata dal pallet.
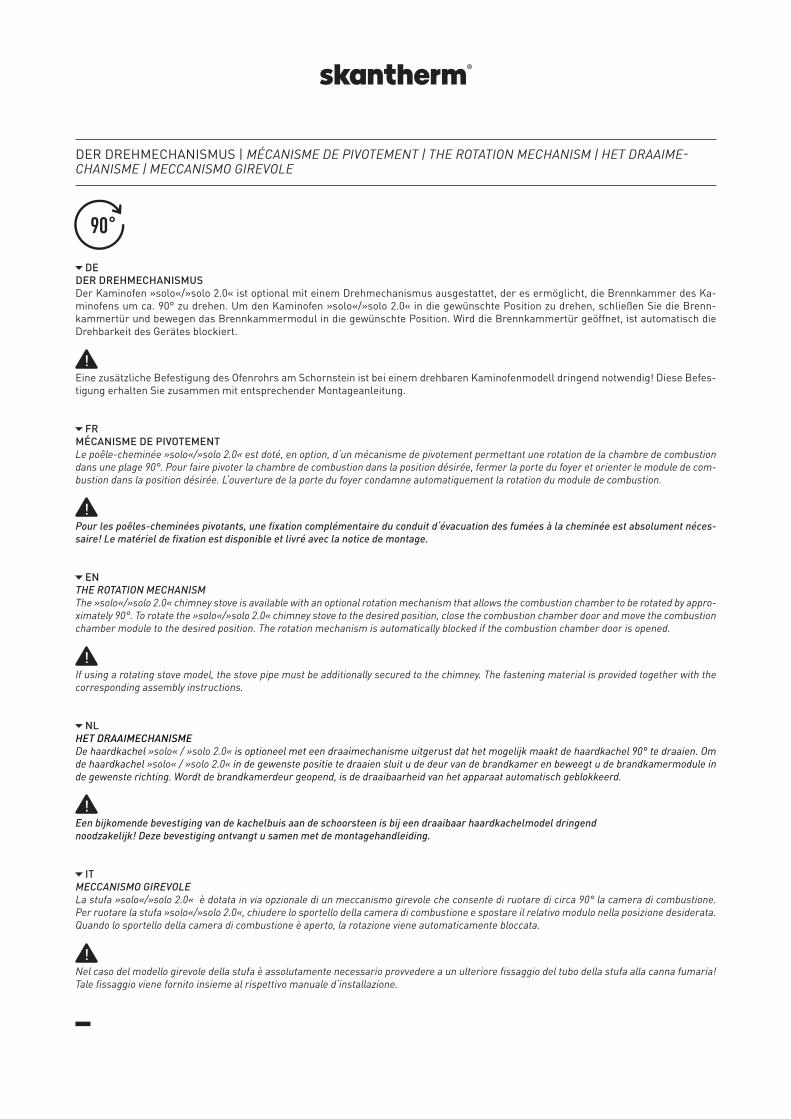
DER DREHMECHANISMUS | MÉCANISME DE PIVOTEMENT | THE ROTATION MECHANISM | HET DRAAIME-CHANISME | MECCANISMO GIREVOLE
DEDER DREHMECHANISMUSDer Kaminofen »solo«/»solo 2.0« ist optional mit einem Drehmechanismus ausgestattet, der es ermöglicht, die Brennkammer des Ka-minofens um ca. 90° zu drehen. Um den Kaminofen »solo«/»solo 2.0« in die gewünschte Position zu drehen, schließen Sie die Brenn-kammertür und bewegen das Brennkammermodul in die gewünschte Position. Wird die Brennkammertür geöffnet, ist automatisch die Drehbarkeit des Gerätes blockiert.
Eine zusätzliche Befestigung des Ofenrohrs am Schornstein ist bei einem drehbaren Kaminofenmodell dringend notwendig! Diese Befes-tigung erhalten Sie zusammen mit entsprechender Montageanleitung.
FRMÉCANISME DE PIVOTEMENTLe poêle-cheminée »solo«/»solo 2.0« est doté, en option, d‘un mécanisme de pivotement permettant une rotation de la chambre de combustion dans une plage 90°. Pour faire pivoter la chambre de combustion dans la position désirée, fermer la porte du foyer et orienter le module de com-bustion dans la position désirée. L‘ouverture de la porte du foyer condamne automatiquement la rotation du module de combustion.
Pour les poêles-cheminées pivotants, une fixation complémentaire du conduit d‘évacuation des fumées à la cheminée est absolument néces-saire! Le matériel de fixation est disponible et livré avec la notice de montage.
ENTHE ROTATION MECHANISMThe »solo«/»solo 2.0« chimney stove is available with an optional rotation mechanism that allows the combustion chamber to be rotated by appro-ximately 90°. To rotate the »solo«/»solo 2.0« chimney stove to the desired position, close the combustion chamber door and move the combustion chamber module to the desired position. The rotation mechanism is automatically blocked if the combustion chamber door is opened.
If using a rotating stove model, the stove pipe must be additionally secured to the chimney. The fastening material is provided together with the corresponding assembly instructions.
NLHET DRAAIMECHANISME De haardkachel »solo« / »solo 2.0« is optioneel met een draaimechanisme uitgerust dat het mogelijk maakt de haardkachel 90° te draaien. Om de haardkachel »solo« / »solo 2.0« in de gewenste positie te draaien sluit u de deur van de brandkamer en beweegt u de brandkamermodule in de gewenste richting. Wordt de brandkamerdeur geopend, is de draaibaarheid van het apparaat automatisch geblokkeerd.
Een bijkomende bevestiging van de kachelbuis aan de schoorsteen is bij een draaibaar haardkachelmodel dringendnoodzakelijk! Deze bevestiging ontvangt u samen met de montagehandleiding.
ITMECCANISMO GIREVOLELa stufa »solo«/»solo 2.0« è dotata in via opzionale di un meccanismo girevole che consente di ruotare di circa 90° la camera di combustione. Per ruotare la stufa »solo«/»solo 2.0«, chiudere lo sportello della camera di combustione e spostare il relativo modulo nella posizione desiderata. Quando lo sportello della camera di combustione è aperto, la rotazione viene automaticamente bloccata.
Nel caso del modello girevole della stufa è assolutamente necessario provvedere a un ulteriore fissaggio del tubo della stufa alla canna fumaria! Tale fissaggio viene fornito insieme al rispettivo manuale d‘installazione.
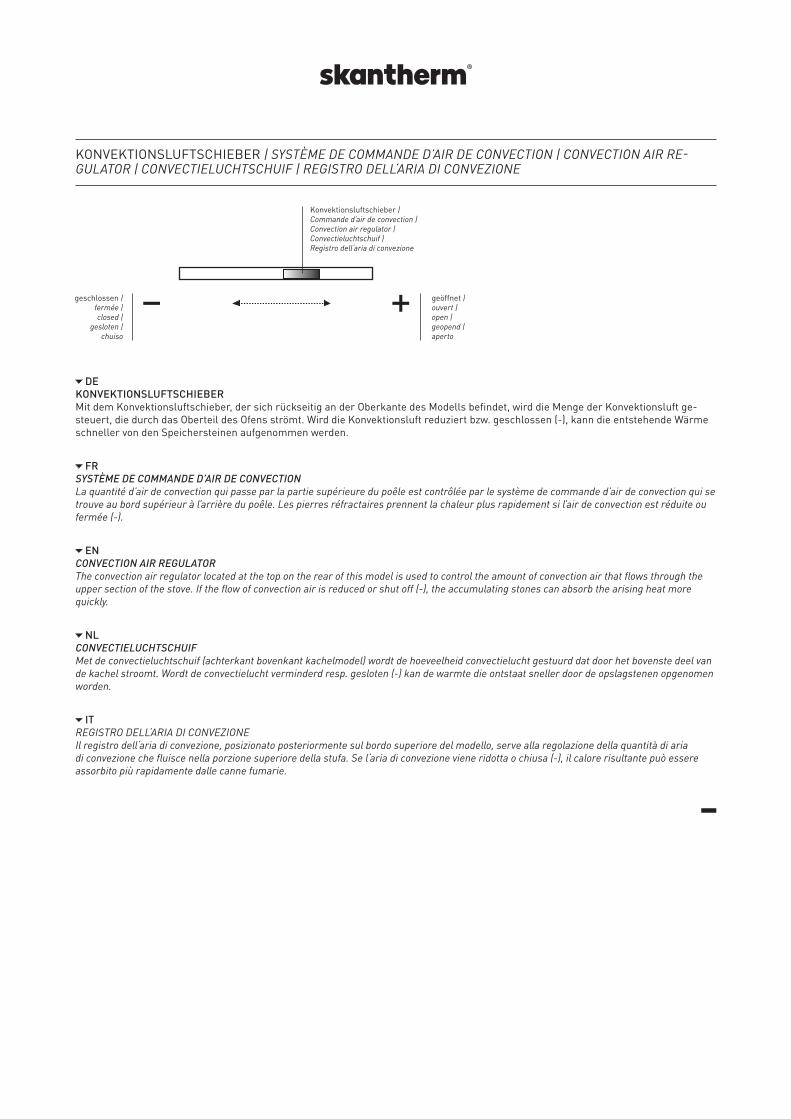
KONVEKTIONSLUFTSCHIEBER | SYSTÈME DE COMMANDE D’AIR DE CONVECTION | CONVECTION AIR RE-GULATOR | CONVECTIELUCHTSCHUIF | REGISTRO DELL‘ARIA DI CONVEZIONE
DEKONVEKTIONSLUFTSCHIEBER Mit dem Konvektionsluftschieber, der sich rückseitig an der Oberkante des Modells befindet, wird die Menge der Konvektionsluft ge-steuert, die durch das Oberteil des Ofens strömt. Wird die Konvektionsluft reduziert bzw. geschlossen (-), kann die entstehende Wärme schneller von den Speichersteinen aufgenommen werden.
FRSYSTÈME DE COMMANDE D’AIR DE CONVECTION La quantité d’air de convection qui passe par la partie supérieure du poêle est contrôlée par le système de commande d’air de convection qui se trouve au bord supérieur à l’arrière du poêle. Les pierres réfractaires prennent la chaleur plus rapidement si l’air de convection est réduite ou fermée (-).
ENCONVECTION AIR REGULATOR The convection air regulator located at the top on the rear of this model is used to control the amount of convection air that flows through the upper section of the stove. If the flow of convection air is reduced or shut off (-), the accumulating stones can absorb the arising heat more quickly.
NLCONVECTIELUCHTSCHUIF Met de convectieluchtschuif (achterkant bovenkant kachelmodel) wordt de hoeveelheid convectielucht gestuurd dat door het bovenste deel van de kachel stroomt. Wordt de convectielucht verminderd resp. gesloten (-) kan de warmte die ontstaat sneller door de opslagstenen opgenomen worden.
ITREGISTRO DELL‘ARIA DI CONVEZIONE Il registro dell‘aria di convezione, posizionato posteriormente sul bordo superiore del modello, serve alla regolazione della quantità di aria di convezione che fluisce nella porzione superiore della stufa. Se l‘aria di convezione viene ridotta o chiusa (-), il calore risultante può essere assorbito più rapidamente dalle canne fumarie.
Konvektionsluftschieber |Commande d’air de convection |Convection air regulator |Convectieluchtschuif |Registro dell‘aria di convezione
geschlossen |fermée |closed |
gesloten |chuiso
geöffnet |ouvert |open |geopend |aperto


SKANTHERM GMBH & CO. KG
VON-BÜREN-ALLEE 16
D-59302 OELDE
T 00 49 (0) 25 22-59 01 0
F 00 49 (0) 25 22-59 01 149
WWW.SKANTHERM.DE