Embed Size (px)
Citation preview
Fiche 2 - Split frequency - Dodge and Burn
Auteur Cimburek Pierre
Preacutesentation deacutetailleacutee au club neacuteant
Cateacutegorie traitement numeacuterique des images
Logiciel Photoshop
Lien internet httppierrecimburekcomretouche-de-peau-split-frequency-dodge-burn
Introduction
En portrait de mode ou de beauteacute il y a beaucoup de choses agrave prendre en consideacuteration
surtout quand il srsquoagit de travailler sur les imperfections de la peau La retouche peut
srsquoaveacuterer tregraves difficile lorsque lrsquoon veut arriver agrave un bon reacutesultat Et il est facile de se
perdre parmi les nombreuses techniques et tutoriels disponibles sur la toile Lors de mes
ateliers jrsquoai pu croiser eacutegalement beaucoup de photographes utilisant des plugins deacutedieacutes agrave
cette tacircche Ils ont lrsquoavantage drsquoecirctre simple agrave utiliser et de pouvoir ecirctre appliqueacute tregraves
rapidement Malheureusement ils ne permettent pas drsquoobtenir le reacutesultat escompteacute A mes
yeux il y a deux techniques que chaque photographe deacutesirant ce lancer dans la retouche
devrait connaitre Le laquo Split Frequency et le laquo Dodge amp Burn raquo
Les deux techniques preacutesenter au travers de ce tutoriel et de cette article sont des techniques professionnels Elles neacutecessitent de la pratique afin drsquoecirctre utiliseacutees de faccedilon optimales En retouche il nrsquoy a pas de recette miracle il faut de la patience et du temps agrave consacrer agrave cette tacircche pouvant srsquoaveacuterer parfois peacutenible Si vous ne posseacutedez ni lrsquoun ni lrsquoautre je vous conseil de vous tourner vers des retoucheurs professionnels dont les prix varieront en fonction de leurs compeacutetences Cependant voici quelques conseils afin de bien deacutebuter avec ces techniqueshellip Bien qursquoun article sur la faccedilon drsquoorganiser ses retouches sera publier prochainementhellip
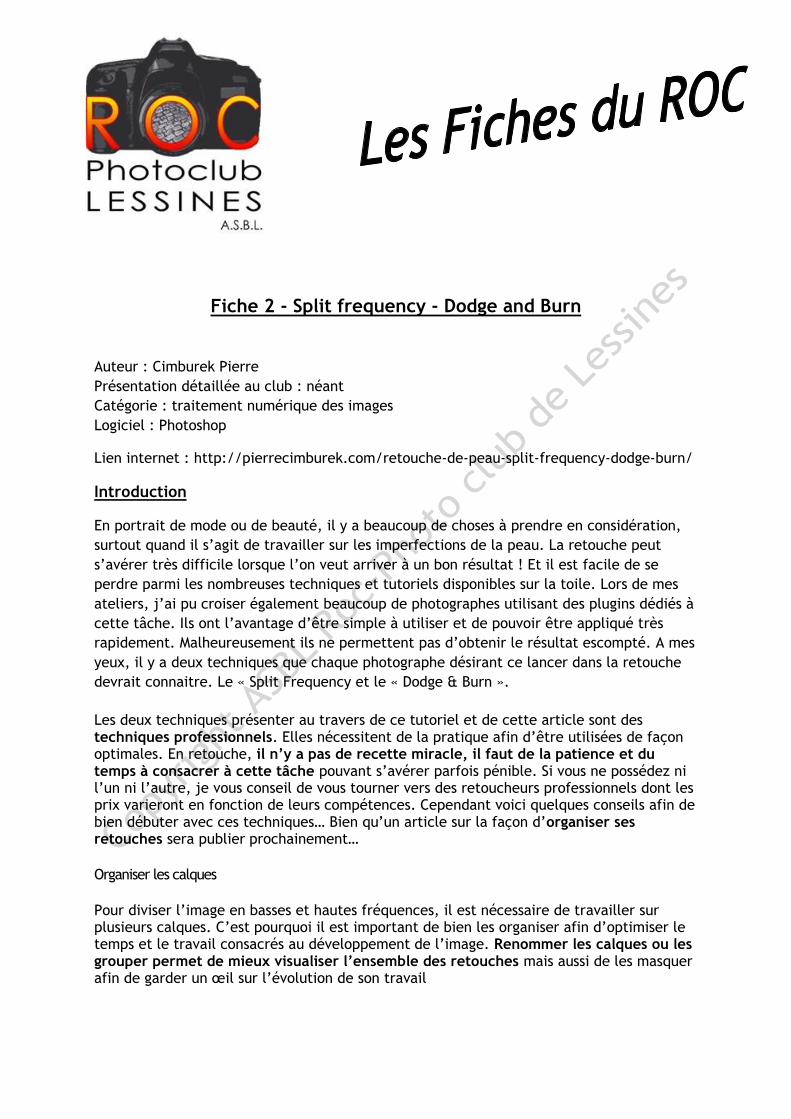
Organiser les calques
Pour diviser lrsquoimage en basses et hautes freacutequences il est neacutecessaire de travailler sur plusieurs calques Crsquoest pourquoi il est important de bien les organiser afin drsquooptimiser le temps et le travail consacreacutes au deacuteveloppement de lrsquoimage Renommer les calques ou les grouper permet de mieux visualiser lrsquoensemble des retouches mais aussi de les masquer afin de garder un œil sur lrsquoeacutevolution de son travail
Utiliser un calque drsquoaide
Creacuteer un calque drsquoaide a pour but de faire ressortir les imperfections de la peau devant
disparaicirctre Ce calque permet de cibler plus preacuteciseacutement et de mieux ce concentrer sur les
zones agrave corriger
Creacuteer le calque drsquoaide
Creacuteer un calque de reacuteglage laquo Meacutelangeur de couche raquo Cochez la case laquo Monochrome raquo Amenez le curseur de la couche rouge agrave une valeur approximative de ndash 40 (lrsquoimage
est maintenant assombrie) Augmentez le curseur de la couche bleue agrave une valeur de plus ou moins 70 pour
ramener de la luminositeacute Renommez le calque ldquoAiderdquo
Lors du travail sur le split frequency ou le dodge amp burn activez et deacutesactivez le calque
de temps agrave autre afin de veacuterifier le rendu
Le Split Frequency
La correction de peau via le Split Frequency est une technique qui permet de retoucher ses
photos sans affecter les tons respectifs de lrsquoimage ou encore sa texture Cette solution agrave
pour avantage de seacuteparer les basses freacutequences des hautes freacutequences Elle permet de
mieux controcircler les outils tel que lrsquooutil Correcteur ou le Tampon de duplication
En divisant lrsquoimage en diffeacuterents niveaux de freacutequences ces outils vont pouvoir ecirctre
utiliseacutes avec plus de preacutecision puisqursquoils nrsquoauront plus drsquoincidence sur les tons lorsque lrsquoon
choisira de travailler sur la texture et vice versa Une chose qui serait impossible si lrsquoon
travaillait sur lrsquoimage directement
Seacuteparer manuellement les freacutequences de lrsquoimage
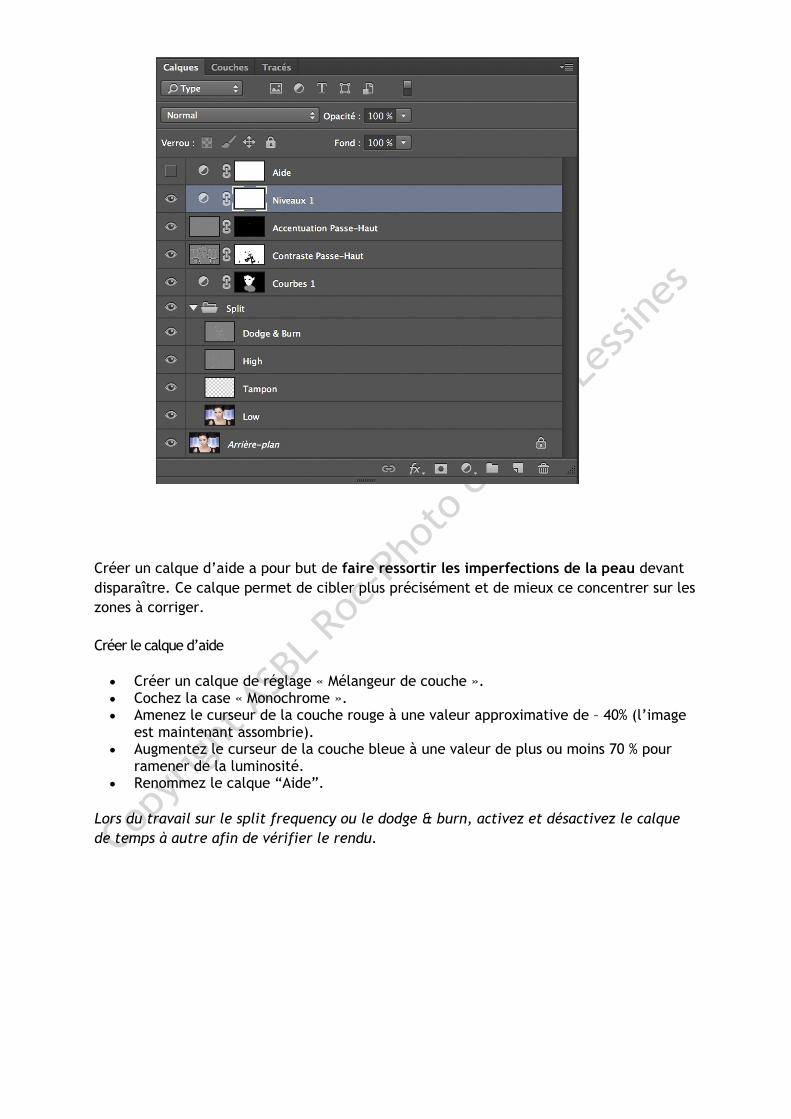
Exportez votre raw en image 16 bits (mode rvb) Dupliquez deux fois le calque drsquoarriegravere plan agrave lrsquoaide du raccourcis (ctrlcmd+J) Renommez la premiegravere copie laquoLow raquo et la seconde laquo High raquo Seacutelectionnez les 2 calques et creacuteez un groupe de calque agrave lrsquoaide du raccourcis
(ctrlcmd+G) et nommer le laquo Split raquo Masquez le calque laquo High raquo Seacutelectionnez le calque laquo Low raquo et appliquez un flou gaussien (voir note ci-dessous)
Filtre gt Flou gt Flou gaussien Seacutelectionnez le calque laquo High raquo et utilisez laquo appliquez une image raquo en utilisant les
paramegravetres ci-dessous et cliquez sur laquo ok raquo Image gt Appliquer une image
Source le nom du fichier sur lequel vous travaillez Couche basse freacutequence Invertion cocher Mode de fusion addition Opaciteacute 100 Eacutechelle 2 Deacutecalage 0
Passez le calque High en mode de fusion laquoLumiegravere lineacuteaireraquo
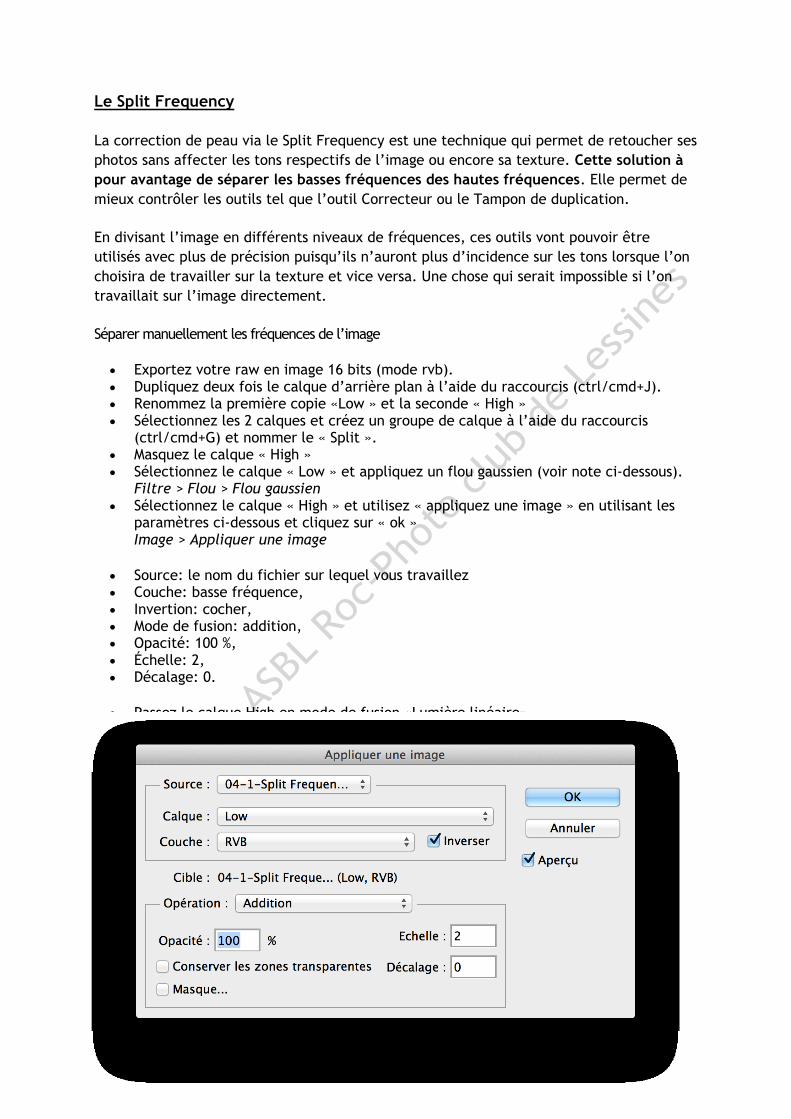
Comment reacutegler le flou gaussien sur le calque laquo Low raquo
La valeur du flou gaussien peut varier drsquoune image agrave une autre Veillez simplement agrave ce
que les imperfections que vous voulez voir disparaicirctre soient masqueacutees par lrsquoajout du flou
ce qui permettra de mieux doser la quantiteacute du flou agrave appliquer Autrement dit
augmentez le rayon jusqursquoagrave ce que les deacutetails de lrsquoimage et les imperfections que vous
deacutesirez masquer ne soient plus visibles
Veillez agrave ne pas mettre plus de flou que neacutecessaire jrsquoutilise en geacuteneacuterale un rayon compris
entre 5px et 10px max 20px
Travailler sur les hautes freacutequences avec lrsquooutil laquo correcteur raquo
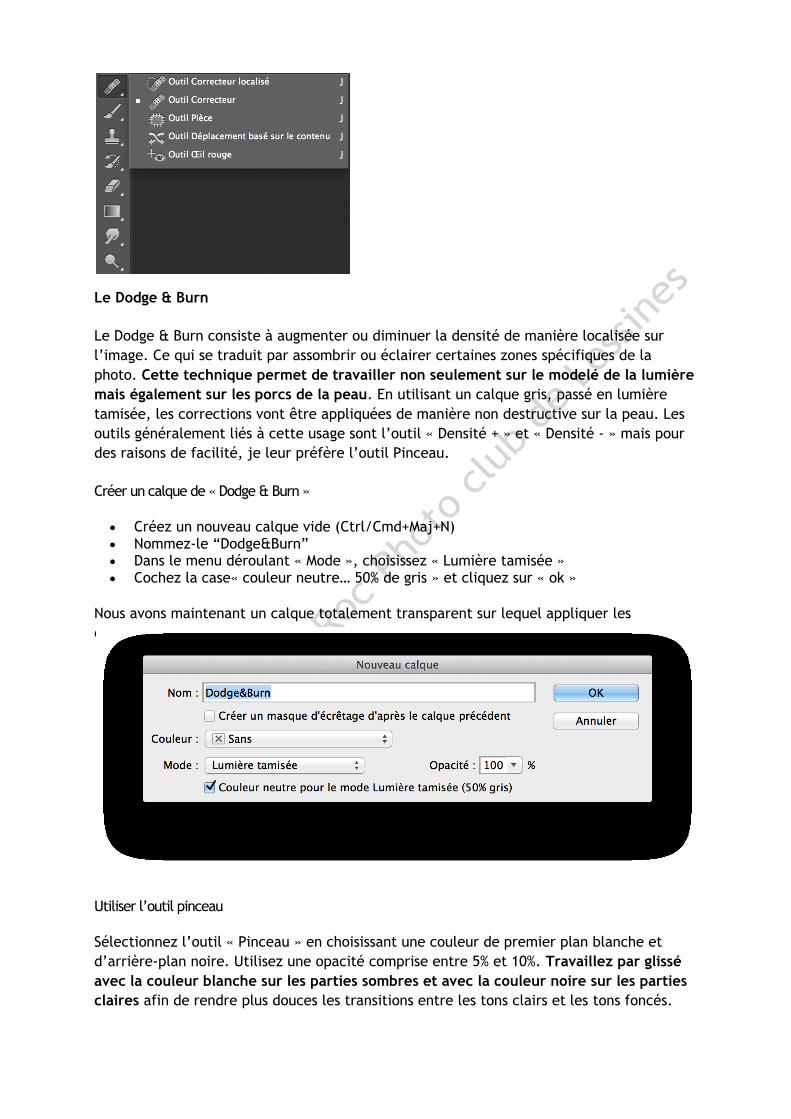
Le laquo Tampon de duplication raquo lrsquooutil laquo Correcteur raquo ou lrsquooutil laquo Correcteur localiseacute raquo sont
les outils adapteacutes agrave la retouche des imperfections de la peau Parmi ces trois outils de
correction lrsquooutil laquo Correcteur raquo est le plus adapter au travail des hautes freacutequences
Lrsquooutil Correcteur localiseacute quand agrave lui ne permet pas de choisir la zone agrave dupliquer ce qui
nrsquoest pas forceacutement ideacuteal puisqursquoil ne permet pas drsquoavoir un controcircle sur la texture qui
sera ajouteacutee
Seacutelectionnez lrsquooutil Correcteur appliquez-lui une opaciteacute ainsi qursquoune dureteacute de 100
ce qui eacutevitera drsquoajouter du flou a la correction
Pour une bonne fusion de la texture favorisez un diamegravetre de brosse plus important que
la retouche agrave effectuer
Attention ndash Pour que lrsquooutil fonctionne correctement veillez agrave seacutelectionner laquo calque
actif raquo dans la barre de lrsquooutil
Le Dodge amp Burn
Le Dodge amp Burn consiste agrave augmenter ou diminuer la densiteacute de maniegravere localiseacutee sur
lrsquoimage Ce qui se traduit par assombrir ou eacuteclairer certaines zones speacutecifiques de la
photo Cette technique permet de travailler non seulement sur le modeleacute de la lumiegravere
mais eacutegalement sur les porcs de la peau En utilisant un calque gris passeacute en lumiegravere
tamiseacutee les corrections vont ecirctre appliqueacutees de maniegravere non destructive sur la peau Les
outils geacuteneacuteralement lieacutes agrave cette usage sont lrsquooutil laquo Densiteacute + raquo et laquo Densiteacute - raquo mais pour
des raisons de faciliteacute je leur preacutefegravere lrsquooutil Pinceau
Creacuteer un calque de laquo Dodge amp Burn raquo
Creacuteez un nouveau calque vide (CtrlCmd+Maj+N) Nommez-le ldquoDodgeampBurnrdquo Dans le menu deacuteroulant laquo Mode raquo choisissez laquo Lumiegravere tamiseacutee raquo Cochez la caselaquo couleur neutrehellip 50 de gris raquo et cliquez sur laquo ok raquo
Nous avons maintenant un calque totalement transparent sur lequel appliquer les
corrections
Utiliser lrsquooutil pinceau
Seacutelectionnez lrsquooutil laquo Pinceau raquo en choisissant une couleur de premier plan blanche et
drsquoarriegravere-plan noire Utilisez une opaciteacute comprise entre 5 et 10 Travaillez par glisseacute
avec la couleur blanche sur les parties sombres et avec la couleur noire sur les parties
claires afin de rendre plus douces les transitions entre les tons clairs et les tons fonceacutes
Lrsquoavantage est que nous allons pouvoir passer rapidement drsquoune couleur agrave lrsquoautre agrave
lrsquoaide de la touche raccourcis laquo X raquo Ensuite zoomez au maximum dans lrsquoimage afin de
finaliser les derniegraveres corrections sur les pores de la peau Durant cette eacutetape affichez et
masquez le calque drsquoaide au besoin
Pour une bonne retouche des imperfections de la peau favorisez un diamegravetre de brosse
plus petite que la retouche agrave effectuer
Pour conclure
Comme vous pourrez le constater une bonne retouche prends du temps (en moyenne 1h agrave
2h par image)hellip Il est important drsquoaiguiser son oeil afin de savoir quand srsquoarrecircter Gardez
agrave lrsquoesprit qursquoen retouche il ne srsquoagit pas de changer la prise de vue ou le modegravele il srsquoagit
simplement de les sublimer Le laquo Split Frequency raquo et le laquo dodge amp burn raquo sont des
techniques parmi tant drsquoautres Comme pour chacune drsquoelles il est important de les
utiliser avec parcimonie
Dans la videacuteo je donne pas mal de petit conseil qui jrsquoespegravere vous permettrons de tirer le
meilleur de vos images
Si vous avez aimeacute cette article nrsquoheacutesitez pas agrave le partager et agrave me rejoindre sur ma
Page Facebook
Non-Destructive Dodge and Burn in Photoshop
Written by Steve Patterson It may be hard to believe these days but there was a time not so long ago when cameras were not digital and photo developing was
done in a lab not on your computer Digital cameras and Photoshop may have brought the world of photo editing out of the darkroom and into your living room
(or wherever your computer happens to be) but many of Photoshops tools and features have their roots in traditional film development
Two great examples of this are Photoshops Dodge andBurn tools both of which are found in the Tools palette The terms dodge and burn refer to
techniques that were used to either lighten (dodge) or darken (burn) specific areas of a photo by increasing or limiting the exposure in those areas The Dodge
and Burn tools in Photoshop are the digital versions of these techniques and are often used to either lighten underexposed areas of a photo or darken overexposed
areas
As useful as the Dodge and Burn tools are however they both suffer from a serious problem Both of them cause permanent damage to your image and this is
never a good thing The best way to work in Photoshop is to keep your original pixel information intact so you always have the original photo to fall back on
This is often referred to as working non-destructively in Photoshop and its the way you should be working whenever and wherever possible Fortunately
Adobe has given us numerous ways to work non-destructively on our images and in this photo editing tutorial were going to look at one of them Well look at a
great technique for selectively controlling the exposure in a photo by lightening and darkening specific areas giving us results very similar to what we could
achieve with the Dodge and Burn tools but without harming a single pixel in the image
Here we have a photo suffering from a very common problem The wedding couple should be the main focal point of the image but thanks to the direction of
sunlight and an apparent lack of fill flash the couple appears too dark in the photo while the background appears too bright
The original photo
Using nothing more than Photoshops Brush Tool and a layer blend mode as well see in a moment we can easily fix things by lightening the couple and
darkening the background
The photo after lightening and darkening specific areas
Lets get started
Download our tutorials as PDFs Learning Photoshop has never been easier
Step 1 Add A New Layer
Open the image you need to work on in Photoshop then hold down your Alt (Win) Option (Mac) key and click on the New Layer icon at the bottom of the
Layers palette
Hold down Alt (Win) Option (Mac) and click on the New Layer icon
Normally this adds a new blank layer above the currently selected layer but by holding down the AltOption key as we click on the New Layer icon we tell
Photoshop to pop open the New Layer dialog box for us before the layer is added This gives us a chance to name the layer and it also allows us to change a
couple of important options First since Ill be using this layer to dodge and burn different areas of the photo Im going to name the layer Dodge and Burn
You dont have to name the layer if you dont want to but naming layers is a very good habit to get into
Name the new layer Dodge and Burn (optional)
The real reason why we brought up the New Layer dialog box is for the option at the very bottomMode Mode is short for Layer Blend Mode and by default
its set to Normal Change the blend mode to Overlay
Set the blend mode of the new layer to Overlay
I cover the Overlay blend mode in much more detail in our Five Essential Blend Modes For Photo Editing tutorial but briefly the Overlay blend mode is part
of the Contrast group of blend modes and is often used to quickly boost the overall contrast in an image Any areas on the layer that are lighter than 50 gray
(meaning the shade of gray directly between black and white) are used to lighten the image while areas darker than 50 gray darken the image Any areas that
are exactly 50 gray are completely ignored by Photoshop and when I say ignored I mean they actually become transparent In fact were about to see this is
action
With the blend mode now set to Overlay in the dialog box youll see a new option directly below it Fill with Overlay-neutral color (50 gray) Click inside
the checkbox to select this option
Click inside the checkbox to select the Fill with Overlay-neutral color (50 gray) option
This option tells Photoshop to fill our new layer with 50 gray Click OK when youre done to exit out of the dialog box If we look in our Layers palette now
we can see that we have a new layer named Dodge and Burn sitting above the photo on the Background layer The layer is set to the Overlay blend mode for
us and if we look in the layers preview thumbnail to the left of the layers name we can see that it has in fact been filled with gray
The new Dodge and Burn layer appears in the Layers palette
I said a moment ago that when a layer is set to the Overlay blend mode any areas of the layer that are 50 gray become transparent and if we look at our image
in the document window even though the Dodge and Burn layer is filled with solid gray which would normally mean that our document window is filled with
gray all we see is our original photo The gray on the Dodge and Burn layer is completely transparent
The solid gray on the Dodge and Burn layer appears transparent in the document window
Step 2 Select The Brush Tool
Were going to lighten and darken different areas of the image simply by painting over them with either black or white Areas we paint over with white will be
lightened while areas we paint over with black will be darkened Again this is because well be painting on a layer thats set to the Overlay blend mode Before
we can paint over anything though we need to grab the Brush Tool so either select the Brush Tool from the Tools palette or press the letter B on your keyboard
to access it with the shortcut
Select the Brush Tool
Step 3 Set Your Foreground Color To White
Im going to begin by lightening the couple which means Ill need to paint over them with white which means I need to set my Foreground color to white since
the Brush Tool paints with whatever color the Foreground color is currently set to If youre following along with your image press the letter D on your keyboard
which resets the Foreground and Background colors to their defaults This makes black the Foreground color and white the Background color To swap them so
white becomes the Foreground color press the letter X on your keyboard If we look at the Foreground and Background color swatches near the bottom of the
Tools palette we can see that white is now the Foreground color (the left swatch)
The Foreground color swatch in the Tools palette
Step 4 Lower The Opacity Of The Brush To Between 10 - 20
The best way to work with this technique is to gradually build up the amount of lightening and darkening thats being applied since even a subtle amount can
sometimes be enough To do that well need to work with a low opacity brush Make sure you have the Brush Tool selected then go up to theOptions Bar at the
top of the screen and lower the Opacity option down to somewhere between 10-20 Im going to set mine to 10 This way each time I paint over the same
area Ill increase the amount of lightening or darkening in 10 increments giving me lots of room to work with
Lower the brush opacity in the Options Bar
Step 5 Paint Over Areas That Need To Be Lightened
With your Brush Tool selected white as your Foreground color and the opacity of your brush lowered simply paint over any areas in your photo that need to be
lightened The effect will be subtle at first due to the low brush opacity but if you need more lightening in certain areas just paint over them a few times to build
up the effect making sure to release your mouse button in between paint strokes You can change the size of your brush by pressing the left bracket key to make
the brush smaller or theright bracket key to make it larger Youll want to use a soft edge brush and you can make the brush edges softer by holding down
the Shift key and pressing the left bracket key a few times HoldingShift and pressing the right bracket key will make the edges harder
I want to brighten the couple in my photo so Im going to paint over them with a medium size soft edge brush Each time I paint over them Ill increase the
brightness by 10 Painting over them 3 or 4 times should do it The mans face is especially dark in the photo so that area may need an extra click or two with
the brush
Paint with white over any areas in the photo that need to be brighter
Step 6 Set Your Foreground Color To Black
When youre done with the areas that needed to be lightened press the letter X on your keyboard to swap your Foreground and Background colors
so black becomes your Foreground color
The color swatches in the Tools palette showing black as the Foreground color
Step 7 Paint Over Areas That Need To Be Darkened
With your Foreground color now set to black paint over any areas in the photo that need to be darkened Again each time you paint over the same area youll
increase the amount of darkening thats applied In my case I want to make everything behind the couple darker so Im going to use a larger brush and paint
around the couple a few times to darken the background
Painting with black over the background to darken it
If we look at the preview thumbnail for the Dodge and Burn layer in the Layers palette we can see all the areas where we painted with white or black
The preview thumbnail shows where we painted on the layer
If you accidentally paint over areas you didnt mean to and want to set those areas back to 50 gray simply click on the Foreground color swatch in the Tools
palette which will bring up Photoshops Color Picker Enter a value of 128 for the R G and B options in the Color Picker which gives you the 50 gray color
Enter a value of 128 for the R G and B values in the Color Picker to select the 50 gray color
Click OK to exit out of the Color Picker then simply paint over those areas in the image to set them back to the original 50 gray
And with that were done Weve successfully adjusted the exposure levels in different areas of the photo by manually painting over them with black or white
giving us results very similar to what we could have achieved with Photoshops Dodge and Burn tools without touching a single pixel in our original image To
see the difference here is my original photo on the left and the corrected image on the right
The original photo (left) and the corrected version (right)
Utiliser un calque drsquoaide
Creacuteer un calque drsquoaide a pour but de faire ressortir les imperfections de la peau devant
disparaicirctre Ce calque permet de cibler plus preacuteciseacutement et de mieux ce concentrer sur les
zones agrave corriger
Creacuteer le calque drsquoaide
Creacuteer un calque de reacuteglage laquo Meacutelangeur de couche raquo Cochez la case laquo Monochrome raquo Amenez le curseur de la couche rouge agrave une valeur approximative de ndash 40 (lrsquoimage
est maintenant assombrie) Augmentez le curseur de la couche bleue agrave une valeur de plus ou moins 70 pour
ramener de la luminositeacute Renommez le calque ldquoAiderdquo
Lors du travail sur le split frequency ou le dodge amp burn activez et deacutesactivez le calque
de temps agrave autre afin de veacuterifier le rendu
Le Split Frequency
La correction de peau via le Split Frequency est une technique qui permet de retoucher ses
photos sans affecter les tons respectifs de lrsquoimage ou encore sa texture Cette solution agrave
pour avantage de seacuteparer les basses freacutequences des hautes freacutequences Elle permet de
mieux controcircler les outils tel que lrsquooutil Correcteur ou le Tampon de duplication
En divisant lrsquoimage en diffeacuterents niveaux de freacutequences ces outils vont pouvoir ecirctre
utiliseacutes avec plus de preacutecision puisqursquoils nrsquoauront plus drsquoincidence sur les tons lorsque lrsquoon
choisira de travailler sur la texture et vice versa Une chose qui serait impossible si lrsquoon
travaillait sur lrsquoimage directement
Seacuteparer manuellement les freacutequences de lrsquoimage
Exportez votre raw en image 16 bits (mode rvb) Dupliquez deux fois le calque drsquoarriegravere plan agrave lrsquoaide du raccourcis (ctrlcmd+J) Renommez la premiegravere copie laquoLow raquo et la seconde laquo High raquo Seacutelectionnez les 2 calques et creacuteez un groupe de calque agrave lrsquoaide du raccourcis
(ctrlcmd+G) et nommer le laquo Split raquo Masquez le calque laquo High raquo Seacutelectionnez le calque laquo Low raquo et appliquez un flou gaussien (voir note ci-dessous)
Filtre gt Flou gt Flou gaussien Seacutelectionnez le calque laquo High raquo et utilisez laquo appliquez une image raquo en utilisant les
paramegravetres ci-dessous et cliquez sur laquo ok raquo Image gt Appliquer une image
Source le nom du fichier sur lequel vous travaillez Couche basse freacutequence Invertion cocher Mode de fusion addition Opaciteacute 100 Eacutechelle 2 Deacutecalage 0
Passez le calque High en mode de fusion laquoLumiegravere lineacuteaireraquo
Comment reacutegler le flou gaussien sur le calque laquo Low raquo
La valeur du flou gaussien peut varier drsquoune image agrave une autre Veillez simplement agrave ce
que les imperfections que vous voulez voir disparaicirctre soient masqueacutees par lrsquoajout du flou
ce qui permettra de mieux doser la quantiteacute du flou agrave appliquer Autrement dit
augmentez le rayon jusqursquoagrave ce que les deacutetails de lrsquoimage et les imperfections que vous
deacutesirez masquer ne soient plus visibles
Veillez agrave ne pas mettre plus de flou que neacutecessaire jrsquoutilise en geacuteneacuterale un rayon compris
entre 5px et 10px max 20px
Travailler sur les hautes freacutequences avec lrsquooutil laquo correcteur raquo
Le laquo Tampon de duplication raquo lrsquooutil laquo Correcteur raquo ou lrsquooutil laquo Correcteur localiseacute raquo sont
les outils adapteacutes agrave la retouche des imperfections de la peau Parmi ces trois outils de
correction lrsquooutil laquo Correcteur raquo est le plus adapter au travail des hautes freacutequences
Lrsquooutil Correcteur localiseacute quand agrave lui ne permet pas de choisir la zone agrave dupliquer ce qui
nrsquoest pas forceacutement ideacuteal puisqursquoil ne permet pas drsquoavoir un controcircle sur la texture qui
sera ajouteacutee
Seacutelectionnez lrsquooutil Correcteur appliquez-lui une opaciteacute ainsi qursquoune dureteacute de 100
ce qui eacutevitera drsquoajouter du flou a la correction
Pour une bonne fusion de la texture favorisez un diamegravetre de brosse plus important que
la retouche agrave effectuer
Attention ndash Pour que lrsquooutil fonctionne correctement veillez agrave seacutelectionner laquo calque
actif raquo dans la barre de lrsquooutil
Le Dodge amp Burn
Le Dodge amp Burn consiste agrave augmenter ou diminuer la densiteacute de maniegravere localiseacutee sur
lrsquoimage Ce qui se traduit par assombrir ou eacuteclairer certaines zones speacutecifiques de la
photo Cette technique permet de travailler non seulement sur le modeleacute de la lumiegravere
mais eacutegalement sur les porcs de la peau En utilisant un calque gris passeacute en lumiegravere
tamiseacutee les corrections vont ecirctre appliqueacutees de maniegravere non destructive sur la peau Les
outils geacuteneacuteralement lieacutes agrave cette usage sont lrsquooutil laquo Densiteacute + raquo et laquo Densiteacute - raquo mais pour
des raisons de faciliteacute je leur preacutefegravere lrsquooutil Pinceau
Creacuteer un calque de laquo Dodge amp Burn raquo
Creacuteez un nouveau calque vide (CtrlCmd+Maj+N) Nommez-le ldquoDodgeampBurnrdquo Dans le menu deacuteroulant laquo Mode raquo choisissez laquo Lumiegravere tamiseacutee raquo Cochez la caselaquo couleur neutrehellip 50 de gris raquo et cliquez sur laquo ok raquo
Nous avons maintenant un calque totalement transparent sur lequel appliquer les
corrections
Utiliser lrsquooutil pinceau
Seacutelectionnez lrsquooutil laquo Pinceau raquo en choisissant une couleur de premier plan blanche et
drsquoarriegravere-plan noire Utilisez une opaciteacute comprise entre 5 et 10 Travaillez par glisseacute
avec la couleur blanche sur les parties sombres et avec la couleur noire sur les parties
claires afin de rendre plus douces les transitions entre les tons clairs et les tons fonceacutes
Lrsquoavantage est que nous allons pouvoir passer rapidement drsquoune couleur agrave lrsquoautre agrave
lrsquoaide de la touche raccourcis laquo X raquo Ensuite zoomez au maximum dans lrsquoimage afin de
finaliser les derniegraveres corrections sur les pores de la peau Durant cette eacutetape affichez et
masquez le calque drsquoaide au besoin
Pour une bonne retouche des imperfections de la peau favorisez un diamegravetre de brosse
plus petite que la retouche agrave effectuer
Pour conclure
Comme vous pourrez le constater une bonne retouche prends du temps (en moyenne 1h agrave
2h par image)hellip Il est important drsquoaiguiser son oeil afin de savoir quand srsquoarrecircter Gardez
agrave lrsquoesprit qursquoen retouche il ne srsquoagit pas de changer la prise de vue ou le modegravele il srsquoagit
simplement de les sublimer Le laquo Split Frequency raquo et le laquo dodge amp burn raquo sont des
techniques parmi tant drsquoautres Comme pour chacune drsquoelles il est important de les
utiliser avec parcimonie
Dans la videacuteo je donne pas mal de petit conseil qui jrsquoespegravere vous permettrons de tirer le
meilleur de vos images
Si vous avez aimeacute cette article nrsquoheacutesitez pas agrave le partager et agrave me rejoindre sur ma
Page Facebook
Non-Destructive Dodge and Burn in Photoshop
Written by Steve Patterson It may be hard to believe these days but there was a time not so long ago when cameras were not digital and photo developing was
done in a lab not on your computer Digital cameras and Photoshop may have brought the world of photo editing out of the darkroom and into your living room
(or wherever your computer happens to be) but many of Photoshops tools and features have their roots in traditional film development
Two great examples of this are Photoshops Dodge andBurn tools both of which are found in the Tools palette The terms dodge and burn refer to
techniques that were used to either lighten (dodge) or darken (burn) specific areas of a photo by increasing or limiting the exposure in those areas The Dodge
and Burn tools in Photoshop are the digital versions of these techniques and are often used to either lighten underexposed areas of a photo or darken overexposed
areas
As useful as the Dodge and Burn tools are however they both suffer from a serious problem Both of them cause permanent damage to your image and this is
never a good thing The best way to work in Photoshop is to keep your original pixel information intact so you always have the original photo to fall back on
This is often referred to as working non-destructively in Photoshop and its the way you should be working whenever and wherever possible Fortunately
Adobe has given us numerous ways to work non-destructively on our images and in this photo editing tutorial were going to look at one of them Well look at a
great technique for selectively controlling the exposure in a photo by lightening and darkening specific areas giving us results very similar to what we could
achieve with the Dodge and Burn tools but without harming a single pixel in the image
Here we have a photo suffering from a very common problem The wedding couple should be the main focal point of the image but thanks to the direction of
sunlight and an apparent lack of fill flash the couple appears too dark in the photo while the background appears too bright
The original photo
Using nothing more than Photoshops Brush Tool and a layer blend mode as well see in a moment we can easily fix things by lightening the couple and
darkening the background
The photo after lightening and darkening specific areas
Lets get started
Download our tutorials as PDFs Learning Photoshop has never been easier
Step 1 Add A New Layer
Open the image you need to work on in Photoshop then hold down your Alt (Win) Option (Mac) key and click on the New Layer icon at the bottom of the
Layers palette
Hold down Alt (Win) Option (Mac) and click on the New Layer icon
Normally this adds a new blank layer above the currently selected layer but by holding down the AltOption key as we click on the New Layer icon we tell
Photoshop to pop open the New Layer dialog box for us before the layer is added This gives us a chance to name the layer and it also allows us to change a
couple of important options First since Ill be using this layer to dodge and burn different areas of the photo Im going to name the layer Dodge and Burn
You dont have to name the layer if you dont want to but naming layers is a very good habit to get into
Name the new layer Dodge and Burn (optional)
The real reason why we brought up the New Layer dialog box is for the option at the very bottomMode Mode is short for Layer Blend Mode and by default
its set to Normal Change the blend mode to Overlay
Set the blend mode of the new layer to Overlay
I cover the Overlay blend mode in much more detail in our Five Essential Blend Modes For Photo Editing tutorial but briefly the Overlay blend mode is part
of the Contrast group of blend modes and is often used to quickly boost the overall contrast in an image Any areas on the layer that are lighter than 50 gray
(meaning the shade of gray directly between black and white) are used to lighten the image while areas darker than 50 gray darken the image Any areas that
are exactly 50 gray are completely ignored by Photoshop and when I say ignored I mean they actually become transparent In fact were about to see this is
action
With the blend mode now set to Overlay in the dialog box youll see a new option directly below it Fill with Overlay-neutral color (50 gray) Click inside
the checkbox to select this option
Click inside the checkbox to select the Fill with Overlay-neutral color (50 gray) option
This option tells Photoshop to fill our new layer with 50 gray Click OK when youre done to exit out of the dialog box If we look in our Layers palette now
we can see that we have a new layer named Dodge and Burn sitting above the photo on the Background layer The layer is set to the Overlay blend mode for
us and if we look in the layers preview thumbnail to the left of the layers name we can see that it has in fact been filled with gray
The new Dodge and Burn layer appears in the Layers palette
I said a moment ago that when a layer is set to the Overlay blend mode any areas of the layer that are 50 gray become transparent and if we look at our image
in the document window even though the Dodge and Burn layer is filled with solid gray which would normally mean that our document window is filled with
gray all we see is our original photo The gray on the Dodge and Burn layer is completely transparent
The solid gray on the Dodge and Burn layer appears transparent in the document window
Step 2 Select The Brush Tool
Were going to lighten and darken different areas of the image simply by painting over them with either black or white Areas we paint over with white will be
lightened while areas we paint over with black will be darkened Again this is because well be painting on a layer thats set to the Overlay blend mode Before
we can paint over anything though we need to grab the Brush Tool so either select the Brush Tool from the Tools palette or press the letter B on your keyboard
to access it with the shortcut
Select the Brush Tool
Step 3 Set Your Foreground Color To White
Im going to begin by lightening the couple which means Ill need to paint over them with white which means I need to set my Foreground color to white since
the Brush Tool paints with whatever color the Foreground color is currently set to If youre following along with your image press the letter D on your keyboard
which resets the Foreground and Background colors to their defaults This makes black the Foreground color and white the Background color To swap them so
white becomes the Foreground color press the letter X on your keyboard If we look at the Foreground and Background color swatches near the bottom of the
Tools palette we can see that white is now the Foreground color (the left swatch)
The Foreground color swatch in the Tools palette
Step 4 Lower The Opacity Of The Brush To Between 10 - 20
The best way to work with this technique is to gradually build up the amount of lightening and darkening thats being applied since even a subtle amount can
sometimes be enough To do that well need to work with a low opacity brush Make sure you have the Brush Tool selected then go up to theOptions Bar at the
top of the screen and lower the Opacity option down to somewhere between 10-20 Im going to set mine to 10 This way each time I paint over the same
area Ill increase the amount of lightening or darkening in 10 increments giving me lots of room to work with
Lower the brush opacity in the Options Bar
Step 5 Paint Over Areas That Need To Be Lightened
With your Brush Tool selected white as your Foreground color and the opacity of your brush lowered simply paint over any areas in your photo that need to be
lightened The effect will be subtle at first due to the low brush opacity but if you need more lightening in certain areas just paint over them a few times to build
up the effect making sure to release your mouse button in between paint strokes You can change the size of your brush by pressing the left bracket key to make
the brush smaller or theright bracket key to make it larger Youll want to use a soft edge brush and you can make the brush edges softer by holding down
the Shift key and pressing the left bracket key a few times HoldingShift and pressing the right bracket key will make the edges harder
I want to brighten the couple in my photo so Im going to paint over them with a medium size soft edge brush Each time I paint over them Ill increase the
brightness by 10 Painting over them 3 or 4 times should do it The mans face is especially dark in the photo so that area may need an extra click or two with
the brush
Paint with white over any areas in the photo that need to be brighter
Step 6 Set Your Foreground Color To Black
When youre done with the areas that needed to be lightened press the letter X on your keyboard to swap your Foreground and Background colors
so black becomes your Foreground color
The color swatches in the Tools palette showing black as the Foreground color
Step 7 Paint Over Areas That Need To Be Darkened
With your Foreground color now set to black paint over any areas in the photo that need to be darkened Again each time you paint over the same area youll
increase the amount of darkening thats applied In my case I want to make everything behind the couple darker so Im going to use a larger brush and paint
around the couple a few times to darken the background
Painting with black over the background to darken it
If we look at the preview thumbnail for the Dodge and Burn layer in the Layers palette we can see all the areas where we painted with white or black
The preview thumbnail shows where we painted on the layer
If you accidentally paint over areas you didnt mean to and want to set those areas back to 50 gray simply click on the Foreground color swatch in the Tools
palette which will bring up Photoshops Color Picker Enter a value of 128 for the R G and B options in the Color Picker which gives you the 50 gray color
Enter a value of 128 for the R G and B values in the Color Picker to select the 50 gray color
Click OK to exit out of the Color Picker then simply paint over those areas in the image to set them back to the original 50 gray
And with that were done Weve successfully adjusted the exposure levels in different areas of the photo by manually painting over them with black or white
giving us results very similar to what we could have achieved with Photoshops Dodge and Burn tools without touching a single pixel in our original image To
see the difference here is my original photo on the left and the corrected image on the right
The original photo (left) and the corrected version (right)
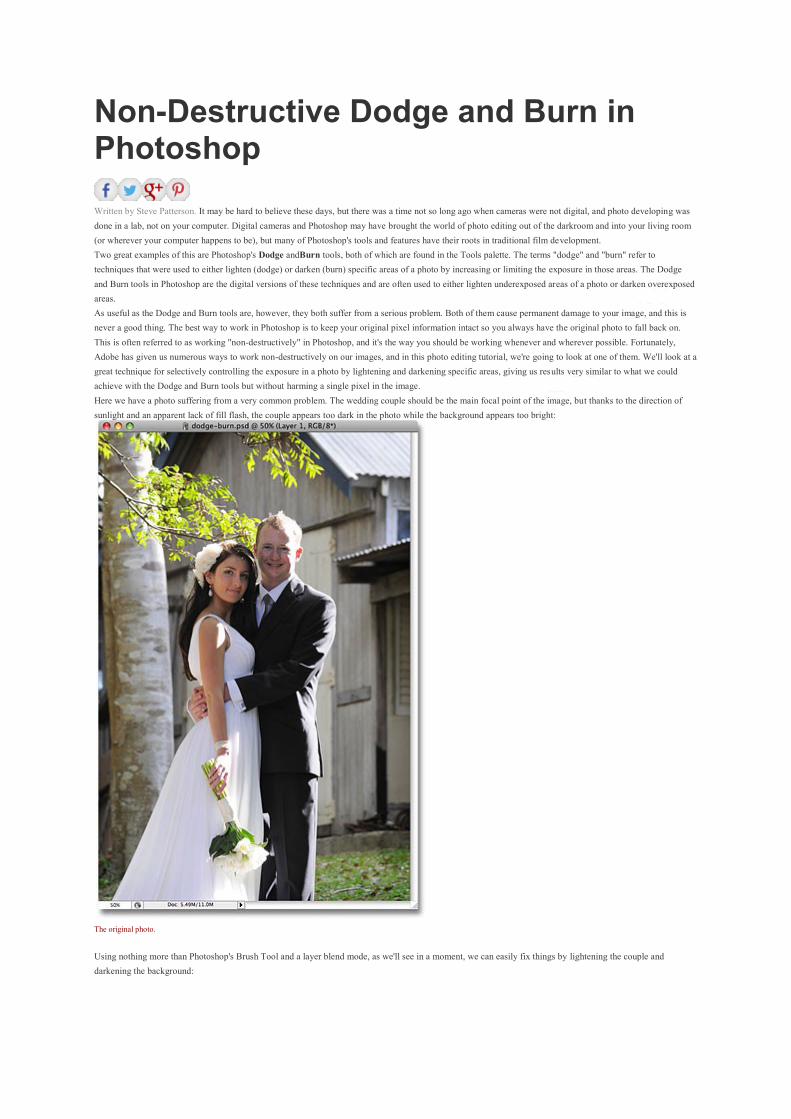
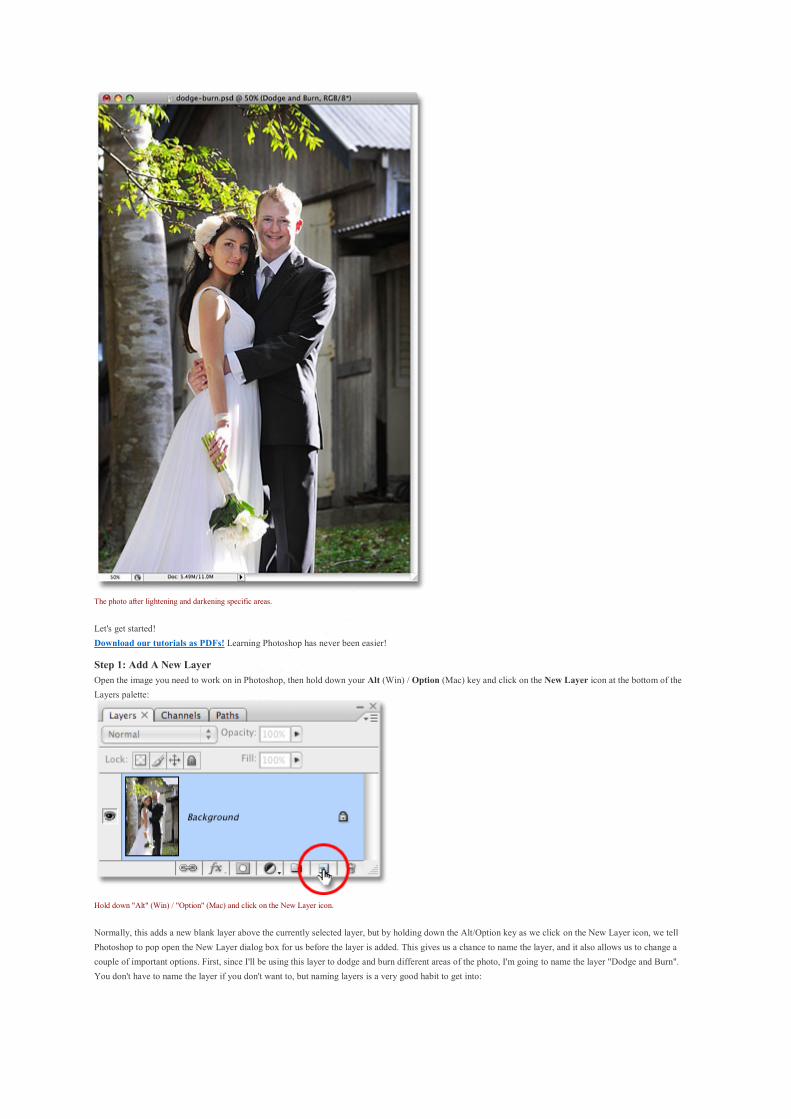
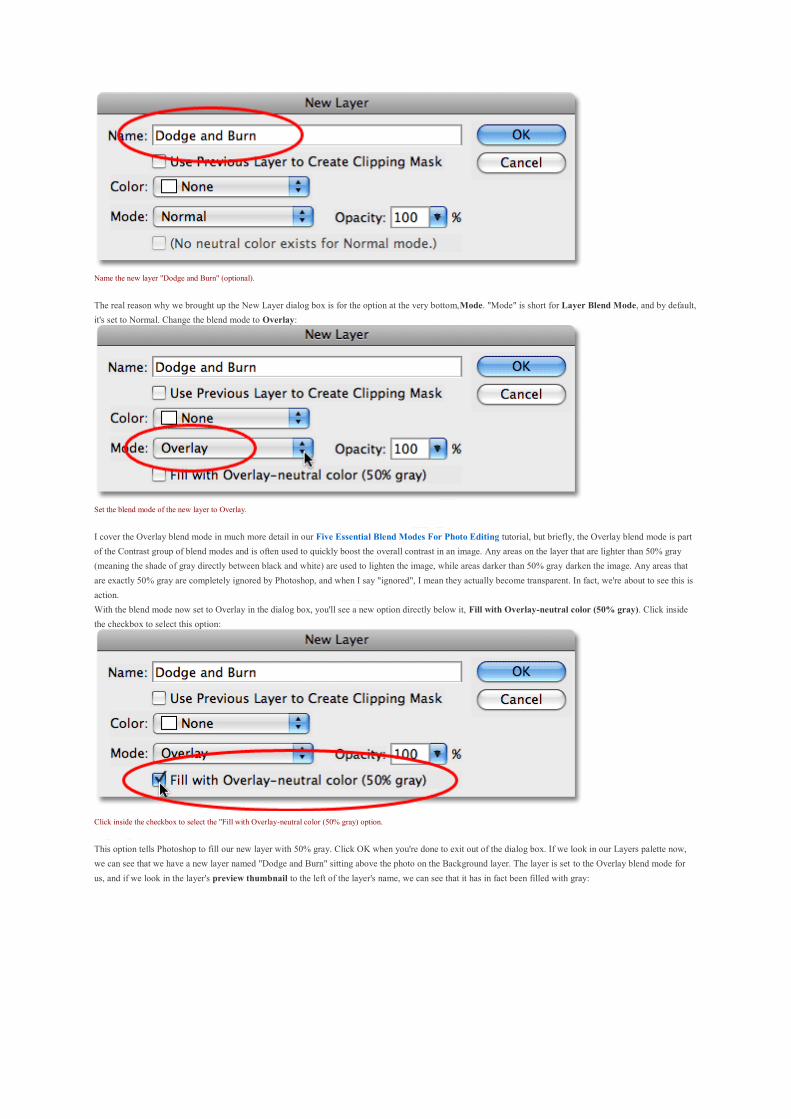
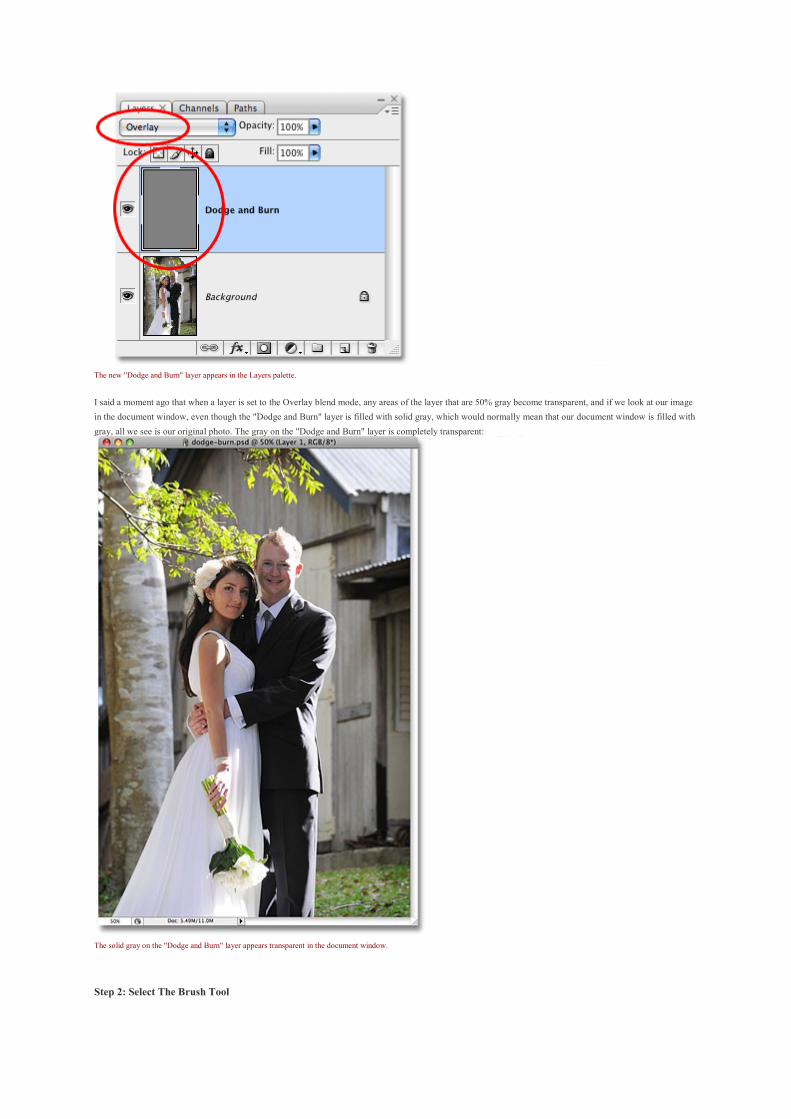
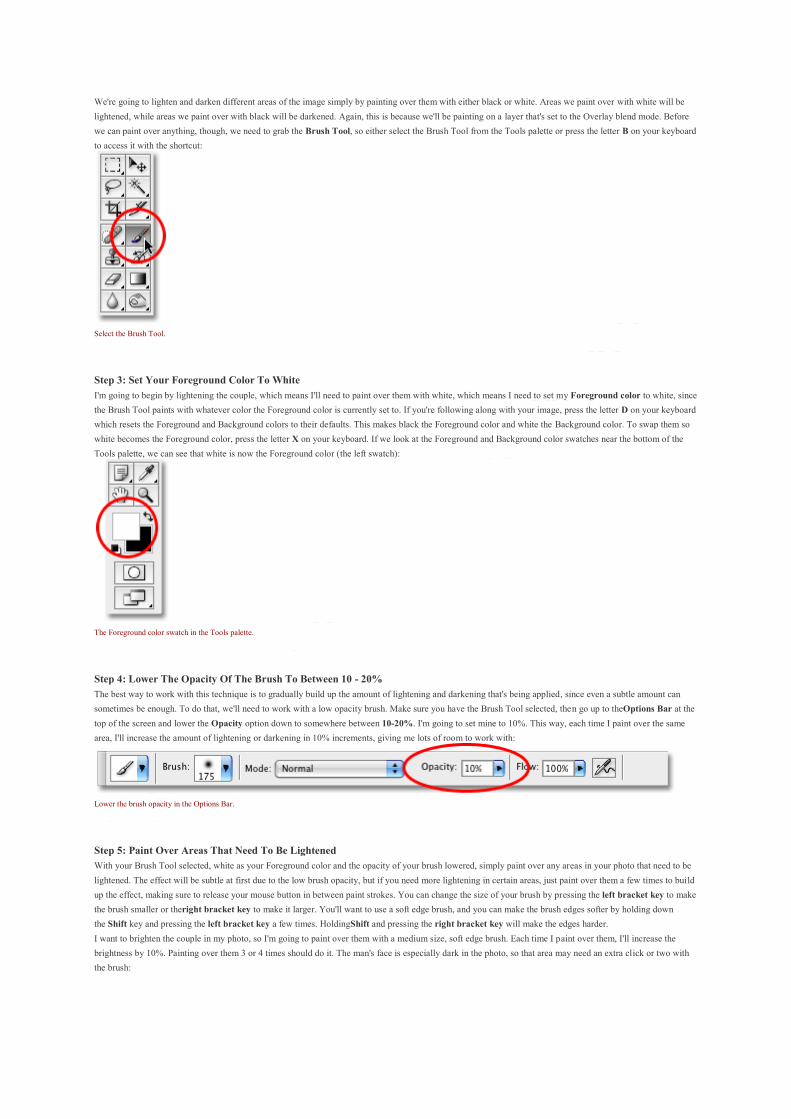
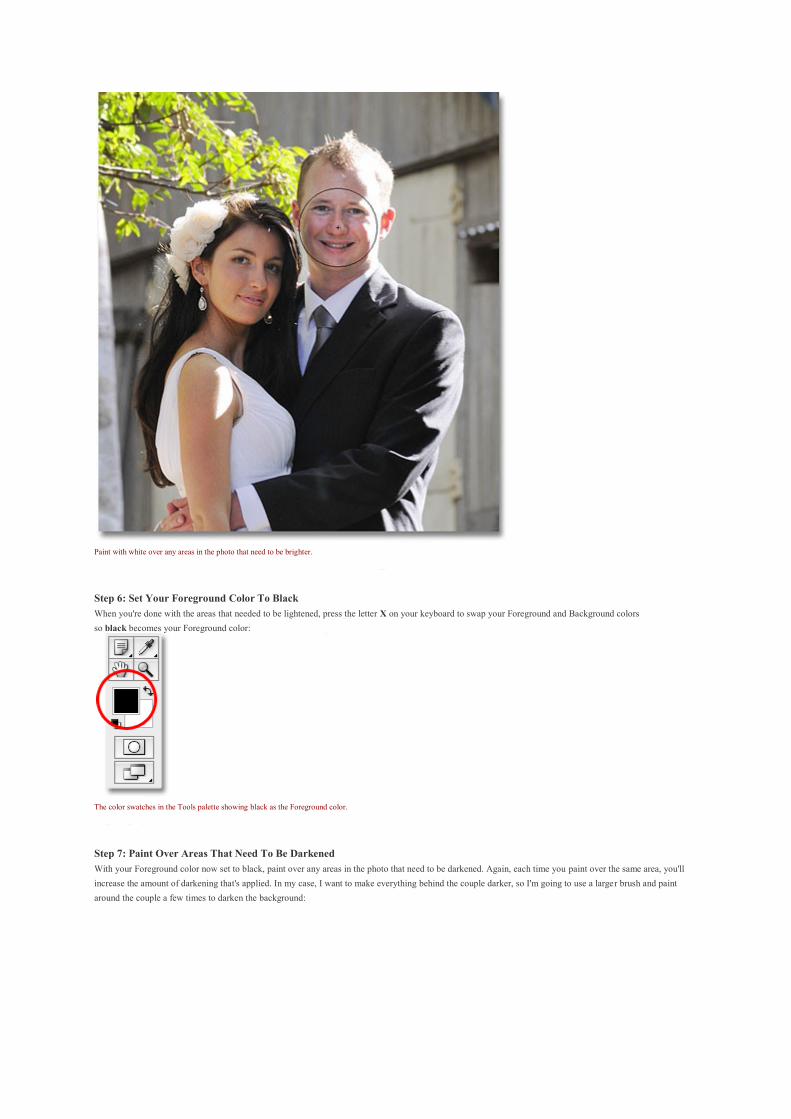
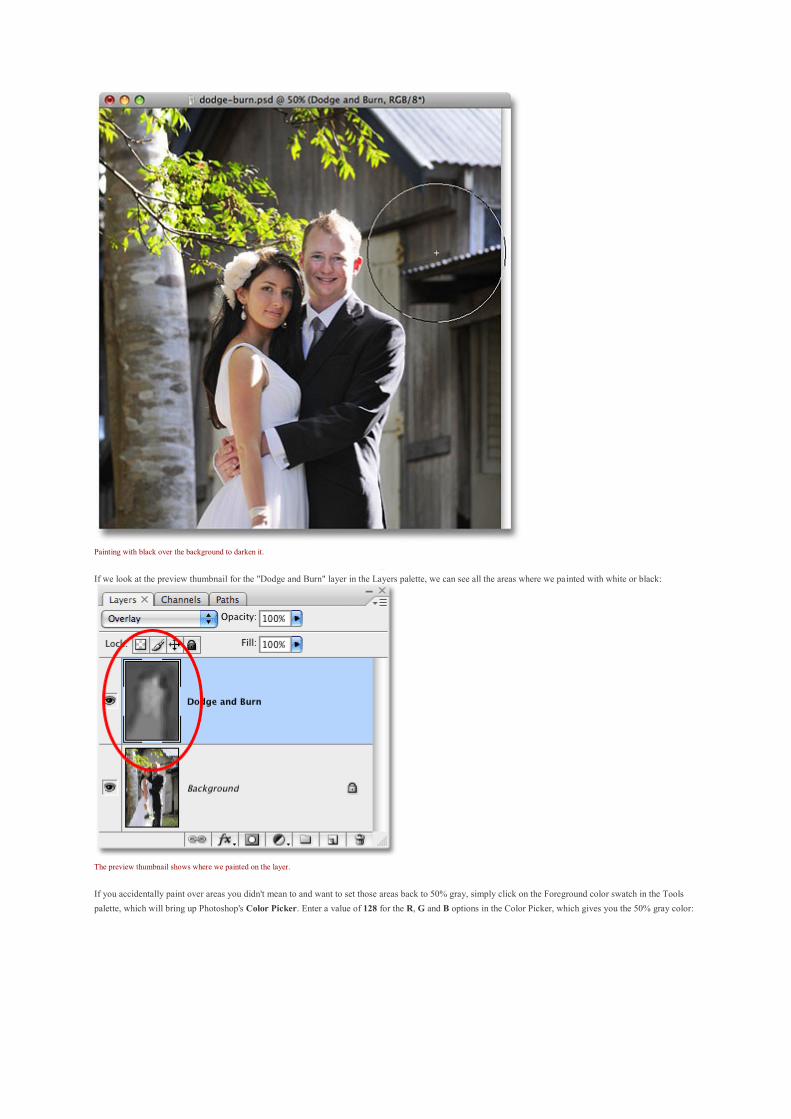
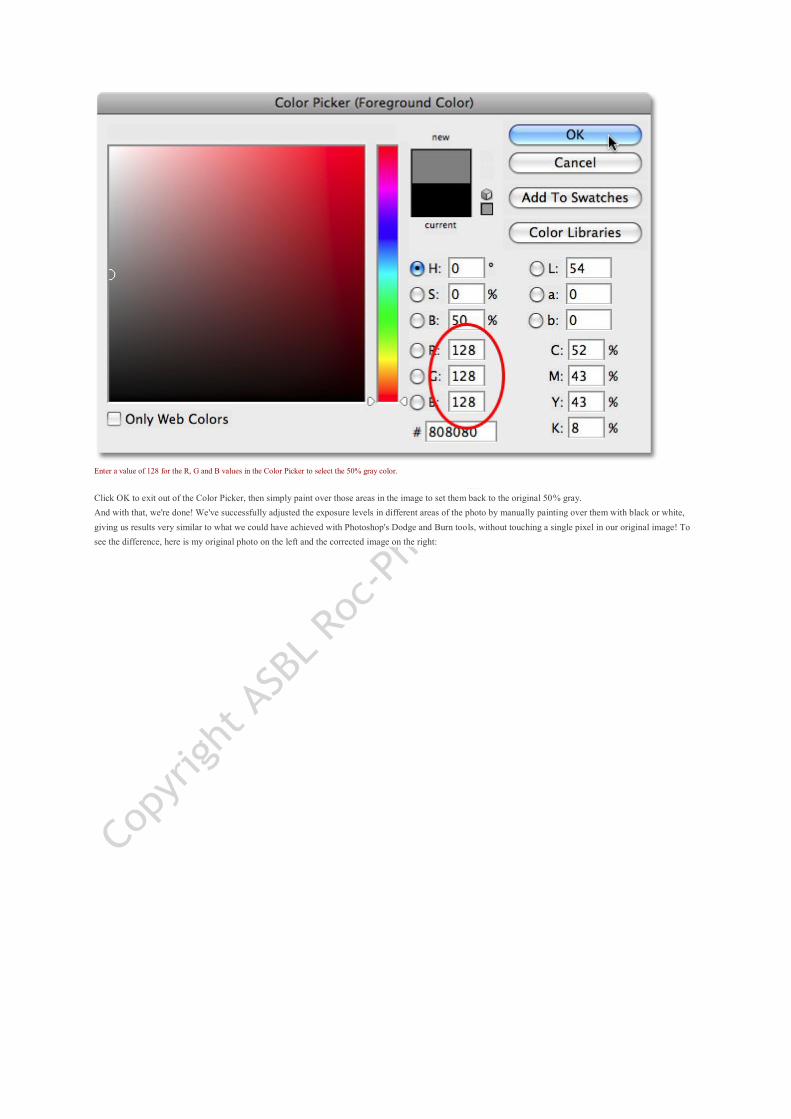

The original photo (left) and the corrected version (right)