Embed Size (px)
Citation preview
1
FRANÇAIS P. 3
DEUTSCH S. 17
ENGLISH P. 31
2
NOTES

3
BIENVENUE
Merci d’avoir choisi VTX TV. Ce manuel utilisateur vous guidera à travers les étapes nécessaires à la mise en route de votre décodeur VTX TV afin de profiter de vos services le plus rapidement possible.
CONTENU (En cas d’absence d’un de ces éléments, veuillez contacter VTX)
Veuillez vérifier que vous avez reçu tous les éléments ci-dessous :
Télécommande
Alimentation Câble réseau (Ethernet) Câble HDMI
Décodeur VTX TV Piles

4
DÉCOUVRIR VOTRE DÉCODEUR VTX TV
Alimentation Activité de la télécommande
Lecteur SDRécepteur infrarouge
(Pour améliorer la réception infrarouge, assurez-vous de laisser le récepteur infrarouge
dégagé et d’avoir bien retiré le plastique de protection)
Plastique de protection
Ports USB Port Ethernet Port HDMI Alimentation
5
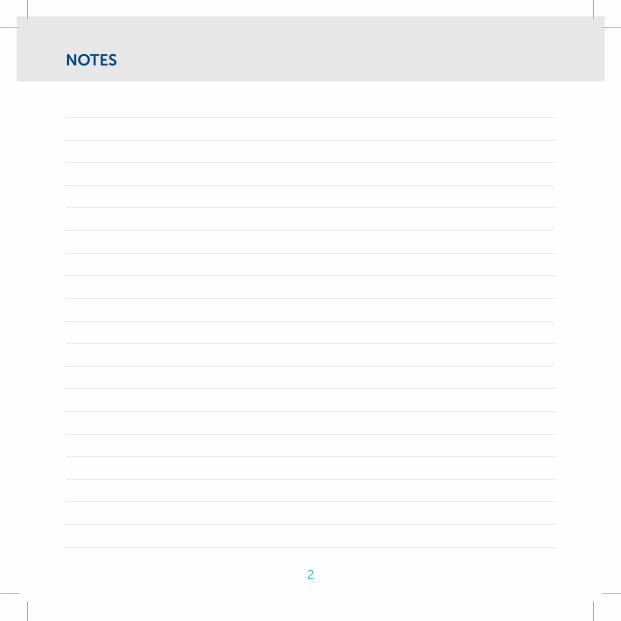
MISE EN SERVICE
APERÇU DE L’INSTALLATION
VTX Box
VTX TVTéléviseur
Alimentation éléctrique
6
MISE EN SERVICE
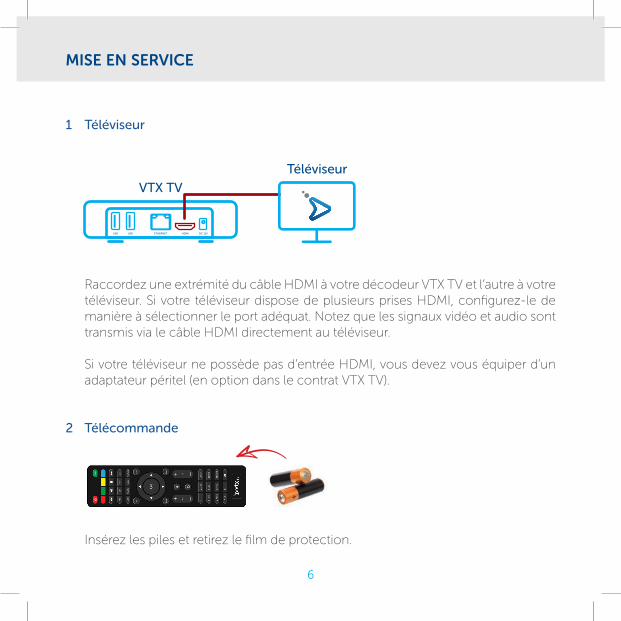
1 Téléviseur
Raccordez une extrémité du câble HDMI à votre décodeur VTX TV et l’autre à votre téléviseur. Si votre téléviseur dispose de plusieurs prises HDMI, configurez-le de manière à sélectionner le port adéquat. Notez que les signaux vidéo et audio sont transmis via le câble HDMI directement au téléviseur.
Si votre téléviseur ne possède pas d’entrée HDMI, vous devez vous équiper d’un adaptateur péritel (en option dans le contrat VTX TV).
2 Télécommande
Insérez les piles et retirez le film de protection.
USB USB ETHERNET HDMI DC 12V
VTX TV
Téléviseur
7
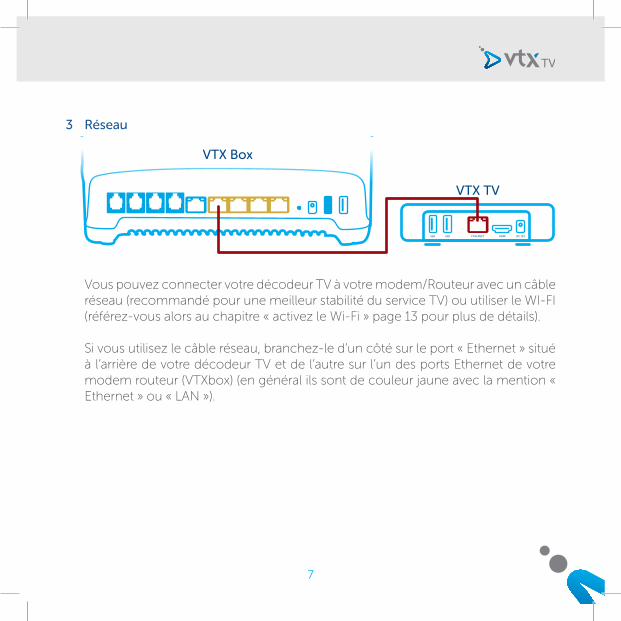
3 Réseau
Vous pouvez connecter votre décodeur TV à votre modem/Routeur avec un câble réseau (recommandé pour une meilleur stabilité du service TV) ou utiliser le WI-FI (référez-vous alors au chapitre « activez le Wi-Fi » page 13 pour plus de détails).
Si vous utilisez le câble réseau, branchez-le d’un côté sur le port « Ethernet » situé à l’arrière de votre décodeur TV et de l’autre sur l’un des ports Ethernet de votre modem routeur (VTXbox) (en général ils sont de couleur jaune avec la mention « Ethernet » ou « LAN »).
USB USB ETHERNET HDMI DC 12V
VTX TV
VTX Box
8
MISE EN SERVICE
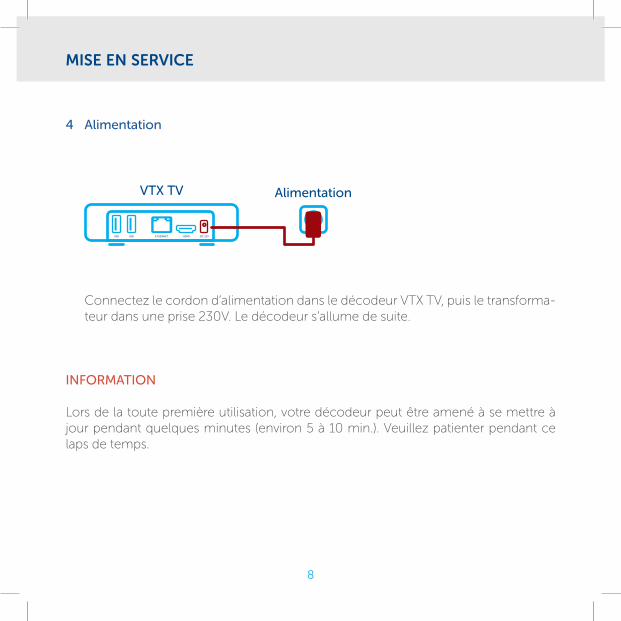
4 Alimentation
Connectez le cordon d’alimentation dans le décodeur VTX TV, puis le transforma-teur dans une prise 230V. Le décodeur s’allume de suite.
INFORMATION
Lors de la toute première utilisation, votre décodeur peut être amené à se mettre à jour pendant quelques minutes (environ 5 à 10 min.). Veuillez patienter pendant ce laps de temps.
USB USB ETHERNET HDMI DC 12V
VTX TV Alimentation
9
TÉLÉCOMMANDE
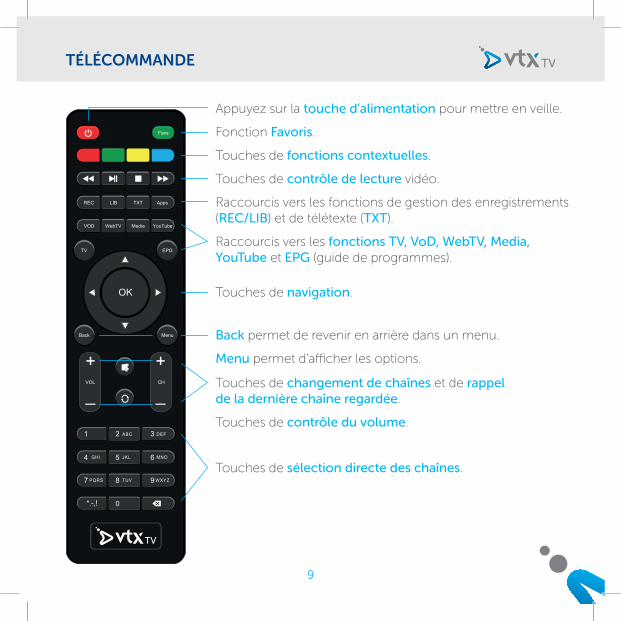
Appuyez sur la touche d’alimentation pour mettre en veille.
Fonction Favoris.
Touches de fonctions contextuelles.
Touches de contrôle de lecture vidéo.
Raccourcis vers les fonctions de gestion des enregistrements (REC/LIB) et de télétexte (TXT).
Raccourcis vers les fonctions TV, VoD, WebTV, Media, YouTube et EPG (guide de programmes).
Touches de navigation.
Touches de changement de chaînes et de rappel de la dernière chaîne regardée.
Touches de contrôle du volume.
Touches de sélection directe des chaînes.
Back permet de revenir en arrière dans un menu.
Menu permet d’afficher les options.
10
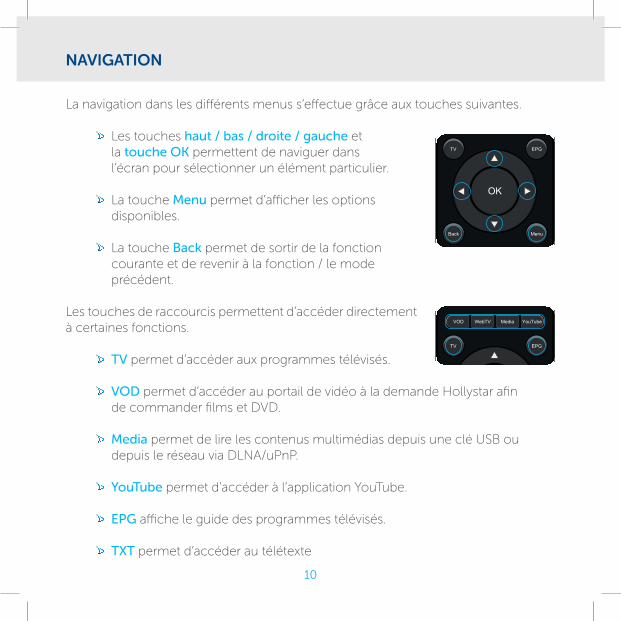
NAVIGATION
La navigation dans les différents menus s’effectue grâce aux touches suivantes.
Les touches haut / bas / droite / gauche et la touche OK permettent de naviguer dans l’écran pour sélectionner un élément particulier.
La touche Menu permet d’afficher les options disponibles.
La touche Back permet de sortir de la fonction courante et de revenir à la fonction / le mode précédent.
Les touches de raccourcis permettent d’accéder directement à certaines fonctions.
TV permet d’accéder aux programmes télévisés.
VOD permet d’accéder au portail de vidéo à la demande Hollystar afin de commander films et DVD.
Media permet de lire les contenus multimédias depuis une clé USB ou depuis le réseau via DLNA/uPnP.
YouTube permet d’accéder à l’application YouTube.
EPG affiche le guide des programmes télévisés.
TXT permet d’accéder au télétexte
11
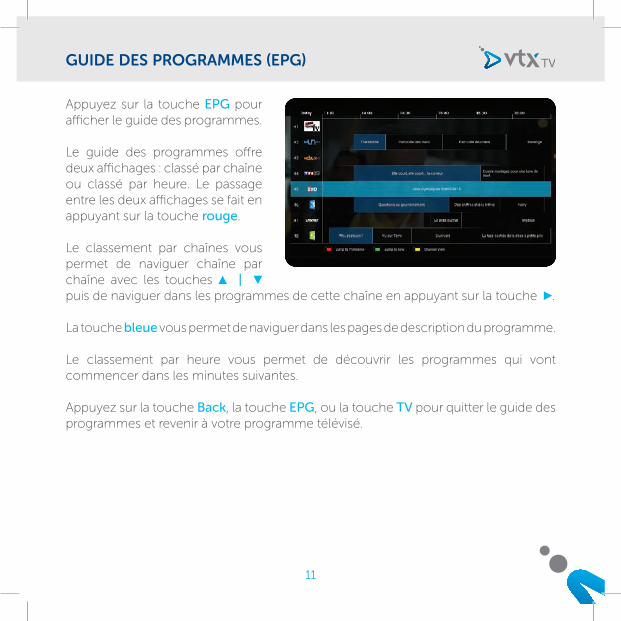
GUIDE DES PROGRAMMES (EPG)
Appuyez sur la touche EPG pour afficher le guide des programmes.
Le guide des programmes offre deux affichages : classé par chaîne ou classé par heure. Le passage entre les deux affichages se fait en appuyant sur la touche rouge.
Le classement par chaînes vous permet de naviguer chaîne par chaîne avec les touches | puis de naviguer dans les programmes de cette chaîne en appuyant sur la touche .
La touche bleue vous permet de naviguer dans les pages de description du programme.
Le classement par heure vous permet de découvrir les programmes qui vont commencer dans les minutes suivantes.
Appuyez sur la touche Back, la touche EPG, ou la touche TV pour quitter le guide des programmes et revenir à votre programme télévisé.
12
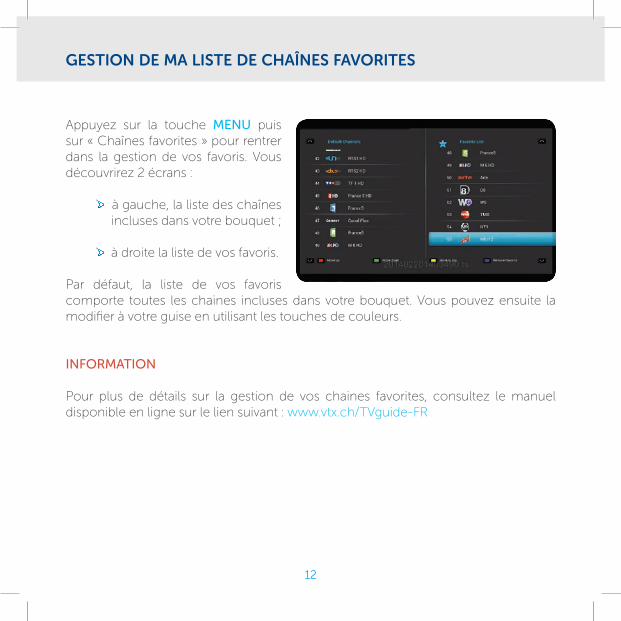
GESTION DE MA LISTE DE CHAÎNES FAVORITES
Appuyez sur la touche MENU puis sur « Chaînes favorites » pour rentrer dans la gestion de vos favoris. Vous découvrirez 2 écrans :
à gauche, la liste des chaînes incluses dans votre bouquet ;
à droite la liste de vos favoris.
Par défaut, la liste de vos favoris comporte toutes les chaines incluses dans votre bouquet. Vous pouvez ensuite la modifier à votre guise en utilisant les touches de couleurs.
INFORMATION
Pour plus de détails sur la gestion de vos chaines favorites, consultez le manuel disponible en ligne sur le lien suivant : www.vtx.ch/TVguide-FR
13
CONFIGURATION RÉSEAU : ACTIVEZ LE WI-FI
Si vous souhaitez connecter votre décodeur VTX TV à votre modem en Wi-Fi, voici les étapes à suivre :
appuyez sur la touche « Menu » de la télécommande fournie avec votre décodeur TV ;
à l’aide des flèches, sélectionnez « Préférences » et appuyez sur la touche « OK » ;
sélectionnez « Accès à Internet » et appuyez sur la touche « OK » ;
sélectionnez « Réseaux Wi-Fi » et appuyez sur « OK ».
Une fois le mode Wi-Fi activé, votre décodeur TV va rechercher automatiquement les réseaux sans fil disponibles et indiquera leur cryptage.
Sélectionnez le réseau sans fil de votre modem/routeur ;
entrez la clé Wi-Fi (située sur l’étiquette au dos de votre modem) en utilisant la télécommande du décodeur TV et appuyer sur « se connecter » ;
votre réseau sans fil est maintenant connecté.
N.B.: Vous ne pouvez pas utiliser la connexion filaire Ethernet et le Wi-Fi en même temps ; l’un sera toujours désactivé automatiquement en cas d’activation de l’autre..

14
VIDÉO À LA DEMANDE (VOD)
Appuyez sur le bouton « VOD » de la télécommande VTX TV pour accéder à l’interface.
Déplacez-vous dans le menu de gauche avec les flèches et de votre télécommande et appuyez sur « OK ».
Les flèches et de votre télécommande vous permettent de choisir un film dans une catégorie. Utilisez la touche « OK » pour accéder aux actions du film sélectionné.
Positionnez le focus sur et appuyez sur « OK ». Si le film est disponible en plusieurs langues, c’est ici que vous pourrez choisir la langue de visionnage. Vous aurez également accès au prix et à la durée de disponibilité du film.
Pour choisir ou changer la langue des sous-titres, appuyez sur la touche bleue de votre télécommande au démarrage du film.
15
CONFIGURATIONS
CONFIGURATION ÉCRAN
Vous pouvez modifier la configuration du format vidéo en sélectionnant Menu, puis Préférences, puis Taille de l’Affichage.
En fonction de votre téléviseur, vous avez le choix entre les modes 720p, 1080i et 1080p.
La fonction Taille de l’affichage vous permet d’ajuster l’affichage aux bordures de l’écran de votre téléviseur. Suivez ensuite les instructions pour procéder aux ajustements. Le décodeur VTX TV redémarrera pour appliquer les modifications.
CHOIX DE LA LANGUE
Vous pouvez changer la langue utilisée par le décodeur en sélectionnant Menu, puis Préférences, puis Langue. Les langues disponibles sont : français, allemand, anglais.
AUTRES PARAMÈTRES
D’autres paramètres sont décrits dans le manuel en ligne :http://www.vtx.ch/TVguide-fr
16
NOTIZEN:
17
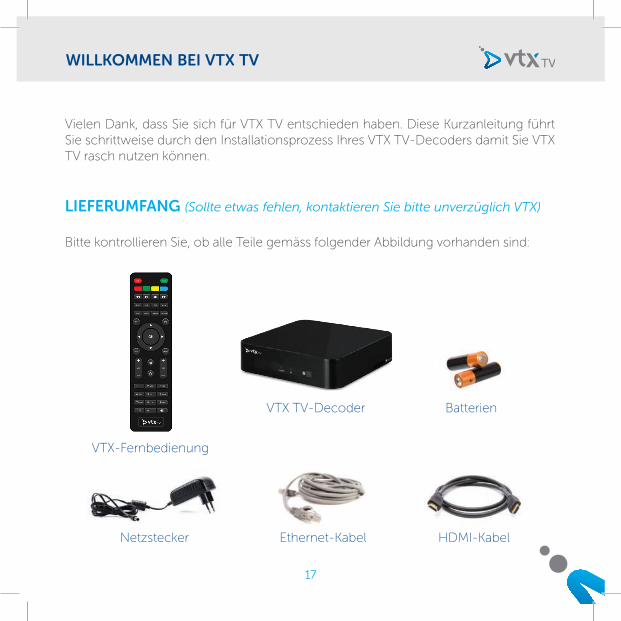
WILLKOMMEN BEI VTX TV
Vielen Dank, dass Sie sich für VTX TV entschieden haben. Diese Kurzanleitung führt Sie schrittweise durch den Installationsprozess Ihres VTX TV-Decoders damit Sie VTX TV rasch nutzen können.
LIEFERUMFANG (Sollte etwas fehlen, kontaktieren Sie bitte unverzüglich VTX)
Bitte kontrollieren Sie, ob alle Teile gemäss folgender Abbildung vorhanden sind:
VTX-Fernbedienung
Netzstecker Ethernet-Kabel HDMI-Kabel
VTX TV-Decoder Batterien
18
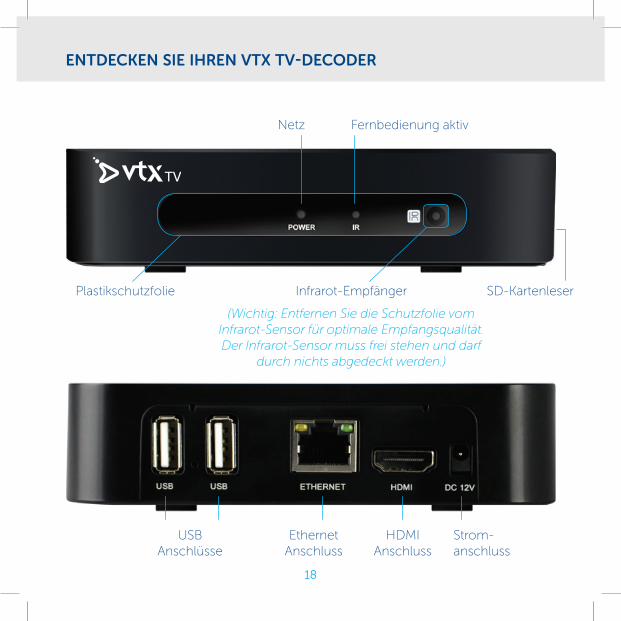
Netz Fernbedienung aktiv
SD-KartenleserInfrarot-Empfänger
(Wichtig: Entfernen Sie die Schutzfolie vom Infrarot-Sensor für optimale Empfangsqualität. Der Infrarot-Sensor muss frei stehen und darf
durch nichts abgedeckt werden.)
Plastikschutzfolie
USBAnschlüsse
EthernetAnschluss
HDMIAnschluss
Strom-anschluss
ENTDECKEN SIE IHREN VTX TV-DECODER

19
TV-DECODER ANSCHLIESSEN
INSTALLATIONSSCHEMA
VTX Box
VTX TVFernseher
Stromversorgung
20
TV-DECODER ANSCHLIESSEN
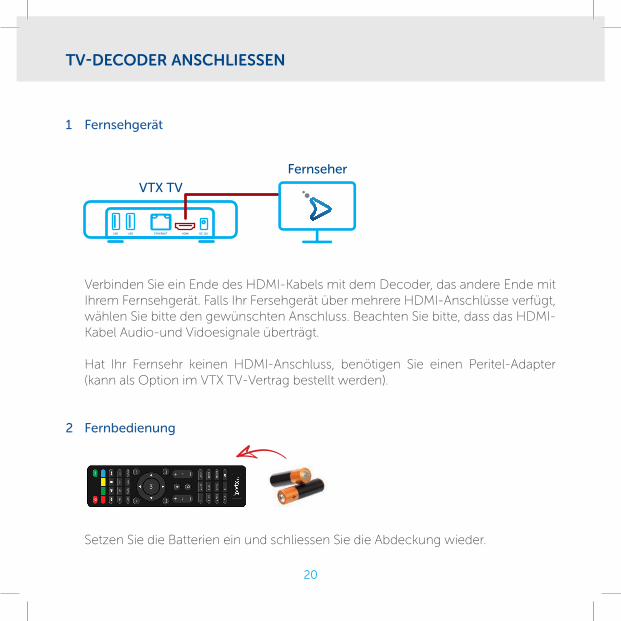
1 Fernsehgerät
Verbinden Sie ein Ende des HDMI-Kabels mit dem Decoder, das andere Ende mit Ihrem Fernsehgerät. Falls Ihr Fersehgerät über mehrere HDMI-Anschlüsse verfügt, wählen Sie bitte den gewünschten Anschluss. Beachten Sie bitte, dass das HDMI-Kabel Audio-und Vidoesignale überträgt.
Hat Ihr Fernsehr keinen HDMI-Anschluss, benötigen Sie einen Peritel-Adapter (kann als Option im VTX TV-Vertrag bestellt werden).
2 Fernbedienung
Setzen Sie die Batterien ein und schliessen Sie die Abdeckung wieder.
USB USB ETHERNET HDMI DC 12V
VTX TV
Fernseher
21
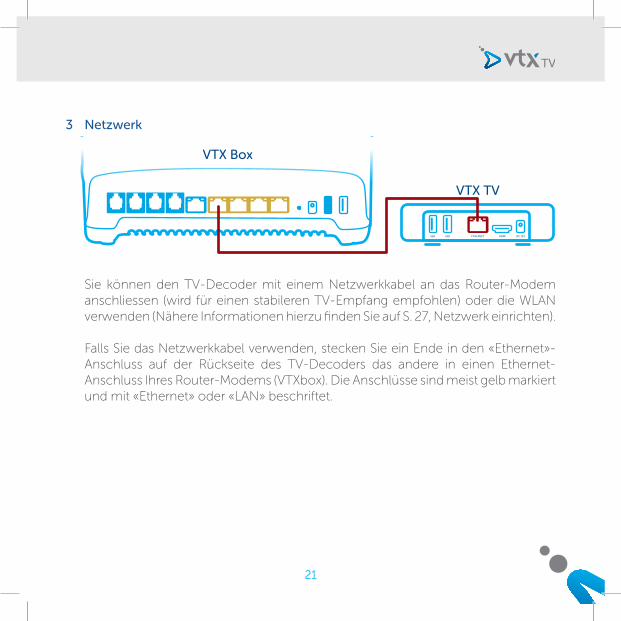
3 Netzwerk
Sie können den TV-Decoder mit einem Netzwerkkabel an das Router-Modem anschliessen (wird für einen stabileren TV-Empfang empfohlen) oder die WLAN verwenden (Nähere Informationen hierzu finden Sie auf S. 27, Netzwerk einrichten).
Falls Sie das Netzwerkkabel verwenden, stecken Sie ein Ende in den «Ethernet»-Anschluss auf der Rückseite des TV-Decoders das andere in einen Ethernet-Anschluss Ihres Router-Modems (VTXbox). Die Anschlüsse sind meist gelb markiert und mit «Ethernet» oder «LAN» beschriftet.
USB USB ETHERNET HDMI DC 12V
VTX TV
VTX Box
22
TV-DECODER ANSCHLIESSEN
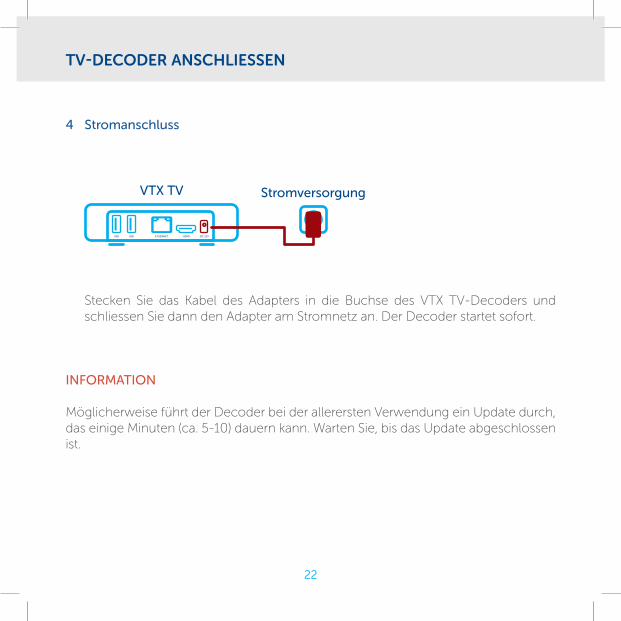
4 Stromanschluss
Stecken Sie das Kabel des Adapters in die Buchse des VTX TV-Decoders und schliessen Sie dann den Adapter am Stromnetz an. Der Decoder startet sofort.
INFORMATION
Möglicherweise führt der Decoder bei der allerersten Verwendung ein Update durch, das einige Minuten (ca. 5-10) dauern kann. Warten Sie, bis das Update abgeschlossen ist.
USB USB ETHERNET HDMI DC 12V
VTX TV Stromversorgung

23
FERNBEDIENUNG
Ein- / Ausschalten
Einstellung der Lieblingssender
Funktionstasten; gemäss Angaben auf dem Bildschirm
Video Playback-Tasten: Rückwärts, Play/Pause, Stop, Vorwärts
Direkttasten REC/LIB für die Bedienung der Aufnahmen. Mit TXT rufen Sie den Teletext auf
Direkttasten für TV, VoD, WebTV, Media, YouTube und EPG (elektronischer Programmführer)
Navigationstasten und OK-Taste
Tasten zum Wechseln der Sender (+/-) und um den zuletzt angesehen Sender wieder aufzurufen
Lautstärke-Tasten (+/-), Stummschaltung
Tasten für die direkte Wahl von TV-Sendern
Back zum Verlassen einer Funktion
Menütaste zum Anzeigen der Optionen
24
NAVIGATION
Die Navigation erfolgt mittels der folgenden Tasten:
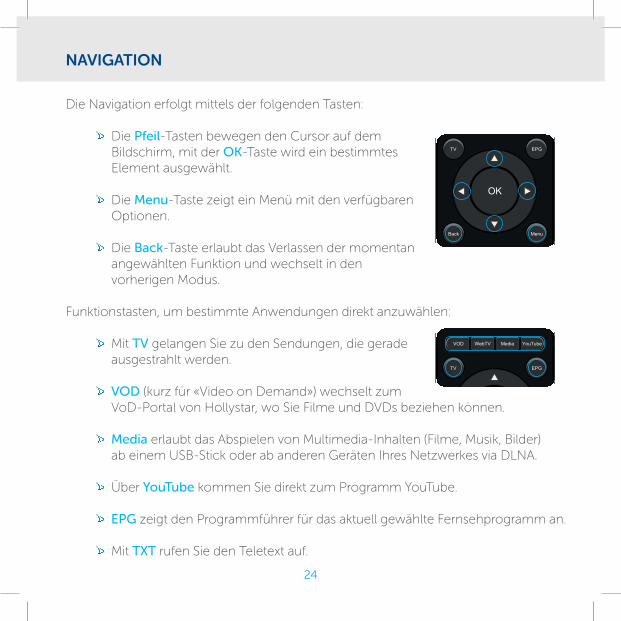
Die Pfeil-Tasten bewegen den Cursor auf dem Bildschirm, mit der OK-Taste wird ein bestimmtes Element ausgewählt.
Die Menu-Taste zeigt ein Menü mit den verfügbaren Optionen.
Die Back-Taste erlaubt das Verlassen der momentan angewählten Funktion und wechselt in den vorherigen Modus.
Funktionstasten, um bestimmte Anwendungen direkt anzuwählen:
Mit TV gelangen Sie zu den Sendungen, die gerade ausgestrahlt werden.
VOD (kurz für «Video on Demand») wechselt zum VoD-Portal von Hollystar, wo Sie Filme und DVDs beziehen können.
Media erlaubt das Abspielen von Multimedia-Inhalten (Filme, Musik, Bilder) ab einem USB-Stick oder ab anderen Geräten Ihres Netzwerkes via DLNA.
Über YouTube kommen Sie direkt zum Programm YouTube.
EPG zeigt den Programmführer für das aktuell gewählte Fernsehprogramm an.
Mit TXT rufen Sie den Teletext auf.
25
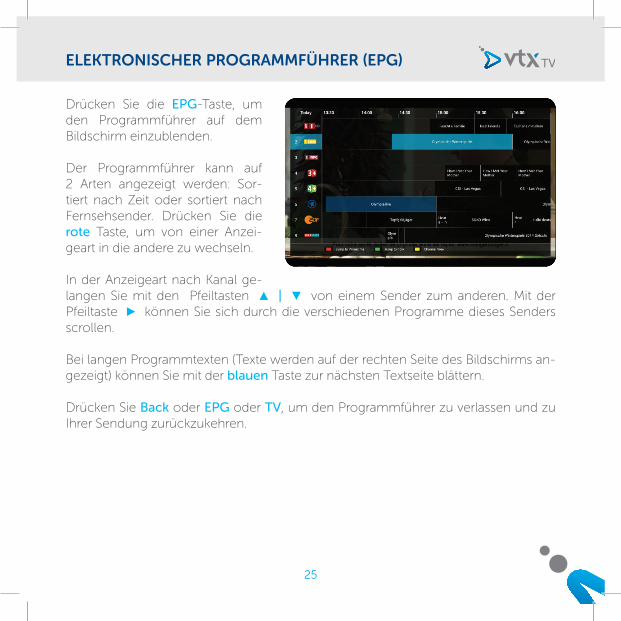
ELEKTRONISCHER PROGRAMMFÜHRER (EPG)
Drücken Sie die EPG-Taste, um den Programmführer auf dem Bildschirm einzublenden.
Der Programmführer kann auf 2 Arten angezeigt werden: Sor-tiert nach Zeit oder sortiert nach Fernsehsender. Drücken Sie die rote Taste, um von einer Anzei-geart in die andere zu wechseln.
In der Anzeigeart nach Kanal ge-langen Sie mit den Pfeiltasten | von einem Sender zum anderen. Mit der Pfeiltaste können Sie sich durch die verschiedenen Programme dieses Senders scrollen.
Bei langen Programmtexten (Texte werden auf der rechten Seite des Bildschirms an-gezeigt) können Sie mit der blauen Taste zur nächsten Textseite blättern.
Drücken Sie Back oder EPG oder TV, um den Programmführer zu verlassen und zu Ihrer Sendung zurückzukehren.
26
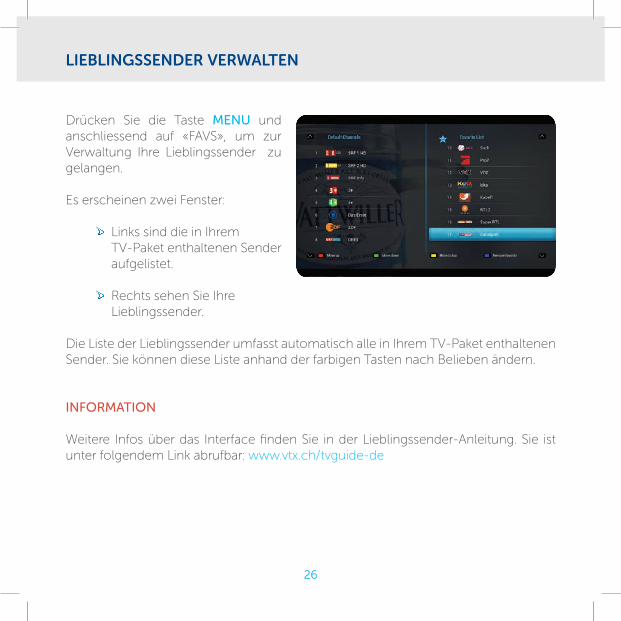
LIEBLINGSSENDER VERWALTEN
Drücken Sie die Taste MENU und anschliessend auf «FAVS», um zur Verwaltung Ihre Lieblingssender zu gelangen.
Es erscheinen zwei Fenster:
Links sind die in Ihrem TV-Paket enthaltenen Sender aufgelistet.
Rechts sehen Sie Ihre Lieblingssender.
Die Liste der Lieblingssender umfasst automatisch alle in Ihrem TV-Paket enthaltenen Sender. Sie können diese Liste anhand der farbigen Tasten nach Belieben ändern.
INFORMATION
Weitere Infos über das Interface finden Sie in der Lieblingssender-Anleitung. Sie ist unter folgendem Link abrufbar: www.vtx.ch/tvguide-de
27
NETZWERK EINRICHTEN
Um den TV-Decoder über WLAN mit dem Modem zu verbinden, gehen Sie wie folgt vor:
Drücken Sie die Taste «Menu» auf der mit dem TV-Decoder mitgelieferten Fernbedienung.
Mit den Pfeiltasten wählen Sie «Einstellungen» und bestätigen mit «OK».
Wählen Sie «Internetzugang» und bestätigen Sie mit «OK».
Wählen Sie «WLAN-Netzwerk» und bestätigen Sie mit «OK».
Sobald der WLAN-Modus aktiviert ist, sucht der TV-Decoder automatisch nach verfügbaren WLAN-Netzwerken und gibt deren Verschlüsselung an.
Wählen Sie das WLAN-Netzwerk des Router-Modems.
Geben Sie mit der Fernbedienung des TV-Decoders den WLAN-Code (auf der Etikette auf der Unterseite des Modems) ein und drücken Sie auf «Verbinden».
Der TV-Decoder ist jetzt mit dem WLAN-Netzwerk verbunden.
Drücken Sie die Taste «TV» auf Ihrer Fernbedienung. Sie können jetzt fernsehen.
Hinweis: Der Ethernet-Anschluss und der WLAN-Anschluss können nicht gleichzeitig verwendet werden. Bei Aktivierung der einen Verbindung wird die andere automatisch ausgeschaltet.
28
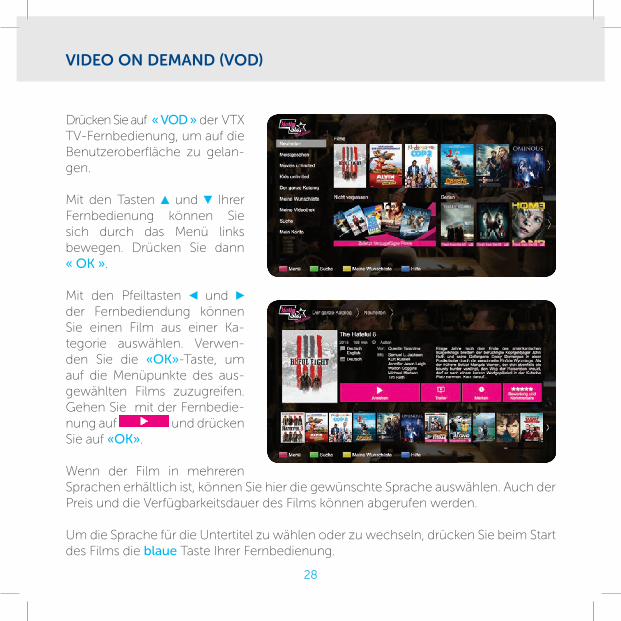
VIDEO ON DEMAND (VOD)
Drücken Sie auf « VOD » der VTX TV-Fernbedienung, um auf die Benutzeroberfläche zu gelan-gen.
Mit den Tasten und Ihrer Fernbedienung können Sie sich durch das Menü links bewegen. Drücken Sie dann « OK ».
Mit den Pfeiltasten und der Fernbediendung können Sie einen Film aus einer Ka-tegorie auswählen. Verwen-den Sie die «OK»-Taste, um auf die Menüpunkte des aus-gewählten Films zuzugreifen.Gehen Sie mit der Fernbedie-nung auf und drücken Sie auf «OK».
Wenn der Film in mehreren Sprachen erhältlich ist, können Sie hier die gewünschte Sprache auswählen. Auch der Preis und die Verfügbarkeitsdauer des Films können abgerufen werden.
Um die Sprache für die Untertitel zu wählen oder zu wechseln, drücken Sie beim Start des Films die blaue Taste Ihrer Fernbedienung.
29
EINSTELLUNGEN
BILDSCHIRMEINSTELLUNGEN
Mit der Taste «Menu» können Sie das Anzeigeformat ändern. Wählen Sie dann Einstellungen und Display-Grösse.
Je nach Fernsehgerät haben Sie die Wahl zwischen 720p, 1080i oder 1080p.
Mit Display-Grösse können Sie Anpassungen vornehmen, falls Teile am Bildschir-mrand abgeschnitten werden. Dazu befolgen Sie bitte die Instruktionen auf dem Bildschirm. Ihr VTX TV-Decoder wird anschliessend automatisch neu gestartet.
SPRACHE WECHSELN
Sie können die vom Decoder benutzte Sprache ändern. Hierzu wählen Sie Taste «Menu», dann Einstellungen und Sprache. Verfügbare Sprachen sind: Deutsch, Französisch, Englisch.
WEITERE EINSTELLUNGEN
Weitere Einstellungen finden Sie in der Online-Anleitung unter:http://www.vtx.ch/TVguide-de
30
NOTES

31
WELCOME TO VTX TV
Many thanks for your interest in VTX TV. This short document will guide you through the setup process of your new VTX TV decoder so that you can start watching TV as quickly as possible.
IN THE BOX (If something is missing, please contact VTX immediately.)
Please check that all the pieces are in the box, as illustrated below.
VTX Remote Control
Power supply Ethernet cable HDMI cable
VTX TV Set Top Box Batteries
32
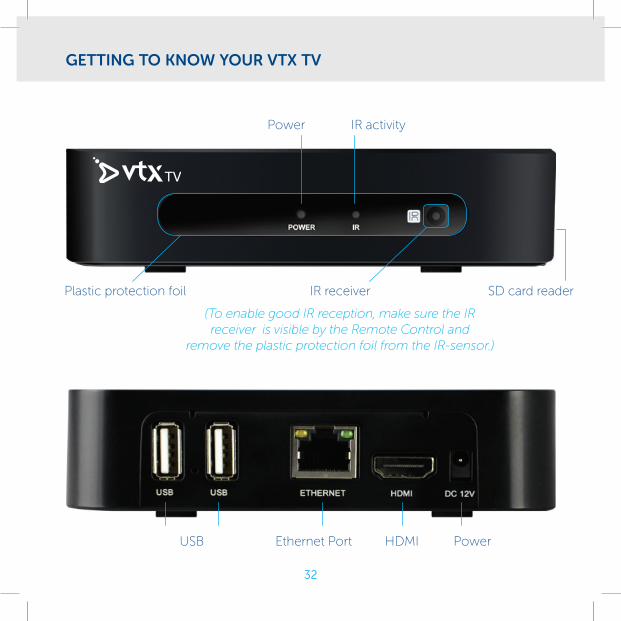
GETTING TO KNOW YOUR VTX TV
Power IR activity
SD card readerIR receiver
(To enable good IR reception, make sure the IRreceiver is visible by the Remote Control and
remove the plastic protection foil from the IR-sensor.)
Plastic protection foil
USB Ethernet Port HDMI Power
33
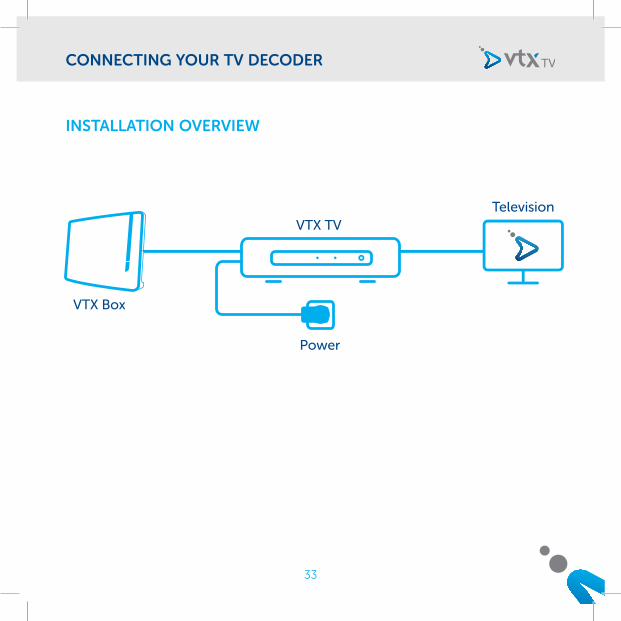
CONNECTING YOUR TV DECODER
INSTALLATION OVERVIEW
VTX Box
VTX TVTelevision
Power
34
CONNECTING YOUR TV DECODER
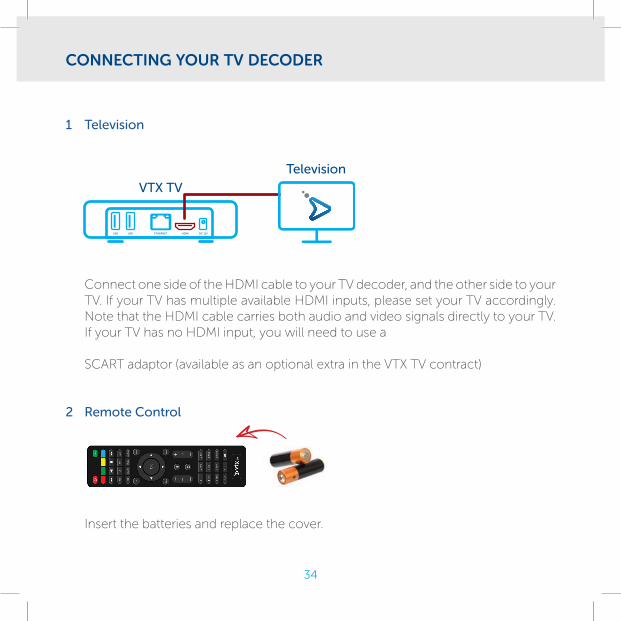
1 Television
Connect one side of the HDMI cable to your TV decoder, and the other side to your TV. If your TV has multiple available HDMI inputs, please set your TV accordingly. Note that the HDMI cable carries both audio and video signals directly to your TV. If your TV has no HDMI input, you will need to use a
SCART adaptor (available as an optional extra in the VTX TV contract)
2 Remote Control
Insert the batteries and replace the cover.
USB USB ETHERNET HDMI DC 12V
VTX TV
Television
35
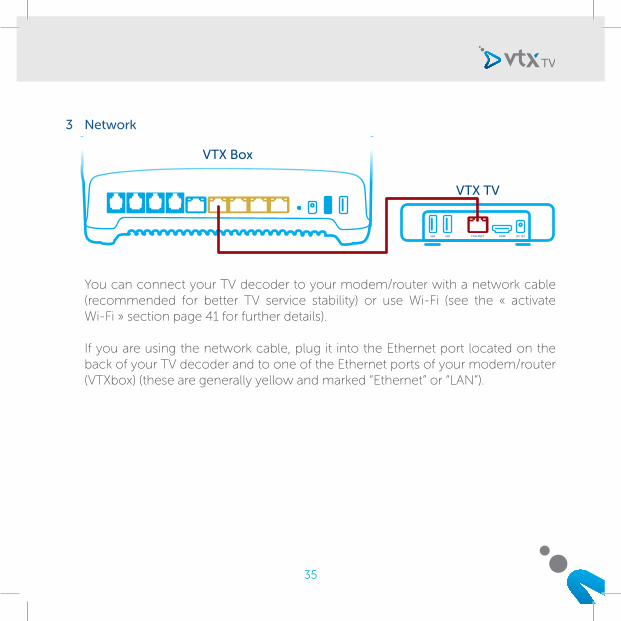
3 Network
You can connect your TV decoder to your modem/router with a network cable (recommended for better TV service stability) or use Wi-Fi (see the « activate Wi-Fi » section page 41 for further details).
If you are using the network cable, plug it into the Ethernet port located on the back of your TV decoder and to one of the Ethernet ports of your modem/router (VTXbox) (these are generally yellow and marked “Ethernet” or “LAN”).
USB USB ETHERNET HDMI DC 12V
VTX TV
VTX Box
36
CONNECTING YOUR TV DECODER
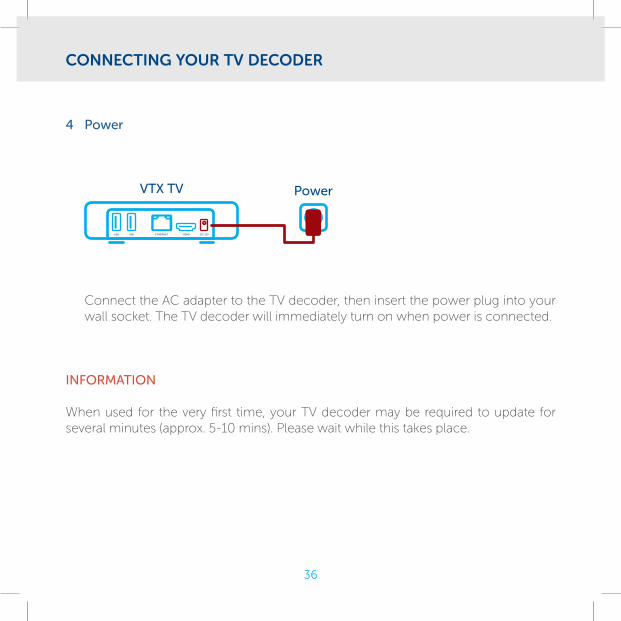
4 Power
Connect the AC adapter to the TV decoder, then insert the power plug into your wall socket. The TV decoder will immediately turn on when power is connected.
INFORMATION
When used for the very first time, your TV decoder may be required to update for several minutes (approx. 5-10 mins). Please wait while this takes place.
USB USB ETHERNET HDMI DC 12V
VTX TV Power
37
REMOTE CONTROL BUTTONS
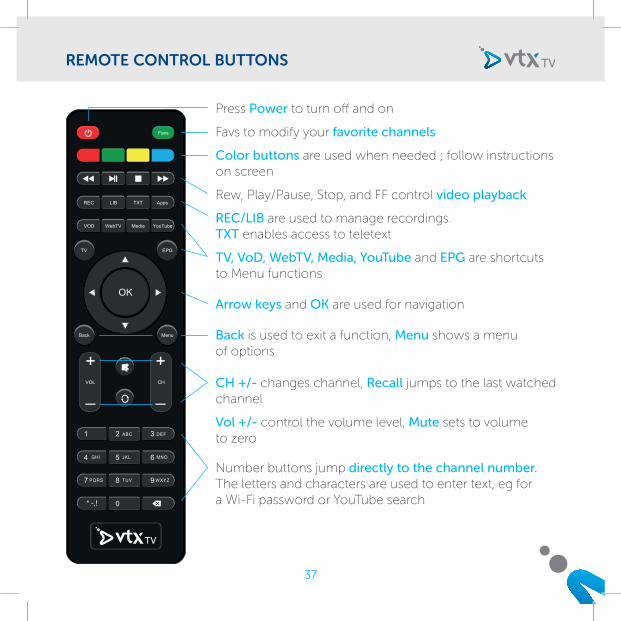
Press Power to turn off and on
Favs to modify your favorite channels
Color buttons are used when needed ; follow instructions on screen
Rew, Play/Pause, Stop, and FF control video playback
REC/LIB are used to manage recordings. TXT enables access to teletext
TV, VoD, WebTV, Media, YouTube and EPG are shortcuts to Menu functions
Arrow keys and OK are used for navigation
CH +/- changes channel, Recall jumps to the last watched channel
Vol +/- control the volume level, Mute sets to volume to zero
Number buttons jump directly to the channel number. The letters and characters are used to enter text, eg for a Wi-Fi password or YouTube search
Back is used to exit a function, Menu shows a menu of options
38
NAVIGATION TIPS
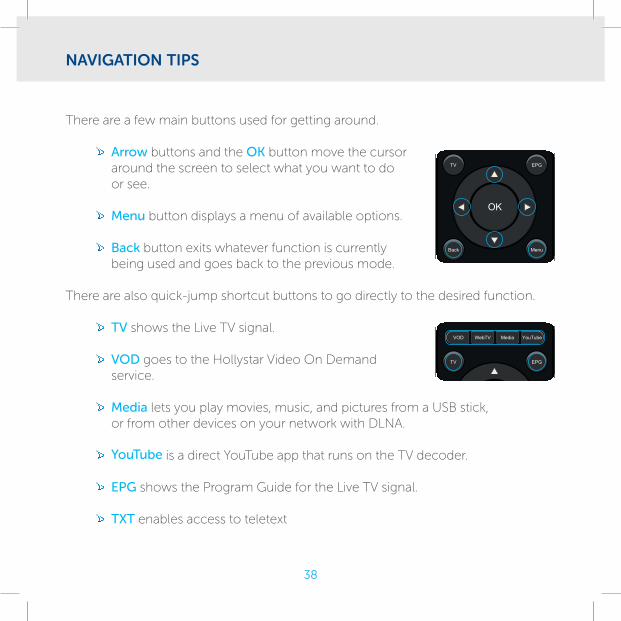
There are a few main buttons used for getting around.
Arrow buttons and the OK button move the cursor around the screen to select what you want to do or see.
Menu button displays a menu of available options.
Back button exits whatever function is currently being used and goes back to the previous mode.
There are also quick-jump shortcut buttons to go directly to the desired function.
TV shows the Live TV signal.
VOD goes to the Hollystar Video On Demand service.
Media lets you play movies, music, and pictures from a USB stick, or from other devices on your network with DLNA.
YouTube is a direct YouTube app that runs on the TV decoder.
EPG shows the Program Guide for the Live TV signal.
TXT enables access to teletext
39
PROGRAM GUIDE (EPG)
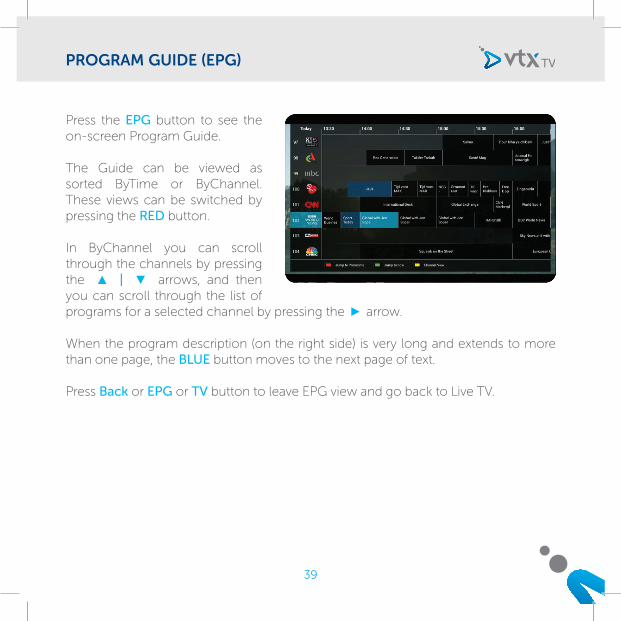
Press the EPG button to see the on-screen Program Guide.
The Guide can be viewed as sorted ByTime or ByChannel. These views can be switched by pressing the RED button.
In ByChannel you can scroll through the channels by pressing the | arrows, and then you can scroll through the list of programs for a selected channel by pressing the arrow.
When the program description (on the right side) is very long and extends to more than one page, the BLUE button moves to the next page of text.
Press Back or EPG or TV button to leave EPG view and go back to Live TV.
40
MANAGING MY FAVORITE CHANNELS LIST
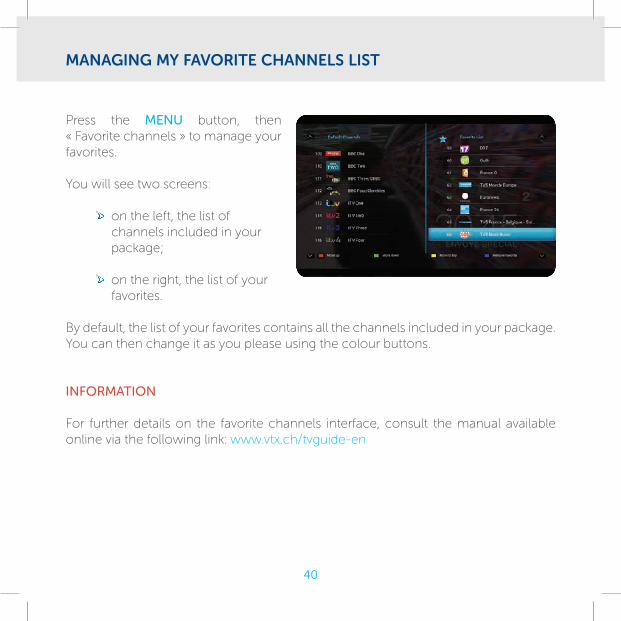
Press the MENU button, then « Favorite channels » to manage your favorites.
You will see two screens:
on the left, the list of channels included in your package;
on the right, the list of your favorites.
By default, the list of your favorites contains all the channels included in your package. You can then change it as you please using the colour buttons.
INFORMATION
For further details on the favorite channels interface, consult the manual available online via the following link: www.vtx.ch/tvguide-en
41
NETWORK CONFIGURATION: ACTIVATE WI-FI
If you wish to connect your VTX TV decoder to your modem using Wi-Fi, follow these steps:
Press the « Menu » button on the remote control supplied with your TV decoder
Using the arrows, select « Settings » and press the « OK » button
Select « Internet access » and press the « OK » button
Select « Wireless » and press « OK »
Once Wi-Fi mode has been activated, your TV decoder will automatically search for available wireless networks and indicate if they are protected.
Select your modem/router’s wireless network
Enter the Wi-Fi code (located on the label on the back of your modem) using the TV decoder remote control, and press « Connect »
Your wireless network is now connected
Press the « TV » button on your remote control. You can now watch TV.
N.B.: you cannot use the wired Ethernet connection and Wi-Fi at the same time; one will always be deactivated automatically when the other is activated.

42
VIDEO ON DEMAND (VOD)
Press the « VOD » button on the VTX TV remote control to access the interface.
Navigate within the menu on the left with the and arrows on your remote control and press « OK ».
The and arrows on your remote control allow you to choose a film within a category. Use the « OK » button to access the options for the selected film.
Go to and press « OK ».
If the film is available in several languages, you can now choose the language in which to watch it. You will also have access to the film’s price and length of availability.
To select or change the subtitles, press the blue button on the remote when starting the movie.
43
CONFIGURATIONS
DISPLAY CONFIGURATION
You can change your Display configuration by pressing Menu, then choosing Settings, then Display size.
Scale lets you select between 720p or 1080i or 1080p mode, depending on your TV.
Screen size let’s you adjust for “overscan” compensation if parts of the screen edges are cutoff. Follow along the onscreen instructions to make these adjustments. The box will reboot when it is finished.
CHANGING THE LANGUAGE
You can change the system language by pressing Menu, then choosing Settings, then Language. Valid options are English, French, and German.
OTHER SETTINGS
More settings are available, described in the online manual here:http://www.vtx.ch/TVguide-en

Copyright © 2016 VTX Telecom SA et AVIQ Systems AG. Version 20160530.
Tous droits réservés. AVIQ et TIPc et les logos associés sont des marques déposées par AVIQ Systems AG. VTX et les logos
associés sont des marques déposées de VTX Telecom SA. Ce produit contient du code source développé par des tierces
parties, notamment du code logiciel soumis à la licence GNU GPL (General Public License) ou à la licence GNU LGPL
(Lesser General Public License). Le code source GPL et LGPL contenu dans ce produit est distribué sans aucune garantie
de quelconque sorte, et est soumis au droit d’un ou plusieurs auteurs. Les autres marques et produits contenus dans ce
document sont des marques déposées aux noms de leurs propriétaires respectifs.
Alle Rechte sind reserviert. AVIQ, TIPc und die zugehörigen Logos sind Markenzeichen der AVIQ Systems AG. VTX und
die zugehörigen Logos sind Markenzeichen von VTX Telecom SA. Dieses Produkt beinhaltet Software Code der durch
Drittparteien entwickelt wurde, einschliesslich Software Code unter der GNU General Public License («GPL») oder
GNU Lesser General Public License («LGPL»). Der in diesem Produkt benutzte GPL Code und LGPL Code wird verteilt
OHNE JEGLICHE GARANTIEN und untersteht den Copyrights von einem oder mehreren Autoren. Andere Brand und
Produktnamen sind Markenzeichen oder eingetragene Marken der entsprechenden Eigentümer.
All rights reserved. AVIQ and TIPc and associated logos are trademarks of AVIQ Systems AG. VTX and associated logos are
trademarks of VTX Telecom SA. This product includes software code developed by third parties, including software code
subject to the GNU General Public License («GPL») or GNU Lesser General Public License («LGPL»). The GPL Code and
LGPL Code used in this product are distributed WITHOUT ANY WARRANTY and is subject to the copyrights of one or more
authors. Other brand and product names are trademarks or registered trademarks of their respective holders.