Embed Size (px)
Citation preview
Appareil conforme aux exigences des directivesR&TTE 1999/5/CE
En raison de l'évolution des normes et du matériel, les caractéristiques indiquées par le texte et les images de ce document ne nous engagent qu'après confirmation par nos services.
Thermostat programmable radioRadio-controlled programmable thermostat
Programmierbarer Funkthermostat
Device complying with the requirements of directivesR&TTE 1999/5/CE
Because of changes in standards and equipment, the characteristics given in the text andthe illustrations of this document are not binding unless confirmed by our services.
Gerät erfüllt die Anforderungen der RichtlinienR&TTE 1999/5/CE
Aufgrund möglicher Weiterentwicklungen von Normen und Produkten sind die in dervorliegenden Dokumentation aufgeführten Angaben und Bilder nur bei entsprechenderBestätigung von uns verbindlich. *2
701485_Rev.2*
INSTALLATIONEmplacement . . . . . . . . . . . . . . . . . . . . . . . . . . 4Fixation . . . . . . . . . . . . . . . . . . . . . . . . . . . . . . . 5Mise en service . . . . . . . . . . . . . . . . . . . . . . . . . 6Retour aux réglages initiaux . . . . . . . . . . . . . 10
UTILISATIONMise à l’heure . . . . . . . . . . . . . . . . . . . . . . . . . 11Réglage des températures . . . . . . . . . . . . . . . 11Programmation . . . . . . . . . . . . . . . . . . . . . . . . 12Mode automatique . . . . . . . . . . . . . . . . . . . . . 13Mode absence . . . . . . . . . . . . . . . . . . . . . . . . . 14Mode manuel . . . . . . . . . . . . . . . . . . . . . . . . . . 15Economie ou confort jusqu’au changement de programme suivant ....................... 15Réglage d’une température pourune durée de 30 minutes à 72 heures..................... 15
Mode arrêt . . . . . . . . . . . . . . . . . . . . . . . . . . . . 17Changer les piles . . . . . . . . . . . . . . . . . . . . . . 18Caractéristiques . . . . . . . . . . . . . . . . . . . . . . . 19
ENGLISH . . . . . . . . . . . . . . . . . . . . . . . . . . . . . . . 20
DEUTSCH . . . . . . . . . . . . . . . . . . . . . . . . . . . . . . 38
Description
- 2 - - 3 -
AUTO
PROG
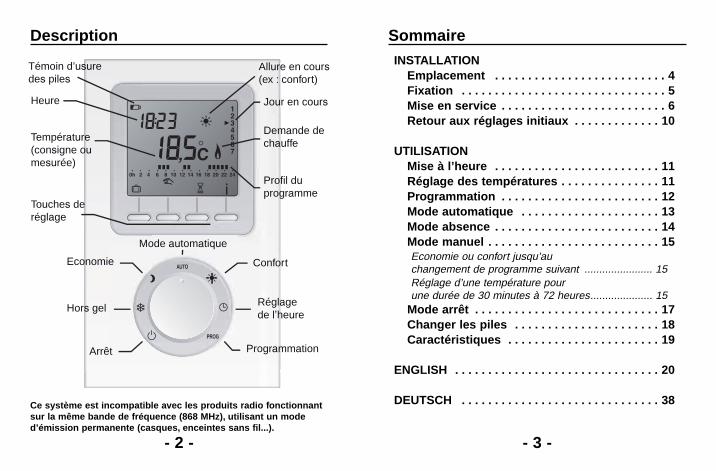
Témoin d’usuredes piles
Allure en cours(ex : confort)
Jour en cours
Demande dechauffe
Profil duprogramme
Heure
Température(consigne oumesurée)
Touches deréglage
Mode automatique
Confort
Réglagede l’heure
Programmation
Economie
Hors gel
Arrêt
Sommaire
Ce système est incompatible avec les produits radio fonctionnantsur la même bande de fréquence (868 MHz), utilisant un moded’émission permanente (casques, enceintes sans fil...).
- 4 - - 5 -
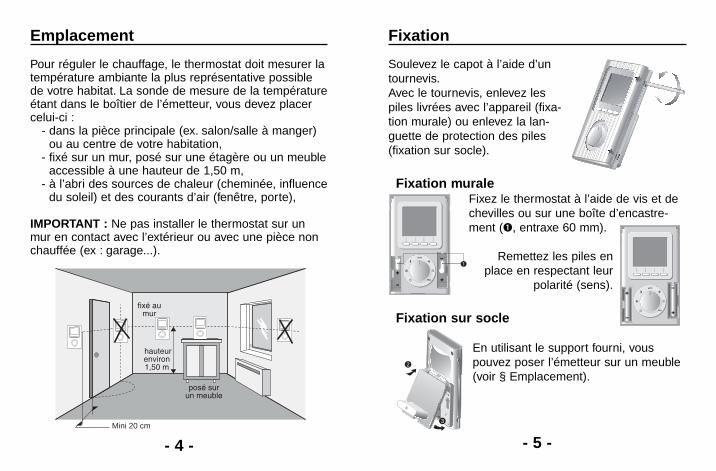
Soulevez le capot à l’aide d’untournevis.Avec le tournevis, enlevez lespiles livrées avec l’appareil (fixa-tion murale) ou enlevez la lan-guette de protection des piles(fixation sur socle).
Fixation muraleFixez le thermostat à l’aide de vis et dechevilles ou sur une boîte d’encastre-ment (➊, entraxe 60 mm).
Remettez les piles enplace en respectant leur
polarité (sens).
Fixation sur socle
En utilisant le support fourni, vouspouvez poser l’émetteur sur un meuble(voir § Emplacement).
Fixation
AUTO
PROG
2
3
AUTO
PROGPRO
Pour réguler le chauffage, le thermostat doit mesurer latempérature ambiante la plus représentative possiblede votre habitat. La sonde de mesure de la températureétant dans le boîtier de l’émetteur, vous devez placercelui-ci :
- dans la pièce principale (ex. salon/salle à manger)ou au centre de votre habitation,
- fixé sur un mur, posé sur une étagère ou un meubleaccessible à une hauteur de 1,50 m,
- à l’abri des sources de chaleur (cheminée, influencedu soleil) et des courants d’air (fenêtre, porte),
IMPORTANT : Ne pas installer le thermostat sur unmur en contact avec l’extérieur ou avec une pièce nonchauffée (ex : garage...).
Emplacement
Mini 20 cm
- 6 - - 7 -
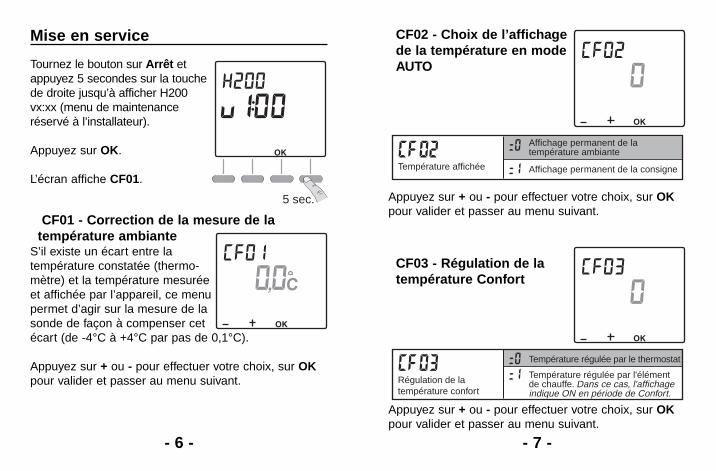
Tournez le bouton sur Arrêt etappuyez 5 secondes sur la touchede droite jusqu’à afficher H200vx:xx (menu de maintenanceréservé à l’installateur).
Appuyez sur OK.
L’écran affiche CF01.
CF01 - Correction de la mesure de latempérature ambiante
S’il existe un écart entre latempérature constatée (thermo-mètre) et la température mesuréeet affichée par l’appareil, ce menupermet d’agir sur la mesure de lasonde de façon à compenser cetécart (de -4°C à +4°C par pas de 0,1°C).
Appuyez sur + ou - pour effectuer votre choix, sur OKpour valider et passer au menu suivant.
Mise en service
5 sec.
CF02 - Choix de l’affichagede la température en modeAUTO
Appuyez sur + ou - pour effectuer votre choix, sur OKpour valider et passer au menu suivant.
CF03 - Régulation de latempérature Confort
Appuyez sur + ou - pour effectuer votre choix, sur OKpour valider et passer au menu suivant.
Affichage permanent de la consigneTempérature affichée
Affichage permanent de latempérature ambiante
Température régulée par le thermostat
Régulation de latempérature confort
Température régulée par l'élémentde chauffe. Dans ce cas, l'affichageindique ON en période de Confort.
- 8 - - 9 -
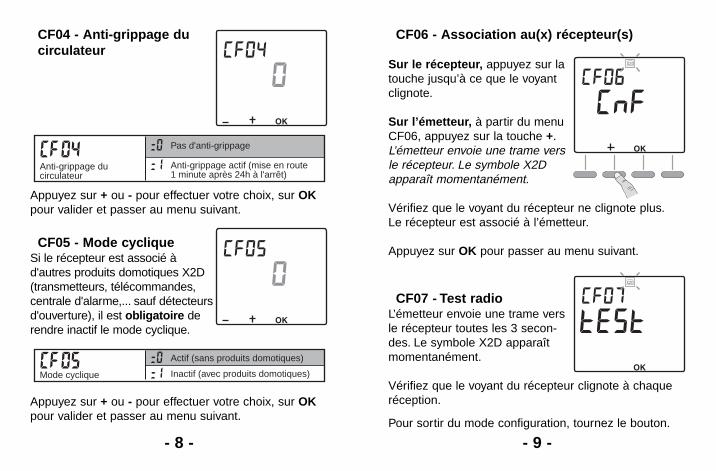
CF04 - Anti-grippage ducirculateur
Appuyez sur + ou - pour effectuer votre choix, sur OKpour valider et passer au menu suivant.
CF05 - Mode cycliqueSi le récepteur est associé àd'autres produits domotiques X2D(transmetteurs, télécommandes,centrale d'alarme,... sauf détecteursd'ouverture), il est obligatoire derendre inactif le mode cyclique.
Appuyez sur + ou - pour effectuer votre choix, sur OKpour valider et passer au menu suivant.
CF06 - Association au(x) récepteur(s)
Sur le récepteur, appuyez sur latouche jusqu’à ce que le voyantclignote.
Sur l’émetteur, à partir du menuCF06, appuyez sur la touche +.L’émetteur envoie une trame versle récepteur. Le symbole X2Dapparaît momentanément.
Vérifiez que le voyant du récepteur ne clignote plus.Le récepteur est associé à l’émetteur.
Appuyez sur OK pour passer au menu suivant.
CF07 - Test radioL’émetteur envoie une trame versle récepteur toutes les 3 secon-des. Le symbole X2D apparaîtmomentanément.
Vérifiez que le voyant du récepteur clignote à chaqueréception.
Pour sortir du mode configuration, tournez le bouton.
Pas d'anti-grippage
Anti-grippage ducirculateur
Anti-grippage actif (mise en route1 minute après 24h à l'arrêt)
Actif (sans produits domotiques)
Mode cyclique Inactif (avec produits domotiques)
- 10 - - 11 -
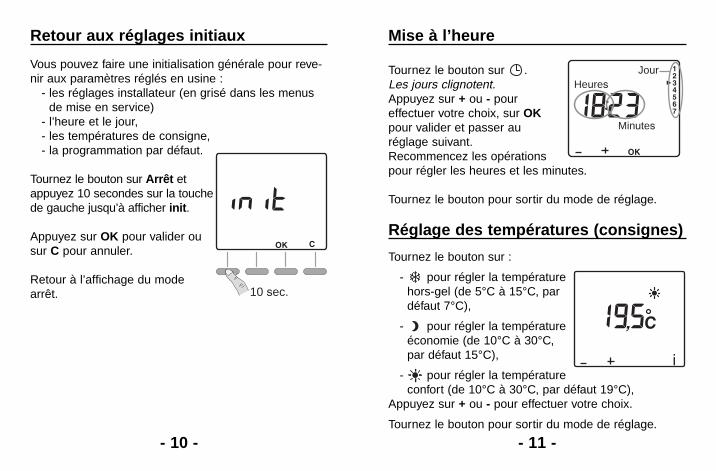
Tournez le bouton sur .Les jours clignotent.Appuyez sur + ou - poureffectuer votre choix, sur OKpour valider et passer auréglage suivant.Recommencez les opérationspour régler les heures et les minutes.
Tournez le bouton pour sortir du mode de réglage.
Tournez le bouton sur :
- pour régler la températurehors-gel (de 5°C à 15°C, pardéfaut 7°C),
- pour régler la températureéconomie (de 10°C à 30°C,par défaut 15°C),
- pour régler la températureconfort (de 10°C à 30°C, par défaut 19°C),
Appuyez sur + ou - pour effectuer votre choix.
Tournez le bouton pour sortir du mode de réglage.
Mise à l’heure
Réglage des températures (consignes)
JourHeures
Minutes
Vous pouvez faire une initialisation générale pour reve-nir aux paramètres réglés en usine :
- les réglages installateur (en grisé dans les menusde mise en service)
- l’heure et le jour,- les températures de consigne,- la programmation par défaut.
Tournez le bouton sur Arrêt etappuyez 10 secondes sur la touchede gauche jusqu’à afficher init.
Appuyez sur OK pour valider ousur C pour annuler.
Retour à l’affichage du modearrêt. 10 sec.
Retour aux réglages initiaux
- 12 - - 13 -
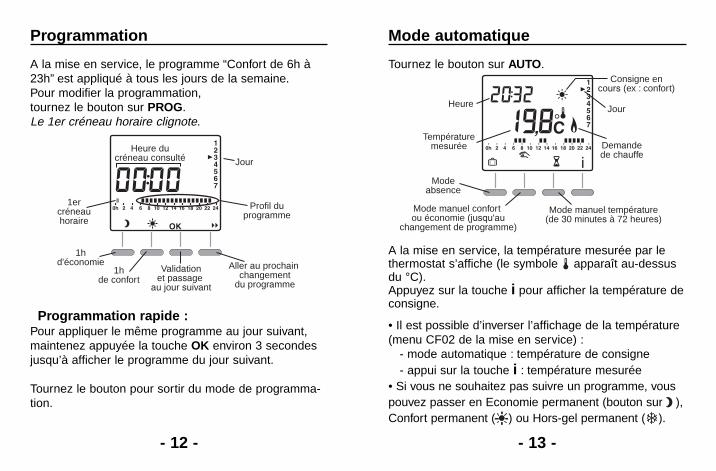
Tournez le bouton sur AUTO.
A la mise en service, la température mesurée par lethermostat s’affiche (le symbole apparaît au-dessusdu °C).Appuyez sur la touche i pour afficher la température deconsigne.
• Il est possible d’inverser l’affichage de la température(menu CF02 de la mise en service) :
- mode automatique : température de consigne- appui sur la touche i : température mesurée
• Si vous ne souhaitez pas suivre un programme, vouspouvez passer en Economie permanent (bouton sur ),Confort permanent ( ) ou Hors-gel permanent ( ).
A la mise en service, le programme “Confort de 6h à23h” est appliqué à tous les jours de la semaine.Pour modifier la programmation,tournez le bouton sur PROG.Le 1er créneau horaire clignote.
Programmation rapide :Pour appliquer le même programme au jour suivant,maintenez appuyée la touche OK environ 3 secondesjusqu’à afficher le programme du jour suivant.
Tournez le bouton pour sortir du mode de programma-tion.
Programmation Mode automatique
1hd'économie
1hde confort
Aller au prochain changement
du programme
Validationet passage
au jour suivant
1ercréneauhoraire
Heure ducréneau consulté Jour
Profil duprogramme
Modeabsence
Mode manuel confort ou économie (jusqu'au
changement de programme)
Mode manuel température(de 30 minutes à 72 heures)
Heure
Consigne encours (ex : confort)
Jour
Demandede chauffe
Températuremesurée
- 14 - - 15 -
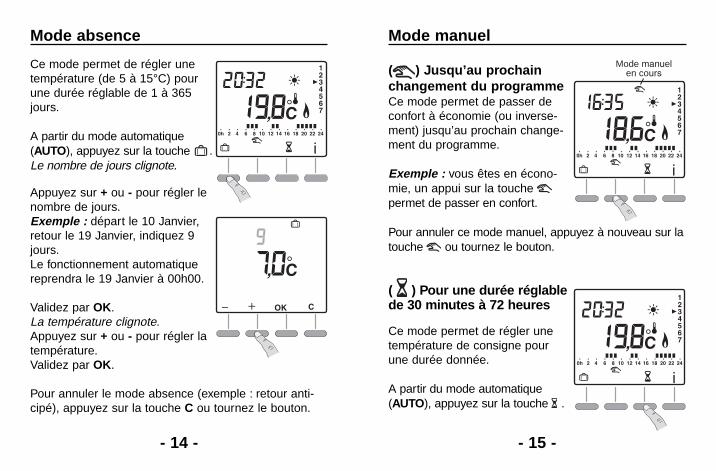
( ) Jusqu’au prochainchangement du programmeCe mode permet de passer deconfort à économie (ou inverse-ment) jusqu’au prochain change-ment du programme.
Exemple : vous êtes en écono-mie, un appui sur la touchepermet de passer en confort.
Pour annuler ce mode manuel, appuyez à nouveau sur latouche ou tournez le bouton.
( ) Pour une durée réglablede 30 minutes à 72 heures
Ce mode permet de régler unetempérature de consigne pourune durée donnée.
A partir du mode automatique(AUTO), appuyez sur la touche .
Mode absence Mode manuel
Ce mode permet de régler unetempérature (de 5 à 15°C) pourune durée réglable de 1 à 365jours.
A partir du mode automatique(AUTO), appuyez sur la touche .Le nombre de jours clignote.
Appuyez sur + ou - pour régler lenombre de jours.Exemple : départ le 10 Janvier,retour le 19 Janvier, indiquez 9jours.Le fonctionnement automatiquereprendra le 19 Janvier à 00h00.
Validez par OK.La température clignote.Appuyez sur + ou - pour régler latempérature.Validez par OK.
Pour annuler le mode absence (exemple : retour anti-cipé), appuyez sur la touche C ou tournez le bouton.
Mode manuelen cours
- 16 - - 17 -
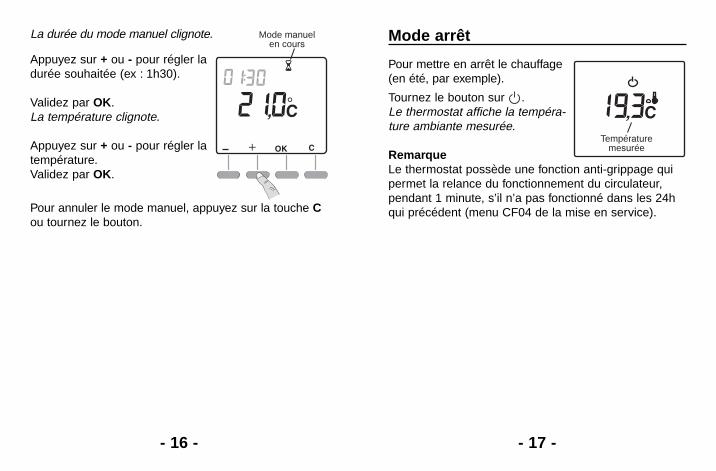
La durée du mode manuel clignote.
Appuyez sur + ou - pour régler ladurée souhaitée (ex : 1h30).
Validez par OK.La température clignote.
Appuyez sur + ou - pour régler latempérature.Validez par OK.
Pour annuler le mode manuel, appuyez sur la touche Cou tournez le bouton.
Pour mettre en arrêt le chauffage(en été, par exemple).
Tournez le bouton sur .Le thermostat affiche la tempéra-ture ambiante mesurée.
RemarqueLe thermostat possède une fonction anti-grippage quipermet la relance du fonctionnement du circulateur,pendant 1 minute, s’il n’a pas fonctionné dans les 24hqui précédent (menu CF04 de la mise en service).
Mode manuelen cours
Températuremesurée
Mode arrêt
- 18 - - 19 -
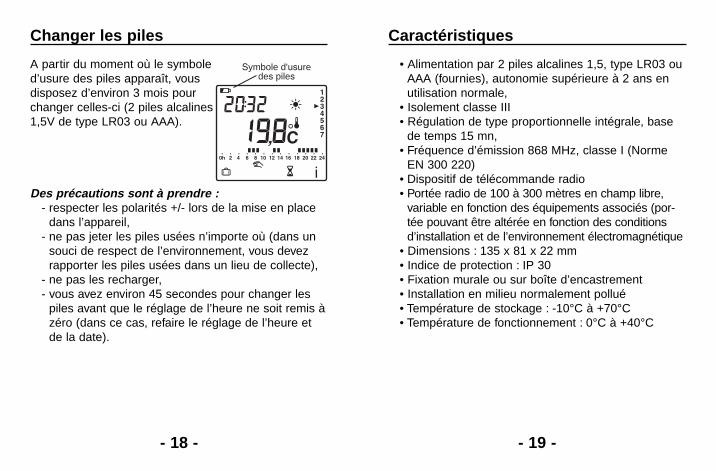
• Alimentation par 2 piles alcalines 1,5, type LR03 ouAAA (fournies), autonomie supérieure à 2 ans enutilisation normale,
• Isolement classe III• Régulation de type proportionnelle intégrale, base
de temps 15 mn,• Fréquence d’émission 868 MHz, classe I (Norme
EN 300 220)• Dispositif de télécommande radio• Portée radio de 100 à 300 mètres en champ libre,
variable en fonction des équipements associés (por-tée pouvant être altérée en fonction des conditionsd’installation et de l’environnement électromagnétique
• Dimensions : 135 x 81 x 22 mm• Indice de protection : IP 30• Fixation murale ou sur boîte d’encastrement• Installation en milieu normalement pollué• Température de stockage : -10°C à +70°C• Température de fonctionnement : 0°C à +40°C
Caractéristiques
A partir du moment où le symboled’usure des piles apparaît, vousdisposez d’environ 3 mois pourchanger celles-ci (2 piles alcalines1,5V de type LR03 ou AAA).
Des précautions sont à prendre :- respecter les polarités +/- lors de la mise en place
dans l’appareil,- ne pas jeter les piles usées n’importe où (dans un
souci de respect de l’environnement, vous devezrapporter les piles usées dans un lieu de collecte),
- ne pas les recharger,- vous avez environ 45 secondes pour changer les
piles avant que le réglage de l’heure ne soit remis àzéro (dans ce cas, refaire le réglage de l’heure etde la date).
Changer les piles
Symbole d'usuredes piles
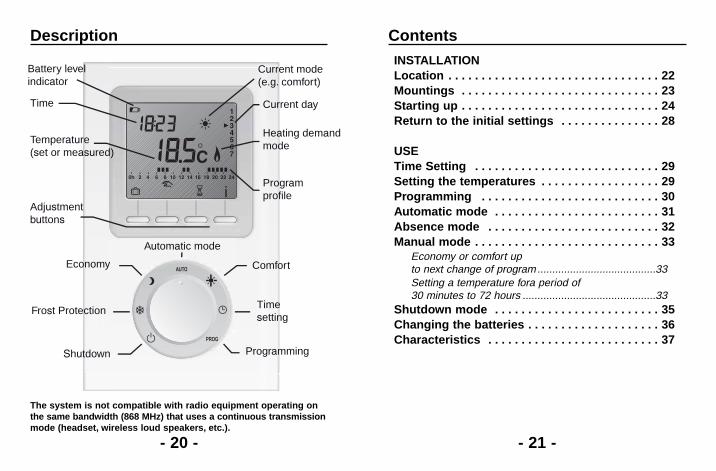
INSTALLATIONLocation . . . . . . . . . . . . . . . . . . . . . . . . . . . . . . . . 22Mountings . . . . . . . . . . . . . . . . . . . . . . . . . . . . . . 23Starting up . . . . . . . . . . . . . . . . . . . . . . . . . . . . . . 24Return to the initial settings . . . . . . . . . . . . . . . 28
USETime Setting . . . . . . . . . . . . . . . . . . . . . . . . . . . . 29Setting the temperatures . . . . . . . . . . . . . . . . . . 29Programming . . . . . . . . . . . . . . . . . . . . . . . . . . . 30Automatic mode . . . . . . . . . . . . . . . . . . . . . . . . . 31Absence mode . . . . . . . . . . . . . . . . . . . . . . . . . . 32Manual mode . . . . . . . . . . . . . . . . . . . . . . . . . . . . 33
Economy or comfort upto next change of program........................................33Setting a temperature fora period of30 minutes to 72 hours .............................................33
Shutdown mode . . . . . . . . . . . . . . . . . . . . . . . . . 35Changing the batteries . . . . . . . . . . . . . . . . . . . . 36Characteristics . . . . . . . . . . . . . . . . . . . . . . . . . . 37
- 21 -
ContentsDescription
- 20 -
AUTO
PROG
Battery levelindicator
Current mode(e.g. comfort)
Current day
Heating demandmode
Programprofile
Time
Temperature(set or measured)
Adjustmentbuttons
Automatic mode
Comfort
Timesetting
Programming
Economy
Frost Protection
Shutdown
The system is not compatible with radio equipment operating onthe same bandwidth (868 MHz) that uses a continuous transmissionmode (headset, wireless loud speakers, etc.).
- 23 -
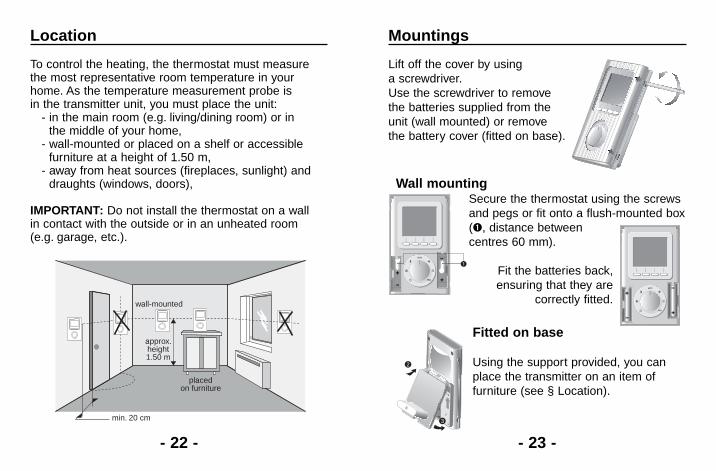
Lift off the cover by usinga screwdriver.Use the screwdriver to removethe batteries supplied from theunit (wall mounted) or removethe battery cover (fitted on base).
Wall mountingSecure the thermostat using the screwsand pegs or fit onto a flush-mounted box(➊, distance betweencentres 60 mm).
Fit the batteries back,ensuring that they are
correctly fitted.
Fitted on base
Using the support provided, you canplace the transmitter on an item offurniture (see § Location).
Mountings
AUTO
PROG
2
3
AUTO
PROGPRO
- 22 -
To control the heating, the thermostat must measurethe most representative room temperature in yourhome. As the temperature measurement probe isin the transmitter unit, you must place the unit:
- in the main room (e.g. living/dining room) or inthe middle of your home,
- wall-mounted or placed on a shelf or accessiblefurniture at a height of 1.50 m,
- away from heat sources (fireplaces, sunlight) anddraughts (windows, doors),
IMPORTANT: Do not install the thermostat on a wallin contact with the outside or in an unheated room(e.g. garage, etc.).
Location
min. 20 cm
wall-mounted
approx.height1.50 m
placedon furniture

- 25 -
CF02 - AUTO modetemperature display option
Press + or - to make your choice, OK to confirm it andgo to the next menu.
CF03 - Control ofthe Comfort temperature
Press + or - to make your choice, OK to confirm it andgo to the next menu.
Continuous display of the set-pointTemperature displayed
Continuous room temperaturedisplay
Temperature controlled by the thermostat
Controlling the Comforttemperature
Temperature controlled by the heatingelement. Here, the display reads ONduring Comfort period.
- 24 -
Turn the knob to Shutdown andpress the right-hand button for5 seconds until H200 vx:xx isdisplayed (maintenance menureserved for the installer).
Press OK.
The screen displays CF01.
CF01 - Correction of room temperaturemeasurement
If there is a difference betweenthe temperature noted (thermo-meter) and the temperaturemeasured and displayed bythe unit, the menu acts on themeasurement of the probe so asto compensate for this difference (from -4°C to +4°C insteps of 0.1°C).
Press + or - to make your choice, OK to confirm it andgo to the next menu.
Starting up
5 sec.
- 27 -
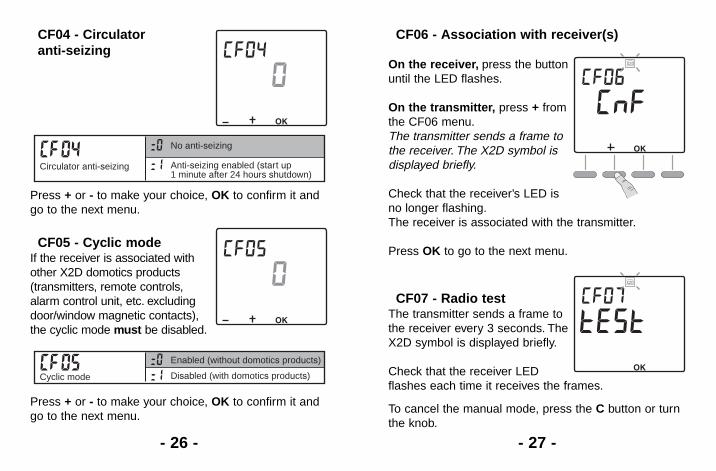
CF06 - Association with receiver(s)
On the receiver, press the buttonuntil the LED flashes.
On the transmitter, press + fromthe CF06 menu.The transmitter sends a frame tothe receiver. The X2D symbol isdisplayed briefly.
Check that the receiver’s LED isno longer flashing.The receiver is associated with the transmitter.
Press OK to go to the next menu.
CF07 - Radio testThe transmitter sends a frame tothe receiver every 3 seconds. TheX2D symbol is displayed briefly.
Check that the receiver LEDflashes each time it receives the frames.
To cancel the manual mode, press the C button or turnthe knob.
- 26 -
CF04 - Circulatoranti-seizing
Press + or - to make your choice, OK to confirm it andgo to the next menu.
CF05 - Cyclic modeIf the receiver is associated withother X2D domotics products(transmitters, remote controls,alarm control unit, etc. excludingdoor/window magnetic contacts),the cyclic mode must be disabled.
Press + or - to make your choice, OK to confirm it andgo to the next menu.
No anti-seizing
Circulator anti-seizing Anti-seizing enabled (start up1 minute after 24 hours shutdown)
Enabled (without domotics products)
Cyclic mode Disabled (with domotics products)
- 29 -
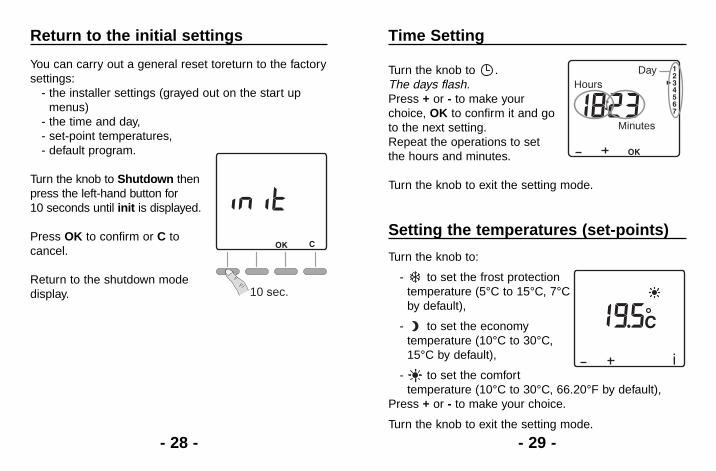
Turn the knob to .The days flash.Press + or - to make yourchoice, OK to confirm it and goto the next setting.Repeat the operations to setthe hours and minutes.
Turn the knob to exit the setting mode.
Turn the knob to:
- to set the frost protectiontemperature (5°C to 15°C, 7°Cby default),
- to set the economytemperature (10°C to 30°C,15°C by default),
- to set the comforttemperature (10°C to 30°C, 66.20°F by default),
Press + or - to make your choice.
Turn the knob to exit the setting mode.
Time Setting
Setting the temperatures (set-points)
DayHours
Minutes
- 28 -
You can carry out a general reset toreturn to the factorysettings:
- the installer settings (grayed out on the start upmenus)
- the time and day,- set-point temperatures,- default program.
Turn the knob to Shutdown thenpress the left-hand button for10 seconds until init is displayed.
Press OK to confirm or C tocancel.
Return to the shutdown modedisplay. 10 sec.
Return to the initial settings
- 31 -
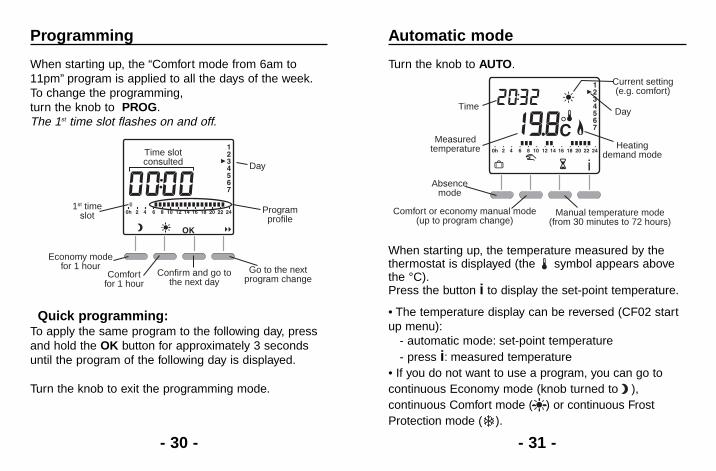
Turn the knob to AUTO.
When starting up, the temperature measured by thethermostat is displayed (the symbol appears abovethe °C).Press the button i to display the set-point temperature.
• The temperature display can be reversed (CF02 startup menu):
- automatic mode: set-point temperature- press i: measured temperature
• If you do not want to use a program, you can go tocontinuous Economy mode (knob turned to ),continuous Comfort mode ( ) or continuous FrostProtection mode ( ).
Automatic mode
Absencemode
Comfort or economy manual mode(up to program change)
Manual temperature mode(from 30 minutes to 72 hours)
Time
Current setting(e.g. comfort)
Day
Heatingdemand mode
Measuredtemperature
- 30 -
When starting up, the “Comfort mode from 6am to11pm” program is applied to all the days of the week.To change the programming,turn the knob to PROG.The 1st time slot flashes on and off.
Quick programming:To apply the same program to the following day, pressand hold the OK button for approximately 3 secondsuntil the program of the following day is displayed.
Turn the knob to exit the programming mode.
Programming
Economy modefor 1 hour
Comfortfor 1 hour
Go to the nextprogram change
Confirm and go tothe next day
1st timeslot
Time slotconsulted Day
Programprofile
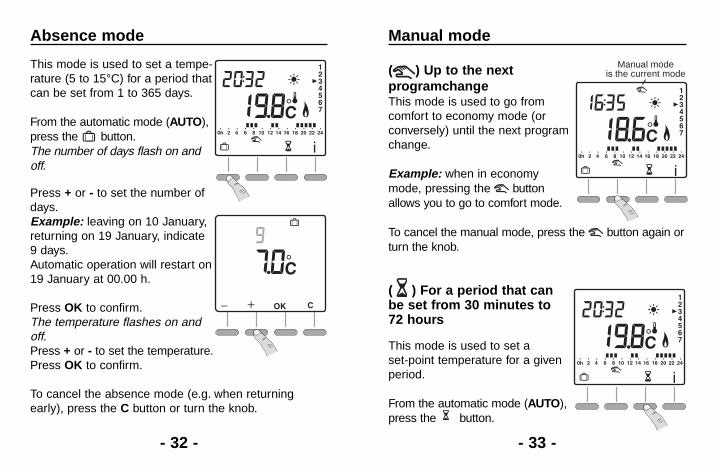
( ) Up to the nextprogramchangeThis mode is used to go fromcomfort to economy mode (orconversely) until the next programchange.
Example: when in economymode, pressing the buttonallows you to go to comfort mode.
To cancel the manual mode, press the button again orturn the knob.
( ) For a period that canbe set from 30 minutes to72 hours
This mode is used to set aset-point temperature for a givenperiod.
From the automatic mode (AUTO),press the button.
Manual mode
Manual modeis the current mode
- 32 - - 33 -
Absence mode
This mode is used to set a tempe-rature (5 to 15°C) for a period thatcan be set from 1 to 365 days.
From the automatic mode (AUTO),press the button.The number of days flash on andoff.
Press + or - to set the number ofdays.Example: leaving on 10 January,returning on 19 January, indicate9 days.Automatic operation will restart on19 January at 00.00 h.
Press OK to confirm.The temperature flashes on andoff.Press + or - to set the temperature.Press OK to confirm.
To cancel the absence mode (e.g. when returningearly), press the C button or turn the knob.
- 35 -
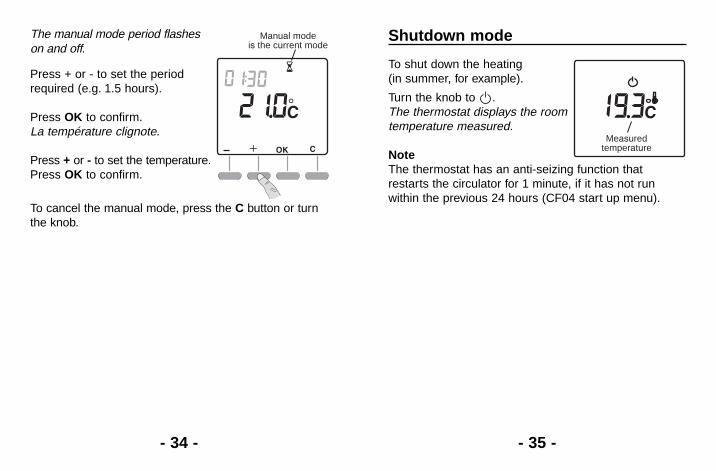
To shut down the heating(in summer, for example).
Turn the knob to .The thermostat displays the roomtemperature measured.
NoteThe thermostat has an anti-seizing function thatrestarts the circulator for 1 minute, if it has not runwithin the previous 24 hours (CF04 start up menu).
Measuredtemperature
Shutdown mode
- 34 -
The manual mode period flasheson and off.
Press + or - to set the periodrequired (e.g. 1.5 hours).
Press OK to confirm.La température clignote.
Press + or - to set the temperature.Press OK to confirm.
To cancel the manual mode, press the C button or turnthe knob.
Manual modeis the current mode
- 37 -
• Power supplied by two LR03 or AAA-type 1.5 Valkaline batteries (supplied), autonomy greater than2 years for normal use,
• Class III insulation• Built-in proportional control, time basis 15 min.,• 868 MHz transmission frequency, class I (standard
EN 300 220)• Radio remote control device• Radio range 100 to 300 metres outside varies
depending on the equipment associated (the rangecan be altered depending on the installation conditionsand the electromagnetic environment)
• Dimensions: 135 x 81 x 0.87 in• Protection index: IP 30• Wall mounting or on flush-mounted box• Installation in an environment with normal pollution
levels• Storage temperature: -10°C to +70°C• Operating temperature: 0°C to +40°C
Characteristics
- 36 -
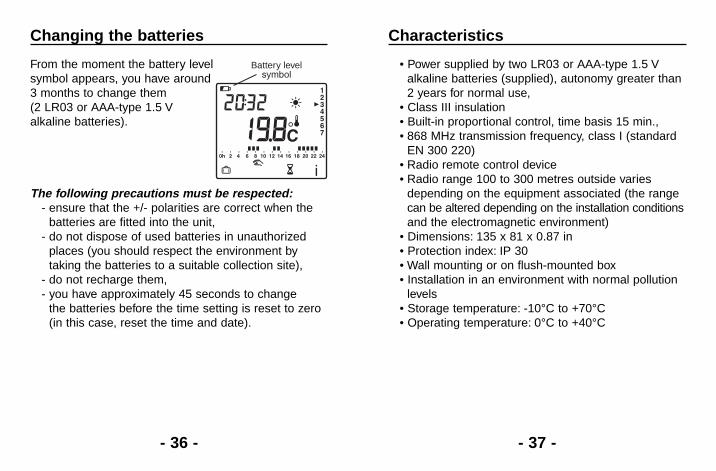
From the moment the battery levelsymbol appears, you have around3 months to change them(2 LR03 or AAA-type 1.5 Valkaline batteries).
The following precautions must be respected:- ensure that the +/- polarities are correct when the
batteries are fitted into the unit,- do not dispose of used batteries in unauthorized
places (you should respect the environment bytaking the batteries to a suitable collection site),
- do not recharge them,- you have approximately 45 seconds to change
the batteries before the time setting is reset to zero(in this case, reset the time and date).
Changing the batteries
Battery levelsymbol
InhaltBeschreibung
- 38 - - 39 -
AUTO
PROG
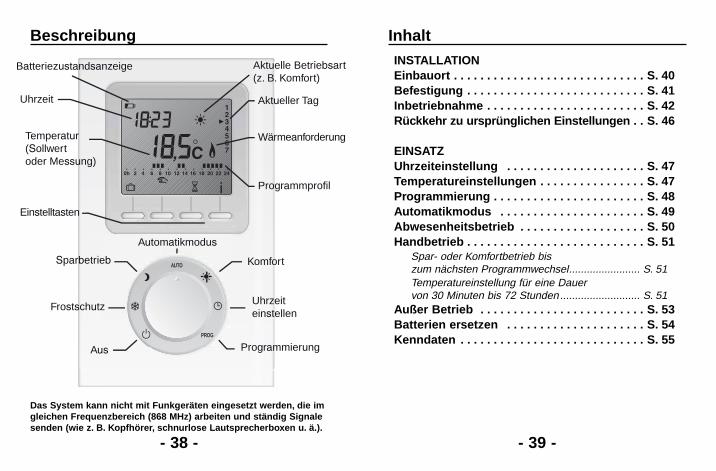
Batteriezustandsanzeige Aktuelle Betriebsart(z. B. Komfort)
Aktueller Tag
Wärmeanforderung
Programmprofil
Uhrzeit
Temperatur(Sollwertoder Messung)
Einstelltasten
Automatikmodus
Komfort
Uhrzeiteinstellen
Programmierung
Sparbetrieb
Frostschutz
Aus
Das System kann nicht mit Funkgeräten eingesetzt werden, die imgleichen Frequenzbereich (868 MHz) arbeiten und ständig Signalesenden (wie z. B. Kopfhörer, schnurlose Lautsprecherboxen u. ä.).
INSTALLATIONEinbauort . . . . . . . . . . . . . . . . . . . . . . . . . . . . . S. 40Befestigung . . . . . . . . . . . . . . . . . . . . . . . . . . . S. 41Inbetriebnahme . . . . . . . . . . . . . . . . . . . . . . . . S. 42Rückkehr zu ursprünglichen Einstellungen . . S. 46
EINSATZUhrzeiteinstellung . . . . . . . . . . . . . . . . . . . . . S. 47Temperatureinstellungen . . . . . . . . . . . . . . . . S. 47Programmierung . . . . . . . . . . . . . . . . . . . . . . . S. 48Automatikmodus . . . . . . . . . . . . . . . . . . . . . . S. 49Abwesenheitsbetrieb . . . . . . . . . . . . . . . . . . . S. 50Handbetrieb . . . . . . . . . . . . . . . . . . . . . . . . . . . S. 51
Spar- oder Komfortbetrieb biszum nächsten Programmwechsel........................ S. 51Temperatureinstellung für eine Dauervon 30 Minuten bis 72 Stunden........................... S. 51
Außer Betrieb . . . . . . . . . . . . . . . . . . . . . . . . . S. 53Batterien ersetzen . . . . . . . . . . . . . . . . . . . . . S. 54Kenndaten . . . . . . . . . . . . . . . . . . . . . . . . . . . . S. 55
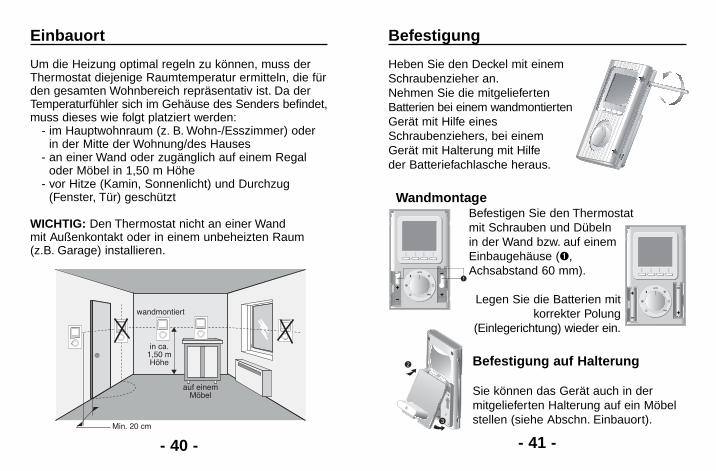
Heben Sie den Deckel mit einemSchraubenzieher an.Nehmen Sie die mitgeliefertenBatterien bei einem wandmontiertenGerät mit Hilfe einesSchraubenziehers, bei einemGerät mit Halterung mit Hilfeder Batteriefachlasche heraus.
WandmontageBefestigen Sie den Thermostatmit Schrauben und Dübelnin der Wand bzw. auf einemEinbaugehäuse (➊,Achsabstand 60 mm).
Legen Sie die Batterien mitkorrekter Polung
(Einlegerichtung) wieder ein.
Befestigung auf Halterung
Sie können das Gerät auch in dermitgelieferten Halterung auf ein Möbelstellen (siehe Abschn. Einbauort).
Befestigung
AUTO
PROG
2
3
AUTO
PROGPRO
- 40 - - 41 -
Um die Heizung optimal regeln zu können, muss derThermostat diejenige Raumtemperatur ermitteln, die fürden gesamten Wohnbereich repräsentativ ist. Da derTemperaturfühler sich im Gehäuse des Senders befindet,muss dieses wie folgt platziert werden:
- im Hauptwohnraum (z. B. Wohn-/Esszimmer) oderin der Mitte der Wohnung/des Hauses
- an einer Wand oder zugänglich auf einem Regaloder Möbel in 1,50 m Höhe
- vor Hitze (Kamin, Sonnenlicht) und Durchzug(Fenster, Tür) geschützt
WICHTIG: Den Thermostat nicht an einer Wandmit Außenkontakt oder in einem unbeheizten Raum(z.B. Garage) installieren.
Einbauort
Min. 20 cm
wandmontiert
in ca.1,50 mHöhe
auf einemMöbel
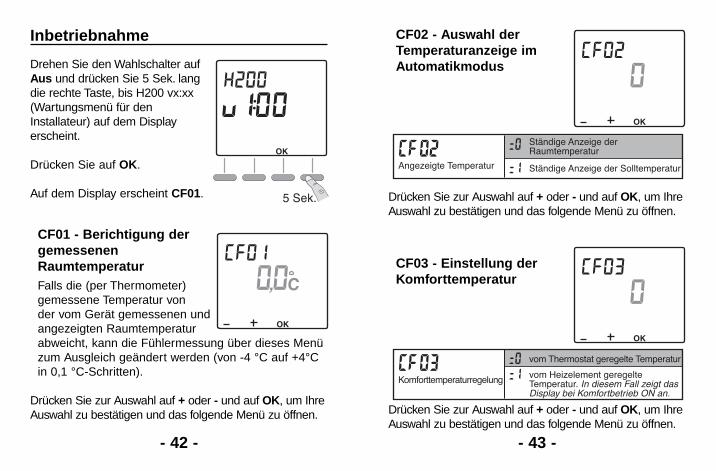
CF02 - Auswahl derTemperaturanzeige imAutomatikmodus
Drücken Sie zur Auswahl auf + oder - und auf OK, um IhreAuswahl zu bestätigen und das folgende Menü zu öffnen.
CF03 - Einstellung derKomforttemperatur
Drücken Sie zur Auswahl auf + oder - und auf OK, um IhreAuswahl zu bestätigen und das folgende Menü zu öffnen.
Ständige Anzeige der SolltemperaturAngezeigte Temperatur
Ständige Anzeige derRaumtemperatur
vom Thermostat geregelte Temperatur
Komforttemperaturregelung vom Heizelement geregelteTemperatur. In diesem Fall zeigt dasDisplay bei Komfortbetrieb ON an.
- 42 - - 43 -
Drehen Sie den Wahlschalter aufAus und drücken Sie 5 Sek. langdie rechte Taste, bis H200 vx:xx(Wartungsmenü für denInstallateur) auf dem Displayerscheint.
Drücken Sie auf OK.
Auf dem Display erscheint CF01.
CF01 - Berichtigung dergemessenenRaumtemperaturFalls die (per Thermometer)gemessene Temperatur vonder vom Gerät gemessenen undangezeigten Raumtemperaturabweicht, kann die Fühlermessung über dieses Menüzum Ausgleich geändert werden (von -4 °C auf +4°Cin 0,1 °C-Schritten).
Drücken Sie zur Auswahl auf + oder - und auf OK, um IhreAuswahl zu bestätigen und das folgende Menü zu öffnen.
Inbetriebnahme
5 Sek.
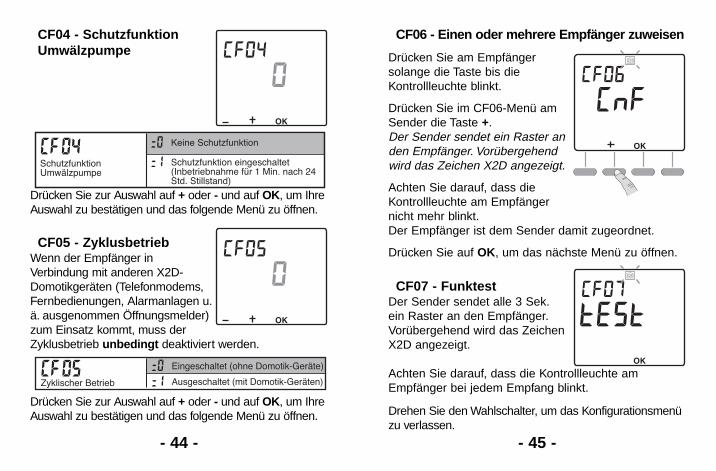
CF06 - Einen oder mehrere Empfänger zuweisen
Drücken Sie am Empfängersolange die Taste bis dieKontrollleuchte blinkt.
Drücken Sie im CF06-Menü amSender die Taste +.Der Sender sendet ein Raster anden Empfänger. Vorübergehendwird das Zeichen X2D angezeigt.
Achten Sie darauf, dass dieKontrollleuchte am Empfängernicht mehr blinkt.Der Empfänger ist dem Sender damit zugeordnet.
Drücken Sie auf OK, um das nächste Menü zu öffnen.
CF07 - FunktestDer Sender sendet alle 3 Sek.ein Raster an den Empfänger.Vorübergehend wird das ZeichenX2D angezeigt.
Achten Sie darauf, dass die Kontrollleuchte amEmpfänger bei jedem Empfang blinkt.
Drehen Sie den Wahlschalter, um das Konfigurationsmenüzu verlassen.
- 44 - - 45 -
CF04 - SchutzfunktionUmwälzpumpe
Drücken Sie zur Auswahl auf + oder - und auf OK, um IhreAuswahl zu bestätigen und das folgende Menü zu öffnen.
CF05 - ZyklusbetriebWenn der Empfänger inVerbindung mit anderen X2D-Domotikgeräten (Telefonmodems,Fernbedienungen, Alarmanlagen u.ä. ausgenommen Öffnungsmelder)zum Einsatz kommt, muss derZyklusbetrieb unbedingt deaktiviert werden.
Drücken Sie zur Auswahl auf + oder - und auf OK, um IhreAuswahl zu bestätigen und das folgende Menü zu öffnen.
Keine Schutzfunktion
SchutzfunktionUmwälzpumpe
Schutzfunktion eingeschaltet(Inbetriebnahme für 1 Min. nach 24Std. Stillstand)
Eingeschaltet (ohne Domotik-Geräte)
Zyklischer Betrieb Ausgeschaltet (mit Domotik-Geräten)
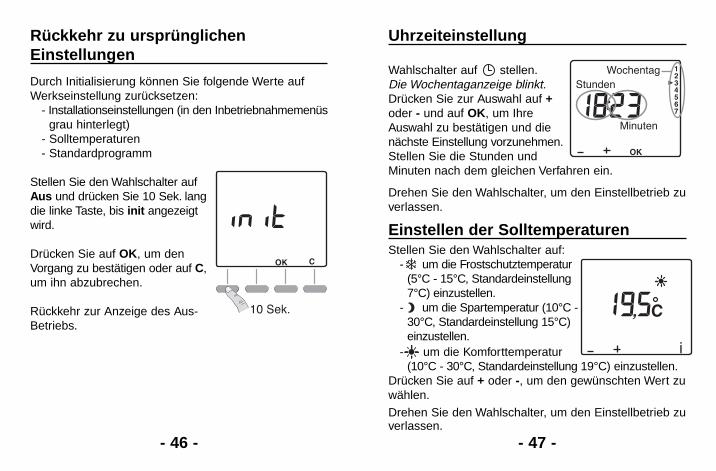
Wahlschalter auf stellen.Die Wochentaganzeige blinkt.Drücken Sie zur Auswahl auf +oder - und auf OK, um IhreAuswahl zu bestätigen und dienächste Einstellung vorzunehmen.Stellen Sie die Stunden undMinuten nach dem gleichen Verfahren ein.
Drehen Sie den Wahlschalter, um den Einstellbetrieb zuverlassen.
Stellen Sie den Wahlschalter auf:- um die Frostschutztemperatur
(5°C - 15°C, Standardeinstellung7°C) einzustellen.
- um die Spartemperatur (10°C -30°C, Standardeinstellung 15°C)einzustellen.
- um die Komforttemperatur(10°C - 30°C, Standardeinstellung 19°C) einzustellen.
Drücken Sie auf + oder -, um den gewünschten Wert zuwählen.
Drehen Sie den Wahlschalter, um den Einstellbetrieb zuverlassen.
Uhrzeiteinstellung
Einstellen der Solltemperaturen
WochentagStunden
Minuten
- 46 - - 47 -
Durch Initialisierung können Sie folgende Werte aufWerkseinstellung zurücksetzen:
- Installationseinstellungen (in den Inbetriebnahmemenüsgrau hinterlegt)
- Solltemperaturen- Standardprogramm
Stellen Sie den Wahlschalter aufAus und drücken Sie 10 Sek. langdie linke Taste, bis init angezeigtwird.
Drücken Sie auf OK, um denVorgang zu bestätigen oder auf C,um ihn abzubrechen.
Rückkehr zur Anzeige des Aus-Betriebs.
10 Sek.
Rückkehr zu ursprünglichenEinstellungen
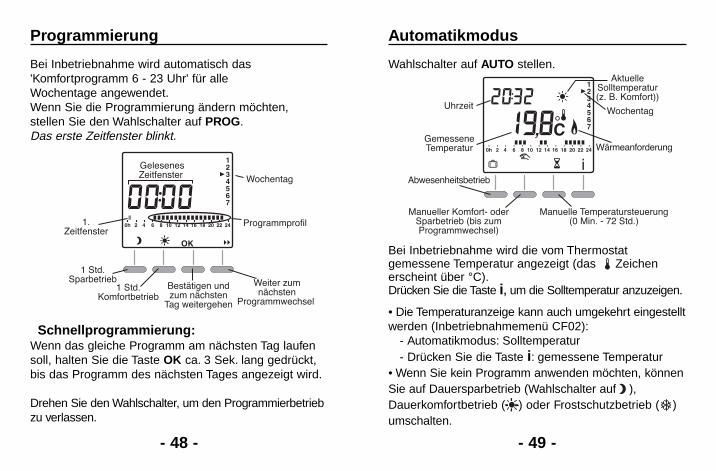
Wahlschalter auf AUTO stellen.
Bei Inbetriebnahme wird die vom Thermostatgemessene Temperatur angezeigt (das Zeichenerscheint über °C).Drücken Sie die Taste i, um die Solltemperatur anzuzeigen.
• Die Temperaturanzeige kann auch umgekehrt eingestelltwerden (Inbetriebnahmemenü CF02):
- Automatikmodus: Solltemperatur- Drücken Sie die Taste i: gemessene Temperatur
• Wenn Sie kein Programm anwenden möchten, könnenSie auf Dauersparbetrieb (Wahlschalter auf ),Dauerkomfortbetrieb ( ) oder Frostschutzbetrieb ( )umschalten.
Automatikmodus
Abwesenheitsbetrieb
Manueller Komfort- oderSparbetrieb (bis zumProgrammwechsel)
Manuelle Temperatursteuerung(0 Min. - 72 Std.)
Uhrzeit
AktuelleSolltemperatur(z. B. Komfort))
Wochentag
WärmeanforderungGemesseneTemperatur
- 48 - - 49 -
Bei Inbetriebnahme wird automatisch das'Komfortprogramm 6 - 23 Uhr' für alleWochentage angewendet.Wenn Sie die Programmierung ändern möchten,stellen Sie den Wahlschalter auf PROG.Das erste Zeitfenster blinkt.
Schnellprogrammierung:Wenn das gleiche Programm am nächsten Tag laufensoll, halten Sie die Taste OK ca. 3 Sek. lang gedrückt,bis das Programm des nächsten Tages angezeigt wird.
Drehen Sie den Wahlschalter, um den Programmierbetriebzu verlassen.
Programmierung
1 Std.Sparbetrieb
1 Std.Komfortbetrieb
Weiter zumnächsten
Programmwechsel
Bestätigen undzum nächsten
Tag weitergehen
1.Zeitfenster
GelesenesZeitfenster Wochentag
Programmprofil
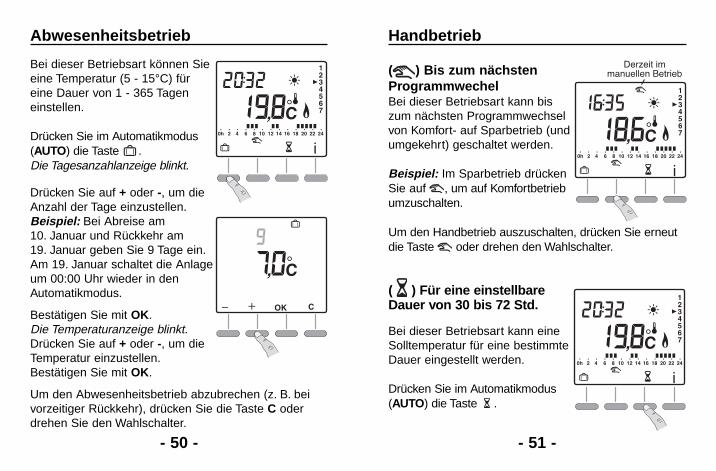
( ) Bis zum nächstenProgrammwechelBei dieser Betriebsart kann biszum nächsten Programmwechselvon Komfort- auf Sparbetrieb (undumgekehrt) geschaltet werden.
Beispiel: Im Sparbetrieb drückenSie auf , um auf Komfortbetriebumzuschalten.
Um den Handbetrieb auszuschalten, drücken Sie erneutdie Taste oder drehen den Wahlschalter.
( ) Für eine einstellbareDauer von 30 bis 72 Std.
Bei dieser Betriebsart kann eineSolltemperatur für eine bestimmteDauer eingestellt werden.
Drücken Sie im Automatikmodus(AUTO) die Taste .
Handbetrieb
Derzeit immanuellen Betrieb
- 50 - - 51 -
Abwesenheitsbetrieb
Bei dieser Betriebsart können Sieeine Temperatur (5 - 15°C) füreine Dauer von 1 - 365 Tageneinstellen.
Drücken Sie im Automatikmodus(AUTO) die Taste .Die Tagesanzahlanzeige blinkt.
Drücken Sie auf + oder -, um dieAnzahl der Tage einzustellen.Beispiel: Bei Abreise am10. Januar und Rückkehr am19. Januar geben Sie 9 Tage ein.Am 19. Januar schaltet die Anlageum 00:00 Uhr wieder in denAutomatikmodus.
Bestätigen Sie mit OK.Die Temperaturanzeige blinkt.Drücken Sie auf + oder -, um dieTemperatur einzustellen.Bestätigen Sie mit OK.
Um den Abwesenheitsbetrieb abzubrechen (z. B. beivorzeitiger Rückkehr), drücken Sie die Taste C oderdrehen Sie den Wahlschalter.
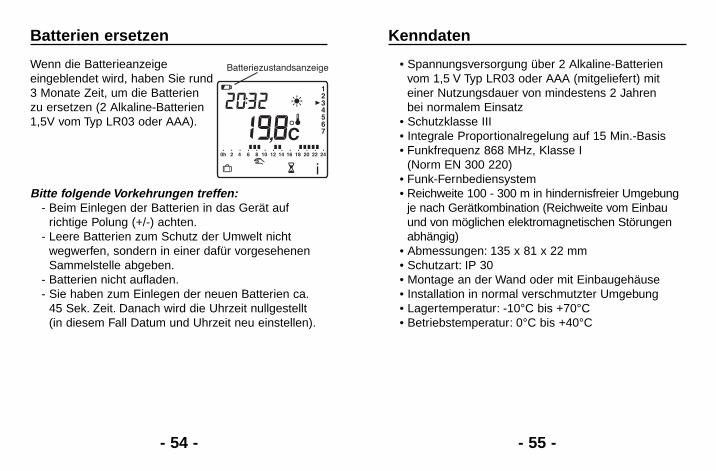
Zum Ausschalten der Heizung(z.B. im Sommer).
Drehen Sie den Wahlschalter auf .Der Thermostat zeigt diegemessene Raumtemperatur an.
HinweisDie Fressschutzfunktion des Thermostats sorgt dafür,dass die Umwälzpumpe immer dann 1 Min. langeinschaltet wird, wenn Sie in den vorhergehenden24 Std. nicht gelaufen ist (Inbetriebnahmemenü CF04).
GemesseneTemperatur
Außer Betrieb
- 52 - - 53 -
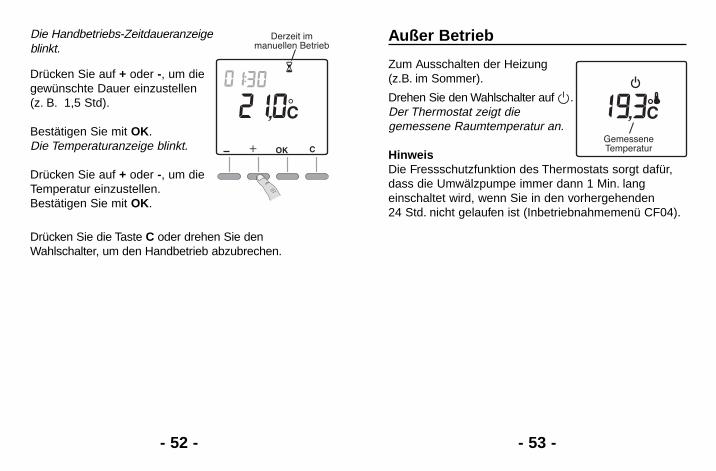
Die Handbetriebs-Zeitdaueranzeigeblinkt.
Drücken Sie auf + oder -, um diegewünschte Dauer einzustellen(z. B. 1,5 Std).
Bestätigen Sie mit OK.Die Temperaturanzeige blinkt.
Drücken Sie auf + oder -, um dieTemperatur einzustellen.Bestätigen Sie mit OK.
Drücken Sie die Taste C oder drehen Sie denWahlschalter, um den Handbetrieb abzubrechen.
Derzeit immanuellen Betrieb
• Spannungsversorgung über 2 Alkaline-Batterienvom 1,5 V Typ LR03 oder AAA (mitgeliefert) miteiner Nutzungsdauer von mindestens 2 Jahrenbei normalem Einsatz
• Schutzklasse III• Integrale Proportionalregelung auf 15 Min.-Basis• Funkfrequenz 868 MHz, Klasse I
(Norm EN 300 220)• Funk-Fernbediensystem• Reichweite 100 - 300 m in hindernisfreier Umgebung
je nach Gerätkombination (Reichweite vom Einbauund von möglichen elektromagnetischen Störungenabhängig)
• Abmessungen: 135 x 81 x 22 mm• Schutzart: IP 30• Montage an der Wand oder mit Einbaugehäuse • Installation in normal verschmutzter Umgebung• Lagertemperatur: -10°C bis +70°C• Betriebstemperatur: 0°C bis +40°C
Kenndaten
- 54 - - 55 -
Wenn die Batterieanzeigeeingeblendet wird, haben Sie rund3 Monate Zeit, um die Batterienzu ersetzen (2 Alkaline-Batterien1,5V vom Typ LR03 oder AAA).
Bitte folgende Vorkehrungen treffen:- Beim Einlegen der Batterien in das Gerät auf
richtige Polung (+/-) achten.- Leere Batterien zum Schutz der Umwelt nicht
wegwerfen, sondern in einer dafür vorgesehenenSammelstelle abgeben.
- Batterien nicht aufladen.- Sie haben zum Einlegen der neuen Batterien ca.
45 Sek. Zeit. Danach wird die Uhrzeit nullgestellt(in diesem Fall Datum und Uhrzeit neu einstellen).
Batterien ersetzen
Batteriezustandsanzeige


![87045 LIMOGES Cedexdocdif.fr.grpleg.com/.../MEDIAGRP/NP-FT-GT/F01989FR-04.pdf · 2016. 10. 25. · Tournevis Pozidriv N°2 recommandé. . Tournevis plat Ø5 à Ø6 [mm] Maximum.](https://img.pdfslide.fr/doc/110x75/611eb3cb3eee616ca267cdfd/87045-limoges-2016-10-25-tournevis-pozidriv-n2-recommand-tournevis-plat.jpg)