Embed Size (px)
Citation preview
CRÉÉ ET IMPRIMÉ AU CANADA - DRAFTED AND PRINTED IN CANADA
www.jalie.com
3881POUR
TISSUSSTABLES
FOR
WOVENFABRICS
Rose28 sizesfor girlsand women
28 taillespour filles
et femmes
JALIE 3881 - ROSE - page 1© Les patrons Jalie inc.
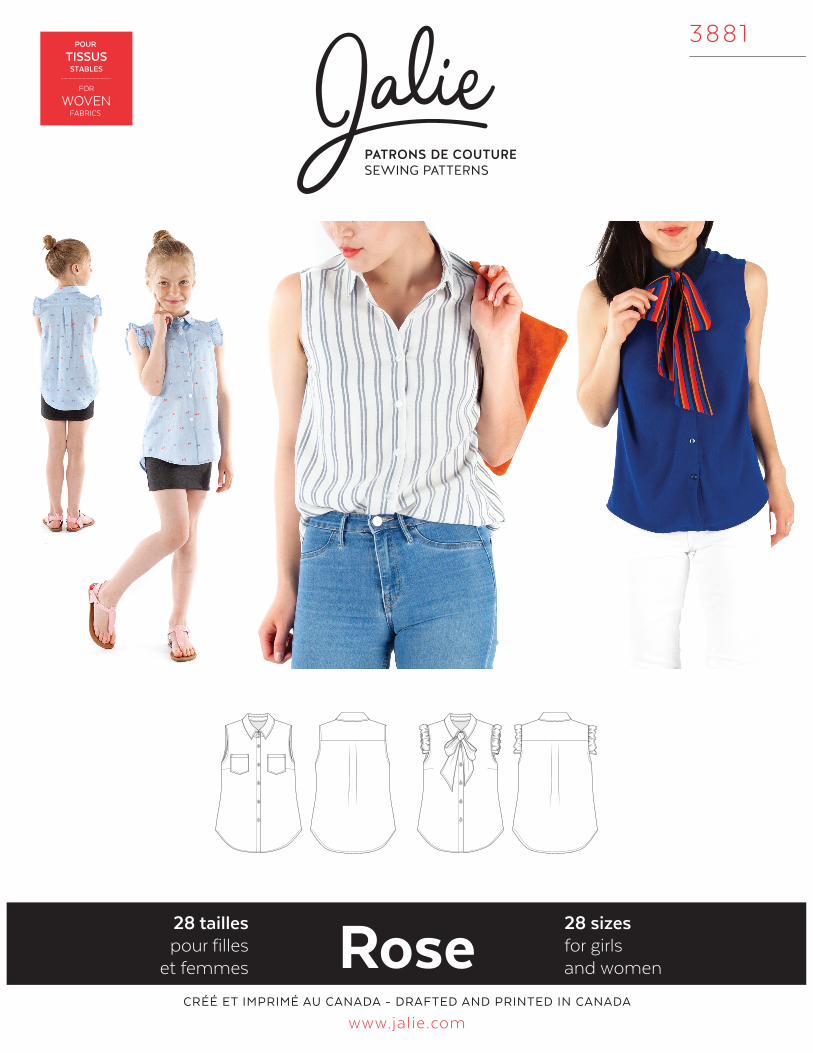
MEASUREMENTS / YARDAGE / FABRIC MESURES /MÉTRAGE / TISSUS
3881 CHEMISIER SANS MANCHES - SLEEVELESS BUTTON-DOWN SHIRT
ROSE Chemisier sans manches avec col à revers, coupe relaxe, ourlet arrondi, pinces (tailles adultes seulement) et boutonnage pleine longueur au devant. A: Emmanchure fi nie avec biais, poches plaquées à la poitrine B: Avec frison et biais à l’emmanchure, cravate.
28 Sleeveless button-down shirt with collar, relaxed fi t through waist and hips, bust dart (adult sizes only), rounded hem, back yoke, forward shoulder seam and box pleat at the back. A: With bound armhole, chest pockets. B: With partially bound armhole, shoulder ruffl e and tie.tailles - sizes
MESURES DU CORPS (FILLES) - BODY MEASUREMENTS (GIRLS)
Âge approximatif - Approximate age 2 3 4 5 6 7 8 9 10 11 12 13
Tailles européennes - European sizes 92 98 104 112 119 127 135 142 146 150 152 155
TAILLE JALIE -JALIE SIZES F G H I J K L M N O P QTOUR DE POITRINE
FULL BUST
21” 22” 23” 24” 25” 26” 27” 28” 29” 30” 31” 32”
53 cm 56 cm 58 cm 61 cm 64 cm 66 cm 69 cm 71 cm 74 cm 76 cm 79 cm 81 cm
TOUR DE TAILLENATURAL WAIST
20” 20 ½” 21” 21 ½” 22” 22 ½” 23” 23 ¾” 24 ½” 25 ¼” 25 ¾” 26 ½”
51 cm 52 cm 53 cm 55 cm 56 cm 57 cm 58 cm 60 cm 62 cm 64 cm 66 cm 67 cm
TOUR DES HANCHESFULL HIPS
22” 23” 24” 25” 26” 27” 28” 29 ½” 30 ½” 32” 33” 34 ½”
56 cm 58 cm 61 cm 64 cm 66 cm 69 cm 71 cm 74 cm 78 cm 81 cm 84 cm 87 cm
TRONC (DEVANT+DOS)
TORSO (FRONT+BACK)
35” 37” 39” 41” 43” 45” 47” 48 ¾” 50 ½” 52” 53 ¾” 55 ½”
89 cm 94 cm 99 cm 104 cm 109 cm 114 cm 119 cm 123 cm 128 cm 132 cm 137 cm 141 cm
MESURES DU CORPS (FEMMES) - BODY MEASUREMENTS (WOMEN)Taille US APPROX. US size 2 4 6 8 10 12 14 16 18 20 22 24
Prêt-à-porter APPROX. RTW size XS S M L XL 2XL
Tailles euro - European sizes 34 36 38 40 42 44 46 48 50 52 54 56
TAILLE JALIE -JALIE SIZES R S T U V W X Y Z AA BB CC DD EE FF GG
TOUR DE POITRINEFULL BUST
33” 34” 35” 36” 37” 38” 39” 40” 41 ½” 42 ¾” 44” 45 ½” 46 ¾” 48 ¼” 49 ½’’ 51”
84 cm 86 cm 89 cm 91 cm 94 cm 96 cm 99 cm 102 cm 106 cm 109 cm 112 cm 116 cm 119 cm 123 cm 126 cm 130 cm
TOUR DE TAILLENATURAL WAIST
27” 28” 29” 30” 31” 32” 33” 34” 35 ¼” 36 ½” 37 ¾” 39” 40 ¼” 41 ½” 42 ¾” 44”
69 cm 71 cm 74 cm 76 cm 78 cm 81 cm 84 cm 86 cm 89 cm 93 cm 96 cm 99 cm 102 cm 105 cm 109 cm 112 cm
TOUR DES HANCHESFULL HIPS
36” 37” 38” 39” 40” 41” 42” 43” 44 ½” 45 ¾” 47” 48 ½” 49 ¾” 51 ¼” 52 ¾” 54”
91 cm 94 cm 96 cm 99 cm 102 cm 104 cm 106 cm 109 cm 112 cm 116 cm 119 cm 123 cm 126 cm 130 cm 134 cm 137 cm
TRONC (DEVANT+DOS)TORSO (FRONT+BACK)
57 ¼” 59” 59 ½” 60” 60 ½” 61” 61 ½” 62” 62 ¾” 63 ¾” 64 ¼” 65 ½” 66 ¼” 67 ¼” 68 ¼ 69 “
145 cm 150 cm 152 cm 155 cm 157 cm 160 cm 161 cm 159 cm 161 cm 163 cm 165 cm 167 cm 169 cm 171 cm 173 cm 175 cm
TISSU REQUIS - YARDAGE 45’’ MODÈLES A/B
(COMPLET)VIEWS A/B (ALL PIECES)
2 ¼ yd 2 ¼ yd 2 ¼ yd 2 ¼ yd 2 ¼ yd 2 ½ yd 2 ½ yd 2 ½ yd 2 ½ yd 2 ½ yd 2 ½ yd 2 ¾ yd 2 ¾ yd 2 ¾ yd 2 ¾ yd 2 ¾ yd
115 cm 1.85 m 1.90 m 1.95 m 2.00 m 2.05 m 2.10 m 2.10 m 2.15 m 2.20 m 2.25 m 2.25 m 2.30 m 2.35 m 2.40 m 2.40 m 2.45 m
54’’ MODÈLES A/B (COMPLET)
VIEWS A/B (ALL PIECES)
2 yd 2 yd 2 yd 2 yd 2 yd 2 yd 2 ¼ yd 2 ¼ yd 2 ¼ yd 2 ¼ yd 2 ¼ yd 2 ¼ yd 2 ¼ yd 2 ¼ yd 2 ¼ yd 2 ¼ yd
137 cm 1.70 m 1.70 m 1.75 m 1.75 m 1.80 m 1.80 m 1.85 m 1.85 m 1.90 m 1.90 m 1.95 m 1.95 m 1.95 m 2.00 m 2.00 m 2.00 m
45’’/54’’COL SEULEMENT
COLLAR ONLY
½ yd ½ yd
115/137 cm 0.55 m 0.60 m
TISSU REQUIS - YARDAGE 45’’ MODÈLES A/B
(COMPLET)VIEWS A/B (ALL PIECES)
1 ½ yd 1 ½ yd 1 ½ yd 1 ½ yd 1 ¾ yd 1 ¾ yd 1 ¾ yd 2 yd 2 yd 2 yd 2 yd 2 yd
115 cm 1.15 m 1.20 m 1.30 m 1.35 m 1.45 m 1.50 m 1.60 m 1.65 m 1.70 m 1.75 m 1.75 m 1.80 m
54’’ MODÈLES A/B (COMPLET)
VIEWS A/B (ALL PIECES)
1 ¼ yd 1 ¼ yd 1 ¼ yd 1 ½ yd 1 ½ yd 1 ½ yd 1 ½ yd 1 ¾ yd 1 ¾ yd 1 ¾ yd 1 ¾ yd 2 yd
137 cm 1.00 m 1.05 m 1.10 m 1.15 m 1.20 m 1.25 m 1.30 m 1.40 m 1.50 m 1.55 m 1.60 m 1.65 m
45’’ / 54’’ COL SEULEMENTCOLLAR ONLY
½ yd ½ yd
115 / 137 cm 0.40 m 0.50 m
TISSUS CONSEILLÉSRECOMMENDED FABRICS
Étoffe tissée légere (lin, chambray, challis de rayonne, crêpe de chine, tencel lyocell)Lightweight fabrics (linen, linen blends, chambray, rayon challis, crepe de chine, tencel lyocell)
1
2
3
4
1
2
3
4
© 2018 LES PATRONS JALIE INC. www.jalie.comIMPRIMÉ AU CANADA / PRINTED IN CANADA
PRÊT À COUDRE // READY TO SEWressources de couture (1 cm / 3/8’’) incluses dans le patron1 cm / 3/8’’ seam allowances included in the pattern
PIÈCES - PATTERN PIECES MERCERIE - NOTIONS
BOUTONS DE 10-12 mm3/8’’ - 1/2’’ BUTTONS
F-J K-O P-R S-GG
5 6 7 7 / 8
ENTOILAGE THERMOCOLLANTFUSIBLE INTERFACING
F - GG
30’’
75 cmA B
KF
E
D
I
J
G
H
C
B
A
1
2
3
4

JALIE 3881 - ROSE - page 2© Les patrons Jalie inc.
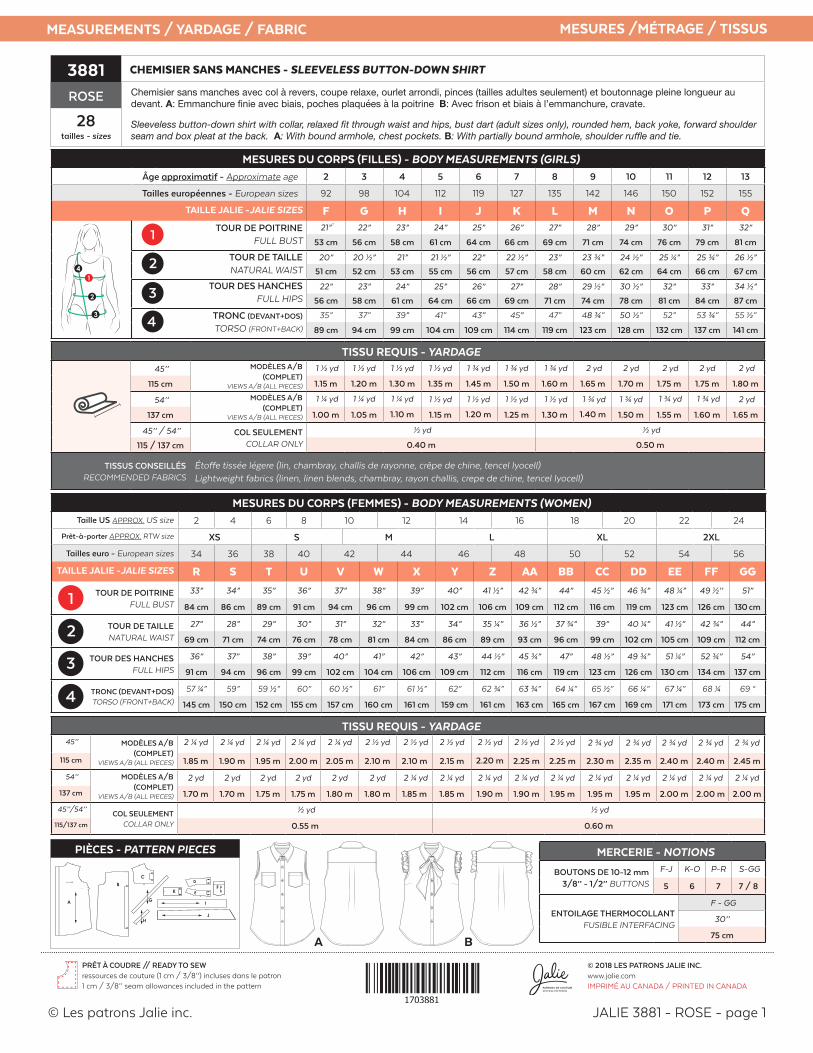
CUTTING LAYOUT PLAN DE COUPE
137 cm (54”)
F - O
TISSU PRINCIPAL - MAIN FABRIC
115 cm (45’’)
P - GG
PLI
UR
E D
U T
ISS
U
FAB
RIC
FO
LD
PLI
UR
E D
U T
ISS
U
FAB
RIC
FO
LD
PLI
UR
E D
U T
ISS
U
FAB
RIC
FO
LD
PLI
UR
E D
U T
ISS
U
FAB
RIC
FO
LDF - L M - GG
F
ED
F
GH
C
C
C
C
CC
C
C
ED
ED ED
A
B
G
H
F
A
A
B
GH
B
G
H F
B
A
F - GG
ENTOILAGE THERMOCOLLANTFUSIBLE INTERFACING
4 cm(1 ½’’)
LON
GU
EU
R D
U D
EV
AN
T - SH
IRT F
RO
NT LE
NG
TH
4 cm(1 ½’’)
LON
GU
EU
R D
U D
EV
AN
T - SH
IRT F
RO
NT LE
NG
TH
ED
JALIE 3881 - ROSE - page 3© Les patrons Jalie inc.
137 cm (54”)
F - O
TISSU PRINCIPAL - MAIN FABRIC
115 cm (45’’)
P - GG F - L M - GG
PLI
UR
E D
U T
ISS
UFA
BR
IC F
OLD
PLI
UR
E D
U T
ISS
UFA
BR
IC F
OLD
PLI
UR
E D
U T
ISS
UFA
BR
IC F
OLD
PLI
UR
E D
U T
ISS
UFA
BR
IC F
OLD
F
G
JJ
JJ
KK
K
K
J
J
J J
I
I
I
I
B H
G
H
B
G
HB
G
H
B
C
C
C
C
C
C
C
C
ED
ED
ED
A
A
A
A
ED
CUTTING LAYOUT PLAN DE COUPE
JALIE 3881 - ROSE - page 4© Les patrons Jalie inc.
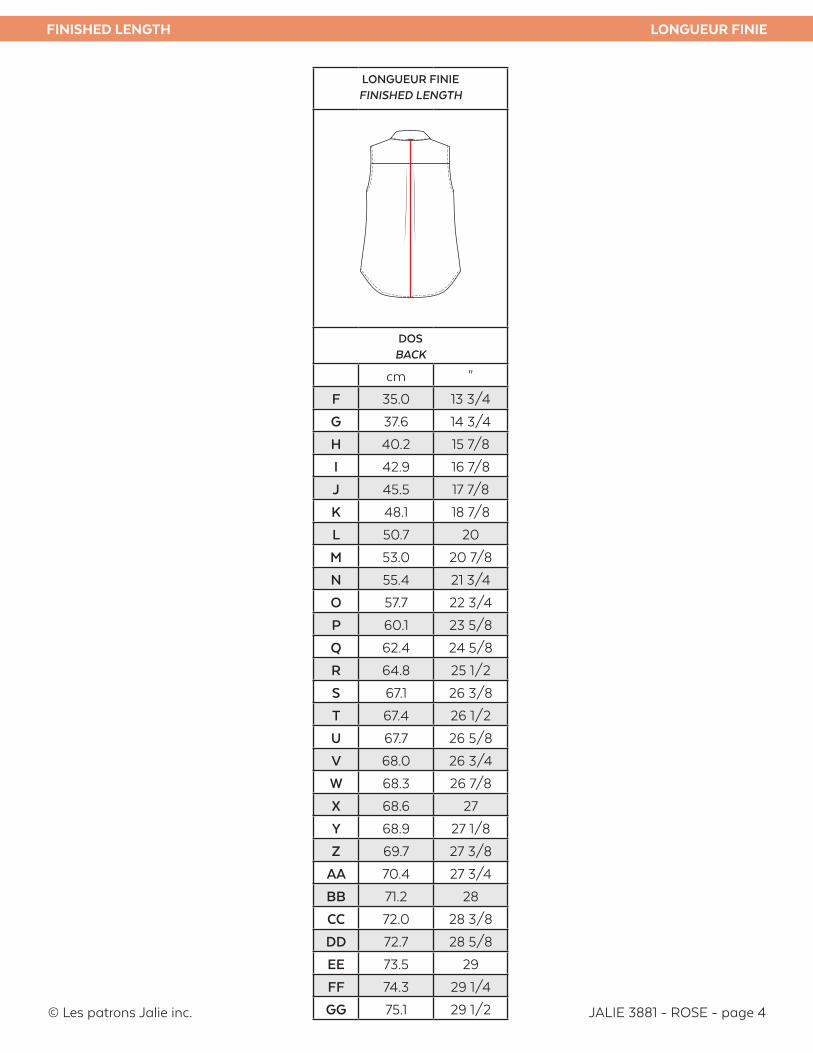
FINISHED LENGTH LONGUEUR FINIE
LONGUEUR FINIEFINISHED LENGTH
DOSBACK
cm "
F 35.0 13 3/4
G 37.6 14 3/4
H 40.2 15 7/8
I 42.9 16 7/8
J 45.5 17 7/8
K 48.1 18 7/8
L 50.7 20
M 53.0 20 7/8
N 55.4 21 3/4
O 57.7 22 3/4
P 60.1 23 5/8
Q 62.4 24 5/8
R 64.8 25 1/2
S 67.1 26 3/8
T 67.4 26 1/2
U 67.7 26 5/8
V 68.0 26 3/4
W 68.3 26 7/8
X 68.6 27
Y 68.9 27 1/8
Z 69.7 27 3/8
AA 70.4 27 3/4
BB 71.2 28
CC 72.0 28 3/8
DD 72.7 28 5/8
EE 73.5 29
FF 74.3 29 1/4
GG 75.1 29 1/2
JALIE 3881 - ROSE - page 5© Les patrons Jalie inc.
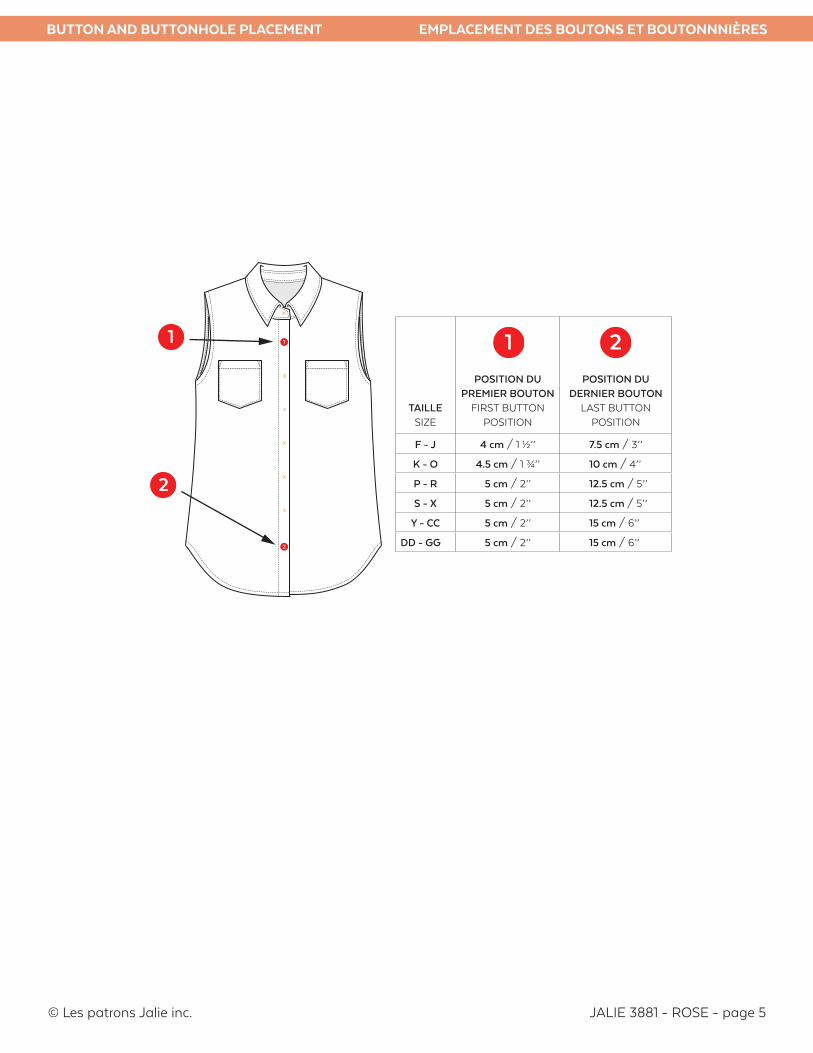
BUTTON AND BUTTONHOLE PLACEMENT EMPLACEMENT DES BOUTONS ET BOUTONNNIÈRES
TAILLESIZE
POSITION DU PREMIER BOUTON
FIRST BUTTON POSITION
POSITION DU DERNIER BOUTON
LAST BUTTON POSITION
F - J 4 cm / 1 ½’’ 7.5 cm / 3’’
K - O 4.5 cm / 1 ¾’’ 10 cm / 4’’
P - R 5 cm / 2’’ 12.5 cm / 5’’
S - X 5 cm / 2’’ 12.5 cm / 5’’
Y - CC 5 cm / 2’’ 15 cm / 6’’
DD - GG 5 cm / 2’’ 15 cm / 6’’
1 21
2
1
2

JALIE 3881 - ROSE - page 6© Les patrons Jalie inc.
SEWING INSTRUCTIONS INSTRUCTIONS DE COUTURE
3881
PATTERN #3881SLEEVELESS BUTTON-DOWN SHIRTINCLUDES 28 SIZES
(GIRLS, TEENS AND WOMEN)
ENGLISH INSTRUCTIONS
PATTERN PIECES
PATRON #3881CHEMISIERSANS MANCHESCOMPREND 28 TAILLES
(FILLES, ADOLESCENTES ET FEMMES)
INSTRUCTIONS EN FRANÇAIS
PIÈCES DU PATRON
SEAM AND HEM ALLOWANCES ARE INCLUDED IN THE PATTERN
HOW TO PICK YOUR JALIE SIZE• Use the size corresponding to your full
bust measurement. • Lengthen / shorten if your torso
measurement is not the same as the torso measurement for your size in the chart.
UNLESS OTHERWISE INSTRUCTED• Sew this garment 1 cm (3/8’’) from edge.• Topstitch 3 mm (1/8’’) from edge.• Pieces are assembled right sides together.
OPTIONS• A: With chest pockets, armhole binding• B: With neck tie, ruffl e and armhole binding
LES RESSOURCES DE COUTURE ET D’OURLET SONT COMPRISES
COMMENT CHOISIR VOTRE TAILLE JALIE• Utiliser la mesure du buste.• Allonger ou raccourcir si votre mesure de
tronc est diff érente que celle pour la taille utilisée.
À MOINS D’AVIS CONTRAIRE• Coudre ce vêtement à 1 cm (3/8”) du bord.• Surpiquer à 3 mm (1/8’’) du bord.• Lors de l’assemblage, les pièces du
vêtement sont cousues endroit contre endroit.
OPTIONS• A: Avec poches à la poitrine et biais à
l’emmanchure• B: Avec cravate, frison et biais à
l’emmanchure.
A - DEVANTCouper 2B - DOS
Couper 1 sur la pliureC - EMPIÈCEMENT
Couper 2 sur la pliureD - COL
Couper 2 dans le tissu principal, sur la pliure+ 1 entoilage sur la pliure
E - PIED DE COLCouper 2 dans le tissu principal, sur la pliure
+ 1 entoilage sur la pliureF - POCHE - MODÈLE A
Couper 2G - BIAIS À L’EMMANCHURE - MODÈLE A
Couper 2H - BIAIS À L’EMMANCHURE - MODÈLE B
Couper 2I - FRISON - MODÈLE B
Couper 2J - PAN DE LA CRAVATE - MODÈLE B
Couper 4K- BANDE DE LA CRAVATE - MODÈLE B
Couper 1 sur la pliure
A - FRONTCut 2B - BACKCut 1 on the foldC - YOKECut 2 on foldD - COLLARCut 2 in main fabric, on fold+ 1 in interfacing, on foldE - COLLAR STANDCut 2 in main fabric, on fold+ 1 in interfacing, on foldF - POCKET - VIEW ACut 2G - ARMHOLE BINDING - VIEW ACut 2H - ARMHOLE BINDING - VIEW BCut 2I - RUFFLE - VIEW BCut 2J - TIE TAIL - VIEW BCut 4K - TIE BAND - VIEW BCut 1 on fold
ROSE
PATRONS DE COUTURESEWING PATTERNS
RoseSANS MANCHES
SLEEVELESS
3881
MARQUEZ LES CENTRES (PLIURES) SUR LES PIÈCES C, D, E, K AVEC UNE MARQUE OU UNE
PETITE ENCOCHE.
MARK CENTERS (FABRIC FOLD) WITH A MARK OR TINY CLIP ON PIECES C,D,E AND K
I J
F KE
D
GH
BA
C
A
B
JALIE 3881 - ROSE - page 7© Les patrons Jalie inc.
SEWING INSTRUCTIONS INSTRUCTIONS DE COUTURE
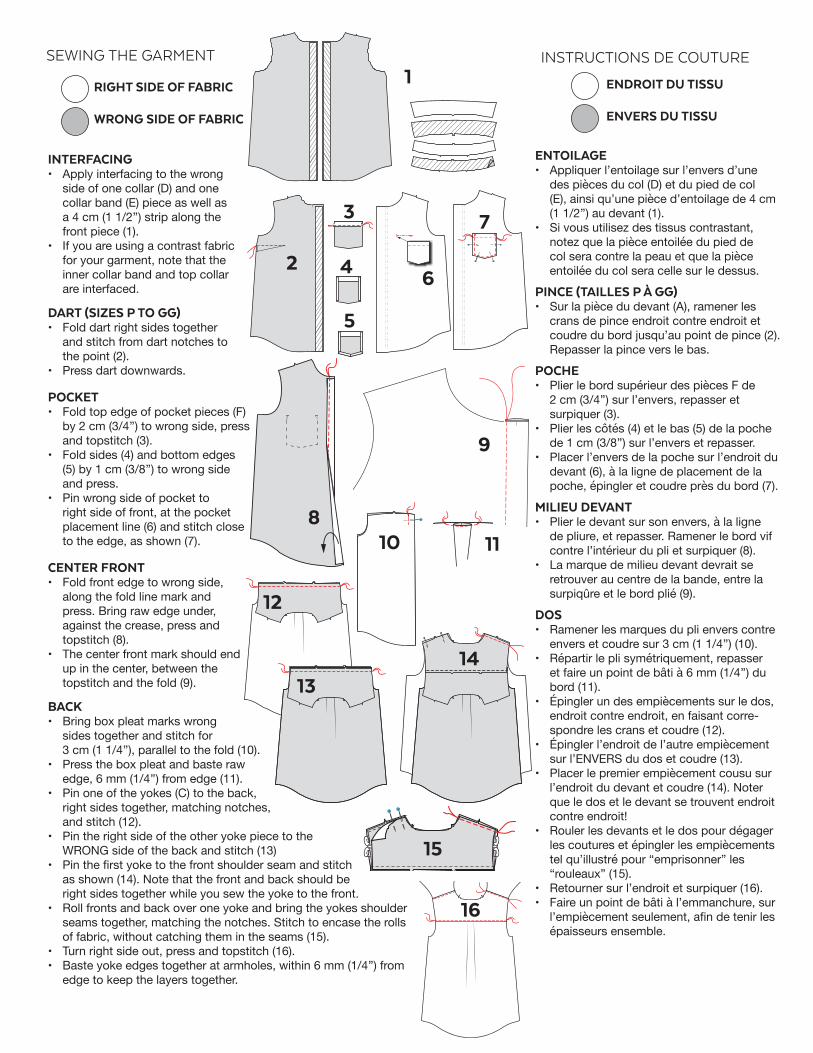
INTERFACING• Apply interfacing to the wrong
side of one collar (D) and one collar band (E) piece as well as a 4 cm (1 1/2’’) strip along the front piece (1).
• If you are using a contrast fabric for your garment, note that the inner collar band and top collar are interfaced.
DART (SIZES P TO GG)• Fold dart right sides together
and stitch from dart notches to the point (2).
• Press dart downwards.
POCKET• Fold top edge of pocket pieces (F)
by 2 cm (3/4’’) to wrong side, press and topstitch (3).
• Fold sides (4) and bottom edges (5) by 1 cm (3/8’’) to wrong side and press.
• Pin wrong side of pocket to right side of front, at the pocket placement line (6) and stitch close to the edge, as shown (7).
CENTER FRONT• Fold front edge to wrong side,
along the fold line mark and press. Bring raw edge under, against the crease, press and topstitch (8).
• The center front mark should end up in the center, between the topstitch and the fold (9).
BACK• Bring box pleat marks wrong
sides together and stitch for 3 cm (1 1/4’’), parallel to the fold (10).
• Press the box pleat and baste raw edge, 6 mm (1/4’’) from edge (11).
• Pin one of the yokes (C) to the back, right sides together, matching notches, and stitch (12).
• Pin the right side of the other yoke piece to the WRONG side of the back and stitch (13)
• Pin the fi rst yoke to the front shoulder seam and stitch as shown (14). Note that the front and back should be right sides together while you sew the yoke to the front.
• Roll fronts and back over one yoke and bring the yokes shoulder seams together, matching the notches. Stitch to encase the rolls of fabric, without catching them in the seams (15).
• Turn right side out, press and topstitch (16).• Baste yoke edges together at armholes, within 6 mm (1/4’’) from
edge to keep the layers together.
3
4
5
2
1INSTRUCTIONS DE COUTURESEWING THE GARMENT
ENDROIT DU TISSU
ENVERS DU TISSU
RIGHT SIDE OF FABRIC
WRONG SIDE OF FABRIC
ENTOILAGE• Appliquer l’entoilage sur l’envers d’une
des pièces du col (D) et du pied de col (E), ainsi qu’une pièce d’entoilage de 4 cm (1 1/2’’) au devant (1).
• Si vous utilisez des tissus contrastant, notez que la pièce entoilée du pied de col sera contre la peau et que la pièce entoilée du col sera celle sur le dessus.
PINCE (TAILLES P À GG)• Sur la pièce du devant (A), ramener les
crans de pince endroit contre endroit et coudre du bord jusqu’au point de pince (2). Repasser la pince vers le bas.
POCHE• Plier le bord supérieur des pièces F de
2 cm (3/4’’) sur l’envers, repasser et surpiquer (3).
• Plier les côtés (4) et le bas (5) de la poche de 1 cm (3/8’’) sur l’envers et repasser.
• Placer l’envers de la poche sur l’endroit du devant (6), à la ligne de placement de la poche, épingler et coudre près du bord (7).
MILIEU DEVANT• Plier le devant sur son envers, à la ligne
de pliure, et repasser. Ramener le bord vif contre l’intérieur du pli et surpiquer (8).
• La marque de milieu devant devrait se retrouver au centre de la bande, entre la surpiqûre et le bord plié (9).
DOS• Ramener les marques du pli envers contre
envers et coudre sur 3 cm (1 1/4’’) (10).• Répartir le pli symétriquement, repasser
et faire un point de bâti à 6 mm (1/4’’) du bord (11).
• Épingler un des empiècements sur le dos, endroit contre endroit, en faisant corre-spondre les crans et coudre (12).
• Épingler l’endroit de l’autre empiècement sur l’ENVERS du dos et coudre (13).
• Placer le premier empiècement cousu sur l’endroit du devant et coudre (14). Noter que le dos et le devant se trouvent endroit contre endroit!
• Rouler les devants et le dos pour dégager les coutures et épingler les empiècements tel qu’illustré pour “emprisonner” les “rouleaux” (15).
• Retourner sur l’endroit et surpiquer (16).• Faire un point de bâti à l’emmanchure, sur
l’empiècement seulement, afi n de tenir les épaisseurs ensemble.
6
7
9
810 11
12
1314
15
16
JALIE 3881 - ROSE - page 8© Les patrons Jalie inc.
SEWING INSTRUCTIONS INSTRUCTIONS DE COUTURE
POSE DU BIAIS D’EMMANCHURE
• Coudre les extrémités de chaque bande ensemble, à 1 cm (3/8’’), pour former des cercles (28).
• Retourner la chemise sur l’envers. Épingler l’endroit du biais sur l’endroit de l’ouverture (29) en faisant correspondre la couture du biais avec la couture côté.
• Coudre à 1 cm (3/8’’) du bord (30) et réduire la ressource de couture à 6 mm (1/4’’).
• Amener le biais vers l’ouverture, sous-piquer (coudre sur le biais, près de la couture pour prendre la ressource de couture) (31).
• Plier le biais sur l’envers de la ressource de couture, le bord vif le long de la couture (32) et épingler.
• Replier le tout sur l’envers de l’ouverture et surpiquer tel qu’illustré (33).
BIAIS BINDING APPLICATION
• Sew ends of bias strips (G) together, 1 cm (3/8’’) from end, to form loops (28).
• Turn shirt wrong side out. Pin right side of bias to right side of armhole (29), matching bias seam with side seam.
• Stitch 1 cm (3/8’) from edge (30) and trim seam allowance down to 6 mm (1/4’’).
• Bring bias towards the opening and understitch (stitch on the bias, close to the seam, to catch the seam allow-ance) (31).
• Fold the bias to the wrong side of the opening, with its raw edge against the seam (32).
• Fold the wrapped seam allowance to the wrong side of the armhole and topstitch as shown (33).
ASSEMBLAGE
• Épingler le dos au devant et coudre les coutures côtés (17).
• Faire une couture de soutien à 1 cm (3/8’’) du bord de l’encolure pour stabiliser l’encolure avant la pose du col (18).
ASSEMBLY
• Pin front to back at side seams and stitch (17).
• Staystitch the neckline, 1 cm (3/8’’) from edge to keep it from stretching out of shape (18).
17
18
COLLAR
• Pin collar pieces right sides together, stitch along the three edges without notches and trim corners (19).
• Turn right side out, press and topstitch with the interfaced side up (20).
• Sew a guide seam 1 cm (3/8’’) from bottom edge of INTERFACED collar band and press seam allowance upwards (21), toward the interfacing and baste with a straight stitch (22).
• Pin NON-INTERFACED side of collar to right side of NON-INTERFACED collar band, where the angle starts, and stitch on the collar (23).
• Pin INTERFACED collar band to the other side of the collar, matching notches, and stitch as shown along the three edges (24).
• Trim seam allowance, turn right side out, shaping nice corners and press.
• Pin raw edge of NON-INTERFACED collar band to right side of neckline and stitch (25-26). Clip the neckline seam allowance to the staystitching so it lays nice and fl at for sewing.
• Bring folded edge of collar band (folded at step 21) to wrong side of neckline, along the seam. Pin generously and topstitch (27).
COL
• Épingler les pièces du col endroit contre endroit et coudre les bords sans crans et réduire les coins (19).
• Retourner sur l’endroit, repasser et surpiquer (20).
• Faire une couture guide à 1 cm (3/8’’) du bord inférieur du pied de COL ENTOILÉ et repasser la ressource de couture vers le haut (21).
• Faire un point de bâti pour maintenir en place et faciliter la pose (22).
• Épingler le côté SANS ENTOILAGE du col sur l’endroit du pied de col non entoilé, ensemble, là ou l’angle débute, et coudre sur le col (23).
• Épingler le pied de col ENTOILÉ sur le col, en faisant correspondre les crans, et coudre tel qu’illustré, le long de trois bords (24) et réduire la ressource de couture.
• Retourner sur l’endroit, bien former les coins et repasser.
• Épingler le bord vif du pied de col SANS ENTOILAGE sur l’endroit de l’encolure et coudre (25-26). Cranter l’ENCOLURE jusqu’à la couture de soutien pour que le tissu soit bien à plat.
• Ramener le bord inférieur du pied de col (qui a été plié à l’étape 21) sur l’envers de l’encolure, épingler généreusement pour cacher la couture et surpiquer (27).
19
20
21
2223
24
25
26 27
28
29 30 31
32
33

JALIE 3881 - ROSE - page 9© Les patrons Jalie inc.
SEWING INSTRUCTIONS INSTRUCTIONS DE COUTURE
FINISHING (VIEWS A AND B)
• Mark the fi rst and last button positions using the measurements in the table. Distribute the other buttons positions evenly between those two buttons (46).
• Make the buttonholes and sew the buttons at the marks.
• Press hem by 1.5 cm (5/8’’) to wrong side then turn under by half to bring the raw edge against the crease and press again.
• Topstitch close to the top fold (47).
34
35
36
39
45
FRISON MODÈLE B
• Plier les extrémités du frison deux fois, de 6 mm (1/4’’) sur l’envers afi n que le bord vif soit caché. Repasser et surpiquer (34).
• Faire la même chose pour le long bord (sans marque de demie) pour une belle fi nition (35).
CRAVATE
• Épingler deux pièces des pans de cravate endroit contre endroit, coudre tel qu’illustré et réduire les coins (41).
• Plier la bande de cou endroit contre endroit sur la longueur et coudre les extrémités sur environ 3 cm (1 1/4’’) (42).
• Faire deux plis pour réduire la largeur du pan à son extrémité ouverte et coudre pour maintenir les plis en place (43).
• Insérer le bout plié du pan de la cravate dans la bande, aligner les bords vifs et coudre (44). Assurez-vous que les pointes sont dans la même direction pour les deux pans.
• Retourner sur l’endroit et surpiquer la bande du cou (45).
RUFFLE - VIEW B
• Fold ends to wrong side by 6 mm (1/4’’) twice, press and topstitch (34).
• Finish the long edge without half mark the same way (35).
• Sew two rows of gathering stitches within the seam allowance, leaving some thread for pulling.
• Gather by pulling the bobbin thread (36).• Pin ruffl e to armhole, ending at the marks
on the armhole and with the half mark aligned with the shoulder (37). Distribute the gathers, add more pins and stitch.
• Pin binding to the remaining section of the armhole, overlapping the ruffl e. Fold up the short ends to their wrong side before stitching (38).
• Pull ruffl e and bias strip out and understitch (bring the seam allowance towards the bias and stitch on the bias) (39) and follow the View A instructions to apply the binding (31-33).
• Continue the binding topstitching all around the armhole to keep the ruffl e seam allowance in place (40).
TIE
• Pin two tail pieces together and stitch as shown. Trim corners (41), turn right side out, press and topstitch.
• Fold tie band right sides together lengthwise and stitch 1 cm (3/8’’) from edge to create a 3 cm (1 1/4’’) tube at both ends (42).
• Make two pleats at the open end of the tail to make it narrower (the same width as the band opening) and baste (43).
• Insert ties, long edge against the seam and stitch across the opening to attach the tail to the band. (44).
• Turn right side out, press and topstitch around the band (45).
FINITION (MODÈLES A ET B)
• Marquer l’emplacement du premier et dernier bouton au devant et distribuer les autres à distance égale entre ces deux marques (46).
• Faires les boutonnières et coudre les boutons aux marques.
• Repasser l’ourlet de 1.5 cm (5/8’’) sur l’envers. Replier le bord vif à l’intérieur pour réduire l’ourlet de moitié, repasser à nouveau.
• Surpiquer près du bord du repli tel qu’illustré (47).
• Faire deux coutures de fronçage (long point droit) à moins de 1 cm (3/8”) du bord vif en laissant du fi l.
• Froncer en tirant le fi l de canette (36).• Épingler le frison à l’emmanchure, les extrémités
aux marques à l’emmanchure et la marque de demie à la marque d’épaule, et coudre (37).
• Tourner la chemise que l’envers, plier les extrémités du biais sur leur envers d’environ 6 mm (1/4’’), épingler pour couvrir l’emmanchure et coudre à 1 cm (3/8’’) du bord (38).
• Réduire la ressource de couture, soupiquer le biais (ramener la ressource sous le biais et coudre en prenant le biais et la ressource) (39). Poursuivre la pose en suivant les étapes du modèle A (31-33).
• Poursuivre la surpiqûre du biais sur l’endroit pour maintenir la ressource de couture du frison en place (40).
37 38
40
41
42
43
44
47
46


![Cutting sequences in Veech surfaces - arXivarxiv.org/pdf/1507.02469.pdf1 Cutting sequences for the hexagon 1.1 Maindefinitions Following[SU11]wecanprovidethesameconstructionforthehexagon](https://img.pdfslide.fr/doc/110x75/5f9765266be8da19ff51ed07/cutting-sequences-in-veech-surfaces-1-cutting-sequences-for-the-hexagon-11-maindeinitions.jpg)