Embed Size (px)
Citation preview
Dan
skS
uom
iN
orsk
Sve
nska
Eng
lish
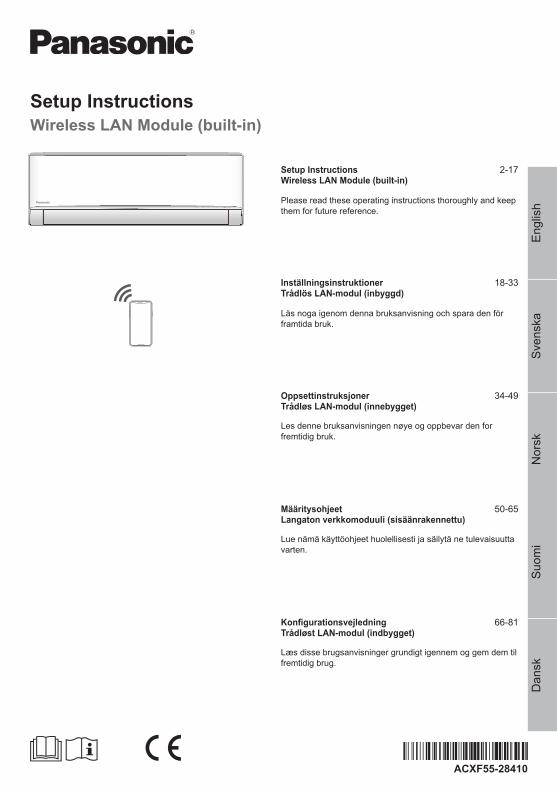
Setup InstructionsWireless LAN Module (built-in)
ACXF55-28410
Setup InstructionsWireless LAN Module (built-in)
2-17
Please read these operating instructions thoroughly and keep them for future reference.
InställningsinstruktionerTrådlös LAN-modul (inbyggd)
18-33
Läs noga igenom denna bruksanvisning och spara den för framtida bruk.
OppsettinstruksjonerTrådløs LAN-modul (innebygget)
34-49
Les denne bruksanvisningen nøye og oppbevar den for fremtidig bruk.
MääritysohjeetLangaton verkkomoduuli (sisäänrakennettu)
50-65
Lue nämä käyttöohjeet huolellisesti ja säilytä ne tulevaisuutta varten.
Konfi gurationsvejledningTrådløst LAN-modul (indbygget)
66-81
Læs disse brugsanvisninger grundigt igennem og gem dem til fremtidig brug.
2
Built-in Network Adaptor that allows you to control your air conditioning unit operation from everywhere.
Table of contentsSafety precautions ................................................................................................................................. 2-3
System Overview ...................................................................................................................................... 4
How to use ........................................................................................................................................... 5-13
Network Adaptor Q & A ...................................................................................................................... 14-15
Troubleshooting ...................................................................................................................................... 16
Information .......................................................................................................................................... 16-17
Copyright ........................................................................................................................................... 82-86
Thank you for purchasing this Panasonic product.
Safety precautionsBefore attempting to control / operate this air-conditioner product via wireless communication from a remote location, make sure to check the installation of the appliance and its surrounding area, and, be wary of any person(s) within the vicinity.To prevent personal injury, injury to others or property damage, please comply with the following: Incorrect operation due to failure to follow instructions below may cause harm or damage, the seriousness of which is classifi ed as below:
WARNINGThis sign warns of death or serious injury.
CAUTIONThis sign warns of injury or damage to property.
The instructions to be followed are classifi ed by the following symbols:
This symbol denotes an action that is PROHIBITED.
This symbol denotes an action that is COMPULSORY.
WARNINGNetwork Adaptor (activated)
Do not use the indoor unit near to any medical equipment or automatic control equipment (automatic door, wire alarms, etc.).(Radio wave from indoor unit may interfere with the equipment and may cause incident due to malfunction)
3
Eng
lish
Safety precautionsKeep at least 15 cm away from the indoor unit if you have a cardiac pacemaker.(Radio wave from indoor unit may interfere with the operation of pacemaker)
CAUTIONNetwork Adaptor (activated)
Check the following requirements in advanced (At home):• Insert the power supply thoroughly. Ensure no dust builds up on the power supply. (This can cause fi re due to ignition in the power supply’s of poor contact)
• Check the status of timer activation set by other persons.(Unexpected run-stop operation may cause harm to human body, pets, and plants)
• There should be no abnormality in the air conditioner such as change of airfl ow. Ensure no object(s) which may be displaced easily due to the airfl ow blowing directly at it. The fallen or moved object(s) might lead to danger such as fi re, injury etc.
• At all times, use the in-house remote control when there is a possibility of person(s) (such as infant, children, disabled person(s), elderly or sickly person(s)) who are incapable of controlling the temperature themselves and rely on the pre-set confi guration of the air-conditioner.The rise and drop in the temperature due to remote operation might cause the occupant(s) to experience discomfort and/or disrupt their daily routine.Plant(s) and animal(s) are likely to be affected by sudden temperature adjustments.
Check the following requirements before operating the air conditioner from a remote location:• Do inform the person(s) in the vicinity of the area being air-conditioned that you will remotely control the air conditioner operation and settings. This is to avoid any possibility of serious effects on person(s) either due to being taken by surprise or due to sudden changes in temperature (from comfort to cold or vice versa).(This may cause harm to human body due to sudden changes of outside temperature and room temperature.Temperature adjustment can be operated by remote control)
- If the main display of the Panasonic Comfort Cloud APP does not refl ect the status of the operation, please use the in-house remote control to operate the air-conditioner.
• As the APP uses network communication, there may be times when remote operation is not possible due to communication and/or network failures (such as Panasonic Cloud server downtime, telecom providers’ server downtime, WIFI connectivity etc.). In the event of such failure(s), please use the in- house remote control to operate the air-conditioner.
Saf
ety
prec
autio
ns
4
System Overview
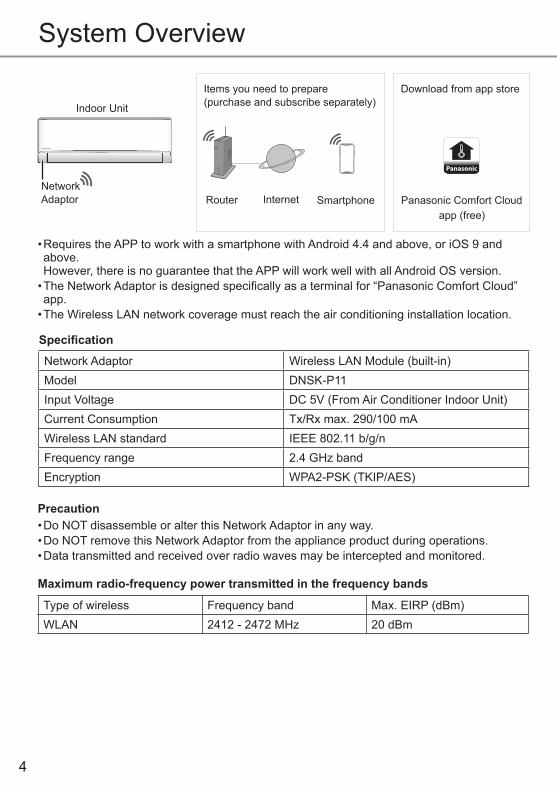
• Requires the APP to work with a smartphone with Android 4.4 and above, or iOS 9 and above. However, there is no guarantee that the APP will work well with all Android OS version.
• The Network Adaptor is designed specifi cally as a terminal for “Panasonic Comfort Cloud” app.
• The Wireless LAN network coverage must reach the air conditioning installation location.
Network Adaptor Wireless LAN Module (built-in)Model DNSK-P11Input Voltage DC 5V (From Air Conditioner Indoor Unit)Current Consumption Tx/Rx max. 290/100 mAWireless LAN standard IEEE 802.11 b/g/nFrequency range 2.4 GHz bandEncryption WPA2-PSK (TKIP/AES)
Specifi cation
Maximum radio-frequency power transmitted in the frequency bands
Type of wireless Frequency band Max. EIRP (dBm)WLAN 2412 - 2472 MHz 20 dBm
• Do NOT disassemble or alter this Network Adaptor in any way.• Do NOT remove this Network Adaptor from the appliance product during operations.• Data transmitted and received over radio waves may be intercepted and monitored.
Precaution
Panasonic
Download from app store
Router Internet Smartphone
Items you need to prepare (purchase and subscribe separately)
Panasonic Comfort Cloudapp (free)
Indoor Unit
Network Adaptor
5
Eng
lish
Sys
tem
Ove
rvie
w /
How
to u
se
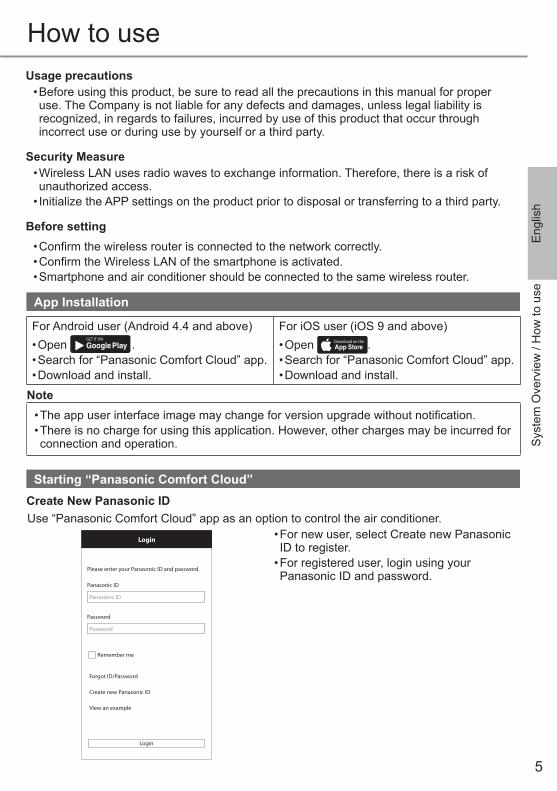
App Installation
For Android user (Android 4.4 and above)• Open
GET IT ON
Google Play .• Search for “Panasonic Comfort Cloud” app.• Download and install.
For iOS user (iOS 9 and above)• Open Download on the
App Store .• Search for “Panasonic Comfort Cloud” app.• Download and install.
Note• The app user interface image may change for version upgrade without notifi cation.• There is no charge for using this application. However, other charges may be incurred for connection and operation.
Starting “Panasonic Comfort Cloud”
• For new user, select Create new Panasonic ID to register.
• For registered user, login using your Panasonic ID and password.
Use “Panasonic Comfort Cloud” app as an option to control the air conditioner.
Please enter your Panasonic ID and password.
Panasonic ID
Password
Password
Remember me
Forgot ID/Password
Create new Panasonic ID
View an example
Login
Login
Panasonic ID
Create New Panasonic ID
How to use
Before setting• Confi rm the wireless router is connected to the network correctly.• Confi rm the Wireless LAN of the smartphone is activated.• Smartphone and air conditioner should be connected to the same wireless router.
Usage precautions• Before using this product, be sure to read all the precautions in this manual for proper use. The Company is not liable for any defects and damages, unless legal liability is recognized, in regards to failures, incurred by use of this product that occur through incorrect use or during use by yourself or a third party.
Security Measure• Wireless LAN uses radio waves to exchange information. Therefore, there is a risk of unauthorized access.
• Initialize the APP settings on the product prior to disposal or transferring to a third party.
6
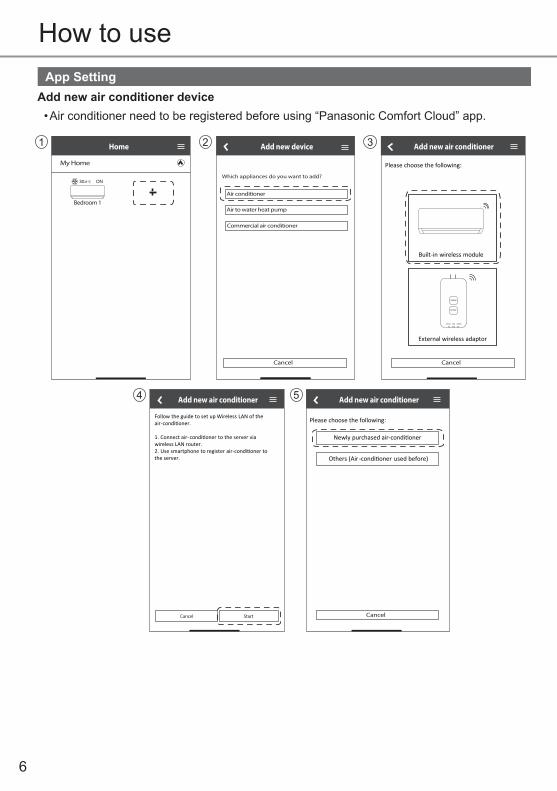
App SettingAdd new air conditioner device• Air conditioner need to be registered before using “Panasonic Comfort Cloud” app.
Commercial air conditioner
My Home
ON
3
5
1 2
4
How to use

7
Eng
lish
Setting connection network
1 Ensure Wireless LAN LED is ON, point the remote control to air conditioner and press Wireless LAN button until the Wireless LAN LED changed to blinking.
3 Select the preferred router support connectivity mode.
Connection Guide
Step 1 Step 2 Step 3
Connect with WPS mode
Connect with AP mode
The router supports WPS.
The router does not supports WPS.
Cancel
2 When Wireless LAN LED is blinking, select the preferred connection setup mode.
Wireless LAN LED.
Connection Guide
Step 1 Step 2 Step 3
LED is OFF
LED is ON
LED is Blinking
Cancel
Make sure smartphone is connected to same wireless network.
When Wireless LAN LED is ON, tap “Next”.1. Point the remote control to air-and press the “Wireless LAN” bu on once. 2. When Wireless LAN LED is blinking, tap “Next”.
Connection Guide
Cancel
Next
Step 1 Step 2 Step 3Step 1 Step 2 Step 3
condi oner
Wireless LAN LED
SET
CANCEL
Wireless LAN bu on
Wireless LAN bu on
How
to u
se
Note• If Wireless LAN LED continuously blinking and you do not want to use the APP, press to turn off.
Fast blink The unit is establishing the connection.Slow blink The unit is not securing the connection.No blink (stays on)
The unit has established the connection.
• It can establish the connection to the unit even if the unit is turned OFF.
8
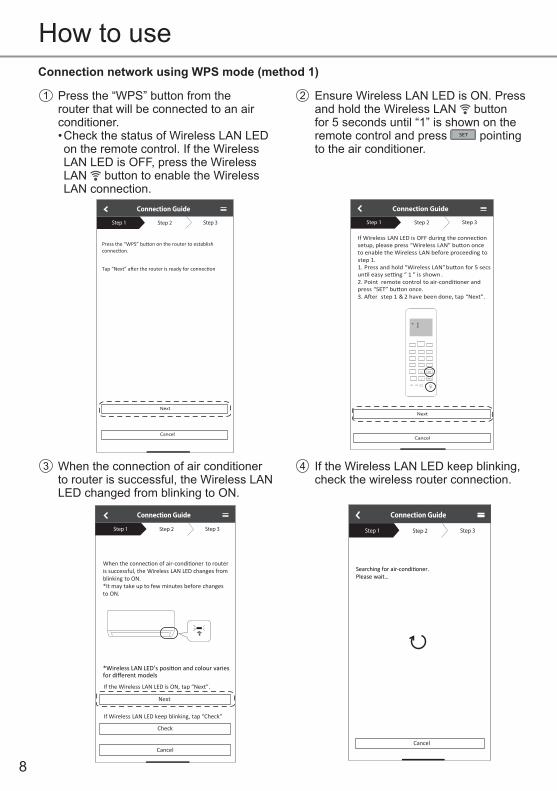
Connection network using WPS mode (method 1)
1 Press the “WPS” button from the router that will be connected to an air conditioner.• Check the status of Wireless LAN LED on the remote control. If the Wireless LAN LED is OFF, press the Wireless LAN button to enable the Wireless LAN connection.
Connection Guide
Step 1 Step 2 Step 3
Next
Cancel
2 Ensure Wireless LAN LED is ON. Press and hold the Wireless LAN button for 5 seconds until “1” is shown on the remote control and press SET pointing to the air conditioner.
If Wireless LAN LED is OFF during the connec on setup, please press “Wireless LAN” bu on once to enable the Wireless LAN before proceeding tostep 1 .1. Press and hold “Wireless LAN” bu on for 5 secs un l easy se ng “ 1 ” is shown .2. Point remote control to air-condi oner and press “SET” bu on once.3. A er step 1 & 2 have been done, tap “Next”.
Connection Guide
Step 1 Step 2 Step 3
Cancel
Next
SET
CANCEL
4 If the Wireless LAN LED keep blinking, check the wireless router connection.
Searching for air-condi oner.Please wait…
Connection Guide
Step 1 Step 2 Step 3
Cancel
3 When the connection of air conditioner to router is successful, the Wireless LAN LED changed from blinking to ON.
Connection Guide
Step 1 Step 2 Step 3
When the connec on of air-condi oner to router is successful, the Wireless LAN LED changes from blinking to ON. *It may take up to few minutes before changes to ON.
Next
If the Wireless LAN LED is ON, tap “Next”.
If Wireless LAN LED keep blinking, tap “Check”
Cancel
Check
How to use
9
Eng
lish
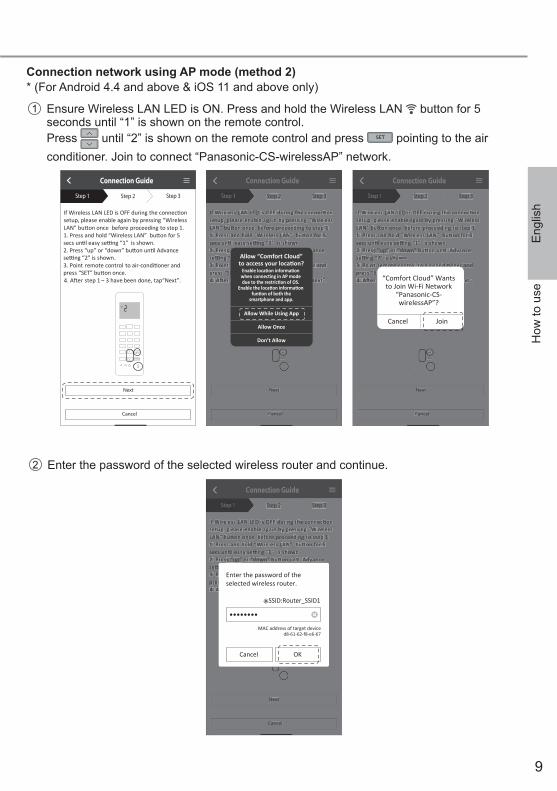
Connection network using AP mode (method 2)* (For Android 4.4 and above & iOS 11 and above only)
1 Ensure Wireless LAN LED is ON. Press and hold the Wireless LAN button for 5 seconds until “1” is shown on the remote control.Press until “2” is shown on the remote control and press SET pointing to the air conditioner. Join to connect “Panasonic-CS-wirelessAP” network.
2 Enter the password of the selected wireless router and continue.
How
to u
seIf Wireless LAN LED is OFF during the connec on setup, please enable again by pressing “Wireless LAN” bu on once before proceeding to step 1 .1. Press and hold “Wireless LAN” bu on for 5 secs un l easy se ng “1” is shown.2. Press “up” or “down” bu on un l Advance se ng “2” is shown.3. Point remote control to air-condi oner and press “SET” bu on once.4. A er step 1 ~ 3 have been done, tap“Next”.
Connection Guide
Step 1 Step 2 Step 3
Cancel
Next
SET
CANCEL
If Wireless LAN LED is OFF during the connec onsetup, please enable again by pressing “WirelessLAN” bu on once before proceeding to step 1.1. Press and hold “Wireless LAN” bu on for 5 secs un l easy se ng “1” is shown.2. Press “up” or “down” bu on un l Advancese ng “2” is shown.3. Point remote control to air-condi oner and press “SET” bu on once.4. A er step 1 ~ 3 have been done, tap“Next”.
Connection Guide
Step 1 Step 2 Step 3
Cancel
Next
SET
CANCEL
Enter the password of theselected wireless router.
MAC address of target device
SSID:Router_SSID1
Cancel OK
d8-61-62-f8-e6-67
If Wireless LAN LED is OFF during the connec on setup, please enable again by pressing “Wireless LAN” bu on once before proceeding to step 1 .1. Press and hold “Wireless LAN” bu on for 5 secs un l easy se ng “1” is shown.2. Press “up” or “down” bu on un l Advance se ng “2” is shown.3. Point remote control to air-condi oner and press “SET” bu on once.4. A er step 1 ~ 3 have been done, tap“Next”.
Connection Guide
Step 1 Step 2 Step 3
Cancel
Next
SET
CANCEL
If Wireless LAN LED is OFF during the connec onsetup, please enable again by pressing “WirelessLAN” bu on once before proceeding to step 1.1. Press and hold “Wireless LAN” bu on for 5 secs un l easy se ng “1” is shown.2. Press “up” or “down” bu on un l Advancese ng “2” is shown.3. Point remote control to air-condi oner and press “SET” bu on once.4. A er step 1 ~ 3 have been done, tap“Next”.
Connection Guide
Step 1 Step 2 Step 3
Cancel
Next
SET
CANCEL
Allow “Comfort Cloud”
If Wireless LAN LED is OFF during the connec on setup, please enable again by pressing “Wireless LAN” bu on once before proceeding to step 1 .1. Press and hold “Wireless LAN” bu on for 5 secs un l easy se ng “1” is shown.2. Press “up” or “down” bu on un l Advance se ng “2” is shown.3. Point remote control to air-condi oner and press “SET” bu on once.4. A er step 1 ~ 3 have been done, tap“Next”.
Connection Guide
Step 1 Step 2 Step 3
Cancel
Next
SET
CANCEL
If Wireless LAN LED is OFF during the connec onsetup, please enable again by pressing “WirelessLAN” bu on once before proceeding to step 1 .1. Press and hold “Wireless LAN” bu on for 5secs un l easy se ng “1” is shown.2. Press “up” or “down” bu on un l Advancese ng “2” is shown.3. Point remote control to air-condi oner and press “SET” bu on once.4. A er step 1 ~ 3 have been done, tap“Next”.
Connection Guide
Step 1 Step 2 Step 3
Cancel
Next
SET
CANCEL
“Comfort Cloud” Wantsto Join Wi-Fi Network
“Panasonic-CS-wirelessAP”?
Cancel Join
10
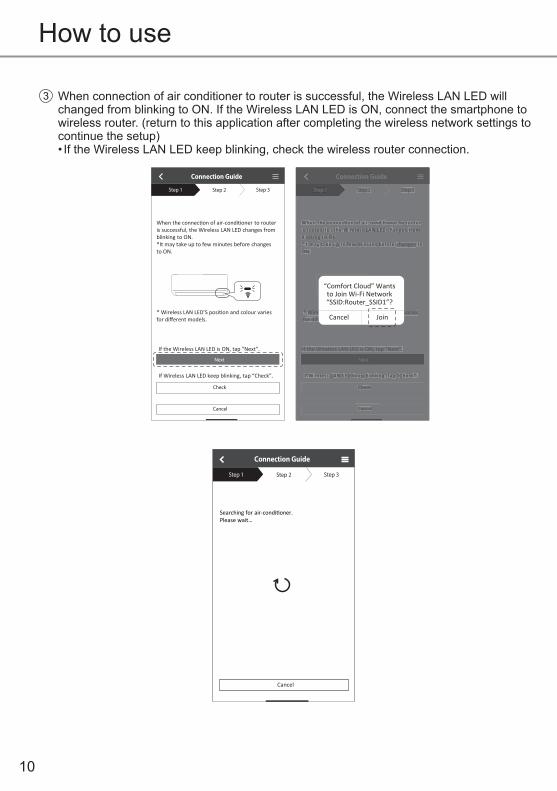
How to use
3 When connection of air conditioner to router is successful, the Wireless LAN LED will changed from blinking to ON. If the Wireless LAN LED is ON, connect the smartphone to wireless router. (return to this application after completing the wireless network settings to continue the setup)• If the Wireless LAN LED keep blinking, check the wireless router connection.
Searching for air-condi oner.Please wait…
Connection Guide
Step 1 Step 2 Step 3
Cancel
Connection Guide
Step 1 Step 2 Step 3
When the connec on of air-condi oner to router is successful, the Wireless LAN LED changes from blinking to ON. *It may take up to few minutes before changes to ON.
If Wireless LAN LED keep blinking, tap “Check”.
If the Wireless LAN LED is ON, tap “Next”. If the Wireless LAN LED is ON, tap “Next”.
Cancel
Check
* *
Connection Guide
Step 1 Step 2 Step 3
When the connec on of air-condi oner to router is successful, the Wireless LAN LED changes from blinking to ON. *It may take up to few minutes before changes to ON.
If Wireless LAN LED keep blinking, tap “Check”.
Cancel
Check
Next Next
If the Wireless LAN LED is ON, tap “Next”.
*
Connection Guide
Step 1 Step 2 Step 3
When the connec on of air-condi oner to routeris successful, the Wireless LAN LED changes fromblinking to ON.*It may take up to few minutes before changes toON.
If Wireless LAN LED keep blinking, tap “Check”.
Cancel
Check
Next
“Comfort Cloud” Wantsto Join Wi-Fi Network“SSID:Router_SSID1”?
Cancel Join
11
Eng
lish
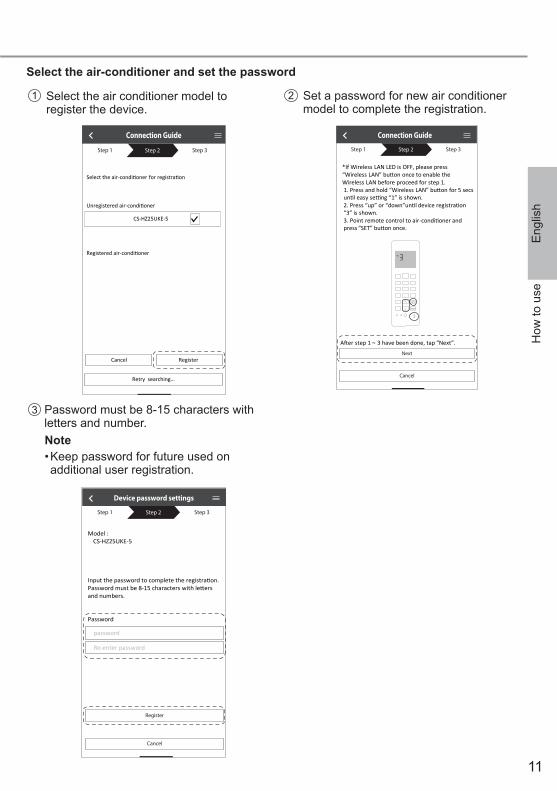
Select the air-conditioner and set the password
2
3
Set a password for new air conditioner model to complete the registration.
Connection Guide
Step 1 Step 2 Step 3
Cancel
Next
*If Wireless LAN LED is OFF, please press “Wireless LAN” bu on once to enable the Wireless LAN before proceed for step 1 . 1. Press and hold “Wireless LAN” bu on for 5 secs un l easy se ng “1” is shown.2. Press “up” or “down”un l device registra on “3” is shown.3. Point remote control to air-condi oner and press “SET” bu on once.
A er step 1 ~ 3 have been done, tap “Next”.
SET
CANCEL
1 Select the air conditioner model to register the device.
Select the air-condi oner for registra on
Unregistered air-condi oner
Registered air-condi oner
Retry searching…
Connection Guide
Step 1 Step 2 Step 3
CS-HZ25UKE-5
Retry searching…
Cancel Register
Password must be 8-15 characters with letters and number.
Model :CS-HZ25UKE-5
Input the password to complete the registra on.Password must be 8-15 characters with le ers and numbers.
Password
password
Re-enter password
Device password settings
Step 1 Step 2 Step 3
Cancel
Register
Note• Keep password for future used on additional user registration.
How
to u
se

12
Registration completed
1 Once connection is established between the app and the new air conditioner through the registration process, set the preferred name for this air conditioner to helps identify it.• By registered the new name of air conditioner, the function of “Panasonic Comfort Cloud” app is ready to be used.
2 Beside operation control, this application can monitor the estimated energy consumption and do comparison for different time frame by referring to the statistic’s graph.
-
Enter your preferred name for this air-condi oner
Air condi oner name
Model :CS HZ25UKE
New air conditioner settings
Step 3Step 1 Step 2
-Model :
CS HZ25UKE-5
Cancel
Register
Living Room
My Home
22 23 16.May 15:50
25. 0 CSET
Cool
Living Room
Statistics Weekly timer Quiet Powerful
ON
How to use
Note• Confi rm the APP’s screen connectivity status before or during operation, if the status is not refl ected, please use in-house remote control to operate.

13
Eng
lish
App InstallationWeekly Timer
How
to u
se
1 Tab on “Weekly Timer” for timer schedule setting.
2 Tab on the .
3 Tab to add new schedule action. A maximum of 6 program can be set in one day.
Weekly timer
Living Room
Monday
No. Time
1. 10:00
2. 14:00 OFF
OFF
3. 18:00
4. 20:00
5.
6.
22:00
- -
Settings
My Home
Copy Apply
0 2 4 6 8 10 12 14 16 18 20 22 24
25. 0 C
25. 0 C
27. 0 C
M T W T F S S
Delete
No.1
Time
SET
10:00
25.0˚c
Change
Please select the day you wouldlike to copy to.
Mon
Tue
Wed
Thu
Fri
Sat
Sun
OK
Edit timer
Copy timer
Weekly timer
25. 0 CSET
Cool
Living RoomMy Home
Confirm
ON
Set time Set conditions
Weekly timer
10 58
14 02
1112 00:
59
13 01
OK
My Home
22 23 16.May 15:50
25. 0 CSET
Cool
Statistics Weekly timer Quiet
Living Room
Powerful
ON
Weekly timer
All OFF All ON
My Home
Living Room
Air conditioner name Edit ON/OFF
14
Initial setting“Panasonic Comfort Cloud” app cannot be installed in smartphone.
Check if OS of the smartphone is compatible.The APP is not guaranteed to work with all versions of Android OS.
Air conditioner and router cannot be connected.
Ensure the router’s LAN signal reaches the unit, the SSID is not hidden, the MAC address setup is enabled for the unit, the router’s dual band signal is enabled for 2.4GHz connection.There is a possibility that you are using a smartphone or wireless router that is not supported or connection method is different. Refer to the smartphone and router installation manual for detail.
Register additional air conditioner to “Panasonic Comfort Cloud” app.
Set the additional unit setting follow to the fi rst unit initial setup. It is recommended to name each of the registered air conditioner units for easy to distinguish.
Register additional user to control the Network Adaptor.
Download “Panasonic Comfort Cloud” app and create new Panasonic ID.Follow initial setting. Once the air conditioner is registered, input the preset device password (set by fi rst user).Approval from administrator (fi rst user) is required to complete the registration.For administrator approval, select the Menu .Choose “Owner” and select “User List” to approve additional user.
Wireless connectionWireless signal is disconnected or interrupted.
There is a possibility of connection network is not stable. Check the signal strength by:-• Confi rm the air conditioner operation is stopped and press the Wireless LAN button for 5 seconds. (“1” is displayed)
• Press the button until “4” is displayed.• Press the SET button and operation stops.• After 5 seconds, the signal strength is shown on the indoor unit Wireless LAN LED.
Strong: Blink 3 times with an intervalModerate: Blink 2 times with an intervalWeak: Blink once with an intervalNo signal: OFF
• It will stop automatically after 10 minutes. To stop immediately, press the Wireless LAN button.
Suspicious unauthorized access to the unit.
• Reset the air conditioner unit to manufacturing default condition by referring to “To transfer or dispose the air conditioner” method at next page. Complete by initial connection setup.
Network Adaptor Q & A
15
Eng
lish
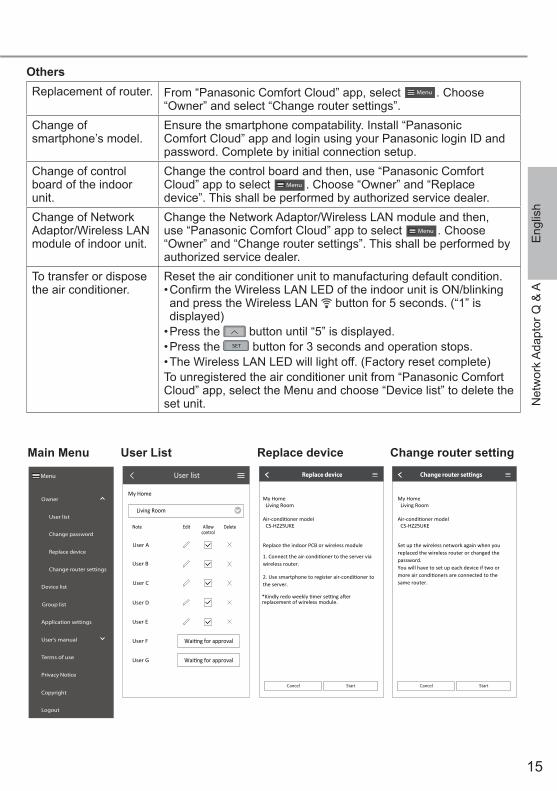
OthersReplacement of router. From “Panasonic Comfort Cloud” app, select Menu . Choose
“Owner” and select “Change router settings”.Change of smartphone’s model.
Ensure the smartphone compatability. Install “Panasonic Comfort Cloud” app and login using your Panasonic login ID and password. Complete by initial connection setup.
Change of control board of the indoor unit.
Change the control board and then, use “Panasonic Comfort Cloud” app to select Menu . Choose “Owner” and “Replace device”. This shall be performed by authorized service dealer.
Change of Network Adaptor/Wireless LAN module of indoor unit.
Change the Network Adaptor/Wireless LAN module and then, use “Panasonic Comfort Cloud” app to select Menu . Choose “Owner” and “Change router settings”. This shall be performed by authorized service dealer.
To transfer or dispose the air conditioner.
Reset the air conditioner unit to manufacturing default condition.• Confi rm the Wireless LAN LED of the indoor unit is ON/blinking and press the Wireless LAN button for 5 seconds. (“1” is displayed)
• Press the button until “5” is displayed.• Press the SET button for 3 seconds and operation stops.• The Wireless LAN LED will light off. (Factory reset complete)To unregistered the air conditioner unit from “Panasonic Comfort Cloud” app, select the Menu and choose “Device list” to delete the set unit.
Menu
User list
Owner
Change password
Replace device
Change router settings
Device list
Group list
Application settings
User’s manual
Terms of use
Privacy Notice
Copyright
Logout
Main Menu User List
My Home
User list
Living Room
Note Edit Allowcontrol
Delete
User A
User B
User C
User D
User E
User F
User G
My HomeLiving Room
CS-HZ25UKE
Replace device
Cancel Start
Replace device
My HomeLiving Room
CS-HZ25UKE
Change router settings
Cancel Start
Change router setting
Net
wor
k A
dapt
or Q
& A
16
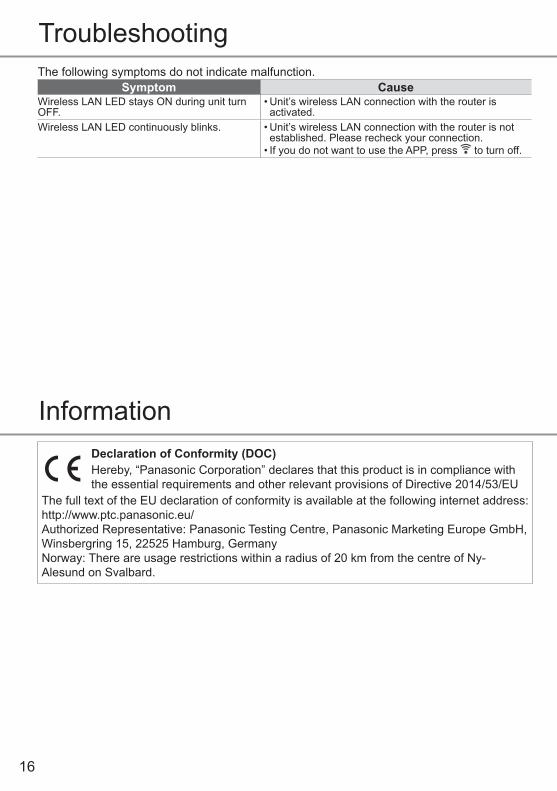
TroubleshootingThe following symptoms do not indicate malfunction.
Symptom CauseWireless LAN LED stays ON during unit turn OFF.
• Unit’s wireless LAN connection with the router is activated.
Wireless LAN LED continuously blinks. • Unit’s wireless LAN connection with the router is not established. Please recheck your connection.
• If you do not want to use the APP, press to turn off.
InformationDeclaration of Conformity (DOC)Hereby, “Panasonic Corporation” declares that this product is in compliance with the essential requirements and other relevant provisions of Directive 2014/53/EU
The full text of the EU declaration of conformity is available at the following internet address: http://www.ptc.panasonic.eu/Authorized Representative: Panasonic Testing Centre, Panasonic Marketing Europe GmbH, Winsbergring 15, 22525 Hamburg, GermanyNorway: There are usage restrictions within a radius of 20 km from the centre of Ny-Alesund on Svalbard.
17
Eng
lish
Firmware Update FunctionThis product has functionality for connecting to the Panasonic fi rmware update server over the Internet to automatically update the device fi rmware to the latest version.To update the fi rmware, the device will do check, once per day, whether its fi rmware is the latest version after power up. And if an update is required, the update is applied and the device restarts automatically. Operations are not possible while the device is being restarted (which takes about 1-5 minutes).
Software License InformationThis product incorporates the following software:(1) The software developed independently by or for Panasonic Corporation,(2) The software owned by third party and licensed to Panasonic Corporation,(3) The open source software under the BSD licence and/or equivalent licenses.The software categorized as of (3) is distributed in the hope that it will be useful, but WITHOUT ANY WARRANTY, without even the implied warranty of MERCHANTABILITY or FITNESS FOR A PARTICULAR PURPOSE.The following license terms shall be applied to Open-Sourced Components.1. Supplicant licenseCopyright (C) 2003-2016, Jouni Malinen <[email protected] > and contributors.All rights reserved.This software may be distributed, used, and modifi ed under the terms of BSD license:Redistribution and use in source and binary forms, with or without modifi cation, are permitted provided that the following conditions are met:1. Redistributions of source code must retain the above copyright notice, this list of conditions and the following disclaimer.2. Redistributions in binary form must reproduce the above copyright notice, this list of conditions and the following disclaimer in the documentation and/ or other materials provided with the distribution.3. Neither the name(s) of the above-listed copyright holder(s) nor the names of its contributors may be used to endorse or promote products derived from this software without specifi c prior written permission.THIS SOFTWARE IS PROVIDED BY THE COPYRIGHT HOLDERS AND CONTRIBUTORS AS IS AND ANY EXPRESS OR IMPLIED WARRANTIES, INCLUDING, BUT NOT LIMITED TO, THE IMPLIED WARRANTIES OF MERCHANTABILITY AND FITNESS FOR A PARTICULAR PURPOSE ARE DISCLAIMED. IN NO EVENT SHALL THE COPYRIGHT OWNER OR CONTRIBUTORS BE LIABLE FOR ANY DIRECT, INDIRECT, INCIDENTAL, SPECIAL, EXEMPLARY, OR CONSEQUENTIAL DAMAGES (INCLUDING, BUT NOT LIMITED TO, PROCUREMENT OF SUBSTITUTE GOODS OR SERVICES; LOSS OF USE, DATA, OR PROFITS; OR BUSINESS INTERRUPTION) HOWEVER CAUSED AND ON ANY THEORY OF LIABILITY, WHETHER IN CONTRACT, STRICT LIABILITY, OR TORT (INCLUDING NEGLIGENCE OR OTHERWISE) ARISING IN ANY WAY OUT OF THE USE OF THIS SOFTWARE, EVEN IF ADVISED OF THE POSSIBILITY OF SUCH DAMAGE.
Information
Trou
bles
hoot
ing
/ Inf
orm
atio
n
18
Inbyggd nätverksadapter som gör att du kan styra driften av din luftkonditioneringsenhet från var som helst.
InnehållsförteckningSäkerhetsföreskrifter .......................................................................................................................... 18-19
Systemöversikt ....................................................................................................................................... 20
Hur den används ............................................................................................................................... 21-29
Frågor och svar om nätverksadapter ................................................................................................. 30-31
Problemlösning ....................................................................................................................................... 32
Information .......................................................................................................................................... 32-33
Copyright ........................................................................................................................................... 82-86
Tack för att du köpt denna Panasonic-produkt.
SäkerhetsföreskrifterEfter försök att kontrollera/köra denna luftkonditioneringsprodukt via den trådlösa kommunikationen från en avlägsen plats, måste du säkerställa enhetens installation och dess omgivning samt vara uppmärksam på på personer som fi nns i dess omgivning.För att förhindra personskada, skada på andra eller skada på egendom bör följande utföras: Felaktig användning orsakad av att skötselanvisningen inte följts kan leda till skador, nedan klassas deras allvar:
VARNINGDenna symbol varnar för dödsfara eller allvarliga skador.
FÖRSIKTIGHETDenna symbol varnar för personskada eller skada på egendom.
Instruktioner klassifi ceras med följande symboler:
Denna symbol betecknar en handling som är FÖRBJUDEN.
Denna symbol betecknar en handling som är NÖDVÄNDIG.
VARNINGNätverksadapter (aktiverad)
Använd inte inomhusenheten i närheten av medicinsk utrustning eller automatiskt kontrollerad utrustning (automatisk dörr, trådbundna larm, etc.).(Radiovågorna från inomhusenheten kan påverka utrustningen och orsaka tillbud till följd av funktionsstörning)
19
Sve
nska
SäkerhetsföreskrifterHåll dig på minst 15 cm avstånd från inomhusenheten om du har en pacemaker.(Radiovågorna från inomhusenheten kan påverka pacemakerns funktion)
FÖRSIKTIGHETNätverksadapter (aktiverad)
Kontrollera följande krav i förväg (hemma):• Sätt in nätaggregatet helt så att inget damm samlas på nätaggregatet. (Detta kan orsaka brand till följd av antändning i nätaggregatets dåliga kontakt)
• Status för aktiveringen av timern som gjorts av andra.(Oväntade driftavbrott kan orsaka att människor, husdjur och växter skadas)
• Det ska ej förekomma några onormalheter från luftkonditioneringen såsom förändrat luftfl öde. Säkerställ så att föremål som lätt kan fl yga omkring på grund av luftfl öde fl yttas till en säker plats. Omkullfallna eller fl yttade föremål kan leda till fara såsom brand, skada o.s.v.
• Man ska alltid använda den interna fjärrkontrollen när det fi nns möjlighet att personer (såsom spädbarn, barn, funktionshindrade, äldre eller sjukliga personer) som inte kan kontrollera temperaturen själv samt att man kan lita på den förinställda konfi gurationen av luftkonditioneringen.Stigandet och sänkanden av temperaturen på grund av fjärrstyrd drift kan gör så att boenden upplever ett obehag och/eller att det stör deras dagliga rutin.Växter och djur kan även påverkas av plötsliga temperaturförändringar.
Kontrolla följande krav innan drift av luftkonditioneringen från en avlägsen plats:• Informera personer som befi nner sig i luftkonditioneringens område om att du fjärrstyrt kontrollerar enheten och dess inställningar. Detta för att undvika och eventuellt orsaka allvarliga biverkningar på personer på grund av att de blir överraskade av den plötsliga temperaturförändringen (från bekväm till kall eller tvärtom).(Detta kan orsaka skada på mänsklig kropp pga. plötsliga ändringar av utomhustemperatur och rumstemperatur. Temperaturjustering kan styras med fjärrkontroll.)
-Om huvudskärmen på Panasonic Comfort Cloud appen inte visar driftstatusen ska du använda den interna fjärrkontrollen för att hantera luftkonditioneringen.
• Då appen använder nätverkskommunikation kan det fi nnas tillfällen då det inte är möjligt att använda fjärrstyrningen, på grund av kommunikation och/eller nätverksfel (t.ex. Panasonic driftsstopp på Cloud Servern, telekomleverantörernas servernedtid, WIFI-anslutning o.s.v.). I händelse av fel ska du använda den interna fjärrkontrollen för att hantera luftkonditioneringen.
Säk
erhe
tsfö
resk
rifte
r
20
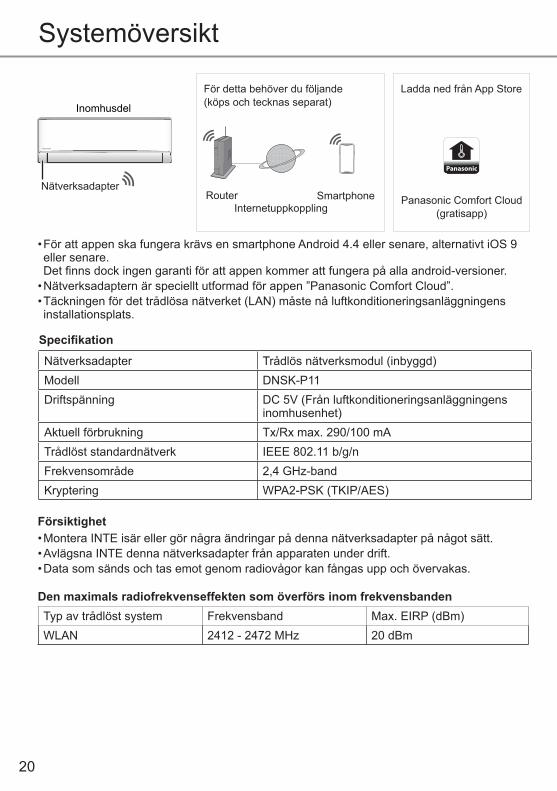
Systemöversikt
• För att appen ska fungera krävs en smartphone Android 4.4 eller senare, alternativt iOS 9 eller senare. Det fi nns dock ingen garanti för att appen kommer att fungera på alla android-versioner.
• Nätverksadaptern är speciellt utformad för appen ”Panasonic Comfort Cloud”.• Täckningen för det trådlösa nätverket (LAN) måste nå luftkonditioneringsanläggningens installationsplats.
Nätverksadapter Trådlös nätverksmodul (inbyggd)Modell DNSK-P11Driftspänning DC 5V (Från luftkonditioneringsanläggningens
inomhusenhet)Aktuell förbrukning Tx/Rx max. 290/100 mATrådlöst standardnätverk IEEE 802.11 b/g/nFrekvensområde 2,4 GHz-bandKryptering WPA2-PSK (TKIP/AES)
Specifi kation
Den maximals radiofrekvenseffekten som överförs inom frekvensbandenTyp av trådlöst system Frekvensband Max. EIRP (dBm)WLAN 2412 - 2472 MHz 20 dBm
• Montera INTE isär eller gör några ändringar på denna nätverksadapter på något sätt.• Avlägsna INTE denna nätverksadapter från apparaten under drift.• Data som sänds och tas emot genom radiovågor kan fångas upp och övervakas.
Försiktighet
Panasonic
Ladda ned från App Store
RouterInternetuppkoppling
Smartphone
För detta behöver du följande (köps och tecknas separat)
Panasonic Comfort Cloud(gratisapp)
Inomhusdel
Nätverksadapter
21
Sve
nska
Sys
tem
över
sikt
/ H
ur d
en a
nvän
ds
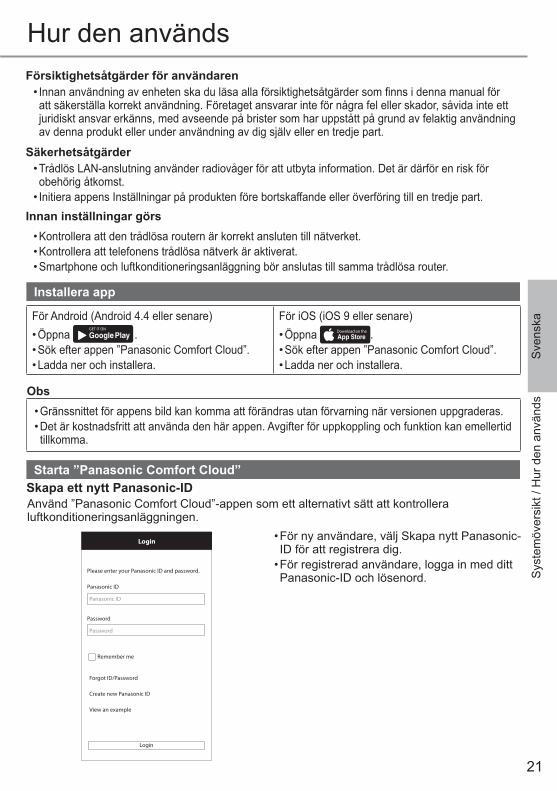
Installera app
För Android (Android 4.4 eller senare)• Öppna
GET IT ON
Google Play .• Sök efter appen ”Panasonic Comfort Cloud”.• Ladda ner och installera.
För iOS (iOS 9 eller senare)• Öppna Download on the
App Store .• Sök efter appen ”Panasonic Comfort Cloud”.• Ladda ner och installera.
Obs• Gränssnittet för appens bild kan komma att förändras utan förvarning när versionen uppgraderas. • Det är kostnadsfritt att använda den här appen. Avgifter för uppkoppling och funktion kan emellertid tillkomma.
Starta ”Panasonic Comfort Cloud”
• För ny användare, välj Skapa nytt Panasonic-ID för att registrera dig.
• För registrerad användare, logga in med ditt Panasonic-ID och lösenord.
Använd ”Panasonic Comfort Cloud”-appen som ett alternativt sätt att kontrollera luftkonditioneringsanläggningen.
Please enter your Panasonic ID and password.
Panasonic ID
Password
Password
Remember me
Forgot ID/Password
Create new Panasonic ID
View an example
Login
Login
Panasonic ID
Skapa ett nytt Panasonic-ID
Hur den används
Innan inställningar görs• Kontrollera att den trådlösa routern är korrekt ansluten till nätverket.• Kontrollera att telefonens trådlösa nätverk är aktiverat. • Smartphone och luftkonditioneringsanläggning bör anslutas till samma trådlösa router.
Försiktighetsåtgärder för användaren• Innan användning av enheten ska du läsa alla försiktighetsåtgärder som fi nns i denna manual för att säkerställa korrekt användning. Företaget ansvarar inte för några fel eller skador, såvida inte ett juridiskt ansvar erkänns, med avseende på brister som har uppstått på grund av felaktig användning av denna produkt eller under användning av dig själv eller en tredje part.
Säkerhetsåtgärder• Trådlös LAN-anslutning använder radiovåger för att utbyta information. Det är därför en risk för obehörig åtkomst.
• Initiera appens Inställningar på produkten före bortskaffande eller överföring till en tredje part.
22
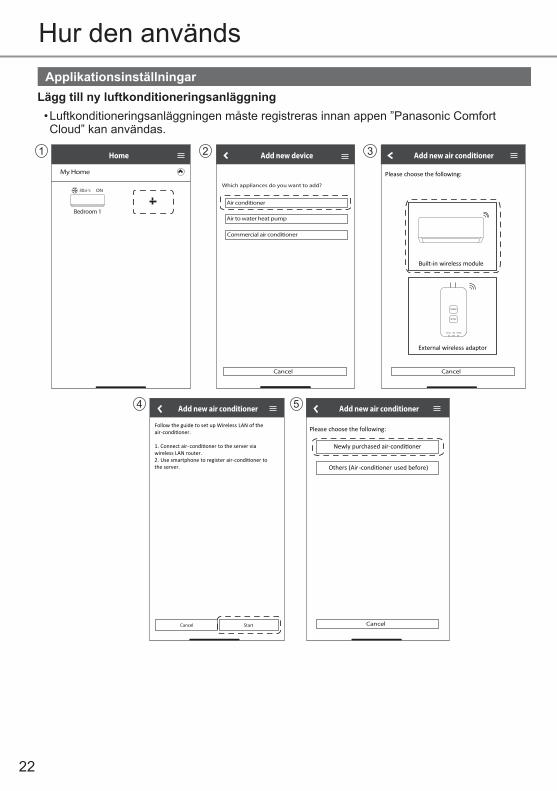
ApplikationsinställningarLägg till ny luftkonditioneringsanläggning• Luftkonditioneringsanläggningen måste registreras innan appen ”Panasonic Comfort Cloud” kan användas.
Commercial air conditioner
My Home
ON
3
5
1 2
4
Hur den används
23
Sve
nska
Inställning av anslutningsnätverk
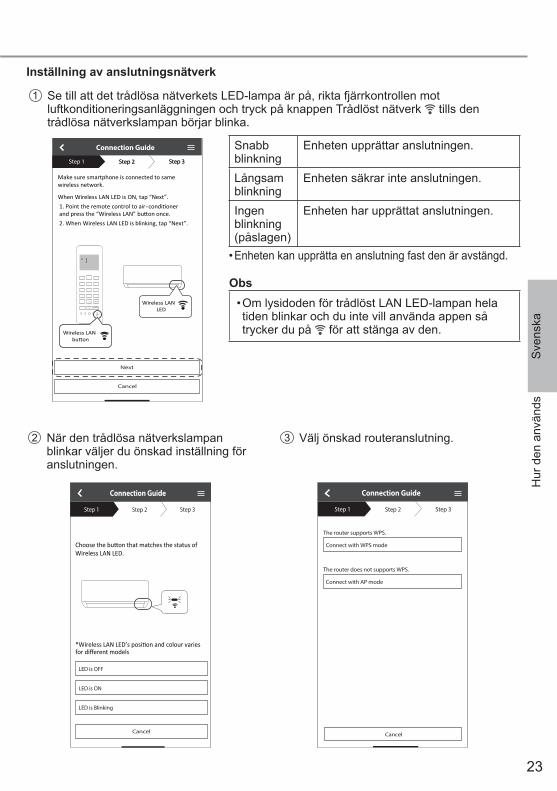
1 Se till att det trådlösa nätverkets LED-lampa är på, rikta fjärrkontrollen mot luftkonditioneringsanläggningen och tryck på knappen Trådlöst nätverk tills den trådlösa nätverkslampan börjar blinka.
3 Välj önskad routeranslutning.
Connection Guide
Step 1 Step 2 Step 3
Connect with WPS mode
Connect with AP mode
The router supports WPS.
The router does not supports WPS.
Cancel
2 När den trådlösa nätverkslampan blinkar väljer du önskad inställning för anslutningen.
Wireless LAN LED.
Connection Guide
Step 1 Step 2 Step 3
LED is OFF
LED is ON
LED is Blinking
Cancel
Make sure smartphone is connected to same wireless network.
When Wireless LAN LED is ON, tap “Next”.1. Point the remote control to air-and press the “Wireless LAN” bu on once. 2. When Wireless LAN LED is blinking, tap “Next”.
Connection Guide
Cancel
Next
Step 1 Step 2 Step 3Step 1 Step 2 Step 3
condi oner
Wireless LAN LED
SET
CANCEL
Wireless LAN bu on
Wireless LAN bu on
Hur
den
anv
änds
Obs• Om lysidoden för trådlöst LAN LED-lampan hela tiden blinkar och du inte vill använda appen så trycker du på för att stänga av den.
Snabb blinkning
Enheten upprättar anslutningen.
Långsam blinkning
Enheten säkrar inte anslutningen.
Ingen blinkning (påslagen)
Enheten har upprättat anslutningen.
• Enheten kan upprätta en anslutning fast den är avstängd.
24
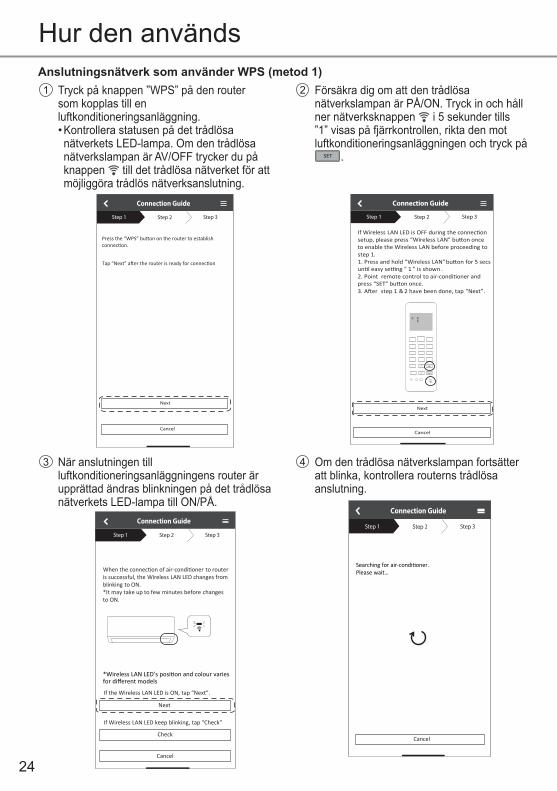
Anslutningsnätverk som använder WPS (metod 1)1 Tryck på knappen ”WPS” på den router
som kopplas till en luftkonditioneringsanläggning.• Kontrollera statusen på det trådlösa nätverkets LED-lampa. Om den trådlösa nätverkslampan är AV/OFF trycker du på knappen till det trådlösa nätverket för att möjliggöra trådlös nätverksanslutning.
Connection Guide
Step 1 Step 2 Step 3
Next
Cancel
2 Försäkra dig om att den trådlösa nätverkslampan är PÅ/ON. Tryck in och håll ner nätverksknappen i 5 sekunder tills ”1” visas på fjärrkontrollen, rikta den mot luftkonditioneringsanläggningen och tryck på SET .
If Wireless LAN LED is OFF during the connec on setup, please press “Wireless LAN” bu on once to enable the Wireless LAN before proceeding tostep 1 .1. Press and hold “Wireless LAN” bu on for 5 secs un l easy se ng “ 1 ” is shown .2. Point remote control to air-condi oner and press “SET” bu on once.3. A er step 1 & 2 have been done, tap “Next”.
Connection Guide
Step 1 Step 2 Step 3
Cancel
Next
SET
CANCEL
4 Om den trådlösa nätverkslampan fortsätter att blinka, kontrollera routerns trådlösa anslutning.
Searching for air-condi oner.Please wait…
Connection Guide
Step 1 Step 2 Step 3
Cancel
3 När anslutningen till luftkonditioneringsanläggningens router är upprättad ändras blinkningen på det trådlösa nätverkets LED-lampa till ON/PÅ.
Connection Guide
Step 1 Step 2 Step 3
When the connec on of air-condi oner to router is successful, the Wireless LAN LED changes from blinking to ON. *It may take up to few minutes before changes to ON.
Next
If the Wireless LAN LED is ON, tap “Next”.
If Wireless LAN LED keep blinking, tap “Check”
Cancel
Check
Hur den används
25
Sve
nska
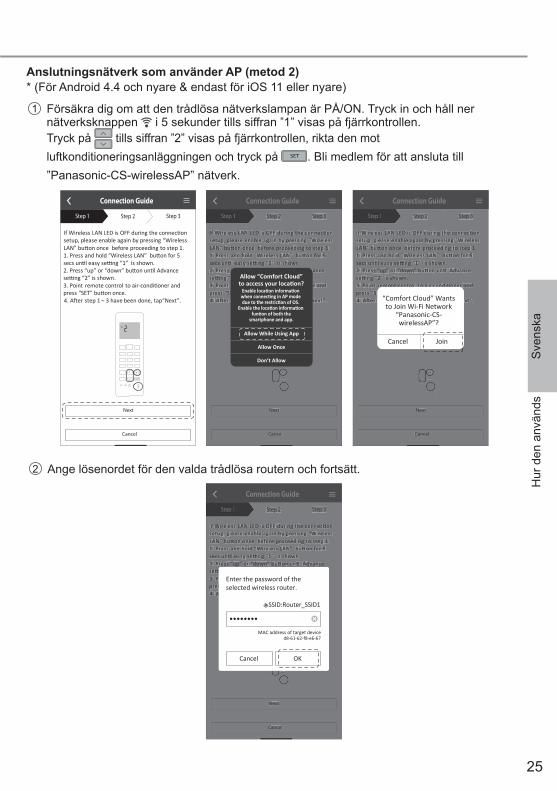
Anslutningsnätverk som använder AP (metod 2)* (För Android 4.4 och nyare & endast för iOS 11 eller nyare)
1 Försäkra dig om att den trådlösa nätverkslampan är PÅ/ON. Tryck in och håll ner nätverksknappen i 5 sekunder tills siffran ”1” visas på fjärrkontrollen.Tryck på tills siffran ”2” visas på fjärrkontrollen, rikta den mot luftkonditioneringsanläggningen och tryck på SET . Bli medlem för att ansluta till ”Panasonic-CS-wirelessAP” nätverk.
2 Ange lösenordet för den valda trådlösa routern och fortsätt.
Hur
den
anv
änds
If Wireless LAN LED is OFF during the connec on setup, please enable again by pressing “Wireless LAN” bu on once before proceeding to step 1 .1. Press and hold “Wireless LAN” bu on for 5 secs un l easy se ng “1” is shown.2. Press “up” or “down” bu on un l Advance se ng “2” is shown.3. Point remote control to air-condi oner and press “SET” bu on once.4. A er step 1 ~ 3 have been done, tap“Next”.
Connection Guide
Step 1 Step 2 Step 3
Cancel
Next
SET
CANCEL
If Wireless LAN LED is OFF during the connec onsetup, please enable again by pressing “WirelessLAN” bu on once before proceeding to step 1.1. Press and hold “Wireless LAN” bu on for 5 secs un l easy se ng “1” is shown.2. Press “up” or “down” bu on un l Advancese ng “2” is shown.3. Point remote control to air-condi oner and press “SET” bu on once.4. A er step 1 ~ 3 have been done, tap“Next”.
Connection Guide
Step 1 Step 2 Step 3
Cancel
Next
SET
CANCEL
Enter the password of theselected wireless router.
MAC address of target device
SSID:Router_SSID1
Cancel OK
d8-61-62-f8-e6-67
If Wireless LAN LED is OFF during the connec on setup, please enable again by pressing “Wireless LAN” bu on once before proceeding to step 1 .1. Press and hold “Wireless LAN” bu on for 5 secs un l easy se ng “1” is shown.2. Press “up” or “down” bu on un l Advance se ng “2” is shown.3. Point remote control to air-condi oner and press “SET” bu on once.4. A er step 1 ~ 3 have been done, tap“Next”.
Connection Guide
Step 1 Step 2 Step 3
Cancel
Next
SET
CANCEL
If Wireless LAN LED is OFF during the connec on setup, please enable again by pressing “Wireless LAN” bu on once before proceeding to step 1 .1. Press and hold “Wireless LAN” bu on for 5 secs un l easy se ng “1” is shown.2. Press “up” or “down” bu on un l Advance se ng “2” is shown.3. Point remote control to air-condi oner and press “SET” bu on once.4. A er step 1 ~ 3 have been done, tap“Next”.
Connection Guide
Step 1 Step 2 Step 3
Cancel
Next
SET
CANCEL
If Wireless LAN LED is OFF during the connec onsetup, please enable again by pressing “WirelessLAN” bu on once before proceeding to step 1.1. Press and hold “Wireless LAN” bu on for 5 secs un l easy se ng “1” is shown.2. Press “up” or “down” bu on un l Advancese ng “2” is shown.3. Point remote control to air-condi oner and press “SET” bu on once.4. A er step 1 ~ 3 have been done, tap“Next”.
Connection Guide
Step 1 Step 2 Step 3
Cancel
Next
SET
CANCEL
Allow “Comfort Cloud”
If Wireless LAN LED is OFF during the connec on setup, please enable again by pressing “Wireless LAN” bu on once before proceeding to step 1 .1. Press and hold “Wireless LAN” bu on for 5 secs un l easy se ng “1” is shown.2. Press “up” or “down” bu on un l Advance se ng “2” is shown.3. Point remote control to air-condi oner and press “SET” bu on once.4. A er step 1 ~ 3 have been done, tap“Next”.
Connection Guide
Step 1 Step 2 Step 3
Cancel
Next
SET
CANCEL
If Wireless LAN LED is OFF during the connec onsetup, please enable again by pressing “WirelessLAN” bu on once before proceeding to step 1 .1. Press and hold “Wireless LAN” bu on for 5secs un l easy se ng “1” is shown.2. Press “up” or “down” bu on un l Advancese ng “2” is shown.3. Point remote control to air-condi oner and press “SET” bu on once.4. A er step 1 ~ 3 have been done, tap“Next”.
Connection Guide
Step 1 Step 2 Step 3
Cancel
Next
SET
CANCEL
“Comfort Cloud” Wantsto Join Wi-Fi Network
“Panasonic-CS-wirelessAP”?
Cancel Join
26
Hur den används
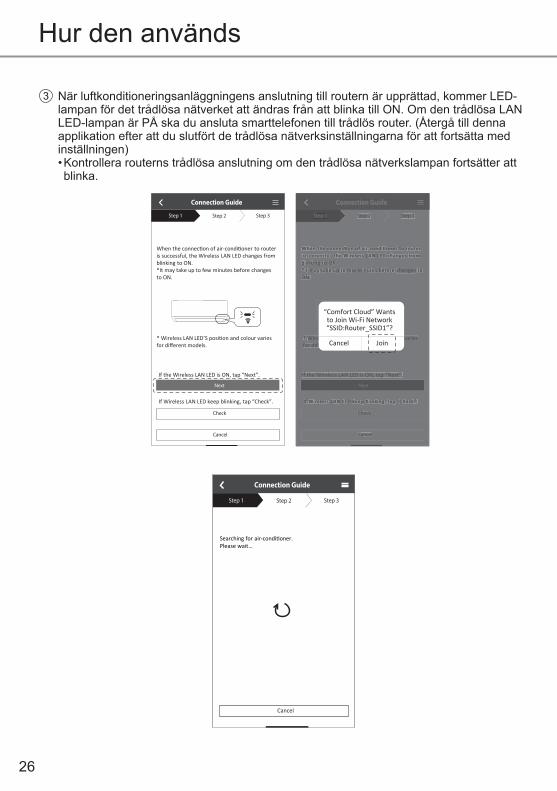
3 När luftkonditioneringsanläggningens anslutning till routern är upprättad, kommer LED-lampan för det trådlösa nätverket att ändras från att blinka till ON. Om den trådlösa LAN LED-lampan är PÅ ska du ansluta smarttelefonen till trådlös router. (Återgå till denna applikation efter att du slutfört de trådlösa nätverksinställningarna för att fortsätta med inställningen)• Kontrollera routerns trådlösa anslutning om den trådlösa nätverkslampan fortsätter att blinka.
Searching for air-condi oner.Please wait…
Connection Guide
Step 1 Step 2 Step 3
Cancel
Connection Guide
Step 1 Step 2 Step 3
When the connec on of air-condi oner to router is successful, the Wireless LAN LED changes from blinking to ON. *It may take up to few minutes before changes to ON.
If Wireless LAN LED keep blinking, tap “Check”.
If the Wireless LAN LED is ON, tap “Next”. If the Wireless LAN LED is ON, tap “Next”.
Cancel
Check
* *
Connection Guide
Step 1 Step 2 Step 3
When the connec on of air-condi oner to router is successful, the Wireless LAN LED changes from blinking to ON. *It may take up to few minutes before changes to ON.
If Wireless LAN LED keep blinking, tap “Check”.
Cancel
Check
Next Next
If the Wireless LAN LED is ON, tap “Next”.
*
Connection Guide
Step 1 Step 2 Step 3
When the connec on of air-condi oner to routeris successful, the Wireless LAN LED changes fromblinking to ON.*It may take up to few minutes before changes toON.
If Wireless LAN LED keep blinking, tap “Check”.
Cancel
Check
Next
“Comfort Cloud” Wantsto Join Wi-Fi Network“SSID:Router_SSID1”?
Cancel Join
27
Sve
nska
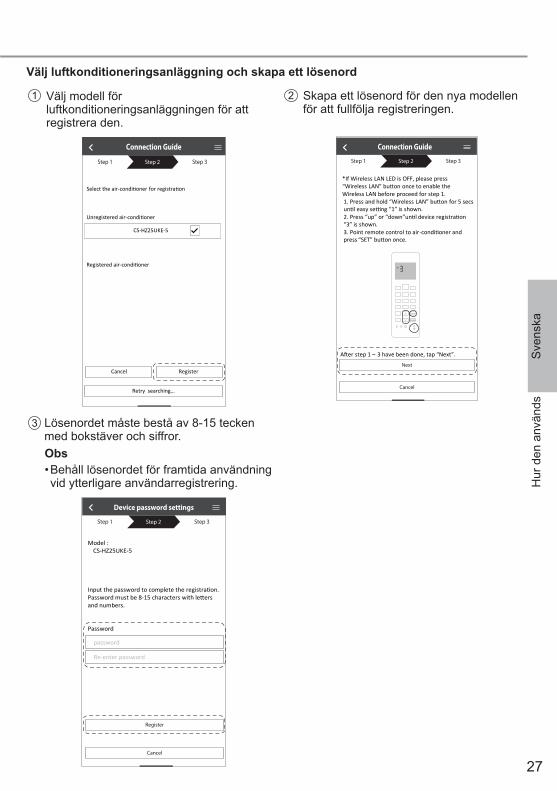
Välj luftkonditioneringsanläggning och skapa ett lösenord
2
3
Skapa ett lösenord för den nya modellen för att fullfölja registreringen.
Connection Guide
Step 1 Step 2 Step 3
Cancel
Next
*If Wireless LAN LED is OFF, please press “Wireless LAN” bu on once to enable the Wireless LAN before proceed for step 1 . 1. Press and hold “Wireless LAN” bu on for 5 secs un l easy se ng “1” is shown.2. Press “up” or “down”un l device registra on “3” is shown.3. Point remote control to air-condi oner and press “SET” bu on once.
A er step 1 ~ 3 have been done, tap “Next”.
SET
CANCEL
1 Välj modell för luftkonditioneringsanläggningen för att registrera den.
Select the air-condi oner for registra on
Unregistered air-condi oner
Registered air-condi oner
Retry searching…
Connection Guide
Step 1 Step 2 Step 3
CS-HZ25UKE-5
Retry searching…
Cancel Register
Lösenordet måste bestå av 8-15 tecken med bokstäver och siffror.
Model :CS-HZ25UKE-5
Input the password to complete the registra on.Password must be 8-15 characters with le ers and numbers.
Password
password
Re-enter password
Device password settings
Step 1 Step 2 Step 3
Cancel
Register
Obs• Behåll lösenordet för framtida användning vid ytterligare användarregistrering. H
ur d
en a
nvän
ds
28
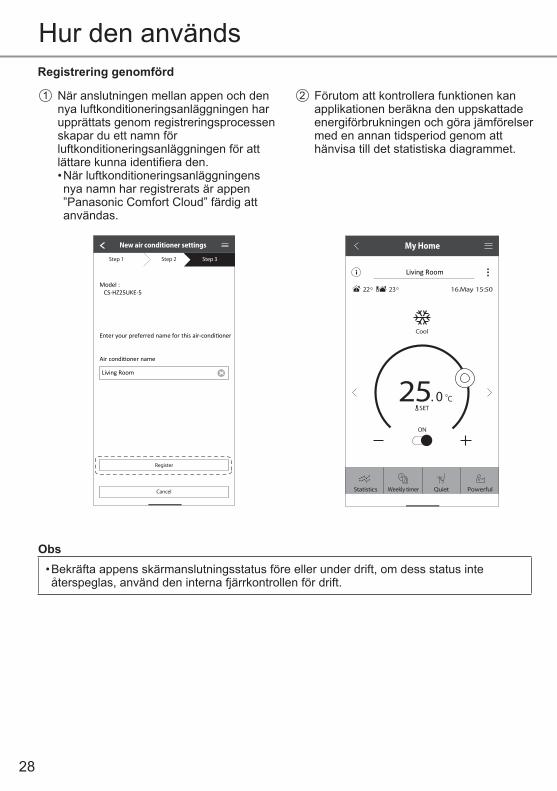
Registrering genomförd
1 När anslutningen mellan appen och den nya luftkonditioneringsanläggningen har upprättats genom registreringsprocessen skapar du ett namn för luftkonditioneringsanläggningen för att lättare kunna identifi era den.• När luftkonditioneringsanläggningens nya namn har registrerats är appen ”Panasonic Comfort Cloud” färdig att användas.
2 Förutom att kontrollera funktionen kan applikationen beräkna den uppskattade energiförbrukningen och göra jämförelser med en annan tidsperiod genom att hänvisa till det statistiska diagrammet.
-
Enter your preferred name for this air-condi oner
Air condi oner name
Model :CS HZ25UKE
New air conditioner settings
Step 3Step 1 Step 2
-Model :
CS HZ25UKE-5
Cancel
Register
Living Room
My Home
22 23 16.May 15:50
25. 0 CSET
Cool
Living Room
Statistics Weekly timer Quiet Powerful
ON
Hur den används
Obs• Bekräfta appens skärmanslutningsstatus före eller under drift, om dess status inte återspeglas, använd den interna fjärrkontrollen för drift.
29
Sve
nska
App InstallationVeckoTimer
Hur
den
anv
änds
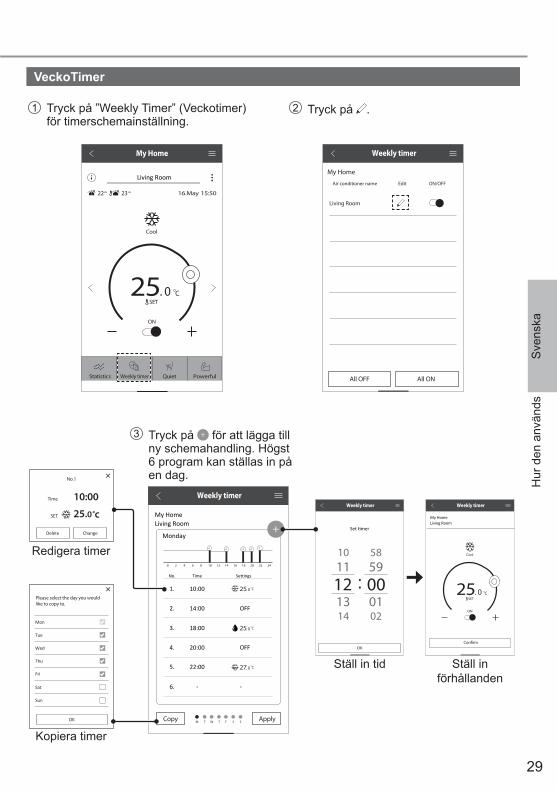
1 Tryck på ”Weekly Timer” (Veckotimer) för timerschemainställning.
2 Tryck på .
3 Tryck på för att lägga till ny schemahandling. Högst 6 program kan ställas in på en dag.
Weekly timer
Living Room
Monday
No. Time
1. 10:00
2. 14:00 OFF
OFF
3. 18:00
4. 20:00
5.
6.
22:00
- -
Settings
My Home
Copy Apply
0 2 4 6 8 10 12 14 16 18 20 22 24
25. 0 C
25. 0 C
27. 0 C
M T W T F S S
Delete
No.1
Time
SET
10:00
25.0˚c
Change
Please select the day you wouldlike to copy to.
Mon
Tue
Wed
Thu
Fri
Sat
Sun
OK
Redigera timer
Kopiera timer
Weekly timer
25. 0 CSET
Cool
Living RoomMy Home
Confirm
ON
Ställ in tid Ställ in förhållanden
Weekly timer
10 58
14 02
1112 00:
59
13 01
OK
My Home
22 23 16.May 15:50
25. 0 CSET
Cool
Statistics Weekly timer Quiet
Living Room
Powerful
ON
Weekly timer
All OFF All ON
My Home
Living Room
Air conditioner name Edit ON/OFF
30
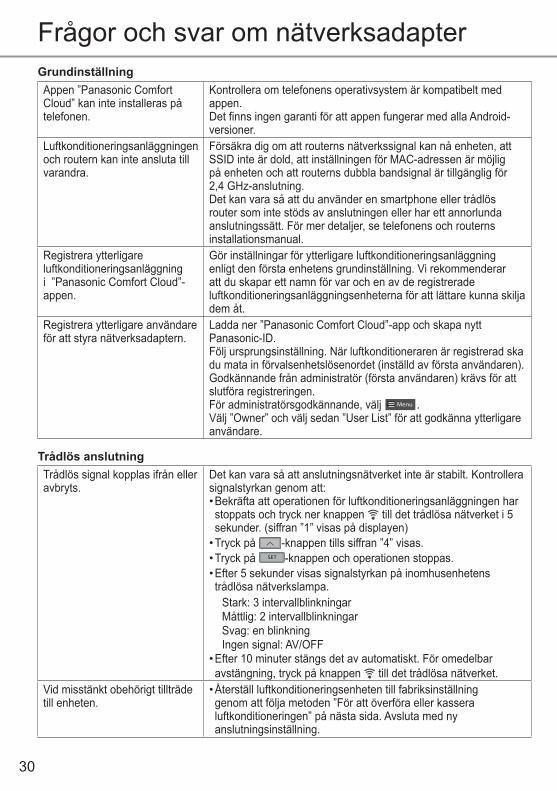
Frågor och svar om nätverksadapterGrundinställningAppen ”Panasonic Comfort Cloud” kan inte installeras på telefonen.
Kontrollera om telefonens operativsystem är kompatibelt med appen.Det fi nns ingen garanti för att appen fungerar med alla Android-versioner.
Luftkonditioneringsanläggningen och routern kan inte ansluta till varandra.
Försäkra dig om att routerns nätverkssignal kan nå enheten, att SSID inte är dold, att inställningen för MAC-adressen är möjlig på enheten och att routerns dubbla bandsignal är tillgänglig för 2,4 GHz-anslutning.Det kan vara så att du använder en smartphone eller trådlös router som inte stöds av anslutningen eller har ett annorlunda anslutningssätt. För mer detaljer, se telefonens och routerns installationsmanual.
Registrera ytterligare luftkonditioneringsanläggning i ”Panasonic Comfort Cloud”-appen.
Gör inställningar för ytterligare luftkonditioneringsanläggning enligt den första enhetens grundinställning. Vi rekommenderar att du skapar ett namn för var och en av de registrerade luftkonditioneringsanläggningsenheterna för att lättare kunna skilja dem åt.
Registrera ytterligare användare för att styra nätverksadaptern.
Ladda ner ”Panasonic Comfort Cloud”-app och skapa nytt Panasonic-ID.Följ ursprungsinställning. När luftkonditioneraren är registrerad ska du mata in förvalsenhetslösenordet (inställd av första användaren).Godkännande från administratör (första användaren) krävs för att slutföra registreringen.För administratörsgodkännande, välj Menu .Välj ”Owner” och välj sedan ”User List” för att godkänna ytterligare användare.
Trådlös anslutningTrådlös signal kopplas ifrån eller avbryts.
Det kan vara så att anslutningsnätverket inte är stabilt. Kontrollera signalstyrkan genom att:• Bekräfta att operationen för luftkonditioneringsanläggningen har stoppats och tryck ner knappen till det trådlösa nätverket i 5 sekunder. (siffran ”1” visas på displayen)
• Tryck på -knappen tills siffran ”4” visas.• Tryck på SET -knappen och operationen stoppas.• Efter 5 sekunder visas signalstyrkan på inomhusenhetens trådlösa nätverkslampa.
Stark: 3 intervallblinkningarMåttlig: 2 intervallblinkningarSvag: en blinkningIngen signal: AV/OFF
• Efter 10 minuter stängs det av automatiskt. För omedelbar avstängning, tryck på knappen till det trådlösa nätverket.
Vid misstänkt obehörigt tillträde till enheten.
• Återställ luftkonditioneringsenheten till fabriksinställning genom att följa metoden ”För att överföra eller kassera luftkonditioneringen” på nästa sida. Avsluta med ny anslutningsinställning.
31
Sve
nska
Menu
User list
Owner
Change password
Replace device
Change router settings
Device list
Group list
Application settings
User’s manual
Terms of use
Privacy Notice
Copyright
Logout
Huvudmeny Användarlista
My Home
User list
Living Room
Note Edit Allowcontrol
Delete
User A
User B
User C
User D
User E
User F
User G
My HomeLiving Room
CS-HZ25UKE
Replace device
Cancel Start
Byt ut enhet
My HomeLiving Room
CS-HZ25UKE
Change router settings
Cancel Start
Ändra routerinställningar
Fråg
or o
ch s
var o
m n
ätve
rksa
dapt
er
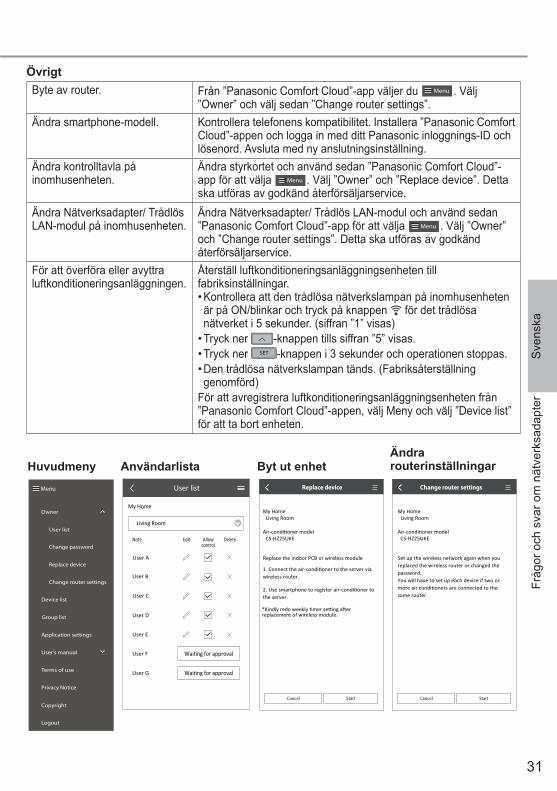
ÖvrigtByte av router. Från ”Panasonic Comfort Cloud”-app väljer du Menu . Välj
”Owner” och välj sedan ”Change router settings”.Ändra smartphone-modell. Kontrollera telefonens kompatibilitet. Installera ”Panasonic Comfort
Cloud”-appen och logga in med ditt Panasonic inloggnings-ID och lösenord. Avsluta med ny anslutningsinställning.
Ändra kontrolltavla på inomhusenheten.
Ändra styrkortet och använd sedan ”Panasonic Comfort Cloud”-app för att välja Menu . Välj ”Owner” och ”Replace device”. Detta ska utföras av godkänd återförsäljarservice.
Ändra Nätverksadapter/ Trådlös LAN-modul på inomhusenheten.
Ändra Nätverksadapter/ Trådlös LAN-modul och använd sedan ”Panasonic Comfort Cloud”-app för att välja Menu . Välj ”Owner” och ”Change router settings”. Detta ska utföras av godkänd återförsäljarservice.
För att överföra eller avyttra luftkonditioneringsanläggningen.
Återställ luftkonditioneringsanläggningsenheten till fabriksinställningar.• Kontrollera att den trådlösa nätverkslampan på inomhusenheten är på ON/blinkar och tryck på knappen för det trådlösa nätverket i 5 sekunder. (siffran ”1” visas)
• Tryck ner -knappen tills siffran ”5” visas.• Tryck ner SET -knappen i 3 sekunder och operationen stoppas.• Den trådlösa nätverkslampan tänds. (Fabriksåterställning genomförd)
För att avregistrera luftkonditioneringsanläggningsenheten från ”Panasonic Comfort Cloud”-appen, välj Meny och välj ”Device list” för att ta bort enheten.
32
ProblemlösningFöljande yttringar är ej tecken på tekniska fel.
Yttring OrsakDen trådlösa nätverkslampan är PÅ/ON medan enheten stängs AV/OFF.
• Enhetens trådlösa LAN-anslutning med routern är aktiverad.
Trådlöst LAN LED-lampan blinkar kontinuerligt. • Enhetens trådlösa LAN-anslutning med routern är inte upprättad. Kontrollera din anslutning igen.
• Om du inte vill använda appen så trycker du på för att stänga av den.
InformationFörsäkran om överensstämmelse (DOC)Härmed försäkrar “Panasonic Corporation” att denna produkt överensstämmer med de grundläggande kraven och andra relevanta bestämmelser i direktiv 2014/53/EU
Den fullständiga texten för EU-försäkran om överensstämmelse är tillgänglig på följande internetadress: http://www.ptc.panasonic.eu/Bemyndigad företrädare: Panasonic Testing Centre, Panasonic Marketing Europe GmbH, Winsbergring 15, 22525 Hamburg, TysklandNorge: Inom en radie av 20 km från Ny-Ålesunds centrum på Svalbard råder begränsningar i användningen.
33
Sve
nska
Information
Pro
blem
lösn
ing
/ Inf
orm
atio
n
Uppdateringsfunktion av fasta programDen här produkten fungerar att ansluta över Internet till Panasonic uppdateringsserver för fasta program för att automatiskt uppdatera enhetens fasta program till den senaste versionen.För att uppdatera de fasta programmen, kommer enheten att en gång om dagen efter systemsstart kontrollera om de fasta programmen är av den senaste versionen. Om en uppdatering behövs, kommer den att genomföras och enheten startas om automatiskt. Det går inte att göra några operationer under tiden som enheten startas om (vilket tar ca 1-5 minuter).
Licensinformation för mjukvaraDen här produkten innehåller följande mjukvara:(1) Mjukvara som utvecklats fristående av eller för Panasonic Corporation,(2) Mjukvara som ägs av tredje part och är licensierad till Panasonic Corporation,(3) Programvara med öppen källkod under BSD-licens och/eller liknande.Mjukvara som kategoriseras som (3) sprids i förhoppningen att den kan bli till nytta, men UTAN GARANTI, till och med utan den MARKNADSMÄSSIGA underförstådda garantin eller den slags garanti som ligger i LÄMPLIGHET FÖR ETT BESTÄMT ÄNDAMÅL.Följande licensvillkor ska tillämpas för öppna källkomponenter.1. AnvändarlicensCopyright (C) 2003-2016, Jouni Malinen <[email protected] > och bidragsgivare.Alla rättigheter förbehålles.Denna mjukvara får spridas, användas och ändras under villkoren för BSD-licensen:Distribution och användning i ursprunglig och binär form, med eller utan ändring, är tillåtet under förutsättning att följande villkor är uppfyllda:1. Vid distribution av källkod måste ovan angivna copyright behållas, tillsammans med denna villkorsförteckning samt nedanstående klausul.2. Distribution i binär form måste återge ovan angivna copyright, tillsammans med denna villkorsförteckning samt nedanstående klausul i dokumentationen och/eller annat material som följer med distributionen.3. Varken namn på ovan angivna copyrightinnehavare eller namn på bidragsgivare får användas för att godkänna eller främja produkter som härrör från denna mjukvara utan föregående uttrycklig skriftlig tillåtelse.DENNA MJUKVARA TILLHANDAHÅLLS AV COPYRIGHTINNEHAVARNA OCH BIDRAGSGIVARNA SOM DEN ÄR, MED, MEN INTE BEGRÄNSAD AV, UTTRYCKLIGA OCH UNDERFÖRSTÅDDA GARANTIER, DE UNDERFÖRSTÅDDA GARANTIER SOM LIGGER I MARKNADSMÄSSIGA ÄNDAMÅL OCH I LÄMPLIGHET FÖR ETT BESTÄMT ÄNDAMÅL. COPYRIGHTINNEHAVARE ELLER BIDRAGSGIVARE SKALL INTE UNDER NÅGRA OMSTÄNDIGHETER HÅLLAS ANSVARIGA FÖR NÅGON DIREKT, INDIREKT, OAVSIKTLIG, SÄRSKILD, BESTRAFFANDE SKADA ELLER FÖLJDSKADA (INKLUSIVE, MEN INTE BEGRÄNSAT TILL, UPPHANDLING AV ERSÄTTNINGSVAROR ELLER TJÄNSTER; ANVÄNDNINGSFÖRLUST, DATAFÖRLUST ELLER INKOMSTBORTFALL; ELLER VERKSAMHETSAVBROTT) ÄVEN OM DETTA ORSAKATS AV NÅGON SOM HELST ANSVARSDOKTRIN, VARE SIG I KONTRAKT, STRIKT ANSVAR ELLER PÅ GRUND AV NÅGON SKADESTÅNDSGRUNDANDE HÄNDELSE (INKLUSIVE OAKTSAMHET ELLER ANNAN ORSAK) SOM PÅ NÅGOT SÄTT UPPKOMMIT GENOM ANVÄNDNING AV DENNA MJUKVARA, ÄVEN OM MAN HAR UPPLYSTS OM MÖJLIGHETEN ATT SÅDAN SKADA KAN UPPSTÅ.
34
Innebygget nettverksadapter som gir mulighet for styring av klimaanlegget fra hvor som helst.
InnholdsfortegnelseSikkerhetsforanstaltninger ................................................................................................................. 34-35
Systemoversikt ....................................................................................................................................... 36
Slik bruker du ..................................................................................................................................... 37-45
Nettverksadapter Spørsmål og svar .................................................................................................. 46-47
Feilsøking ............................................................................................................................................... 48
Informasjon ......................................................................................................................................... 48-49
Copyright ........................................................................................................................................... 82-86
Takk for at du kjøpte dette produktet fra Panasonic.
SikkerhetsforanstaltningerFor forsøk på å styre / betjene dette klimaanlegg-produktet med trådløs kommunikasjon fra et eksternt sted, må installasjonen av apparatet og det omkringliggende området kontrolleres, og vær oppmerksom på eventuelle personer fi nnes i nærheten.For å forhindre skade på deg selv, andre eller skade på eiendom, må du overholde følgende: Feil bruk på grunn av at instruksjonene ikke følges, kan føre til skade eller ødeleggelser. Alvorligheten av dette klassifi seres som følger:
ADVARSELDette skiltet advarer om fare for død eller alvorlig personskade.
OBSDette skiltet advarer om fare for personskade eller skade på eiendom.
Instruksjonene som må følges, klassifi seres av følgende symboler:
Dette symbolet angir en handling som er FORBUDT.
Dette symbolet angir en handling som er OBLIGATORISK.
ADVARSELNettverksadapter-(aktivert)
Ikke bruk innendørsenheten i nærheten av noe medisinsk utstyr eller automatisk styringsutstyr (automatisk dør, kabelalarmer osv.).(Radiobølger fra innendørsenheten kan påvirke utstyret og kan forårsake ulykker på grunn av funksjonsfeil)
35
Nor
sk
SikkerhetsforanstaltningerHold deg minst 15 cm borte fra innendørsenheten hvis du bruker en pacemaker.(Radiobølger fra innendørsenheten kan påvirke funksjonen i pacemakeren)
OBSNettverksadapter-(aktivert)
Kontroller følgende krav på forhånd (hjemme):• Sett strømtilførselen godt inn. Ingen støvoppsamlinger på strømforsyningen. (Dette kan medføre brann på grunn av antennelse i en dårlig tilkobling av strømforsyningskontakten)
• Status for tidsstyrings-aktivering som er utført av andre personer.(Uventet kjørestopp kan medføre skade på personer, kjæledyr og planter)
• Det må ikke være noe unormalt med klimaanlegget, som for eksempel endring av luftfl yten. Sørg for at det ikke fi nnes noen gjenstander som enkelt kan fl ytte på seg på grunn av luftfl yt som blåser rett mot den. Gjenstander som faller ned eller fl ytter på seg, kan medføre farer som for eksempel brann, personskader osv.
• Bruk alltid fjernkontrollen i huset når det er mulig at det fi nnes personer (som for eksempel babyer, barn, funksjonshemmede personer, eldre eller syke personer) som ikke er i stand til å styre temperaturen selv og må stole på den forhåndsinnstilte konfi gurasjonen i klimaanlegget.Økning og reduksjon av temperaturen på grunn av fjernstyrt drift kan medføre at beboerne opplever ubehag og/eller at de daglige rutinene forstyrres.Planter og dyr kan også påvirkes av plutselige temperaturjusteringer.
Kontroller følgende betingelser før klimaanlegget betjenes fra et eksternt sted:• Informer personene i nærheten av området som klimastyres, om at du fjernstyrer klimaanleggets betjening og innstillinger. Dette er for å unngå mulige alvorlige påvirkninger på personer, enten på grunn av at de blir overrasket eller på grunn av plutselige endringer i temperaturen (fra komfort til kulde eller omvendt).(Dette kan forårsake personskader på grunn av plutselige endringer i utetemperaturen og romtemperaturen. Temperaturjusteringer kan utføres fra fjernkontrollen)
-Hvis hoveddisplayet i appen Panasonic Comfort Cloud ikke viser driftsstatus, brukes fjernkontrollen i huset for å betjene klimaanlegget.
• Hvis appen bruker nettverkskommunikasjon, kan det hende at fjernstyrt drift ikke er mulig på grunn av feil i kommunikasjon og/eller nettverk (som for eksempel nedetid for Panasonic Cloud-serveren, Wi-Fi-forbindelse osv.). Ved slike feil brukes fjernkontrollen i huset for å betjene klimaanlegget.
Sik
kerh
etsf
oran
stal
tnin
ger
36
Systemoversikt
• Krever at APP-en virker på en smarttelefon med Android 4.4 eller senere, eller iOS 9 eller senere. Men det er ingen garanti for at APP-en vi virke korrekt på alle Android/OS-versjoner.
• Nettverksadapteren er spesielt utformet som en terminal for “Panasonic Comfort Cloud” -appen.
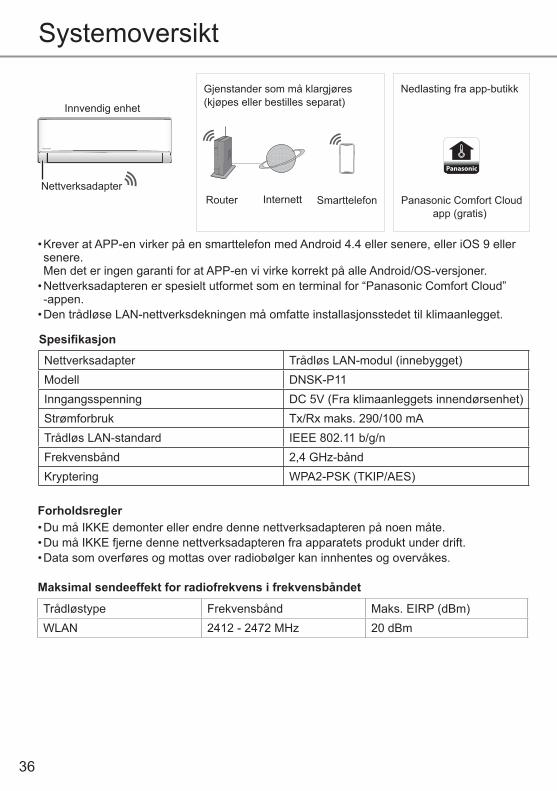
• Den trådløse LAN-nettverksdekningen må omfatte installasjonsstedet til klimaanlegget.
Panasonic
Nedlasting fra app-butikk
Router Internett Smarttelefon
Gjenstander som må klargjøres (kjøpes eller bestilles separat)
Panasonic Comfort Cloudapp (gratis)
Innvendig enhet
Nettverksadapter
Nettverksadapter Trådløs LAN-modul (innebygget)Modell DNSK-P11Inngangsspenning DC 5V (Fra klimaanleggets innendørsenhet)Strømforbruk Tx/Rx maks. 290/100 mATrådløs LAN-standard IEEE 802.11 b/g/nFrekvensbånd 2,4 GHz-båndKryptering WPA2-PSK (TKIP/AES)
Spesifi kasjon
Maksimal sendeeffekt for radiofrekvens i frekvensbåndet
Trådløstype Frekvensbånd Maks. EIRP (dBm)WLAN 2412 - 2472 MHz 20 dBm
• Du må IKKE demonter eller endre denne nettverksadapteren på noen måte.• Du må IKKE fjerne denne nettverksadapteren fra apparatets produkt under drift.• Data som overføres og mottas over radiobølger kan innhentes og overvåkes.
Forholdsregler
37
Nor
skS
yste
mov
ersi
kt /
Slik
bru
ker d
u
App-installasjon
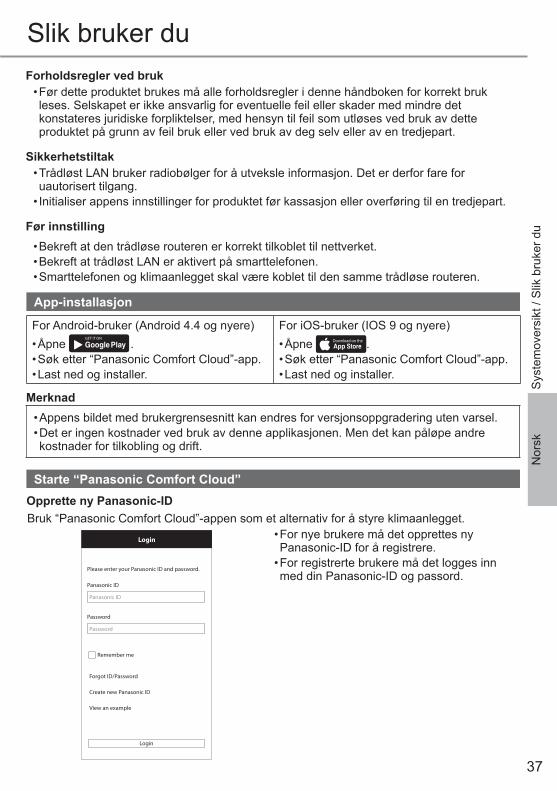
Starte “Panasonic Comfort Cloud”
• For nye brukere må det opprettes ny Panasonic-ID for å registrere.
• For registrerte brukere må det logges inn med din Panasonic-ID og passord.
Bruk “Panasonic Comfort Cloud”-appen som et alternativ for å styre klimaanlegget.
Please enter your Panasonic ID and password.
Panasonic ID
Password
Password
Remember me
Forgot ID/Password
Create new Panasonic ID
View an example
Login
Login
Panasonic ID
Opprette ny Panasonic-ID
Slik bruker du
Før innstilling• Bekreft at den trådløse routeren er korrekt tilkoblet til nettverket.• Bekreft at trådløst LAN er aktivert på smarttelefonen.• Smarttelefonen og klimaanlegget skal være koblet til den samme trådløse routeren.
Forholdsregler ved bruk• Før dette produktet brukes må alle forholdsregler i denne håndboken for korrekt bruk leses. Selskapet er ikke ansvarlig for eventuelle feil eller skader med mindre det konstateres juridiske forpliktelser, med hensyn til feil som utløses ved bruk av dette produktet på grunn av feil bruk eller ved bruk av deg selv eller av en tredjepart.
Sikkerhetstiltak• Trådløst LAN bruker radiobølger for å utveksle informasjon. Det er derfor fare for uautorisert tilgang.
• Initialiser appens innstillinger for produktet før kassasjon eller overføring til en tredjepart.
For Android-bruker (Android 4.4 og nyere)• Åpne
GET IT ON
Google Play .• Søk etter “Panasonic Comfort Cloud”-app.• Last ned og installer.
For iOS-bruker (IOS 9 og nyere)• Åpne Download on the
App Store .• Søk etter “Panasonic Comfort Cloud”-app.• Last ned og installer.
Merknad• Appens bildet med brukergrensesnitt kan endres for versjonsoppgradering uten varsel.• Det er ingen kostnader ved bruk av denne applikasjonen. Men det kan påløpe andre kostnader for tilkobling og drift.
38
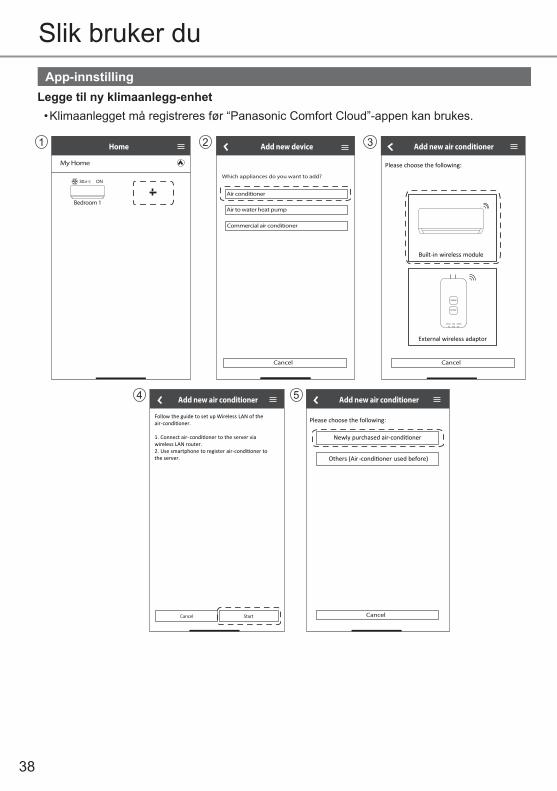
App-innstillingLegge til ny klimaanlegg-enhet• Klimaanlegget må registreres før “Panasonic Comfort Cloud”-appen kan brukes.
Commercial air conditioner
My Home
ON
3
5
1 2
4
Slik bruker du
39
Nor
sk
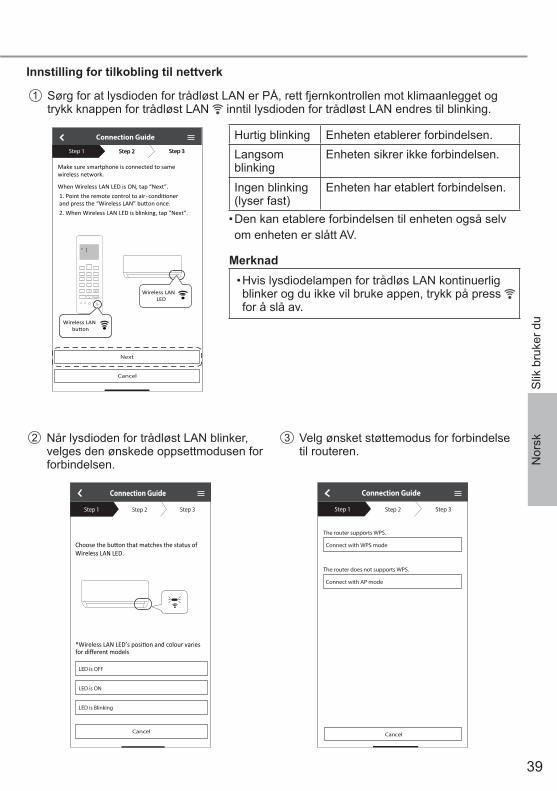
Innstilling for tilkobling til nettverk
1 Sørg for at lysdioden for trådløst LAN er PÅ, rett fjernkontrollen mot klimaanlegget og trykk knappen for trådløst LAN inntil lysdioden for trådløst LAN endres til blinking.
3 Velg ønsket støttemodus for forbindelse til routeren.
Connection Guide
Step 1 Step 2 Step 3
Connect with WPS mode
Connect with AP mode
The router supports WPS.
The router does not supports WPS.
Cancel
2 Når lysdioden for trådløst LAN blinker, velges den ønskede oppsettmodusen for forbindelsen.
Wireless LAN LED.
Connection Guide
Step 1 Step 2 Step 3
LED is OFF
LED is ON
LED is Blinking
Cancel
Make sure smartphone is connected to same wireless network.
When Wireless LAN LED is ON, tap “Next”.1. Point the remote control to air-and press the “Wireless LAN” bu on once. 2. When Wireless LAN LED is blinking, tap “Next”.
Connection Guide
Cancel
Next
Step 1 Step 2 Step 3Step 1 Step 2 Step 3
condi oner
Wireless LAN LED
SET
CANCEL
Wireless LAN bu on
Wireless LAN bu on
Slik
bru
ker d
u
Merknad• Hvis lysdiodelampen for trådløs LAN kontinuerlig blinker og du ikke vil bruke appen, trykk på press for å slå av.
Hurtig blinking Enheten etablerer forbindelsen.Langsom blinking
Enheten sikrer ikke forbindelsen.
Ingen blinking (lyser fast)
Enheten har etablert forbindelsen.
• Den kan etablere forbindelsen til enheten også selv om enheten er slått AV.
40
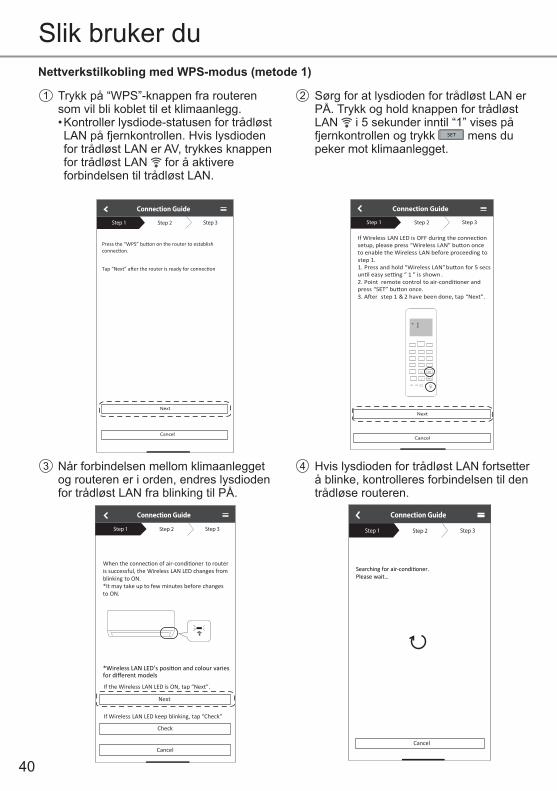
Nettverkstilkobling med WPS-modus (metode 1)
1 Trykk på “WPS”-knappen fra routeren som vil bli koblet til et klimaanlegg.• Kontroller lysdiode-statusen for trådløst LAN på fjernkontrollen. Hvis lysdioden for trådløst LAN er AV, trykkes knappen for trådløst LAN for å aktivere forbindelsen til trådløst LAN.
Connection Guide
Step 1 Step 2 Step 3
Next
Cancel
2 Sørg for at lysdioden for trådløst LAN er PÅ. Trykk og hold knappen for trådløst LAN i 5 sekunder inntil “1” vises på fjernkontrollen og trykk SET mens du peker mot klimaanlegget.
If Wireless LAN LED is OFF during the connec on setup, please press “Wireless LAN” bu on once to enable the Wireless LAN before proceeding tostep 1 .1. Press and hold “Wireless LAN” bu on for 5 secs un l easy se ng “ 1 ” is shown .2. Point remote control to air-condi oner and press “SET” bu on once.3. A er step 1 & 2 have been done, tap “Next”.
Connection Guide
Step 1 Step 2 Step 3
Cancel
Next
SET
CANCEL
4 Hvis lysdioden for trådløst LAN fortsetter å blinke, kontrolleres forbindelsen til den trådløse routeren.
Searching for air-condi oner.Please wait…
Connection Guide
Step 1 Step 2 Step 3
Cancel
3 Når forbindelsen mellom klimaanlegget og routeren er i orden, endres lysdioden for trådløst LAN fra blinking til PÅ.
Connection Guide
Step 1 Step 2 Step 3
When the connec on of air-condi oner to router is successful, the Wireless LAN LED changes from blinking to ON. *It may take up to few minutes before changes to ON.
Next
If the Wireless LAN LED is ON, tap “Next”.
If Wireless LAN LED keep blinking, tap “Check”
Cancel
Check
Slik bruker du
41
Nor
sk
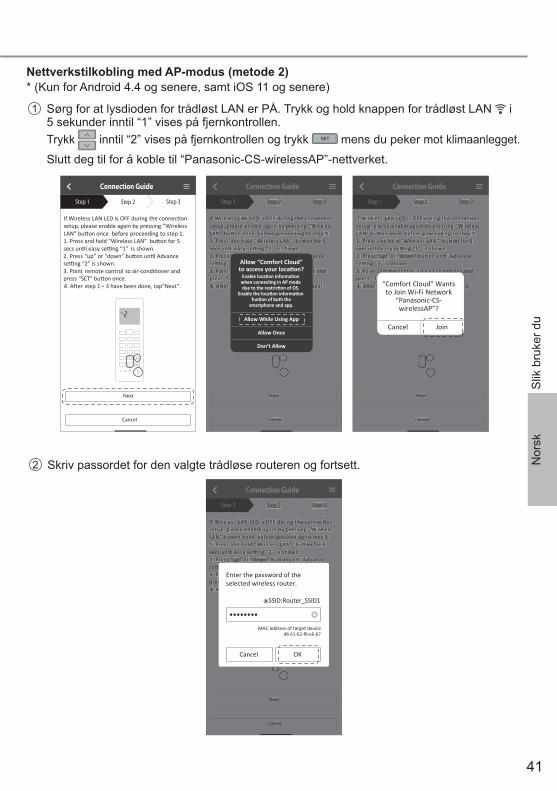
Nettverkstilkobling med AP-modus (metode 2)* (Kun for Android 4.4 og senere, samt iOS 11 og senere)
1 Sørg for at lysdioden for trådløst LAN er PÅ. Trykk og hold knappen for trådløst LAN i 5 sekunder inntil “1” vises på fjernkontrollen.Trykk inntil “2” vises på fjernkontrollen og trykk SET mens du peker mot klimaanlegget.
Slutt deg til for å koble til “Panasonic-CS-wirelessAP”-nettverket.
2 Skriv passordet for den valgte trådløse routeren og fortsett.
Slik
bru
ker d
uIf Wireless LAN LED is OFF during the connec on setup, please enable again by pressing “Wireless LAN” bu on once before proceeding to step 1 .1. Press and hold “Wireless LAN” bu on for 5 secs un l easy se ng “1” is shown.2. Press “up” or “down” bu on un l Advance se ng “2” is shown.3. Point remote control to air-condi oner and press “SET” bu on once.4. A er step 1 ~ 3 have been done, tap“Next”.
Connection Guide
Step 1 Step 2 Step 3
Cancel
Next
SET
CANCEL
If Wireless LAN LED is OFF during the connec onsetup, please enable again by pressing “WirelessLAN” bu on once before proceeding to step 1.1. Press and hold “Wireless LAN” bu on for 5 secs un l easy se ng “1” is shown.2. Press “up” or “down” bu on un l Advancese ng “2” is shown.3. Point remote control to air-condi oner and press “SET” bu on once.4. A er step 1 ~ 3 have been done, tap“Next”.
Connection Guide
Step 1 Step 2 Step 3
Cancel
Next
SET
CANCEL
Enter the password of theselected wireless router.
MAC address of target device
SSID:Router_SSID1
Cancel OK
d8-61-62-f8-e6-67
If Wireless LAN LED is OFF during the connec on setup, please enable again by pressing “Wireless LAN” bu on once before proceeding to step 1 .1. Press and hold “Wireless LAN” bu on for 5 secs un l easy se ng “1” is shown.2. Press “up” or “down” bu on un l Advance se ng “2” is shown.3. Point remote control to air-condi oner and press “SET” bu on once.4. A er step 1 ~ 3 have been done, tap“Next”.
Connection Guide
Step 1 Step 2 Step 3
Cancel
Next
SET
CANCEL
If Wireless LAN LED is OFF during the connec on setup, please enable again by pressing “Wireless LAN” bu on once before proceeding to step 1 .1. Press and hold “Wireless LAN” bu on for 5 secs un l easy se ng “1” is shown.2. Press “up” or “down” bu on un l Advance se ng “2” is shown.3. Point remote control to air-condi oner and press “SET” bu on once.4. A er step 1 ~ 3 have been done, tap“Next”.
Connection Guide
Step 1 Step 2 Step 3
Cancel
Next
SET
CANCEL
If Wireless LAN LED is OFF during the connec onsetup, please enable again by pressing “WirelessLAN” bu on once before proceeding to step 1.1. Press and hold “Wireless LAN” bu on for 5 secs un l easy se ng “1” is shown.2. Press “up” or “down” bu on un l Advancese ng “2” is shown.3. Point remote control to air-condi oner and press “SET” bu on once.4. A er step 1 ~ 3 have been done, tap“Next”.
Connection Guide
Step 1 Step 2 Step 3
Cancel
Next
SET
CANCEL
Allow “Comfort Cloud”
If Wireless LAN LED is OFF during the connec on setup, please enable again by pressing “Wireless LAN” bu on once before proceeding to step 1 .1. Press and hold “Wireless LAN” bu on for 5 secs un l easy se ng “1” is shown.2. Press “up” or “down” bu on un l Advance se ng “2” is shown.3. Point remote control to air-condi oner and press “SET” bu on once.4. A er step 1 ~ 3 have been done, tap“Next”.
Connection Guide
Step 1 Step 2 Step 3
Cancel
Next
SET
CANCEL
If Wireless LAN LED is OFF during the connec onsetup, please enable again by pressing “WirelessLAN” bu on once before proceeding to step 1 .1. Press and hold “Wireless LAN” bu on for 5secs un l easy se ng “1” is shown.2. Press “up” or “down” bu on un l Advancese ng “2” is shown.3. Point remote control to air-condi oner and press “SET” bu on once.4. A er step 1 ~ 3 have been done, tap“Next”.
Connection Guide
Step 1 Step 2 Step 3
Cancel
Next
SET
CANCEL
“Comfort Cloud” Wantsto Join Wi-Fi Network
“Panasonic-CS-wirelessAP”?
Cancel Join
42
Slik bruker du
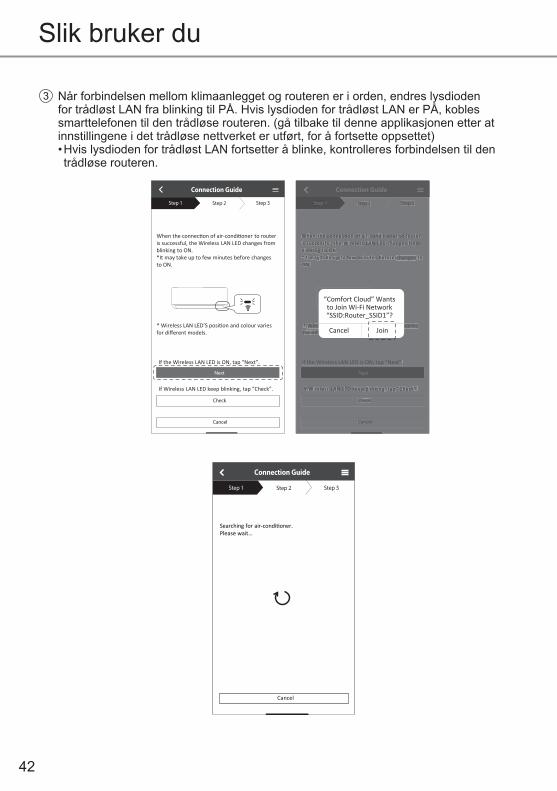
3 Når forbindelsen mellom klimaanlegget og routeren er i orden, endres lysdioden for trådløst LAN fra blinking til PÅ. Hvis lysdioden for trådløst LAN er PÅ, kobles smarttelefonen til den trådløse routeren. (gå tilbake til denne applikasjonen etter at innstillingene i det trådløse nettverket er utført, for å fortsette oppsettet)• Hvis lysdioden for trådløst LAN fortsetter å blinke, kontrolleres forbindelsen til den trådløse routeren.
Searching for air-condi oner.Please wait…
Connection Guide
Step 1 Step 2 Step 3
Cancel
Connection Guide
Step 1 Step 2 Step 3
When the connec on of air-condi oner to router is successful, the Wireless LAN LED changes from blinking to ON. *It may take up to few minutes before changes to ON.
If Wireless LAN LED keep blinking, tap “Check”.
If the Wireless LAN LED is ON, tap “Next”. If the Wireless LAN LED is ON, tap “Next”.
Cancel
Check
* *
Connection Guide
Step 1 Step 2 Step 3
When the connec on of air-condi oner to router is successful, the Wireless LAN LED changes from blinking to ON. *It may take up to few minutes before changes to ON.
If Wireless LAN LED keep blinking, tap “Check”.
Cancel
Check
Next Next
If the Wireless LAN LED is ON, tap “Next”.
*
Connection Guide
Step 1 Step 2 Step 3
When the connec on of air-condi oner to routeris successful, the Wireless LAN LED changes fromblinking to ON.*It may take up to few minutes before changes toON.
If Wireless LAN LED keep blinking, tap “Check”.
Cancel
Check
Next
“Comfort Cloud” Wantsto Join Wi-Fi Network“SSID:Router_SSID1”?
Cancel Join
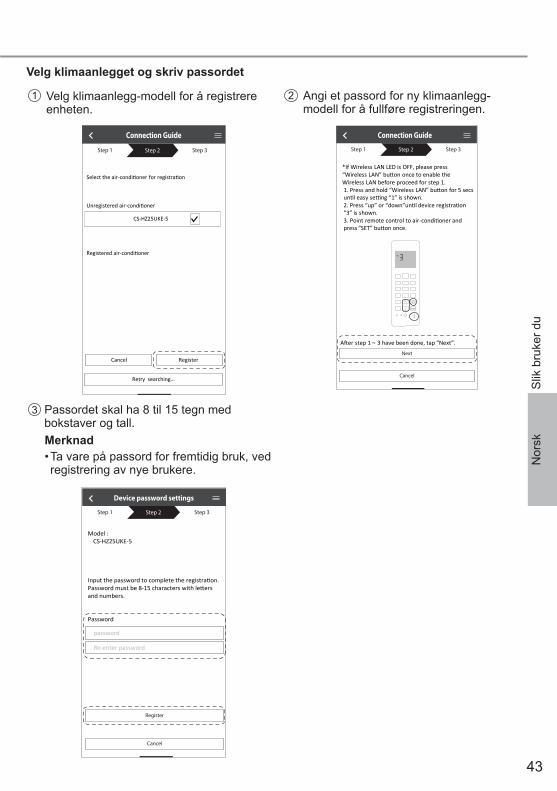
43
Nor
sk
Velg klimaanlegget og skriv passordet
2
3
Angi et passord for ny klimaanlegg-modell for å fullføre registreringen.
Connection Guide
Step 1 Step 2 Step 3
Cancel
Next
*If Wireless LAN LED is OFF, please press “Wireless LAN” bu on once to enable the Wireless LAN before proceed for step 1 . 1. Press and hold “Wireless LAN” bu on for 5 secs un l easy se ng “1” is shown.2. Press “up” or “down”un l device registra on “3” is shown.3. Point remote control to air-condi oner and press “SET” bu on once.
A er step 1 ~ 3 have been done, tap “Next”.
SET
CANCEL
1 Velg klimaanlegg-modell for å registrere enheten.
Select the air-condi oner for registra on
Unregistered air-condi oner
Registered air-condi oner
Retry searching…
Connection Guide
Step 1 Step 2 Step 3
CS-HZ25UKE-5
Retry searching…
Cancel Register
Passordet skal ha 8 til 15 tegn med bokstaver og tall.
Model :CS-HZ25UKE-5
Input the password to complete the registra on.Password must be 8-15 characters with le ers and numbers.
Password
password
Re-enter password
Device password settings
Step 1 Step 2 Step 3
Cancel
Register
Merknad• Ta vare på passord for fremtidig bruk, ved registrering av nye brukere.
Slik
bru
ker d
u
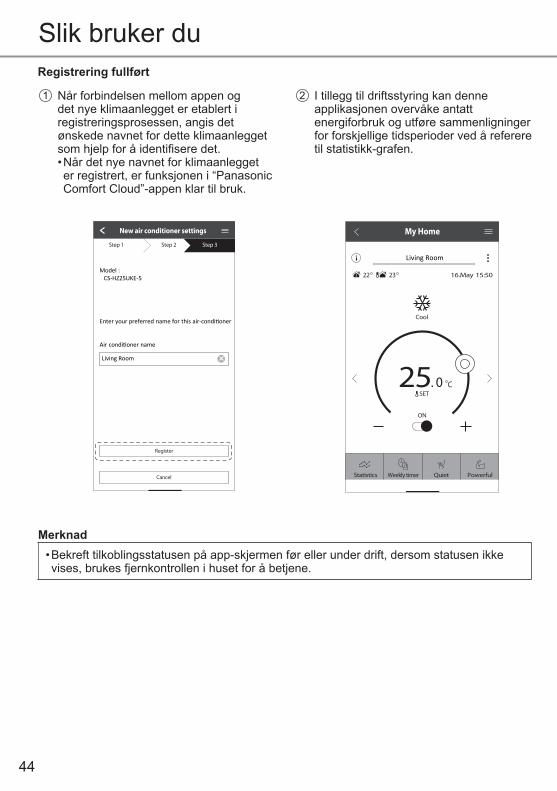
44
Registrering fullført
1 Når forbindelsen mellom appen og det nye klimaanlegget er etablert i registreringsprosessen, angis det ønskede navnet for dette klimaanlegget som hjelp for å identifi sere det.• Når det nye navnet for klimaanlegget er registrert, er funksjonen i “Panasonic Comfort Cloud”-appen klar til bruk.
2 I tillegg til driftsstyring kan denne applikasjonen overvåke antatt energiforbruk og utføre sammenligninger for forskjellige tidsperioder ved å referere til statistikk-grafen.
-
Enter your preferred name for this air-condi oner
Air condi oner name
Model :CS HZ25UKE
New air conditioner settings
Step 3Step 1 Step 2
-Model :
CS HZ25UKE-5
Cancel
Register
Living Room
My Home
22 23 16.May 15:50
25. 0 CSET
Cool
Living Room
Statistics Weekly timer Quiet Powerful
ON
Slik bruker du
Merknad• Bekreft tilkoblingsstatusen på app-skjermen før eller under drift, dersom statusen ikke vises, brukes fjernkontrollen i huset for å betjene.
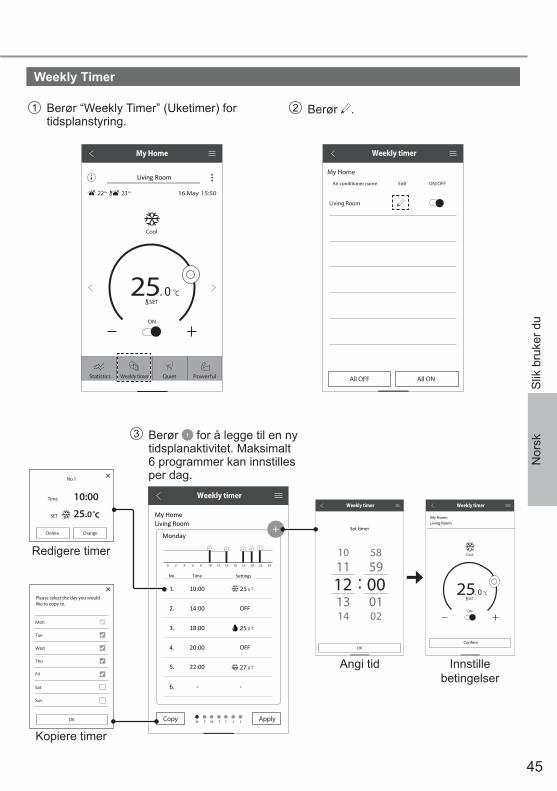
45
Nor
sk
App InstallationWeekly Timer
1 Berør “Weekly Timer” (Uketimer) for tidsplanstyring.
2 Berør .
3 Berør for å legge til en ny tidsplanaktivitet. Maksimalt 6 programmer kan innstilles per dag.
Weekly timer
Living Room
Monday
No. Time
1. 10:00
2. 14:00 OFF
OFF
3. 18:00
4. 20:00
5.
6.
22:00
- -
Settings
My Home
Copy Apply
0 2 4 6 8 10 12 14 16 18 20 22 24
25. 0 C
25. 0 C
27. 0 C
M T W T F S S
Delete
No.1
Time
SET
10:00
25.0˚c
Change
Please select the day you wouldlike to copy to.
Mon
Tue
Wed
Thu
Fri
Sat
Sun
OK
Redigere timer
Kopiere timer
Weekly timer
25. 0 CSET
Cool
Living RoomMy Home
Confirm
ON
Angi tid Innstille betingelser
Weekly timer
10 58
14 02
1112 00:
59
13 01
OK
My Home
22 23 16.May 15:50
25. 0 CSET
Cool
Statistics Weekly timer Quiet
Living Room
Powerful
ON
Weekly timer
All OFF All ON
My Home
Living Room
Air conditioner name Edit ON/OFF
Slik
bru
ker d
u
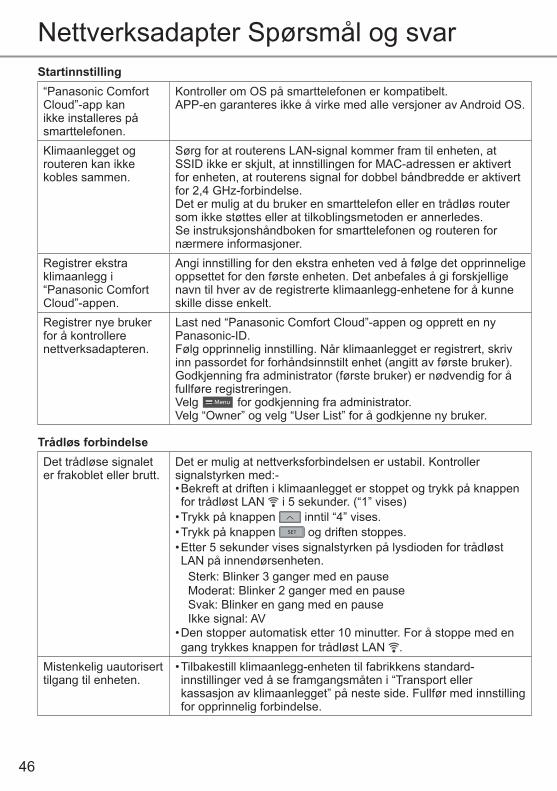
46
Nettverksadapter Spørsmål og svarStartinnstilling“Panasonic Comfort Cloud”-app kan ikke installeres på smarttelefonen.
Kontroller om OS på smarttelefonen er kompatibelt.APP-en garanteres ikke å virke med alle versjoner av Android OS.
Klimaanlegget og routeren kan ikke kobles sammen.
Sørg for at routerens LAN-signal kommer fram til enheten, at SSID ikke er skjult, at innstillingen for MAC-adressen er aktivert for enheten, at routerens signal for dobbel båndbredde er aktivert for 2,4 GHz-forbindelse.Det er mulig at du bruker en smarttelefon eller en trådløs router som ikke støttes eller at tilkoblingsmetoden er annerledes. Se instruksjonshåndboken for smarttelefonen og routeren for nærmere informasjoner.
Registrer ekstra klimaanlegg i “Panasonic Comfort Cloud”-appen.
Angi innstilling for den ekstra enheten ved å følge det opprinnelige oppsettet for den første enheten. Det anbefales å gi forskjellige navn til hver av de registrerte klimaanlegg-enhetene for å kunne skille disse enkelt.
Registrer nye bruker for å kontrollere nettverksadapteren.
Last ned “Panasonic Comfort Cloud”-appen og opprett en ny Panasonic-ID.Følg opprinnelig innstilling. Når klimaanlegget er registrert, skriv inn passordet for forhåndsinnstilt enhet (angitt av første bruker).Godkjenning fra administrator (første bruker) er nødvendig for å fullføre registreringen.Velg Menu for godkjenning fra administrator.Velg “Owner” og velg “User List” for å godkjenne ny bruker.
Trådløs forbindelseDet trådløse signalet er frakoblet eller brutt.
Det er mulig at nettverksforbindelsen er ustabil. Kontroller signalstyrken med:-• Bekreft at driften i klimaanlegget er stoppet og trykk på knappen for trådløst LAN i 5 sekunder. (“1” vises)
• Trykk på knappen inntil “4” vises.• Trykk på knappen SET og driften stoppes.• Etter 5 sekunder vises signalstyrken på lysdioden for trådløst LAN på innendørsenheten.
Sterk: Blinker 3 ganger med en pauseModerat: Blinker 2 ganger med en pauseSvak: Blinker en gang med en pauseIkke signal: AV
• Den stopper automatisk etter 10 minutter. For å stoppe med en gang trykkes knappen for trådløst LAN .
Mistenkelig uautorisert tilgang til enheten.
• Tilbakestill klimaanlegg-enheten til fabrikkens standard-innstillinger ved å se framgangsmåten i “Transport eller kassasjon av klimaanlegget” på neste side. Fullfør med innstilling for opprinnelig forbindelse.
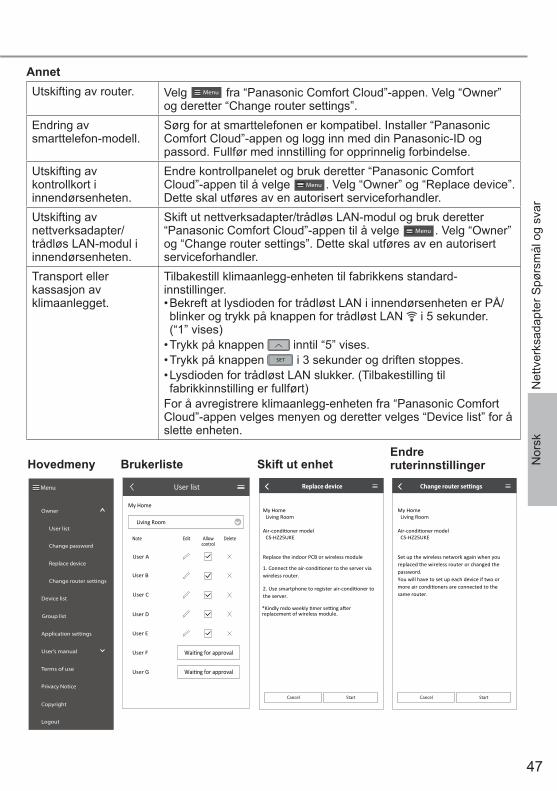
47
Nor
sk
Menu
User list
Owner
Change password
Replace device
Change router settings
Device list
Group list
Application settings
User’s manual
Terms of use
Privacy Notice
Copyright
Logout
Hovedmeny Brukerliste
My Home
User list
Living Room
Note Edit Allowcontrol
Delete
User A
User B
User C
User D
User E
User F
User G
My HomeLiving Room
CS-HZ25UKE
Replace device
Cancel Start
Skift ut enhet
My HomeLiving Room
CS-HZ25UKE
Change router settings
Cancel Start
Endre ruterinnstillinger
AnnetUtskifting av router. Velg Menu fra “Panasonic Comfort Cloud”-appen. Velg “Owner”
og deretter “Change router settings”.Endring av smarttelefon-modell.
Sørg for at smarttelefonen er kompatibel. Installer “Panasonic Comfort Cloud”-appen og logg inn med din Panasonic-ID og passord. Fullfør med innstilling for opprinnelig forbindelse.
Utskifting av kontrollkort i innendørsenheten.
Endre kontrollpanelet og bruk deretter “Panasonic Comfort Cloud”-appen til å velge Menu . Velg “Owner” og “Replace device”. Dette skal utføres av en autorisert serviceforhandler.
Utskifting av nettverksadapter/trådløs LAN-modul i innendørsenheten.
Skift ut nettverksadapter/trådløs LAN-modul og bruk deretter “Panasonic Comfort Cloud”-appen til å velge Menu . Velg “Owner” og “Change router settings”. Dette skal utføres av en autorisert serviceforhandler.
Transport eller kassasjon av klimaanlegget.
Tilbakestill klimaanlegg-enheten til fabrikkens standard-innstillinger.• Bekreft at lysdioden for trådløst LAN i innendørsenheten er PÅ/blinker og trykk på knappen for trådløst LAN i 5 sekunder. (“1” vises)
• Trykk på knappen inntil “5” vises.• Trykk på knappen SET i 3 sekunder og driften stoppes.• Lysdioden for trådløst LAN slukker. (Tilbakestilling til fabrikkinnstilling er fullført)
For å avregistrere klimaanlegg-enheten fra “Panasonic Comfort Cloud”-appen velges menyen og deretter velges “Device list” for å slette enheten.
Net
tver
ksad
apte
r Spø
rsm
ål o
g sv
ar
48
FeilsøkingFølgende symptomer indikerer ikke funksjonsfeil.
Symptom ÅrsakLysdioden for trådløst LAN forblir PÅ mens enheten slås AV.
• Enhetens forbindelse med trådløst LAN til routeren er aktivert.
LED for trådløst LAN blinker kontinuerlig. • Enhetens forbindelse med trådløst LAN til routeren er ikke etablert. Kontroller forbindelsen på nytt.
• Hvis du ikke vil bruke appen, trykker du på for å slå av.
InformasjonSamsvarserklæring (DOC)“Panasonic Corporation” erklærer herved at dette produktet er i samsvar med de grunnleggende krav og øvrige relevante krav i direktiv 2014/53/EU
Den fulle teksten i EU-samsvarserklæringen er tilgjengelig på følgende Internett-adresse: http://www.ptc.panasonic.eu/Autorisert representant: Panasonic Testing Centre, Panasonic Marketing Europe GmbH, Winsbergring 15, 22525 Hamburg, TysklandNorge: Det foreligger bruksrestriksjoner innenfor en radius på 20 km fra sentrum i Ny-Ålesund på Svalbard.
49
Nor
sk
Informasjon
Oppdateringsfunksjon for fastvareDette produktet har funksjonalitet for tilkobling til Panasonics server for fastvareoppdatering via Internett for automatisk oppdatering av enhetens fastvare til den siste versjonen.For å oppdatere fastvaren vil enheten kontrollere en gang per dag etter oppstart om fastvaren er den siste versjonen. Og hvis det trengs en oppdatering, blir oppdateringen gjennomført og enheten starter automatisk på nytt. Drift er ikke mulig mens enheten startes på nytt (dette tar omtrent 1-5 minutter).
Informasjon om programvarelisensDette produktet inneholder følgende programvare:(1) Programvare som er utviklet uavhengig av eller for Panasonic Corporation,(2) Programvare som eies av tredjepart og er lisensiert til Panasonic Corporation,(3) Åpen kilde-programvaren under BSD-lisensen og/eller tilsvarende lisenser.Programvaren som er kategorisert som av (3), distribueres i håp om at den vil være nyttig, men UTEN NOE GARANTI, også uten implisitt garanti for SALGBARHET eller PASSENDE FOR ET BESTEMT FORMÅL.De følgende lisensbetingelsene gjelder for åpen kilde-komponenter.1. Forbruker-lisensCopyright (C) 2003-2016, Jouni Malinen <[email protected] > og bidragsytereMed enerett.Denne programvaren distribueres, brukes og endres under betingelsene i BSD-lisens:Videre distribusjon og bruk i kildeform og binær form, med eller uten endringer, er tillatt under forutsetning av at følgende betingelser er tilfredsstilt:1. Videre distribusjon av kildekode må beholde copyright-merknaden ovenfor, denne listen med betingelser og følgende ansvarsfraskrivelse.2. Videre distribusjon i binær form må reprodusere copyright-merknaden ovenfor, denne listen med betingelser og følgende ansvarsfraskrivelse i dokumentasjonen og/eller annet materiale som leveres ved distribusjonen.3. Verken navnet/navnene til ovennevnte innehaver(e) av copyright, eller navnene til bidragsyterne kan benyttes for å støtte eller fremme produkter som er utviklet fra denne programvaren uten spesiell skriftlig forhåndstillatelse.DENNE PROGRAMVAREN LEVERES AV COPYRIGHT-INNEHAVERNE OG BIDRAGSYTERNE SOM DEN ER, OG UTEN GARANTIER AV NOE SLAG, DIREKTE ELLER INDIREKTE, INKLUDERT, MEN IKKE BEGRENSET TIL, DIREKTE GARANTIER FOR SALGBARHET OG EGNETHET FOR ET BESTEMT FORMÅL. COPYRIGHT-INNEHAVERNE OG BIDRAGSYTERNE SKAL IKKE I NOEN TILFELLER VÆRE ANSVARLIG FOR DIREKTE, INDIREKTE, UHELDIGE, SPESIELLE, TYPISKE ELLER FØLGESKADER (INKLUDERT, MEN IKKE BEGRENSET TIL, ANSKAFFELSE AV ERSTATNINGSVARER ELLER TJENESTER, TAP AV BRUK, DATA ELLER FORTJENESTER, ELLER AVBRUDD I VIRKSOMHET) UANSETT HVORDAN DE ER OPPSTÅTT OG UANSETT ERSTATNINGSANSVARSTEORIER, VERKEN I KONTRAKTSFORM, STRENGT ERSTATNINGSANSVAR ELLER SKADE (INKLUDERT UAKTSOMHET ELLER ANNET) SOM MÅTTE OPPSTÅ PÅ NOEN MÅTE SOM FØLGE AV BRUK AV DENNE PROGRAMVAREN, SELV OM DET ER ADVART OM MULIGHET FOR SLIKE SKADER.
Feils
økin
g / I
nfor
mas
jon
50
Sisäänrakennettu verkkosovitin, jolla ilmastointilaitteen toimintaa voi ohjata mistä tahansa.
SisällysluetteloTurvatoimet ........................................................................................................................................ 50-51
Järjestelmän yleiskatsaus ....................................................................................................................... 52
Käyttö ................................................................................................................................................ 53-61
Kysymyksiä ja vastauksia verkkosovittimesta ................................................................................... 62-63
Vianetsintä .............................................................................................................................................. 64
Tiedot .................................................................................................................................................. 64-65
Copyright ........................................................................................................................................... 82-86
Kiitos, että olet ostanut tämän Panasonic-tuotteen.
TurvatoimetEnnen kuin yrität ohjata/käyttää tätä ilmastointilaitetuotetta etäsijainnista, varmista laitteen asennus ja sen ympäröivä alue ja huomioi mahdollisesti lähistöllä olevat henkilöt.Voit välttää loukkaantumisia ja omaisuusvahinkoja noudattamalla seuraavia ohjeita: Ohjeiden huomiotta jättäminen ja yksikön virheellinen käyttö voi johtaa vikoihin ja vaurioihin, joiden vakavuus luokitellaan alla olevalla tavalla:
VAARATämä merkki varoittaa kuoleman ja vakavien loukkaantumisten vaarasta.
VAROITUSTämä merkki varoittaa loukkaantumisen ja aineellisen vahingon vaarasta.
Ohjeet, joita tulee noudattaa, luokitellaan seuraavien symbolien avulla:
Tämä symboli merkitsee KIELLETTYÄ toimintaa.
Tämä symboli merkitsee PAKOLLISTA TOIMINTOA.
VAARAVerkkosovitin (aktivoitu)
Älä käytä sisäyksikköä lääketieteellisten laitteiden tai automaattisten ohjauslaitteiden (automaattiovi, vaijerihälyttimet jne.) lähellä.(Sisäyksikön radioaallot voivat aiheuttaa häiriötä laitteisiin ja aiheuttaa toimintahäiriöstä johtuvan tapaturman)
51
Suo
mi
TurvatoimetPysyttele vähintään 15 cm:n päässä sisäyksiköstä, jos sinulla on sydämentahdistin.(Sisäyksikön radioaalto voi häiritä tahdistimen toimintaa.)
VAROITUSVerkkosovitin (aktivoitu)
Tarkista seuraavat lisävaatimukset (Koti):• Aseta virransyöttö huolellisesti. Pölyä ei ole kertynyt virransyöttöön.(Virransyötön kosketushäiriöstä voi aiheutua tulipalo.)
• Muiden henkilöiden asettaman ajastinaktivoinnin tila.(Odottamaton käynnistyminen ja pysähtyminen voi aiheuttaa loukkaantumisen ihmisille ja lemmikeille tai vahingoittaa kasveja.)
• Ilmastointilaitteessa ei saa olla vikoja tai vaurioita, kuten ilmavirran muutosta. Varmista, ettei mikään esine pääse helposti siirtymään paikaltaan suoraan siihen puhaltavan ilmavirran vuoksi. Kaatuvat tai liikkuvat esineet voivat aiheuttaa vaaratilanteita, kuten tulipalon, loukkaantumisen jne.
• Käytä aina talon sisäistä kaukosäädintä, jos tilassa on mahdollisesti sellaisia henkilöitä (esim. lapset, vammaiset, ikääntyneet tai sairaat), jotka eivät pysty hallitsemaan lämpötilaa itse ja tarvitsevat ilmastointilaitteen esiasetettuja määrityksiä.Etäkäytöstä johtuva lämpötilan nousu ja lasku voivat aiheuttaa tilassa olijoille epämukavuutta ja/tai häiritä heidän päivittäisiä toimiaan.Äkilliset lämpötilan muutokset vaikuttavat todennäköisesti kasveihin ja eläimiin.
Tarkista seuraavat vaatimukset, ennen kuin käytät ilmastointilaitetta etäältä:• Tiedota ilmastoidun alueen lähistöllä oleskeleville henkilöille, että ohjaat etäältä ilmastointilaitetta ja sen asetuksia. Näin voidaan välttää mahdolliset vakavat henkilöihin kohdistuvat vaikutukset, jotka johtuvat joko yllätyksestä tai lämpötilan äkillisistä muutoksista (mukavasta kylmään tai toisinpäin).(Tämä voi aiheuttaa vahinkoa ihmisen keholle johtuen äkillisistä ulkolämpötilan ja huoneenlämpötilan muutoksista. Lämpötilaa on mahdollista säätää kaukosäätimellä.)
-Jos Panasonic Comfort Cloud -sovelluksen päänäyttö ei näytä oikeaa toimintatilaa, käytä ilmastointilaitetta talon sisäisellä kaukosäätimellä.
• Koska sovellus käyttää verkkoyhteyttä, etäkäyttö ei ehkä ole toisinaan mahdollista tietoyhteys- ja/tai verkkokatkosten vuoksi (kuten Panasonic Cloud -palvelimen katkokset, verkko-operaattorien palvelinten katkokset, Wifi -yhteyden ongelmat jne.). Jos tällaisia toimintahäiriöitä ilmenee, käytä ilmastointilaitetta talon sisäisellä kaukosäätimellä.
Turv
atoi
met
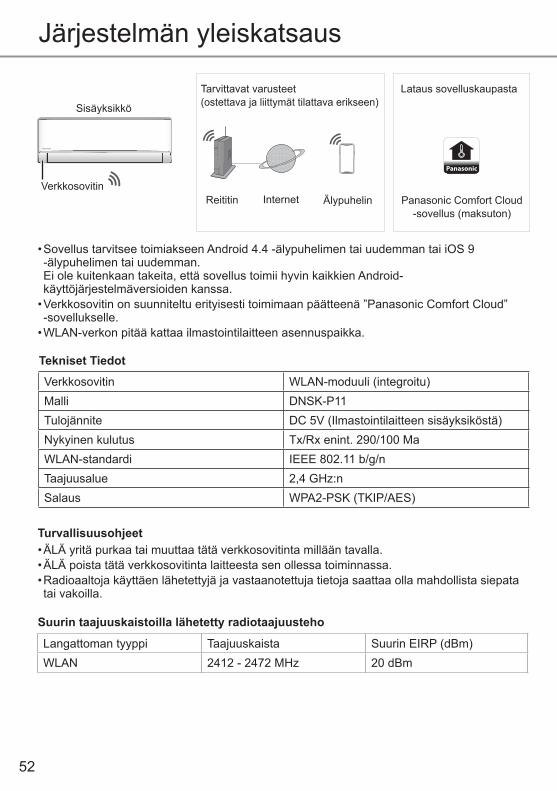
52
Järjestelmän yleiskatsaus
Panasonic
Lataus sovelluskaupasta
Reititin Internet Älypuhelin
Tarvittavat varusteet (ostettava ja liittymät tilattava erikseen)
Panasonic Comfort Cloud -sovellus (maksuton)
Sisäyksikkö
Verkkosovitin
Verkkosovitin WLAN-moduuli (integroitu)Malli DNSK-P11Tulojännite DC 5V (Ilmastointilaitteen sisäyksiköstä)Nykyinen kulutus Tx/Rx enint. 290/100 MaWLAN-standardi IEEE 802.11 b/g/nTaajuusalue 2,4 GHz:nSalaus WPA2-PSK (TKIP/AES)
• Sovellus tarvitsee toimiakseen Android 4.4 -älypuhelimen tai uudemman tai iOS 9 -älypuhelimen tai uudemman. Ei ole kuitenkaan takeita, että sovellus toimii hyvin kaikkien Android-käyttöjärjestelmäversioiden kanssa.
• Verkkosovitin on suunniteltu erityisesti toimimaan päätteenä ”Panasonic Comfort Cloud” -sovellukselle.
• WLAN-verkon pitää kattaa ilmastointilaitteen asennuspaikka.
Tekniset Tiedot
Suurin taajuuskaistoilla lähetetty radiotaajuusteho
Langattoman tyyppi Taajuuskaista Suurin EIRP (dBm)WLAN 2412 - 2472 MHz 20 dBm
• ÄLÄ yritä purkaa tai muuttaa tätä verkkosovitinta millään tavalla.• ÄLÄ poista tätä verkkosovitinta laitteesta sen ollessa toiminnassa.• Radioaaltoja käyttäen lähetettyjä ja vastaanotettuja tietoja saattaa olla mahdollista siepata tai vakoilla.
Turvallisuusohjeet
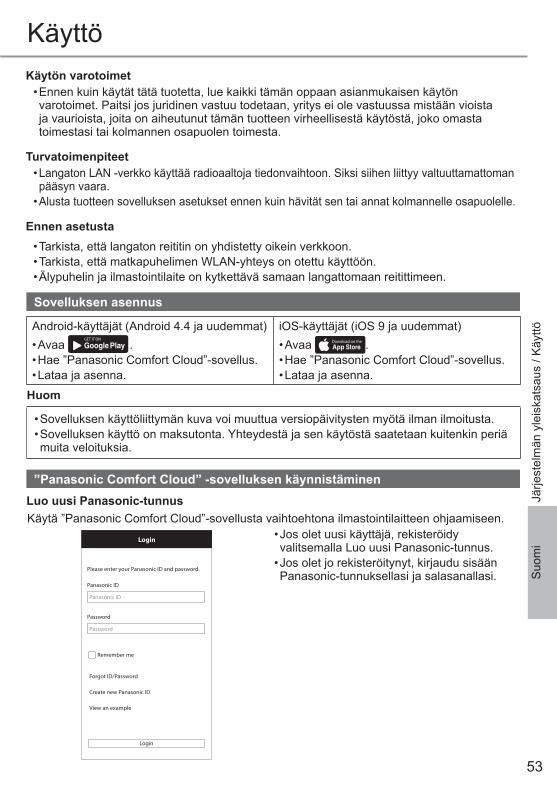
53
Suo
mi
Sovelluksen asennus
Android-käyttäjät (Android 4.4 ja uudemmat)• Avaa
GET IT ON
Google Play .• Hae ”Panasonic Comfort Cloud”-sovellus.• Lataa ja asenna.
iOS-käyttäjät (iOS 9 ja uudemmat)• Avaa Download on the
App Store .• Hae ”Panasonic Comfort Cloud”-sovellus.• Lataa ja asenna.
Huom
• Sovelluksen käyttöliittymän kuva voi muuttua versiopäivitysten myötä ilman ilmoitusta.• Sovelluksen käyttö on maksutonta. Yhteydestä ja sen käytöstä saatetaan kuitenkin periä muita veloituksia.
”Panasonic Comfort Cloud” -sovelluksen käynnistäminen
• Jos olet uusi käyttäjä, rekisteröidy valitsemalla Luo uusi Panasonic-tunnus.
• Jos olet jo rekisteröitynyt, kirjaudu sisään Panasonic-tunnuksellasi ja salasanallasi.
Käytä ”Panasonic Comfort Cloud”-sovellusta vaihtoehtona ilmastointilaitteen ohjaamiseen.
Please enter your Panasonic ID and password.
Panasonic ID
Password
Password
Remember me
Forgot ID/Password
Create new Panasonic ID
View an example
Login
Login
Panasonic ID
Luo uusi Panasonic-tunnus
Käyttö
Ennen asetusta• Tarkista, että langaton reititin on yhdistetty oikein verkkoon.• Tarkista, että matkapuhelimen WLAN-yhteys on otettu käyttöön.• Älypuhelin ja ilmastointilaite on kytkettävä samaan langattomaan reitittimeen.
Käytön varotoimet• Ennen kuin käytät tätä tuotetta, lue kaikki tämän oppaan asianmukaisen käytön varotoimet. Paitsi jos juridinen vastuu todetaan, yritys ei ole vastuussa mistään vioista ja vaurioista, joita on aiheutunut tämän tuotteen virheellisestä käytöstä, joko omasta toimestasi tai kolmannen osapuolen toimesta.
Turvatoimenpiteet• Langaton LAN -verkko käyttää radioaaltoja tiedonvaihtoon. Siksi siihen liittyy valtuuttamattoman pääsyn vaara.
• Alusta tuotteen sovelluksen asetukset ennen kuin hävität sen tai annat kolmannelle osapuolelle.
Järje
stel
män
yle
iska
tsau
s / K
äyttö
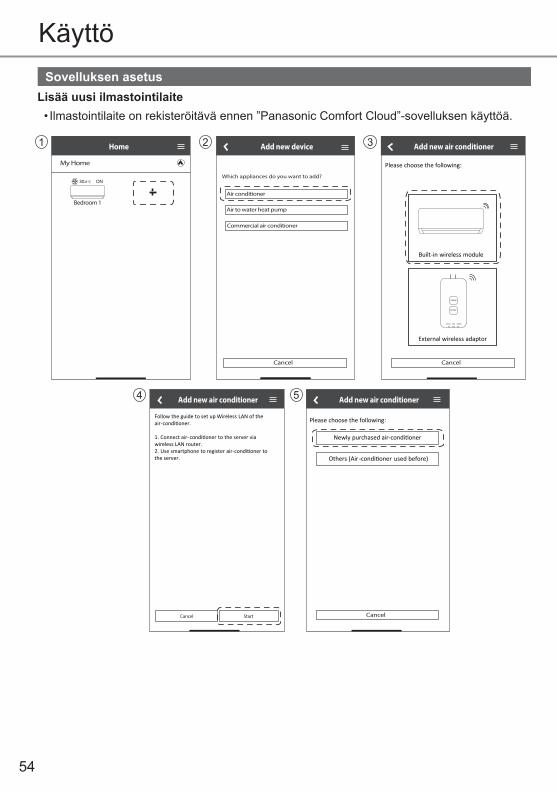
54
Sovelluksen asetusLisää uusi ilmastointilaite• Ilmastointilaite on rekisteröitävä ennen ”Panasonic Comfort Cloud”-sovelluksen käyttöä.
Commercial air conditioner
My Home
ON
3
5
1 2
4
Käyttö
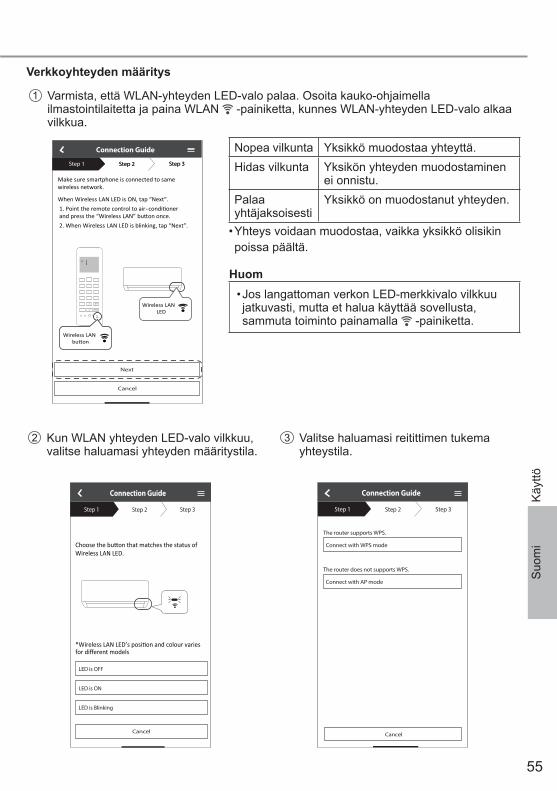
55
Suo
mi
Verkkoyhteyden määritys
1 Varmista, että WLAN-yhteyden LED-valo palaa. Osoita kauko-ohjaimella ilmastointilaitetta ja paina WLAN -painiketta, kunnes WLAN-yhteyden LED-valo alkaa vilkkua.
3 Valitse haluamasi reitittimen tukema yhteystila.
Connection Guide
Step 1 Step 2 Step 3
Connect with WPS mode
Connect with AP mode
The router supports WPS.
The router does not supports WPS.
Cancel
2 Kun WLAN yhteyden LED-valo vilkkuu, valitse haluamasi yhteyden määritystila.
Wireless LAN LED.
Connection Guide
Step 1 Step 2 Step 3
LED is OFF
LED is ON
LED is Blinking
Cancel
Make sure smartphone is connected to same wireless network.
When Wireless LAN LED is ON, tap “Next”.1. Point the remote control to air-and press the “Wireless LAN” bu on once. 2. When Wireless LAN LED is blinking, tap “Next”.
Connection Guide
Cancel
Next
Step 1 Step 2 Step 3Step 1 Step 2 Step 3
condi oner
Wireless LAN LED
SET
CANCEL
Wireless LAN bu on
Wireless LAN bu on
Huom• Jos langattoman verkon LED-merkkivalo vilkkuu jatkuvasti, mutta et halua käyttää sovellusta, sammuta toiminto painamalla -painiketta.
Nopea vilkunta Yksikkö muodostaa yhteyttä.Hidas vilkunta Yksikön yhteyden muodostaminen
ei onnistu.Palaa yhtäjaksoisesti
Yksikkö on muodostanut yhteyden.
• Yhteys voidaan muodostaa, vaikka yksikkö olisikin poissa päältä.
Käy
ttö
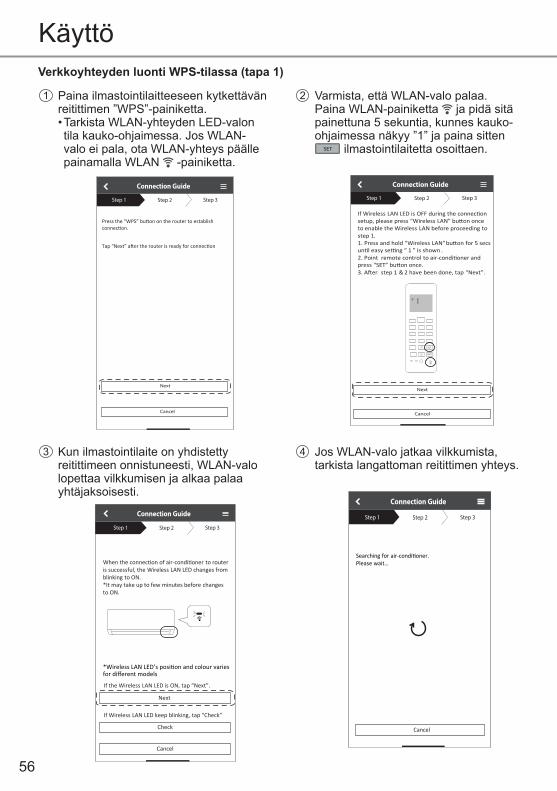
56
Verkkoyhteyden luonti WPS-tilassa (tapa 1)
1 Paina ilmastointilaitteeseen kytkettävän reitittimen ”WPS”-painiketta.• Tarkista WLAN-yhteyden LED-valon tila kauko-ohjaimessa. Jos WLAN-valo ei pala, ota WLAN-yhteys päälle painamalla WLAN -painiketta.
Connection Guide
Step 1 Step 2 Step 3
Next
Cancel
2 Varmista, että WLAN-valo palaa. Paina WLAN-painiketta ja pidä sitä painettuna 5 sekuntia, kunnes kauko-ohjaimessa näkyy ”1” ja paina sitten SET ilmastointilaitetta osoittaen.
If Wireless LAN LED is OFF during the connec on setup, please press “Wireless LAN” bu on once to enable the Wireless LAN before proceeding tostep 1 .1. Press and hold “Wireless LAN” bu on for 5 secs un l easy se ng “ 1 ” is shown .2. Point remote control to air-condi oner and press “SET” bu on once.3. A er step 1 & 2 have been done, tap “Next”.
Connection Guide
Step 1 Step 2 Step 3
Cancel
Next
SET
CANCEL
4 Jos WLAN-valo jatkaa vilkkumista, tarkista langattoman reitittimen yhteys.
Searching for air-condi oner.Please wait…
Connection Guide
Step 1 Step 2 Step 3
Cancel
3 Kun ilmastointilaite on yhdistetty reitittimeen onnistuneesti, WLAN-valo lopettaa vilkkumisen ja alkaa palaa yhtäjaksoisesti.
Connection Guide
Step 1 Step 2 Step 3
When the connec on of air-condi oner to router is successful, the Wireless LAN LED changes from blinking to ON. *It may take up to few minutes before changes to ON.
Next
If the Wireless LAN LED is ON, tap “Next”.
If Wireless LAN LED keep blinking, tap “Check”
Cancel
Check
Käyttö
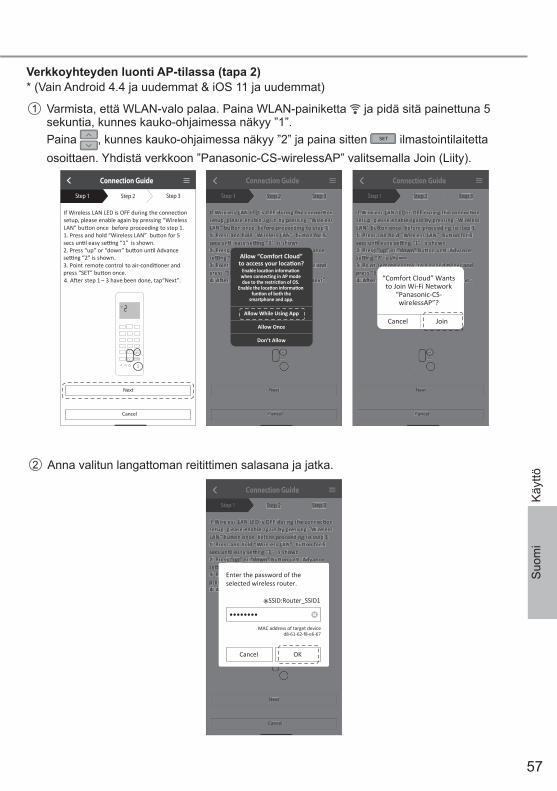
57
Suo
mi
Verkkoyhteyden luonti AP-tilassa (tapa 2)* (Vain Android 4.4 ja uudemmat & iOS 11 ja uudemmat)
1 Varmista, että WLAN-valo palaa. Paina WLAN-painiketta ja pidä sitä painettuna 5 sekuntia, kunnes kauko-ohjaimessa näkyy ”1”.Paina , kunnes kauko-ohjaimessa näkyy ”2” ja paina sitten SET ilmastointilaitetta osoittaen. Yhdistä verkkoon ”Panasonic-CS-wirelessAP” valitsemalla Join (Liity).
2 Anna valitun langattoman reitittimen salasana ja jatka.
If Wireless LAN LED is OFF during the connec on setup, please enable again by pressing “Wireless LAN” bu on once before proceeding to step 1 .1. Press and hold “Wireless LAN” bu on for 5 secs un l easy se ng “1” is shown.2. Press “up” or “down” bu on un l Advance se ng “2” is shown.3. Point remote control to air-condi oner and press “SET” bu on once.4. A er step 1 ~ 3 have been done, tap“Next”.
Connection Guide
Step 1 Step 2 Step 3
Cancel
Next
SET
CANCEL
If Wireless LAN LED is OFF during the connec onsetup, please enable again by pressing “WirelessLAN” bu on once before proceeding to step 1.1. Press and hold “Wireless LAN” bu on for 5 secs un l easy se ng “1” is shown.2. Press “up” or “down” bu on un l Advancese ng “2” is shown.3. Point remote control to air-condi oner and press “SET” bu on once.4. A er step 1 ~ 3 have been done, tap“Next”.
Connection Guide
Step 1 Step 2 Step 3
Cancel
Next
SET
CANCEL
Enter the password of theselected wireless router.
MAC address of target device
SSID:Router_SSID1
Cancel OK
d8-61-62-f8-e6-67
If Wireless LAN LED is OFF during the connec on setup, please enable again by pressing “Wireless LAN” bu on once before proceeding to step 1 .1. Press and hold “Wireless LAN” bu on for 5 secs un l easy se ng “1” is shown.2. Press “up” or “down” bu on un l Advance se ng “2” is shown.3. Point remote control to air-condi oner and press “SET” bu on once.4. A er step 1 ~ 3 have been done, tap“Next”.
Connection Guide
Step 1 Step 2 Step 3
Cancel
Next
SET
CANCEL
If Wireless LAN LED is OFF during the connec on setup, please enable again by pressing “Wireless LAN” bu on once before proceeding to step 1 .1. Press and hold “Wireless LAN” bu on for 5 secs un l easy se ng “1” is shown.2. Press “up” or “down” bu on un l Advance se ng “2” is shown.3. Point remote control to air-condi oner and press “SET” bu on once.4. A er step 1 ~ 3 have been done, tap“Next”.
Connection Guide
Step 1 Step 2 Step 3
Cancel
Next
SET
CANCEL
If Wireless LAN LED is OFF during the connec onsetup, please enable again by pressing “WirelessLAN” bu on once before proceeding to step 1.1. Press and hold “Wireless LAN” bu on for 5 secs un l easy se ng “1” is shown.2. Press “up” or “down” bu on un l Advancese ng “2” is shown.3. Point remote control to air-condi oner and press “SET” bu on once.4. A er step 1 ~ 3 have been done, tap“Next”.
Connection Guide
Step 1 Step 2 Step 3
Cancel
Next
SET
CANCEL
Allow “Comfort Cloud”
If Wireless LAN LED is OFF during the connec on setup, please enable again by pressing “Wireless LAN” bu on once before proceeding to step 1 .1. Press and hold “Wireless LAN” bu on for 5 secs un l easy se ng “1” is shown.2. Press “up” or “down” bu on un l Advance se ng “2” is shown.3. Point remote control to air-condi oner and press “SET” bu on once.4. A er step 1 ~ 3 have been done, tap“Next”.
Connection Guide
Step 1 Step 2 Step 3
Cancel
Next
SET
CANCEL
If Wireless LAN LED is OFF during the connec onsetup, please enable again by pressing “WirelessLAN” bu on once before proceeding to step 1 .1. Press and hold “Wireless LAN” bu on for 5secs un l easy se ng “1” is shown.2. Press “up” or “down” bu on un l Advancese ng “2” is shown.3. Point remote control to air-condi oner and press “SET” bu on once.4. A er step 1 ~ 3 have been done, tap“Next”.
Connection Guide
Step 1 Step 2 Step 3
Cancel
Next
SET
CANCEL
“Comfort Cloud” Wantsto Join Wi-Fi Network
“Panasonic-CS-wirelessAP”?
Cancel Join
Käy
ttö

58
Käyttö
3 Kun ilmastointilaite on yhdistetty reitittimeen onnistuneesti, WLAN-valo lakkaa vilkkumasta ja alkaa palaa yhtäjaksoisesti. Jos WLAN-yhteyden LED-valo PALAA, yhdistä älypuhelin langattomaan reitittimeen. (kun olet tehnyt langattoman verkon asetukset, palaa tähän sovellukseen jatkamaan määritystä)• Jos WLAN-valo jatkaa vilkkumista, tarkista langattoman reitittimen yhteys.
Searching for air-condi oner.Please wait…
Connection Guide
Step 1 Step 2 Step 3
Cancel
Connection Guide
Step 1 Step 2 Step 3
When the connec on of air-condi oner to router is successful, the Wireless LAN LED changes from blinking to ON. *It may take up to few minutes before changes to ON.
If Wireless LAN LED keep blinking, tap “Check”.
If the Wireless LAN LED is ON, tap “Next”. If the Wireless LAN LED is ON, tap “Next”.
Cancel
Check
* *
Connection Guide
Step 1 Step 2 Step 3
When the connec on of air-condi oner to router is successful, the Wireless LAN LED changes from blinking to ON. *It may take up to few minutes before changes to ON.
If Wireless LAN LED keep blinking, tap “Check”.
Cancel
Check
Next Next
If the Wireless LAN LED is ON, tap “Next”.
*
Connection Guide
Step 1 Step 2 Step 3
When the connec on of air-condi oner to routeris successful, the Wireless LAN LED changes fromblinking to ON.*It may take up to few minutes before changes toON.
If Wireless LAN LED keep blinking, tap “Check”.
Cancel
Check
Next
“Comfort Cloud” Wantsto Join Wi-Fi Network“SSID:Router_SSID1”?
Cancel Join

59
Suo
mi
Valitse ilmastointilaite ja määritä salasana
2
3
Suorita rekisteröinti loppuun määrittämällä uuden ilmastointilaitteen salasana.
Connection Guide
Step 1 Step 2 Step 3
Cancel
Next
*If Wireless LAN LED is OFF, please press “Wireless LAN” bu on once to enable the Wireless LAN before proceed for step 1 . 1. Press and hold “Wireless LAN” bu on for 5 secs un l easy se ng “1” is shown.2. Press “up” or “down”un l device registra on “3” is shown.3. Point remote control to air-condi oner and press “SET” bu on once.
A er step 1 ~ 3 have been done, tap “Next”.
SET
CANCEL
1 Valitse ilmastointilatteen malli ja rekisteröi laite.
Select the air-condi oner for registra on
Unregistered air-condi oner
Registered air-condi oner
Retry searching…
Connection Guide
Step 1 Step 2 Step 3
CS-HZ25UKE-5
Retry searching…
Cancel Register
Salasanan on oltava 8–15 merkkiä, ja siinä on oltava kirjaimia ja numeroita.
Model :CS-HZ25UKE-5
Input the password to complete the registra on.Password must be 8-15 characters with le ers and numbers.
Password
password
Re-enter password
Device password settings
Step 1 Step 2 Step 3
Cancel
Register
Huom• Säilytä salasana, sillä sitä tarvitaan lisäkäyttäjien rekisteröimiseen.
Käy
ttö
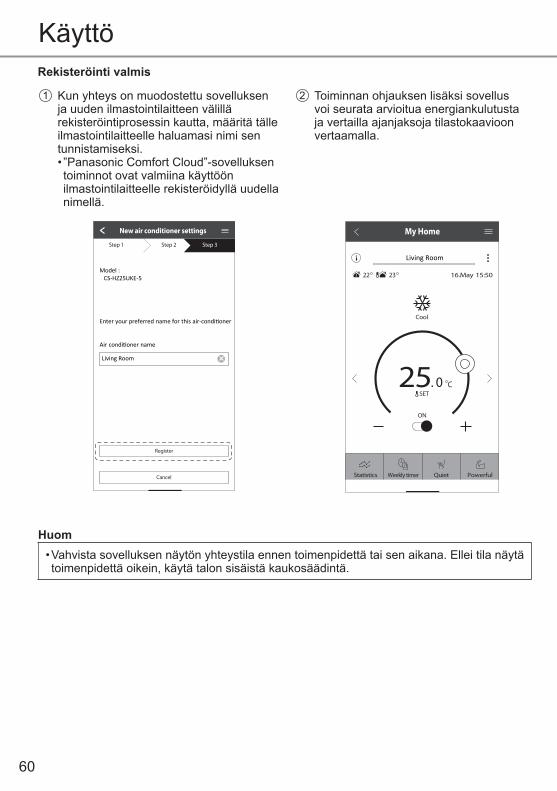
60
Rekisteröinti valmis
1 Kun yhteys on muodostettu sovelluksen ja uuden ilmastointilaitteen välillä rekisteröintiprosessin kautta, määritä tälle ilmastointilaitteelle haluamasi nimi sen tunnistamiseksi.• ”Panasonic Comfort Cloud”-sovelluksen toiminnot ovat valmiina käyttöön ilmastointilaitteelle rekisteröidyllä uudella nimellä.
2 Toiminnan ohjauksen lisäksi sovellus voi seurata arvioitua energiankulutusta ja vertailla ajanjaksoja tilastokaavioon vertaamalla.
-
Enter your preferred name for this air-condi oner
Air condi oner name
Model :CS HZ25UKE
New air conditioner settings
Step 3Step 1 Step 2
-Model :
CS HZ25UKE-5
Cancel
Register
Living Room
My Home
22 23 16.May 15:50
25. 0 CSET
Cool
Living Room
Statistics Weekly timer Quiet Powerful
ON
Käyttö
Huom• Vahvista sovelluksen näytön yhteystila ennen toimenpidettä tai sen aikana. Ellei tila näytä toimenpidettä oikein, käytä talon sisäistä kaukosäädintä.
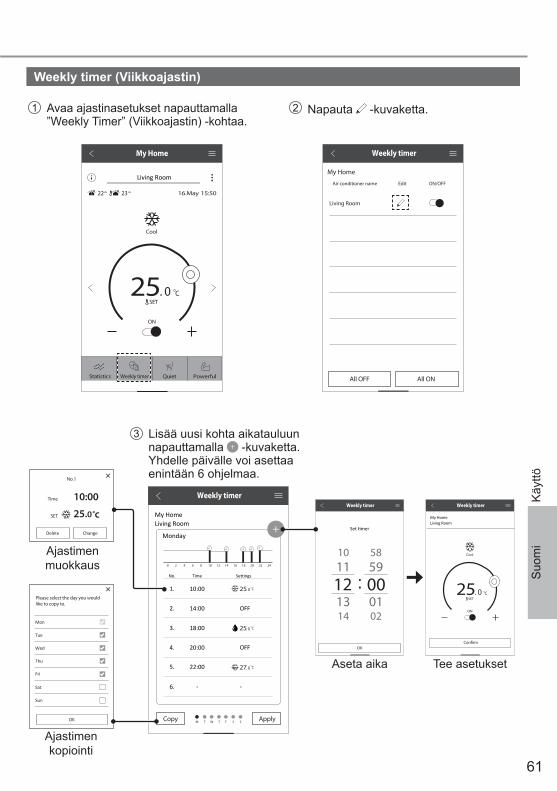
61
Suo
mi
App InstallationWeekly timer (Viikkoajastin)
1 Avaa ajastinasetukset napauttamalla ”Weekly Timer” (Viikkoajastin) -kohtaa.
2 Napauta -kuvaketta.
3 Lisää uusi kohta aikatauluun napauttamalla -kuvaketta. Yhdelle päivälle voi asettaa enintään 6 ohjelmaa.
Weekly timer
Living Room
Monday
No. Time
1. 10:00
2. 14:00 OFF
OFF
3. 18:00
4. 20:00
5.
6.
22:00
- -
Settings
My Home
Copy Apply
0 2 4 6 8 10 12 14 16 18 20 22 24
25. 0 C
25. 0 C
27. 0 C
M T W T F S S
Delete
No.1
Time
SET
10:00
25.0˚c
Change
Please select the day you wouldlike to copy to.
Mon
Tue
Wed
Thu
Fri
Sat
Sun
OK
Ajastimen muokkaus
Ajastimen kopiointi
Weekly timer
25. 0 CSET
Cool
Living RoomMy Home
Confirm
ON
Aseta aika Tee asetukset
Weekly timer
10 58
14 02
1112 00:
59
13 01
OK
My Home
22 23 16.May 15:50
25. 0 CSET
Cool
Statistics Weekly timer Quiet
Living Room
Powerful
ON
Weekly timer
All OFF All ON
My Home
Living Room
Air conditioner name Edit ON/OFF
Käy
ttö
62
Kysymyksiä ja vastauksia verkkosovittimestaAlkuasetus”Panasonic Comfort Cloud”-sovelluksen asennus ei onnistu älypuhelimeen.
Tarkista, että älypuhelimen käyttöjärjestelmä on yhteensopiva.Sovelluksen toimintaa ei voida taata kaikilla Android OS -versioilla.
Ilmastointilaitteen yhdistäminen reitittimeen ei onnistu.
Varmista, että laite pystyy vastaanottamaan WLAN-signaalin, että SSID ei ole piilossa, että MAC-osoitteen määritys on otettu käyttöön yksikölle ja että reitittimen kaksitaajuussignaali on otettu käyttöön 2,4 GHz:n yhteydelle.Saatat käyttää älypuhelinta tai langatonta reititintä, jota ei tueta tai jonka yhteysmenetelmä on erilainen. Katso lisätietoja älypuhelimen ja reitittimen asennusoppaasta.
Rekisteröi lisäilmastointilaite ”Panasonic Comfort Cloud”-sovellukseen.
Määritä lisäyksikkö ensimmäisen yksikön alkuasetuksen jälkeen. Jokaiselle rekisteröidylle ilmastointilaitteelle suositellaan annettavaksi nimi, jotta ne on helppo erottaa toisistaan.
Rekisteröi lisäkäyttäjä, joka voi ohjata verkkosovitinta.
Lataa ”Panasonic Comfort Cloud”-sovellus ja luo uusi Panasonic-tunnus.Määritä perusasetukset. Kun ilmastointilaite on rekisteröity, syötä laitteen oletussalasana (ensimmäisen käyttäjän määrittämä).Rekisteröinnin suorittaminen loppuun vaatii pääkäyttäjän (ensimmäinen käyttäjä) hyväksynnän.Suorita pääkäyttäjän hyväksyntä valitsemalla Menu .Valitse ”Owner” ja hyväksy lisäkäyttäjä valitsemalla ”User List”.
Langaton yhteysLangaton yhteys on katkennut tai signaalissa on häiriöitä.
Verkkoyhteys ei ehkä ole vakaa. Tarkista signaalin vahvuus seuraavasti:-• Varmista, että ilmastointilaitteen toiminta on pysähtynyt, ja paina WLAN -painiketta 5 sekuntia. (Näyttöön tulee ”1”.)
• Paina -painiketta, kunnes näyttöön tulee ”4”.• Paina SET -painiketta, jolloin toiminta päättyy.• 5 sekunnin kuluttua sisäyksikön WLAN LED ilmaisee signaalin vahvuuden.
Vahva: Vilkkuu 3 kertaa ja pitää välinKeskitaso: Vilkkuu 2 kertaa ja pitää välinHeikko: Vilkkuu kerran ja pitää välinEi signaalia: POIS
• Pysähtyy automaattisesti 10 minuutin kuluttua. Voit sammuttaa laitteen välittömästi painamalla WLAN -painiketta.
Epäilyttävä valtuuttamaton pääsy yksikköön.
• Palauta ilmastointilaitteeseen valmistajan oletusasetukset noudattamalla seuraavalla sivulla kohdassa ”Ilmastointilaitteen siirtäminen tai hävittäminen” annettuja ohjeita. Suorita alkuyhteyden määritys.
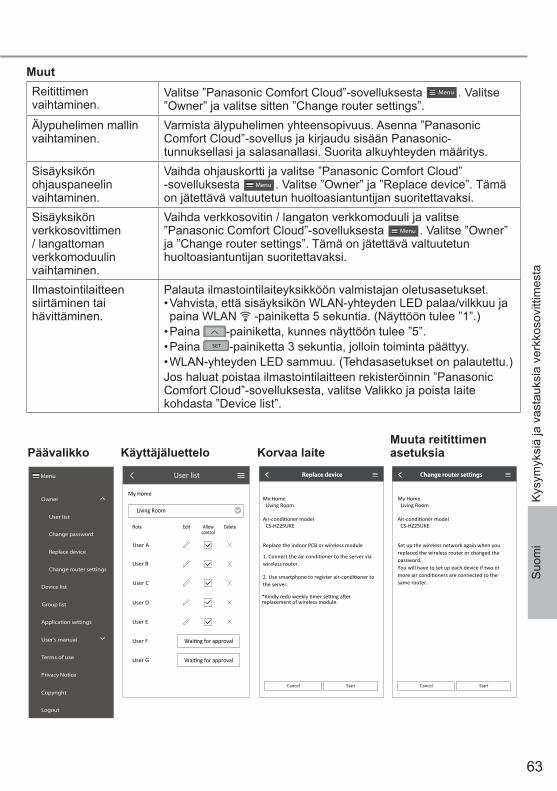
63
Suo
mi
Menu
User list
Owner
Change password
Replace device
Change router settings
Device list
Group list
Application settings
User’s manual
Terms of use
Privacy Notice
Copyright
Logout
Päävalikko Käyttäjäluettelo
My Home
User list
Living Room
Note Edit Allowcontrol
Delete
User A
User B
User C
User D
User E
User F
User G
My HomeLiving Room
CS-HZ25UKE
Replace device
Cancel Start
Korvaa laite
My HomeLiving Room
CS-HZ25UKE
Change router settings
Cancel Start
Muuta reitittimen asetuksia
MuutReitittimen vaihtaminen.
Valitse ”Panasonic Comfort Cloud”-sovelluksesta Menu . Valitse ”Owner” ja valitse sitten ”Change router settings”.
Älypuhelimen mallin vaihtaminen.
Varmista älypuhelimen yhteensopivuus. Asenna ”Panasonic Comfort Cloud”-sovellus ja kirjaudu sisään Panasonic-tunnuksellasi ja salasanallasi. Suorita alkuyhteyden määritys.
Sisäyksikön ohjauspaneelin vaihtaminen.
Vaihda ohjauskortti ja valitse ”Panasonic Comfort Cloud” -sovelluksesta Menu . Valitse ”Owner” ja ”Replace device”. Tämä on jätettävä valtuutetun huoltoasiantuntijan suoritettavaksi.
Sisäyksikön verkkosovittimen / langattoman verkkomoduulin vaihtaminen.
Vaihda verkkosovitin / langaton verkkomoduuli ja valitse ”Panasonic Comfort Cloud”-sovelluksesta Menu . Valitse ”Owner” ja ”Change router settings”. Tämä on jätettävä valtuutetun huoltoasiantuntijan suoritettavaksi.
Ilmastointilaitteen siirtäminen tai hävittäminen.
Palauta ilmastointilaiteyksikköön valmistajan oletusasetukset.• Vahvista, että sisäyksikön WLAN-yhteyden LED palaa/vilkkuu ja paina WLAN -painiketta 5 sekuntia. (Näyttöön tulee ”1”.)
• Paina -painiketta, kunnes näyttöön tulee ”5”.• Paina SET -painiketta 3 sekuntia, jolloin toiminta päättyy.• WLAN-yhteyden LED sammuu. (Tehdasasetukset on palautettu.)Jos haluat poistaa ilmastointilaitteen rekisteröinnin ”Panasonic Comfort Cloud”-sovelluksesta, valitse Valikko ja poista laite kohdasta ”Device list”.
Kys
ymyk
siä
ja v
asta
uksi
a ve
rkko
sovi
ttim
esta
64
VianetsintäSeuraavassa kuvatut ilmiöt eivät ole merkki toimintahäiriöstä.
Ilmiö SyyWLAN-yhteyden LED palaa laitteen sammumisen aikana.
• Yksikön langaton verkkoyhteys reitittimeen on käytössä.
Langattoman verkon LED-valo vilkkuu jatkuvasti.
• Yksikön langatonta verkkoyhteyttä reitittimeen ei ole muodostettu. Tarkista yhteys uudelleen.
• Jos et halua käyttää sovellusta, sammuta toiminto painamalla -painiketta.
TiedotVaatimustenmukaisuusvakuutus (DOC)“Panasonic Corporation” täten vakuuttaa, että tämä tuote on yhdenmukainen direktiiviin 2014/53/EU keskeisten vaatimusten sekä sen muiden merkityksellisten määräysten kanssa
Koko EU-vaatimustenmukaisuusvakuutuksen teksti on saatavalla seuraavassa internetosoitteessa: http://www.ptc.panasonic.eu/Valtuutettu edustaja: Panasonic Testing Centre, Panasonic Marketing Europe GmbH, Winsbergring 15, 22525 Hamburg, GermanyNorja: Noudatettava käyttörajoituksia Huippuvuorilla 20 km:n säteellä Ny-Ålesundin keskustasta.
65
Suo
mi
Tiedot
Laiteohjelmiston päivityksetTämä tuote voi luoda yhteyden Panasonic-laiteohjelmiston päivityspalvelimeen Internetin kautta ja päivittää automaattisesti laiteohjelmiston uusimpaan versioon.Laiteohjelmiston päivittämistä varten laite tarkastaa kerran päivässä käynnistyksen jälkeen, onko sen laiteohjelmiston versio uusin. Jos päivitystä tarvitaan, päivitys tehdään ja laite käynnistyy uudelleen automaattisesti. Toimintoja ei voi tehdä laitteen uudelleenkäynnistymisen aikana (kestää noin 1–5 minuuttia).
OhjelmistolisenssitiedotTässä tuotteessa on seuraavia ohjelmistoja:(1) Panasonic Corporationin riippumattomasti kehittämä tai sille kehitetty ohjelmisto,(2) Kolmannen osapuolen omistama ja Panasonic Corporationille lisensoitu ohjelmisto,(3) BSD-lisenssin ja/tai vastaavien lisenssien alainen avoimen lähdekoodin ohjelmisto.Ohjelmisto, joka on luokiteltu kohtaan (3) on jaeltu siinä toivossa, että siitä olisi hyötyä, mutta ILMAN MITÄÄN TAKUITA, myös ilman epäsuoria takuita MYYNTIKELPOISUUDESTA tai SOPIVUUDESTA TIETTYYN TARKOITUKSEEN.Seuraavia lisenssiehtoja noudatetaan avoimen lähdekoodin komponentteihin.1. Anojan lisenssiCopyright (C) 2003–2016, Jouni Malinen <[email protected] > ja avustajat.Kaikki oikeudet pidätetään.Tätä ohjelmistoa voidaan jaella, käyttää ja muokata BSD-lisenssin ehtojen mukaisesti:Jakelu ja käyttö lähdemuodossa ja binaarisessa muodossa on sallittu muokattuna ja muokkaamattomana, jos seuraavat ehdot täyttyvät:1. Lähdekoodiin on liitettävä edellä mainittu tekijänoikeusilmoitus, luettelo ehdoista ja seuraava vastuuvapauslauseke.2. Binaariseen muotoon on liitettävä edellä mainittu tekijänoikeusilmoitus, luettelo ehdoista ja seuraava vastuuvapauslauseke toimitukseen sisältyvissä asiakirjoissa ja/tai muussa aineistossa.3. Edellä lueteltujen tekijänoikeudenhaltijoiden tai niiden kumppaneiden nimeä ei saa käyttää tästä ohjelmistosta johdettujen tuotteiden markkinointiin ilman edeltävää kirjallista suostumusta.TEKIJÄNOIKEUDENHALTIJAT JA NÄIDEN KUMPPANIT TARJOAVAT TÄMÄN OHJELMISTON “SELLAISENAAN” JA NE VAPAUTETAAN KAIKISTA SUORISTA JA VÄLILLISISTÄ TAKUISTA MUKAAN LUKIEN RAJOITTUMATTA TAKUUT MYYNTIKELPOISUUDESTA JA SOPIVUUDESTA TIETTYYN TARKOITUKSEEN. MISSÄÄN TAPAUKSESSA ORGANISAATIO TAI SEN KUMPPANIT EIVÄT OLE VASTUUSSA MISTÄÄN SUORISTA, EPÄSUORISTA, TAHATTOMISTA, ERITYISISTÄ, ESIMERKILLISISTÄ TAI SEURAAMUKSELLISISTA VAHINGOISTA (MUKAAN LUKIEN RAJOITTUMATTA KORVAAVIEN TUOTTEIDEN TAI PALVELUIDEN KUSTANTAMINEN, KÄYTTÖKELVOTTOMUUS, TIETOJEN TAI TUOTTOJEN MENETTÄMINEN TAI LIIKETOIMINNAN KATKEAMINEN) MISTÄ TAHANSA SYYSTÄ MINKÄ TAHANSA VASTUUN, SOPIMUKSEN VAHINGON NOJALLA (MUKAAN LUKIEN VÄLINPITÄMÄTTÖMYYS JA VASTAAVAT), JOKA JOLLAIN TAVALLA JOHTUU TÄMÄN OHJELMISTON KÄYTÖSTÄ, VAIKKA VAARASTA OLISI ILMOITETTU.
Vian
etsi
ntä
/ Tie
dot
66
Med den indbyggede netværksadapter kan du styre dit klimaanlægs drift fra hvorsomhelst.
IndholdsfortegnelseSikkerhedsforskrifter .......................................................................................................................... 66-67
Systemoversigt ....................................................................................................................................... 68
Sådan bruger du anlægget ................................................................................................................ 69-77
Almene spørgsmål for netværksadapteren ....................................................................................... 78-79
Fejlfi nding ............................................................................................................................................... 80
Oplysninger ........................................................................................................................................ 80-81
Copyright ........................................................................................................................................... 82-86
Tak for dit køb af dette Panasonic-produkt.
SikkerhedsforskrifterInden man forsøger at styre / betjene dette klimaanlæg via trådløs kommunikation fra et fjernt sted, sørg for at tjekke apparatets installation og dets omgivelser, og vær forsigtig ved en eventuel person(er) i dets nærhed.For at forhindre personskade, skade mod andre eller beskadigelse af ejendom skal følgende overholdes: Forkert brug grundet manglende overholdelse af brugsanvisningen kan resultere i person- eller tingskade, og farligheden heraf er klassifi ceret nedenstående:
ADVARSELDette symbol advarer om fare for dødsfald eller alvorlig tilskadekomst.
FORSIGTIGDette symbol advarer om fare for person- eller tingskade.
Anvisninger, der skal følges, klassifi ceres med følgende symboler:
Dette symbol angiver en handling, der er FORBUDT.
Dette symbol angiver en handling, der er OBLIGATORISK.
ADVARSELNetværksadapter (aktiveret)
Undlad at anvende indendørsenheden i nærheden af medicinsk udstyr eller automatiseret udstyr (automatdører, alarmer osv.).(Radiobølgerne fra indendørsenheden kan forstyrre udstyr og forårsage tilstande med funktionsfejl)
67
Dan
sk
SikkerhedsforskrifterHold mindst 15 cm afstand til indendørsenheden, hvis du benytter pacemaker.(Radiobølgerne fra indendørsenheden kan forstyrre pacemakerens funktion)
FORSIGTIGNetværksadapter (aktiveret)
Tjek på forhånd, at de følgende krav er opfyldt (derhjemme):• Strømstikket skal være sat ordentligt i stikkontakten. Støv må ikke samle sig på strømforsyningen. (Dette kan lede til, at brand forårsages pga. antændelse ved ringe strømkontakt)
• Status for timer, der er sat af andre personer.(Uventet opstart og slukning kan forårsage skade på mennesker, kæledyr og planter)
• Klimaanlægget skal være fri for unormale driftsforhold så som ændring i luftstrøm. Sørg for, at ingen objekt(er) nemt kan blæse væk, hvis luftstrømmen blæser direkte på dem. Det/de bortblæste objekt(er) kan medføre fare så som brand eller personskade, osv.
• Brug altid kun den lokale fjernbetjening hvis der mulighed for, at en/fl ere person(er) (så som handikappede, børn, invaliderede, ældre eller syge personer) ikke selv er i stand til at styre temperaturindstillingen og stol på den forudindstillede konfi guration af klimaanlægget.Hævning eller sænkning af temperaturen ved fjernstyret drift kan forårsage, at beboer(e) kan opleve ubehag og/eller afbrydelse af deres daglige rutine.Planter og dyr vil sandsynligvis blive påvirket af pludselige temperaturjusteringer.
Tjek følgende krav inden betjening af klimaanlægget fra et fjerntliggende sted:• Informer person(er), i nærheden af det område der bliver klimareguleret, om at du vil fjernstyre klimaanlæggets drift og indstillinger. Dette for at undgå eventuelle alvorlige påvirkninger af person(er) ved, at de overraskes over pludselige ændringer i temperaturen (fra komfort til kold eller vice versa).(Det kan forårsage skade på den menneskelige krop hvis der opstår pludselige ændringer i udendørstemperatur og i rumtemperatur. Temperaturjustering kan udføres med fjernbetjeningen)
-Hvis Panasonic Comfort Cloud-appens hovedskærm ikke afspejler status for driften, brug den lokale fjernbetjening til at styre og betjene klimaanlægget.
• Da appen bruger netværkskommunikation, kan der være tidspunkter, hvor fjernstyret drift ikke er mulig på grund af kommunikationsfejl og/eller netværksfejl (så som nedetid for Panasonic Cloud-server eller teleoperatørens server, Wi-Fi-forbindelse, osv.). I tilfælde af sådanne fejl, brug den lokale fjernbetjening til at styre og betjene klimaanlægget.
Sik
kerh
edsf
orsk
rifte
r
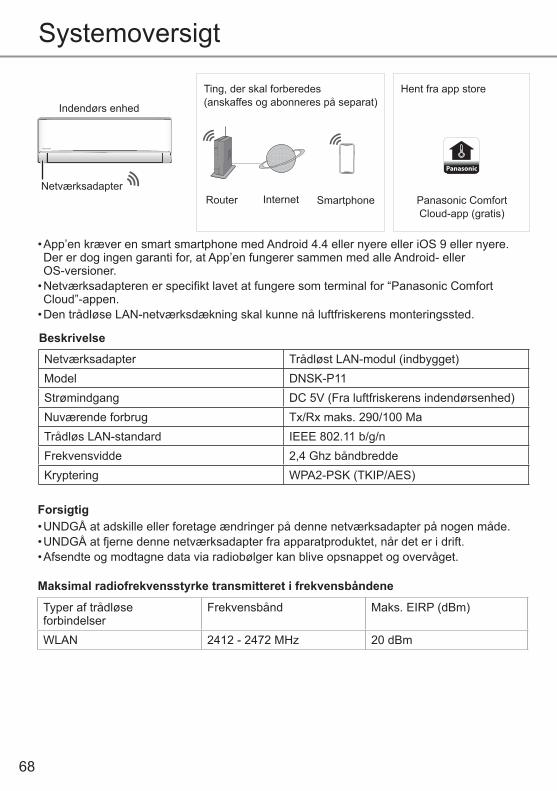
68
Systemoversigt
• App’en kræver en smart smartphone med Android 4.4 eller nyere eller iOS 9 eller nyere.Der er dog ingen garanti for, at App’en fungerer sammen med alle Android- eller OS-versioner.
• Netværksadapteren er specifi kt lavet at fungere som terminal for “Panasonic Comfort Cloud”-appen.
• Den trådløse LAN-netværksdækning skal kunne nå luftfriskerens monteringssted.
Panasonic
Hent fra app store
Router Internet Smartphone
Ting, der skal forberedes (anskaffes og abonneres på separat)
Panasonic Comfort Cloud-app (gratis)
Indendørs enhed
Netværksadapter
Netværksadapter Trådløst LAN-modul (indbygget)Model DNSK-P11Strømindgang DC 5V (Fra luftfriskerens indendørsenhed)Nuværende forbrug Tx/Rx maks. 290/100 MaTrådløs LAN-standard IEEE 802.11 b/g/nFrekvensvidde 2,4 Ghz båndbreddeKryptering WPA2-PSK (TKIP/AES)
Beskrivelse
Maksimal radiofrekvensstyrke transmitteret i frekvensbåndene
Typer af trådløse forbindelser
Frekvensbånd Maks. EIRP (dBm)
WLAN 2412 - 2472 MHz 20 dBm
• UNDGÅ at adskille eller foretage ændringer på denne netværksadapter på nogen måde.• UNDGÅ at fjerne denne netværksadapter fra apparatproduktet, når det er i drift.• Afsendte og modtagne data via radiobølger kan blive opsnappet og overvåget.
Forsigtig
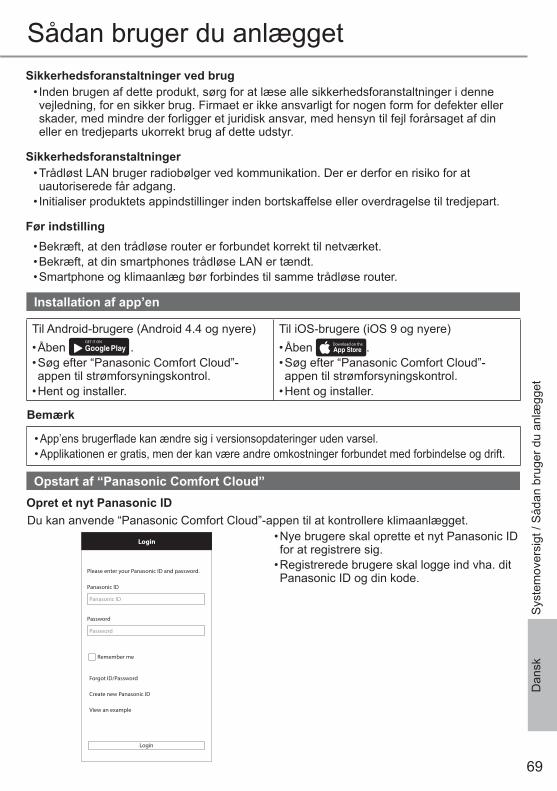
69
Dan
sk
Installation af app’en
Bemærk
• App’ens brugerfl ade kan ændre sig i versionsopdateringer uden varsel.• Applikationen er gratis, men der kan være andre omkostninger forbundet med forbindelse og drift.
Opstart af “Panasonic Comfort Cloud”
• Nye brugere skal oprette et nyt Panasonic ID for at registrere sig.
• Registrerede brugere skal logge ind vha. dit Panasonic ID og din kode.
Du kan anvende “Panasonic Comfort Cloud”-appen til at kontrollere klimaanlægget.
Please enter your Panasonic ID and password.
Panasonic ID
Password
Password
Remember me
Forgot ID/Password
Create new Panasonic ID
View an example
Login
Login
Panasonic ID
Opret et nyt Panasonic ID
Sådan bruger du anlægget
Før indstilling• Bekræft, at den trådløse router er forbundet korrekt til netværket.• Bekræft, at din smartphones trådløse LAN er tændt.• Smartphone og klimaanlæg bør forbindes til samme trådløse router.
Sikkerhedsforanstaltninger ved brug• Inden brugen af dette produkt, sørg for at læse alle sikkerhedsforanstaltninger i denne vejledning, for en sikker brug. Firmaet er ikke ansvarligt for nogen form for defekter eller skader, med mindre der forligger et juridisk ansvar, med hensyn til fejl forårsaget af din eller en tredjeparts ukorrekt brug af dette udstyr.
Sikkerhedsforanstaltninger• Trådløst LAN bruger radiobølger ved kommunikation. Der er derfor en risiko for at uautoriserede får adgang.
• Initialiser produktets appindstillinger inden bortskaffelse eller overdragelse til tredjepart.
Til Android-brugere (Android 4.4 og nyere)• Åben
GET IT ON
Google Play .• Søg efter “Panasonic Comfort Cloud”-appen til strømforsyningskontrol.
• Hent og installer.
Til iOS-brugere (iOS 9 og nyere)• Åben Download on the
App Store .• Søg efter “Panasonic Comfort Cloud”-appen til strømforsyningskontrol.
• Hent og installer.
Sys
tem
over
sigt
/ S
ådan
bru
ger d
u an
lægg
et
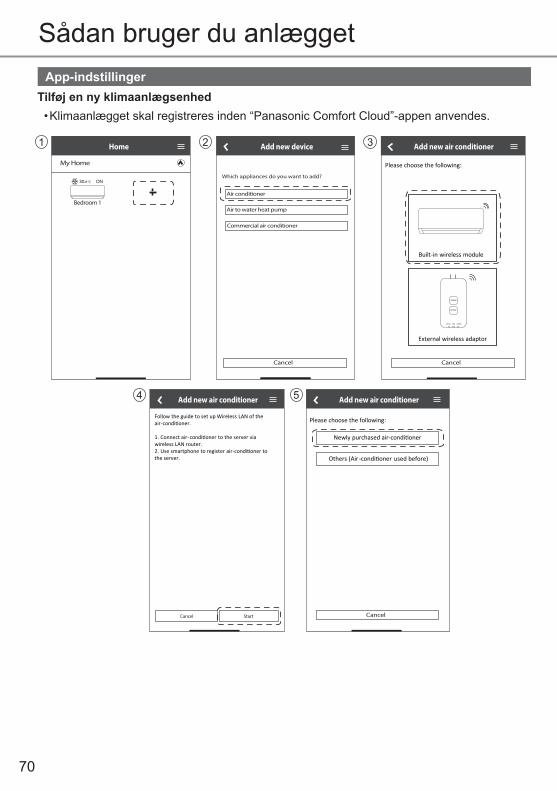
70
App-indstillingerTilføj en ny klimaanlægsenhed• Klimaanlægget skal registreres inden “Panasonic Comfort Cloud”-appen anvendes.
Commercial air conditioner
My Home
ON
3
5
1 2
4
Sådan bruger du anlægget
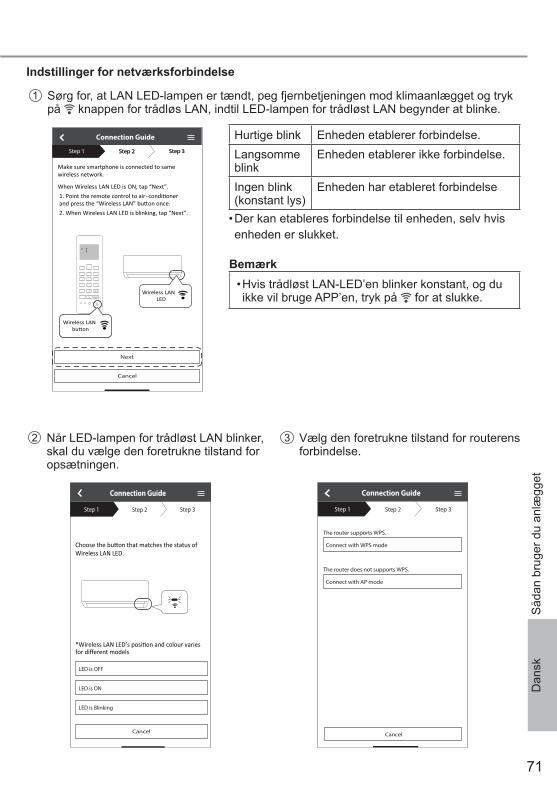
71
Dan
sk
Indstillinger for netværksforbindelse
1 Sørg for, at LAN LED-lampen er tændt, peg fjernbetjeningen mod klimaanlægget og tryk på knappen for trådløs LAN, indtil LED-lampen for trådløst LAN begynder at blinke.
3 Vælg den foretrukne tilstand for routerens forbindelse.
Connection Guide
Step 1 Step 2 Step 3
Connect with WPS mode
Connect with AP mode
The router supports WPS.
The router does not supports WPS.
Cancel
2 Når LED-lampen for trådløst LAN blinker, skal du vælge den foretrukne tilstand for opsætningen.
Wireless LAN LED.
Connection Guide
Step 1 Step 2 Step 3
LED is OFF
LED is ON
LED is Blinking
Cancel
Make sure smartphone is connected to same wireless network.
When Wireless LAN LED is ON, tap “Next”.1. Point the remote control to air-and press the “Wireless LAN” bu on once. 2. When Wireless LAN LED is blinking, tap “Next”.
Connection Guide
Cancel
Next
Step 1 Step 2 Step 3Step 1 Step 2 Step 3
condi oner
Wireless LAN LED
SET
CANCEL
Wireless LAN bu on
Wireless LAN bu on
Bemærk• Hvis trådløst LAN-LED’en blinker konstant, og du ikke vil bruge APP’en, tryk på for at slukke.
Hurtige blink Enheden etablerer forbindelse.Langsomme blink
Enheden etablerer ikke forbindelse.
Ingen blink (konstant lys)
Enheden har etableret forbindelse
• Der kan etableres forbindelse til enheden, selv hvis enheden er slukket.
Såd
an b
ruge
r du
anlæ
gget
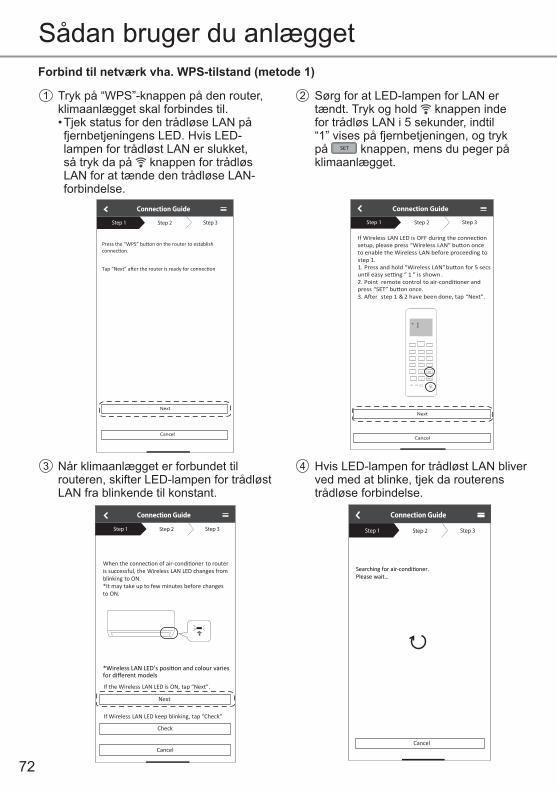
72
Forbind til netværk vha. WPS-tilstand (metode 1)
1 Tryk på “WPS”-knappen på den router, klimaanlægget skal forbindes til.• Tjek status for den trådløse LAN på fjernbetjeningens LED. Hvis LED-lampen for trådløst LAN er slukket, så tryk da på knappen for trådløs LAN for at tænde den trådløse LAN-forbindelse.
Connection Guide
Step 1 Step 2 Step 3
Next
Cancel
2 Sørg for at LED-lampen for LAN er tændt. Tryk og hold knappen inde for trådløs LAN i 5 sekunder, indtil “1” vises på fjernbetjeningen, og tryk på SET knappen, mens du peger på klimaanlægget.
If Wireless LAN LED is OFF during the connec on setup, please press “Wireless LAN” bu on once to enable the Wireless LAN before proceeding tostep 1 .1. Press and hold “Wireless LAN” bu on for 5 secs un l easy se ng “ 1 ” is shown .2. Point remote control to air-condi oner and press “SET” bu on once.3. A er step 1 & 2 have been done, tap “Next”.
Connection Guide
Step 1 Step 2 Step 3
Cancel
Next
SET
CANCEL
4 Hvis LED-lampen for trådløst LAN bliver ved med at blinke, tjek da routerens trådløse forbindelse.
Searching for air-condi oner.Please wait…
Connection Guide
Step 1 Step 2 Step 3
Cancel
3 Når klimaanlægget er forbundet til routeren, skifter LED-lampen for trådløst LAN fra blinkende til konstant.
Connection Guide
Step 1 Step 2 Step 3
When the connec on of air-condi oner to router is successful, the Wireless LAN LED changes from blinking to ON. *It may take up to few minutes before changes to ON.
Next
If the Wireless LAN LED is ON, tap “Next”.
If Wireless LAN LED keep blinking, tap “Check”
Cancel
Check
Sådan bruger du anlægget
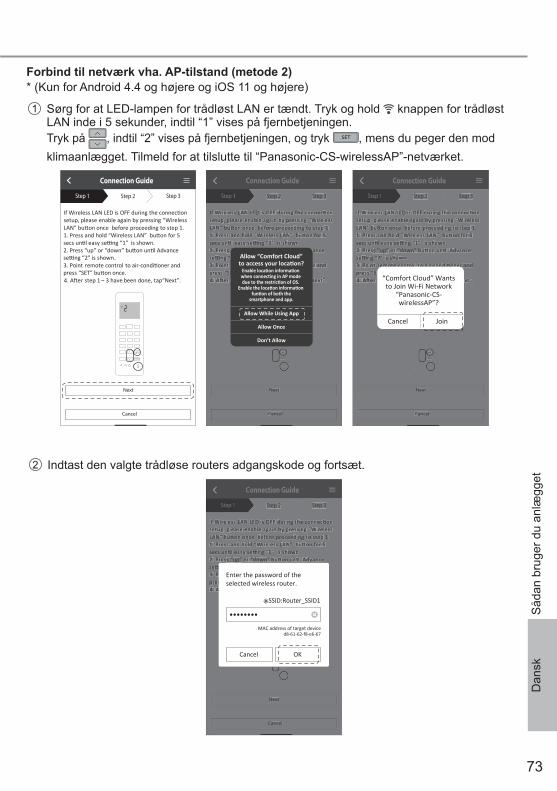
73
Dan
sk
Forbind til netværk vha. AP-tilstand (metode 2)* (Kun for Android 4.4 og højere og iOS 11 og højere)
1 Sørg for at LED-lampen for trådløst LAN er tændt. Tryk og hold knappen for trådløst LAN inde i 5 sekunder, indtil “1” vises på fjernbetjeningen.Tryk på , indtil “2” vises på fjernbetjeningen, og tryk SET , mens du peger den mod klimaanlægget. Tilmeld for at tilslutte til “Panasonic-CS-wirelessAP”-netværket.
2 Indtast den valgte trådløse routers adgangskode og fortsæt.
If Wireless LAN LED is OFF during the connec on setup, please enable again by pressing “Wireless LAN” bu on once before proceeding to step 1 .1. Press and hold “Wireless LAN” bu on for 5 secs un l easy se ng “1” is shown.2. Press “up” or “down” bu on un l Advance se ng “2” is shown.3. Point remote control to air-condi oner and press “SET” bu on once.4. A er step 1 ~ 3 have been done, tap“Next”.
Connection Guide
Step 1 Step 2 Step 3
Cancel
Next
SET
CANCEL
If Wireless LAN LED is OFF during the connec onsetup, please enable again by pressing “WirelessLAN” bu on once before proceeding to step 1.1. Press and hold “Wireless LAN” bu on for 5 secs un l easy se ng “1” is shown.2. Press “up” or “down” bu on un l Advancese ng “2” is shown.3. Point remote control to air-condi oner and press “SET” bu on once.4. A er step 1 ~ 3 have been done, tap“Next”.
Connection Guide
Step 1 Step 2 Step 3
Cancel
Next
SET
CANCEL
Enter the password of theselected wireless router.
MAC address of target device
SSID:Router_SSID1
Cancel OK
d8-61-62-f8-e6-67
If Wireless LAN LED is OFF during the connec on setup, please enable again by pressing “Wireless LAN” bu on once before proceeding to step 1 .1. Press and hold “Wireless LAN” bu on for 5 secs un l easy se ng “1” is shown.2. Press “up” or “down” bu on un l Advance se ng “2” is shown.3. Point remote control to air-condi oner and press “SET” bu on once.4. A er step 1 ~ 3 have been done, tap“Next”.
Connection Guide
Step 1 Step 2 Step 3
Cancel
Next
SET
CANCEL
If Wireless LAN LED is OFF during the connec on setup, please enable again by pressing “Wireless LAN” bu on once before proceeding to step 1 .1. Press and hold “Wireless LAN” bu on for 5 secs un l easy se ng “1” is shown.2. Press “up” or “down” bu on un l Advance se ng “2” is shown.3. Point remote control to air-condi oner and press “SET” bu on once.4. A er step 1 ~ 3 have been done, tap“Next”.
Connection Guide
Step 1 Step 2 Step 3
Cancel
Next
SET
CANCEL
If Wireless LAN LED is OFF during the connec onsetup, please enable again by pressing “WirelessLAN” bu on once before proceeding to step 1.1. Press and hold “Wireless LAN” bu on for 5 secs un l easy se ng “1” is shown.2. Press “up” or “down” bu on un l Advancese ng “2” is shown.3. Point remote control to air-condi oner and press “SET” bu on once.4. A er step 1 ~ 3 have been done, tap“Next”.
Connection Guide
Step 1 Step 2 Step 3
Cancel
Next
SET
CANCEL
Allow “Comfort Cloud”
If Wireless LAN LED is OFF during the connec on setup, please enable again by pressing “Wireless LAN” bu on once before proceeding to step 1 .1. Press and hold “Wireless LAN” bu on for 5 secs un l easy se ng “1” is shown.2. Press “up” or “down” bu on un l Advance se ng “2” is shown.3. Point remote control to air-condi oner and press “SET” bu on once.4. A er step 1 ~ 3 have been done, tap“Next”.
Connection Guide
Step 1 Step 2 Step 3
Cancel
Next
SET
CANCEL
If Wireless LAN LED is OFF during the connec onsetup, please enable again by pressing “WirelessLAN” bu on once before proceeding to step 1 .1. Press and hold “Wireless LAN” bu on for 5secs un l easy se ng “1” is shown.2. Press “up” or “down” bu on un l Advancese ng “2” is shown.3. Point remote control to air-condi oner and press “SET” bu on once.4. A er step 1 ~ 3 have been done, tap“Next”.
Connection Guide
Step 1 Step 2 Step 3
Cancel
Next
SET
CANCEL
“Comfort Cloud” Wantsto Join Wi-Fi Network
“Panasonic-CS-wirelessAP”?
Cancel Join
Såd
an b
ruge
r du
anlæ
gget
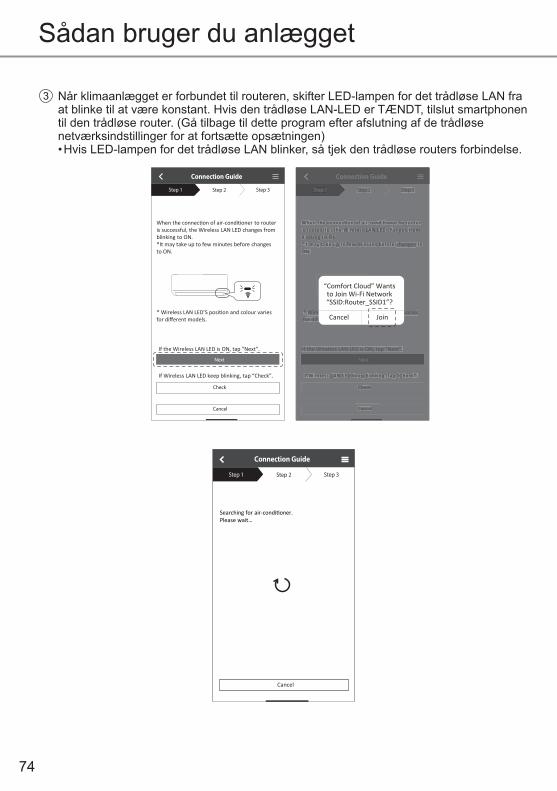
74
Sådan bruger du anlægget
3 Når klimaanlægget er forbundet til routeren, skifter LED-lampen for det trådløse LAN fra at blinke til at være konstant. Hvis den trådløse LAN-LED er TÆNDT, tilslut smartphonen til den trådløse router. (Gå tilbage til dette program efter afslutning af de trådløse netværksindstillinger for at fortsætte opsætningen)• Hvis LED-lampen for det trådløse LAN blinker, så tjek den trådløse routers forbindelse.
Searching for air-condi oner.Please wait…
Connection Guide
Step 1 Step 2 Step 3
Cancel
Connection Guide
Step 1 Step 2 Step 3
When the connec on of air-condi oner to router is successful, the Wireless LAN LED changes from blinking to ON. *It may take up to few minutes before changes to ON.
If Wireless LAN LED keep blinking, tap “Check”.
If the Wireless LAN LED is ON, tap “Next”. If the Wireless LAN LED is ON, tap “Next”.
Cancel
Check
* *
Connection Guide
Step 1 Step 2 Step 3
When the connec on of air-condi oner to router is successful, the Wireless LAN LED changes from blinking to ON. *It may take up to few minutes before changes to ON.
If Wireless LAN LED keep blinking, tap “Check”.
Cancel
Check
Next Next
If the Wireless LAN LED is ON, tap “Next”.
*
Connection Guide
Step 1 Step 2 Step 3
When the connec on of air-condi oner to routeris successful, the Wireless LAN LED changes fromblinking to ON.*It may take up to few minutes before changes toON.
If Wireless LAN LED keep blinking, tap “Check”.
Cancel
Check
Next
“Comfort Cloud” Wantsto Join Wi-Fi Network“SSID:Router_SSID1”?
Cancel Join
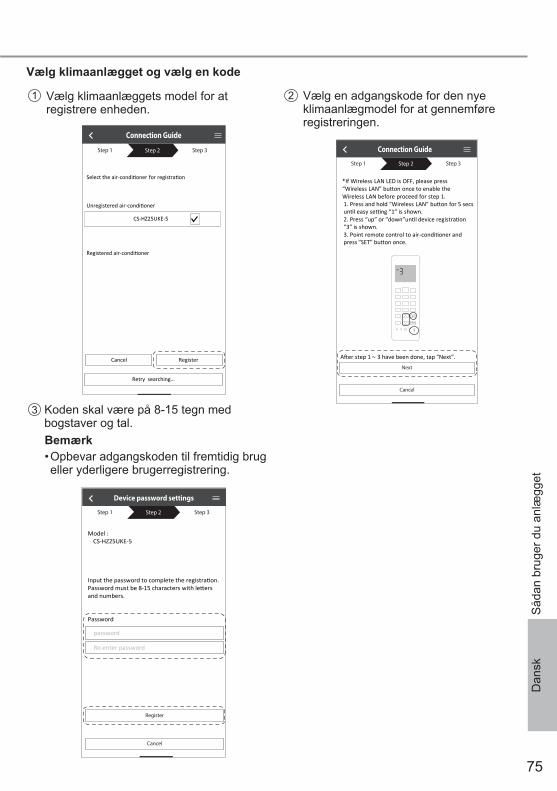
75
Dan
sk
Vælg klimaanlægget og vælg en kode
2
3
Vælg en adgangskode for den nye klimaanlægmodel for at gennemføre registreringen.
Connection Guide
Step 1 Step 2 Step 3
Cancel
Next
*If Wireless LAN LED is OFF, please press “Wireless LAN” bu on once to enable the Wireless LAN before proceed for step 1 . 1. Press and hold “Wireless LAN” bu on for 5 secs un l easy se ng “1” is shown.2. Press “up” or “down”un l device registra on “3” is shown.3. Point remote control to air-condi oner and press “SET” bu on once.
A er step 1 ~ 3 have been done, tap “Next”.
SET
CANCEL
1 Vælg klimaanlæggets model for at registrere enheden.
Select the air-condi oner for registra on
Unregistered air-condi oner
Registered air-condi oner
Retry searching…
Connection Guide
Step 1 Step 2 Step 3
CS-HZ25UKE-5
Retry searching…
Cancel Register
Koden skal være på 8-15 tegn med bogstaver og tal.
Model :CS-HZ25UKE-5
Input the password to complete the registra on.Password must be 8-15 characters with le ers and numbers.
Password
password
Re-enter password
Device password settings
Step 1 Step 2 Step 3
Cancel
Register
Bemærk• Opbevar adgangskoden til fremtidig brug eller yderligere brugerregistrering.
Såd
an b
ruge
r du
anlæ
gget
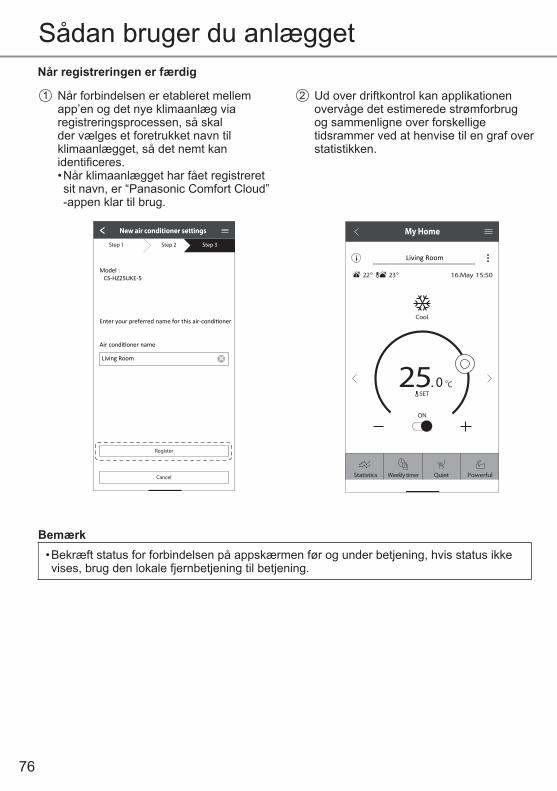
76
Når registreringen er færdig
1 Når forbindelsen er etableret mellem app’en og det nye klimaanlæg via registreringsprocessen, så skal der vælges et foretrukket navn til klimaanlægget, så det nemt kan identifi ceres.• Når klimaanlægget har fået registreret sit navn, er “Panasonic Comfort Cloud” -appen klar til brug.
2 Ud over driftkontrol kan applikationen overvåge det estimerede strømforbrug og sammenligne over forskellige tidsrammer ved at henvise til en graf over statistikken.
-
Enter your preferred name for this air-condi oner
Air condi oner name
Model :CS HZ25UKE
New air conditioner settings
Step 3Step 1 Step 2
-Model :
CS HZ25UKE-5
Cancel
Register
Living Room
My Home
22 23 16.May 15:50
25. 0 CSET
Cool
Living Room
Statistics Weekly timer Quiet Powerful
ON
Sådan bruger du anlægget
Bemærk• Bekræft status for forbindelsen på appskærmen før og under betjening, hvis status ikke vises, brug den lokale fjernbetjening til betjening.
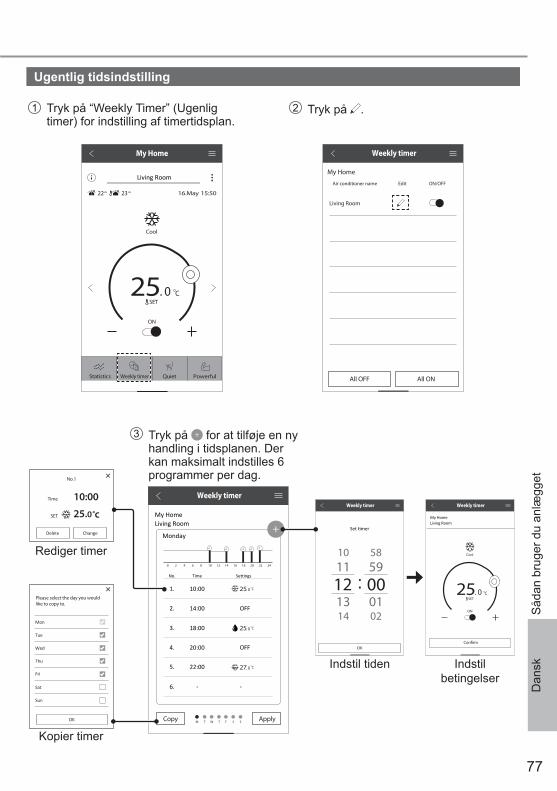
77
Dan
sk
App InstallationUgentlig tidsindstilling
1 Tryk på “Weekly Timer” (Ugenlig timer) for indstilling af timertidsplan.
2 Tryk på .
3 Tryk på for at tilføje en ny handling i tidsplanen. Der kan maksimalt indstilles 6 programmer per dag.
Weekly timer
Living Room
Monday
No. Time
1. 10:00
2. 14:00 OFF
OFF
3. 18:00
4. 20:00
5.
6.
22:00
- -
Settings
My Home
Copy Apply
0 2 4 6 8 10 12 14 16 18 20 22 24
25. 0 C
25. 0 C
27. 0 C
M T W T F S S
Delete
No.1
Time
SET
10:00
25.0˚c
Change
Please select the day you wouldlike to copy to.
Mon
Tue
Wed
Thu
Fri
Sat
Sun
OK
Rediger timer
Kopier timer
Weekly timer
25. 0 CSET
Cool
Living RoomMy Home
Confirm
ON
Indstil tiden Indstil betingelser
Weekly timer
10 58
14 02
1112 00:
59
13 01
OK
My Home
22 23 16.May 15:50
25. 0 CSET
Cool
Statistics Weekly timer Quiet
Living Room
Powerful
ON
Weekly timer
All OFF All ON
My Home
Living Room
Air conditioner name Edit ON/OFF
Såd
an b
ruge
r du
anlæ
gget
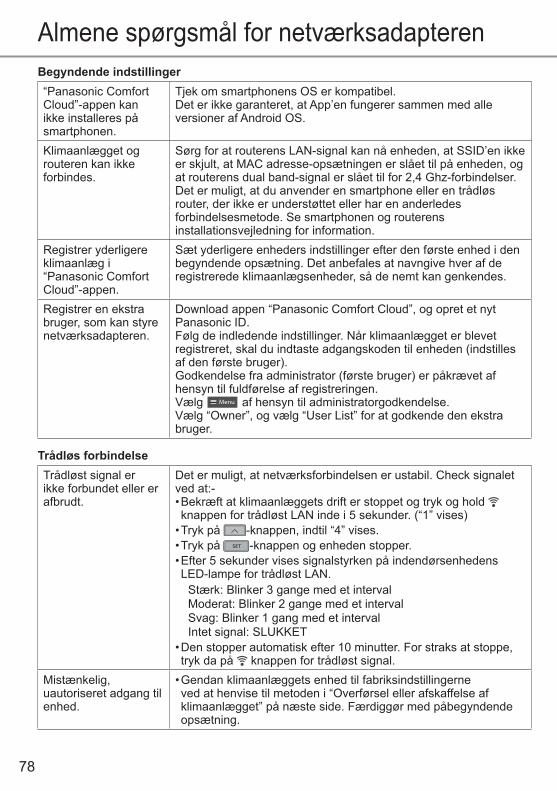
78
Almene spørgsmål for netværksadapterenBegyndende indstillinger“Panasonic Comfort Cloud”-appen kan ikke installeres på smartphonen.
Tjek om smartphonens OS er kompatibel.Det er ikke garanteret, at App’en fungerer sammen med alle versioner af Android OS.
Klimaanlægget og routeren kan ikke forbindes.
Sørg for at routerens LAN-signal kan nå enheden, at SSID’en ikke er skjult, at MAC adresse-opsætningen er slået til på enheden, og at routerens dual band-signal er slået til for 2,4 Ghz-forbindelser.Det er muligt, at du anvender en smartphone eller en trådløs router, der ikke er understøttet eller har en anderledes forbindelsesmetode. Se smartphonen og routerens installationsvejledning for information.
Registrer yderligere klimaanlæg i “Panasonic Comfort Cloud”-appen.
Sæt yderligere enheders indstillinger efter den første enhed i den begyndende opsætning. Det anbefales at navngive hver af de registrerede klimaanlægsenheder, så de nemt kan genkendes.
Registrer en ekstra bruger, som kan styre netværksadapteren.
Download appen “Panasonic Comfort Cloud”, og opret et nyt Panasonic ID.Følg de indledende indstillinger. Når klimaanlægget er blevet registreret, skal du indtaste adgangskoden til enheden (indstilles af den første bruger).Godkendelse fra administrator (første bruger) er påkrævet af hensyn til fuldførelse af registreringen.Vælg Menu af hensyn til administratorgodkendelse.Vælg “Owner”, og vælg “User List” for at godkende den ekstra bruger.
Trådløs forbindelseTrådløst signal er ikke forbundet eller er afbrudt.
Det er muligt, at netværksforbindelsen er ustabil. Check signalet ved at:-• Bekræft at klimaanlæggets drift er stoppet og tryk og hold knappen for trådløst LAN inde i 5 sekunder. (“1” vises)
• Tryk på -knappen, indtil “4” vises.• Tryk på SET -knappen og enheden stopper.• Efter 5 sekunder vises signalstyrken på indendørsenhedens LED-lampe for trådløst LAN.
Stærk: Blinker 3 gange med et intervalModerat: Blinker 2 gange med et intervalSvag: Blinker 1 gang med et intervalIntet signal: SLUKKET
• Den stopper automatisk efter 10 minutter. For straks at stoppe, tryk da på knappen for trådløst signal.
Mistænkelig, uautoriseret adgang til enhed.
• Gendan klimaanlæggets enhed til fabriksindstillingerne ved at henvise til metoden i “Overførsel eller afskaffelse af klimaanlægget” på næste side. Færdiggør med påbegyndende opsætning.
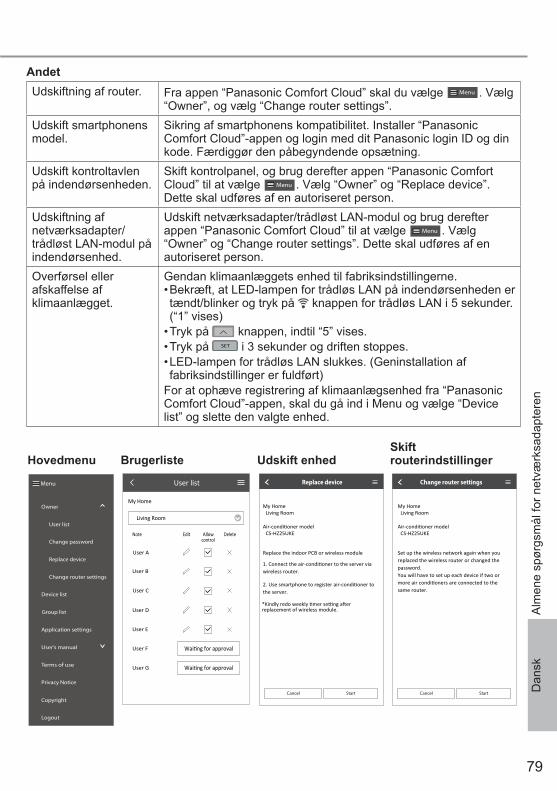
79
Dan
sk
Menu
User list
Owner
Change password
Replace device
Change router settings
Device list
Group list
Application settings
User’s manual
Terms of use
Privacy Notice
Copyright
Logout
Hovedmenu Brugerliste
My Home
User list
Living Room
Note Edit Allowcontrol
Delete
User A
User B
User C
User D
User E
User F
User G
My HomeLiving Room
CS-HZ25UKE
Replace device
Cancel Start
Udskift enhed
My HomeLiving Room
CS-HZ25UKE
Change router settings
Cancel Start
Skift routerindstillinger
AndetUdskiftning af router. Fra appen “Panasonic Comfort Cloud” skal du vælge Menu . Vælg
“Owner”, og vælg “Change router settings”.Udskift smartphonens model.
Sikring af smartphonens kompatibilitet. Installer “Panasonic Comfort Cloud”-appen og login med dit Panasonic login ID og din kode. Færdiggør den påbegyndende opsætning.
Udskift kontroltavlen på indendørsenheden.
Skift kontrolpanel, og brug derefter appen “Panasonic Comfort Cloud” til at vælge Menu . Vælg “Owner” og “Replace device”. Dette skal udføres af en autoriseret person.
Udskiftning af netværksadapter/trådløst LAN-modul på indendørsenhed.
Udskift netværksadapter/trådløst LAN-modul og brug derefter appen “Panasonic Comfort Cloud” til at vælge Menu . Vælg “Owner” og “Change router settings”. Dette skal udføres af en autoriseret person.
Overførsel eller afskaffelse af klimaanlægget.
Gendan klimaanlæggets enhed til fabriksindstillingerne.• Bekræft, at LED-lampen for trådløs LAN på indendørsenheden er tændt/blinker og tryk på knappen for trådløs LAN i 5 sekunder. (“1” vises)
• Tryk på knappen, indtil “5” vises.• Tryk på SET i 3 sekunder og driften stoppes.• LED-lampen for trådløs LAN slukkes. (Geninstallation af fabriksindstillinger er fuldført)
For at ophæve registrering af klimaanlægsenhed fra “Panasonic Comfort Cloud”-appen, skal du gå ind i Menu og vælge “Device list” og slette den valgte enhed.
Alm
ene
spør
gsm
ål fo
r net
værk
sada
pter
en
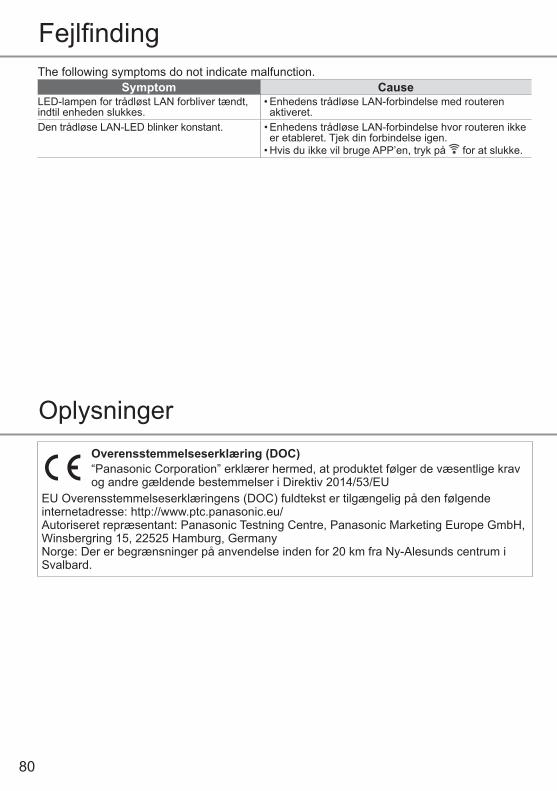
80
Fejlfi ndingThe following symptoms do not indicate malfunction.
Symptom CauseLED-lampen for trådløst LAN forbliver tændt, indtil enheden slukkes.
• Enhedens trådløse LAN-forbindelse med routeren aktiveret.
Den trådløse LAN-LED blinker konstant. • Enhedens trådløse LAN-forbindelse hvor routeren ikke er etableret. Tjek din forbindelse igen.
• Hvis du ikke vil bruge APP’en, tryk på for at slukke.
OplysningerOverensstemmelseserklæring (DOC)“Panasonic Corporation” erklærer hermed, at produktet følger de væsentlige krav og andre gældende bestemmelser i Direktiv 2014/53/EU
EU Overensstemmelseserklæringens (DOC) fuldtekst er tilgængelig på den følgende internetadresse: http://www.ptc.panasonic.eu/Autoriseret repræsentant: Panasonic Testning Centre, Panasonic Marketing Europe GmbH, Winsbergring 15, 22525 Hamburg, GermanyNorge: Der er begrænsninger på anvendelse inden for 20 km fra Ny-Alesunds centrum i Svalbard.
81
Dan
sk
OplysningerFunktion til opgradering af fi rmwareDette produkt er i stand til at forbinde til Panasonics fi rmware-opdateringsserver gennem internettet, så enhedens fi rmware automatisk kan opdateres til den seneste version.For at opdatere fi rmwaren, skal enheden udføre et tjek hver dag efter opstart, uanset om fi rmwaren er opdateret til den nyeste version eller ej. Og hvis en opdatering er påkrævet, udføres både opdateringen og genopstarten automatisk. Almindelig drift er ikke mulig, mens enheden genstartes (hvilket tager mellem 1-5 minutter).
Information om softwarelicensenDette produkt indarbejder følgende software:(1) Softwaren udvikles uafhængigt af eller for Panasonic Corporation,(2) Softwaren ejes af tredjepart og er licenseret til Panasonic Corporation,(3) Open Source-softwaren under BSD-licensen og/eller tilsvarende licenser.Softwaren kategoriseret som (3) distribueres med håb om, at den er anvendelig, men UDEN NOGEN GARANTI, uden den implicerede garanti i omfattet af KØBELOVEN eller om den er PASSENDE TIL SÆRLIGE FORMÅL.De følgende licensbetingelser er gældende for Open Source-komponenter.1. SupplikantlicensCopyright (C) 2003-2016, Jouni Malinen <[email protected] > og bidragsydere.Alle rettigheder forbeholdes.Denne software må distribueres, anvendes og modifi ceres under betingelserne i BSD-licensen:Videresalg og anvendelse i kilde og binære former med eller uden modifi cering, og det er tilladt, såfremt de følgende betingelser mødes:1. Videresalg af kildekoden skal indeholde copyright-informationerne ovenfor, denne liste med betingelser og følgende ansvarsfraskrivelse.2. Videresalg i binær form skal gengive copyright-informationerne ovenfor, denne liste med betingelser og følgende ansvarsfraskrivelse i dokumentationen og/eller andre materialer, der leveres ved distributionen.3. Hverken navn(e) på ovenfornævnte copyright-indehaver(e) eller bidragsydernes navne kan bruges til at godkende eller promovere produkter, der afl edes af denne software uden skriftlig forhåndsgivet tilladelse.DENNE SOFTWARE LEVERES AF COPYRIGHT-INDEHAVERE OG -BIDRAGSYDERE SOM DEN ER, OG FRASKRIVER SIG ALLE UDTRYKTE ELLER UNDERFORSTÅEDE GARANTIER, INKLUSIV, MEN IKKE BEGRÆNSET TIL, DE UNDERFORSTÅEDE KØBELOVSGARANTIER TIL SPECIFIKKE FORMÅL. COPYRIGHT-INDEHAVER ELLER -BIDRAGSYDERE VIL UNDER INGEN OMSTÆNDIGHEDER VÆRE ANSVARLIGE FOR NOGEN DIREKTE, INDIREKTE, TILFÆLDIGE, SÆRLIGE, EKSEMPLARISKE ELLER FØLGENDE SKADER (INKLUSIV, MEN IKKE BEGRÆNSET TIL, ANSKAFFELSE AF SUBSTITUTPRODUKTER ELLER -TJENESTER; TAB AF ANVENDELSE, DATA ELLER PROFIT; ELLER AFBRYDELSE AF FORRETNING), DER KAN VÆRE FORÅRSAGET OG I TEORETISK ANSVAR, UANSET OM DET OPTRÆDER I KONTRAKT, OBJEKTIVT ANSVAR ELLER ERSTATNING (INKLUSIV NEGLEKT ELLER LIGNENDE), DER OPSTÅR VED ANVENDELSE AF DENNE SOFTWARE, SELV HVIS DER ER RÅDGIVET OM MULIGHEDEN FOR SKADE.
Fejlfi
ndi
ng /
Opl
ysni
nger

82
Copyright 1
• The App Store is a service mark of Apple Inc.• iPhone is a trademark of Apple Inc. registered in the United States
and other countries. The iPhone trademarks is used under license of iPhone Co., Ltd.
• Android and Google Play are trademarks or registered trademarks of Google LLC.
• “WPATM” and “WPA2TM” are trademarks of “Wi-Fi Alliance®”.• Other names, company names, product names, etc described in this
manual are trademarks or registered trademarks of each company. In the text, some TM and ® marks are not listed.
About SoftwareThis product incorporates the following software:1) The software developed independently by or for Panasonic Corporation,2) The software owned by third party and licensed to Panasonic Corporation,3) The software licensed under the GNU GENERAL PUBLIC LICENSE Version 2.0 (GPL V2.0),4) Open sourced software other than the software licensed under the GPL V2.0.The software categorized as (3) and (4) are distributed in the hope that it will be useful, but without any warranty, without even the implied warranty of [merchantability] or [fi tness for a particular purpose]. Please refer to the detailed terms and conditions thereof shown in the “Software License” menu on this product.At least three (3) years from delivery of this product, Panasonic will give to any third party who contacts us at the contact information provided below, for a charge no more than our cost of physically performing source code distribution, a complete machine-readable copy of the corresponding source code covered under GPL V2.0 or the other licenses with the obligation to do so, as well as the respective copyright notice thereof.Contact information:[email protected] source code and the copyright notice are also available for free in our website below.https://panasonic.net/cns/oss/ap/
lwIPlwIP is licenced under the BSD licence:Copyright (c) 2001-2004 Swedish Institute of Computer Science.All rights reserved.Redistribution and use in source and binary forms, with or without modifi cation, are permitted provided that the following conditions are met:1. Redistributions of source code must retain the above copyright notice, this list of conditions and the following disclaimer.2. Redistributions in binary form must reproduce the above copyright notice, this list of conditions and the following disclaimer in the documentation and/or other materials provided with the distribution.3. The name of the author may not be used to endorse or promote products derived from this software without specifi c prior written permission.THIS SOFTWARE IS PROVIDED BY THE AUTHOR ``AS IS AND ANY EXPRESS OR IMPLIED WARRANTIES, INCLUDING, BUT NOT LIMITED TO, THE IMPLIED WARRANTIES OF MERCHANTABILITY AND FITNESS FOR A PARTICULAR PURPOSE ARE DISCLAIMED. IN NO EVENT SHALL THE AUTHOR BE LIABLE FOR ANY DIRECT, INDIRECT, INCIDENTAL, SPECIAL, EXEMPLARY, OR CONSEQUENTIAL DAMAGES (INCLUDING, BUT NOT LIMITED TO, PROCUREMENT OF SUBSTITUTE GOODS OR SERVICES; LOSS OF USE, DATA, OR PROFITS; OR BUSINESS INTERRUPTION) HOWEVER CAUSED AND ON ANY THEORY OF LIABILITY, WHETHER IN CONTRACT, STRICT LIABILITY, OR TORT (INCLUDING NEGLIGENCE OR OTHERWISE) ARISING IN ANY WAY OUT OF THE USE OF THIS SOFTWARE, EVEN IF ADVISED OF THE POSSIBILITY OF SUCH DAMAGE.
mbedTLSApache LicenseVersion 2.0, January 2004http://www.apache.org/licenses/TERMS AND CONDITIONS FOR USE, REPRODUCTION, AND DISTRIBUTION1. Defi nitions.“License” shall mean the terms and conditions for use, reproduction, and distribution as defi ned by Sections 1 through 9 of this document.“Licensor” shall mean the copyright owner or entity authorized by the copyright owner that is granting the License.“Legal Entity” shall mean the union of the acting entity and all other entities that control, are controlled by, or are under common control with that entity. For the purposes of this defi nition, “control” means (i) the power, direct or indirect, to cause the direction or management of such entity, whether by contract or otherwise, or (ii) ownership of fi fty percent (50%) or more of the outstanding shares, or (iii) benefi cial ownership of such entity.“You” (or “Your”) shall mean an individual or Legal Entity exercising permissions granted by this License.“Source” form shall mean the preferred form for making modifi cations, including but not limited to software source code, documentation source, and confi guration fi les.“Object” form shall mean any form resulting from mechanical transformation or translation of a Source form, including but not limited to compiled object code, generated documentation, and conversions to other media types.“Work” shall mean the work of authorship, whether in Source or Object form, made available under the License, as indicated by a copyright notice that is included in or attached to the work.“Derivative Works” shall mean any work, whether in Source or Object form, that is based on (or derived from) the Work and for which the editorial revisions, annotations, elaborations, or other modifi cations represent, as a whole, an original work of authorship. For the purposes of this License, Derivative Works shall not include works that remain separable from, or merely link (or bind by name) to the interfaces of, the Work and Derivative Works thereof.“Contribution” shall mean any work of authorship, including the original version of the Work and any modifi cations or additions to that Work or Derivative Works thereof, that is intentionally submitted to Licensor for inclusion in the Work by the copyright owner or by an individual or Legal Entity authorized to submit on behalf of the copyright owner. For the purposes of this defi nition, “submitted” means any form of electronic, verbal, or written communication sent to the Licensor or its representatives, including but not limited to communication on electronic mailing lists, source code control systems, and issue tracking systems that are managed by, or on behalf of, the Licensor for the purpose of discussing and improving the Work, but excluding communication that is conspicuously marked or otherwise designated in writing by the copyright owner as “Not a Contribution.”“Contributor” shall mean Licensor and any individual or Legal Entity on behalf of whom a Contribution has been received by Licensor and subsequently incorporated within the Work.2. Grant of Copyright License. Subject to the terms and conditions of this License, each Contributor hereby grants to You a perpetual, worldwide, non-exclusive, no-charge, royalty-free, irrevocable copyright license to reproduce, prepare Derivative Works of, publicly display, publicly perform, sublicense, and distribute the Work and such Derivative Works in Source or Object form.3. Grant of Patent License. Subject to the terms and conditions of this License, each Contributor hereby grants to You a perpetual, worldwide, non-exclusive, no-charge, royaltyfree, irrevocable (except as stated in this section) patent license to make, have made, use, offer to sell, sell, import, and otherwise transfer the Work, where such license applies only to those patent claims licensable by such
83
Contributor that are necessarily infringed by their Contribution(s) alone or by combination of their Contribution(s) with the Work to which such Contribution(s) was submitted.If You institute patent litigation against any entity (including a cross-claim or counterclaim in a lawsuit) alleging that the Work or a Contribution incorporated within the Work constitutes direct or contributory patent infringement, then any patent licenses granted to You under this License for that Work shall terminate as of the date such litigation is fi led.4. Redistribution. You may reproduce and distribute copies of the Work or Derivative Works thereof in any medium, with or without modifi cations, and in Source or Object form, provided that You meet the following conditions:(a) You must give any other recipients of the Work or Derivative Works
a copy of this License; and(b) You must cause any modifi ed fi les to carry prominent notices stating
that You changed the fi les; and(c) You must retain, in the Source form of any Derivative Works that
You distribute, all copyright, patent, trademark, and attribution notices from the Source form of the Work, excluding those notices that do not pertain to any part of the Derivative Works; and
(d) If the Work includes a “NOTICE” text fi le as part of its distribution, then any Derivative Works that You distribute must include a readable copy of the attribution notices contained within such NOTICE fi le, excluding those notices that do not pertain to any part of the Derivative Works, in at least one of the following places: within a NOTICE text fi le distributed as part of the Derivative Works; within the Source form or documentation, if provided along with the Derivative Works; or, within a display generated by the Derivative Works, if and wherever such third-party notices normally appear. The contents of the NOTICE fi le are for informational purposes only and do not modify the License. You may add Your own attribution notices within Derivative Works that You distribute, alongside or as an addendum to the NOTICE text from the Work, provided that such additional attribution notices cannot be construed as modifying the License.
You may add Your own copyright statement to Your modifi cations and may provide additional or different license terms and conditions for use, reproduction, or distribution of Your modifi cations, or for any such Derivative Works as a whole, provided Your use, reproduction, and distribution of the Work otherwise complies with the conditions stated in this License.5. Submission of Contributions. Unless You explicitly state otherwise, any Contribution intentionally submitted for inclusion in the Work by You to the Licensor shall be under the terms and conditions of this License, without any additional terms or conditions.Notwithstanding the above, nothing herein shall supersede or modify the terms of any separate license agreement you may have executed with Licensor regarding such Contributions.6. Trademarks. This License does not grant permission to use the trade names, trademarks, service marks, or product names of the Licensor, except as required for reasonable and customary use in describing the origin of the Work and reproducing the content of the NOTICE fi le.7. Disclaimer of Warranty. Unless required by applicable law or agreed to in writing, Licensor provides the Work (and each Contributor provides its Contributions) on an “AS IS” BASIS, WITHOUT WARRANTIES OR CONDITIONS OF ANY KIND, either express or implied, including, without limitation, any warranties or conditions of TITLE, NON-INFRINGEMENT, MERCHANTABILITY, or FITNESS FOR A PARTICULAR PURPOSE. You are solely responsible for determining the appropriateness of using or redistributing the Work and assume any risks associated with Your exercise of permissions under this License.8. Limitation of Liability. In no event and under no legal theory, whether in tort (including negligence), contract, or otherwise, unless required by applicable law (such as deliberate and grossly negligent
acts) or agreed to in writing, shall any Contributor be liable to You for damages, including any direct, indirect, special, incidental, or consequential damages of any character arising as a result of this License or out of the use or inability to use the Work (including but not limited to damages for loss of goodwill, work stoppage, computer failure or malfunction, or any and all other commercial damages or losses), even if such Contributor has been advised of the possibility of such damages.9. Accepting Warranty or Additional Liability. While redistributing the Work or Derivative Works thereof, You may choose to offer, and charge a fee for, acceptance of support, warranty, indemnity, or other liability obligations and or rights consistent with this License. However, in accepting such obligations, You may act only on Your own behalf and/ on Your sole responsibility, not on behalf of any other Contributor, and only if You agree to indemnify, defend, and hold each Contributor harmless for any liability incurred by, or claims asserted against, such Contributor by reason of your accepting any such warranty or additional liability.END OF TERMS AND CONDITIONS
WPA Supplicant======================================================Copyright (c) 2003-2016, Jouni Malinen <[email protected] > and contributors All Rights Reserved.This program is licensed under the BSD license (the one with advertisement clause removed).If you are submitting changes to the project, please see CONTRIBUTIONS fi le for more instructions.License-----------------------------------------------------------------------------------------------This software may be distributed, used, and modifi ed under the terms of BSD license:Redistribution and use in source and binary forms, with or without modifi cation, are permitted provided that the following conditions are met:1. Redistributions of source code must retain the above copyright notice, this list of conditions and the following disclaimer.2. Redistributions in binary form must reproduce the above copyright notice, this list of conditions and the following disclaimer in the documentation and/or other materials provided with the distribution.3. Neither the name(s) of the above-listed copyright holder(s) nor the names of its contributors may be used to endorse or promote products derived from this software without specifi c prior written permission.THIS SOFTWARE IS PROVIDED BY THE COPYRIGHT HOLDERS AND CONTRIBUTORS “AS IS” AND ANY EXPRESS OR IMPLIED WARRANTIES, INCLUDING, BUT NOT LIMITED TO, THE IMPLIED WARRANTIES OF MERCHANTABILITY AND FITNESS FOR A PARTICULAR PURPOSE ARE DISCLAIMED. IN NO EVENT SHALL THE COPYRIGHT OWNER OR CONTRIBUTORS BE LIABLE FOR ANY DIRECT, INDIRECT, INCIDENTAL, SPECIAL, EXEMPLARY, OR CONSEQUENTIAL DAMAGES (INCLUDING, BUT NOT LIMITED TO, PROCUREMENT OF SUBSTITUTE GOODS OR SERVICES; LOSS OF USE, DATA, OR PROFITS; OR BUSINESS INTERRUPTION) HOWEVER CAUSED AND ON ANY THEORY OF LIABILITY, WHETHER IN CONTRACT, STRICT LIABILITY, OR TORT (INCLUDING NEGLIGENCE OR OTHERWISE) ARISING IN ANY WAY OUT OF THE USE OF THIS SOFTWARE, EVEN IF ADVISED OF THE POSSIBILITY OF SUCH DAMAGE.
Free RTOSThe FreeRTOS source code is licensed by a *modifi ed* GNU General Public License (GPL). The modifi cation is provided in the form of an exception.NOTE: The modifi cation to the GPL is included to allow you to distribute a combined work that includes FreeRTOS without being obliged to provide the source code for proprietary components outside of the FreeRTOS kernel.-----------------------------------------------------------------------------------------------
84
The FreeRTOS GPL Exception Text:Any FreeRTOS source code, whether modifi ed or in it’s original release form, or whether in whole or in part, can only be distributed by you under the terms of the GNU General Public License plus this exception. An independent module is a module which is not derived from or based on FreeRTOS.Clause 1:Linking FreeRTOS statically or dynamically with other modules is making a combined work based on FreeRTOS. Thus, the terms and conditions of the GNU General Public License cover the whole combination.As a special exception, the copyright holder of FreeRTOS gives you permission to link FreeRTOS with independent modules that communicate with FreeRTOS solely through the FreeRTOS API interface, regardless of the license terms of these independent modules, and to copy and distribute the resulting combined work under terms of your choice, provided that
+ Every copy of the combined work is accompanied by a written statement that details to the recipient the version of FreeRTOS used and an offer by yourself to provide the FreeRTOS source code (including any modifi cations you may have made) should the recipient request it.+ The combined work is not itself an RTOS, scheduler, kernel or related product.+ The independent modules add signifi cant and primary functionality to FreeRTOS and do not merely extend the existing functionality already present in FreeRTOS.
Clause 2:FreeRTOS may not be used for any competitive or comparative purpose, including the publication of any form of run time or compile time metric, without the express permission of Real Time Engineers Ltd. (this is the norm within the industry and is intended to ensure information accuracy).-----------------------------------------------------------------------------------------------The standard GPL exception text:
GNU GENERAL PUBLIC LICENSEVersion 2, June 1991
Copyright (C) 1989, 1991 Free Software Foundation, Inc. 59 Temple Place, Suite 330, Boston, MA 02111-1307 USA Everyone is permitted to copy and distribute verbatim copies of this license document, but changing it is not allowed.
Preamble The licenses for most software are designed to take away your freedom to share and change it. By contrast, the GNU General Public License is intended to guarantee your freedom to share and change free software--to make sure the software is free for all its users. This General Public License applies to most of the Free Software Foundation’s software and to any other program whose authors commit to using it. (Some other Free Software Foundation software is covered by the GNU Library General Public License instead.) You can apply it to your programs, too. When we speak of free software, we are referring to freedom, not price. Our General Public Licenses are designed to make sure that you have the freedom to distribute copies of free software (and charge for this service if you wish), that you receive source code or can get it if you want it, that you can change the software or use pieces of it in new free programs; and that you know you can do these things. To protect your rights, we need to make restrictions that forbid anyone to deny you these rights or to ask you to surrender the rights. These restrictions translate to certain responsibilities for you if you distribute copies of the software, or if you modify it.
For example, if you distribute copies of such a program, whether gratis or for a fee, you must give the recipients all the rights that you have. You must make sure that they, too, receive or can get the source code. And you must show them these terms so they know their rights. We protect your rights with two steps: (1) copyright the software, and (2) offer you this license which gives you legal permission to copy, distribute and/or modify the software. Also, for each author’s protection and ours, we want to make certain that everyone understands that there is no warranty for this free software. If the software is modifi ed by someone else and passed on, we want its recipients to know that what they have is not the original, so that any problems introduced by others will not refl ect on the original authors’ reputations. Finally, any free program is threatened constantly by software patents. We wish to avoid the danger that redistributors of a free program will individually obtain patent licenses, in effect making the program proprietary. To prevent this, we have made it clear that any patent must be licensed for everyone’s free use or not licensed at all. The precise terms and conditions for copying, distribution and modifi cation follow.
GNU GENERAL PUBLIC LICENSETERMS AND CONDITIONS FOR COPYING,
DISTRIBUTION AND MODIFICATION 0. This License applies to any program or other work which contains a notice placed by the copyright holder saying it may be distributed under the terms of this General Public License. The “Program”, below, refers to any such program or work, and a “work based on the Program” means either the Program or any derivative work under copyright law: that is to say, a work containing the Program or a portion of it, either verbatim or with modifi cations and/or translated into another language. (Hereinafter, translation is included without limitation in the term “modifi cation”.) Each licensee is addressed as “you”.Activities other than copying, distribution and modifi cation are not covered by this License; they are outside its scope. The act of running the Program is not restricted, and the output from the Program is covered only if its contents constitute a work based on the Program (independent of having been made by running the Program).Whether that is true depends on what the Program does. 1. You may copy and distribute verbatim copies of the Program’s source code as you receive it, in any medium, provided that you conspicuously and appropriately publish on each copy an appropriate copyright notice and disclaimer of warranty; keep intact all the notices that refer to this License and to the absence of any warranty; and give any other recipients of the Program a copy of this License along with the Program. You may charge a fee for the physical act of transferring a copy, and you may at your option offer warranty protection in exchange for a fee. 2. You may modify your copy or copies of the Program or any portion of it, thus forming a work based on the Program, and copy and distribute such modifi cations or work under the terms of Section 1 above, provided that you also meet all of these conditions:
a) You must cause the modifi ed fi les to carry prominent notices stating that you changed the fi les and the date of any change.b) You must cause any work that you distribute or publish, that in whole or in part contains or is derived from the Program or any part thereof, to be licensed as a whole at no charge to all third parties under the terms of this License.c) If the modifi ed program normally reads commands interactively when run, you must cause it, when started running for such nteractive use in the most ordinary way, to print or display an announcement including an appropriate copyright notice and a notice that there is no warranty (or else, saying that you provide a warranty) and that users may redistribute the program under these
Copyright 2
85
conditions, and telling the user how to view a copy of this License.(Exception: if the Program itself is interactive but does not normally print such an announcement, your work based on the Program is not required to print an announcement.)
These requirements apply to the modifi ed work as a whole. If identifi able sections of that work are not derived from the Program, and can be reasonably considered independent and separate works in themselves, then this License, and its terms, do not apply to those sections when you distribute them as separate works. But when you distribute the same sections as part of a whole which is a work based on the Program the distribution of the whole must be on the terms of this License, whose permissions for other licensees extend to the entire whole, and thus to each and every part regardless of who wrote it.Thus, it is not the intent of this section to claim rights or contest your rights to work written entirely by you; rather, the intent is to exercise the right to control the distribution of derivative or collective works based on the Program.In addition, mere aggregation of another work not based on the Program with the Program (or with a work based on the Program) on a volume of a storage or distribution medium does not bring the other work under the scope of this License. 3. You may copy and distribute the Program (or a work based on it, under Section 2) in object code or executable form under the terms of Sections 1 and 2 above provided that you also do one of the following:
a) Accompany it with the complete corresponding machine-readable source code, which must be distributed under the terms of Sections 1 and 2 above on a medium customarily used for software interchange; or,b) Accompany it with a written offer, valid for at least three years, to give any third party, for a charge no more than your cost of physically performing source distribution, a complete machine-readable copy of the corresponding source code, to be distributed under the terms of Sections 1 and 2 above on a medium customarily used for software interchange; or,c) Accompany it with the information you received as to the offer to distribute corresponding source code. (This alternative is allowed only for noncommercial distribution and only if you received the program in object code or executable form with such an offer, in accord with Subsection b above.)
The source code for a work means the preferred form of the work for making modifi cations to it. For an executable work, complete source code means all the source code for all modules it contains, plus any associated interface defi nition fi les, plus the scripts used to control compilation and installation of the executable. However, as a special exception, the source code distributed need not include anything that is normally distributed (in either source or binary form) with the major components (compiler, kernel, and so on) of the operating system on which the executable runs, unless that component itself accompanies the executable.If distribution of executable or object code is made by offering access to copy from a designated place, then offering equivalent access to copy the source code from the same place counts as distribution of the source code, even though third parties are not compelled to copy the source along with the object code. 4. You may not copy, modify, sublicense, or distribute the Program except as expressly provided under this License. Any attempt otherwise to copy, modify, sublicense or distribute the Program is void, and will automatically terminate your rights under this License. However, parties who have received copies, or rights, from you under this License will not have their licenses terminated so long as such parties remain in full compliance.
5. You are not required to accept this License, since you have not signed it. However, nothing else grants you permission to modify or distribute the Program or its derivative works. These actions are prohibited by law if you do not accept this License. Therefore, by modifying or distributing the Program (or any work based on the Program), you indicate your acceptance of this License to do so, and all its terms and conditions for copying, distributing or modifying the Program or works based on it. 6. Each time you redistribute the Program (or any work based on the Program), the recipient automatically receives a license from the original licensor to copy, distribute or modify the Program subject to these terms and conditions. You may not impose any further restrictions on the recipients’ exercise of the rights granted herein. You are not responsible for enforcing compliance by third parties to this License. 7. If, as a consequence of a court judgment or allegation of patent infringement or for any other reason (not limited to patent issues), conditions are imposed on you (whether by court order, agreement or otherwise) that contradict the conditions of this License, they do not excuse you from the conditions of this License. If you cannot distribute so as to satisfy simultaneously your obligations under this License and any other pertinent obligations, then as a consequence you may not distribute the Program at all. For example, if a patent license would not permit royalty-free redistribution of the Program by all those who receive copies directly or indirectly through you, then the only way you could satisfy both it and this License would be to refrain entirely from distribution of the Program.If any portion of this section is held invalid or unenforceable under any particular circumstance, the balance of the section is intended to apply and the section as a whole is intended to apply in other circumstances. It is not the purpose of this section to induce you to infringe any patents or other property right claims or to contest validity of any such claims; this section has the sole purpose of protecting the integrity of the free software distribution system, which is implemented by public license practices. Many people have made generous contributions to the wide range of software distributed through that system in reliance on consistent application of that system; it is up to the author/donor to decide if he or she is willing to distribute software through any other system and a licensee cannot impose that choice.This section is intended to make thoroughly clear what is believed to be a consequence of the rest of this License. 8. If the distribution and/or use of the Program is restricted in certain countries either by patents or by copyrighted interfaces, the original copyright holder who places the Program under this License may add an explicit geographical distribution limitation excluding those countries, so that distribution is permitted only in or among countries not thus excluded. In such case, this License incorporates the limitation as if written in the body of this License. 9. The Free Software Foundation may publish revised and/or new versions of the General Public License from time to time. Such new versions will be similar in spirit to the present version, but may differ in detail to address new problems or concerns.Each version is given a distinguishing version number. If the Program specifi es a version number of this License which applies to it and “any later version”, you have the option of following the terms and conditions either of that version or of any later version published by the Free Software Foundation. If the Program does not specify a version number of this License, you may choose any version ever published by the Free Software Foundation. 10. If you wish to incorporate parts of the Program into other free programs whose distribution conditions are different, write to the author to ask for permission. For software which is copyrighted by the Free Software Foundation, write to the Free Software Foundation; we sometimes make exceptions for this. Our decision will be guided by the two goals of preserving the free status of all derivatives of our free software and of promoting the sharing and reuse of software generally.
86
NO WARRANTY 11. BECAUSE THE PROGRAM IS LICENSED FREE OF CHARGE, THERE IS NO WARRANTY FOR THE PROGRAM, TO THE EXTENT PERMITTED BY APPLICABLE LAW. EXCEPT WHEN OTHERWISE STATED IN WRITING THE COPYRIGHT HOLDERS AND/OR OTHER PARTIES PROVIDE THE PROGRAM “AS IS” WITHOUT WARRANTY OF ANY KIND, EITHER EXPRESSED OR IMPLIED, INCLUDING, BUT NOT LIMITED TO, THE IMPLIED WARRANTIES OF MERCHANTABILITY AND FITNESS FOR A PARTICULAR PURPOSE. THE ENTIRE RISK AS TO THE QUALITY AND PERFORMANCE OF THE PROGRAM IS WITH YOU. SHOULD THE PROGRAM PROVE DEFECTIVE, YOU ASSUME THE COST OF ALL NECESSARY SERVICING, REPAIR OR CORRECTION. 12. IN NO EVENT UNLESS REQUIRED BY APPLICABLE LAW OR AGREED TO IN WRITING WILL ANY COPYRIGHT HOLDER, OR ANY OTHER PARTY WHO MAY MODIFY AND/OR REDISTRIBUTE THE PROGRAM AS PERMITTED ABOVE, BE LIABLE TO YOU FOR DAMAGES, INCLUDING ANY GENERAL, SPECIAL, INCIDENTAL OR CONSEQUENTIAL DAMAGES ARISING OUT OF THE USE OR INABILITY TO USE THE PROGRAM (INCLUDING BUT NOT LIMITED TO LOSS OF DATA OR DATA BEING RENDERED INACCURATE OR LOSSES SUSTAINED BY YOU OR THIRD PARTIES OR A FAILURE OF THE PROGRAM TO OPERATE WITH ANY OTHER PROGRAMS), EVEN IF SUCH HOLDER OR OTHER PARTY HAS BEEN ADVISED OF THE POSSIBILITY OF SUCH DAMAGES.
END OF TERMS AND CONDITIONSHow to Apply These Terms to Your New Programs
If you develop a new program, and you want it to be of the greatest possible use to the public, the best way to achieve this is to make it free software which everyone can redistribute and change under these terms. To do so, attach the following notices to the program. It is safest to attach them to the start of each source fi le to most effectively convey the exclusion of warranty; and each fi le should have at least the “copyright” line and a pointer to where the full notice is found. <one line to give the program’s name and a brief idea of what it does.> Copyright (C) <year> <name of author>
This program is free software; you can redistribute it and/ or modify it under the terms of the GNU General Public License** as published by the Free Software Foundation; either version 2 of the License, or (at your option) any later version.This program is distributed in the hope that it will be useful, but WITHOUT ANY WARRANTY; without even the implied warranty of MERCHANTABILITY or FITNESS FOR A PARTICULAR PURPOSE. See the GNU General Public License for more details.You should have received a copy of the GNU General Public License along with this program; if not, write to the Free Software Foundation, Inc., 59 Temple Place, Suite 330, Boston, MA 02111-1307 USA
Also add information on how to contact you by electronic and paper mail. If the program is interactive, make it output a short notice like this when it starts in an interactive mode:
Gnomovision version 69, Copyright (C) year name of author Gnomovision comes with ABSOLUTELY NO WARRANTY; for details type `show w’. This is free software, and you are welcome to redistribute it under certain conditions; type `show c’ for details.
The hypothetical commands `show w’ and `show c’ should show the appropriate parts of the General Public License. Of course, the commands you use may be called something other than `show w’ and `show c’; they could even be mouseclicks or menu items--whatever suits your program.
You should also get your employer (if you work as a programmer) or your school, if any, to sign a “copyright disclaimer” for the program, if necessary. Here is a sample; alter the names:
Yoyodyne, Inc., hereby disclaims all copyright interest in the program ‘Gnomovision’ (which makes passes at compilers) written by James Hacker.<signature of Ty Coon>, 1 April 1989Ty Coon, President of Vice
This General Public License does not permit incorporating your program into proprietary programs. If your program is a subroutine library, you may consider it more useful to permit linking proprietary applications with the library. If this is what you want to do, use the GNU Library General Public License instead of this License.
Copyright 3

87
Memo

ACXF55-28410FS0620-0Printed in Malaysia
Manufactured by: Panasonic Corporation1006 Kadoma, Kadoma City, Osaka, Japan
Importer for Europe: Panasonic Marketing Europe GmbHPanasonic Testing CentreWinsbergring 15, 22525 Hamburg, Germany
Website: http://www.panasonic.com
© Panasonic Corporation 2020
Authorised representative in EUPanasonic Testing Centre Panasonic Marketing Europe GmbH Winsbergring 15, 22525 Hamburg, Germany
HIDF16000141