Embed Size (px)
Citation preview

Mode d'emploi
DW-600
Adaptateur USB sans fil double bande AC600
1910020774 REV1.0.0
Downloaded from www.vandenborre.be

Avertissement sur le marquage CE
Ceci est un produit de classe B. Dans un environnement domestique, ce produit peut provoquer
des interférences radio, auquel cas l'utilisateur peut être dans l'obligation de prendre les
mesures qui s'imposent.
Restrictions nationales Cet appareil est conçu pour une utilisation domestique et professionnelle dans tous les pays de
l'Union européenne (et les autres pays respectant la directive UE 1999/5/CE), sans aucune
limite, à l'exception des pays mentionnés ci-dessous:
Pays Restriction Raison/remarque
Bulgarie
Aucune
Autorisation générale requise pour une utilisation
en extérieur et dans un service public
France
L'utilisation en extérieur est limitée à
10 mW e.i.r.p. dans la
bande des
2454-2483,5 MHz
Utilisation militaire de radiolocalisation. La réattribution
de la bande 2,4 GHz est en cours ces dernières années
pour permettre un assouplissement de la réglementation
actuelle. Mise en œuvre totale prévue pour 2012
Italie
Aucune
Autorisation générale requise en cas d'utilisation en
dehors de son propre domicile
Luxembourg
Aucune
Autorisation générale requise pour la fourniture réseau
et service (pas pour le spectre)
Norvège
Mise en œuvre
Cette sous-section ne s'applique pas dans la zone
géographique située dans un rayon de 20 km autour de
Ny-Ålesund
Fédération de Russie
Aucune
Uniquement pour les applications en intérieur
Remarque: Veuillez ne pas utiliser ce produit à l'extérieur en France.
5150-5250 MHz
Pays Restriction Raison/remarque
Bulgarie
Pas mise en œuvre
Planifiée
Croatie
Licence requise
Italie
Autorisation générale requise en cas d'utilisation en
dehors de son propre domicile
Downloaded from www.vandenborre.be

Luxembourg
Aucune
Autorisation générale requise pour la fourniture réseau
et service (pas pour le spectre)
Fédération de Russie
Pas d'informations
5250-5350 MHz
Pays Restriction Raison/remarque
Bulgarie
Pas mise en œuvre
Planifiée
Croatie
Licence requise
Italie
Autorisation générale requise en cas d'utilisation en
dehors de son propre domicile
Luxembourg
Aucune
Autorisation générale requise pour la fourniture réseau
et service (pas pour le spectre)
Fédération de Russie
Pas d'informations
5470-5725 MHz
Pays Restriction Raison/remarque
Bulgarie
Pas mise en œuvre
Planifiée
France
Pertinent+ provisions pour la mise en œuvre du
mécanisme DFS décrit dans la norme ETSI EN 301 893
V1.3.1 et versions ultérieures
Italie
Autorisation générale requise en cas d'utilisation en
dehors de son propre domicile
Luxembourg
Aucune
Autorisation générale requise pour la fourniture réseau et
service (pas pour le spectre)
Fédération de Russie
Pas d'informations
Turquie
Pas mise en œuvre
Systèmes de défense
Remarque: Veuillez ne pas utiliser ce produit à l'extérieur en France.
Downloaded from www.vandenborre.be

5
TABLE DES MATIÈRES Contenu ..................................................................................................................... 1
Chapitre 1 Description du Produit .......................................................................... 2
1.1 Introduction ................................................................................................................ 2 1.2 Caractéristiques ......................................................................................................... 2
1.3 Aperçu du matériel .................................................................................................... 3 Chapitre 2 Installation .............................................................................................. 4
2.1 Installation du matériel ............................................................................................... 4 2.2 Installation du logiciel ................................................................................................ 5
Chapitre 3 Connexion à un réseau sans fil ............................................................ 9
3.1 Connexion via TWCU ................................................................................................ 9 3.2 Connexion via WPS ................................................................................................. 12
3.2.1 Méthode PBC (Push Button Configuration, "configuration par appui sur un bouton") ...................................................................................................... 12
3.2.2 Méthode PIN ............................................................................................... 13
3.3 Connexion via l'utilitaire sans fil intégré à Windows................................................ 15 3.3.1 Sur Windows XP......................................................................................... 15
3.3.2 Sur Windows 7 ........................................................................................... 17
3.3.3 Sur Windows 8 ........................................................................................... 18
3.3.4 Sur Windows 8.1 ........................................................................................ 20
Chapitre 4 Gestion ................................................................................................. 23
4.1 Profil ......................................................................................................................... 23 4.1.1 Ajouter un profil .......................................................................................... 23
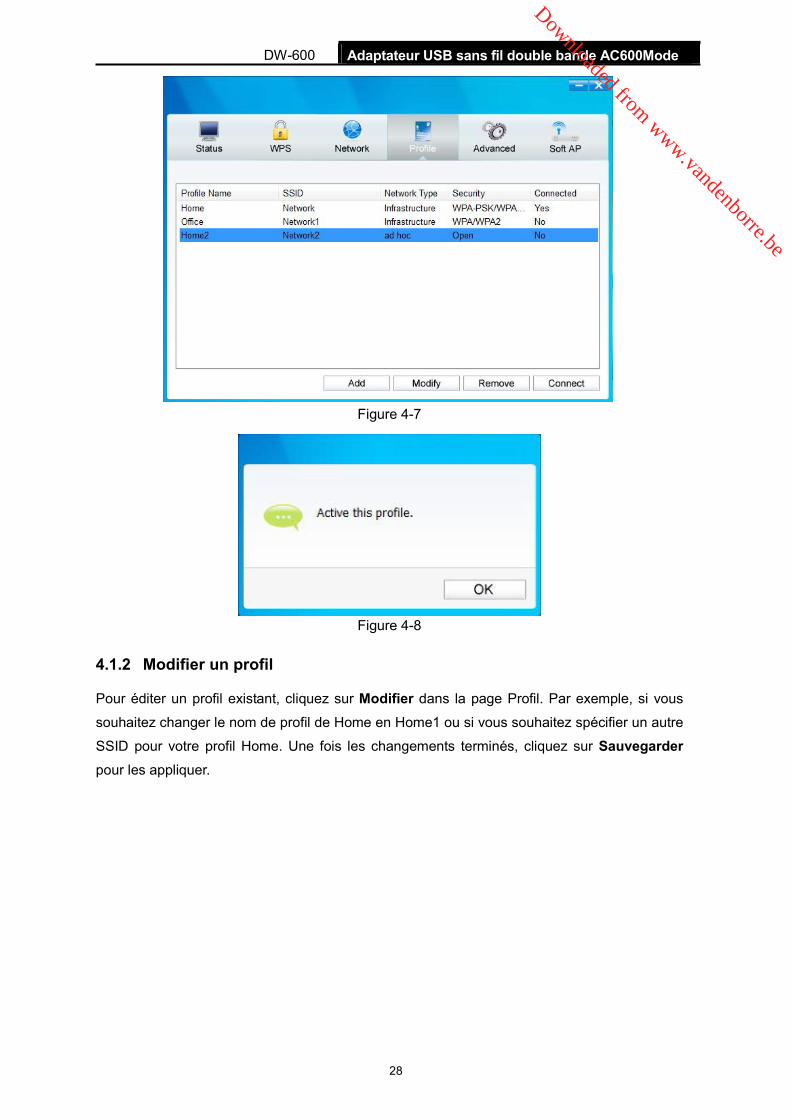
4.1.2 Modifier un profil ......................................................................................... 28
4.1.3 Supprimer un profil ..................................................................................... 29
4.2 Avancé ..................................................................................................................... 29 4.3 À propos .................................................................................................................. 30
Chapitre 5 Mode SoftAP ........................................................................................ 31
Chapitre 6 Désinstallation du logiciel ................................................................... 34
6.1 Sur Windows XP/7 ................................................................................................... 34 6.1.1 Désinstaller le logiciel d'utilitaire à partir d'un PC ...................................... 34
6.1.2 Désinstaller le logiciel pilote à partir d'un PC ............................................. 34
6.2 Dans Windows 8/8.1 ................................................................................................ 34 6.2.1 Désinstaller le logiciel d'utilitaire à partir d'un PC ...................................... 34
6.2.2 Désinstaller le logiciel pilote à partir d'un PC ............................................. 34
Annexe A : Spécifications...................................................................................... 35
Annexe B : Glossaire ............................................................................................. 36
Downloaded from www.vandenborre.be

Adaptateur USB sans fil double bande AC600Mode
5
DW-600 AC600 Wireless Dual Band USB Adapter User Guide
Contenu Vérifiez que le produit contient les éléments ci-dessous.
1 adaptateur USB sans fil double bande AC600 DW-600 Guide rapide d'installation 1 CD de ressource pour le DW-600, avec:
• Pilotes et utilitaire de configuration sans fil (TWCU) AC600 • Mode d'emploi • Autres informations utiles
Assurez-vous que tous ces éléments sont au complet. Si l'un des éléments ci-dessus est manquant ou endommagé, veuillez prendre contact avec votre distributeur.
Remarque: Sauf indication contraire, l'"adaptateur" nommé dans le présent mode d'emploi est l'adaptateur USB sans fil double bande AC600 DW-600.
Downloaded from www.vandenborre.be
Adaptateur USB sans fil double bande AC600Mode
6
DW-600 AC600 Wireless Dual Band USB Adapter User Guide
Chapitre 1 Description du Produit 1.1 Introduction
Cet adaptateur est un périphérique client double bande 802.11ac conçu pour fournir des performances sans fil très rapides à votre ordinateur. Une connexion sans fil à très grande vitesse vous sera très utile pour toutes vos utilisations d'Internet: téléchargement, jeu, vidéo en streaming, etc.
Grâce à la technologie 802.11ac et aux améliorations du débit via 1T1R, la capacité de
détection automatique du DW-600 permet une vitesse de transfert des paquets élevée, jusqu'à
433 Mb/s de débit maximal. Il dispose d'une bonne capacité d'antibrouillage et il peut
également interagir avec d'autres produits sans fil (802.11a/b/g/n/ac). L'adaptateur prend en
charge le cryptage WEP, WPA-PSK/WPA2-PSK et WPA/WPA2 pour empêcher tout risque
d'intrusion extérieure et protéger vos informations personnelles.
L'adaptateur est facile à installer et à utiliser. L'Assistant de configuration rapide vous guidera
étape par étape dans l'installation et l'Utilitaire de configuration sans fil (TWCU) AC2600 vous
expliquera comment établir rapidement une connexion sans fil.
Avec une réception, une sécurité, une protection, et des performances sans fil inégalées, le
DW-600 est le meilleur choix pour ajouter ou actualiser facilement une connexion sans fil à votre
ordinateur.
1.2 Caractéristiques
Conforme à la norme IEEE 802.11ac
Interface USB 2.0 disponible
Prise en charge de double bande, 2,4GHz ou 5GHz
Compatibilité parfaite avec les produits 802.11a/b/g/n/ac
Amélioration de la fluidité du streaming vidéo et des jeux en ligne grâce à l'utilisation de la bande 5 GHz pour les connexions sans fil
Prise en charge de 64/128 WEP, WPA/WPA2, WPA-PSK/WPA2-PSK(TKIP/AES)
Prise en charge de Windows XP 32/64 bit, Windows 7 32/64 bit, Windows 8 32/64 bit, Windows 8.1 32/64 bit, Windows 10 32/64 bit
Prise en charge des modes ad-hoc et infrastructure Utilitaire unique pour une installation rapide et facile
Downloaded from www.vandenborre.be

Adaptateur USB sans fil double bande AC600Mode
3
DW-600 AC600 Wireless Dual Band USB Adapter User Guide
1.3 Aperçu du matériel État des LED:
État État de fonctionnement
Éteint
Le pilote n'a pas été installé.
La radio de l'adaptateur est désactivée.
Clignotement lent Le pilote a été installé mais aucune transmission ou réception de données n'est en cours.
Clignotement rapide Données en cours de transmission ou de réception.
Downloaded from www.vandenborre.be

Adaptateur USB sans fil double bande AC600Mode
4
DW-600 AC600 Wireless Dual Band USB Adapter User Guide
Chapitre 2 Installation Installez l'adaptateur sur votre ordinateur avant d'installer le pilote et l'utilitaire du CD de
ressource ou télécharger le programme via http://www.darty.com/res1/drivers/itworks/AC-600.zip.
2.1 Installation du matériel Branchez directement l'adaptateur sur un port USB disponible de votre ordinateur.
Remarque:
Une fois le matériel installé avec succès sur votre ordinateur, vous devriez recevoir un message
'Assistant de nouveau matériel détecté' (cf Figure 2-1); cliquez sur Annuler puis installez le
pilote et l'utilitaire de l'adaptateur en suivant les étapes indiquées dans Installation du logiciel.
Figure 2-1 Assistant de nouveau matériel détecté dans Windows XP
Downloaded from www.vandenborre.be

Adaptateur USB sans fil double bande AC600Mode
5
DW-600 AC600 Wireless Dual Band USB Adapter User Guide
2.2 Installation du logiciel L'Assistant de configuration vous guidera dans l'installation pour Windows XP, Windows 7,
Windows 8, Windows 8.1 et Windows 10. Les procédures sont en grandes partie similaires
dans les différents systèmes; celles de Windows 7 sont montrées ici à titre d'exemple.
1. Insérez le CD de ressource dans votre lecteur CD-ROM et allez dans Poste de travail ou
télécharger le programme via http://www.darty.com/res1/drivers/itworks/AC-600.zip. Faites
un double-clic sur CD-ROM DW-600 1.0; vous verrez s'afficher la fenêtre indiquée sur la
Figure 2-2. Faites un double-clic sur Setup.exe pour lancer l'installation.
Figure 2-2 2. La fenêtre de l'Assistant InstallShield s'affiche. Cliquez sur Suivant pour continuer.
Figure 2-3
Downloaded from www.vandenborre.be

Adaptateur USB sans fil double bande AC600Mode
6
DW-600 AC600 Wireless Dual Band USB Adapter User Guide
3. Choisissez un type de configuration. Nous vous recommandons de sélectionner Installer le pilote et l'utilitaire de configuration sans fil AC2600. Sélectionnez Installer le pilote seulement pour installer le pilote seulement. Cliquez sur Suivant pour continuer.
Figure 2-4
4. Cliquez sur Changer pour spécifier l'emplacement de destination du logiciel, ou laissez
l'option par défaut. Cliquez sur Suivant dans l'écran ci-dessous pour continuer.
Figure 2-5
Downloaded from www.vandenborre.be

Adaptateur USB sans fil double bande AC600Mode
7
DW-600 AC600 Wireless Dual Band USB Adapter User Guide
5. Cliquez sur Installer pour poursuivre l'installation.
Figure 2-6
6. L'installation de l'utilitaire et des pilotes commence. Cela peut prendre 1 à 2 minutes.
Figure 2-7
Downloaded from www.vandenborre.be

Adaptateur USB sans fil double bande AC600Mode
8
DW-600 AC600 Wireless Dual Band USB Adapter User Guide
7. Une fois terminées les étapes ci-dessus, vous devez voir s'afficher l'écran ci-dessous. Cliquez sur Terminer pour achever l'installation.
Figure 2-8
8. Après l'installation, la page de configuration de l'utilitaire s'affiche automatiquement (voir figure ci-dessous) et l'icône apparaît dans la barre d'état système. Pour établir une connexion à un réseau, veuillez vous référer au Chapitre 3 Connexion à un réseau sans fil.
Figure 2-9
Downloaded from www.vandenborre.be

Adaptateur USB sans fil double bande AC600Mode
9
DW-600 AC600 Wireless Dual Band USB Adapter User Guide
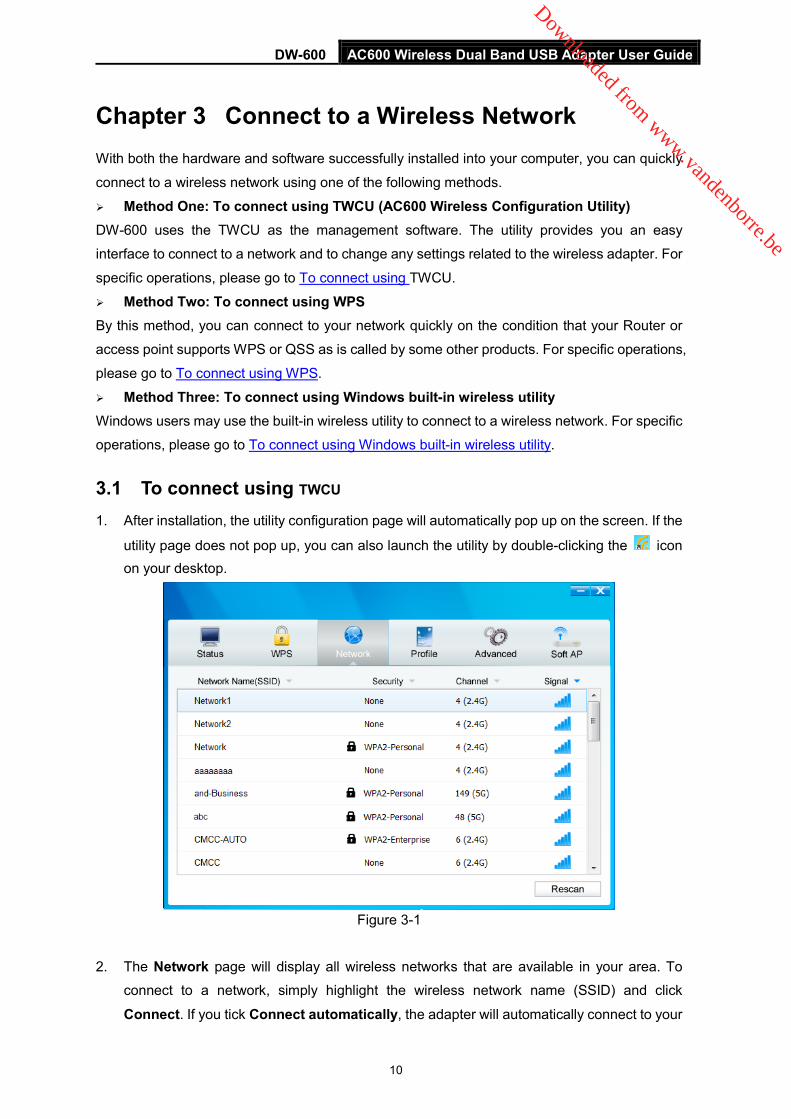
Chapitre 3 Connexion à un réseau sans fil Une fois le matériel et le logiciel installés avec succès sur votre ordinateur, vous pouvez vous
connecter rapidement à un réseau sans fil en utilisant l'une des méthodes suivantes.
Première méthode: Connexion par TWCU (utilitaire de configuration sans fil AC2600) Le DW-600 utilise le TWCU comme logiciel de gestion. Cet utilitaire vous fournit une interface très
simple de connexion aux réseaux et vous permet de changer tous les paramètres en rapport avec
l'adaptateur sans fil. Pour des opérations spécifiques, allez dans Connexion par TWCU.
Deuxième méthode: Connexion par WPS
Cette méthode vous permet de vous connecter rapidement à votre réseau à condition que votre
routeur ou votre point d'accès prennent en charge les fonctions WPS ou QSS (nom donné par
certaines marques). Pour des opérations spécifiques, allez dans Connexion par WPS.
Troisième méthode: Connexion via l'utilitaire sans fil intégré à Windows
Les utilisateurs de Windows peuvent se connecter à un réseau sans fil en se servant de
l'utilitaire sans fil intégré à Windows. Pour des opérations spécifiques, allez dans Connexion via
l'utilitaire sans fil intégré à Windows.
3.1 Connexion par TWCU 1. Après l'installation, la page de configuration de l'utilitaire s'ouvre automatiquement à
l'écran. Si la page de l'utilitaire ne s'ouvre pas, vous pouvez également lancer l'utilitaire en
faisant un double-clic sur l'icône du bureau.
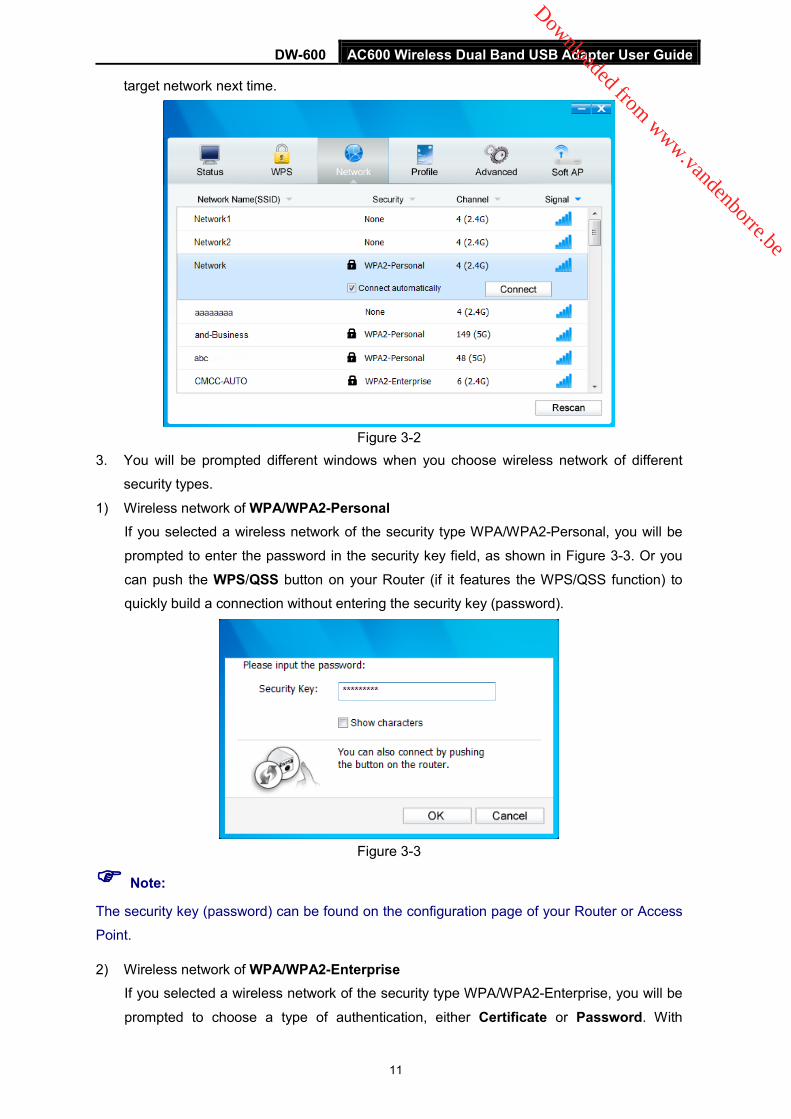
Figure 3-1
2. Sur la page Réseau s'affichent tous les réseaux sans fil disponibles où vous vous trouvez.
Pour vous connecter à un réseau sans fil, sélectionnez le nom du réseau (SSID) et cliquez
sur Connecter. Si vous cochez la case Connexion automatique, l'adaptateur se
connectera automatiquement à votre réseau cible la prochaine fois.
Downloaded from www.vandenborre.be

Adaptateur USB sans fil double bande AC600Mode
1
DW-600 AC600 Wireless Dual Band USB Adapter User Guide
Figure 3-2
3. Selon le type de sécurité du réseau sans fil choisi, différentes fenêtres s'afficheront.
1) Réseau sans fil de WPA/WPA2-Personal Si vous avez sélectionné un réseau sans fil du type de sécurité WPA/WPA2-Personal, vous
serez invité à saisir le mot de passe dans le champ de la clé de sécurité, voir Figure 3-3.
Sinon, vous pouvez appuyer sur le bouton WPS/QSS de votre routeur (si celui-ci a la
fonction WPS/QSS) pour établir rapidement une connexion sans avoir à saisir la clé de
sécurité (mot de passe).
Remarque:
La clé de sécurité (mot de passe) se trouve sur la page de configuration de votre routeur ou de
votre point d'accès.
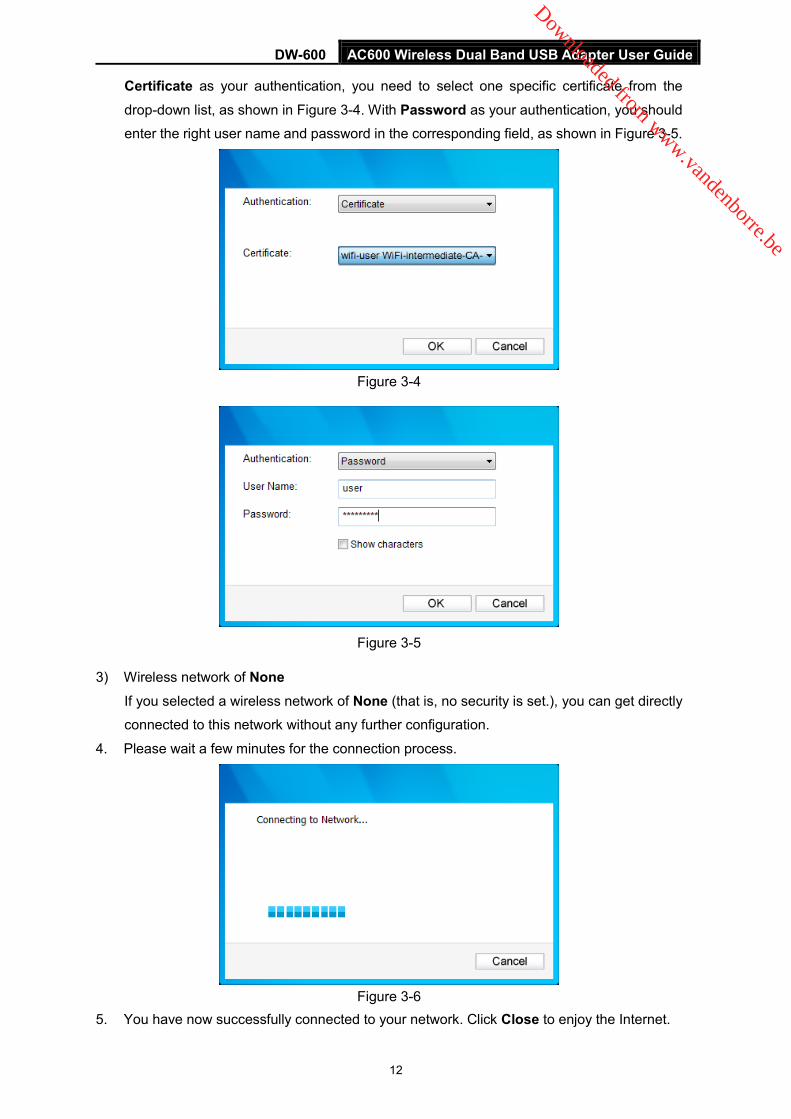
2) Réseau sans fil de WPA/WPA2-Enterprise
Si vous avez sélectionné un réseau sans fil du type de sécurité WPA/WPA2-Enterprise, vous
serez invité à choisir un type d'authentification, à savoir Certificat ou Mot de passe.
Downloaded from www.vandenborre.be

Adaptateur USB sans fil double bande AC600Mode
10
DW-600 AC600 Wireless Dual Band USB Adapter User Guide
Avec l'authentification par Certificat, vous devrez sélectionner un certificat spécifique dans le
menu déroulant, voir Figure 3-4. Avec l'authentification par Mot de passe, vous devrez saisir le
nom d'utilisateur et le mot de passe corrects dans les champs correspondants, voir Figure 3-5.
Figure 3-4
Figure 3-5
3) Réseau sans fil de type Aucune
Si vous avez sélectionné un réseau sans fil de type Aucune (c-à-d. sans aucune sécurité),
vous pourrez vous connecter directement à ce réseau sans autre configuration.
4. Veuillez attendre quelques minutes, le temps que la connexion s'établisse.
Figure 3-6
5. Vous êtes maintenant connecté à votre réseau avec succès. Cliquez sur Fermer; vous pouvez maintenant surfer en toute tranquillité.
Downloaded from www.vandenborre.be

Adaptateur USB sans fil double bande AC600Mode
12
DW-600 AC600 Wireless Dual Band USB Adapter User Guide
Figure 3-7
6. Pour afficher plus d'informations sur le réseau auquel vous êtes actuellement connecté,
cliquez sur Statut dans la section Outils; la page affichera des informations comme le type
de réseau, le canal, le débit etc.
3.2 Connexion par WPS
La fonction WPS (Wi-Fi Protected Setup, "configuration protégée par Wi-Fi") vous permet
d'ajouter rapidement un nouveau périphérique sans fil à un réseau existant.
Si le routeur sans fil prend en charge la fonction WPS ou QSS (Quick Security Setup), vous
pouvez établir une connexion sans fil entre la carte sans fil et le routeur en utilisant la méthode
PIN ou la méthode PBC (Push Button Configuration, "configuration par appui sur un bouton").
Trois méthodes de connexion WPS sont listées ci-après.
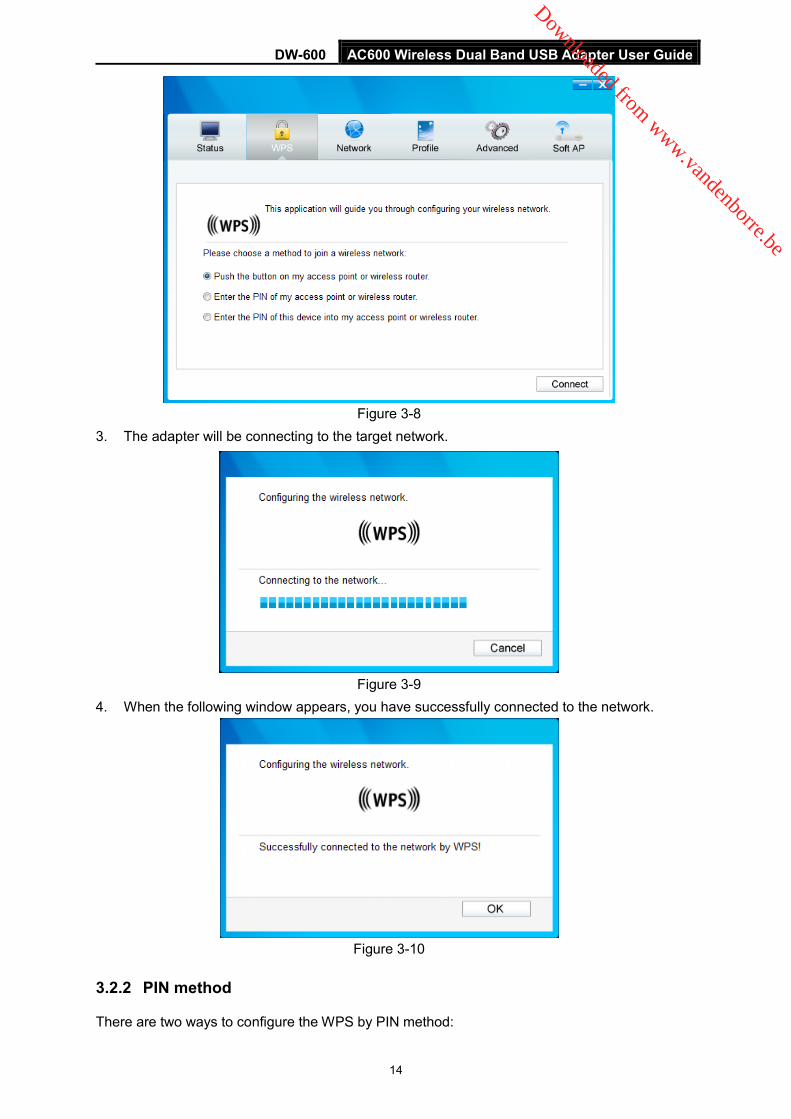
3.2.1 Méthode PBC (Push Button Configuration)
1. Appuyez sur le bouton WPS ou QSS du routeur pendant 2-3 secondes.
2. Ouvrez le TWCU et cliquez sur l'onglet WPS. Sélectionnez Appuyer sur le bouton de
mon point d'accès ou de mon routeur sans fil puis cliquez sur Connecter.
Downloaded from www.vandenborre.be
Adaptateur USB sans fil double bande AC600Mode
13
DW-600 AC600 Wireless Dual Band USB Adapter User Guide
Figure 3-8
3. L'adaptateur se connecte au réseau cible.
Figure 3-9
4. Si la fenêtre suivante s'affiche, votre connexion au réseau a réussi.
Figure 3-10
3.2.2 Méthode PIN
Il existe deux manières de configurer le WPS par la méthode PIN:
Downloaded from www.vandenborre.be

Adaptateur USB sans fil double bande AC600Mode
14
DW-600 AC600 Wireless Dual Band USB Adapter User Guide
1) Saisie du code PIN de votre routeur ou point d'accès.
2) Saisie d'un code PIN dans votre routeur ou point d'accès.
Ces deux procédures de configuration sont décrites en détail ci-après.
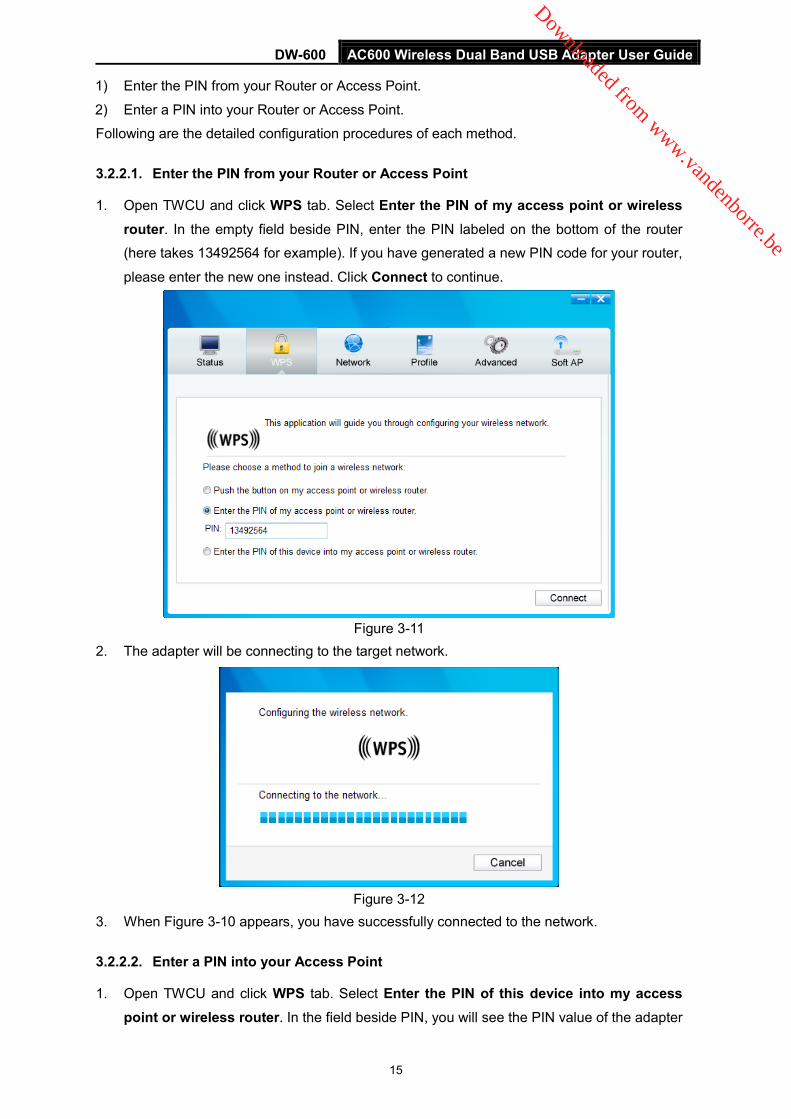
3.2.2.1. Saisie du code PIN de votre routeur ou point d'accès
1. Ouvrez le TWCU et cliquez sur l'onglet WPS. Sélectionnez Saisir le code PIN de mon point d'accès ou de mon routeur sans fil. Dans le champ vide à côté de PIN, saisissez
le PIN indiqué sur l'étiquette située sous le routeur (dans notre exemple: 13492564). Si
vous avez généré un nouveau code PIN pour votre routeur, saisissez le nouveau code.
Cliquez sur Connecter pour continuer.
Figure 3-11
2. L'adaptateur se connecte au réseau cible.
Figure 3-12
3. Si la Figure 3-10 apparaît, votre connexion au réseau a réussi.
3.2.2.2. Saisie d'un code PIN dans votre point d'accès 1. Ouvrez le TWCU et cliquez sur l'onglet WPS. Sélectionnez Saisir le code PIN de ce
périphérique dans mon point d'accès ou dans mon routeur sans fil. Dans le champ à
côté de PIN, vous verrez s'afficher le PIN généré de manière aléatoire pour l'adaptateur.
Downloaded from www.vandenborre.be

Adaptateur USB sans fil double bande AC600Mode
15
DW-600 AC600 Wireless Dual Band USB Adapter User Guide
Cliquez sur Connecter pour continuer.
Figure 3-13
2. Saisissez le code PIN de l'adaptateur (54413207 dans notre exemple sur la capture d'écran) dans l'utilitaire de configuration du point d'accès. Pour plus de détails sur la configuration du point d'accès, veuillez vous reporter au mode d'emploi du point d'accès.
3. Quand l'écran de la Figure 3-14 apparaît, la configuration est terminée.
Figure 3-14
3.3 Connexion via l'utilitaire sans fil intégré à Windows
3.3.1 Sur Windows XP
Les utilisateurs de Windows XP peuvent se servir de l'utilitaire sans fil intégré. Suivez les étapes indiquées ci-après.
1. Faites un clic droit sur l'icône d'utilitaire située dans la barre d'état système (en bas à
droite). Sélectionnez Passer à l'outil de configuration sans fil Windows.
Downloaded from www.vandenborre.be

Adaptateur USB sans fil double bande AC600Mode
16
DW-600 AC600 Wireless Dual Band USB Adapter User Guide
Figure 3-15
Alternativement, faites un double-clic sur l'icône d'utilitaire pour charger la page de
configuration de l'utilitaire. Dans la section des outils, cliquez sur Avancé, puis
sélectionnez Utiliser l'outil de configuration sans fil Windows (voir figure ci-dessous).
Cliquez sur OK quand la figure Figure 3-17 apparaît pour continuer.
Figure 3-16
Figure 3-17
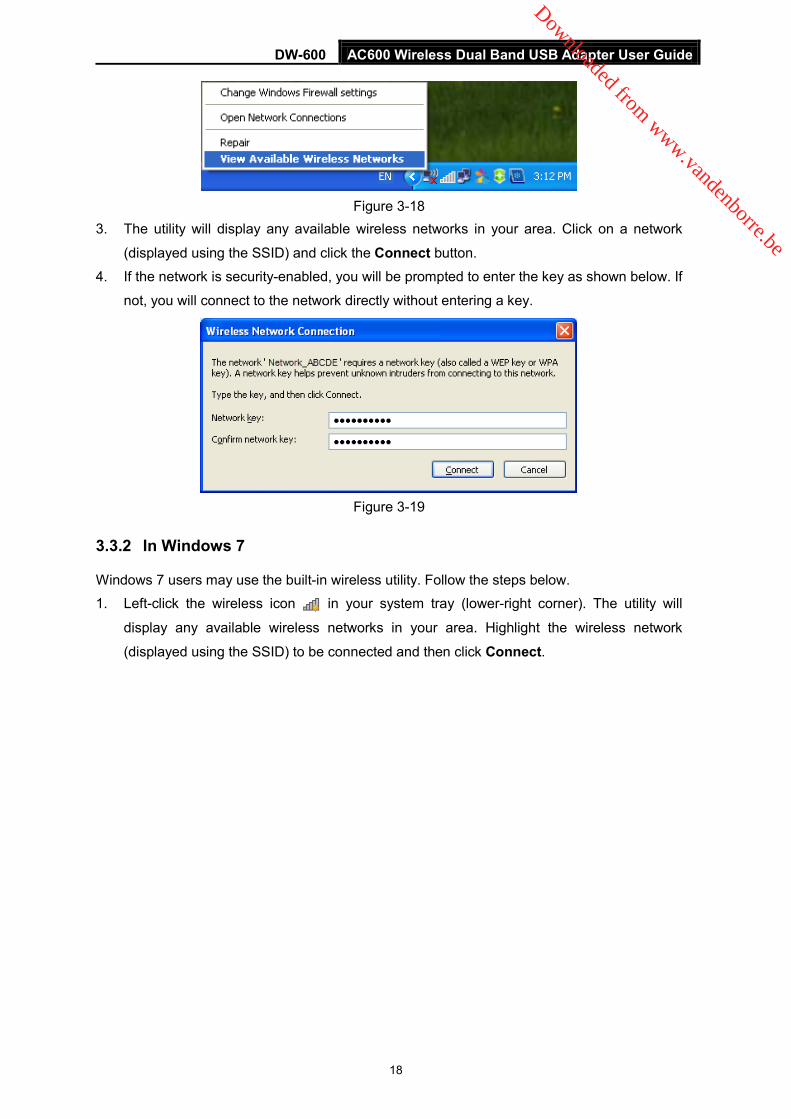
2. Faites un clic droit sur l'icône de réseau sans fil située dans la barre d'état système (en bas à droite). Cliquez sur Afficher les réseaux sans fil disponibles.
Downloaded from www.vandenborre.be

Adaptateur USB sans fil double bande AC600Mode
17
DW-600 AC600 Wireless Dual Band USB Adapter User Guide
Figure 3-18
3. L'appareil affiche tous les réseaux sans fil disponibles où vous vous trouvez. Cliquez sur un
réseau (indiqué par son SSID) puis cliquez sur Connecter. 4. Si le réseau est sécurisé, un message vous invitera à saisir la clé (voir ci-dessous). Sinon,
vous serez connecté au réseau directement, sans avoir à saisir de clé.
Figure 3-19
3.3.2 Sous Windows 7
Les utilisateurs de Windows 7 peuvent se servir de l'utilitaire sans fil intégré. Suivez les étapes indiquées ci-après.
1. Faites un clic gauche sur l'icône sans fil dans la barre d'état système (en bas à droite).
L'appareil affiche tous les réseaux sans fil disponibles où vous vous trouvez. Allez sur le
réseau sans fil (indiqué par son SSID) auquel vous souhaitez vous connecter et cliquez sur Connecter.
Downloaded from www.vandenborre.be

Adaptateur USB sans fil double bande AC600Mode
18
DW-600 AC600 Wireless Dual Band USB Adapter User Guide
2. le réseau auquel vous souhaitez vous connecter est crypté, saisissez la même clé de
sécurité ou le même mot de passe que celui de votre routeur. Sinon, appuyez sur le bouton
WPS/QSS du routeur ou du point d'accès (si la fonction WPS est prise en charge, vous
serez amené à appuyer sur le bouton de la fenêtre, voir figure ci-dessous). Si le réseau
auquel vous souhaitez vous connecter n'est pas sécurisé, la connexion s'établira sans clé
de sécurité.
Figure 3-20
3. Quand le mot Connecté s'affiche derrière le SSID, votre connexion au réseau cible a
réussi.
3.3.3 Sous Windows 8
Les utilisateurs de Windows 8 peuvent se servir de l'utilitaire sans fil intégré. Suivez les étapes indiquées ci-après.
1. Cliquez sur l'icône en bas de votre écran; une liste de réseaux s'affiche à droite de l'écran. Cliquez sur le réseau cible, puis sur Connexion.
Figure 3-21
Downloaded from www.vandenborre.be

Adaptateur USB sans fil double bande AC600Mode
19
DW-600 AC600 Wireless Dual Band USB Adapter User Guide
2. Si le réseau n'est pas crypté, vous serez directement connecté.
Si le réseau est crypté, saisissez le mot de passe (clé de sécurité réseau) puis cliquez sur Suivant pour continuer.
Remarque:
Figure 3-22
Vous pouvez également appuyer sur le bouton WPS/QSS sur votre routeur si vous y êtes invité
par le message "Vous pouvez également vous connecter en appuyant sur le bouton du routeur".
Cliquez sur Suivant pour continuer.
3. Quand le mot Connecté s'affiche derrière le SSID (comme sur la capture d'écran
ci-dessous), votre connexion au réseau cible a réussi.
Figure 3-23
Downloaded from www.vandenborre.be

Adaptateur USB sans fil double bande AC600Mode
20
DW-600 AC600 Wireless Dual Band USB Adapter User Guide
Remarque:
Si l'adaptateur est connecté au réseau en question pour la première fois, vous serez invité à
choisir entre activer ou non le partage et la connexion aux périphériques. Choisissez "Oui, ..."
ou "Non, ..." selon le cas applicable à l'environnement.
Figure 3-24
3.3.4 Sous Windows 8.1
Les utilisateurs de Windows 8.1 peuvent se servir de l'utilitaire sans fil intégré. Suivez les étapes indiquées ci-après.
1. Cliquez sur l'icône en bas de votre écran; une liste de réseaux s'affiche à droite de l'écran. Cliquez sur le réseau cible, puis sur Connexion.
Figure 3-25
2. Si le réseau n'est pas crypté, vous serez directement connecté.
Downloaded from www.vandenborre.be

Adaptateur USB sans fil double bande AC600Mode
20
DW-600 AC600 Wireless Dual Band USB Adapter User Guide
Si le réseau est crypté, saisissez le mot de passe (clé de sécurité réseau) puis cliquez sur Suivant pour continuer.
Remarque:
1) Vous pouvez également appuyer sur le bouton WPS/QSS sur votre routeur si vous y
êtes invité par le message "Vous pouvez également vous connecter en appuyant sur le
bouton du routeur". Cliquez sur Suivant pour continuer.
2) Vous pouvez également taper le code PIN de votre routeur si vous y êtes invité par le
message "Me connecter en utilisant plutôt une clé de sécurité". Cliquez sur Suivant pour continuer.
Figure 3-27
3. Quand le mot Connecté s'affiche derrière le SSID (comme sur la capture d'écran
ci-dessous), votre connexion au réseau cible a réussi.
Downloaded from www.vandenborre.be

Adaptateur USB sans fil double bande AC600Mode
22
DW-600 AC600 Wireless Dual Band USB Adapter User Guide
Remarque:
Figure 3-28
Si l'adaptateur est connecté au réseau en question pour la première fois, vous serez invité à
choisir entre activer ou non la connexion aux périphériques. Choisissez "Oui" ou "Non" selon le
cas applicable à l'environnement.
Figure 3-29
3.3.5 Dans Windows 10
1. Cliquez sur (icône de réseau) dans la barre d'état système. Sélectionnez le réseau auquel
vous souhaitez vous connecter, puis cliquez sur Connexion. Tapez le mot de passe du Wi-Fi, le
cas échéant.
Remarque:
Si vous souhaitez ne pas avoir à taper de mot de passe Wi-Fi, vous pouvez également vous
connecter à un réseau sans fil en appuyant sur le bouton WBS ou QSS de votre routeur ou de
votre point d'accès, ou en tapant le code PIN de votre routeur lorsqu'une fenêtre de dialogue
vous y invite. Puis cliquez sur suivant.
2. Lorsque le mot Connecté s'affiche à côté du nom de réseau (SSID) à l'écran, cela signifie que la
connexion au réseau a réussi.
Downloaded from www.vandenborre.be

Adaptateur USB sans fil double bande AC600Mode
23
DW-600 AC600 Wireless Dual Band USB Adapter User Guide
Chapitre 4 Gestion Cette section vous explique comment configurer votre adaptateur DW-600 à l'aide de l'utilitaire
de configuration sans fil (TWCU) AC2600.
L'adaptateur DW-600 utilise l'utilitaire de configuration sans fil AC2600 comme logiciel de gestion. Cette utilitaire offre à l'utilisateur une interface permettant de changer facilement tous
les paramètres en rapport avec l'adaptateur. Faites un double-clic sur l'icône du bureau pour lancer l'utilitaire.
4.1 Profil Vos réseaux sans fil peuvent varier selon les endroits (domicile, bureau, café etc.). La gestion
de Profil vous permet de sauvegarder et gérer facilement les différents réseaux cibles sans
avoir à répéter chaque fois les mêmes configurations. Dans la section des outils, cliquez sur
Profil; la page suivante s'affiche.
Figure 4-1
4.1.1 Ajouter un profil
Pour ajouter un profil, cliquez sur Ajouter en bas de l'écran. La fenêtre de configuration
s'affiche.
4.1.1.1. Ajouter un profil en mode infrastructure
Si vous devez vous connecter à un routeur sans fil ou à un point d'accès, sélectionnez
Infrastructure comme type de réseau dans l'écran qui apparaît, puis suivez les instructions
ci-dessous pour terminer le paramétrage.
Downloaded from www.vandenborre.be

Adaptateur USB sans fil double bande AC600Mode
24
DW-600 AC600 Wireless Dual Band USB Adapter User Guide
Figure 4-2
Figure 4-3
Les éléments suivants figurent à l'écran.
Nom profil: Tapez un nom pour votre profil (ex: Home, Office, CoffeeShop). Il n'est pas
possible d'utiliser le même nom. Veuillez également noter que les mots ne peuvent pas
être espacés.
SSID: Choisissez le réseau cible dans le menu déroulant.
Type de réseau: Choisissez le type de réseau. Pour une connexion à un point d'accès ou
à un routeur sans fil, sélectionnez Infrastructure. Pour une connexion à un autre client
sans fil (ex: un adaptateur), sélectionnez ad-hoc.
Type de sécurité: Sélectionnez le type de sécurité dans la liste. Quatre options sont
disponibles: WPA-PSK/WPA2-PSK, WPA/WPA2, WEP et Aucune. Le type de sécurité
doit être le même que sur votre routeur ou point d'accès, faute de quoi vous n'arriverez pas
à établir la connexion. WPA-PSK/WPA2-PSK utilise un mot de passe (clé) pour authentifier
votre connexion sans fil. La clé doit être exactement la même que celle saisie sur votre
routeur sans fil ou point d'accès. Aucune signifie qu'il n'y a pas de sécurité. Nous vous
conseillons d'activer WPA-PSK/WPA2-PSK sur votre routeur sans fil ou votre point d'accès
avant de configurer votre adaptateur sans fil.
Downloaded from www.vandenborre.be

Adaptateur USB sans fil double bande AC600Mode
25
DW-600 AC600 Wireless Dual Band USB Adapter User Guide
Remarque: Vous verrez la Figure 4-2 si vous avez sélectionné le type de sécurité WPA-PSK/WPA2-PSK; si vous avez sélectionné le type WPA/WPA2, c'est la Figure 4-3 qui s'affichera.
Type de cryptage: Dans le menu déroulant, choisissez le même type de cryptage que
celui de votre routeur ou point d'accès.
Clé de sécurité: Saisissez exactement le même mot de passe que sur votre point d'accès
ou routeur sans fil. Cochez la case Afficher les caractères pour visualiser le mot de
passe, et décochez-la pour le cacher.
Authentification: Choisissez un type d'authentification: certificat ou mot de passe.
Certificat: Si vous sélectionnez Certificat comme Authentification, vous devrez spécifier
votre certificat dans le menu déroulant.
Lancer cette connexion automatiquement: Cochez cette boîte pour vous connecter
automatiquement à ce réseau la fois suivante.
Sauvegarder: Cliquez sur Sauvegarder pour sauvegarder vos paramètres.
Une fois réglés tous les paramètres ci-dessus, la page Profil devrait ressembler à la capture
d'écran ci-dessous. Pour vous connecter à un réseau donné, il vous suffit de le sélectionner et
de cliquer sur Connecter en bas de la fenêtre. Puis cliquez sur OK dans la Figure 4-5 pour
activer le profil.
Figure 4-4
Downloaded from www.vandenborre.be

26
Figure 4-5
4.1.1.2. Ajouter un profil en mode ad hoc
Remarque:
Le mode Ad hoc est incompatible avec Windows 8 Windows 8.1 et Windows 10.
Si vous devez vous connecter à un autre client sans fil, comme par exemple un adaptateur,
sélectionnez ad hoc comme type de réseau dans l'écran qui apparaît, puis suivez les
instructions ci-dessous pour terminer le paramétrage.
Figure 4-6
Les éléments suivants figurent à l'écran.
Nom profil: Tapez un nom pour votre profil (ex: Home, Office, Coffee Shop). Il n'est pas
possible d'utiliser le même nom. Veuillez également noter que les mots ne peuvent pas
être espacés.
SSID: Choisissez le réseau cible dans le menu déroulant.
Type de réseau: Choisissez le type de réseau. Pour une connexion à un point d'accès ou
à un routeur sans fil, sélectionnez Infrastructure. Pour une connexion à un autre client
sans fil (ex: un adaptateur), sélectionnez ad hoc.
Bande: Ce paramètre détermine la fréquence de fonctionnement à utiliser. Deux options
sont disponibles: 2,4 GHz et 5 GHz. Nous vous conseillons d'utiliser la bande 5 GHz pour
vos ordinateurs et périphériques utilisant des applications vocales et vidéo, tout en
réservant la bande 2,4 GHz pour l'accès invités et pour les ordinateurs utilisés seulement
pour la navigation sur le web.
Downloaded from www.vandenborre.be

27
Adaptateur USB sans fil double bande AC600Mode
DW-600
2,4 GHz - La bande 2,4 GHz peut vous servir à vous connecter à de nombreux périphériques sans fil classiques: consoles de jeu, laptops, DVR etc.
5 GHz - Cette bande est moins occupée et peut vous servir pour les jeux ou le streaming audio ou vidéo sensible au facteur temps. L'utilisation de cette bande permet d'éviter les interférences avec les réseaux à 2,4 GHz ou avec les appareils bruyants (ex: téléphones sans fil, fours micro-ondes).
Remarque: Le choix de Bande n'existe que dans Windows XP; dans Windows 7, seul le réseau 2,4 GHz est pris en charge par défaut en mode Ad-hoc.
Type de sécurité: Sélectionnez le type de sécurité dans la liste. Deux options sont
disponibles: WEP et Aucune. Aucune signifie qu'il n'y a pas de sécurité. Il est
recommandé de sélectionner WEP pour sécuriser le réseau sans fil.
Type de cryptage: Si vous sélectionnez Aucun comme type de sécurité, le type de
cryptage sera également Aucun. Si vous sélectionnez WEP comme type de sécurité, le
type de cryptage sera Ouvert. Index de clé: Sélectionnez le format ASCII ou Hexadécimal à droite. Le format ASCII
signifie n'importe quelle combinaison de caractères du clavier de la longueur spécifiée. Le
format hexadécimal correspond à n'importe quelle combinaison de signes hexadécimaux
(0-9, a-f, A-F) de la longueur spécifiée.
• Pour le cryptage 64 bit- Vous pouvez taper jusqu'à 10 signes hexadécimaux
(n'importe quelle combinaison des caractères suivants: 0-9, a-f, A-F, clé zéro non
autorisée) ou 5 caractères ASCII.
• Pour le cryptage 128 bit- Vous pouvez taper jusqu'à 26 signes hexadécimaux
(n'importe quelle combinaison des caractères suivants: 0-9, a-f, A-F, clé zéro non
autorisée) ou 13 caractères ASCII.
Clé de sécurité: Tapez le mot de passe. Cochez la case Afficher les caractères pour
visualiser le mot de passe. Décochez-la pour les cacher.
Lancer cette connexion automatiquement: Cochez cette boîte pour vous connecter
automatiquement à ce réseau la fois suivante.
Sauvegarder: Cliquez sur Sauvegarder pour sauvegarder vos paramètres.
Une fois réglés tous les paramètres ci-dessus, la page Profil devrait ressembler à la capture
d'écran ci-dessous. Pour vous connecter à un réseau donné, il vous suffit de le sélectionner et
de cliquer sur Connecter en bas de la fenêtre. Puis cliquez sur OK dans la Figure 4-8 pour
activer le profil.
Downloaded from www.vandenborre.be
28
Adaptateur USB sans fil double bande AC600Mode
DW-600
Figure 4-7
Figure 4-8
4.1.2 Modifier un profil
Pour éditer un profil existant, cliquez sur Modifier dans la page Profil. Par exemple, si vous
souhaitez changer le nom de profil de Home en Home1 ou si vous souhaitez spécifier un autre
SSID pour votre profil Home. Une fois les changements terminés, cliquez sur Sauvegarder pour les appliquer.
Downloaded from www.vandenborre.be

29
Adaptateur USB sans fil double bande AC600Mode
DW-600
Figure 4-9
4.1.3 Supprimer un profil
Pour supprimer un profil existant, sélectionnez le nom du profil et cliquez sur Enlever en bas de
l'écran ou appuyez sur la touche Effacer de votre clavier. Lorsque la figure suivante apparaît,
cliquez sur OK pour continuer.
4.2 Avancé
Figure 4-10
Les configurations suivantes peuvent s'effectuer sur la page Avancé:
1) Pour sélectionner un outil de configuration sans fil.
Vous pouvez décider de l'outil à utiliser: soit l'utilitaire de configuration sans fil AC2600, soit
l'outil de configuration sans fil de Windows. (Cette option n'est disponible que dans
Windows XP.)
2) Pour changer d'adaptateur réseau sans fil. Vous pouvez passer à un autre adaptateur installé dans votre ordinateur. Les adaptateurs installés avec succès sur votre ordinateur sont listés dans le menu déroulant si les adaptateurs sont pris en charge par cet utilitaire.
3) Pour changer de mode d'économie d'énergie. L'option par défaut est OFF.
Downloaded from www.vandenborre.be

30
Adaptateur USB sans fil double bande AC600Mode
DW-600
4.3 À propos
Figure 4-11
Dans À propos, vous trouverez des informations sur les différentes versions d'utilitaire et de
pilote de l'adaptateur. Faites un clic droit sur l'icône de votre barre d'état système et
sélectionnez À propos dans la liste.
Figure 4-12
Figure 4-13
Downloaded from www.vandenborre.be

Adaptateur USB sans fil double bande AC600Mode
30
DW-600
Chapitre 5 Mode SoftAP (point d’accès logiciel) En mode SoftAP ("point d'accès logiciel), l'adaptateur se comporte comme un point d'accès.
Imaginons qu'un seul ordinateur de votre domicile ait accès à Internet pour différentes raisons
(ex: un seul port LAN disponible sur votre routeur haut débit câblé) alors que d'autres
périphériques à fonction sans fil doivent également s'y connecter. L'adaptateur peut alors être
configuré comme point d'accès en mode SoftAP, en remplacement d'un routeur ou d'un point
d'accès distinct.
Grâce à cette fonction, un ordinateur peut utiliser un adaptateur matériel sans fil unique pour se
connecter à un point d'accès matériel en tant que client, tout en agissant en fonction de point
d'accès logiciel pour permettre à d'autres périphériques à fonction sans fil de se connecter.
Pour aller dans ce mode, faites un clic droit sur l'icône d'utilitaire située dans votre barre d'état
système, puis cliquez sur Passer en mode SoftAP.
Figure 5-1
Alternativement, allez dans la page Point d'accès logiciel de l'utilitaire et cochez ON à droite
du mode SoftAP (voir figure ci-dessous). Cliquez sur OK quand un message vous invite à
confirmer le réglage.
Figure 5-2
Downloaded from www.vandenborre.be

Adaptateur USB sans fil double bande AC600Mode
32
DW-600
Ensuite, les informations du point d'accès logiciel s'afficheront comme dans la capture d'écran ci-dessous.
Figure 5-3
Figure 5-4
Mode SoftAP: Sélectionner pour activer ou désactiver cette fonction. Internet Connecting Share (ICS): Spécifiez une connexion par le biais de laquelle les
périphériques connectés à votre point d'accès pourront accéder à Internet. SSID: Tapez le nom de votre point d'accès logiciel (par ex. Jone) afin que les autres
puissent savoir quel point d'accès est le votre lorsqu'ils veulent s'y connecter.
Bande: Ce paramètre détermine la fréquence de fonctionnement à utiliser. Deux options
sont disponibles: 2,4 GHz et 5 GHz. Nous vous conseillons d'utiliser la bande 5 GHz pour
vos ordinateurs et périphériques utilisant des applications vocales et vidéo, tout en
réservant la bande 2,4 GHz pour l'accès invités et pour les ordinateurs utilisés seulement
pour la navigation sur le web. 2,4 GHz - La bande 2,4 GHz peut vous servir à vous connecter à de nombreux
périphériques sans fil classiques: consoles de jeu, laptops, DVR etc. 5 GHz - Cette bande est moins occupée et peut vous servir pour les jeux ou le
streaming audio ou vidéo sensible au facteur temps. L'utilisation de cette bande permet d'éviter les interférences avec les réseaux à 2,4 GHz ou avec les appareils bruyants (ex: téléphones sans fil, fours micro-ondes).
Downloaded from www.vandenborre.be

Adaptateur USB sans fil double bande AC600Mode
33
DW-600
Remarque: Le choix de Bande n'existe que dans Windows XP; dans Windows 7, Windows 8 et Windows 8.1, seul le réseau 2,4 GHz est pris en charge par défaut.
Type de sécurité: Ici, le type de sécurité à utiliser est WPA2-PSK, qui est basé sur la norme 802.11i et utilise le standard de chiffrement avancé (AES) au lieu du TKIP. Il a été spécialement conçu pour renforcer la sécurité du WEP. WPA2-PSK utilise un mot de passe (clé) pour authentifier votre connexion sans fil. Vous n'avez pas besoin de configuration dans ce cas.
Type de cryptage: Le type de cryptage doit être AES ici. Clé de sécurité: Tapez la clé dans le champ pour activer la sécurité de votre point d'accès.
Nous vous recommandons de définir une autre clé plutôt que de garder la clé par défaut 12345678. La clé sera ensuite indispensable aux autres ordinateurs pour établir une connexion avec votre point d'accès.
Adresse IP: Tapez l'adresse IP du point d'accès logiciel.
Une fois terminés les réglages susmentionnés, cliquez sur Appliquer; la Figure 5-4 s'affiche; cliquez sur OK pour appliquer le mode de point d'accès logiciel (Soft AP).
Downloaded from www.vandenborre.be

34
Chapitre 6 Désinstallation du logiciel
6.1 Sur Windows XP/7 La désinstallation du logiciel se fait de manière assez similaire dans Windows XP et dans
Windows 7; nous vous donnons ici l'exemple de Windows 7.
6.1.1 Désinstaller le logiciel d'utilitaire à partir d'un PC
1. Dans la barre des tâches de Windows, allez dans Démarrer, cliquez sur Tous les
programmesSans fil, puis cliquez sur Désinstaller - Utilitaire de configuration sans fil AC2600.
2. Suivez l'Assistant InstallShield pour désinstaller le logiciel d'utilitaire de votre PC.
6.1.2 Désinstaller le logiciel pilote à partir d'un PC
1. Dans la barre des tâches de Windows, allez dans Démarrer, cliquez sur Tous les programmesSans fil, puis cliquez sur Désinstaller - Pilote DW-600.
2. Suivez l'Assistant InstallShield pour désinstaller le logiciel pilote de votre PC.
6.2 Dans Windows 8/8.1/10 La désinstallation du logiciel se fait de manière assez similaire dans Windows 8/8.1 et dans
Windows 10; nous vous donnons ici l'exemple de Windows 8.
6.2.1 Désinstaller le logiciel d'utilitaire à partir d'un PC
1. Allez dans l'interface Applications, cherchez l'application Sans fil, puis cliquez sur
Désinstaller - Utilitaire de configuration sans fil AC2600. 2. Suivez l'Assistant InstallShield pour désinstaller le logiciel d'utilitaire de votre PC.
6.2.2 Désinstaller le logiciel pilote à partir d'un PC
1. Allez dans l'interface Applications, cherchez l'application Sans fil, puis cliquez sur
Désinstaller - Pilote DW-600. 2. Suivez l'Assistant InstallShield pour désinstaller le logiciel pilote de votre PC.
Downloaded from www.vandenborre.be
Adaptateur USB sans fil double bande AC600Mode
35
DW-600
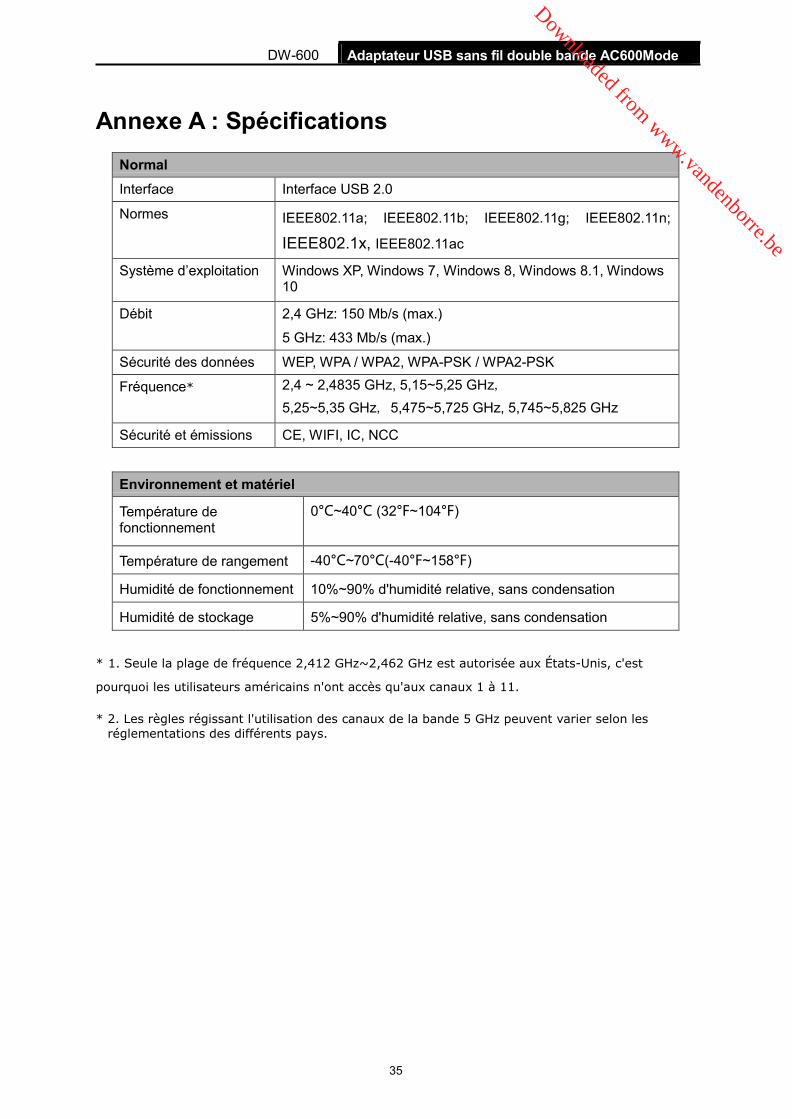
Annexe A : Spécifications
Normal Interface Interface USB 2.0 Normes IEEE802.11a; IEEE802.11b; IEEE802.11g; IEEE802.11n;
IEEE802.1x, IEEE802.11ac
Système d’exploitation Windows XP, Windows 7, Windows 8, Windows 8.1, Windows 10
Débit 2,4 GHz: 150 Mb/s (max.)
5 GHz: 433 Mb/s (max.) Sécurité des données WEP, WPA / WPA2, WPA-PSK / WPA2-PSK Fréquence* 2,4 ~ 2,4835 GHz, 5,15~5,25 GHz,
5,25~5,35 GHz, 5,475~5,725 GHz, 5,745~5,825 GHz
Sécurité et émissions CE, WIFI, IC, NCC
Environnement et matériel
Température de fonctionnement
0°C~40°C (32°F~104°F)
Température de rangement -40°C~70°C(-40°F~158°F)
Humidité de fonctionnement 10%~90% d'humidité relative, sans condensation
Humidité de stockage 5%~90% d'humidité relative, sans condensation
* 1. Seule la plage de fréquence 2,412 GHz~2,462 GHz est autorisée aux États-Unis, c'est
pourquoi les utilisateurs américains n'ont accès qu'aux canaux 1 à 11.
* 2. Les règles régissant l'utilisation des canaux de la bande 5 GHz peuvent varier selon les réglementations des différents pays.
Downloaded from www.vandenborre.be
Adaptateur USB sans fil double bande AC600Mode
36
DW-600
Annexe B : Glossaire 802.11ac - IEEE 802.11ac est une évolution du standard de transmission sans fil
802.11.Cette spécification permet un débit de WLAN multi-stations d'au moins 1 gigabit par
seconde. Cela est rendu possible par l'extension des interfaces aériennes incluses par la
norme 802.11n: bande passante RF plus large, plus de flux spatiaux MIMO, MIMO
multi-utilisateurs, modulation haute densité (jusqu'à 256 QAM). 802.11n - 802.11n est un amendement au groupe de normes 802.11, avec l'ajout du système
MIMO (multi-entrées multi-sorties). MIMO utilise plusieurs antennes d'émission et de réception pour augmenter le débit des données via la multiplexation spatiale et augmenter la gamme en exploitant la diversité spatiale, comme par exemples via des schémas de codage comme Alamouti. L'EWC (Enhanced Wireless Consortium) a été créé pour accélérer le développement de la norme IEEE 802.11n et promouvoir une spécification technologique d'interopérabilité des produits WLAN (réseaux locaux sans fil) de nouvelle génération.
802.11g - Norme de réseau sans fil à 54 Mb/s, utilisant une technologie direct-sequence spread-spectrum (DSSS) et une modulation OFDM, fonctionnant sur le spectre radio sans licence à 2,4 GHz, avec compatibilité descendante des périphériques IEEE 802.11b et cryptage WEP pour la sécurité.
802.11b - La norme 802.11b définit un produit réseau sans fil à 11 Mbps, utilisant une technologie direct-sequence spread-spectrum (DSSS) et fonctionnant sur le spectre radio sans licence à 2,4 GHz, avec un cryptage WEP pour la sécurité. Les réseaux 802.11b sont également dénommés réseaux Wi-Fi.
802.11a - Spécification pour les réseaux sans fil à 54 Mb/s utilisant la modulation OFDM et fonctionnant dans une bande radio de 5 GHz.
Réseau Ad hoc - Un réseau Ad-Hoc est un groupe d'ordinateurs, chacun d'eux doté d'un adaptateur sans fil et connecté à un réseau local sans fil 802.11 indépendant. Les ordinateurs sans fil Ad-Hoc fonctionnent sur une base peer-to-peer et communiquent directement les uns avec les autres sans utiliser de point d'accès. Le mode Ad-Hoc est également dénommé Independent Basic Service Set (IBSS) ou mode peer-to-peer, et il est fréquemment utilisé à l'échelle d'un service ou chez les indépendants.
DSSS - (Direct-Sequence Spread Spectrum) - Le DSSS génère un modèle de bit redondant pour toutes les données transmises. Ce modèle de bit est appelé code d'étalement (chipping code). Même si un ou plusieurs bits du chipping code sont endommagés pendant la transmission, les techniques statistiques intégrées dans le récepteur peuvent récupérer les données originales sans avoir besoin d'une retransmission. Pour un récepteur inconnu, le DSSS apparaît comme un bruit à large bande de faible puissance et il est rejeté (ignoré) par la plupart des récepteurs à bande étroite. Cependant, pour un récepteur connu (c'est-à-dire un autre point du réseau local sans fil) le signal DSSS est reconnu comme étant le seul signal valable, et les interférences sont par conséquent rejetées (ignorées).
FHSS - (Frequency Hopping Spread Spectrum) - Le FHSS change (par sauts) continuellement la fréquence d'une porteuse conventionnelle, plusieurs fois par seconde, en fonction d'un jeu pseudo-aléatoire de canaux. Puisqu'une fréquence fixe n'est pas utilisée et que seul l'émetteur et le récepteur connaissent les modèles de saut, le FHSS est extrêmement difficile à intercepter.
Downloaded from www.vandenborre.be

Adaptateur USB sans fil double bande AC600Mode
36
DW-600
Réseau d'infrastructure - Un réseau d'infrastructure est un groupe d'ordinateurs ou d'autres périphériques, chacun d'eux doté d'un adaptateur sans fil et connecté à un réseau local sans fil 802.11. En mode infrastructure, les périphériques sans fil communiquent les uns avec les autres et avec un réseau filaire en passant d'abord par un point d'accès. Un réseau d'infrastructure sans fil connecté à un réseau filaire est dénommé Basic Service Set (BSS). Un ensemble de deux BSS ou plus dans un seul réseau est dénommé Extended Service Set (ESS). Le mode infrastructure est utilisé à l'échelle de l'entreprise ou lorsqu'il est nécessaire de raccorder des réseaux sans fil et filaires.
Étalement du spectre - La technologie d'étalement du spectre est une technique de fréquences radio à large bande développée par les militaires pour des systèmes de communication vitaux, sécurisés et fiables. Il est conçu pour troquer l'efficacité de la largeur de bande contre la fiabilité, l'intégrité et la sécurité. En d'autres mots, plus de bande passante est consommée que dans le cas d'une transmission à bande étroite, mais l'échange produit un signal qui est plus bas et par conséquent plus facile à détecter, à condition que le récepteur connaisse les paramètres du signal d'étalement du spectre en cours de diffusion. Si un récepteur n'est pas réglé sur la bonne fréquence, un signal d'étalement du spectre ressemble à un bruit de fond. Il existe deux alternatives principales, Direct Sequence Spread Spectrum (DSSS) et Frequency Hopping Spread Spectrum (FHSS).
SSID - Un Service Set Identification est une clé alphanumérique de trente-deux caractères (maximum) identifiant un réseau local sans fil. Pour que les périphériques d'un réseau sans fil communiquent les uns avec les autres, ils doivent tous être configurés avec le même SSID. C'est typiquement le paramètre de configuration d'une carte PC sans fil. Cette clé correspond à l'ESSID d'un point d'accès sans fil et au nom d'un réseau sans fil. Voir également Nom de réseau sans fil et ESSID.
WEP - (Wired Equivalent Privacy) - Mécanisme de confidentialité des données basé sur un algorithme à clé partagée de 64, 128 ou 152 bits, conformément à la norme IEEE 802.11. Pour obtenir l'accès à un réseau WEP, vous devez en connaître la clé. La clé est une chaîne de caractères créée par vous. Lors de l'utilisation du mode WEP, vous devez définir le niveau de cryptage. Le type de cryptage détermine la longueur de la clé. Un cryptage sur 128 bits nécessite une clé plus longue qu'un cryptage sur 64 bits. Les clés sont définies en saisissant une chaîne au format HEX (hexadécimal - avec les chiffres 0 à 9 et les lettres A à F) ou ASCII (American Standard Code for Information Interchange – caractères alphanumériques). Le format ASCII vous permet de saisir une chaîne facile à mémoriser. La chaîne ASCII est ensuite convertie en HEX pour être utilisée sur le réseau. Quatre clés peuvent être ainsi définies, afin d'en changer plus facilement.
Wi-Fi - Nom de marque pour la norme de réseau sans fil 802.11b, attribué par la Wireless Ethernet Compatibility Alliance (WECA, voir http://www.wi-fi.net), un groupe industriel de normalisation et promoteur de l'interopérabilité des périphériques 802.11b.
WLAN - (Wireless Local Area Network) - Un groupe d'ordinateurs et de périphériques associés qui communiquent les uns avec les autres en mode sans fil, et dont le réseau dessert des utilisateurs dans une zone locale.
WPA - (Wi-Fi Protected Access) - Protocole de sécurité sans fil utilisant le cryptage TKIP (Temporal Key Integrity Protocol), qui peut être utilisé conjointement avec un serveur RADIUS.
Downloaded from www.vandenborre.be

Adaptateur USB sans fil double bande AC600Mode
37
DW-600
MISE AU REBUT
En tant que distributeurs responsables, nous sommes soucieux de l’environnement.
Nous vous prions donc de bien vouloir respecter la procédure de mise au rebut de votre produit, de l’emballage et, le cas échéant, des accessoires, afin de contribuer à la préservation des ressources naturelles et de garantir le recyclage des matériaux d’une manière respectueuse de la santé et de l’environnement.
Ce produit doit être mis au rebut d’une manière conforme aux lois et réglementations locales. Les produits électriques usagés ne doivent pas être jetés avec les ordures ménagères à la fin de leur durée de vie. Contactez le magasin d'achat et les autorités locales pour plus d'informations concernant les procédures de mise au rebut et de recyclage.
En raison des mises au point et améliorations constamment apportées à nos produits, de petites incohérences peuvent apparaître dans le mode d'emploi. Veuillez nous excuser pour la gêne occasionnée.
Darty Holdings SAS © 14 route d'Aulnay 93140 Bondy, France 04 / 06 / 2015
Downloaded from www.vandenborre.be

DW-600
AC600 Wireless Dual Band USB Adapter
Downloaded from www.vandenborre.be
CE Mark Warning
This is a class B product. In a domestic environment, this product may cause radio interference,
in which case the user may be required to take adequate measures.
National Restrictions This device is intended for home and office use in all EU countries (and other countries
following the EU directive 1999/5/EC) without any limitation except for the countries mentioned
below:
Country Restriction Reason/remark
Bulgaria None General authorization required for outdoor use and
public service
France
Outdoor use limited to
10 mW e.i.r.p. within
the band 2454-2483.5
MHz
Military Radiolocation use. Refarming of the 2.4 GHz
band has been ongoing in recent years to allow current
relaxed regulation. Full implementation planned 2012
Italy None If used outside of own premises, general authorization is
required
Luxembourg None General authorization required for network and service
supply(not for spectrum)
Norway Implemented This subsection does not apply for the geographical area
within a radius of 20 km from the centre of Ny-Ålesund
Russian Federation None Only for indoor applications
Note: Please don’t use the product outdoors in France.
5150-5250 MHz
Country Restriction Reason/remark
Bulgaria Not implemented Planned
Croatia License required
Italy General authorization required if used outside own
premises
Downloaded from www.vandenborre.be
Luxembourg None General authorization required for network and service
supply (not for spectrum)
Russian Federation No info
5250-5350 MHz
Country Restriction Reason/remark
Bulgaria Not implemented Planned
Croatia License required
Italy General authorization required if used outside own
premises
Luxembourg None General authorization required for network and service
supply (not for spectrum)
Russian Federation No info
5470-5725 MHz
Country Restriction Reason/remark
Bulgaria Not implemented Planned
France
Relevant+ provisions for the implementation of DFS
mechanism described in ETSI standard EN 301 893
V1.3.1 and subsequent versions
Italy General authorization required if used outside own
premises
Luxembourg None General authorization required for network and service
supply (not for spectrum)
Russian Federation No info
Turkey Not implemented Defence systems
Note: Please don’t use the product outdoors in France.
Downloaded from www.vandenborre.be

4
CONTENTS
Package Contents .................................................................................................... 1
Chapter 1 Product Overview ................................................................................. 2
1.1 Introduction ................................................................................................................ 2
1.2 Features ..................................................................................................................... 2
1.3 Hardware Overview ................................................................................................... 3 Chapter 2 Installation ............................................................................................. 4
2.1 Hardware Installation ................................................................................................. 4
2.2 Software Installation .................................................................................................. 5 Chapter 3 Connect to a Wireless Network ......................................................... 10
3.1 To connect using TWCU ......................................................................................... 10
3.2 To connect using WPS ............................................................................................ 13 3.2.1 PBC (Push Button Configuration) method ................................................. 13
3.2.2 PIN method ................................................................................................. 14
3.3 To connect using Windows built-in wireless utility .................................................. 16 3.3.1 In Windows XP ........................................................................................... 16
3.3.2 In Windows 7 .............................................................................................. 18
3.3.3 In Windows 8 .............................................................................................. 19
3.3.4 In Windows 8.1 ........................................................................................... 21
3.3.5 In Windows 10 ............................................................................................ 23
Chapter 4 Management ........................................................................................ 24
4.1 Profile ....................................................................................................................... 24 4.1.1 Add a profile ............................................................................................... 24
4.1.2 Modify a profile ........................................................................................... 29
4.1.3 Delete a profile ........................................................................................... 30
4.2 Advanced ................................................................................................................. 30 4.3 About ....................................................................................................................... 31
Chapter 5 SoftAP Mode ....................................................................................... 32
Chapter 6 Uninstall Software ............................................................................... 35
6.1 In Windows XP/7 ..................................................................................................... 35 6.1.1 Uninstall the utility software from your PC ................................................. 35
6.1.2 Uninstall the driver software from your PC ................................................ 35
6.2 In Windows 8/8.1/10 ................................................................................................ 35 6.2.1 Uninstall the utility software from your PC ................................................. 35
6.2.2 Uninstall the driver software from your PC ................................................ 35
Appendix A: Specifications ................................................................................... 36
Downloaded from www.vandenborre.be

5
Appendix B: Glossary ............................................................................................ 37
Downloaded from www.vandenborre.be

DW-600 N300 Wireless Dual Band USB Adapter User Guide
1
Package Contents Please verify that all the package contents below are available.
One DW-600 AC600 Wireless Dual Band USB Adapter Quick Installation Guide One Resource CD for DW-600, including:
• AC600 Wireless Configuration Utility (TWCU)and Drivers • User Guide • Other helpful information
Make sure that the above items are contained in the package. If any of the above items is damaged or missing, please contact your distributor.
Note:
The ‘adapter’ mentioned in this User Guide stands for DW-600 AC600 Wireless Dual Band USB
Adapter without any explanation.
Downloaded from www.vandenborre.be

DW-600 AC600 Wireless Dual Band USB Adapter User Guide
2
Chapter 1 Product Overview 1.1 Introduction
The adapter is a dual band 802.11ac client device designed to deliver a high-speed wireless performance for your desktop. With a faster wireless connection, you can get a better Internet experience, such as downloading, gaming, and video streaming.
With the 802.11ac technology, higher throughput improvements using 1T1R, the DW-600’s
auto-sensing capability allows high packet transfer rate of up to 433Mbps for maximum
throughput. It has good capability on anti-jamming, and it can also interoperate with other
wireless (802.11a/b/g/n/ac) products. The adapter supports WEP, WPA-PSK/WPA2-PSK and
WPA/WPA2 encryption to prevent outside intrusion and protect your personal information from
being exposed.
The adapter is easy to install and manage. The Quick Setup Wizard will guide you step-by-step
through the installation process and the AC600 Wireless Configuration Utility (TWCU) will
instruct you to quickly set up a wireless connection.
With unmatched wireless performance, reception, and security protection, the DW-600 is the
best choice for easily adding or upgrading wireless connectivity to your desktop.
1.2 Features
Complies with IEEE 802.11ac
Provides USB 2.0 interface
Supports dual-band, 2.4GHz or 5GHz
Seamlessly compatible with 802.11a/b/g/n/ac products
Experience smoother video streaming and online gaming by choosing the clearer 5GHz band for wireless connections
Supports 64/128 WEP, WPA/WPA2, WPA-PSK/WPA2-PSK(TKIP/AES)
Supports Windows XP 32/64bit, Windows 7 32/64bit, Windows 8 32/64bit, Windows 8.1 32/64bit, Windows 10 32/64bit
Supports ad-hoc and infrastructure mode
Bundled utility provides quick & hassle-free installation
Downloaded from www.vandenborre.be

DW-600 AC600 Wireless Dual Band USB Adapter User Guide
3
1.3 Hardware Overview LED status:
Status Working Status
Off The driver has not been installed;
The adapter's radio has been disabled.
Flashing Slowly The driver has been installed but no data is being transmitted or received.
Flashing Quickly Data is being transmitted or received.
Downloaded from www.vandenborre.be

DW-600 AC600 Wireless Dual Band USB Adapter User Guide
4
Chapter 2 Installation Please install the adapter into your computer before installing the driver and utility software from
the Resource CD or download the program via
http://www.darty.com/res1/drivers/itworks/AC-600.zip.
2.1 Hardware Installation Plug the adapter into an available USB interface on your computer directly.
Note:
When the hardware has been successfully installed on your computer, you may be prompted
'Found New Hardware Wizard' (as shown in Figure 2-1); please click Cancel, and then follow
the Software Installation steps to install driver and utility for your adapter.
Figure 2-1 Found New Hardware Wizard in Windows XP
Downloaded from www.vandenborre.be

DW-600 AC600 Wireless Dual Band USB Adapter User Guide
5
2.2 Software Installation The adapter’s Setup Wizard will guide you through the installation procedures for Windows XP,
Windows 7, Windows 8 and Windows 8.1 and windows 10. The procedures in different systems
are quite similar, therefore here we use the procedures in Windows 7 as an example.
1. Insert the Resource CD into your CD-ROM drive and then go to My Computer or
download the program via http://www.darty.com/res1/drivers/itworks/AC-600.zip.
Double-click CD-ROM DW-600 1.0, and you will see the window as shown in Figure 2-2.
Double-click Setup.exe to start the installation.
Figure 2-2 2. The InstallShield Wizard window will appear. Click Next to continue.
Figure 2-3
3. Choose a setup type. It is recommended to select Install AC600 Wireless Configuration
Downloaded from www.vandenborre.be

DW-600 AC600 Wireless Dual Band USB Adapter User Guide
6
Utility and Driver. Selecting Install Driver Only can only install driver. Click Next to
continue.
Figure 2-4
4. Click Change to specify the destination location for the software or you can leave it default.
Click Next in the screen below to continue.
Figure 2-5
Downloaded from www.vandenborre.be

DW-600 AC600 Wireless Dual Band USB Adapter User Guide
7
5. Click Install to continue the setup.
Figure 2-6
6. The utility and drivers will install. It may take 1-2 minutes.
Figure 2-7
Note:
If prompted to “Windows can’t verify the publisher of this driver software”, click Install this driver
software anyway to continue.
Downloaded from www.vandenborre.be

DW-600 AC600 Wireless Dual Band USB Adapter User Guide
8
7. After all the steps above, you will see the screen below. Click Finish to complete the setup.
Figure 2-8
Downloaded from www.vandenborre.be

DW-600 AC600 Wireless Dual Band USB Adapter User Guide
9
8. After installation, the utility configuration page will automatically pop up as shown in the following figure and the icon will appear in your system tray. To connect to a network, please refer to Chapter 3 Connect to a Wireless Network.
Figure 2-9
Downloaded from www.vandenborre.be
DW-600 AC600 Wireless Dual Band USB Adapter User Guide
10
Chapter 3 Connect to a Wireless Network With both the hardware and software successfully installed into your computer, you can quickly
connect to a wireless network using one of the following methods.
Method One: To connect using TWCU (AC600 Wireless Configuration Utility) DW-600 uses the TWCU as the management software. The utility provides you an easy
interface to connect to a network and to change any settings related to the wireless adapter. For
specific operations, please go to To connect using TWCU.
Method Two: To connect using WPS By this method, you can connect to your network quickly on the condition that your Router or
access point supports WPS or QSS as is called by some other products. For specific operations,
please go to To connect using WPS.
Method Three: To connect using Windows built-in wireless utility Windows users may use the built-in wireless utility to connect to a wireless network. For specific
operations, please go to To connect using Windows built-in wireless utility.
3.1 To connect using TWCU 1. After installation, the utility configuration page will automatically pop up on the screen. If the
utility page does not pop up, you can also launch the utility by double-clicking the icon on your desktop.
Figure 3-1
2. The Network page will display all wireless networks that are available in your area. To
connect to a network, simply highlight the wireless network name (SSID) and click
Connect. If you tick Connect automatically, the adapter will automatically connect to your
Downloaded from www.vandenborre.be
DW-600 AC600 Wireless Dual Band USB Adapter User Guide
11
target network next time.
Figure 3-2
3. You will be prompted different windows when you choose wireless network of different
security types.
1) Wireless network of WPA/WPA2-Personal If you selected a wireless network of the security type WPA/WPA2-Personal, you will be
prompted to enter the password in the security key field, as shown in Figure 3-3. Or you
can push the WPS/QSS button on your Router (if it features the WPS/QSS function) to
quickly build a connection without entering the security key (password).
Figure 3-3
Note:
The security key (password) can be found on the configuration page of your Router or Access
Point.
2) Wireless network of WPA/WPA2-Enterprise
If you selected a wireless network of the security type WPA/WPA2-Enterprise, you will be
prompted to choose a type of authentication, either Certificate or Password. With
Downloaded from www.vandenborre.be
DW-600 AC600 Wireless Dual Band USB Adapter User Guide
12
Certificate as your authentication, you need to select one specific certificate from the
drop-down list, as shown in Figure 3-4. With Password as your authentication, you should
enter the right user name and password in the corresponding field, as shown in Figure 3-5.
Figure 3-4
Figure 3-5
3) Wireless network of None
If you selected a wireless network of None (that is, no security is set.), you can get directly
connected to this network without any further configuration.
4. Please wait a few minutes for the connection process.
Figure 3-6
5. You have now successfully connected to your network. Click Close to enjoy the Internet.
Downloaded from www.vandenborre.be

DW-600 AC600 Wireless Dual Band USB Adapter User Guide
13
Figure 3-7
6. To view more information about the network currently connected, click Status in the tools
section and the page will display information such as the network type, channel, rate, etc.
3.2 To connect using WPS
WPS (Wi-Fi Protected Setup) function allows you to add a new wireless device to an existing
network quickly.
If your wireless Router supports WPS or QSS (Quick Security Setup), you can establish a
wireless connection between wireless card and Router using either Push Button Configuration
(PBC) method or PIN method. Three WPS connection methods are listed in the following parts.
3.2.1 PBC (Push Button Configuration) method
1. Press the WPS or QSS button on the Router for 2-3 seconds.
2. Open TWCU and click WPS tab. Select Push the button on my access point or wireless
router and then click Connect.
Downloaded from www.vandenborre.be
DW-600 AC600 Wireless Dual Band USB Adapter User Guide
14
Figure 3-8
3. The adapter will be connecting to the target network.
Figure 3-9
4. When the following window appears, you have successfully connected to the network.
Figure 3-10
3.2.2 PIN method
There are two ways to configure the WPS by PIN method:
Downloaded from www.vandenborre.be
DW-600 AC600 Wireless Dual Band USB Adapter User Guide
15
1) Enter the PIN from your Router or Access Point.
2) Enter a PIN into your Router or Access Point.
Following are the detailed configuration procedures of each method.
3.2.2.1. Enter the PIN from your Router or Access Point
1. Open TWCU and click WPS tab. Select Enter the PIN of my access point or wireless router. In the empty field beside PIN, enter the PIN labeled on the bottom of the router
(here takes 13492564 for example). If you have generated a new PIN code for your router,
please enter the new one instead. Click Connect to continue.
Figure 3-11
2. The adapter will be connecting to the target network.
Figure 3-12
3. When Figure 3-10 appears, you have successfully connected to the network.
3.2.2.2. Enter a PIN into your Access Point
1. Open TWCU and click WPS tab. Select Enter the PIN of this device into my access point or wireless router. In the field beside PIN, you will see the PIN value of the adapter
Downloaded from www.vandenborre.be

DW-600 AC600 Wireless Dual Band USB Adapter User Guide
16
which is randomly generated. Click Connect to continue.
Figure 3-13
2. Enter the PIN code of the adapter (here takes 54413207 in the screen for example) into the configuration utility of the Access Point. For the detailed instructions of the Access Point configuration, please refer to the User Guide of the Access Point.
3. When Figure 3-14 appears, the configuration is complete.
Figure 3-14
3.3 To connect using Windows built-in wireless utility
3.3.1 In Windows XP
Windows XP users may use the built-in wireless utility. Follow the steps below.
1. Right-click on the utility icon in your system tray (lower-right corner). Select Switch to Windows wireless configuration tool.
Downloaded from www.vandenborre.be

DW-600 AC600 Wireless Dual Band USB Adapter User Guide
17
Figure 3-15
Or double-click the utility icon to load the utility configuration page. Click Advanced in the
tools section and then select Use Windows wireless configuration tool in the figure
shown below. Click OK when Figure 3-17 appears to continue.
Figure 3-16
Figure 3-17
2. Right-click on the wireless computer icon in your system tray (lower-right corner). Select
View Available Wireless Networks.
Downloaded from www.vandenborre.be
DW-600 AC600 Wireless Dual Band USB Adapter User Guide
18
Figure 3-18
3. The utility will display any available wireless networks in your area. Click on a network
(displayed using the SSID) and click the Connect button.
4. If the network is security-enabled, you will be prompted to enter the key as shown below. If
not, you will connect to the network directly without entering a key.
Figure 3-19
3.3.2 In Windows 7
Windows 7 users may use the built-in wireless utility. Follow the steps below.
1. Left-click the wireless icon in your system tray (lower-right corner). The utility will
display any available wireless networks in your area. Highlight the wireless network
(displayed using the SSID) to be connected and then click Connect.
Downloaded from www.vandenborre.be

DW-600 AC600 Wireless Dual Band USB Adapter User Guide
19
2. If the network you would like to connect is encrypted, enter the same security key or
passphrase that is on your Router. Or push the WPS/QSS button on the Router or access
point (You will be prompted to push the button on the window if WPS function is supported
as shown in the figure below). If the network to be connected is not secure, the connection
will be built without entering a key.
Figure 3-20
3. When Connected appears behind the SSID, you have successfully connected to the target
network.
3.3.3 In Windows 8
Windows 8 users may use the built-in wireless utility. Follow the steps below.
1. Click the icon at the bottom of your screen, and a network list will appear at the right side of your screen. Select your target network, and then click Connect.
Figure 3-21
Downloaded from www.vandenborre.be

DW-600 AC600 Wireless Dual Band USB Adapter User Guide
20
2. If the network is unencrypted, you will directly connect to it.
If the network is encrypted, enter the password (network security key) and then click Next to continue.
Figure 3-22
Note:
You can also push the WPS/QSS button on your router as hinted “You can also connect by
pushing the button on the router”. Then click Next to continue.
3. When Connected appears behind the SSID (as shown below), you have successfully
connected to the target network.
Figure 3-23
Downloaded from www.vandenborre.be

DW-600 AC600 Wireless Dual Band USB Adapter User Guide
21
Note:
If the adapter is connected to the network for the first time, you will be asked whether to turn on
sharing or connect to devices. Please select “Yes, ...”or “No, ...” according to your Internet
environment.
Figure 3-24
3.3.4 In Windows 8.1
Windows 8.1 users may use the built-in wireless utility. Follow the steps below.
1. Click the icon at the bottom of your screen, and a network list will appear at the right side of your screen. Select your target network, and then click Connect.
Figure 3-25
2. If the network is unencrypted, you will directly connect to it.
Downloaded from www.vandenborre.be
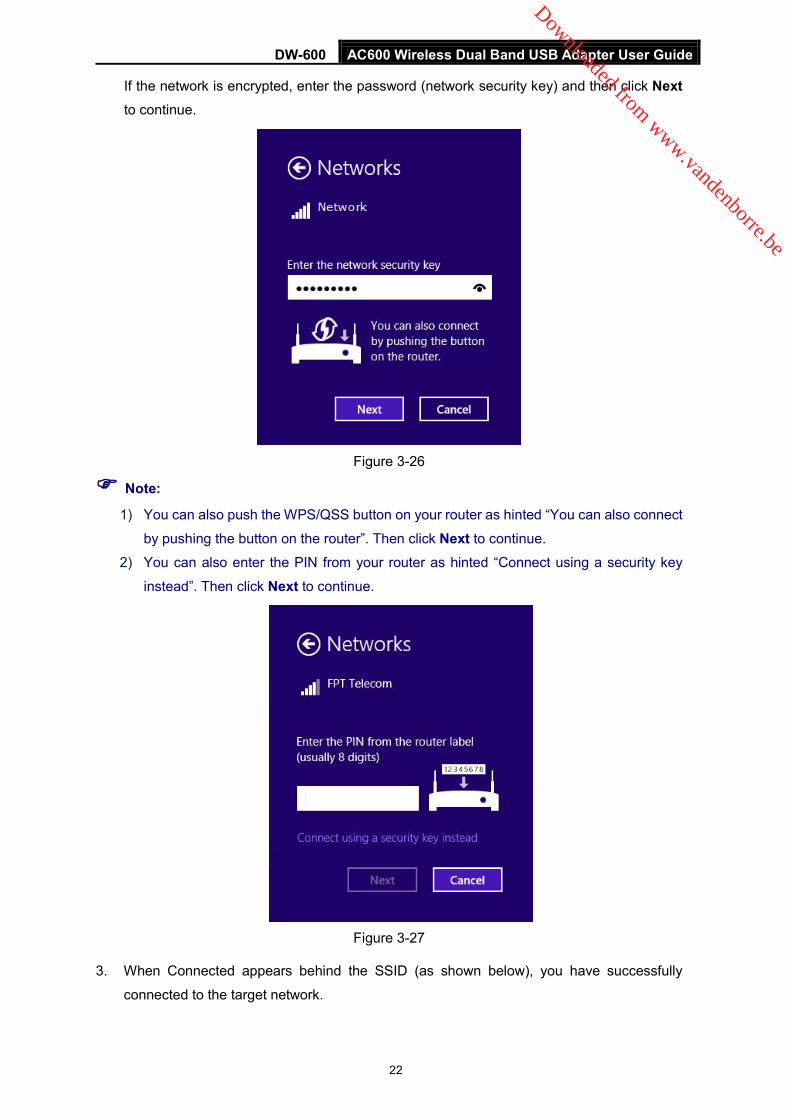
DW-600 AC600 Wireless Dual Band USB Adapter User Guide
22
If the network is encrypted, enter the password (network security key) and then click Next to continue.
Figure 3-26
Note:
1) You can also push the WPS/QSS button on your router as hinted “You can also connect
by pushing the button on the router”. Then click Next to continue.
2) You can also enter the PIN from your router as hinted “Connect using a security key
instead”. Then click Next to continue.
Figure 3-27
3. When Connected appears behind the SSID (as shown below), you have successfully
connected to the target network.
Downloaded from www.vandenborre.be

DW-600 AC600 Wireless Dual Band USB Adapter User Guide
23
Figure 3-28
Note:
If the adapter is connected to the network for the first time, you will be asked whether to connect
to devices. Please select “Yes” or “No” according to your Internet environment.
Figure 3-29
3.3.5 In Windows 10
1. Click (Network icon) on the system tray. Select the network you want to join, and click
Connect. Enter your Wi-Fi password when prompted.
Note:
If you do not want to enter the Wi-Fi password, you can also join a wireless network either by
pushing the WPS or QSS button on your router or AP, or entering the PIN of your router when
the screen prompts you to do so, and click Next.
2. When Connected displays next to the network name (SSID) on the screen, it indicates a
successful network connection.
Downloaded from www.vandenborre.be

DW-600 AC600 Wireless Dual Band USB Adapter User Guide
24
Chapter 4 Management This section will show you how to configure your DW-600 adapter using AC600 Wireless
Configuration Utility (TWCU).
The DW-600 adapter uses AC600 Wireless Configuration Utility as the management software.
The utility provides users with an easy interface to change any settings related to the adapter.
Double-clicking on the icon on your desktop will start the utility.
4.1 Profile Your wireless networks may vary in different places like home, office or coffee shop. With
Profile management, you can easily save and manage various networks to be connected,
saving you the trouble of having to repeat the same configurations. Click Profile in the tools
section, the following page will appear.
Figure 4-1
4.1.1 Add a profile
To add a profile, click the Add button on the bottom of the screen. Then the configuration
window will appear.
4.1.1.1. Add a profile in Infrastructure mode
If you are connecting to a wireless router or access point, select Infrastructure as the Network
Type in the screen that appears and follow the instructions below to finish the setting.
Downloaded from www.vandenborre.be
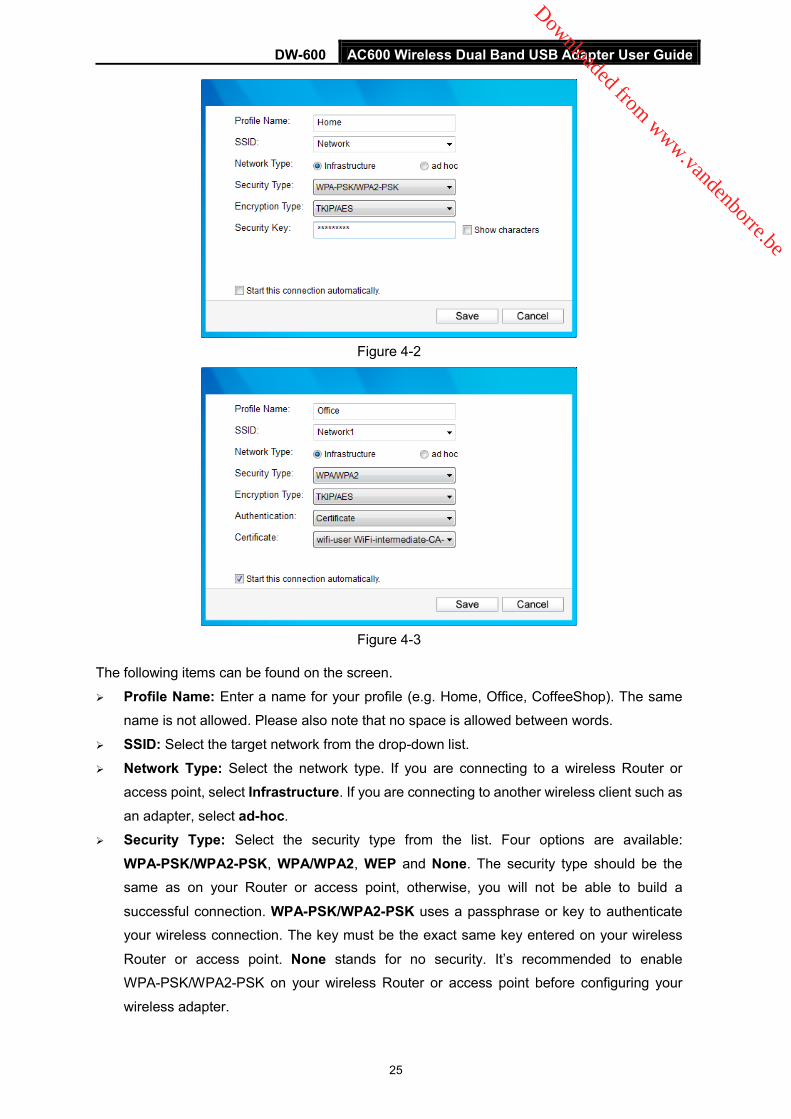
DW-600 AC600 Wireless Dual Band USB Adapter User Guide
25
Figure 4-2
Figure 4-3
The following items can be found on the screen.
Profile Name: Enter a name for your profile (e.g. Home, Office, CoffeeShop). The same
name is not allowed. Please also note that no space is allowed between words.
SSID: Select the target network from the drop-down list.
Network Type: Select the network type. If you are connecting to a wireless Router or
access point, select Infrastructure. If you are connecting to another wireless client such as
an adapter, select ad-hoc.
Security Type: Select the security type from the list. Four options are available:
WPA-PSK/WPA2-PSK, WPA/WPA2, WEP and None. The security type should be the
same as on your Router or access point, otherwise, you will not be able to build a
successful connection. WPA-PSK/WPA2-PSK uses a passphrase or key to authenticate
your wireless connection. The key must be the exact same key entered on your wireless
Router or access point. None stands for no security. It’s recommended to enable
WPA-PSK/WPA2-PSK on your wireless Router or access point before configuring your
wireless adapter.
Downloaded from www.vandenborre.be

DW-600 AC600 Wireless Dual Band USB Adapter User Guide
26
Note: You will see Figure 4-2 if you selected the security type WPA-PSK/WPA2-PSK; while, if you selected the security type WPA/WPA2, Figure 4-3 will be displayed.
Encryption Type: From the drop-down menu, select the encryption type that is the same
as on your Router or access point.
Security Key: Enter the passphrase exactly as it is on your wireless Router or access
point. Click the Show characters box to see the passphrase, or uncheck this box to hide it. Authentication: Select a type of authentication, either certificate or password. Certificate: If you select certificate as your Authentication, then you need to specify your
certificate from the drop-down list here. Start this connection automatically: Check this box to automatically connect to this
network next time. Save: Click Save to save your settings. Having completed the above settings, the Profile page should look like the following figure. To
connect to a desired network, just highlight the network you would like to connect to and click
the Connect button on the bottom of the window. Then click OK in Figure 4-5 to activate the
profile.
Figure 4-4
Downloaded from www.vandenborre.be

DW-600 AC600 Wireless Dual Band USB Adapter User Guide
27
Figure 4-5
4.1.1.2. Add a profile in ad hoc mode
Note:
Ad hoc mode is not suitable in Windows 8 Windows8.1 and Windows 10.
If you are connecting to another wireless client such as an adapter, select ad hoc as the
Network Type in the screen that appears and follow the instructions below to finish the setting.
Figure 4-6
The following items can be found on the screen.
Profile Name: Enter a name for your profile e.g. Home, Office, Coffee Shop. The same
name is not allowed. Please also note that no space is allowed between words.
SSID: Select the target network from the drop-down list.
Network Type: Select the network type. If you are connecting to a wireless router or
access point, select Infrastructure. If you are connecting to another wireless client such as
an adapter, select ad hoc.
Band: This item determines which operating frequency will be used. Two options are
available: 2.4GHz and 5GHz. It is recommended that your computers and devices running
video and voice applications use the 5GHz band, while your guest access and computers
that are only browsing the web use the 2.4GHz band.
Downloaded from www.vandenborre.be

DW-600 AC600 Wireless Dual Band USB Adapter User Guide
28
2.4GHz - You can use the 2.4GHz band to connect to many classic wireless devices like gaming consoles, laptops, DVRs, ect.
5GHz - This band is less crowded and is used for time-sensitive music, video streaming or gaming. Using this band can avoid interference with 2.4GHz networks or noisy devices like cordless phones and microwave ovens.
Note: The choice for Band is only available in Windows XP; while in Windows 7, by default it only supports 2.4 Ghz network in Ad-hoc mode.
Security Type: Select the security type from the list. Two options are available: WEP and
None. None stands for no security. It is recommended that you select WEP to secure your
wireless network. Encryption Type: If you select None as the Security Type, the Encryption Type will be
None accordingly. If you select WEP as the Security Type, the Encryption Type will be
Open.
Key Index: You can select ASCII or Hexadecimal format on the right. ASCII format stands
for any combination of keyboard characters in the specified length. Hexadecimal format
stands for any combination of hexadecimal digits (0-9, a-f, A-F) in the specified length.
• For 64-bit encryption - You can enter 10 hexadecimal digits (any combination of 0-9,
a-f, A-F, zero key is not permitted) or 5 ASCII characters.
• For 128-bit encryption - You can enter 26 hexadecimal digits (any combination of 0-9,
a-f, A-F, zero key is not permitted) or 13 ASCII characters.
Security Key: Enter the passphrase. Click the Show characters box to see the
passphrase. Unchecking it will hide it. Start this connection automatically: Check this box to automatically connect to this
network next time. Save: Click Save to save your settings.
Having completed the above settings, the Profile page should looks like the following figure. To
connect to a desired network, just highlight the network you would like to connect to and click
the Connect button on the bottom of the window. Then click OK in Figure 4-8 to activate the
profile.
Downloaded from www.vandenborre.be
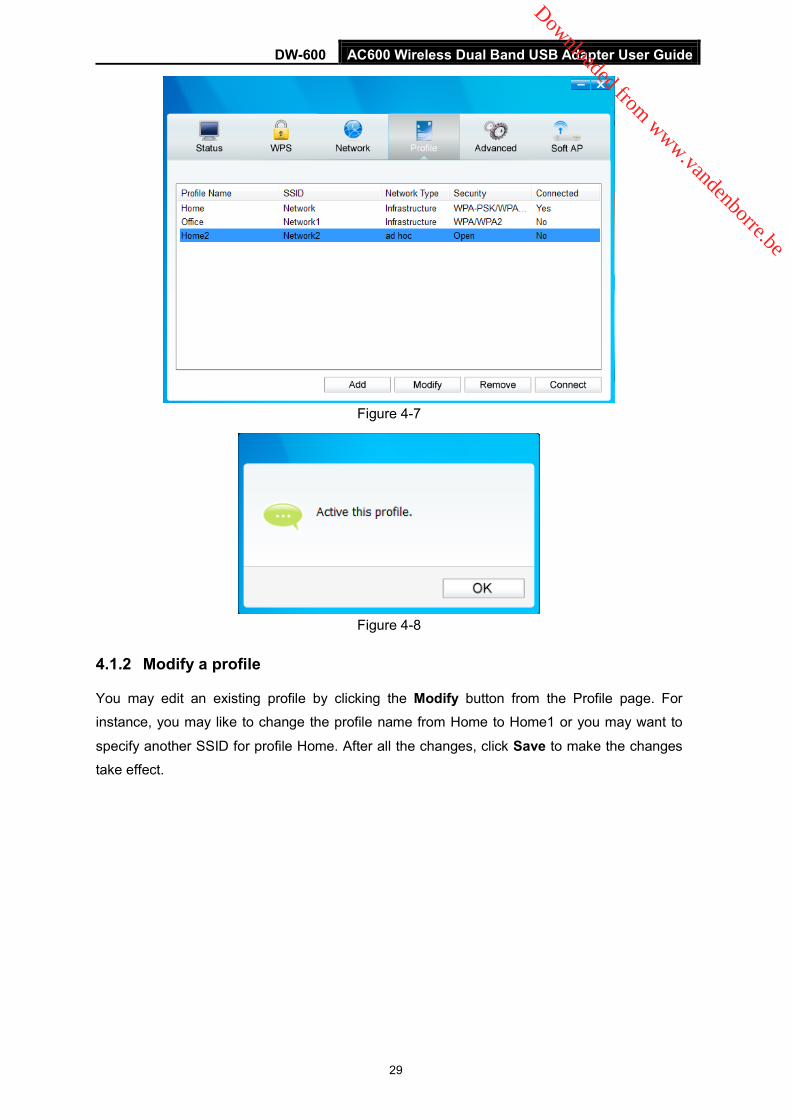
DW-600 AC600 Wireless Dual Band USB Adapter User Guide
29
Figure 4-7
Figure 4-8
4.1.2 Modify a profile
You may edit an existing profile by clicking the Modify button from the Profile page. For
instance, you may like to change the profile name from Home to Home1 or you may want to
specify another SSID for profile Home. After all the changes, click Save to make the changes
take effect.
Downloaded from www.vandenborre.be
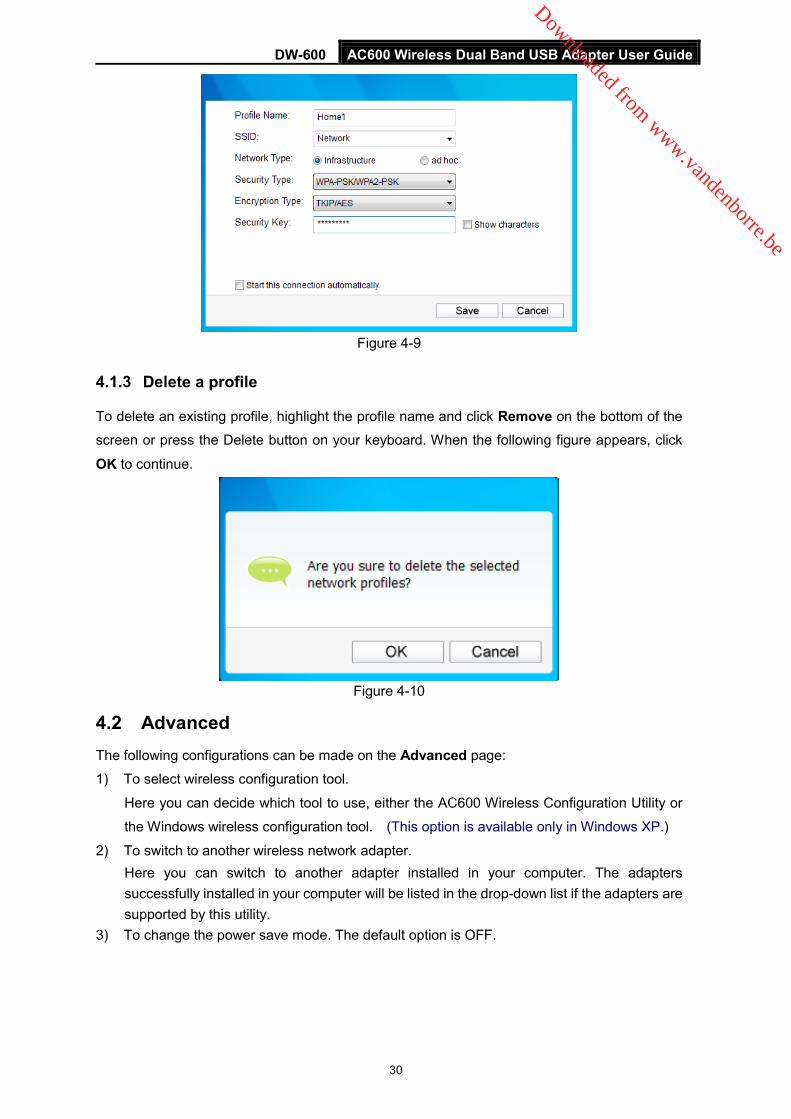
DW-600 AC600 Wireless Dual Band USB Adapter User Guide
30
Figure 4-9
4.1.3 Delete a profile
To delete an existing profile, highlight the profile name and click Remove on the bottom of the
screen or press the Delete button on your keyboard. When the following figure appears, click
OK to continue.
Figure 4-10
4.2 Advanced The following configurations can be made on the Advanced page:
1) To select wireless configuration tool.
Here you can decide which tool to use, either the AC600 Wireless Configuration Utility or
the Windows wireless configuration tool. (This option is available only in Windows XP.)
2) To switch to another wireless network adapter. Here you can switch to another adapter installed in your computer. The adapters successfully installed in your computer will be listed in the drop-down list if the adapters are supported by this utility.
3) To change the power save mode. The default option is OFF.
Downloaded from www.vandenborre.be
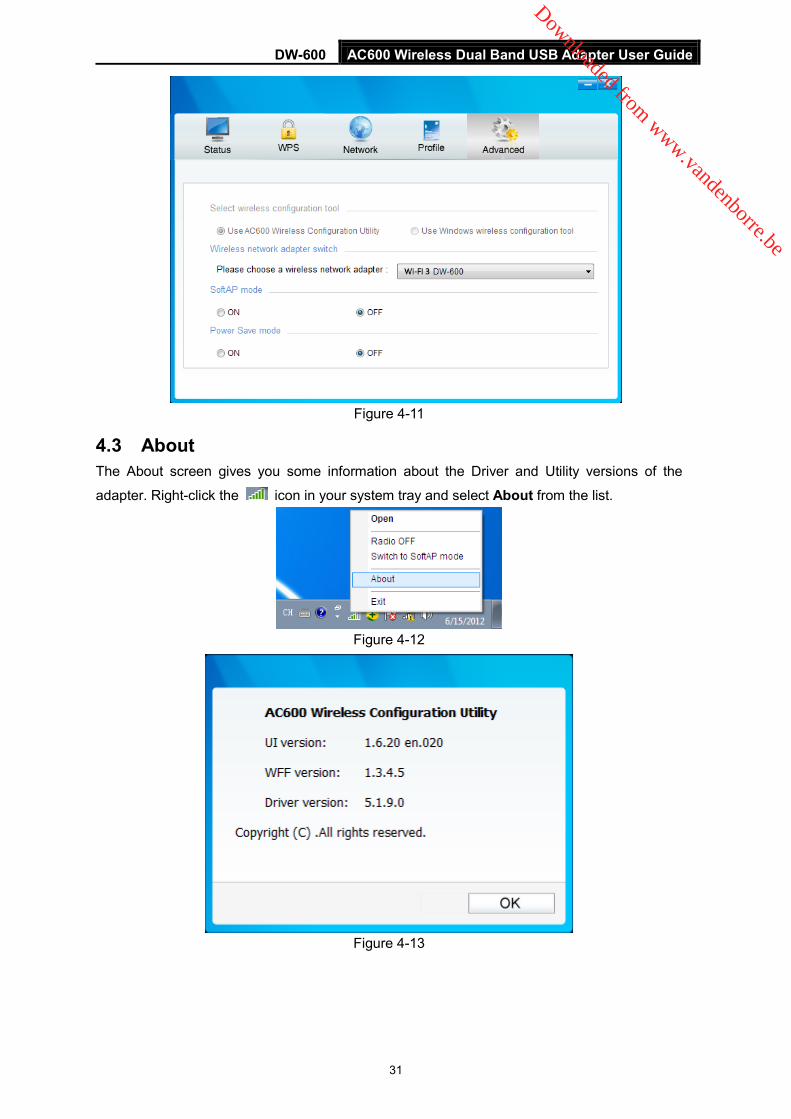
DW-600 AC600 Wireless Dual Band USB Adapter User Guide
31
Figure 4-11
4.3 About The About screen gives you some information about the Driver and Utility versions of the
adapter. Right-click the icon in your system tray and select About from the list.
Figure 4-12
Figure 4-13
Downloaded from www.vandenborre.be

DW-600 AC600 Wireless Dual Band USB Adapter User Guide
32
Chapter 5 SoftAP Mode In SoftAP mode, the adapter will work as an AP.
Suppose that only one computer in your house can access the Internet for various reasons like
only one LAN port is available on your wired broadband Router, however, other
wireless-capable devices also want to share the Internet. Then the adapter can be configured
as an AP under the SoftAP mode, saving you the trouble of having to get a separate access
point or a Router.
With this feature, a computer can use a single physical wireless adapter to connect as a client
to a hardware access point while at the same time acting as a software AP allowing other
wireless-capable devices to connect to it.
To switch to this mode, right-click on the utility icon in your system tray and select Switch to SoftAP mode.
Figure 5-1
Or from the Soft AP page of the utility, tick ON to the right of the SoftAP mode as shown in the
following figure. Click OK when prompted to confirm the setting.
Figure 5-2
Downloaded from www.vandenborre.be

DW-600 AC600 Wireless Dual Band USB Adapter User Guide
33
Then the information about the Soft AP will display as shown in the following figure.
Figure 5-3
Figure 5-4
SoftAP mode: Select to enable or disable the function. Internet Connecting Share (ICS): Specify a connection through which devices connected
to your AP can access the Internet. SSID: Enter the name for your Soft AP (for example, Jone) so that others can know which
AP is yours when trying to connect to it.
Band: This item determines which operating frequency will be used. Two options are
available: 2.4GHz and 5Ghz. It is recommended that your computers and devices running
video and voice applications use the 5GHz band, while your guest access and computers
that are only browsing the web use the 2.4Ghz band. 2.4GHz - You can use the 2.4GHz band to connect to many classic wireless devices
like gaming consoles, laptops, DVRs, ect. 5GHz - This band is less crowded and is used for time-sensitive music, video
streaming or gaming. Using this band can avoid interference with 2.4GHz networks or noisy devices like cordless phones and microwave ovens.
Downloaded from www.vandenborre.be

DW-600 AC600 Wireless Dual Band USB Adapter User Guide
34
Note: The choice for Band is only available in Windows XP; while in Windows 7, Windows 8 and Windows 8.1, by default it only supports 2.4 GHz network.
Security Type: The security type here is set to be WPA2-PSK which is based on 802.11i and uses AES (Advanced Encryption Standard) instead of TKIP. It was designed to improve the security features of WEP. WPA2-PSK uses a passphrase or key to authenticate your wireless connection. You needn’t make any configuration here.
Encryption Type: The encryption type here is set to be AES. Security Key: Enter the Key in the field to make your AP security enabled. It is
recommended that you specify another key instead of the default key 12345678. Only by entering the corresponding key can other computers establish a successful connection with your AP.
IP Address: Here displays the IP address of the Soft AP.
Having completed the above settings, click Apply; then Figure 5-4 will pop up, where you click OK to make Soft AP mode take effect.
Downloaded from www.vandenborre.be

DW-600 AC600 Wireless Dual Band USB Adapter User Guide
35
Chapter 6 Uninstall Software
6.1 In Windows XP/7 The software uninstall steps are similar in Windows XP and Windows 7, here we take Windows
7 as an example.
6.1.1 Uninstall the utility software from your PC
1. On the Windows taskbar, click the Start button, click All programsWireless, and then click Uninstall - AC600 Wireless Configuration Utility.
2. Follow the InstallShield Wizard to uninstall the utility software from your PC. .
6.1.2 Uninstall the driver software from your PC
1. On the Windows taskbar, click the Start button, click All programsWireless, and then click Uninstall - DW-600 Driver.
2. Follow the InstallShield Wizard to uninstall the driver software from your PC.
6.2 In Windows 8/8.1/10 The software uninstall steps are similar in Windows 8, Windows 8.1 and Windows 10, here we
take Windows 8 as an example. Utility do not apply to Windows 10.
6.2.1 Uninstall the utility software from your PC
1. Enter the Apps interface, and find the Wireless application, then click Uninstall- AC600 Wireless Configuration Utility.
2. Follow the InstallShield Wizard to uninstall the utility software from your PC.
6.2.2 Uninstall the driver software from your PC
1. Enter the Apps interface, and find the Wireless application, then click Uninstall - DW-600 Driver.
2. Follow the InstallShield Wizard to uninstall the driver software from your PC.
Downloaded from www.vandenborre.be
DW-600 N300 Wireless Dual Band USB Adapter User Guide
36
Appendix A: Specifications Normal Interface USB 2.0 Interface
Standards IEEE802.11a; IEEE802.11b; IEEE802.11g; IEEE802.11n;
IEEE802.1x, IEEE802.11ac
Operating System Windows XP, Windows 7, Windows 8, Windows 8.1, Windows
10
Throughput 2.4GHz:150Mbps (Maximal)
5GHz: 433Mbps (Maximal)
Data Security WEP, WPA / WPA2, WPA-PSK / WPA2-PSK
Frequency* 2.4 ~ 2.4835 GHz, 5.15~5.25GHz,
5.25~5.35GHz, 5.475~5.725GHz, 5.745~5.825GHz
Safety & Emissions CE, WIFI, IC, NCC
Environmental and Physical
Working Temperature 0℃~40℃ (32℉~104℉)
Storage Temperature -40℃~70℃(-40℉~158℉)
Working Humidity 10%~90%RH, Non-condensing
Storage Humidity 5%~90%RH, Non-condensing
* 1. Only 2.412GHz~2.462GHz is allowed to be used in USA, which means only channel 1~11 is
available for American users to choose.
* 2. Rules on the use of 5GHz band channels may vary according to different national laws.
Downloaded from www.vandenborre.be

DW-600 AC600 Wireless Dual Band USB Adapter User Guide
37
Appendix B: Glossary 802.11ac - IEEE 802.11ac is a wireless computer networking standard of 802.11.This
specification will enable multi-station WLAN throughput of at least 1 gigabit per
second .This is accomplished by extending the air interface concepts embraced by
802.11n: wider RF bandwidth, more MIMO spatial streams, multi-user MIMO, and
high-density modulation (up to 256 QAM). 802.11n - 802.11n builds upon previous 802.11 standards by adding MIMO (multiple-input
multiple-output). MIMO uses multiple transmitter and receiver antennas to allow for increased data throughput via spatial multiplexing and increased range by exploiting the spatial diversity, perhaps through coding schemes like Alamouti coding. The Enhanced Wireless Consortium (EWC) was formed to help accelerate the IEEE 802.11n development process and promote a technology specification for interoperability of next-generation wireless local area networking (WLAN) products.
802.11g - specification for wireless networking at 54 Mbps using direct-sequence spread-spectrum (DSSS) technology, using OFDM modulation and operating in the unlicensed radio spectrum at 2.4GHz, and backward compatibility with IEEE 802.11b devices, and WEP encryption for security.
802.11b - The 802.11b standard specifies a wireless product networking at 11 Mbps using direct-sequence spread-spectrum (DSSS) technology and operating in the unlicensed radio spectrum at 2.4GHz, and WEP encryption for security. 802.11b networks are also referred to as Wi-Fi networks.
802.11a - specification for wireless networking at 54 Mbps using OFDM modulation and operating in radio band at 5GHz.
Ad hoc Network - An ad hoc network is a group of computers, each with a Wireless Adapter, connected as an independent 802.11 wireless LAN. Ad hoc wireless computers operate on a peer-to-peer basis, communicating directly with each other without the use of an access point. Ad hoc mode is also referred to as an Independent Basic Service Set (IBSS) or as peer-to-peer mode, and is useful at a departmental scale or SOHO operation.
DSSS - (Direct-Sequence Spread Spectrum) - DSSS generates a redundant bit pattern for all data transmitted. This bit pattern is called a chip (or chipping code). Even if one or more bits in the chip are damaged during transmission, statistical techniques embedded in the receiver can recover the original data without the need of retransmission. To an unintended receiver, DSSS appears as low power wideband noise and is rejected (ignored) by most narrowband receivers. However, to an intended receiver (i.e. another wireless LAN endpoint), the DSSS signal is recognized as the only valid signal, and interference is inherently rejected (ignored).
FHSS - (Frequency Hopping Spread Spectrum) - FHSS continuously changes (hops) the carrier frequency of a conventional carrier several times per second according to a pseudo-random set of channels. Because a fixed frequency is not used, and only the transmitter and receiver know the hop patterns, interception of FHSS is extremely difficult.
Downloaded from www.vandenborre.be
DW-600 AC600 Wireless Dual Band USB Adapter User Guide
38
Infrastructure Network - An infrastructure network is a group of computers or other devices, each with a Wireless Adapter, connected as an 802.11 wireless LAN. In infrastructure mode, the wireless devices communicate with each other and to a wired network by first going through an access point. An infrastructure wireless network connected to a wired network is referred to as a Basic Service Set (BSS). A set of two or more BSS in a single network is referred to as an Extended Service Set (ESS). Infrastructure mode is useful at a corporation scale, or when it is necessary to connect the wired and wireless networks.
Spread Spectrum - Spread Spectrum technology is a wideband radio frequency technique developed by the military for use in reliable, secure, mission-critical communications systems. It is designed to trade off bandwidth efficiency for reliability, integrity, and security. In other words, more bandwidth is consumed than in the case of narrowband transmission, but the trade off produces a signal that is, in effect, louder and thus easier to detect, provided that the receiver knows the parameters of the spread-spectrum signal being broadcast. If a receiver is not tuned to the right frequency, a spread-spectrum signal looks like background noise. There are two main alternatives, Direct Sequence Spread Spectrum (DSSS) and Frequency Hopping Spread Spectrum (FHSS).
SSID - A Service Set Identification is a thirty-two character (maximum) alphanumeric key identifying a wireless local area network. For the wireless devices in a network to communicate with each other, all devices must be configured with the same SSID. This is typically the configuration parameter for a wireless PC card. It corresponds to the ESSID in the wireless Access Point and to the wireless network name. See also Wireless Network Name and ESSID.
WEP - (Wired Equivalent Privacy) - A data privacy mechanism based on a 64-bit or 128-bit or 152-bit shared key algorithm, as described in the IEEE 802.11 standard. To gain access to a WEP network, you must know the key. The key is a string of characters that you create. When using WEP, you must determine the level of encryption. The type of encryption determines the key length. 128-bit encryption requires a longer key than 64-bit encryption. Keys are defined by entering in a string in HEX (hexadecimal - using characters 0-9, A-F) or ASCII (American Standard Code for Information Interchange – alphanumeric characters) format. ASCII format is provided so you can enter a string that is easier to remember. The ASCII string is converted to HEX for use over the network. Four keys can be defined so that you can change keys easily.
Wi-Fi - A trade name for the 802.11b wireless networking standard, given by the Wireless Ethernet Compatibility Alliance (WECA, see http://www.wi-fi.net), an industry standards group promoting interoperability among 802.11b devices.
WLAN - (Wireless Local Area Network) - A group of computers and associated devices communicate with each other wirelessly, which network serving users are limited in a local area.
WPA - (Wi-Fi Protected Access) - A wireless security protocol uses TKIP (Temporal Key Integrity Protocol) encryption, which can be used in conjunction with a RADIUS server.
Downloaded from www.vandenborre.be

DW-600 AC600 Wireless Dual Band USB Adapter User Guide
39
DISPOSAL
As a responsible retailer we care about the environment.
As such we urge you to follow the correct disposal procedure for the product, packaging
materials and if applicable, accessories. This will help conserve natural resources and ensure
that the materials are recycled in a manner that protects health and the environment.
You must follow laws and regulations about disposal. Waste electrical products must be
disposed of separately from household waste when the product reaches the end of its life.
Contact the store where you bought the product and your local authority to learn about disposal
and recycling.
We apologise for any inconvenience caused by minor inconsistencies in these instructions,
which may occur as a result of product improvement and development.
Darty Holdings SAS © 14 route d'Aulnay 93140 Bondy, France 04 / 06 / 2015
Downloaded from www.vandenborre.be
Handleiding
DW-600
AC600 draadloze dubbele band USB-adapter
Downloaded from www.vandenborre.be

Waarschuwing CE-markering
Dit is een klasse B-product. In een huishoudelijke omgeving kan dit product radiostoringen
veroorzaken, in dat geval dient de gebruiker de nodige maatregelen te treffen.
Nationale restricties Dit apparaat is zonder enige beperking bedoeld voor thuisgebruik en gebruik op kantoor in alle
EU-landen (en andere landen die de EU-richtlijn 1999/5/EG volgen) behalve de landen die
hieronder worden vermeld:
Land Restrictie Reden/opmerking
Bulgarije
Geen
Algemene toestemming vereist voor buitengebruik
en openbare dienstverlening
Frankrijk
Buitengebruik beperkt tot 10 mW e.i.r.p. binnen de band 2454-2483.5 MHz
Gebruik voor militaire radioplaatsbepaling. Herschikking
van de 2.4 GHz band is in de voorbije jaren aan de
gang om de huidige minder strenge regelgeving
mogelijk te maken. Volledige doorvoering gepland voor
2012
Italië
Geen
Algemene toestemming vereist bij gebruik buiten eigen
eigendom
Luxemburg
Geen
Algemene toestemming vereist voor l eve r ing van
netwerk en service (niet voor spectrum)
Noorwegen
Doorgevoerd
Deze sub-sectie geldt niet voor het geografische gebied
binnen een straal van 20km van het centrum van Ny-
Ålesund
Russische Federatie
Geen
Uitsluitend voor binnengebruik
Opmerking: gelieve dit product in Frankrijk niet buitenhuis te gebruiken.
5150-5250 MHz
Land Restrictie Reden/opmerking
Bulgarije
Niet doorgevoerd
Gepland
Kroatië
Licentie vereist
Italië
Algemene toestemming vereist bij gebruik buiten het
eigen eigendom
Downloaded from www.vandenborre.be

Luxemburg
Geen
Algemene toestemming vereist voor l eve r ing van
netwerk en service (niet voor spectrum)
Russische Federatie
Geen info
5250-5350 MHz
Land Restrictie Reden/opmerking
Bulgarije
Niet doorgevoerd
Gepland
Kroatië
Licentie vereist
Italië
Algemene toestemming vereist bij gebruik buiten het
eigen eigendom
Luxemburg
Geen
Algemene toestemming vereist voor l eve r ing van
netwerk en service (niet voor spectrum)
Russische Federatie
Geen info
5470-5725 MHz
Land Restrictie Reden/opmerking
Bulgarije
Niet doorgevoerd
Gepland
Frankrijk
Relevante+ voorzieningen voor de doorvoering van DFS-
mechanisme beschreven in de ETSI-standaard EN 301
893 V1.3.1 en latere versies
Italië
Algemene toestemming vereist bij gebruik buiten het
eigen eigendom
Luxemburg
Geen
Algemene toestemming vereist voor l eve r ing van
netwerk en service (niet voor spectrum)
Russische Federatie
Geen info
Turkey
Niet doorgevoerd
Defensie systemen
Opmerking: gelieve dit product in Frankrijk niet buitenhuis te gebruiken.
Downloaded from www.vandenborre.be

5
INHOUDSOPGAVE
Inhoud van de verpakking ........................................................................................ 1
Hoofdstuk 1 Overzicht van het apparaat ............................................................... 2
1.1 Inleiding ...................................................................................................................... 2 1.2 Kenmerken................................................................................................................. 2
1.3 Overzicht van de hardware ........................................................................................ 3 Hoofdstuk 2 Installatie ............................................................................................ 4
2.1 Installatie van de hardware ........................................................................................ 4 2.2 Installatie van de software ......................................................................................... 5
Hoofdstuk 3 Verbinden met een draadloos netwerk ............................................ 9
3.1 Om te verbinden via TWCU ....................................................................................... 9 3.2 Om te verbinden via WPS ....................................................................................... 12
3.2.1 De methode PBC (druktoets-configuratie) .................................................. 12
3.2.2 PIN-methode ............................................................................................... 13
3.3 Om te verbinden via ingebouwd draadloos hulpprogramma van Windows ............ 15 3.3.1 In Windows XP ........................................................................................... 15
3.3.2 In Windows 7 .............................................................................................. 17
3.3.3 In Windows 8 .............................................................................................. 18
3.3.4 In Windows 8.1 ........................................................................................... 20
Hoofdstuk 4 Beheer .............................................................................................. 23
4.1 Profiel ....................................................................................................................... 23 4.1.1 Een profiel toevoegen ................................................................................ 23
4.1.2 Een profiel bewerken .................................................................................. 28
4.1.3 Een profiel wissen ....................................................................................... 29
4.2 Geavanceerde instellingen ...................................................................................... 29 4.3 Over ......................................................................................................................... 30
Hoofdstuk 5 De modus SoftAP ............................................................................ 31
Hoofdstuk 6 Software verwijderen ....................................................................... 34
6.1 In Windows XP/7 ..................................................................................................... 34 6.1.1 De software van het hulpprogramma van uw pc verwijderen ..................... 34
6.1.2 De software van de driver van uw pc verwijderen ...................................... 34
6.2 In Windows 8/8.1 ..................................................................................................... 34 6.2.1 De software van het hulpprogramma van uw pc verwijderen ..................... 34
6.2.2 De software van de driver van uw pc verwijderen ...................................... 34
Appendix A: Technische gegevens ....................................................................... 35
Appendix B: Terminologie ..................................................................................... 36
Downloaded from www.vandenborre.be
AC600 Wireless Dual Band USB Adapter User Guide
1
DW-600
Inhoud van de verpakking Controleer met behulp van onderstaande lijst of alle inhoud van de verpakking aanwezig is.
Een DW-600 AC600 draadloze dubbele band USB-adapter Snelle installatiegids Een installatie-cd voor DW-600 met:
AC600 hulprogramma voor draadloze configuratie (TWCU) en aandrijvingen Handleiding Andere nuttige informatie
Controleer of de bovenstaande items in de verpakking aanwezig zijn. Neem onmiddellijk contact op met uw verdeler als een van de bovenstaande items ontbreekt of beschadigd is.
Opmerking:
Als in deze handleiding ‘adapter’ wordt vermeld zonder uitleg, verwijst dit naar de DW-600 AC600
Draadloze dubbele band USB-adapter.
Downloaded from www.vandenborre.be

AC600 Wireless Dual Band USB Adapter User Guide
2
DW-600
Hoofdstuk 1 Overzicht van het apparaat 1.1 Inleiding
Deze adapter is een dubbele band 802.11ac cliënt-apparaat en is ontworpen om hoge snelheid draadloze performance voor uw desktop te leveren. Met een snellere draadloze verbinding kunt u genieten van een betere internetervaring, zoals downloaden, gamen en video-streaming.
De 802.11ac technologie maakt een verbeterde doorvoer mogelijk dankzij 1T1R, de DW-600’s
automatische sensor van de adapter maakt een hoge pakket-transfer snelheid van tot 433Mbps
mogelijk voor maximale doorvoer. Het heeft een degelijk vermogen voor anti-jamming en kan
bovendien samenwerken met andere draadloze (802.11a/b/g/n/ac) apparatuur. Deze adapter
ondersteunt WEP, WPA-PSK/WPA2-PSK en WPA/WPA2 encryptie om inbraak van buitenaf te
voorkomen en uw persoonlijke gegevens te beschermen.
De adapter is eenvoudig te installeren en beheren. De Snelle installatie-wizard zal u stap voor
stap begeleiden doorheen het installatieproces en het AC600 hulpprogramma voor draadloze
configuratie (TWCU) zal u instructies geven om snel een draadloze verbinding te installeren.
Met ongeëvenaarde draadloze performance, ontvangst en beveiliging is de DW-600 de beste
keuze voor het eenvoudig toevoegen of upgraden van draadloze connectiviteit van uw computer.
1.2 Kenmerken
Conform IEEE 802.11ac
Biedt USB 2.0 interface
Ondersteunt dubbele band, 2.4GHz of 5GHz
Naadloos verenigbaar met 802.11a/b/g/n/ac producten
Geniet van vlotte video-streaming en online gaming door de meer heldere 5GHz band voor draadloze verbindingen te kiezen
Ondersteunt 64/128 WEP, WPA/WPA2, WPA-PSK/WPA2-PSK(TKIP/AES)
Ondersteunt Windows XP 32/64bit, Windows 7 32/64bit, Windows 8 32/64bit, Windows 8.1 32/64bit, Windows 10 32/64bit
Ondersteunt d e m o d i ad-hoc en infrastructuur Gebundeld hulpprogramma biedt snelle & probleemloze installatie
Downloaded from www.vandenborre.be
AC600 Wireless Dual Band USB Adapter User Guide
3
DW-600
1.3 Overzicht van de hardware LED-status:
Status Status van de werking
Uit
De driver is niet geïnstalleerd;
De radio van de adapter is uitgeschakeld.
Langzaam knipperend
De driver is geïnstalleerd, doch er worden geen gegevens verzonden of ontvangen.
Snel knipperend
Gegevens worden verzonden of ontvangen.
Downloaded from www.vandenborre.be

AC600 Wireless Dual Band USB Adapter User Guide
4
DW-600
Hoofdstuk 2 Installatie Gelieve de adapter op uw computer te installeren voordat u de driver en het hulpprogramma van
de installatie-cd gebruikt of het programma te downloaden via
http://www.darty.com/res1/drivers/itworks/AC-600.zip.
2.1 Installatie van de hardware Sluit de USB-adapter rechtstreeks aan op een beschikbare USB-interface van uw computer.
Opmerking:
Er verschijnt een venster ‘Wizard nieuwe hardware gevonden’ op uw scherm wanneer de
adapter correct is aangesloten (als aangegeven in Afbeelding 2-1). Klik op Annuleren en volg
dan de stappen van Installatie van de software om de driver en het hulpprogramma voor uw
adapter te installeren.
Afbeelding 2-1 Wizard nieuwe hardware gevonden in Windows XP
Downloaded from www.vandenborre.be

AC600 Wireless Dual Band USB Adapter User Guide
5
DW-600
2.2 Installatie van de software De installatie-wizard van de adapter zal u begeleiden bij het installeren op Windows XP,
Windows 7, Windows 8 Windows 8.1 en Windows 10. De procedures zijn nogal gelijklopend
voor de verschillende systemen, dus nemen we de procedure voor Windows 7 als voorbeeld.
1. Zet de installatie-cd in uw cd-rom-drive en ga dan naar Mijn computer of het
programma te downloaden via http://www.darty.com/res1/drivers/itworks/AC-600.zip.
Dubbelklik op CD-ROM DW-600 1.0 en u krijgt het onderstaande venster Afbeelding 2-2
t e z i e n . Dubbelklik op Setup.exe om de installatie te starten.
Afbeelding 2-2
2. Het venster van de InstallShield Wizard verschijnt op uw scherm. Klik op Volgende om verder te gaan.
Afbeelding
2-3
Downloaded from www.vandenborre.be

AC600 Wireless Dual Band USB Adapter User Guide
6
DW-600
3. Kies een installatietype. Installeer bij voorkeur het AC600 Hulprogramma voor draadloze configuratie en aandrijving. Als u Alleen driver installeren kiest wordt alleen de
driver geïnstalleerd. Klik op Volgende om verder te gaan.
Afbeelding
2-4 4. Klik op Wijzigen om een doellocatie voor de software te selecteren. U kunt ook de
standaard doellocatie laten. Klik in het onderstaande venster op Volgende om verder te
gaan.
Afbeelding
2-5
Downloaded from www.vandenborre.be

AC600 Wireless Dual Band USB Adapter User Guide
7
DW-600
5. Klik op Installeren om verder te gaan met de installatie.
Afbeelding
2-6 6. Het hulpprogramma en de aandrijvingen worden geïnstalleerd. Dit kan 1-2 minuten duren.
Afbeelding
2-7
Downloaded from www.vandenborre.be

AC600 Wireless Dual Band USB Adapter User Guide
8
DW-600
7. Na het uitvoeren van de bovenstaande stappen verschijnt het onderstaande venster op uw scherm. Klik op Voltooien om de installatie te voltooien.
Afbeelding
2-8
8. Na de installatie zal de configuratiepagina van het hulpprogramma automatisch opengaan als aangegeven in de onderstaande afbeelding en verschijnt het icoon in uw systeemlade. Verwijs naar Hoofdstuk 3 Verbinden met een draadloos netwerk om verbinding te maken met een netwerk.
Afbeelding 2-9
Downloaded from www.vandenborre.be
AC600 Wireless Dual Band USB Adapter User Guide
10
DW-600
Hoofdstuk 3 Verbinden met een draadloos netwerk Nadat de hardware en software beide met succes op uw computer zijn geïnstalleerd kunt u snel
met een draadloos netwerk verbinden met behulp van een van de volgende methodes.
Methode een: om te verbinden via TWCU (AC600 hulpprogramma voor draadloze configuratie)
DW-600 maakt gebruik van de TWCU als so f twa rebeheerder. Dit hulpprogramma biedt u
een eenvoudige interface om met een netwerk te verbinden en instellingen met betrekking tot
de draadloze adapter te wijzigen. Verwijs naar Om te verbinden via TWCU voor meer details.
Methode twee: om te verbinden via WPS
Met deze methode kunt u snel met uw netwerk verbinden op voorwaarde dat u router of
draadloos toegangspunt (WAP) QSS of WPS ondersteunt, naargelang de naam die het merk het
geeft. Verwijs naar Om te verbinden via WPS voor meer details.
Methode drie: om te verbinden via het ingebouwde draadloos hulpprogramma van Windows
Gebruikers van Windows kunnen het ingebouwde draadloze hulpprogramma gebruiken om met
een draadloos netwerk te verbinden. Ga naar Om te verbinden via het ingebouwde draadloos
hulpprogramma van Windows voor specifieke informatie over deze methode.
3.1 Om te verbinden via TWCU 1. Na de installatie verschijnt de configuratiepagina van het hulpprogramma automatisch op
uw scherm. Als de pagina van het hulpprogramma niet opent kunt u het hulpprogramma
ook opstarten door te dubbelklikken op het icoon op uw bureaublad.
Afbeelding
3-1
2. De Netwerkpagina geeft alle draadloze netwerken aan die in uw omgeving beschikbaar
zijn. Highlight eenvoudig de naam van het netwerk (SSID) waarmee u wilt verbinden en
Downloaded from www.vandenborre.be
AC600 Wireless Dual Band USB Adapter User Guide
10
klik op Verbinden. Als u Automatisch verbinden aanvinkt zal de adapter de volgende keer
automatisch verbinding maken het gekozen netwerk.
Afbeelding 3-2 1) U krijgt verschillende vensters te zien naargelang uw keuze van een beveiligingstype voor
het draadloze netwerk.
1. Draadloos netwerk van WPA/WPA2-Personal Als u een draadloos netwerk met beveiligingstype WPA/WPA2-Personal selecteert wordt u
gevraagd om het wachtwoord in te voeren in het veld van de beveiligingssleutel als
aangegeven in Afbeelding 3-3. Of u kunt drukken op de toets WPS/QSS van uw router
(als deze is uitgerust met de functie WPS/QSS) om snel een verbinding te maken zonder
i n v o e r e n v a n d e beveiligingssleutel (wachtwoord).
Afbeelding 3-3
Opmerking:
Downloaded from www.vandenborre.be
AC600 Wireless Dual Band USB Adapter User Guide
11
DW-600
De beveiligingssleutel (wachtwoord) kan worden gevonden op de configuratiepagina van uw
Router of draadloos toegangspunt (WAP).
2) Draadloos netwerk van WPA/WPA2-Enterprise
Als u een draadloos netwerk met het beveiligingstype WPA/WPA2-Enterprise selecteert
wordt u gevraagd om een type van authenticatie te kiezen, certificaat of wachtwoord. Met
Certificaat als authenticatie moet u een specifiek certificaat uit het drop-down menu
kiezen als aangeven in Afbeelding 3-4. Met Wachtwoord als authenticatie moet u de
correcte gebruikersnaam en het wachtwoord in de overeenkomstige velden invoeren als
aangegeven in Afbeelding 3-5.
Afbeelding 3-4
Afbeelding 3-5
3) Draadloos netwerk Geen
Als u een draadloos netwerk Geen (dat betekent zonder beveiliging) selecteert kunt u
zonder verdere configuratie met dit netwerk verbinden.
3. Wacht enkele minuten tot de verbinding tot stand komt.
Downloaded from www.vandenborre.be

AC600 Wireless Dual Band USB Adapter User Guide
12
DW-600
Afbeelding 3-6
4. U bent nu met uw netwerk verbonden. Klik op Sluiten om op het internet te surfen.
Afbeelding 3-7
5. Klik op Status in de werktuigenbalk om meer informatie te zien over het netwerk waarmee
u verbonden bent. Deze pagina geeft onder meer het netwerk type, het kanaal, de
snelheid enz. aan.
3.2 Om te verbinden via WPS
Met de functie WPS (Wi-Fi beveiligde installatie) kunt u snel een nieuw draadloos apparaat
toevoegen aan een bestaand netwerk.
Als de draadloze router i s u i t g e r u s t m e t d e f u n c t i e WPS of QSS (Snelle
beveiligde installatie) kunt u een draadloze verbinding tot stand brengen tussen een draadloze
kaart en router met behulp van de druktoets-configuratie methode (PBC) of de PIN-methode.
De drie methodes voor WPS-verbinding vindt u hieronder.
3.2.1 De methode PBC (druktoets-configuratie)
2. Druk 2-3 seconden lang op de toets WPS of QSS van de router.
3. Open TWCU en klik op de tab WPS. Selecteer Druk op de toets van mijn draadloos
Downloaded from www.vandenborre.be

AC600 Wireless Dual Band USB Adapter User Guide
13
DW-600 toegangspunt (WAP) of draadloze router en klik dan op Verbinden.
Afbeelding 3-8
4. De adapter maakt verbinding met het gekozen netwerk.
Afbeelding 3-9
5. De verbinding met het netwerk is tot stand gebracht wanneer het onderstaande venster verschijnt.
Afbeelding 3-10
3.2.2 PIN-methode
Downloaded from www.vandenborre.be

AC600 Wireless Dual Band USB Adapter User Guide
14
DW-600 Er zijn twee manieren om de WPS via de PIN-methode te configureren:
1) Voer de PIN in vanaf uw Router of Access Point.
2) Voer een PIN op uw Router of Access Point.
Hieronder volgt de gedetailleerde configuratie van beide manieren.
3.2.2.1. Voer de PIN in vanaf uw Router of Access Point
1. Open TWCU en klik op de tab WPS. Selecteer Voer de PIN van mijn draadloos toegangspunt (WAP) of draadloze router in. Voer in het lege veld naast PIN de PIN in
die op het label onderaan de router is aangegeven (wij nemen 13492564 als voorbeeld).
Als u een nieuwe PIN-code voor uw router heeft geconfigureerd dient u de nieuwe code in
te voeren. Klik op Verbinden om verder te gaan.
Afbeelding
3-11 2. De adapter maakt verbinding met het gekozen netwerk.
Afbeelding
3-12 3. U bent correct verbonden met het netwerk wanneer Afbeelding 3-10 op het scherm verschijnt.
3.2.2.2. Voer een PIN in op uw Access Point
Downloaded from www.vandenborre.be

AC600 Wireless Dual Band USB Adapter User Guide
15
DW-600 1. Open TWCU en klik op de tab WPS. Selecteer Voer de PIN van dit apparaat in op mijn
draadloos toegangspunt (WAP) o f draadloze router. U ziet in het veld naast PIN de
willekeurig gegenereerde PIN-code van de adapter. Klik op Verbinden om verder te gaan.
Afbeelding
3-13 2. Voer de PIN-code van de adapter (wij nemen 54413207 als voorbeeld in de afbeelding) in
het hulpprogramma voor de configuratie van het Access Point. Verwijs naar de handleiding van het Draadloze toegangspunt (WAP) voor meer informatie.
3. De configuratie is voltooid wanneer Afbeelding 3-14 op uw scherm verschijnt.
Afbeelding
3-14
Om te verbinden via het ingebouwde draadloze hulpprogramma van Windows
3.3.1 In Windows XP
Gebruikers van Windows XP kunnen gebruik maken van het ingebouwde draadloze hulpprogramma. Volg de onderstaande stappen.
1. Rechts-klik op het icoon van het hulpprogramma in uw systeemlade (hoek linksonder).
Selecteer Overschakelen op draadloze configuratiewerktuig van Windows.
Downloaded from www.vandenborre.be

AC600 Wireless Dual Band USB Adapter User Guide
20
DW-600
Afbeelding
3-15 Of dubbelklik het icoon van het hulpprogramma om de configuratiepagina van het
hulpprogramma te openen. Klik op Geavanceerde instellingen in de werktuigenbalk en
selecteer dan Gebruik het draadloos configuratiewerktuig van Windows als in de
onderstaande afbeelding. Klik op OK wanneer Afbeelding 3-17 verschijnt om verder te
gaan.
Afbeelding 3-16
Afbeelding 3-17
Downloaded from www.vandenborre.be

AC600 Wireless Dual Band USB Adapter User Guide
20
DW-600 DW-600
Rechts-klik op het icoon van draadloos in uw systeemlade (hoek rechtsonder). Selecteer Bekijk beschikbare draadloze netwerken.
Afbeelding
3-18 2. Het hulpprogramma geeft alle beschikbare draadloze netwerken in uw omgeving aan. Klik
op een netwerk (aangegeven met behulp van de SSID) en klik op de button Verbinden.
3. Als het netwerk beveiligd is wordt u gevraagd de sleutel in te voeren als hieronder
aangegeven. Zo niet maakt het systeem zonder wachtwoord verbinding met het netwerk.
Afbeelding
3-19
3.3.2 In Windows 7
Gebruikers van Windows 7 kunnen gebruik maken van het ingebouwde draadloze hulpprogramma. Volg de onderstaande stappen.
1. Linksklik op het draadloos-icoon in uw systeemlade (hoek rechtsonder). Het
hulpprogramma toont alle beschikbare draadloze netwerken in uw omgeving. Highlight het draadloze netwerk (aangegeven door middel van SSID) waarmee u wilt verbinden en klik
dan op Verbinden.
2. Als het netwerk waarmee u wilt verbinden gecodeerd is, voert u de/het zelfde
beveiligingssleutel of wachtwoord in als van uw router. Of druk op de toets WPS/QSS van
de router of het draadloos toegangspunt (WAP) (U wordt verzocht op de toets in drukken
op het venster als de functie WPS wordt ondersteund als aangegeven in de onderstaande
afbeelding). Als het netwerk waarmee u wilt verbinden niet beveiligd is wordt de verbinding
zonder wachtwoord tot stand gebracht.
Downloaded from www.vandenborre.be

AC600 Wireless Dual Band USB Adapter User Guide
20
Afbeelding
3-20 3. U bent verbonden met het gekozen netwerk als Verbonden naast SSID verschijnt.
3.3.3 In Windows 8
Gebruikers van Windows 8 kunnen gebruik maken van het ingebouwde draadloze hulpprogramma. Volg de onderstaande stappen.
1. Klik op het icoon onderaan uw scherm, zodat een lijst van netwerken op de rechterzijde van het scherm verschijnt. Selecteer het netwerk waarmee u wilt verbinden en klik dan op Verbinden.
Afbeelding
3-21
2. Als het netwerk ongecodeerd is wordt u er onmiddellijk mee verbonden. Als het netwerk gecodeerd is moet u eerst het wachtwoord (beveiligingssleutel van het netwerk) invoeren en dan klikken op Volgende om verder te gaan.
Downloaded from www.vandenborre.be

AC600 Wireless Dual Band USB Adapter User Guide
20
DW-600 DW-600
Afbeelding 3-22
Opmerking:
U kunt ook drukken op de toets WPS/QSS van uw router als gevraagd in “U kunt ook verbinding
maken door op de toets van de router te drukken”. Klik daarna op Volgende om verder te gaan.
2. U bent verbonden met het gekozen netwerk wanneer naast de SSID Verbonden verschijnt
(als hieronder aangegeven).
Afbeelding
3-23
Opmerking:
Wanneer de adapter voor het eerst met een netwerk verbinding maakt wordt u gevraagd of u
delen wilt inschakelen of met apparaten wil verbinden. Selecteer “Ja, ...” of “Neen, ...”
naargelang uw internetomgeving.
Downloaded from www.vandenborre.be

AC600 Wireless Dual Band USB Adapter User Guide
20
Afbeelding
3-24
3.3.4 In Windows 8.1
Gebruikers van Windows 8.1 kunnen gebruik maken van het ingebouwde draadloze hulpprogramma. Volg de onderstaande stappen.
1. Klik op het icoon onderaan het scherm. Er verschijnt een lijst van netwerken op de rechterzijde van uw scherm. Selecteer het netwerk waarmee u verbinding wilt en klik dan op Verbinden.
Afbeelding
3-25 2. Als het netwerk niet gecodeerd is komt de verbinding onmiddellijk tot stand.
Downloaded from www.vandenborre.be
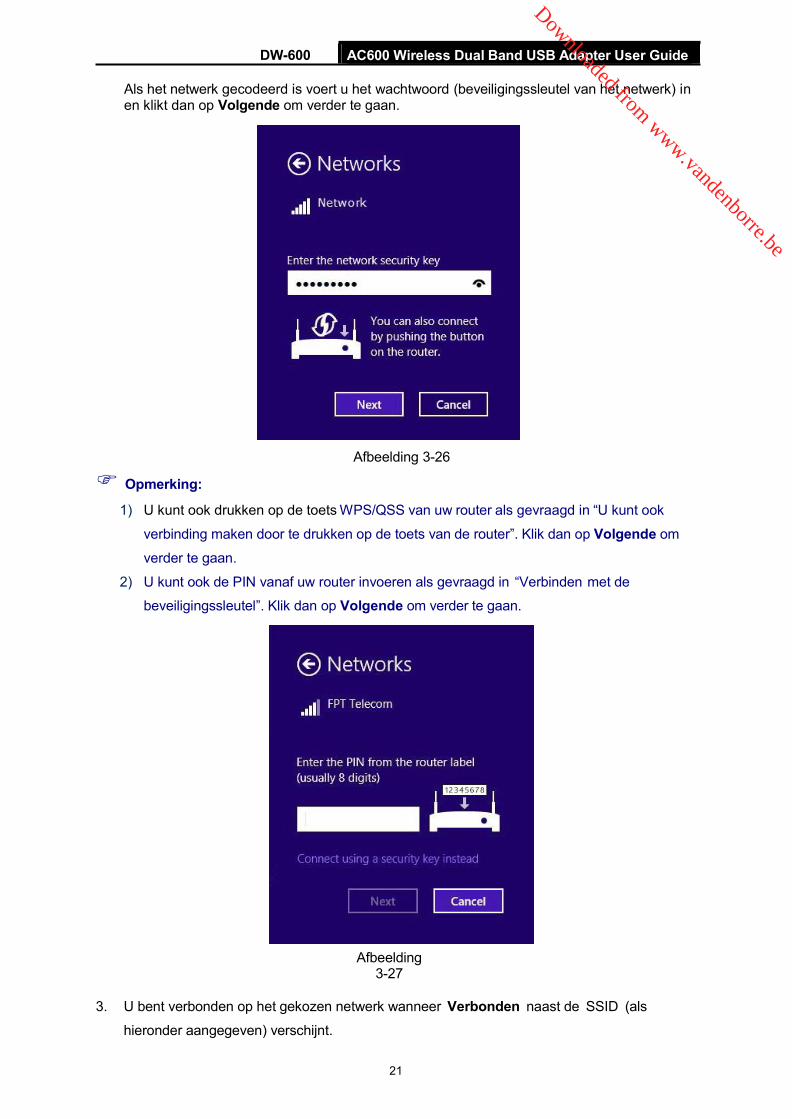
AC600 Wireless Dual Band USB Adapter User Guide
21
DW-600
Als het netwerk gecodeerd is voert u het wachtwoord (beveiligingssleutel van het netwerk) in en klikt dan op Volgende om verder te gaan.
Opmerking:
Afbeelding 3-26
1) U kunt ook drukken op de toets WPS/QSS van uw router als gevraagd in “U kunt ook
verbinding maken door te drukken op de toets van de router”. Klik dan op Volgende om
verder te gaan.
2) U kunt ook de PIN vanaf uw router invoeren als gevraagd in “Verbinden met de
beveiligingssleutel”. Klik dan op Volgende om verder te gaan.
Afbeelding
3-27
3. U bent verbonden op het gekozen netwerk wanneer Verbonden naast de SSID (als
hieronder aangegeven) verschijnt.
Downloaded from www.vandenborre.be

AC600 Wireless Dual Band USB Adapter User Guide
22
DW-600
Opmerking:
Afbeelding 3-28
Als de adapter voor het eerst met dit netwerk is verbonden, wordt u gevraagd of u verbinding
wil maken met apparatuur wilt. Selecteer “Ja” of “Neen” naargelang uw internetomgeving.
Afbeelding
3-29 3.3.5 In Windows 10
1. Klik op (netwerk-icoon) in het systeemvak. Selecteer het netwerk waarmee u wilt
verbinden en klik op Verbinden. Voer uw Wi-Fi-wachtwoord in wanneer daarom wordt
gevraagd.
Opmerking:
Als u geen Wi-Fi-wachtwoord wenst in te voeren kunt u ook met een draadloos netwerk
verbinden door ofwel op de toets WPS of QSS van uw router of AP te drukken, of door de PIN
van uw router in te voeren wanneer het scherm u daarom vraagt, en dan op Volgende klikken.
2. Wanneer naast de netwerknaam (SSID) Verbonden op het scherm verschijnt, betekent dit
dat de netwerkverbinding met succes is voltooid.
Downloaded from www.vandenborre.be

AC600 Wireless Dual Band USB Adapter User Guide
23
DW-600
Hoofdstuk 4 Beheer Dit hoofdstuk leert u hoe u uw DW-600 adapter configureert met behulp van het AC600
Hulprogramma voor draadloze configuratie (TWCU).
De DW-600 adapter maakt gebruik van het AC600 Hulpprogramma voor draadloze configuratie als softwarebeheerder. Dit hulpprogramma biedt gebruikers een eenvoudige interface waarmee instellingen van de adapter kunnen worden gewijzigd. Dubbelklik op het
icoon op uw bureaublad om het hulpprogramma te openen.
4.1 Profiel De beschikbare draadloze netwerken k u n n e n v e r s c h i l l e n d z i j n n a a r g e l a n g u
t h u i s , o p k a n t o o r o f o p c a f é b e n t . Met de optie Profiel kunt u heel eenvoudig
verschillende netwerken opslaan waarmee u wilt verbinden en zo te voorkomen dat u telkens
dezelfde configuraties moet invoeren. Klik in de werktuigenbalk op Profiel om het
onderstaande venster te zien verschijnen.
Afbeelding
4-1
4.1.1 Een profiel toevoegen
Om een profiel toe te voegen klikt u op de button Toevoegen onderaan het scherm. Het
onderstaande configuratievenster verschijnt dan op uw scherm.
4.1.1.1. Een profiel toevoegen in De modus infrastructuur
Selecteer in het venster dat verschijnt Infrastructuur als het netwerktype als u verbinding
maakt met een draadloze router of access point en volg de instructies om de installatie te
voltooien.
Downloaded from www.vandenborre.be

AC600 Wireless Dual Band USB Adapter User Guide
24
DW-600
Afbeelding
4-2
Afbeelding 4-3 U vindt de onderstaande items op het scherm.
Profielnaam: voer een naam in voor uw profiel (bijv. Café, Thuis, Kantoor). U kunt
eenzelfde naam niet twee keer gebruiken. Noteer ook dat spaties tussen woorden niet
toegestaan zijn.
SSID: selecteer het netwerk waarmee u wilt verbinden in het drop-down menu.
Netwerkt ype: selecteer het netwerktype. Selecteer Infrastructuur om verbinding te
maken met een draadloze router o f draadloos toegangspunt (WAP). Selecteer Ad hoc
om verbinding te maken met een a n d e r e draadloze zoals een adapter.
Beveiligingstype: selecteer een beveiligingstype in de lijst. In de modus Infrastructuur heeft u de keuze uit vier opties: WPA-PSK/WPA2-PSK, WPA/WPA2, WEP en Geen. Het
beveiligingstype moet hetzelfde zijn als op uw router of draadloos toegangspunt (WAP),
zo niet kunt u geen verbinding maken. WPA-PSK/WPA2-PSK maakt gebruik van een
wachtwoord of sleutel om uw draadloze verbinding te authentiseren. De sleutel moet exact
dezelfde zijn als op uw draadloze router o f draadloos toegangspunt (WAP). Geen betekent geen beveiliging. Het is raadzaam WPA-PSK/WPA2-PSK te activeren op uw
draadloze router of access point voordat u uw draadloze adapter configureert.
Downloaded from www.vandenborre.be

25
DW-600
Opmerking: U ziet Afbeelding 4-2 als u het beveiligingstype WPA-PSK/WPA2-PSK heeft geselecteerd, terwijl u Afbeelding 4-3 op het scherm ziet wanneer u het beveiligingstype WPA/WPA2 selecteert.
Encryptietype: selecteer het encryptietype uit het drop-down menu dat overeenstemt met
dat van uw router of draadloos Access Point.
Beveiligingssleutel: voer exact hetzelfde wachtwoord in als dat van uw draadloze router
of draadloos toegangspunt (WAP). Vink het vakje Toon tekens aan om het wachtwoord te
zien. Vink het vakje uit om het wachtwoord te verbergen.
Authenticatie: selecteer een type van authenticatie met certificaat of wachtwoord.
Certificaat: als u certificaat als Authenticatie heeft geselecteerd moet u hier uw
certificaat uit het drop-down menu selecteren.
Start deze verbinding automatisch: vink dit vakje aan om de volgende keer
automatisch met dit netwerk te verbinden.
Opslaan: klik op Opslaan om uw instellingen in het geheugen op te slaan.
Nadat u de bovenstaande instellingen heeft gemaakt ziet de Profielpagina er uit als in de
onderstaande afbeelding. Om te verbinden met een netwerk van uw keuze hoeft u enkel het
netwerk te highlighten en klikken op de button Verbinden onderaan het venster. Klik dan op
OK in Afbeelding 4-5 om het profiel te activeren.
Afbeelding
4-4
AC600 Draadloze dubbele band USB-adapter
Downloaded from www.vandenborre.be

26
AC600 Wireless Dual Band USB Adapter User Guide
DW-600
Afbeelding
4-5
4.1.1.2. Een profiel toevoegen in de modus ad-hoc
Opmerking:
De modus ad-hoc is niet beschikbaar op Windows 8 Windows 8.1 en Windows 10.
Als u een verbinding maakt met een andere draadloze cliënt zoals een adapter kunt u in het
venster dat verschijnt ad hoc selecteren als het netwerktype en de onderstaande instructies
volgen om de instelling te voltooien.
Afbeelding 4-6
U vindt de onderstaande items op het scherm.
Profielnaam: voer een naam in voor uw profiel bijv. Thuis, Kantoor, Café. U kunt
eenzelfde naam niet twee keer gebruiken. Noteer ook dat spaties tussen woorden niet
toegestaan zij.
ID: selecteer het netwerk waarmee u wilt verbinden in het drop-down menu.
Netwerkt ype: selecteer het netwerktype. Selecteer Infrastructuur om verbinding te
maken met een draadloze router o f draadloos toegangspunt (WAP). Selecteer Ad hoc
om verbinding te maken met een a n d e r e draadloze zoals een adapter.
Band: deze optie bepaalt welke werkingsfrequentie zal worden gebruikt. U heeft de keuze
uit twee mogelijkheden: 2.4GHz en 5GHz. Het is raadzaam dat uw computers en
apparaten die gebruik maken van video- en stemapplicaties werken met de 5GHz band,
Downloaded from www.vandenborre.be
27
AC600 Wireless Dual Band USB Adapter User Guide
DW-600 terwijl uw gasttoegang en computers die alleen op het net surfen de 2.4GHz band
gebruiken.
2.4GHz – u kunt de 2.4GHz band gebruiken om met vele klassieke draadloze apparaten te verbinden zoals spelconsoles, laptops, DVR’s enz.
5GHz – deze band wordt minder druk gebruikt en wordt gebruikt voor tijdgevoelige muziek en video-streaming of gaming. Het gebruik van deze band kan storingen van 2.4GHz netwerken of lawaaierige apparaten zoals draadloze telefoons en magnetrons voorkomen.
Opmerking: De keuze van Band is alleen mogelijk in Windows XP, terwijl Windows 7 standaard alleen het 2.4 GHz netwerk in de Ad-hoc modus ondersteunt.
Beveiligingstype: Selecteer het beveiligingstype uit de list. Er zijn twee opties
beschikbaar: WEP en Geen. Geen staat voor geen beveiliging. Het is raadzaam WEP te
selecteren om uw draadloze netwerk te beveiligen.
Encryptietype: als u Geen als het beveiligingstype selecteert is het encryptietype
bijgevolg Geen. Als u WEP als het beveiligingstype selecteert zal het encryptietype Open
zijn.
Sleutelindex: u kunt op de rechterzijde de format ASCII of Hexadecimaal selecteren. De
format ASCII staat voor eender welke combinatie van toetsenbord-tekens in de
gespecificeerde lengte. De hexadecimale format staat voor eender welke combinatie van
hexadecimale tekens (0-9, a-f, A-F) in de gespecificeerde lengte.
Voor 64-bit encryptie – u kunt 10 hexadecimale tekens invoeren (eender welke
combinatie van 0-9, a-f, A-F, het cijfer nul is niet toegestaan) of 5 ASCII-tekens.
Voor 128-bit encryptie - u kunt 26 hexadecimale tekens invoeren (eender welke
combinatie van 0-9, a-f, A-F, het cijfer nul is niet toegestaan) of 13 ASCII-tekens.
Beveiligingstoets: voer het wachtwoord in. Vink het vakje Toon de tekens aan om het
wachtwoord te zien, of vink het vakje uit om de tekens te verbergen.
Start deze verbinding automatisch: vink dit vakje aan om de volgende keer
automatisch met dit netwerk te verbinden.
Opslaan: klik op Opslaan om uw instellingen in het geheugen op te slaan.
Nadat u de bovenstaande instellingen heeft gemaakt ziet de Profielpagina er uit als in de
onderstaande afbeelding. Om te verbinden met een netwerk van uw keuze hoeft u enkel het
netwerk te highlighten en klikken op de button Verbinden onderaan het venster. Klik dan op
OK in Afbeelding 4-8 om het profiel te activeren.
Downloaded from www.vandenborre.be
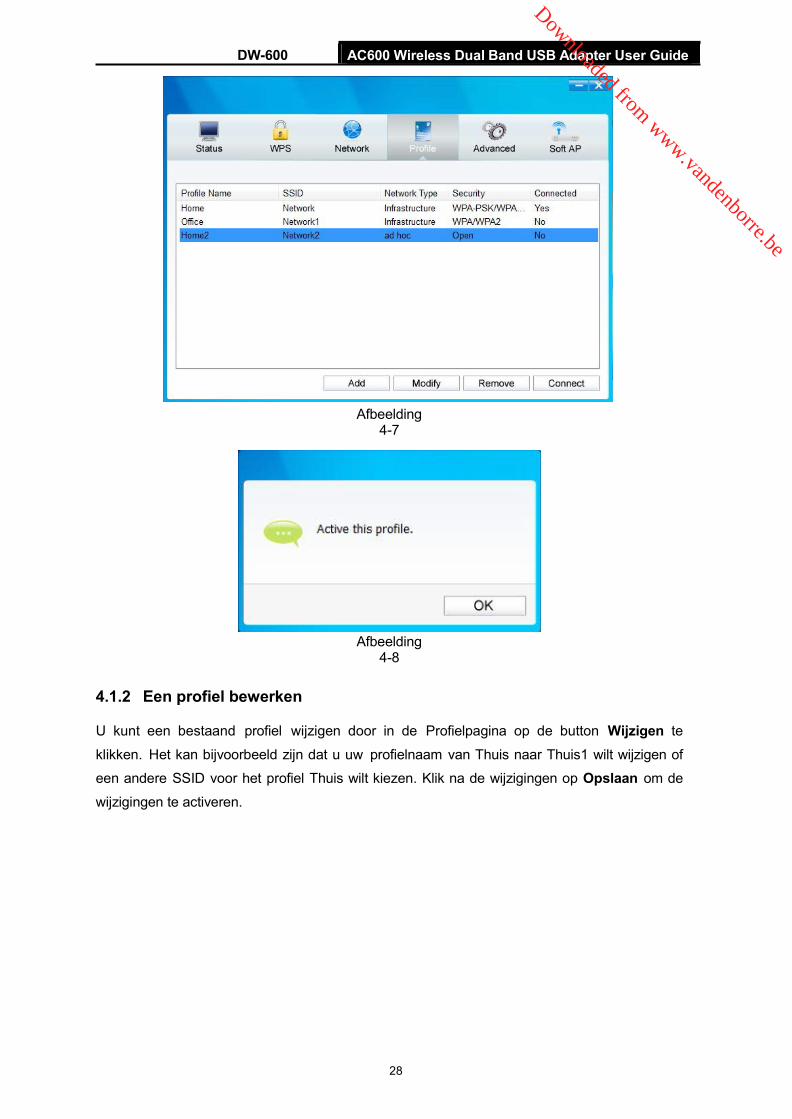
28
AC600 Wireless Dual Band USB Adapter User Guide
DW-600
Afbeelding
4-7
Afbeelding
4-8
4.1.2 Een profiel bewerken
U kunt een bestaand profiel wijzigen door in de Profielpagina op de button Wijzigen te
klikken. Het kan bijvoorbeeld zijn dat u uw profielnaam van Thuis naar Thuis1 wilt wijzigen of
een andere SSID voor het profiel Thuis wilt kiezen. Klik na de wijzigingen op Opslaan om de
wijzigingen te activeren.
Downloaded from www.vandenborre.be

AC600 Wireless Dual Band USB Adapter User Guide
30
DW-600
Afbeelding
4-9
4.1.3 Een profiel wissen
Om een bestaand profiel te wissen highlight u de profielnaam en klikt dan onderaan het scherm
op Verwijderen of drukt op de button Wissen van uw toetsenbord. Klik op OK om verder te
gaan wanneer de onderstaande afbeelding verschijnt.
Afbeelding 4-10
4.2 Geavanceerde instellingen
De onderstaande configuraties kunnen worden gemaakt in de pagina van de Geavanceerde instellingen:
1) Om een draadloos configuratiewerktuig te selecteren.
U kunt hier kiezen welk werktuig u wilt gebruiken, ofwel het AC600 hulprogramma voor
draadloze configuratie of het draadloze configuratiewerktuig van Windows. (Deze optie is
alleen beschikbaar in Windows XP.)
2) Om over te schakelen naar een andere draadloze netwerkadapter. U kunt hier overschakelen naar een andere adapter die in uw computer is geïnstalleerd. De correct in uw computer geïnstalleerde adapters verschijnen in het drop-down menu als de adapters door dit hulpprogramma worden ondersteund.
3) Om een andere energiebesparingsmodus te selecteren. The default option is OFF.
Downloaded from www.vandenborre.be

AC600 Wireless Dual Band USB Adapter User Guide
30
DW-600
4.3 Over
Afbeelding 4-11
Het v e n s t e r Over geeft u wat informatie over de versies van de driver en het
hulpprogramma. Rechtsklik op het icoon in uw systeemlade en selecteer Over op de lijst.
Afbeelding 4-12
Afbeelding
4-13
Downloaded from www.vandenborre.be

33
Hoofdstuk 5 De modus SoftAP In de modus SoftAP werkt de adapter als een AP.
Stel dat slechts één computer in uw woning over internettoegang beschikt omdat bijvoorbeeld
op uw breedband router met kabel slechts één LAN-poort beschikbaar is, doch u wil op andere
apparatuur die draadloos kunnen werken ook op het internet. In dat geval kan de adapter in de
modus SoftAP geconfigureerd worden als een AP, zodat u geen afzonderlijk draadloos
toegangspunt (WAP) van een router nodig heeft.
Met dit kenmerk kan een computer gebruik maken van één enkele fysieke draadloze adapter
om als cliënt te verbinden met een hardware draadloos toegangspunt (WAP), terwijl hij
tegelijkertijd dienst doet als een software- AP zodat andere draadloze apparatuur ermee kan
worden verbonden.
Rechtsklik op het icoon van het hulpprogramma in uw systeemlade om naar deze modus over
te schakelen en selecteer Overschakelen naar de modus SoftAP.
Afbeelding
5-1 Of klik rechts van de modus SoftAP op de pagina Soft AP van het hulpprogramma op AAN als aangegeven in de onderstaande afbeelding. Klik op OK als u wordt gevraagd om de
instelling te bevestigen.
Afbeelding5-2
Downloaded from www.vandenborre.be

34
De informatie over de SoftAP verschijnt dan op het scherm als aangegeven in de onderstaande display als aangegeven in de onderstaande afbeelding.
Afbeelding
5-3
Afbeelding
5-4 De modus SoftAP: selecteer om deze functie te activeren of deactiveren.
Internetverbinding delen (ICS): specificeer een verbinding waarmee apparatuur die met
uw AP is verbonden toegang heeft tot het internet.
SSID: voer de naam van uw SoftAP (bijvoorbeeld Jone) in, zodat anderen kunnen weten welke AP van u is wanneer zij ermee proberen te verbinden.
Band: dit item bepaalt welke gebruiksfrequentie zal worden gebruikt. U heeft de keuze uit
twee opties: 2.4GHz en 5Ghz. Het is raadzaam uw computers en apparaten die video- en
stemtoepassingen gebruiken werken met de 5GHz band, terwijl uw gasttoegang en
computers die alleen op het net surfen de 2.4Ghz band gebruiken. 2.4GHz – u kunt de 2.4GHz band gebruiken om met vele klassieke draadloze apparaten
te verbinden, zoals spelconsoles, laptops, DVR’s enz. 5GHz – deze band wordt minder druk gebruikt en wordt gebruikt voor tijdgevoelige
muziek en video-streaming of gaming. Het gebruik van deze band kan storingen van 2.4GHz netwerken of lawaaierige apparaten zoals draadloze telefoons en magnetrons voorkomen.
Downloaded from www.vandenborre.be
35
Opmerking: Het kiezen van de Band is alleen mogelijk in Windows XP, terwijl in Windows 7, Windows 8 en Windows 8.1 standaard alleen het 2.4 GHz netwerk wordt ondersteund.
Beveiligingstype: het beveiligingstype is hier ingesteld op WPA2-PSK, wat gebaseerd is op 802.11i en gebruik maakt van AES (geavanceerde instellingen encryptiestandaard) in plaats van TKIP. Dit is ontworpen om de beveiligingsfunctie van WEP te verbeteren. WPA2-PSK maakt gebruik van een wachtwoord of sleutel om uw draadloze verbinding te authenticeren. U hoeft hier geen configuraties te doen.
Encryptietype: het encryptietype hier is ingesteld op AES. Beveiligingssleutel: voer de sleutel in het veld in om uw AP te beveiligen. Het is
raadzaam een andere sleutel te specificeren dan de standaardsleutel 12345678. Andere computers kunnen alleen met uw AP verbinden mits invoeren van de correcte sleutel.
IP-adres: hier wordt het IP-adres van de SoftAP aangegeven.
Klik wanneer u met bovenstaande instellingen klaar bent op Toepassen. Afbeelding 5-4 verschijnt dan op het scherm, waarin u op OK om de modus SoftAP te activeren.
Downloaded from www.vandenborre.be

AC600 Wireless Dual Band USB Adapter User Guide
34
DW-600
Hoofdstuk 6 Software verwijderen
6.1 In Windows XP/7 De stappen voor het ont-installeren van software zijn gelijkaardig voor Windows XP en
Windows 7. Hier nemen we Windows 7 als voorbeeld.
6.1.1 De software van het hulpprogramma van uw pc verwijderen
1. Klik in de takenbalk van Windows op de button Start, klik op Alle
programma’sDraadloos en klik dan op Wissen - AC600 Hulprogramma voor draadloze configuratie.
2. Volg de InstallShield Wizard om de software van het hulpprogramma uit uw pc te wissen.
6.1.2 De software van de driver van uw pc verwijderen
1. Klik in de takenbalk van Windows op de button Start, klik op Alle programma’sDraadloos en klik dan op Wissen - DW-600 driver.
2. Volg de InstallShield Wizard om de software van de driver uit uw pc wissen.
6.2 In Windows 8/8.1/10 De stappen voor het wissen van de software zijn gelijkaardig voor Windows 8/8.1 en Windows
10. Hier nemen we Windows 8 als voorbeeld.
6.2.1 De software van het hulpprogramma van uw pc verwijderen
1. Ga de interface Apps binnen en zoek naar de applicatie Draadloos, klik dan op Wissen -
AC600 Hulprogramma voor draadloze configuratie. 2. Volg de InstallShield Wizard om de software van het hulpprogramma van uw pc verwijderen.
6.2.2 De software van de driver van uw pc verwijderen
1. Ga de interface Apps binnen en zoek naar de applicatie Draadloos, klik dan op Wissen
- DW-600 driver. 2. Volg InstallShield Wizard om de software van de driver van uw pc verwijderen.
Downloaded from www.vandenborre.be

AC600 Wireless Dual Band USB Adapter User Guide
35
DW-600 Appendix A: Technische gegevens
Normaal Interface USB 2.0 interface Standaarden IEEE802.11a; IEEE802.11b; IEEE802.11g; IEEE802.11n;
IEEE802.1x, IEEE802.11ac
Besturingssysteem Windows XP, Windows 7, Windows 8, Windows 8.1, Windows 10
Doorvoer 2.4GHz:150Mbps (maximaal)
5GHz: 433Mbps (maximaal) Databeveiliging WEP, WPA / WPA2, WPA-PSK / WPA2-PSK Frequentie * 2.4 ~ 2.4835 GHz, 5.15~5.25GHz,
5.25~5.35GHz, 5.475~5.725GHz, 5.745~5.825GHz
Beveiliging & emissie CE, WIFI, IC, NCC
Omgeving en fysiek
Werkingstemperatuur 0℃~40℃ (32℉~104℉)
Opslagtemperatuur -40℃~70℃(-40℉~158℉)
Relatieve vochtigheid werking 10%~90% RV, niet-condenserend
Relatieve vochtigheid opslag 5%~90% RV, niet-condenserend
* 1. In de VS mag alleen 2.412GHz~2.462GHz worden gebruikt, wat inhoudt dat Amerikanen
alleen kunnen kiezen uit de kanalen 1~11.
* 2. De nationale wetgeving op het gebruik van de kanalen op de 5GHz band kan van land tot land verschillen.
Downloaded from www.vandenborre.be

AC600 Wireless Dual Band USB Adapter User Guide
37
DW-600
Appendix B: Terminologie 802.11ac - IEEE 802.11ac is een netwerkstandaard voor draadloze computers van
802.11. Deze specificatie maakt multi-station WLAN-doorvoer van ten minste 1 gigabite
per seconde mogelijk. Dit wordt bereikt door uitbreiding van de luchtinterface-concepten
die worden gebruikt door 802.11n: grotere RF-bandbreedte, meer MIMO spatiale
streams, multi-gebruiker MIMO en hoge-densiteit-modulatie (tot 256 QAM).
802.11n - 802.11n bouwt verder op de voorgaande 802.11 standaarden door toevoeging
van MIMO (meervoudige input - meervoudige output). MIMO maakt gebruik van meerdere
zend- en ontvangantennes om een versnelde doorvoer van gegevens mogelijk te maken via
ruimtelijke multiplexen en vergroot het bereik door exploitatie van de ruimtelijke diversiteit,
wellicht via codeschema’s zoals de Alamouti-codering. Het Verbeterde draadloze
consortium (EWC) werd opgericht om het ontwikkelingsproces van IEEE 802.11n te helpen
versnellen en een technologiespecificatie te promoten voor interoperabiliteit van producten
met toekomstige generaties van draadloze lokale gebiedsnetwerken (WLAN).
802.11g - d e specificatie voor h e t draadloos netwerken op 54 Mbps, waarbij gebruikt wordt gemaakt van rechtstreekse-sequentie-gespreid-spectrum (DSSS) technologie en OFDM- modulatie en d a t in het vrije radiospectrum opereert op 2.4GHz. Met achterwaartse verenigbaarheid met IEEE 802.11b apparaten en WEP-encryptie als beveiliging.
802.11b - de standaard 802.11b verwijst naar het draadloos netwerken op 11 Mbps, waarbij gebruikt wordt gemaakt van de rechtstreekse-sequentie-gespreid-spectrum (DSSS) technologie en dat in het vrije radiospectrum op 2.4GHz opereert, met WEP-encryptie als beveiliging. 802.11b netwerken worden ook Wi-Fi netwerken genoemd.
802.11a - d e specificatie voor h e t draadloos netwerken op 54 Mbps, waarbij gebruikt wordt gemaakt van OFDM-modulatie en die werkt in de radioband op 5GHz.
Ad-hoc netwerk - een ad-hoc netwerk is een groep van computers, elk met een draadloze adapter, d i e z i j n verbonden als een onafhankelijke 802.11 draadloze LAN. Ad-hoc draadloze computers werken op een peer-to-peer basis en communiceren rechtstreeks met elkaar zonder gebruik van een draadloos toegangspunt (WAP). D e m o d u s Ad-hoc wordt ook onafhankelijke set met basisservice (IBSS) of de modus peer-to-peer genoemd en is nuttig op een afdelingsschaal van SOHO-werking.
DSSS - (rechtstreekse-sequentie-gespreid-spectrum) - DSSS genereert een overtollig bitpatroon voor alle overgezette gegevens. Dit bitpatroon wordt een chip (of chip-code) genoemd. Zelfs wanneer een of meer bits in de chip tijdens de overdracht beschadigd raken, kunnen de statistische technieken die in de ontvanger zijn ingebed de oorspronkelijke data hervinden zonder dat her-transmissie nodig is. Voor een onbedoelde ontvanger verschijnt DSSS als een storing op breedband met laag vermogen en wordt door de meeste smalband-ontvangers verworpen (of genegeerd). Door een bedoelde ontvanger (bijv. een ander draadloos LAN-eindpunt) wordt het DSSS-signaal echter herkend als het enige geldige signaal en wordt storing verworpen (of genegeerd)
Downloaded from www.vandenborre.be

AC600 Wireless Dual Band USB Adapter User Guide
37
DW-600 FHSS - (frequentieverspringend-gespreid-spectrum) - FHSS wijzigt (verspringt)
verschillende keren per seconde de draaggolffrequenties van een conventionele drager naar een pseudo-random reeks van kanalen. Omdat geen vaste frequentie wordt gebruikt en alleen de zender en ontvanger het springpatroon herkennen is onderschepping van FHSS uiterst moeilijk.
Infrastructuurnetwerk - een infrastructuurnetwerk is een groep van computers of andere apparaten, elk met een draadloze adapter, die met elkaar verbonden zijn als een 802.11 draadloze LAN. In de modus infrastructuur communiceren draadloze apparaten met elkaar en met een bekabeld netwerk door eerst via een draadloos toegangspunt (WAP) te gaan. Een infrastructuur draadloos netwerk dat is verbonden met een bekabeld netwerk wordt een Basis service-set (BSS) genoemd. Een set van twee of meer BSS’en in een enkel netwerk wordt aangeduid als een Uitgebreid service-set (ESS). De infrastructuurmodus is nuttig op ondernemingsniveau of wanneer het nodig is om bekabelde en draadloze netwerken met elkaar te verbinden.
Gespreid spectrum – gespreide spectrumtechnologie is een breedband radiofrequentietechniek die door het leger werd ontwikkeld voor gebruik in betrouwbare, veilige en missie-kritische communicatiesystemen. Deze is zo ontworpen dat de efficiëntie van bandbreedte wordt ingeruild voor betrouwbaarheid, integriteit en beveiliging. Met andere woorden, er wordt meer bandbreedte verbruikt dan bij smalband-transmissie, doch in ruil wordt een signaal geproduceerd dat in feite luider en dus gemakkelijker te detecteren is, op voorwaarde dat de ontvanger de parameters van het uitgezonden gespreid spectrumsignaal kent. Als een ontvanger niet op de juiste frequentie is afgestemd ziet het breedbeeldsignaal er uit als achtergrondgeluid. Er zijn twee belangrijke alternatieven: rechtstreekse-sequentie gespreid-spectrum (DSSS) en frequentieverspringend-gespreid-spectrum (FHSS).
SSID - een service set-identificatie is een a l f anumer i eke s leu te l bes taande u i t (m ax imaa l ) tweeënder t i g t ekens voor he t i den t i f i ce ren van een d raad loos l okaa l ne twe rk . Opdat draadloze apparaten in een netwerk met elkaar kunnen communiceren moeten alle apparaten met dezelfde SSID zijn geconfigureerd. Dit is meestal de configuratieparameter voor een draadloze pc-kaart en stemt overeen met de ESSID van een draadloos toegangspunt (WAP) en de naam van het draadloze netwerk. Zie ook Draadloos Netwerknaam en ESSID.
WEP - (bekabelde equivalente privacy) - een mechanisme van dataprivacy dat gebaseerd is op een gedeeld sleutelalgoritme van 64-bit, 128-bit of 152-bit als beschreven in de IEEE 802.11 standaard. Men moet de sleutel kennen om toegang te krijgen tot een WEP-netwerk. De sleutel is een reeks van tekens die wordt aanmaakt en bij het aanmaken van de WEP moet het niveau van de encryptie worden bepaald. Het encryptietype bepaalt de lengte van de sleutel. 128-bit encryptie vereist een langere sleutel dan 64-bit encryptie. Sleutels worden gedefinieerd door het invoeren van een reeks in de opmaak HEX (hexadecimaal – met de tekens 0-9, A-F) of ASCII (Amerikaanse standaardcode voor gegevensuitwisseling – alfanumerieke tekens). De opmaak ASCII is beschikbaar omdat men er een reeks mee kan invoeren die gemakkelijker te onthouden is. De ASCII-reeks wordt omgezet naar HEX om over het netwerk te worden gebruikt. Vier sleutels kunnen worden gedefinieerd zodat de sleutels gemakkelijk kunnen gewijzigd worden.
Wi-Fi - handelsnaam voor de 802.11b draadloze netwerkstandaard, gegeven door de Draadloze ethernet verenigbaarheid alliantie (WECA zie http://www.wi-fi.net), een groep die
Downloaded from www.vandenborre.be

AC600 Wireless Dual Band USB Adapter User Guide
37
industriestandaards ontwerpt om interoperabiliteit tussen 802.11b apparaten te bevorderen.
WLAN - (draadloos lokaal gebiedsn etwerk) – een groep van computers en bijbehorende apparaten die draadloos met elkaar communiceren en waarvan de netwerkgebruikers b e p e r k t b l i j v e n t o t e e n l o k a a l g e b i e d .
WPA - (Wi-Fi beveiligde toegang) - een draadloos beveiligingsprotocol dat gebruik maakt van TKIP-encryp t i e (temporele sleutel integriteitsprotocol), die kan worden gebruikt in combinatie met een RADIUS-server.
Downloaded from www.vandenborre.be

VERWIJDEREN Als een verantwoordelijke verkoper willen wij zorg dragen voor het milieu. Daarom sporen wij u als klant aan de correcte procedure te volgen voor het verwijderen van dit product, de verpakkingsmaterialen en –waar van toepassing- de accessoires. Dit zal helpen bij het besparen van natuurlijke grondstoffen en verzekeren dat de materialen zullen worden gerecycled op een wijze die de gezondheid en het milieu beschermd.
U dient de wetten en reglementering inzake verwijdering te volgen. Afgedankte elektrische producten dienen aan het eind van de gebruiksduur afzonderlijk van het huishoudafval te worden gesorteerd. Neem contact op met de winkel waar u dit product aankocht voor meer informatie over verwijdering en recycling.
Onze verontschuldiging voor eventueel ongemak als gevolg van kleine onnauwkeurigheden, die in deze gebruiksaanwijzing kunnen voorkomen omdat wij onze producten voortdurend verbeteren en ontwikkelen.
Darty Holdings SAS © 14 route d'Aulnay 93140 Bondy, Frankrijk 04 / 06 / 2015
38
Downloaded from www.vandenborre.be