Embed Size (px)
Citation preview
8a49de62-0fc5-4ba4-b233-804c3e19d015 / DP3.0 / 2018-11-06 Page 1 of 14 Eurolyser Diagnostica GmbH
EUROLyser ConneXport
Version 3.0
Eurolyser Diagnostica GmbH Bindergasse 3 5020 Salzburg, AUSTRIA Tel: +43 662 432100 Fax: +43 662 432100 50 www.eurolyser.com
8a49de62-0fc5-4ba4-b233-804c3e19d015 / DP3.0 / 2018-11-06 Page 2 of 14 Eurolyser Diagnostica GmbH
Table of contents
How to download and install ................................................................................................................................................. 3
How to update ....................................................................................................................................................................... 4
How to connect ...................................................................................................................................................................... 5
The EUROLyser ConneXport menu ......................................................................................................................................... 7
How to transmit ..................................................................................................................................................................... 9
Automatic transmission ....................................................................................................................................................... 11
Transmitting operator ID, lot number and serial number..................................................................................................... 12
Setting the baudrate on a smart / solo instrument .............................................................................................................. 13
Transmitting results with the HL7 Sender ............................................................................................................................ 13
8a49de62-0fc5-4ba4-b233-804c3e19d015 / DP3.0 / 2018-11-06 Page 3 of 14 Eurolyser Diagnostica GmbH
How to download and install
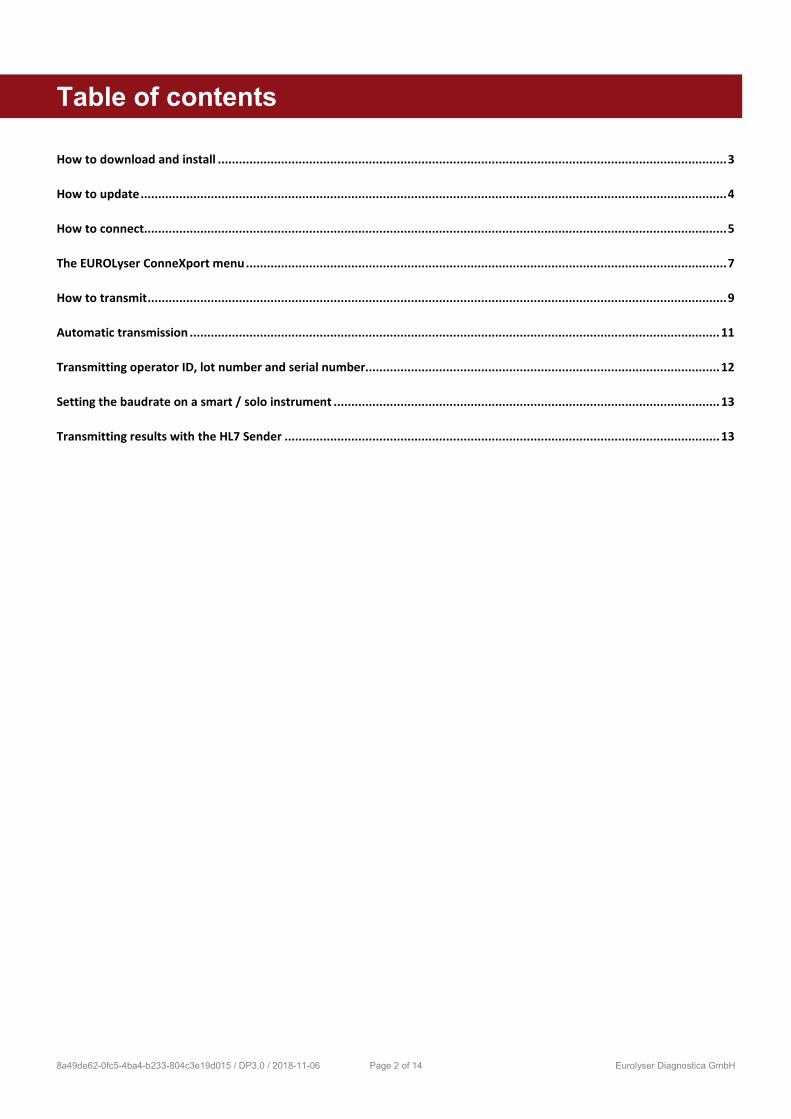
You can download the latest application installer from this location (click!) After the download has finished, unzip the folder (The required password is: 1234) and double click the EUROLyser ConneXport.exe
1) First, choose a location where you want EUROLyser ConneXport to be installed. A recommended location on your harddisk is already filled in. Click Next > to continue.
2) In the following window you can decide if you want a desktop shortcut to be created upon installation. Make your selection and click Next >.
3) The program is now ready to install. A short collection of information about the destination location and the additional tasks is shown. Click Install to start the installation.
4) After the installation has finished, you can check the box next to Launch ConneXport to open it right away. Click Finish to quit the installer.
8a49de62-0fc5-4ba4-b233-804c3e19d015 / DP3.0 / 2018-11-06 Page 4 of 14 Eurolyser Diagnostica GmbH
How to update
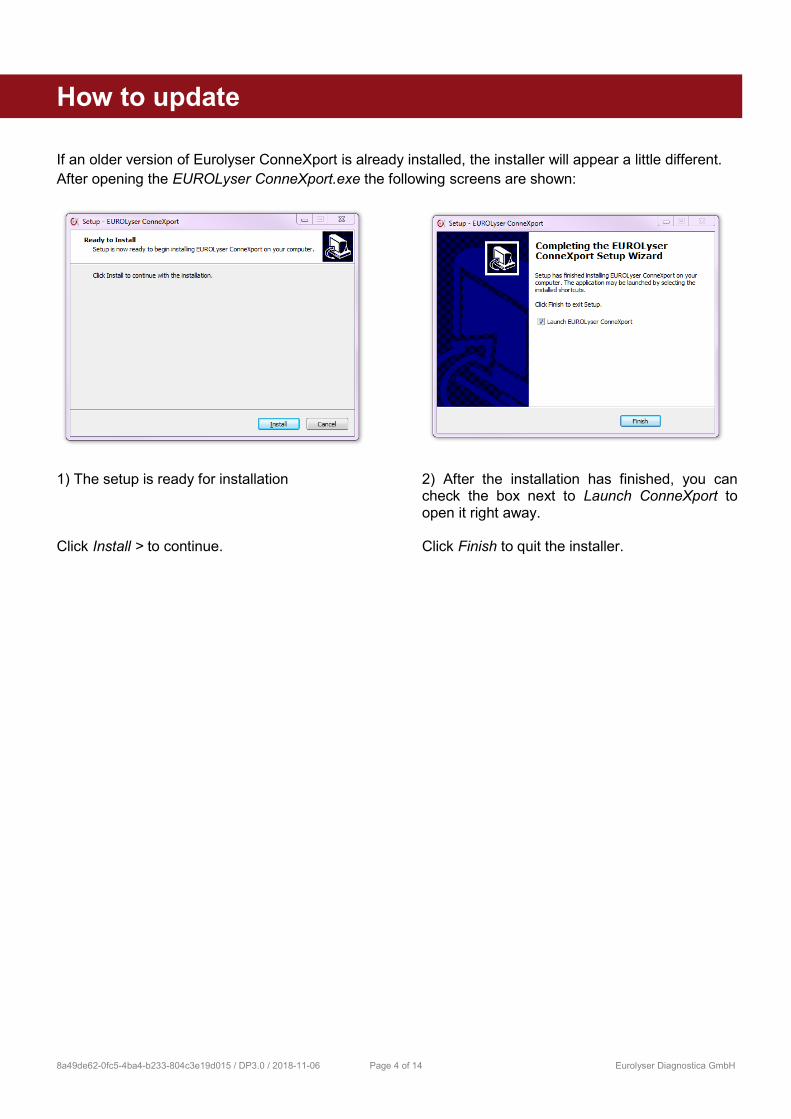
If an older version of Eurolyser ConneXport is already installed, the installer will appear a little different. After opening the EUROLyser ConneXport.exe the following screens are shown:
1) The setup is ready for installation Click Install > to continue.
2) After the installation has finished, you can check the box next to Launch ConneXport to open it right away. Click Finish to quit the installer.
8a49de62-0fc5-4ba4-b233-804c3e19d015 / DP3.0 / 2018-11-06 Page 5 of 14 Eurolyser Diagnostica GmbH
How to connect
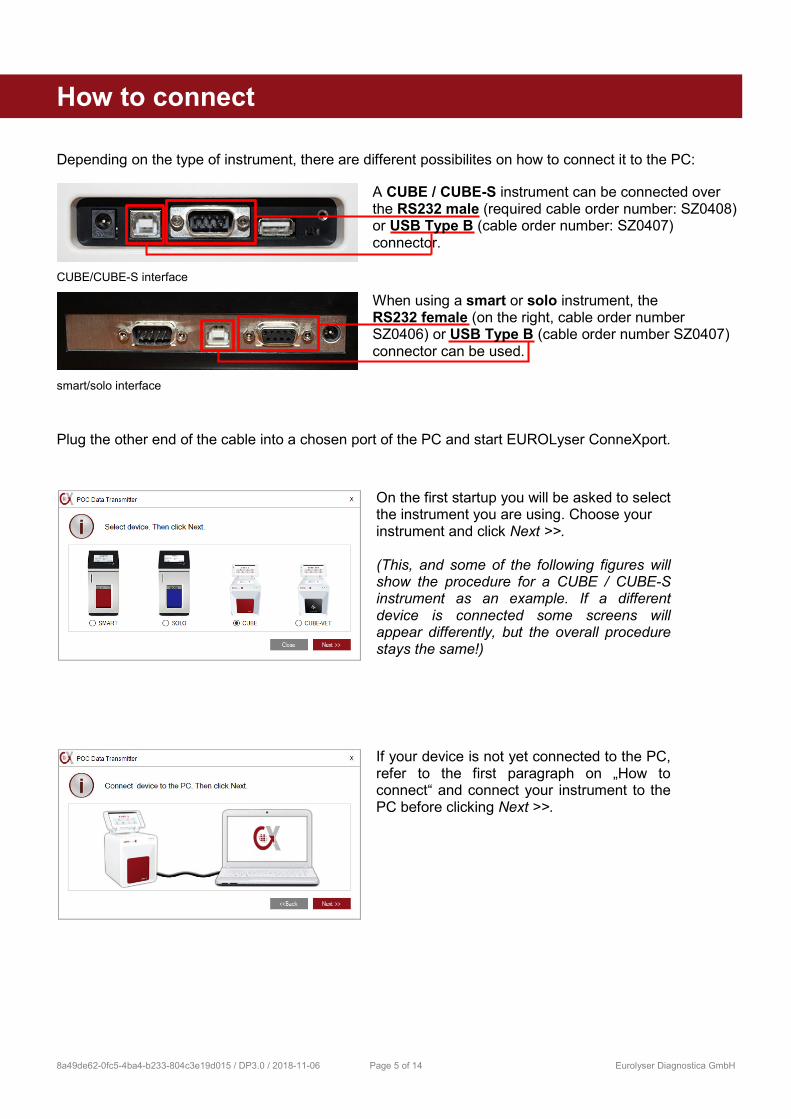
Depending on the type of instrument, there are different possibilites on how to connect it to the PC:
CUBE/CUBE-S interface
A CUBE / CUBE-S instrument can be connected over the RS232 male (required cable order number: SZ0408) or (cable order number: SZ0407) USB Type Bconnector.
smart/solo interface
When using a smart or solo instrument, the RS232 female (on the right, cable order number SZ0406) or USB Type B (cable order number SZ0407) connector can be used.
Plug the other end of the cable into a chosen port of the PC and start EUROLyser ConneXport.
On the first startup you will be asked to select the instrument you are using. Choose your instrument and click Next >>. (This, and some of the following figures will show the procedure for a CUBE / CUBE-S instrument as an example. If a different device is connected some screens will appear differently, but the overall procedure stays the same!)
If your device is not yet connected to the PC, refer to the first paragraph on „How to connect“ and connect your instrument to the PC before clicking Next >>.

8a49de62-0fc5-4ba4-b233-804c3e19d015 / DP3.0 / 2018-11-06 Page 6 of 14 Eurolyser Diagnostica GmbH
Afterwards you will be prompted to select the port to which your instrument is connected. The baudrate is fixed at 9600. If it was changed to 115200 on your smart or solo instrument, you need to change it back to 9600 (see Setting the baudrate on a smart / solo instrument on page 13). A CUBE / CUBE-S instrument‘s baudrate is always set to 9600. Click Save to save your settings. The past 3 screens will only show up once before the settings have been saved.
8a49de62-0fc5-4ba4-b233-804c3e19d015 / DP3.0 / 2018-11-06 Page 7 of 14 Eurolyser Diagnostica GmbH
The EUROLyser ConneXport menu
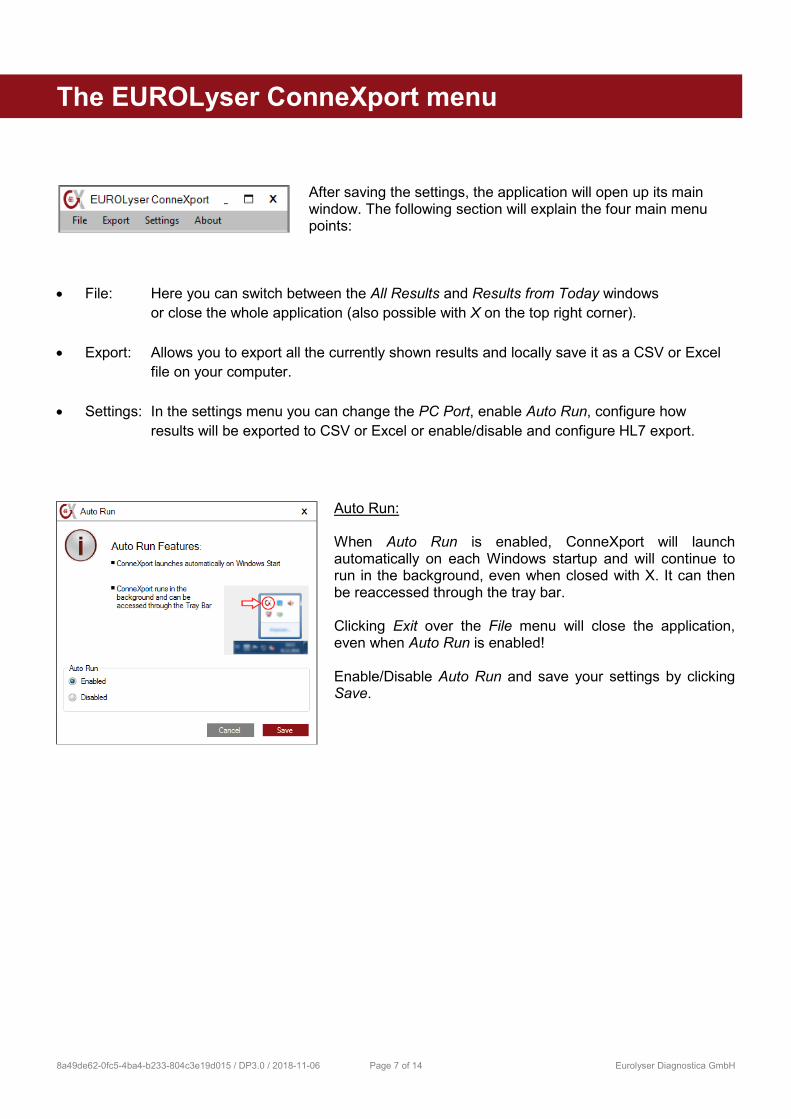
After saving the settings, the application will open up its main window. The following section will explain the four main menu points:
• File: Here you can switch between the All Results and Results from Today windows or close the whole application (also possible with X on the top right corner).
• Export: Allows you to export all the currently shown results and locally save it as a CSV or Excel
file on your computer. • Settings: In the settings menu you can change the PC Port, enable Auto Run, configure how
results will be exported to CSV or Excel or enable/disable and configure HL7 export.
Auto Run: When Auto Run is enabled, ConneXport will launch automatically on each Windows startup and will continue to run in the background, even when closed with X. It can then be reaccessed through the tray bar. Clicking Exit over the File menu will close the application, even when Auto Run is enabled! Enable/Disable Auto Run and save your settings by clicking Save.
8a49de62-0fc5-4ba4-b233-804c3e19d015 / DP3.0 / 2018-11-06 Page 8 of 14 Eurolyser Diagnostica GmbH
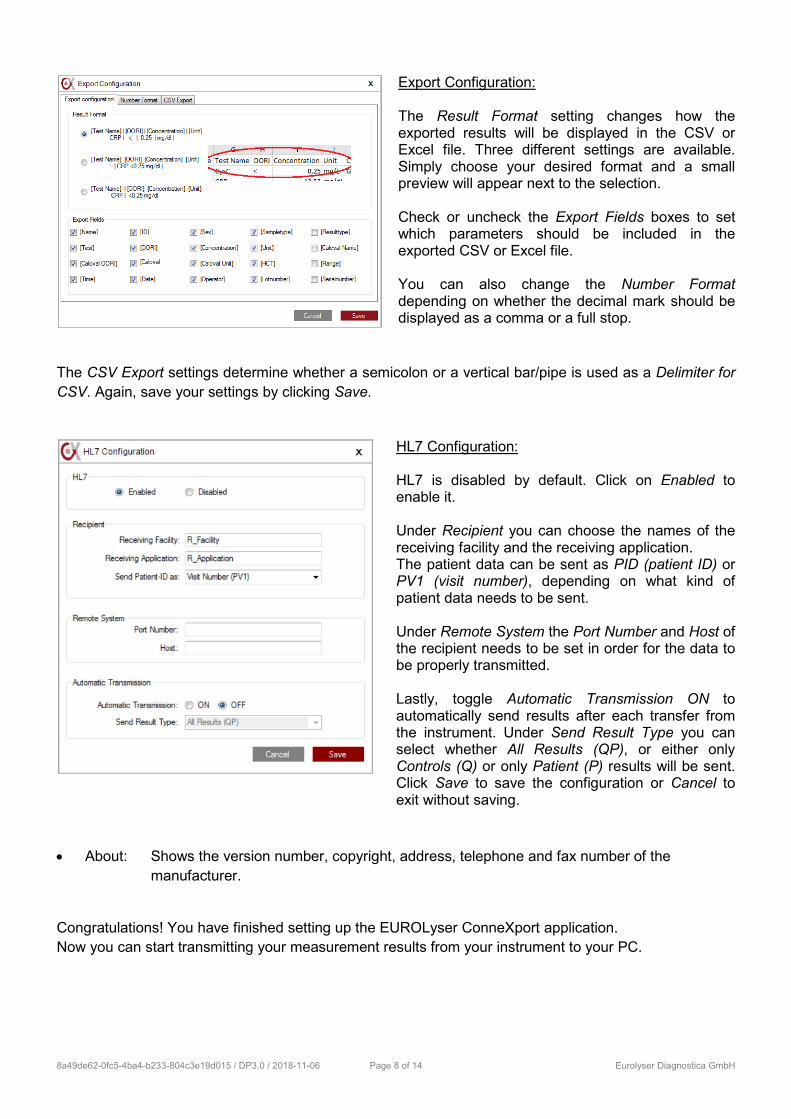
Export Configuration: The Result Format setting changes how the exported results will be displayed in the CSV or Excel file. Three different settings are available. Simply choose your desired format and a small preview will appear next to the selection. Check or uncheck the Export Fields boxes to set which parameters should be included in the exported CSV or Excel file. You can also change the Number Format depending on whether the decimal mark should be displayed as a comma or a full stop.
The CSV Export settings determine whether a semicolon or a vertical bar/pipe is used as a Delimiter for CSV. Again, save your settings by clicking Save.
HL7 Configuration: HL7 is disabled by default. Click on Enabled to enable it. Under Recipient you can choose the names of the receiving facility and the receiving application. The patient data can be sent as PID (patient ID) or PV1 (visit number), depending on what kind of patient data needs to be sent. Under Remote System the Port Number and Host of the recipient needs to be set in order for the data to be properly transmitted. Lastly, toggle Automatic Transmission ON to automatically send results after each transfer from the instrument. Under Send Result Type you can select whether All Results (QP), or either only Controls (Q) or only Patient (P) results will be sent. Click Save to save the configuration or Cancel to exit without saving.
• About: Shows the version number, copyright, address, telephone and fax number of the
manufacturer.
Congratulations! You have finished setting up the EUROLyser ConneXport application. Now you can start transmitting your measurement results from your instrument to your PC.
8a49de62-0fc5-4ba4-b233-804c3e19d015 / DP3.0 / 2018-11-06 Page 9 of 14 Eurolyser Diagnostica GmbH
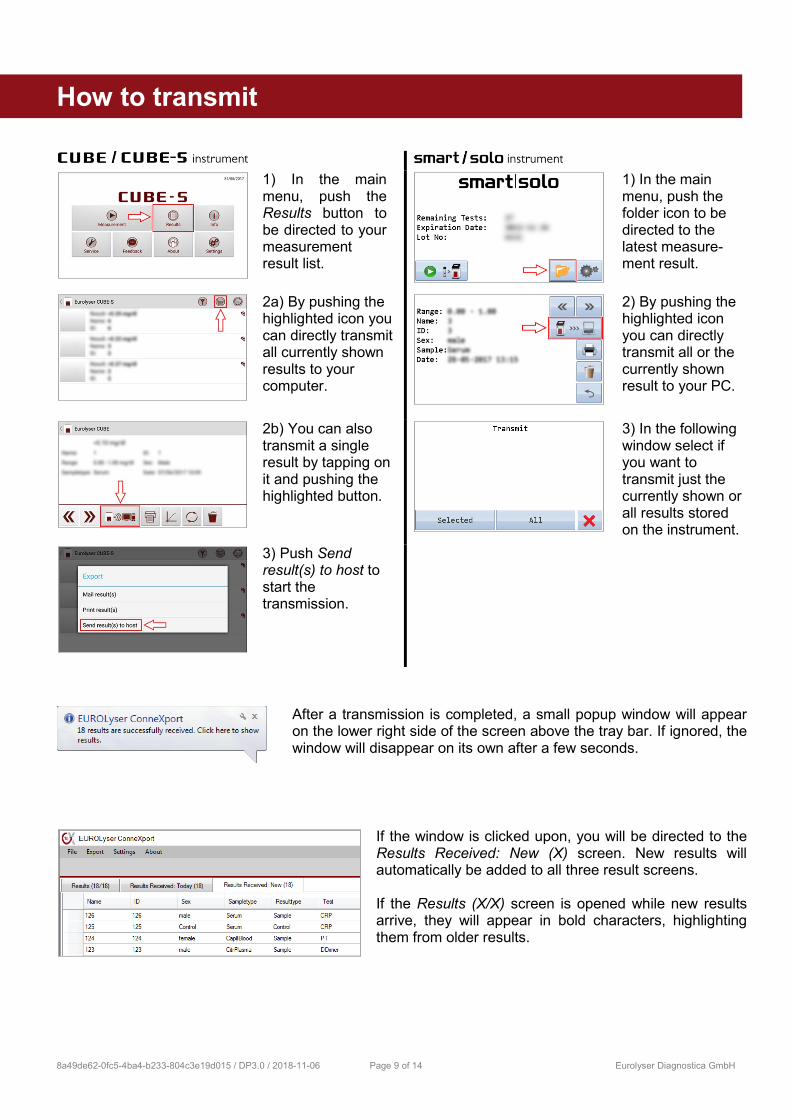
How to transmit
1) In the main menu, push the Results button to be directed to your measurement result list.
1) In the main menu, push the folder icon to be directed to the latest measure-ment result.
2a) By pushing the highlighted icon you can directly transmit all currently shown results to your computer.
2) By pushing the highlighted icon you can directly transmit all or the currently shown result to your PC.
2b) You can also transmit a single result by tapping on it and pushing the highlighted button.
3) In the following window select if you want to transmit just the currently shown or all results stored on the instrument.
3) Push Send result(s) to host to start the transmission.
After a transmission is completed, a small popup window will appear on the lower right side of the screen above the tray bar. If ignored, the window will disappear on its own after a few seconds.
If the window is clicked upon, you will be directed to the Results Received: New (X) screen. New results will automatically be added to all three result screens. If the Results (X/X) screen is opened while new results arrive, they will appear in bold characters, highlighting them from older results.
8a49de62-0fc5-4ba4-b233-804c3e19d015 / DP3.0 / 2018-11-06 Page 10 of 14 Eurolyser Diagnostica GmbH
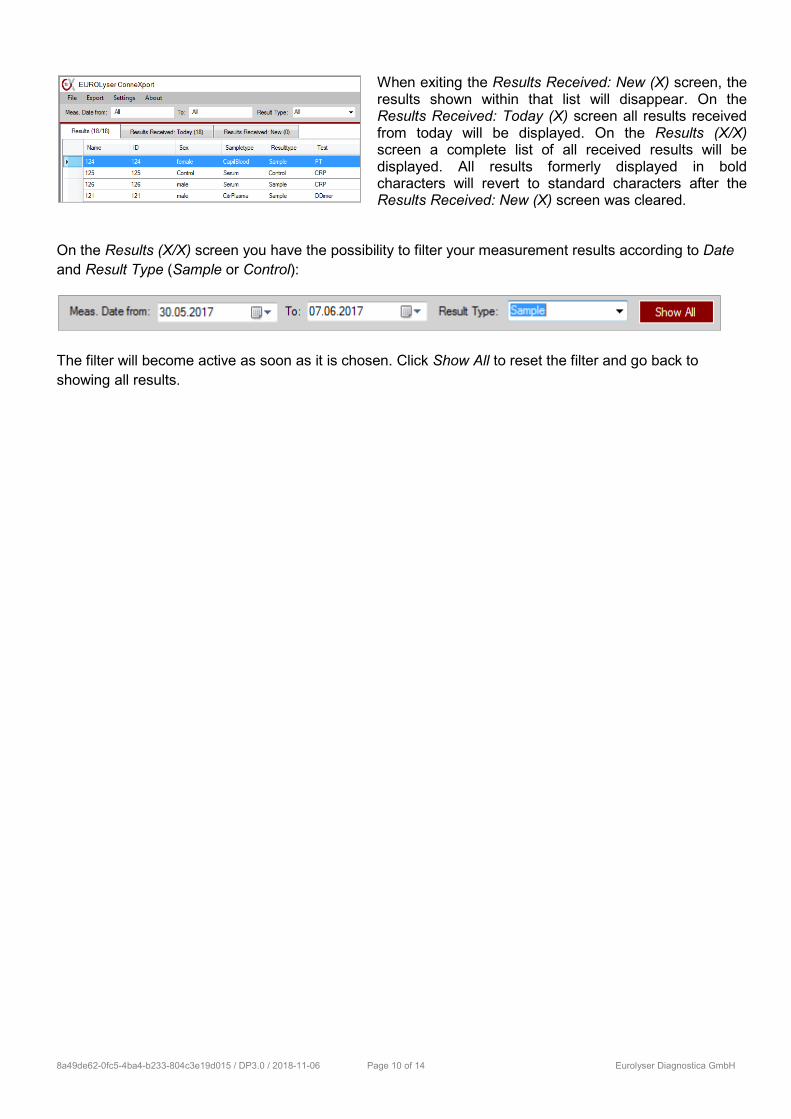
When exiting the Results Received: New (X) screen, the results shown within that list will disappear. On the Results Received: Today (X) screen all results received from today will be displayed. On the Results (X/X) screen a complete list of all received results will be displayed. All results formerly displayed in bold characters will revert to standard characters after the Results Received: New (X) screen was cleared.
On the Results (X/X) screen you have the possibility to filter your measurement results according to Date and Result Type (Sample or Control):
The filter will become active as soon as it is chosen. Click Show All to reset the filter and go back to showing all results.
8a49de62-0fc5-4ba4-b233-804c3e19d015 / DP3.0 / 2018-11-06 Page 11 of 14 Eurolyser Diagnostica GmbH
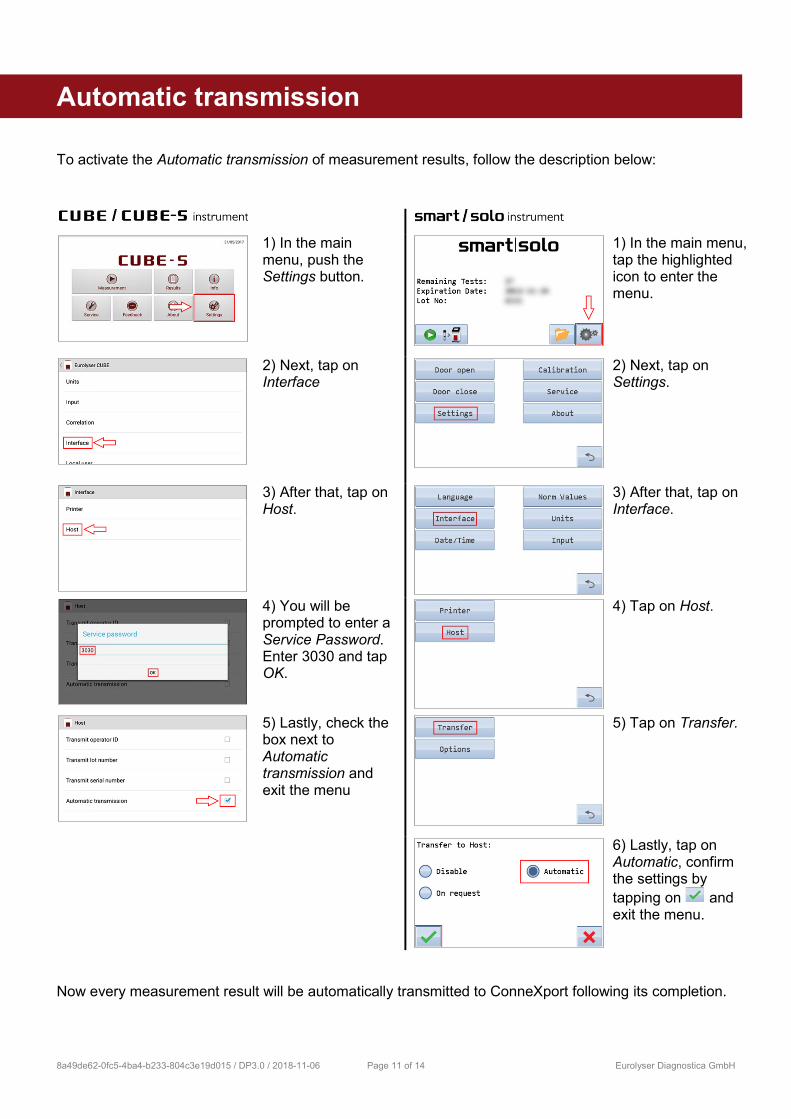
Automatic transmission
To activate the Automatic transmission of measurement results, follow the description below:
1) In the main menu, push the Settings button.
1) In the main menu, tap the highlighted icon to enter the menu.
2) Next, tap on Interface
2) Next, tap on Settings.
3) After that, tap on Host.
3) After that, tap on Interface.
4) You will be prompted to enter a Service Password. Enter 3030 and tap OK.
4) Tap on Host.
5) Lastly, check the box next to Automatic transmission and exit the menu
5) Tap on Transfer.
6) Lastly, tap on Automatic, confirm the settings by tapping on and exit the menu.
Now every measurement result will be automatically transmitted to ConneXport following its completion.
8a49de62-0fc5-4ba4-b233-804c3e19d015 / DP3.0 / 2018-11-06 Page 12 of 14 Eurolyser Diagnostica GmbH
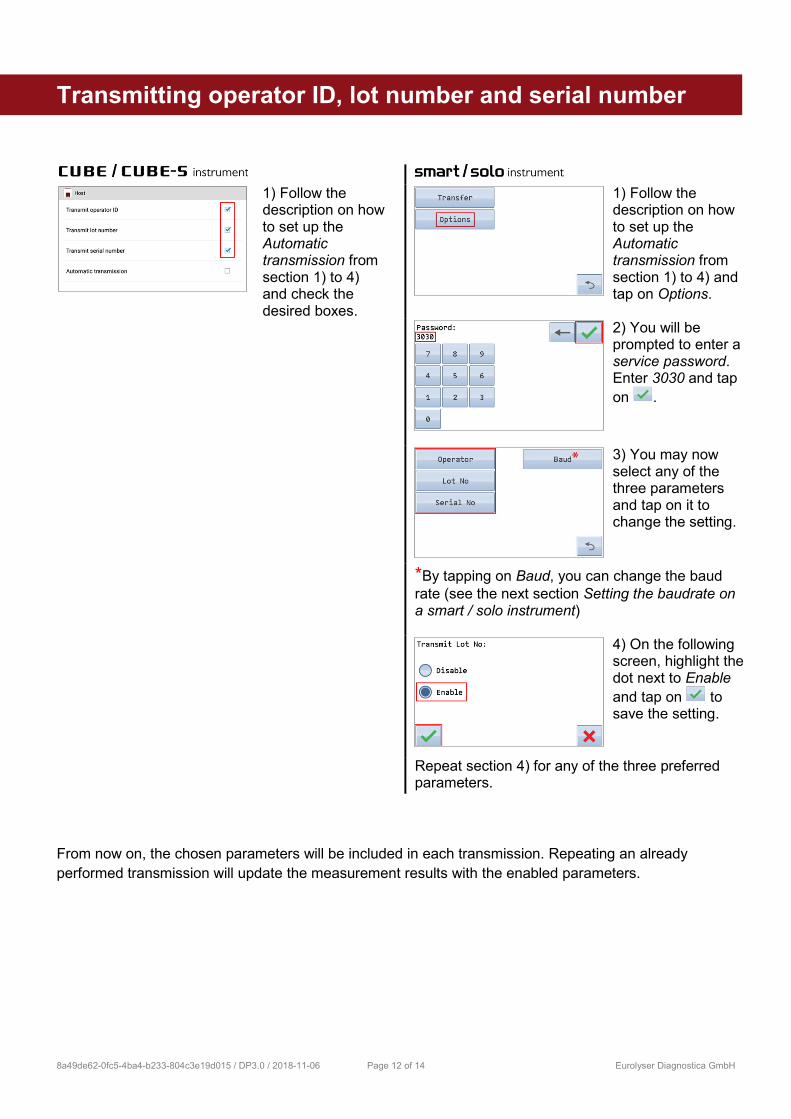
Transmitting operator ID, lot number and serial number
1) Follow the description on how to set up the Automatic transmission from section 1) to 4) and check the desired boxes.
1) Follow the description on how to set up the Automatic transmission from section 1) to 4) and tap on Options.
2) You will be prompted to enter a service password. Enter 3030 and tap on .
3) You may now select any of the three parameters and tap on it to change the setting.
*By tapping on Baud, you can change the baud rate (see the next section Setting the baudrate on a smart / solo instrument)
4) On the following screen, highlight the dot next to Enable and tap on to save the setting.
Repeat section 4) for any of the three preferred parameters.
From now on, the chosen parameters will be included in each transmission. Repeating an already performed transmission will update the measurement results with the enabled parameters.
8a49de62-0fc5-4ba4-b233-804c3e19d015 / DP3.0 / 2018-11-06 Page 13 of 14 Eurolyser Diagnostica GmbH
Setting the baudrate on a smart / solo instrument
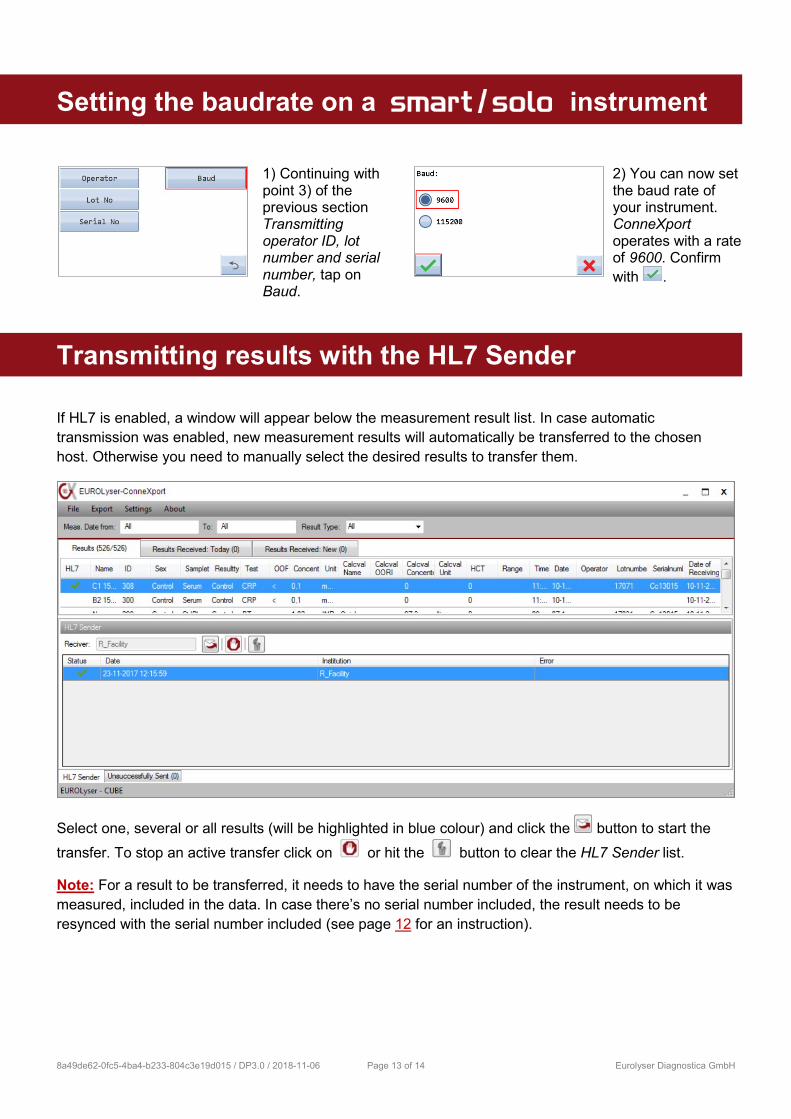
1) Continuing with point 3) of the previous section Transmitting operator ID, lot number and serial number, tap on Baud.
2) You can now set the baud rate of your instrument. ConneXport operates with a rate of 9600. Confirm with .
Transmitting results with the HL7 Sender
If HL7 is enabled, a window will appear below the measurement result list. In case automatic transmission was enabled, new measurement results will automatically be transferred to the chosen host. Otherwise you need to manually select the desired results to transfer them.
Select one, several or all results (will be highlighted in blue colour) and click the button to start the transfer. To stop an active transfer click on or hit the button to clear the HL7 Sender list.
Note: For a result to be transferred, it needs to have the serial number of the instrument, on which it was measured, included in the data. In case there’s no serial number included, the result needs to be resynced with the serial number included (see page 12 for an instruction).
8a49de62-0fc5-4ba4-b233-804c3e19d015 / DP3.0 / 2018-11-06 Page 14 of 14 Eurolyser Diagnostica GmbH
Successfully transferred results will be marked with an icon. The icon will always be shown in the result list, even when the result is deleted from the HL7 Sender window. If the transfer was unsuccessful it will be marked with an icon and also appear in the Unsuccessfully Sent window next to the HL7 Sender window. Check the serial number and/or host settings and try transferring it again from the Unsuccessfully Sent window. Results from that window cannot be deleted and will dissappear by themselves after a successful transfer. To send all the previously failed measurements at once, click on Send All.


![Obésité infantile...2018/11/21 · Définitions Category Adults (18 years and older)[1] Youth (2 to 18 yrs) CDC, AAP, IOM, ES, IOTF[2,3] Underweight BMI](https://img.pdfslide.fr/doc/110x75/5f880e8654ab6162e068d9df/obsit-infantile-20181121-dfinitions-category-adults-18-years-and.jpg)


![divine [id] - didhbgt€¦ · Web view2018/07/20 · Hamel-Desnos C., Desnos P., Allaert F-A, Kern P. Thermal ablation of saphenous veins is feasible and safe in patients older than](https://img.pdfslide.fr/doc/110x75/5f3e01b9ba1fa24146718712/divine-id-didhbgt-web-view-20180720-hamel-desnos-c-desnos-p-allaert.jpg)