Embed Size (px)
Citation preview
MOTORE TUBOLARE PER TENDE DA SOLE ETAPPARELLE CON CENTRALE INTEGRATA
TUBULAR MOTOR FOR AWNINGS AND ROLLINGSHUTTERS WITH BUILT-IN CONTROL UNIT
MOTEUR TUBULAIRE POUR STORES ET VOLETSAVEC ARMOIRE DE COMMANDE INTEGREE
ROHRMOTOR FÜR SONNENSCHUTZ UNDROLLLÄDEN MIT INTEGRIERTEM STEUERGEHÄUSE
MOTOR TUBULAR PARA TOLDOS Y PERSIANASCON CUADRO DE MANIOBRAS INTEGRADO
BUISMOTOR VOOR ZONNEWERINGEN ENROLLUIKEN MET INGEBOUWDE STURING
I
GB
F
D
E
NL
V2 S.p.A.Corso Principi di Piemonte, 65/67
12035 RACCONIGI (CN) ITALY
tel. +39 01 72 81 24 11 - fax +39 01 72 84 050
[email protected] - www.v2home.com
VEO-RFE
IL n. 322EDIZ. 25/06/2012
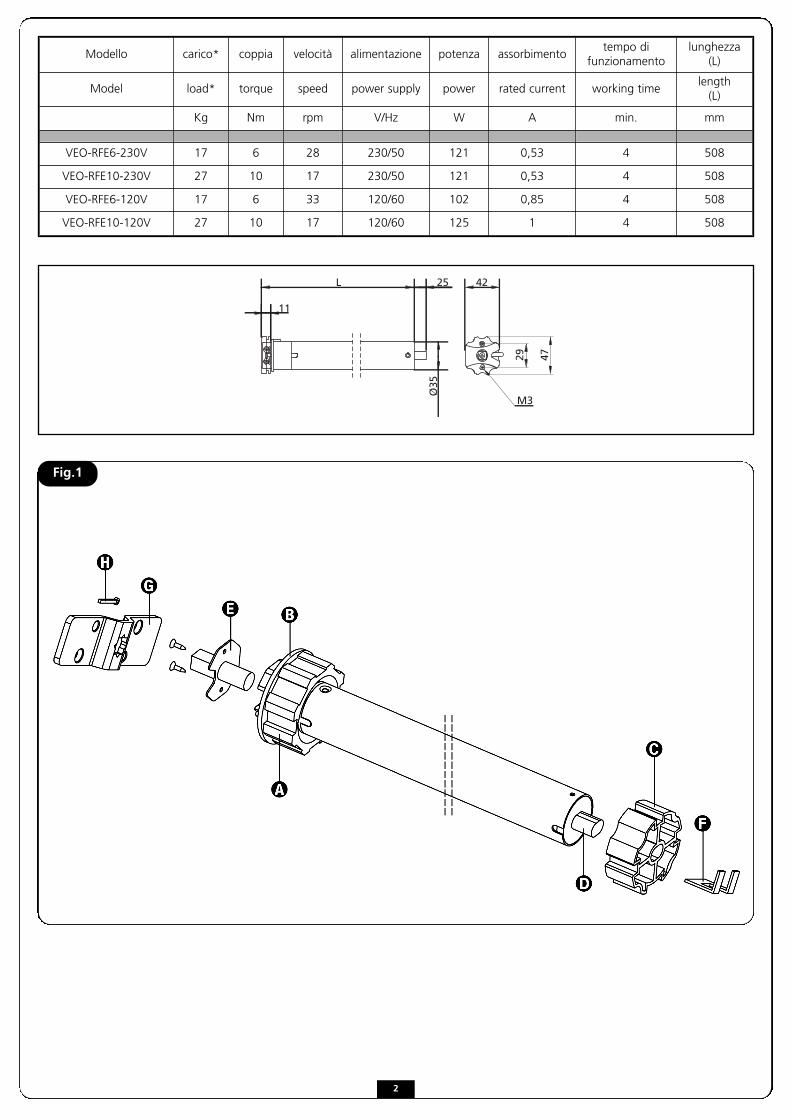
Fig.1
Modello carico* coppia velocità alimentazione potenza assorbimentotempo di
funzionamentolunghezza
(L)
Model load* torque speed power supply power rated current working timelength(L)
Kg Nm rpm V/Hz W A min. mm
VEO-RFE6-230V 17 6 28 230/50 121 0,53 4 508
VEO-RFE10-230V 27 10 17 230/50 121 0,53 4 508
VEO-RFE6-120V 17 6 33 120/60 102 0,85 4 508
VEO-RFE10-120V 27 10 17 120/60 125 1 4 508
42
4729
M3
11
25L
Ø35
2
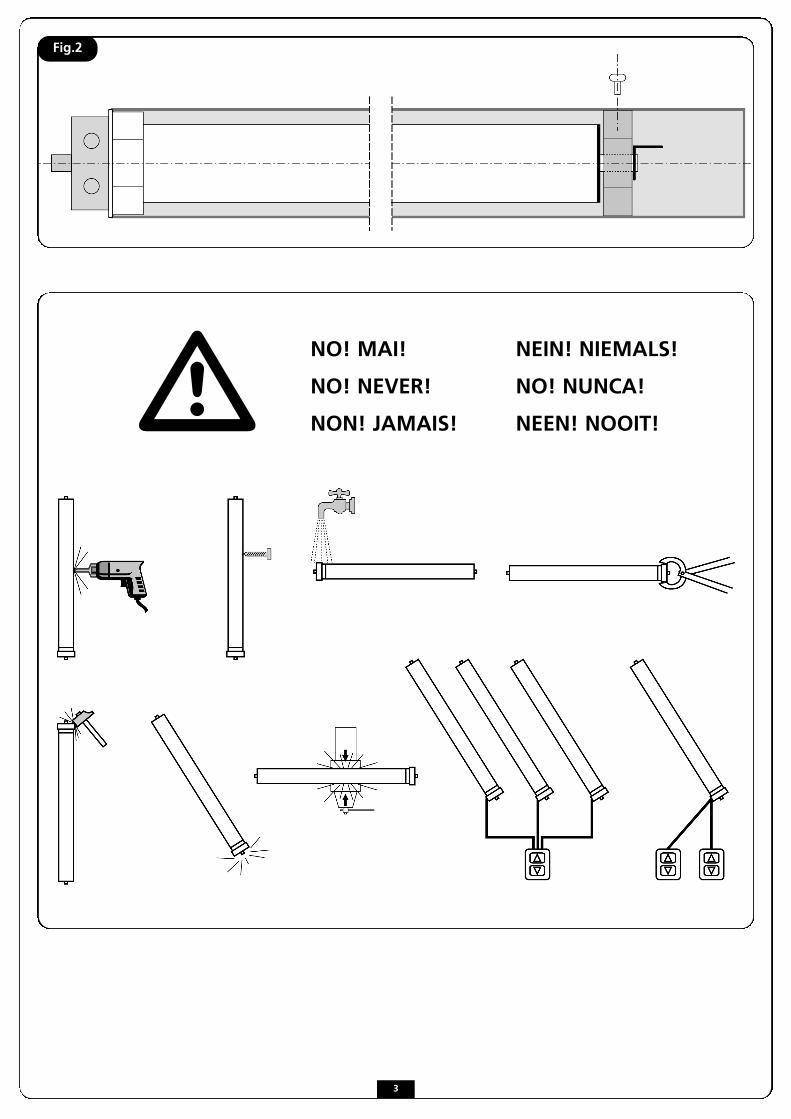
Fig.2
m NO! MAI!
NO! NEVER!
NON! JAMAIS!
NEIN! NIEMALS!
NO! NUNCA!
NEEN! NOOIT!
3

Fig.3
230V COLLEGAMENTI CONNECTIONS BRANCHEMENTS
� BLU - Neutro BLUE - Neutral BLEU - neutre
� MARRONE - Fase BROWN - Phase MARRON - phase
� NERO - Pulsante BLACK - External switch NOIR - touche
� GIALLO-VERDE - Terra YELLOW-GREEN - Ground JAUNE-VERT - terre
230V CONEXIONES ANSCHLÜSSE AANSLUITINGEN
� AZUL - Neutro BLAU - Nullleiter BLAUW - Neutraal
� MARRON - Fase BRAUN - Phase BRUIN - Fase
� NEGRO - Pulsador SCHWARZ - Taste ZWART - Drukknop
� AMARILLO-VERDE - Tierra GELB-GRÜN - Masse GEEL-GROEN - Aarding
Fig.4
120V COLLEGAMENTI CONNECTIONS BRANCHEMENTS
� BIANCO - Neutro WHITE - Neutral BLANC - neutre
� NERO - Fase BLACK - Phase NOIR - phase
� ROSSO - Pulsante RED - External switch ROUGE - touche
� VERDE - Terra GREEN - Ground VERT - terre
120V CONEXIONES ANSCHLÜSSE AANSLUITINGEN
� BLANCO - Neutro WEISS - Nullleiter WIT - Neutraal
� NEGRO - Fase SCHWARZ - Phase ZWART - Fase
� ROJO - Pulsador ROT - Taste ROOD - Drukknop
� VERDE - Tierra GRÜN - Masse GROEN - Aarding
ITALIA
NO
GaranziaV2 SPA garantisce i motori tubolari per sessanta mesi dalla data difabbricazione e le eventuali componenti elettroniche per ventiquattromesi dalla data di fabbricazione. La garanzia consiste nella riparazione o sostituzione gratuita delleparti riconosciute difettose nella fabbricazione, ad insindacabilegiudizio di V2 SPA. Il materiale in garanzia inviato alla sede di V2 SPA, dovrà essere spedito in porto franco e verrà rispedito inporto assegnato. Il materiale sostituito rimarrà di proprietà di V2 SPA. Il costo della manodopera rimane in ogni caso a caricodell’acquirente. Non è riconosciuto alcun indennizzo per il periodod’inoperatività dell’impianto. L’intervento non prolunga il termine didurata della garanzia. Resta inteso che la validità della garanzia èsubordinata al rispetto delle specifiche prestazionali dei prodotti,indicate nei manuali d’istruzione in dotazione ai prodotti stessi.
La garanzia non comprende:• Avarie o danni causati dal trasporto• Avarie o danni causati da vizi dell’impianto elettrico e/o da
trascuratezza, negligenza, inadeguatezza dell’impianto all’uso al quale è destinato e in ogni caso da uso anomalo
• Avarie o danni dovuti a manomissioni da parte di personale non autorizzato o all’impiego di pezzi di ricambio non originali
• Difetti causati da agenti chimici o fenomeni atmosferici• Il materiale di consumo• Gli interventi per vizi presunti o le verifiche di comodo
Caratteristiche dei prodottiI prodotti V2 SPA sono soggetti a continue innovazioni e miglioramenti; pertanto, le caratteristiche costruttive e l’immagine degli stessi, possono subire variazioni anche senza preavviso.
Foro competentePoiché il contratto viene perfezionato mediate Conferma d’Ordinecompilata in Racconigi, in caso di controversia legale di qualsiasinatura è applicabile il diritto italiano ed è competente il Foro diSaluzzo.
AVVERTENZE IMPORTANTI• L’installazione deve essere eseguita da personale tecnico
attenendosi alle norme di sicurezza vigenti. Per l’installazione elettrica far riferimento alla norma NFC15-100.
• Per la sostituzione del cavo di alimentazione del motore rivolgersi solo a personale autorizzato.
• Non forare né inserire viti per tutta la lunghezza del motore.• Non sottoporre il motore a contatto di liquidi.• Evitare urti, schiacciamenti o cadute del motore• Eventuali manomissioni o collegamenti errati non sono
coperti da garanzia.
ATTENZIONE:1. Prima di installare il motore, rimuovere tutti i cavi non
necessari e disabilitare le apparecchiature non necessarie per la messa in movimento
2. Per l’installazione di tende, è necessario mantenere una distanza orizzontale di almeno 0,4 m tra la parte in movimentocompletamente srotolata e qualunque oggetto fisso
3. Il cavo di alimentazione non deve essere esposto all’azione diretta dei raggi solari o della pioggia
Note:a) Leggere attentamente le istruzioni prima dell’installazioneb) Assicurarsi che tutti gli accessori siano fissati in modo che il
motore lavori senza problemi meccanici. Il carico dev’essere bilanciato alla potenza del motore
c) Le connessioni elettriche devono essere effettuate da personale tecnico specializzato e operare in conformità alle leggi
ATTENZIONE: Istruzioni importanti per la sicurezza. E’ importante per la sicurezza delle persone seguire questeistruzioni. Conservare queste istruzioni.
ATTENZIONE: Istruzioni importanti per la sicurezza. • Seguire tutte le istruzioni: un’installazione non corretta può
provocare gravi danni• Non permettere ai bambini di giocare con i comandi fissi. • Tenere i telecomandi fuori dalla portata dei bambini• Controllare l’installazione frequentemente per evitare
sbilanciamenti e segni di usura o danno ai cavi ed alle molle.• Non utilizzare nel caso in cui siano necessari riparazioni o
regolazioni• Le parti in movimento devono essere installate ad un’altezza
superiore a 2,5 m dal pavimento o da qualsiasi altro livello che ne consenta l’accesso
• L’elemento azionante di un pulsante dev’essere situato direttamente presso l’elemento movimentato ma lontano da parti in movimento e installato ad un’altezza minima di 1,5 m
• I comandi fissi devono essere installati in posizione visibile • Il dispositivo non può essere utilizzato in ambiente esterno• Prevedere a monte del circuito un sezionatore bipolare con
una distanza di apertura di almeno 3mm.• Non collegare più di un motore per ogni pulsante di
comando.
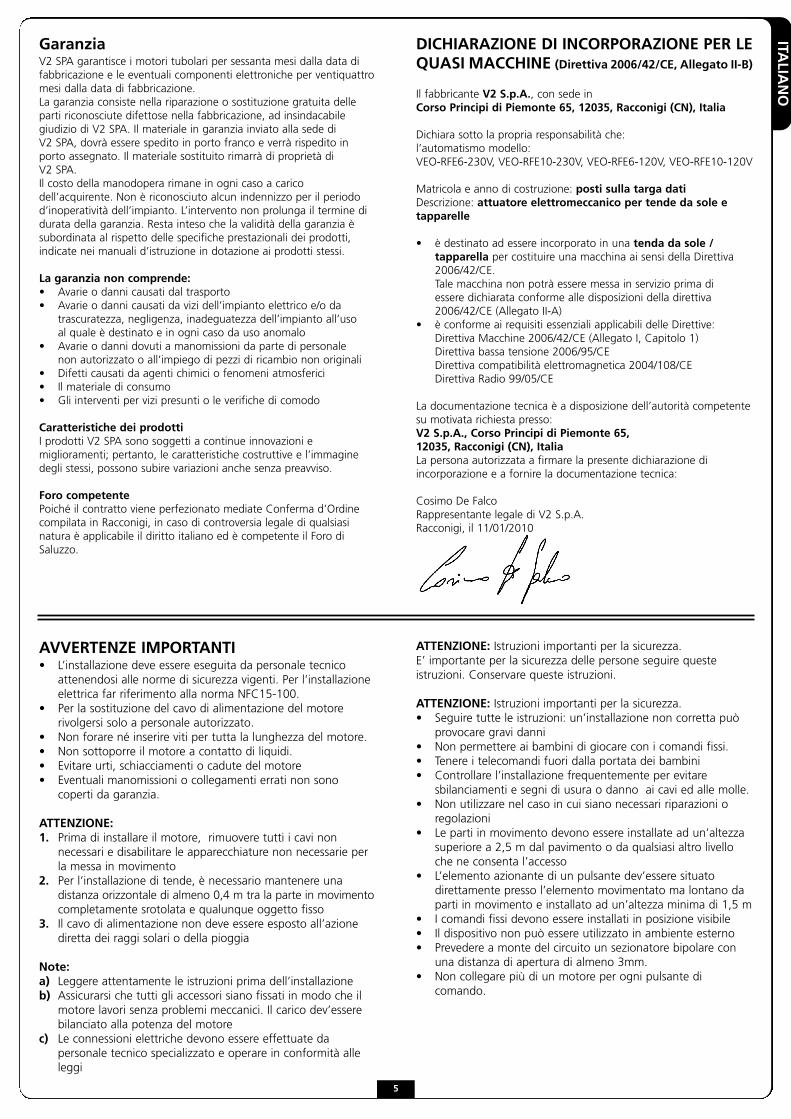
DICHIARAZIONE DI INCORPORAZIONE PER LE QUASI MACCHINE (Direttiva 2006/42/CE, Allegato II-B)
Il fabbricante V2 S.p.A., con sede in Corso Principi di Piemonte 65, 12035, Racconigi (CN), Italia
Dichiara sotto la propria responsabilità che:l’automatismo modello: VEO-RFE6-230V, VEO-RFE10-230V, VEO-RFE6-120V, VEO-RFE10-120V
Matricola e anno di costruzione: posti sulla targa datiDescrizione: attuatore elettromeccanico per tende da sole etapparelle
• è destinato ad essere incorporato in una tenda da sole / tapparella per costituire una macchina ai sensi della Direttiva 2006/42/CE.Tale macchina non potrà essere messa in servizio prima di essere dichiarata conforme alle disposizioni della direttiva 2006/42/CE (Allegato II-A)
• è conforme ai requisiti essenziali applicabili delle Direttive:Direttiva Macchine 2006/42/CE (Allegato I, Capitolo 1)Direttiva bassa tensione 2006/95/CEDirettiva compatibilità elettromagnetica 2004/108/CEDirettiva Radio 99/05/CE
La documentazione tecnica è a disposizione dell’autorità competentesu motivata richiesta presso:V2 S.p.A., Corso Principi di Piemonte 65, 12035, Racconigi (CN), ItaliaLa persona autorizzata a firmare la presente dichiarazione diincorporazione e a fornire la documentazione tecnica:
Cosimo De FalcoRappresentante legale di V2 S.p.A.Racconigi, il 11/01/2010
5
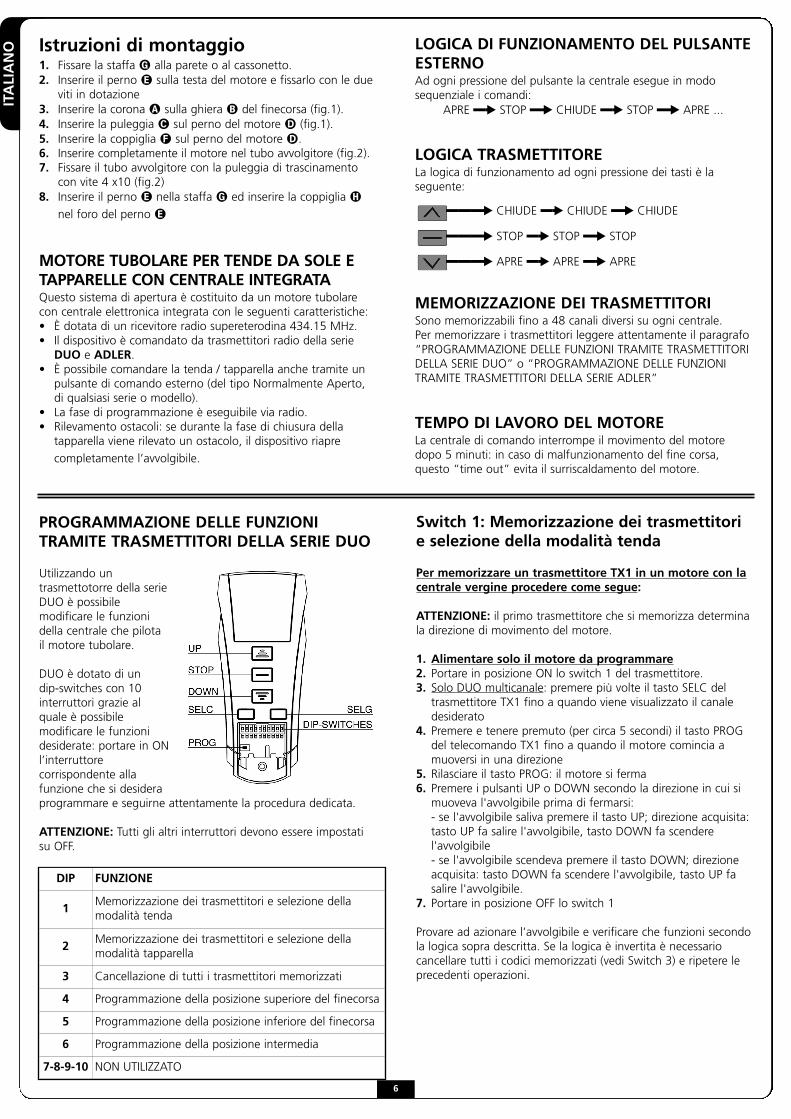
ITALIANO Istruzioni di montaggio
1. Fissare la staffa � alla parete o al cassonetto.2. Inserire il perno � sulla testa del motore e fissarlo con le due
viti in dotazione3. Inserire la corona � sulla ghiera � del finecorsa (fig.1).4. Inserire la puleggia � sul perno del motore � (fig.1).5. Inserire la coppiglia � sul perno del motore �.6. Inserire completamente il motore nel tubo avvolgitore (fig.2). 7. Fissare il tubo avvolgitore con la puleggia di trascinamento
con vite 4 x10 (fig.2) 8. Inserire il perno � nella staffa � ed inserire la coppiglia �
nel foro del perno �
MOTORE TUBOLARE PER TENDE DA SOLE ETAPPARELLE CON CENTRALE INTEGRATAQuesto sistema di apertura è costituito da un motore tubolarecon centrale elettronica integrata con le seguenti caratteristiche:• È dotata di un ricevitore radio supereterodina 434.15 MHz. • Il dispositivo è comandato da trasmettitori radio della serie
DUO e ADLER. • È possibile comandare la tenda / tapparella anche tramite un pulsante di comando esterno (del tipo Normalmente Aperto, di qualsiasi serie o modello).
• La fase di programmazione è eseguibile via radio.• Rilevamento ostacoli: se durante la fase di chiusura della tapparella viene rilevato un ostacolo, il dispositivo riapre completamente l’avvolgibile.
LOGICA DI FUNZIONAMENTO DEL PULSANTEESTERNOAd ogni pressione del pulsante la centrale esegue in modosequenziale i comandi:
APRE �� STOP �� CHIUDE �� STOP �� APRE ...
LOGICA TRASMETTITORELa logica di funzionamento ad ogni pressione dei tasti è laseguente:
MEMORIZZAZIONE DEI TRASMETTITORISono memorizzabili fino a 48 canali diversi su ogni centrale. Per memorizzare i trasmettitori leggere attentamente il paragrafo“PROGRAMMAZIONE DELLE FUNZIONI TRAMITE TRASMETTITORIDELLA SERIE DUO” o “PROGRAMMAZIONE DELLE FUNZIONITRAMITE TRASMETTITORI DELLA SERIE ADLER”
TEMPO DI LAVORO DEL MOTORELa centrale di comando interrompe il movimento del motoredopo 5 minuti: in caso di malfunzionamento del fine corsa,questo “time out” evita il surriscaldamento del motore.
PROGRAMMAZIONE DELLE FUNZIONITRAMITE TRASMETTITORI DELLA SERIE DUO
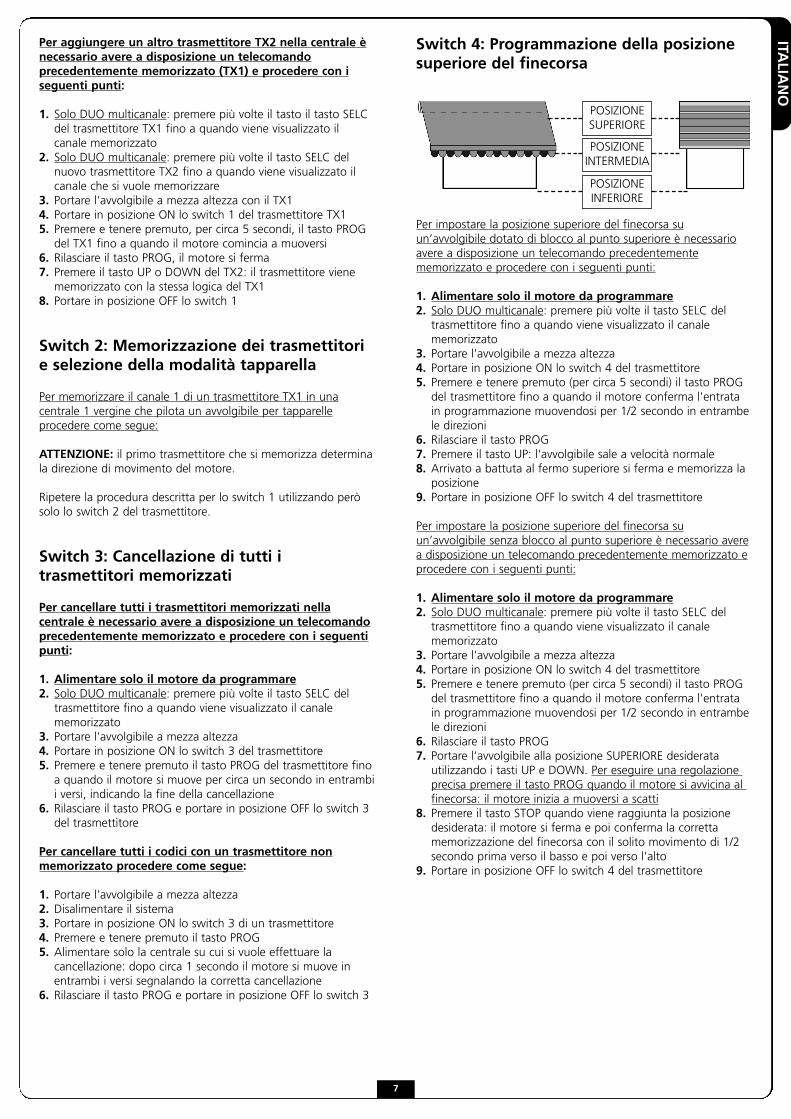
Utilizzando untrasmettotorre della serieDUO è possibilemodificare le funzionidella centrale che pilotail motore tubolare.
DUO è dotato di un dip-switches con 10interruttori grazie alquale è possibilemodificare le funzionidesiderate: portare in ONl’interruttorecorrispondente allafunzione che si desideraprogrammare e seguirne attentamente la procedura dedicata.
ATTENZIONE: Tutti gli altri interruttori devono essere impostatisu OFF.
DIP FUNZIONE
1Memorizzazione dei trasmettitori e selezione dellamodalità tenda
2Memorizzazione dei trasmettitori e selezione dellamodalità tapparella
3 Cancellazione di tutti i trasmettitori memorizzati
4 Programmazione della posizione superiore del finecorsa
5 Programmazione della posizione inferiore del finecorsa
6 Programmazione della posizione intermedia
7-8-9-10 NON UTILIZZATO
Switch 1: Memorizzazione dei trasmettitorie selezione della modalità tenda
Per memorizzare un trasmettitore TX1 in un motore con lacentrale vergine procedere come segue:
ATTENZIONE: il primo trasmettitore che si memorizza determinala direzione di movimento del motore.
1. Alimentare solo il motore da programmare2. Portare in posizione ON lo switch 1 del trasmettitore.3. Solo DUO multicanale: premere più volte il tasto SELC del trasmettitore TX1 fino a quando viene visualizzato il canale desiderato
4. Premere e tenere premuto (per circa 5 secondi) il tasto PROG del telecomando TX1 fino a quando il motore comincia a muoversi in una direzione
5. Rilasciare il tasto PROG: il motore si ferma6. Premere i pulsanti UP o DOWN secondo la direzione in cui si muoveva l'avvolgibile prima di fermarsi: - se l'avvolgibile saliva premere il tasto UP; direzione acquisita: tasto UP fa salire l'avvolgibile, tasto DOWN fa scendere l'avvolgibile- se l'avvolgibile scendeva premere il tasto DOWN; direzione acquisita: tasto DOWN fa scendere l'avvolgibile, tasto UP fa salire l'avvolgibile.
7. Portare in posizione OFF lo switch 1
Provare ad azionare l’avvolgibile e verificare che funzioni secondola logica sopra descritta. Se la logica è invertita è necessariocancellare tutti i codici memorizzati (vedi Switch 3) e ripetere leprecedenti operazioni.
���� CHIUDE �� CHIUDE �� CHIUDE
���� STOP �� STOP �� STOP
���� APRE �� APRE �� APRE
6
ITALIA
NO
Per aggiungere un altro trasmettitore TX2 nella centrale ènecessario avere a disposizione un telecomandoprecedentemente memorizzato (TX1) e procedere con iseguenti punti:
1. Solo DUO multicanale: premere più volte il tasto il tasto SELC del trasmettitore TX1 fino a quando viene visualizzato ilcanale memorizzato
2. Solo DUO multicanale: premere più volte il tasto SELC del nuovo trasmettitore TX2 fino a quando viene visualizzato il canale che si vuole memorizzare
3. Portare l'avvolgibile a mezza altezza con il TX14. Portare in posizione ON lo switch 1 del trasmettitore TX15. Premere e tenere premuto, per circa 5 secondi, il tasto PROG del TX1 fino a quando il motore comincia a muoversi
6. Rilasciare il tasto PROG, il motore si ferma7. Premere il tasto UP o DOWN del TX2: il trasmettitore viene memorizzato con la stessa logica del TX1
8. Portare in posizione OFF lo switch 1
Switch 2: Memorizzazione dei trasmettitorie selezione della modalità tapparella
Per memorizzare il canale 1 di un trasmettitore TX1 in unacentrale 1 vergine che pilota un avvolgibile per tapparelleprocedere come segue:
ATTENZIONE: il primo trasmettitore che si memorizza determinala direzione di movimento del motore.
Ripetere la procedura descritta per lo switch 1 utilizzando peròsolo lo switch 2 del trasmettitore.
Switch 3: Cancellazione di tutti itrasmettitori memorizzati
Per cancellare tutti i trasmettitori memorizzati nellacentrale è necessario avere a disposizione un telecomandoprecedentemente memorizzato e procedere con i seguentipunti:
1. Alimentare solo il motore da programmare2. Solo DUO multicanale: premere più volte il tasto SELC del trasmettitore fino a quando viene visualizzato il canale memorizzato
3. Portare l'avvolgibile a mezza altezza 4. Portare in posizione ON lo switch 3 del trasmettitore5. Premere e tenere premuto il tasto PROG del trasmettitore fino a quando il motore si muove per circa un secondo in entrambi i versi, indicando la fine della cancellazione
6. Rilasciare il tasto PROG e portare in posizione OFF lo switch 3 del trasmettitore
Per cancellare tutti i codici con un trasmettitore nonmemorizzato procedere come segue:
1. Portare l'avvolgibile a mezza altezza 2. Disalimentare il sistema3. Portare in posizione ON lo switch 3 di un trasmettitore4. Premere e tenere premuto il tasto PROG5. Alimentare solo la centrale su cui si vuole effettuare la cancellazione: dopo circa 1 secondo il motore si muove in entrambi i versi segnalando la corretta cancellazione
6. Rilasciare il tasto PROG e portare in posizione OFF lo switch 3
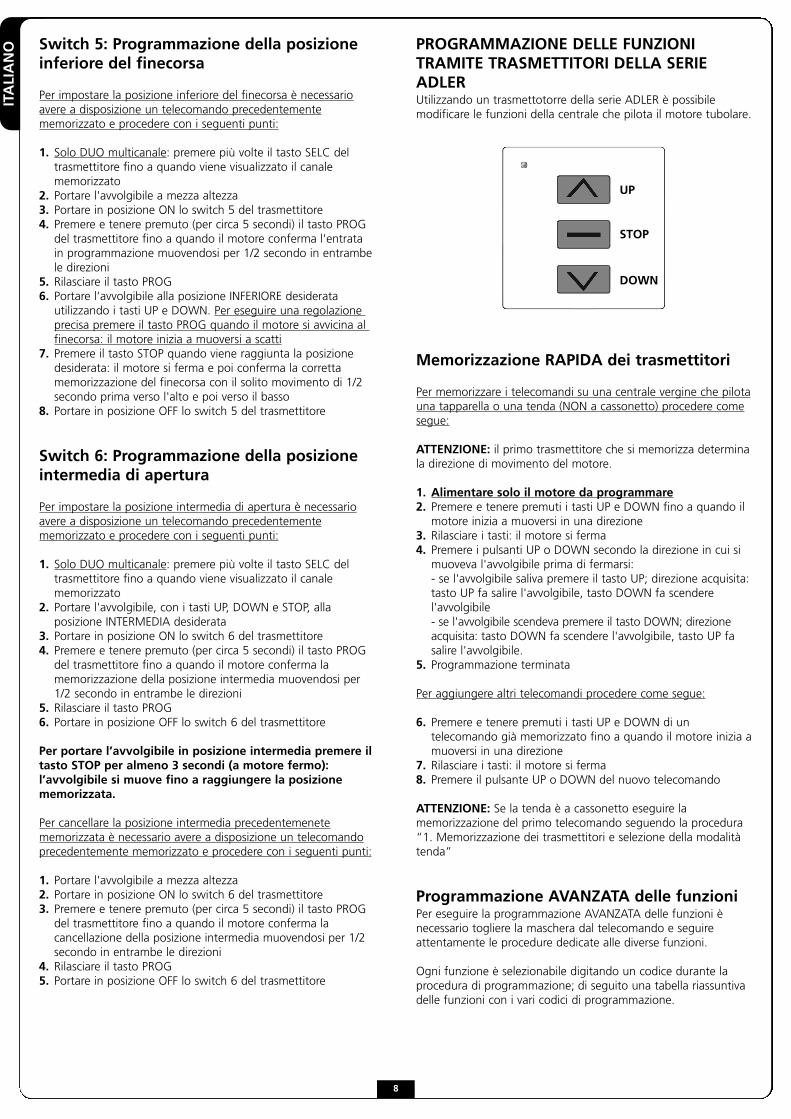
Switch 4: Programmazione della posizionesuperiore del finecorsa
Per impostare la posizione superiore del finecorsa suun’avvolgibile dotato di blocco al punto superiore è necessarioavere a disposizione un telecomando precedentementememorizzato e procedere con i seguenti punti:
1. Alimentare solo il motore da programmare2. Solo DUO multicanale: premere più volte il tasto SELC del trasmettitore fino a quando viene visualizzato il canale memorizzato
3. Portare l'avvolgibile a mezza altezza 4. Portare in posizione ON lo switch 4 del trasmettitore5. Premere e tenere premuto (per circa 5 secondi) il tasto PROG del trasmettitore fino a quando il motore conferma l'entrata in programmazione muovendosi per 1/2 secondo in entrambe le direzioni
6. Rilasciare il tasto PROG7. Premere il tasto UP: l'avvolgibile sale a velocità normale8. Arrivato a battuta al fermo superiore si ferma e memorizza la posizione
9. Portare in posizione OFF lo switch 4 del trasmettitore
Per impostare la posizione superiore del finecorsa suun’avvolgibile senza blocco al punto superiore è necessario averea disposizione un telecomando precedentemente memorizzato eprocedere con i seguenti punti:
1. Alimentare solo il motore da programmare2. Solo DUO multicanale: premere più volte il tasto SELC del trasmettitore fino a quando viene visualizzato il canale memorizzato
3. Portare l'avvolgibile a mezza altezza 4. Portare in posizione ON lo switch 4 del trasmettitore5. Premere e tenere premuto (per circa 5 secondi) il tasto PROG del trasmettitore fino a quando il motore conferma l'entrata in programmazione muovendosi per 1/2 secondo in entrambe le direzioni
6. Rilasciare il tasto PROG7. Portare l’avvolgibile alla posizione SUPERIORE desiderata utilizzando i tasti UP e DOWN. Per eseguire una regolazione precisa premere il tasto PROG quando il motore si avvicina al finecorsa: il motore inizia a muoversi a scatti
8. Premere il tasto STOP quando viene raggiunta la posizione desiderata: il motore si ferma e poi conferma la corretta memorizzazione del finecorsa con il solito movimento di 1/2 secondo prima verso il basso e poi verso l'alto
9. Portare in posizione OFF lo switch 4 del trasmettitore
POSIZIONESUPERIORE
POSIZIONEINTERMEDIA
POSIZIONEINFERIORE
7
ITALIANO PROGRAMMAZIONE DELLE FUNZIONI
TRAMITE TRASMETTITORI DELLA SERIEADLERUtilizzando un trasmettotorre della serie ADLER è possibilemodificare le funzioni della centrale che pilota il motore tubolare.
Memorizzazione RAPIDA dei trasmettitori
Per memorizzare i telecomandi su una centrale vergine che pilotauna tapparella o una tenda (NON a cassonetto) procedere comesegue:
ATTENZIONE: il primo trasmettitore che si memorizza determinala direzione di movimento del motore.
1. Alimentare solo il motore da programmare2. Premere e tenere premuti i tasti UP e DOWN fino a quando il motore inizia a muoversi in una direzione
3. Rilasciare i tasti: il motore si ferma4. Premere i pulsanti UP o DOWN secondo la direzione in cui si muoveva l'avvolgibile prima di fermarsi: - se l'avvolgibile saliva premere il tasto UP; direzione acquisita: tasto UP fa salire l'avvolgibile, tasto DOWN fa scendere l'avvolgibile- se l'avvolgibile scendeva premere il tasto DOWN; direzione acquisita: tasto DOWN fa scendere l'avvolgibile, tasto UP fa salire l'avvolgibile.
5. Programmazione terminata
Per aggiungere altri telecomandi procedere come segue:
6. Premere e tenere premuti i tasti UP e DOWN di un telecomando già memorizzato fino a quando il motore inizia a muoversi in una direzione
7. Rilasciare i tasti: il motore si ferma8. Premere il pulsante UP o DOWN del nuovo telecomando
ATTENZIONE: Se la tenda è a cassonetto eseguire lamemorizzazione del primo telecomando seguendo la procedura“1. Memorizzazione dei trasmettitori e selezione della modalitàtenda”
Programmazione AVANZATA delle funzioni Per eseguire la programmazione AVANZATA delle funzioni ènecessario togliere la maschera dal telecomando e seguireattentamente le procedure dedicate alle diverse funzioni.
Ogni funzione è selezionabile digitando un codice durante laprocedura di programmazione; di seguito una tabella riassuntivadelle funzioni con i vari codici di programmazione.
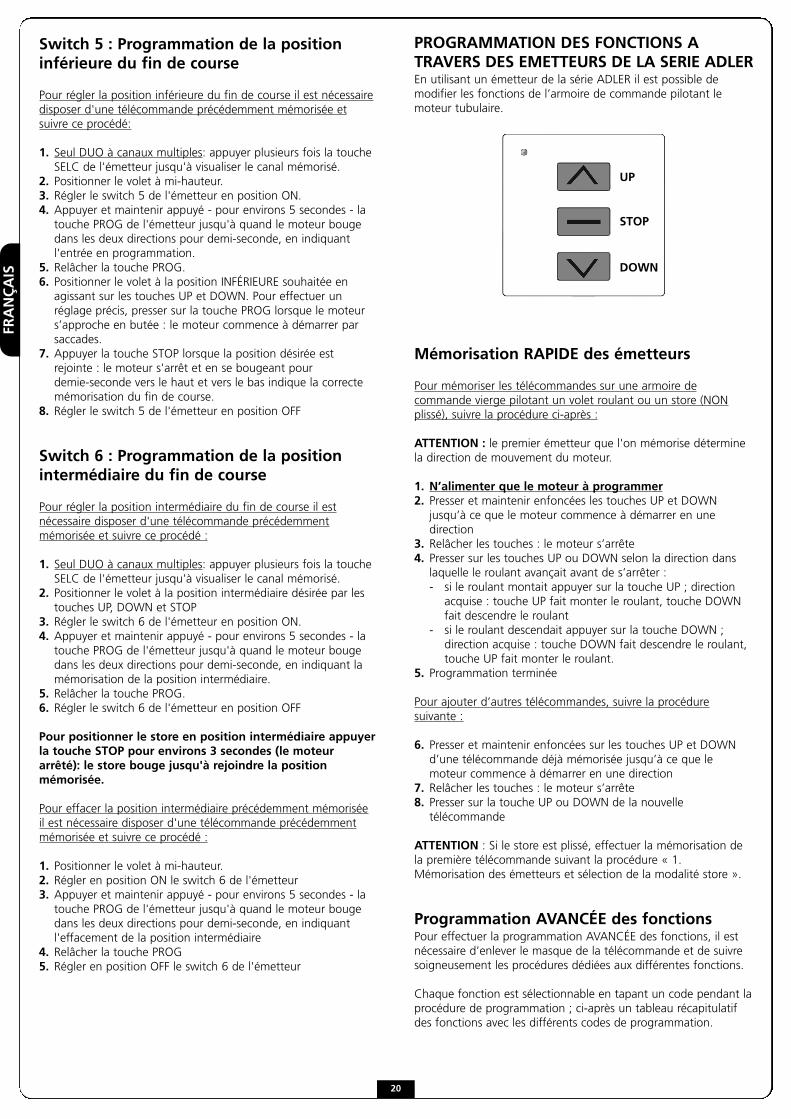
UP
STOP
DOWN
Switch 5: Programmazione della posizioneinferiore del finecorsa
Per impostare la posizione inferiore del finecorsa è necessarioavere a disposizione un telecomando precedentementememorizzato e procedere con i seguenti punti:
1. Solo DUO multicanale: premere più volte il tasto SELC del trasmettitore fino a quando viene visualizzato il canale memorizzato
2. Portare l'avvolgibile a mezza altezza 3. Portare in posizione ON lo switch 5 del trasmettitore4. Premere e tenere premuto (per circa 5 secondi) il tasto PROG del trasmettitore fino a quando il motore conferma l'entrata in programmazione muovendosi per 1/2 secondo in entrambe le direzioni
5. Rilasciare il tasto PROG6. Portare l’avvolgibile alla posizione INFERIORE desiderata utilizzando i tasti UP e DOWN. Per eseguire una regolazione precisa premere il tasto PROG quando il motore si avvicina al finecorsa: il motore inizia a muoversi a scatti
7. Premere il tasto STOP quando viene raggiunta la posizione desiderata: il motore si ferma e poi conferma la corretta memorizzazione del finecorsa con il solito movimento di 1/2 secondo prima verso l'alto e poi verso il basso
8. Portare in posizione OFF lo switch 5 del trasmettitore
Switch 6: Programmazione della posizioneintermedia di apertura
Per impostare la posizione intermedia di apertura è necessarioavere a disposizione un telecomando precedentementememorizzato e procedere con i seguenti punti:
1. Solo DUO multicanale: premere più volte il tasto SELC del trasmettitore fino a quando viene visualizzato il canale memorizzato
2. Portare l'avvolgibile, con i tasti UP, DOWN e STOP, alla posizione INTERMEDIA desiderata
3. Portare in posizione ON lo switch 6 del trasmettitore4. Premere e tenere premuto (per circa 5 secondi) il tasto PROG del trasmettitore fino a quando il motore conferma la memorizzazione della posizione intermedia muovendosi per 1/2 secondo in entrambe le direzioni
5. Rilasciare il tasto PROG6. Portare in posizione OFF lo switch 6 del trasmettitore
Per portare l’avvolgibile in posizione intermedia premere iltasto STOP per almeno 3 secondi (a motore fermo):l’avvolgibile si muove fino a raggiungere la posizionememorizzata.
Per cancellare la posizione intermedia precedentemenetememorizzata è necessario avere a disposizione un telecomandoprecedentemente memorizzato e procedere con i seguenti punti:
1. Portare l'avvolgibile a mezza altezza 2. Portare in posizione ON lo switch 6 del trasmettitore3. Premere e tenere premuto (per circa 5 secondi) il tasto PROG del trasmettitore fino a quando il motore conferma la cancellazione della posizione intermedia muovendosi per 1/2 secondo in entrambe le direzioni
4. Rilasciare il tasto PROG5. Portare in posizione OFF lo switch 6 del trasmettitore
8
ITALIA
NO
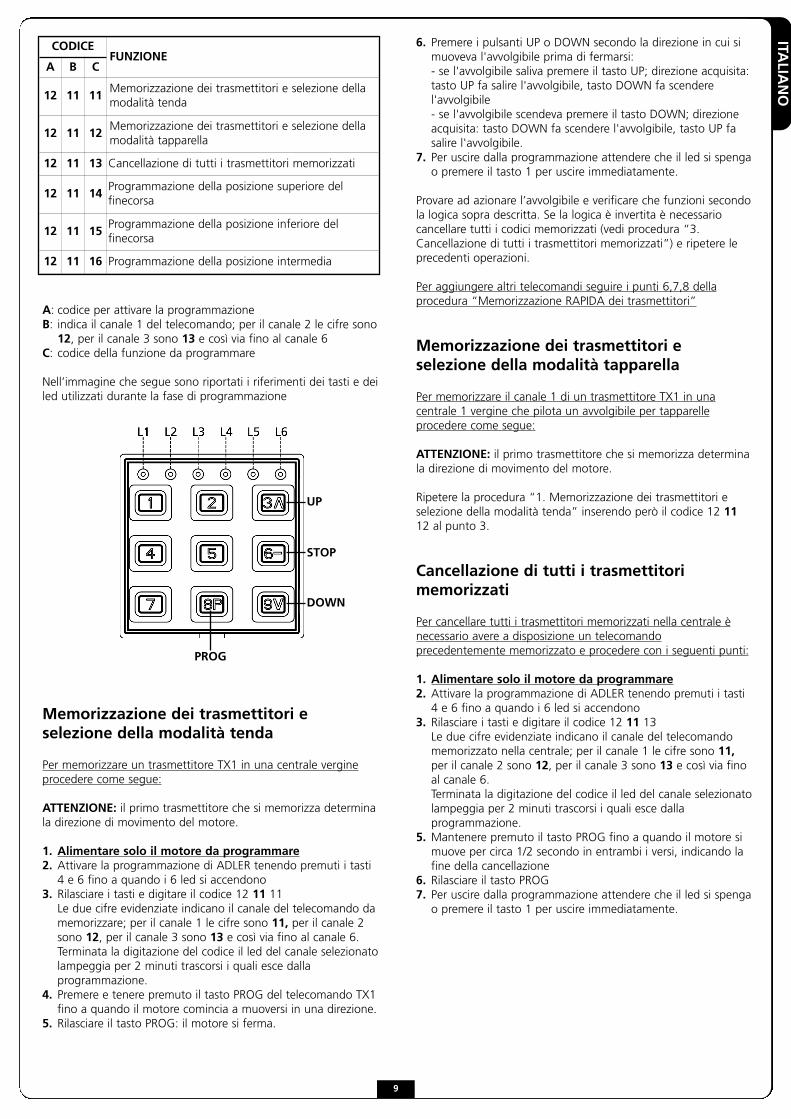
A: codice per attivare la programmazioneB: indica il canale 1 del telecomando; per il canale 2 le cifre sono
12, per il canale 3 sono 13 e così via fino al canale 6C: codice della funzione da programmare
Nell’immagine che segue sono riportati i riferimenti dei tasti e deiled utilizzati durante la fase di programmazione
Memorizzazione dei trasmettitori eselezione della modalità tenda
Per memorizzare un trasmettitore TX1 in una centrale vergineprocedere come segue:
ATTENZIONE: il primo trasmettitore che si memorizza determinala direzione di movimento del motore.
1. Alimentare solo il motore da programmare2. Attivare la programmazione di ADLER tenendo premuti i tasti 4 e 6 fino a quando i 6 led si accendono
3. Rilasciare i tasti e digitare il codice 12 11 11Le due cifre evidenziate indicano il canale del telecomando da memorizzare; per il canale 1 le cifre sono 11, per il canale 2 sono 12, per il canale 3 sono 13 e così via fino al canale 6.Terminata la digitazione del codice il led del canale selezionato lampeggia per 2 minuti trascorsi i quali esce dalla programmazione.
4. Premere e tenere premuto il tasto PROG del telecomando TX1 fino a quando il motore comincia a muoversi in una direzione.
5. Rilasciare il tasto PROG: il motore si ferma.
UP
STOP
DOWN
PROG
CODICEFUNZIONE
A B C
12 11 11Memorizzazione dei trasmettitori e selezione dellamodalità tenda
12 11 12Memorizzazione dei trasmettitori e selezione dellamodalità tapparella
12 11 13 Cancellazione di tutti i trasmettitori memorizzati
12 11 14Programmazione della posizione superiore delfinecorsa
12 11 15Programmazione della posizione inferiore delfinecorsa
12 11 16 Programmazione della posizione intermedia
6. Premere i pulsanti UP o DOWN secondo la direzione in cui si muoveva l'avvolgibile prima di fermarsi: - se l'avvolgibile saliva premere il tasto UP; direzione acquisita: tasto UP fa salire l'avvolgibile, tasto DOWN fa scendere l'avvolgibile- se l'avvolgibile scendeva premere il tasto DOWN; direzione acquisita: tasto DOWN fa scendere l'avvolgibile, tasto UP fa salire l'avvolgibile.
7. Per uscire dalla programmazione attendere che il led si spenga o premere il tasto 1 per uscire immediatamente.
Provare ad azionare l’avvolgibile e verificare che funzioni secondola logica sopra descritta. Se la logica è invertita è necessariocancellare tutti i codici memorizzati (vedi procedura “3.Cancellazione di tutti i trasmettitori memorizzati”) e ripetere leprecedenti operazioni.
Per aggiungere altri telecomandi seguire i punti 6,7,8 dellaprocedura “Memorizzazione RAPIDA dei trasmettitori”
Memorizzazione dei trasmettitori eselezione della modalità tapparella
Per memorizzare il canale 1 di un trasmettitore TX1 in unacentrale 1 vergine che pilota un avvolgibile per tapparelleprocedere come segue:
ATTENZIONE: il primo trasmettitore che si memorizza determinala direzione di movimento del motore.
Ripetere la procedura “1. Memorizzazione dei trasmettitori eselezione della modalità tenda” inserendo però il codice 12 1112 al punto 3.
Cancellazione di tutti i trasmettitorimemorizzati
Per cancellare tutti i trasmettitori memorizzati nella centrale ènecessario avere a disposizione un telecomandoprecedentemente memorizzato e procedere con i seguenti punti:
1. Alimentare solo il motore da programmare2. Attivare la programmazione di ADLER tenendo premuti i tasti 4 e 6 fino a quando i 6 led si accendono
3. Rilasciare i tasti e digitare il codice 12 11 13Le due cifre evidenziate indicano il canale del telecomando memorizzato nella centrale; per il canale 1 le cifre sono 11, per il canale 2 sono 12, per il canale 3 sono 13 e così via fino al canale 6. Terminata la digitazione del codice il led del canale selezionato lampeggia per 2 minuti trascorsi i quali esce dalla programmazione.
5. Mantenere premuto il tasto PROG fino a quando il motore si muove per circa 1/2 secondo in entrambi i versi, indicando la fine della cancellazione
6. Rilasciare il tasto PROG7. Per uscire dalla programmazione attendere che il led si spenga o premere il tasto 1 per uscire immediatamente.
9
ITALIANO
10
Per cancellare tutti i codici con un trasmettitore NONmemorizzato procedere come segue:1. Disalimentare il sistema.2. Attivare la programmazione di ADLER tenendo premuti i tasti 4 e 6 fino a quando i 6 led si accendono
3. Rilasciare i tasti e digitare il codice 12 11 134. Premere e tenere premuto il tasto PROG5. Alimentare le centrali su cui si vuole effettuare la cancellazione6. Mantenere premuto il tasto PROG fino a quando il motore si muove per circa 1/2 secondo in entrambi i versi, indicando la fine della cancellazione
7. Rilasciare il tasto PROG: il motore si ferma.8. Per uscire dalla programmazione attendere che il led si spenga o premere il tasto 1 per uscire immediatamente.
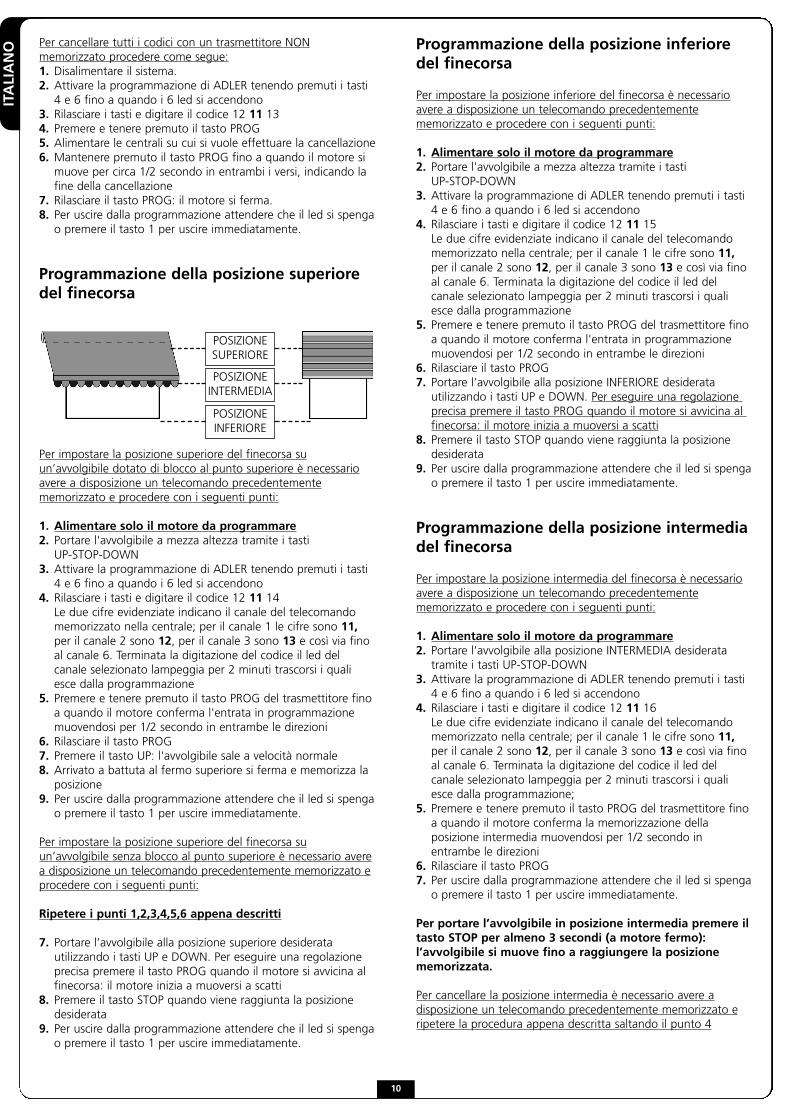
Programmazione della posizione superioredel finecorsa
Per impostare la posizione superiore del finecorsa suun’avvolgibile dotato di blocco al punto superiore è necessarioavere a disposizione un telecomando precedentementememorizzato e procedere con i seguenti punti:
1. Alimentare solo il motore da programmare2. Portare l'avvolgibile a mezza altezza tramite i tasti UP-STOP-DOWN
3. Attivare la programmazione di ADLER tenendo premuti i tasti 4 e 6 fino a quando i 6 led si accendono
4. Rilasciare i tasti e digitare il codice 12 11 14Le due cifre evidenziate indicano il canale del telecomando memorizzato nella centrale; per il canale 1 le cifre sono 11, per il canale 2 sono 12, per il canale 3 sono 13 e così via fino al canale 6. Terminata la digitazione del codice il led del canale selezionato lampeggia per 2 minuti trascorsi i quali esce dalla programmazione
5. Premere e tenere premuto il tasto PROG del trasmettitore fino a quando il motore conferma l'entrata in programmazione muovendosi per 1/2 secondo in entrambe le direzioni
6. Rilasciare il tasto PROG7. Premere il tasto UP: l'avvolgibile sale a velocità normale8. Arrivato a battuta al fermo superiore si ferma e memorizza la posizione
9. Per uscire dalla programmazione attendere che il led si spenga o premere il tasto 1 per uscire immediatamente.
Per impostare la posizione superiore del finecorsa suun’avvolgibile senza blocco al punto superiore è necessario averea disposizione un telecomando precedentemente memorizzato eprocedere con i seguenti punti:
Ripetere i punti 1,2,3,4,5,6 appena descritti
7. Portare l’avvolgibile alla posizione superiore desiderata utilizzando i tasti UP e DOWN. Per eseguire una regolazione precisa premere il tasto PROG quando il motore si avvicina al finecorsa: il motore inizia a muoversi a scatti
8. Premere il tasto STOP quando viene raggiunta la posizione desiderata
9. Per uscire dalla programmazione attendere che il led si spenga o premere il tasto 1 per uscire immediatamente.
POSIZIONESUPERIORE
POSIZIONEINTERMEDIA
POSIZIONEINFERIORE
Programmazione della posizione inferioredel finecorsa
Per impostare la posizione inferiore del finecorsa è necessarioavere a disposizione un telecomando precedentementememorizzato e procedere con i seguenti punti:
1. Alimentare solo il motore da programmare2. Portare l'avvolgibile a mezza altezza tramite i tasti UP-STOP-DOWN
3. Attivare la programmazione di ADLER tenendo premuti i tasti 4 e 6 fino a quando i 6 led si accendono
4. Rilasciare i tasti e digitare il codice 12 11 15Le due cifre evidenziate indicano il canale del telecomando memorizzato nella centrale; per il canale 1 le cifre sono 11, per il canale 2 sono 12, per il canale 3 sono 13 e così via fino al canale 6. Terminata la digitazione del codice il led del canale selezionato lampeggia per 2 minuti trascorsi i quali esce dalla programmazione
5. Premere e tenere premuto il tasto PROG del trasmettitore fino a quando il motore conferma l'entrata in programmazione muovendosi per 1/2 secondo in entrambe le direzioni
6. Rilasciare il tasto PROG7. Portare l’avvolgibile alla posizione INFERIORE desiderata utilizzando i tasti UP e DOWN. Per eseguire una regolazione precisa premere il tasto PROG quando il motore si avvicina al finecorsa: il motore inizia a muoversi a scatti
8. Premere il tasto STOP quando viene raggiunta la posizione desiderata
9. Per uscire dalla programmazione attendere che il led si spenga o premere il tasto 1 per uscire immediatamente.
Programmazione della posizione intermediadel finecorsa
Per impostare la posizione intermedia del finecorsa è necessarioavere a disposizione un telecomando precedentementememorizzato e procedere con i seguenti punti:
1. Alimentare solo il motore da programmare2. Portare l'avvolgibile alla posizione INTERMEDIA desiderata tramite i tasti UP-STOP-DOWN
3. Attivare la programmazione di ADLER tenendo premuti i tasti 4 e 6 fino a quando i 6 led si accendono
4. Rilasciare i tasti e digitare il codice 12 11 16Le due cifre evidenziate indicano il canale del telecomando memorizzato nella centrale; per il canale 1 le cifre sono 11, per il canale 2 sono 12, per il canale 3 sono 13 e così via fino al canale 6. Terminata la digitazione del codice il led del canale selezionato lampeggia per 2 minuti trascorsi i quali esce dalla programmazione;
5. Premere e tenere premuto il tasto PROG del trasmettitore fino a quando il motore conferma la memorizzazione della posizione intermedia muovendosi per 1/2 secondo in entrambe le direzioni
6. Rilasciare il tasto PROG7. Per uscire dalla programmazione attendere che il led si spenga o premere il tasto 1 per uscire immediatamente.
Per portare l’avvolgibile in posizione intermedia premere iltasto STOP per almeno 3 secondi (a motore fermo):l’avvolgibile si muove fino a raggiungere la posizionememorizzata.
Per cancellare la posizione intermedia è necessario avere adisposizione un telecomando precedentemente memorizzato eripetere la procedura appena descritta saltando il punto 4
ENGLISH
1111
WarrantyV2 SPA warranties the goods supplied during the sixty months formotors and 24 months for electronically devices after the date ofmanufacturing.Warranty covers the free repair or replacement of the defectivegoods due to a bad manufacturing, according to V2 SPA final decision.The goods under warranty shall be sent DDP (Incoterms 2000 CCI) toV2 SPA, and they shall be sent back EX-WORKS (Incoterms 2000CCI) to the Buyer.The replaced material shall be of V2 SPA own. The Buyer shall paythe labor costs. The Buyer shall not be entitled in any compensationfor any plant outage. The repair/replacement time shall not extendthe warranty period. It is understood that the warranty shall dependon the specifications of the products, being duly shown into theiroperating manuals.
Warranty does not cover as follows• Any carriage damage or average;• Any damage caused by any electric plant failures or
negligence, a different use of the system as to its original purpose and any improper use as well;
• Any damage caused by a staff’s tampering or any use of non-original spare parts;
• Any defect caused by chemical agents or atmospheric phenomenon;
• Any consumption material;• Any call for supposed failures or convenient surveys.
Product featuresV2 SPA’s products are subject to continue changes andimprovements; therefore their technical features and image maychange without a previous notice.
Applicable law and competent courtAs the contract of sale is executed by means of the OrderConfirmation drawn up in Racconigi (Italy), the Court of Saluzzo(Italy) shall be the place of jurisdiction for any dispute which will besettled according to the Italian laws.
IMPORTANT REMARKS• The installation must be done by a technician following the
safety norms in force. For the electric installation make reference to the norm NFC15-100.
• Only apply to authorized personnel to replace the feeding cable of the motor.
• Do not pierce nor insert screws in the whole length of the motor.
• Avoid any contact of the motor with liquids.• Avoid to crush or knock over the motor.• Possible tampering or wrong connections are not covered by
guarantee.
INSTALLATION WARNING:1. Before installing the drive, remove any unnecessary cords and
disable any equipment not needed for powered operation.2. For installation for awnings, a horizontal distance of at least
0,4m is to be maintained between the fully unrolled driven part and any permanent object.
3. The power supply cable should not be exposed to sunlight or rain directly.
Note:a) Please read the instruction carefully before installation.b) Assure that all accessories have been fixed so that the motor
works without any mechanical problem. The loading weight should be matched with the output power of the motor.
c) Electrical connection must be done by professional technicians to operate in conformity with the rules.
WARNING: Important safety instructions. It is important for thesafety of persons to follow these instructions. Save theseinstructions.
WARNING: Important safety instructions. • Follow all instructions, since incorrect installation can lead to
severe injury.• Do not allow children to play with fixed controls. • Keeps remote controls away from children.• Frequently examine the installation for imbalance and sings
of wear or damage to cables and springs. • Do not use if repair or adjustment is necessary.• Moving parts of the drive must be installed higher than 2.5
m above the floor or other level that could provide access to it.• Install the actuating member of a manual release at a height
less than 1.8 m.• The actuating member of a biased-off switch is to be located
within direct sight of the driven part but away from moving parts. It is to be installed at a minimum height of 1.5 m.
• Fixed controls have to be installed visibly.• The appliance can not be used in outside.
EC DECLARATION OF INCORPORATION FORPARTLY COMPLETED MACHINERY(Directive 2006/42/EC, Annex II-B)
The manufacturer V2 S.p.A., headquarters in Corso Principi di Piemonte 65, 12035, Racconigi (CN), Italy
Under its sole responsibility hereby declares that:
the partly completed machinery model(s): VEO-RFE6-230V, VEO-RFE10-230V, VEO-RFE6-120V, VEO-RFE10-120V
Identification number and year of manufacturing: typed onnameplate Description: electromechanical actuator for awnings and rolling shutters
- is intended to be installed on awnings and rolling shuttersto create a machine according to the provisions of the Directive 2006/42/EC. The machinery must not be put into service until the final machinery into which it has to be incorporated has been declared in conformity with the provisions of the Directive 2006/42/EC (annex II-A).
- is compliant with the applicable essential safety requirements of the following Directives:Machinery Directive 2006/42/EC (annex I, chapter 1)Low Voltage Directive 2006/95/EC.Electromagnetic Compatibility Directive 2004/108/EC.Radio Directive 99/05/EC
The relevant technical documentation is available at the nationalauthorities’ request after justifiable request to:V2 S.p.A., Corso Principi di Piemonte 65, 12035, Racconigi (CN), ItalyThe person empowered to draw up the declaration and to providethe technical documentation:
Cosimo De FalcoLegal representative of V2 S.p.A.Racconigi, 11th January 2010
ENGLISH
ASSEMBLAGE INSTRUCTIONS 1. Fix the stirrup � to the wall. 2. Insert the pin � on the motor head and fix it with the two
supplied screws 3. Insert the crown � in the driving wheel � of the limit switch
(fig.1)4. Insert the pulley � on the pin of the motor � (fig.1)5. Insert the split pin � on the pin of the motor �6. Insert completely the motor in the roll-tube (fig.2)7. Fix the roll-tube to the driving wheel with m 4 x10 screw (fig.2)8. Insert the pin � into the bracket � and insert the split pin
� into the hole of the pin �
BUILT-IN CONTROL UNITThis opening system is made of a tubular motor with built-incontrol unit with the following characteristics:• It is provided with a 434.15 MHz super-heterodyne radio receiver
• It is driven by means of DUO / ADLER transmitters.• It is possible to drive the awning / rolling shutter also by mean of an external push-button (type: Normally Open, each series or model).
• The programming phase can be effected via radio or by means of an external switch.
• Obstacle detection: if during the closing phase of the rolling shutter an obstacle is detected, the device opens the rolling shutter completely.
FUNCTIONING WITH EXTERNAL WIREDSWITCHPressing the external wired switch, the control unit has thefollowing functioning logic:OPENS �� STOPS �� CLOSES �� STOPS �� OPENS ...
FUNCTIONING WITH TRANSMITTERSAt each push button pressure, the functioning logic is thefollowing.
TRANSMITTERS PROGRAMMINGUp to 48 different channel can be stored on each central unit.To store the transmitters read carefully the paragraph“PROGRAMMING OF THE FUNCTIONS BY MEANS OF ATRANSMITTER OF THE DUO SERIES” or “PROGRAMMING OF THE FUNCTIONS BY MEANS OF A TRANSMITTER OF THE ADLER SERIES”
WORKING TIME OF MOTORThe control unit stops the motor movement after 5 minutes: incase of limit switches malfunction this “time out” avoids themotor overheating.
���� CLOSES �� CLOSES �� CLOSES
���� STOPS �� STOPS �� STOPS
���� OPENS �� OPENS �� OPENS
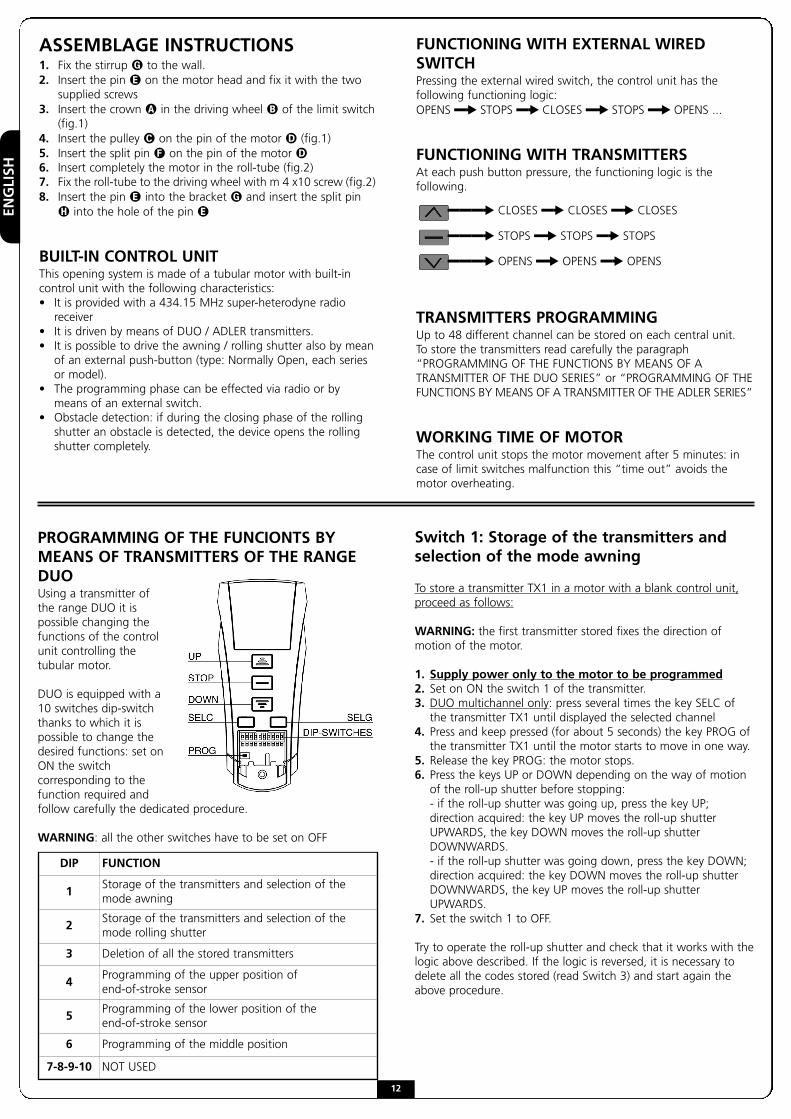
PROGRAMMING OF THE FUNCIONTS BYMEANS OF TRANSMITTERS OF THE RANGEDUOUsing a transmitter ofthe range DUO it ispossible changing thefunctions of the controlunit controlling thetubular motor.
DUO is equipped with a10 switches dip-switchthanks to which it ispossible to change thedesired functions: set onON the switchcorresponding to thefunction required andfollow carefully the dedicated procedure.
WARNING: all the other switches have to be set on OFF
DIP FUNCTION
1Storage of the transmitters and selection of themode awning
2Storage of the transmitters and selection of themode rolling shutter
3 Deletion of all the stored transmitters
4Programming of the upper position of end-of-stroke sensor
5Programming of the lower position of the end-of-stroke sensor
6 Programming of the middle position
7-8-9-10 NOT USED
Switch 1: Storage of the transmitters andselection of the mode awning
To store a transmitter TX1 in a motor with a blank control unit,proceed as follows:
WARNING: the first transmitter stored fixes the direction ofmotion of the motor.
1. Supply power only to the motor to be programmed2. Set on ON the switch 1 of the transmitter.3. DUO multichannel only: press several times the key SELC of the transmitter TX1 until displayed the selected channel
4. Press and keep pressed (for about 5 seconds) the key PROG of the transmitter TX1 until the motor starts to move in one way.
5. Release the key PROG: the motor stops.6. Press the keys UP or DOWN depending on the way of motion of the roll-up shutter before stopping:- if the roll-up shutter was going up, press the key UP; direction acquired: the key UP moves the roll-up shutter UPWARDS, the key DOWN moves the roll-up shutter DOWNWARDS.- if the roll-up shutter was going down, press the key DOWN; direction acquired: the key DOWN moves the roll-up shutter DOWNWARDS, the key UP moves the roll-up shutter UPWARDS.
7. Set the switch 1 to OFF.
Try to operate the roll-up shutter and check that it works with thelogic above described. If the logic is reversed, it is necessary todelete all the codes stored (read Switch 3) and start again theabove procedure.
12
ENGLISH
To add another transmitter TX2 to the control unit it is necessaryto use a remote control previously stored (TX1) and proceed asfollows:
1. DUO multichannel only: press several times the key SELC of the transmitter TX1 until displayed the channel stored.
2. DUO multichannel only: press several times the key SELC of the new transmitter TX2 until display the channel to be stored.
3. Take the roll-up shutter to half its way with TX1.4. Set to ON the switch 1 of the transmitter TX1.5. Press and keep pressed for about 5 seconds the key PROG of the TX1 until the motor starts to move.
6. Release the key PROG, the motor stops.7. Press the key UP or DOWN of the TX2: the transmitter is stored with the same logic of the TX1.
8. Set the switch 1 to OFF.
Switch 2: storing of the transmitters andselection of the mode rolling shutter
To store the channel 1 of a transmitter TX1 in a blank control unit1 controlling a roll-up shutter proceed as follows:
WARNING: the first transmitter stored fixes the direction of themotion of the motor.
Repeat the procedure described for switch 1 using, however, only switch 2
Switch 3: deletion of all the storedtransmitters
To delete all the transmitters stored on the control unit it isnecessary using a remote control previously stored and proceedas follows:
1. Supply power only to the motor to be programmed2. DUO multichannel only: press several times the button SELC on the transmitter until displayed the channel stored.
3. Position the roll-up shutter at the mid-height.4. Set on ON the switch 3 of the transmitter.5. Press and keep pressed the button PROG of the transmitter until the motor moves in both the ways for 1 second, showing the end of deletion.
6. Release the button PROG and set on OFF the switch 3 of the transmitter.
To delete all the codes by means of a transmitter non-stored,proceed as follows:
1. Position the retractable at the mid-height.2. Switch off power supply of the system.3. Set on ON the switch 3 of a transmitter.4. Press and keep pressed the button PROG.5. Supply power only to the control unit on which to make the deletion: after about 1 second the motor moves in both the ways showing the correct deletion.
6. Release the button PROG and set on OFF the switch 3.
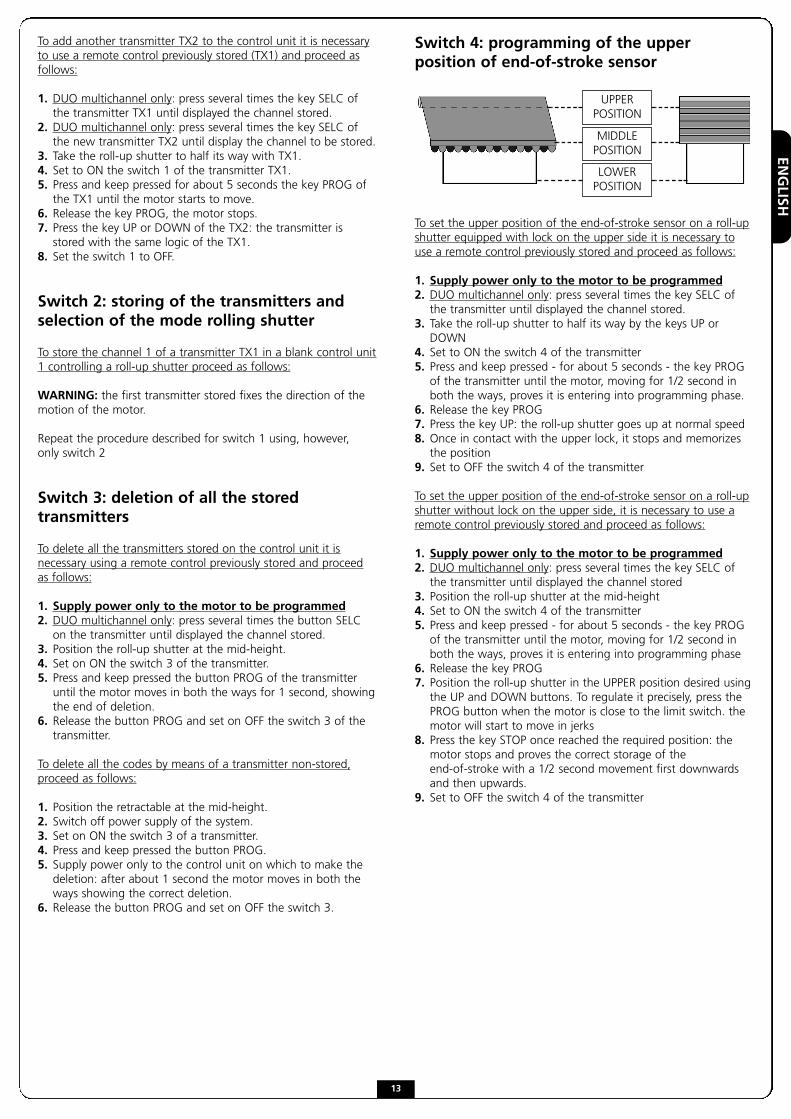
Switch 4: programming of the upperposition of end-of-stroke sensor
To set the upper position of the end-of-stroke sensor on a roll-upshutter equipped with lock on the upper side it is necessary touse a remote control previously stored and proceed as follows:
1. Supply power only to the motor to be programmed2. DUO multichannel only: press several times the key SELC of the transmitter until displayed the channel stored.
3. Take the roll-up shutter to half its way by the keys UP or DOWN
4. Set to ON the switch 4 of the transmitter5. Press and keep pressed - for about 5 seconds - the key PROG of the transmitter until the motor, moving for 1/2 second in both the ways, proves it is entering into programming phase.
6. Release the key PROG7. Press the key UP: the roll-up shutter goes up at normal speed8. Once in contact with the upper lock, it stops and memorizes the position
9. Set to OFF the switch 4 of the transmitter
To set the upper position of the end-of-stroke sensor on a roll-upshutter without lock on the upper side, it is necessary to use aremote control previously stored and proceed as follows:
1. Supply power only to the motor to be programmed2. DUO multichannel only: press several times the key SELC of the transmitter until displayed the channel stored
3. Position the roll-up shutter at the mid-height4. Set to ON the switch 4 of the transmitter5. Press and keep pressed - for about 5 seconds - the key PROG of the transmitter until the motor, moving for 1/2 second in both the ways, proves it is entering into programming phase
6. Release the key PROG7. Position the roll-up shutter in the UPPER position desired using the UP and DOWN buttons. To regulate it precisely, press the PROG button when the motor is close to the limit switch. the motor will start to move in jerks
8. Press the key STOP once reached the required position: the motor stops and proves the correct storage of the end-of-stroke with a 1/2 second movement first downwards and then upwards.
9. Set to OFF the switch 4 of the transmitter
UPPERPOSITION
MIDDLEPOSITION
LOWERPOSITION
13
ENGLISH
Switch 5: programming of the lowerposition of the end-of-stroke sensor
To set the lower position of the end-of-stroke sensor it isnecessary to use a remote control previously stored and proceedas follows:
1. DUO multichannel only: press several times the key SELC of the transmitter until displayed the channel stored
2. Position the roll-up shutter at the mid-height3. Set to ON the switch 5 of the transmitter4. Press and keep pressed - for about 5 seconds - the key PROG of the transmitter until the motor proves it is entering into programming phase by moving for 1/2 second in both the ways
5. Release the key PROG6. Position the roll-up shutter in the LOWER position desired using the UP and DOWN buttons. To regulate it precisely, press the PROG button when the motor is close to the limit switch. the motor will start to move in jerks
7. Press the key STOP once reached the required position: the motor stops and then proves the correct storage of the end-of-stroke by moving for 1/2 second first upwards and then downwards
8. Set to OFF the switch 5 of the transmitter
Switch 6: Programming of the middleposition of the end-of-stroke sensor
To set the middle position of the end-of-stroke sensor it isnecessary to use a remote control previously stored and proceedas follows:
1. DUO multichannel only: press several times the key SELC of the transmitter until displayed the channel stored
2. Take the roll-up shutter to the desired position with the keys UP, DOWN and STOP
3. Set to ON the switch 6 of the transmitter4. Press and keep pressed - for about 5 seconds - the key PROG of the transmitter until the motor proves the correct storage of the end-of-stroke by moving for 1/2 second in both the ways
5. Release the key PROG6. Set to OFF the switch 6 of the transmitter
To take the roll-up shutter to a middle position press thekey STOP for at least 3 seconds (when the motor isstopped): the roll-up shutter moves until reached theposition stored.
To delete the middle position previously stored it is necessary touse a remote control previously stored and proceed as follows:
1. Position the roll-up shutter at the mid-height2. Set to ON the switch 6 of the transmitter3. Press and keep pressed - for about 5 seconds - the key PROG of the transmitter until the motor proves the deletion of the middle position by moving for 1/2 second in both the ways
4. Release the key PROG5. Set to OFF the switch 6 of the transmitter
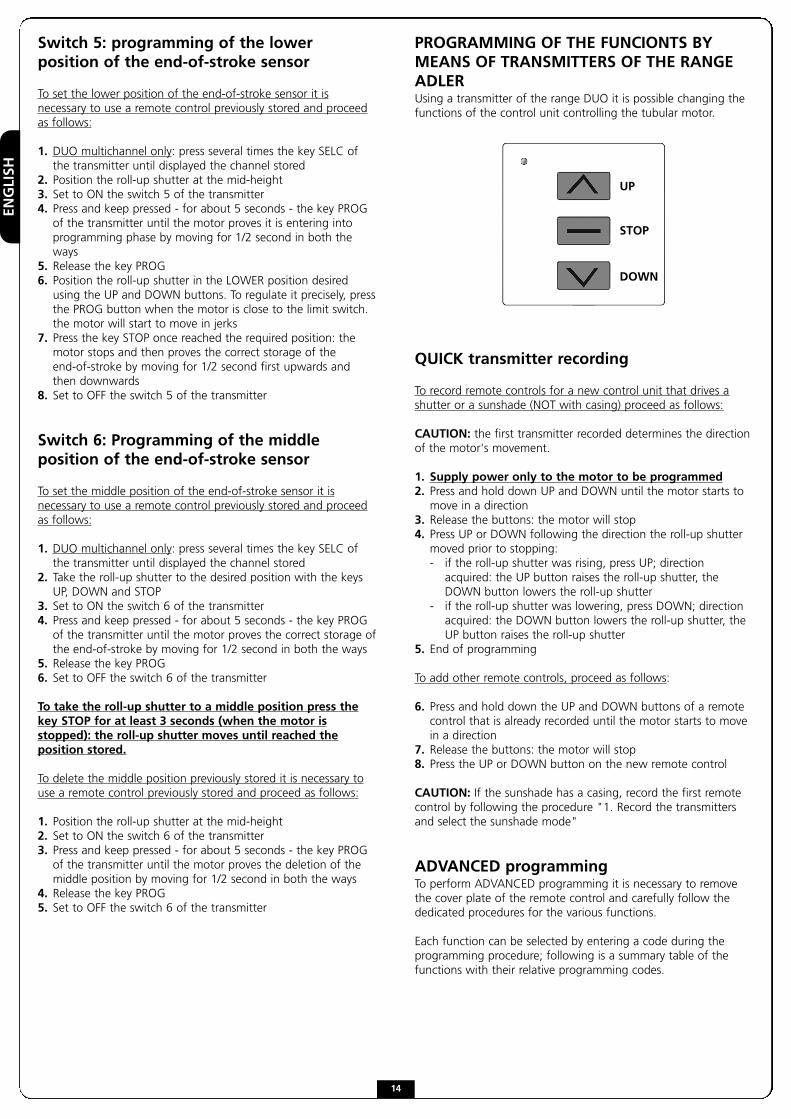
PROGRAMMING OF THE FUNCIONTS BYMEANS OF TRANSMITTERS OF THE RANGEADLERUsing a transmitter of the range DUO it is possible changing thefunctions of the control unit controlling the tubular motor.
QUICK transmitter recording
To record remote controls for a new control unit that drives ashutter or a sunshade (NOT with casing) proceed as follows:
CAUTION: the first transmitter recorded determines the directionof the motor's movement.
1. Supply power only to the motor to be programmed2. Press and hold down UP and DOWN until the motor starts to move in a direction
3. Release the buttons: the motor will stop4. Press UP or DOWN following the direction the roll-up shutter moved prior to stopping: - if the roll-up shutter was rising, press UP; direction acquired: the UP button raises the roll-up shutter, the DOWN button lowers the roll-up shutter
- if the roll-up shutter was lowering, press DOWN; direction acquired: the DOWN button lowers the roll-up shutter, the UP button raises the roll-up shutter
5. End of programming
To add other remote controls, proceed as follows:
6. Press and hold down the UP and DOWN buttons of a remote control that is already recorded until the motor starts to move in a direction
7. Release the buttons: the motor will stop8. Press the UP or DOWN button on the new remote control
CAUTION: If the sunshade has a casing, record the first remotecontrol by following the procedure "1. Record the transmittersand select the sunshade mode"
ADVANCED programming To perform ADVANCED programming it is necessary to removethe cover plate of the remote control and carefully follow thededicated procedures for the various functions.
Each function can be selected by entering a code during theprogramming procedure; following is a summary table of thefunctions with their relative programming codes.
UP
STOP
DOWN
14
ENGLISH
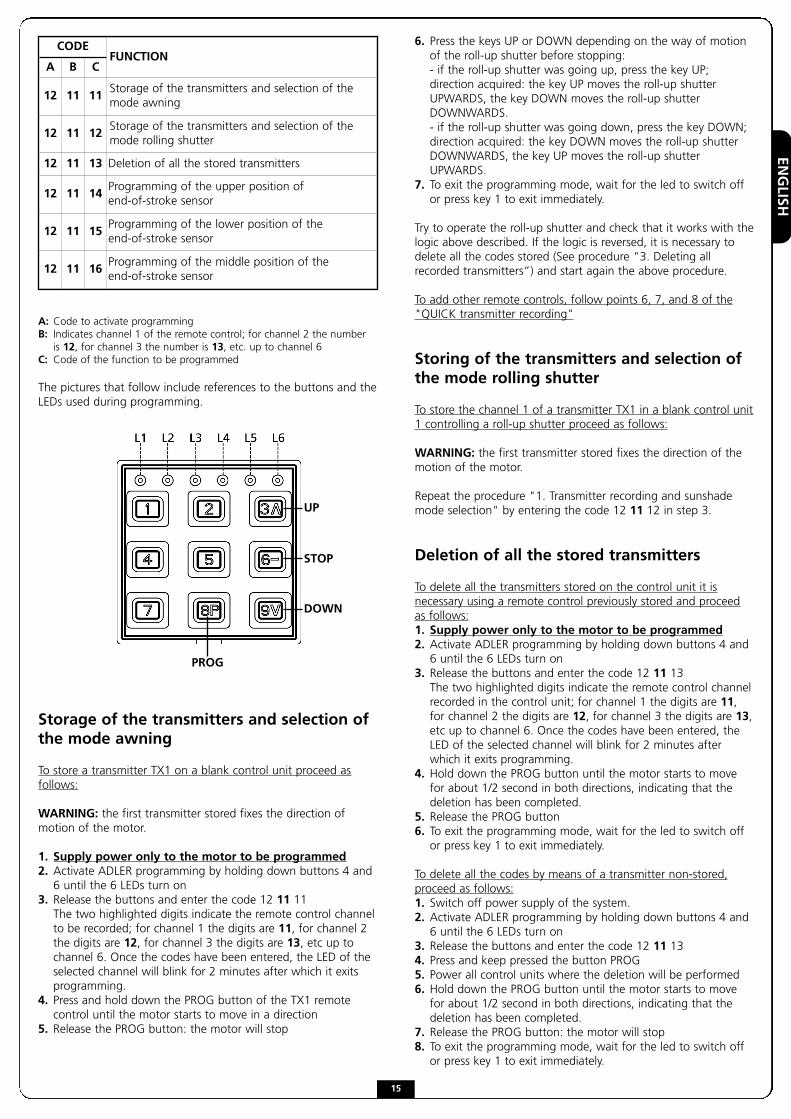
A: Code to activate programmingB: Indicates channel 1 of the remote control; for channel 2 the number
is 12, for channel 3 the number is 13, etc. up to channel 6C: Code of the function to be programmed
The pictures that follow include references to the buttons and theLEDs used during programming.
Storage of the transmitters and selection ofthe mode awning
To store a transmitter TX1 on a blank control unit proceed asfollows:
WARNING: the first transmitter stored fixes the direction ofmotion of the motor.
1. Supply power only to the motor to be programmed2. Activate ADLER programming by holding down buttons 4 and 6 until the 6 LEDs turn on
3. Release the buttons and enter the code 12 11 11The two highlighted digits indicate the remote control channel to be recorded; for channel 1 the digits are 11, for channel 2 the digits are 12, for channel 3 the digits are 13, etc up to channel 6. Once the codes have been entered, the LED of the selected channel will blink for 2 minutes after which it exits programming.
4. Press and hold down the PROG button of the TX1 remote control until the motor starts to move in a direction
5. Release the PROG button: the motor will stop
6. Press the keys UP or DOWN depending on the way of motion of the roll-up shutter before stopping:- if the roll-up shutter was going up, press the key UP; direction acquired: the key UP moves the roll-up shutter UPWARDS, the key DOWN moves the roll-up shutter DOWNWARDS.- if the roll-up shutter was going down, press the key DOWN; direction acquired: the key DOWN moves the roll-up shutter DOWNWARDS, the key UP moves the roll-up shutter UPWARDS.
7. To exit the programming mode, wait for the led to switch off or press key 1 to exit immediately.
Try to operate the roll-up shutter and check that it works with thelogic above described. If the logic is reversed, it is necessary todelete all the codes stored (See procedure "3. Deleting allrecorded transmitters”) and start again the above procedure.
To add other remote controls, follow points 6, 7, and 8 of the"QUICK transmitter recording"
Storing of the transmitters and selection ofthe mode rolling shutter
To store the channel 1 of a transmitter TX1 in a blank control unit1 controlling a roll-up shutter proceed as follows:
WARNING: the first transmitter stored fixes the direction of themotion of the motor.
Repeat the procedure "1. Transmitter recording and sunshademode selection" by entering the code 12 11 12 in step 3.
Deletion of all the stored transmitters
To delete all the transmitters stored on the control unit it isnecessary using a remote control previously stored and proceedas follows:1. Supply power only to the motor to be programmed2. Activate ADLER programming by holding down buttons 4 and 6 until the 6 LEDs turn on
3. Release the buttons and enter the code 12 11 13The two highlighted digits indicate the remote control channel recorded in the control unit; for channel 1 the digits are 11, for channel 2 the digits are 12, for channel 3 the digits are 13, etc up to channel 6. Once the codes have been entered, the LED of the selected channel will blink for 2 minutes after which it exits programming.
4. Hold down the PROG button until the motor starts to move for about 1/2 second in both directions, indicating that the deletion has been completed.
5. Release the PROG button6. To exit the programming mode, wait for the led to switch off or press key 1 to exit immediately.
To delete all the codes by means of a transmitter non-stored,proceed as follows:1. Switch off power supply of the system.2. Activate ADLER programming by holding down buttons 4 and 6 until the 6 LEDs turn on
3. Release the buttons and enter the code 12 11 134. Press and keep pressed the button PROG5. Power all control units where the deletion will be performed6. Hold down the PROG button until the motor starts to move for about 1/2 second in both directions, indicating that the deletion has been completed.
7. Release the PROG button: the motor will stop8. To exit the programming mode, wait for the led to switch off or press key 1 to exit immediately.
CODEFUNCTION
A B C
12 11 11Storage of the transmitters and selection of themode awning
12 11 12Storage of the transmitters and selection of themode rolling shutter
12 11 13 Deletion of all the stored transmitters
12 11 14Programming of the upper position of end-of-stroke sensor
12 11 15Programming of the lower position of the end-of-stroke sensor
12 11 16Programming of the middle position of the end-of-stroke sensor
UP
STOP
DOWN
PROG
15
ENGLISH
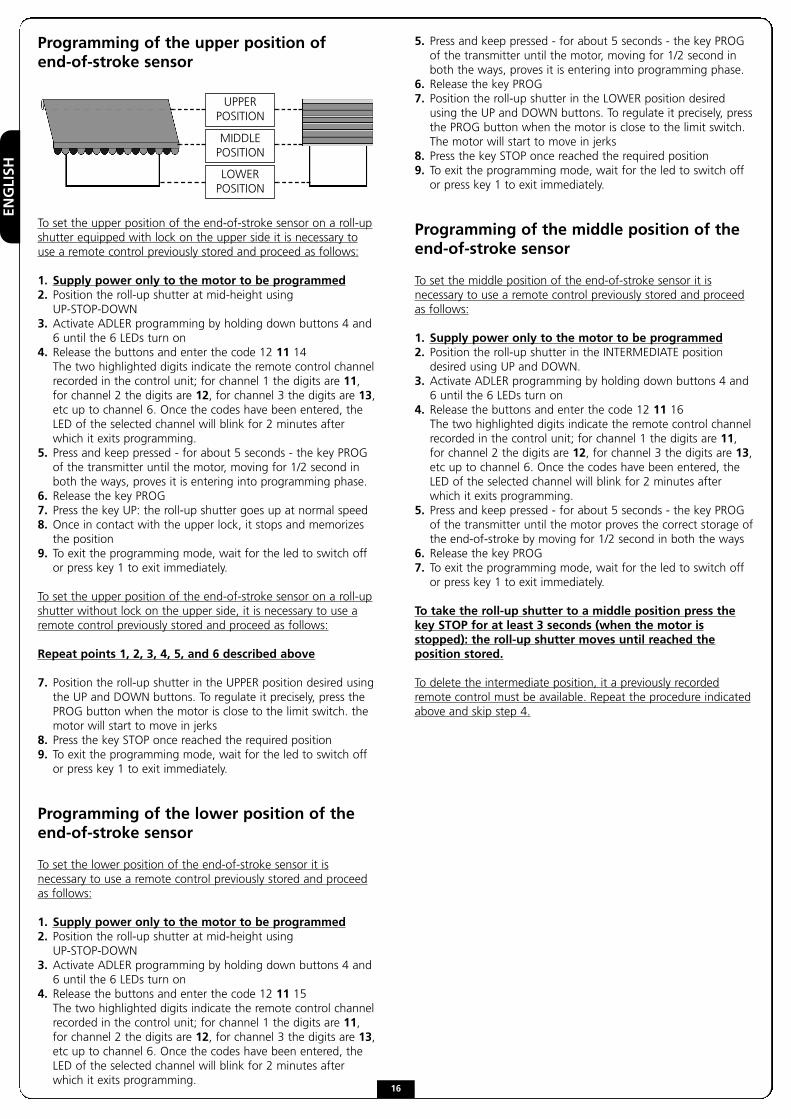
Programming of the upper position of end-of-stroke sensor
To set the upper position of the end-of-stroke sensor on a roll-upshutter equipped with lock on the upper side it is necessary touse a remote control previously stored and proceed as follows:
1. Supply power only to the motor to be programmed2. Position the roll-up shutter at mid-height using UP-STOP-DOWN
3. Activate ADLER programming by holding down buttons 4 and 6 until the 6 LEDs turn on
4. Release the buttons and enter the code 12 11 14The two highlighted digits indicate the remote control channel recorded in the control unit; for channel 1 the digits are 11, for channel 2 the digits are 12, for channel 3 the digits are 13, etc up to channel 6. Once the codes have been entered, the LED of the selected channel will blink for 2 minutes after which it exits programming.
5. Press and keep pressed - for about 5 seconds - the key PROG of the transmitter until the motor, moving for 1/2 second in both the ways, proves it is entering into programming phase.
6. Release the key PROG7. Press the key UP: the roll-up shutter goes up at normal speed8. Once in contact with the upper lock, it stops and memorizes the position
9. To exit the programming mode, wait for the led to switch off or press key 1 to exit immediately.
To set the upper position of the end-of-stroke sensor on a roll-upshutter without lock on the upper side, it is necessary to use aremote control previously stored and proceed as follows:
Repeat points 1, 2, 3, 4, 5, and 6 described above
7. Position the roll-up shutter in the UPPER position desired using the UP and DOWN buttons. To regulate it precisely, press the PROG button when the motor is close to the limit switch. the motor will start to move in jerks
8. Press the key STOP once reached the required position9. To exit the programming mode, wait for the led to switch off or press key 1 to exit immediately.
Programming of the lower position of the end-of-stroke sensor
To set the lower position of the end-of-stroke sensor it isnecessary to use a remote control previously stored and proceedas follows:
1. Supply power only to the motor to be programmed2. Position the roll-up shutter at mid-height using UP-STOP-DOWN
3. Activate ADLER programming by holding down buttons 4 and 6 until the 6 LEDs turn on
4. Release the buttons and enter the code 12 11 15The two highlighted digits indicate the remote control channel recorded in the control unit; for channel 1 the digits are 11, for channel 2 the digits are 12, for channel 3 the digits are 13, etc up to channel 6. Once the codes have been entered, the LED of the selected channel will blink for 2 minutes after which it exits programming.
5. Press and keep pressed - for about 5 seconds - the key PROG of the transmitter until the motor, moving for 1/2 second in both the ways, proves it is entering into programming phase.
6. Release the key PROG7. Position the roll-up shutter in the LOWER position desired using the UP and DOWN buttons. To regulate it precisely, press the PROG button when the motor is close to the limit switch. The motor will start to move in jerks
8. Press the key STOP once reached the required position9. To exit the programming mode, wait for the led to switch off or press key 1 to exit immediately.
Programming of the middle position of theend-of-stroke sensor
To set the middle position of the end-of-stroke sensor it isnecessary to use a remote control previously stored and proceedas follows:
1. Supply power only to the motor to be programmed2. Position the roll-up shutter in the INTERMEDIATE position desired using UP and DOWN.
3. Activate ADLER programming by holding down buttons 4 and 6 until the 6 LEDs turn on
4. Release the buttons and enter the code 12 11 16The two highlighted digits indicate the remote control channel recorded in the control unit; for channel 1 the digits are 11, for channel 2 the digits are 12, for channel 3 the digits are 13, etc up to channel 6. Once the codes have been entered, the LED of the selected channel will blink for 2 minutes after which it exits programming.
5. Press and keep pressed - for about 5 seconds - the key PROG of the transmitter until the motor proves the correct storage of the end-of-stroke by moving for 1/2 second in both the ways
6. Release the key PROG7. To exit the programming mode, wait for the led to switch off or press key 1 to exit immediately.
To take the roll-up shutter to a middle position press thekey STOP for at least 3 seconds (when the motor isstopped): the roll-up shutter moves until reached theposition stored.
To delete the intermediate position, it a previously recordedremote control must be available. Repeat the procedure indicatedabove and skip step 4.
UPPERPOSITION
MIDDLEPOSITION
LOWERPOSITION
16
FRANÇAIS
GarantieV2 SPA assure les moteurs tubulaires pour soixante mois à partir dela date de fabrication et les composantes éventuelles électroniquespour vingt-quatre mois de la date de fabrication.La garantie concerne la réparation ou le remplacement des piècesjugées défectueuses dans la fabrication et revient incontestablementà V2 SPA. Le matériel sous garantie envoyé au siège de V2 SPA,devra être envoyé franco de port et devra être retourné port dû. Lematériel remplacé restera de propriété de V2 SPA.Le coût de la main-d’oeuvre reste en tout cas à la charge del’acheteur. Aucune indemnisation n’est reconnue pour toute la duréed’inutilisation de l’installation. Les temps de réparation ne prolongenten aucun cas la durée de la garantie. Il demeure bien entendu que lavalidité de la garantie est subordonnée au respect des spécificités etdes performances des produits, précisées dans les notices d’entretienincluses dans l’emballage.
La garantie ne comprend pas:• des pannes ou des dommages causés par le transport• des pannes ou des dommages causés par des défauts de
l’installation électrique et/ou par des omissions, des négligences, des inadéquations de l’installation à l’usage auquel elle est destinée et dans tous les cas d’utilisation anormale
• des pannes ou des dommages dus à des effractions de la part de personnel non autorisé ou à l’emploi de pièces rechange non originales
• des défauts causés par des agents chimiques ou par des phénomènes atmosphériques
• le matériel de consommation• les interventions pour des défauts présumés ou les
vérifications de complaisance
Caractéristiques des produitsLes caractéristiques des produits V2 SPA sont susceptibles d’êtremodifiées et améliorées à tout moment; donc, les caractéristiques deconstruction et l’image du matériel peuvent subir des modificationssans préavis.
Tribunal compétentÉtant donné que le contrat est perfectionné à travers Confirmationde Commande remplie à Racconigi, pour tout contentieux estapplicable le droit italien et le tribunal compétent est celui deSaluzzo.
CONSEILS IMPORTANTS• L’installation doit être faite par techniciens qualifiés suivant
attentivement les normes de sécurité en vigueur.• Pour le remplacement du câble d’alimentation du moteur, se
rapporter seulement à des techniciens qualifiés.• Ni percer ni insérer vises pour toute la longueur du moteur.• Ne pas mettre le moteur en contact avec liquides.• Eviter choc, écrasements ou chutes du moteur.• Altérations ou branchements incorrects annulent la garantie.
ATTENTION :1. Avant d’installer le moteur, enlever toutes les câbles non
nécessaires et désactiver les appareillages non nécessaires pour la mise en mouvement
2. Pour la mise en place de rideaux, il est nécessaire de garder une distance horizontale d’au moins 0,4 m entre la partie en mouvement complètement déroulée et tout objet fixe
3. Le câble d’alimentation ne doit pas être exposé à l’action directe des rayons solaires ou de la pluie
Remarque :a) Lire attentivement les instructions avant la mise en placeb) S’assurer que tous les accessoires sont fixés de sorte à ce que
le moteur fonctionne sans aucun problème mécanique. La charge doit être balancée par rapport à la puissance du moteur
c) Les branchements électriques doivent être effectués par le personnel technique spécialisé et œuvrer conformément aux lois
ATTENTION : Instructions importantes pour la sécurité.Il est important pour la sécurité des personnes de suivre cesinstructions. Sauver ces instructions.
ATTENTION : Instructions importantes pour la sécurité.• Suivre toutes les instructions : une mise en place erronée
peut engendrer de graves endommagements• Empêcher les enfants de jouer avec les commandes fixes.• Garder les télécommandes hors de la portée des enfants• Contrôler fréquemment la mise en place pour éviter des
déséquilibres et des signes d’usure ou endommagement aux câbles et aux ressorts
• Ne pas utiliser au cas où des réparations ou réglages seraient nécessaires
• Les pièces en mouvement doivent être installées à une hauteur supérieure à 2,5 m du sol ou de tout autre niveau y permettant l’accès
• L’élément d’actionnement d’un poussoir doit être placé directement auprès de l’élément mouvementé mais loin des pièces en mouvement et installé à une hauteur minimale de 1,5 m
• Les commandes fixes doivent être installées en position visible• Le mécanisme ne peut pas être utilisé en plein air• Prévoir au but du circuit un sectionneur bipolaire d’une
distance de ouverture de au moins 3mm.• Ne brancher plus d’un moteur pour chaque touche de
commande.
DÉCLARATION D'INCORPORATION POUR LES QUASI-MACHINES (Directive 2006/42/CE, Annexe II-B)
Le fabricant V2 S.p.A., ayant son siège social a: Corso Principi di Piemonte 65, 12035, Racconigi (CN), Italie
Déclare sous sa propre responsabilité que: l’automatisme modèle: VEO-RFE6-230V, VEO-RFE10-230V, VEO-RFE6-120V, VEO-RFE10-120V
Numéro de fabrication et année de construction: positionnés sur laplaque de donnéesDescription: actionneur électromécanique pour volets roulantset rideaux pare-soleil
• a été conçu pour être incorporé dans una volets roulants / rideaux pare-soleil garage en vue de former une machine conformément à la Directive 2006/42/CE.Cette machine ne pourra pas être mise en service avant d'être déclarée conforme aux dispositions de la directive 2006/42/CE (Annexe II-A)
• est conforme exigences essentielles applicables des Directives: Directive Machines 2006/42/CE (Annexe I, Chapitre 1)Directive basse tension 2006/95/CE Directive compatibilité électromagnétique 2004/108/CE Directive Radio 99/05/CE
La documentation technique est à disposition de l'autoritécompétente sur demande motivée à l'adresse suivante: V2 S.p.A., Corso Principi di Piemonte 65, 12035, Racconigi (CN), ItalieLa personne autorisée à signer la présente déclarationd'incorporation et à fournir la documentation technique est :
Cosimo De FalcoReprésentant légal de V2 S.p.A.Racconigi, le 11/01/2010
17

FRANÇAIS
Notices de montage1. Fixer l’étrier � au mur.2. Introduire le goujon � sur la tête du moteur et le fixer avec les
deux vis en dotation3. Insérer la couronne � sur le collier � du fin course (fig. 1)4. Insérer la poulie � sur le gujon du moteur �.5. Insérer la goupille � sur le gujon du moteur �.6. Insérer complètement le moteur dans le tube enrouleur.7. Fixer le tube enrouleur avec la poulie de traxion avec vis 4 x 10
(fig. 2)8. Introduire le goujon � dans l’étrier � et introduire la
goupille � dans le trou du gujon �
ARMOIRE DE COMMANDE INTEGREE Ce système d'ouverture est constitué par un moteur tubulaireavec armoire de commande intégrée avec les caractéristiquessuivantes: • Récepteur radio super-héterodine incorporé 434.15 MHz. • Le système est géré par émetteurs série DUO /ADLER. • Il est même possible gérer le store / volet roulant par un bouton de commande externe (type Norm. Ouvert, de n’importe quelle série).
• La programmation on peut la faire via radio ou par bouton de commande externe.
• Détection d'obstacles: si pendant la fermeture du store un obstacle est détecté, le dispositif ouvre complètement le store
���� FERME �� FERME �� FERME
���� STOP �� STOP �� STOP
���� OUVRE �� OUVRE �� OUVRE
LOGIQUE DI FONCTIONNEMENT DUPOUSSOIR EXTERNEA chaque pression du poussoir la centrale exécute de façonséquentielle le commande suivant:OUVRE �� STOP �� FERME �� STOP �� OUVRE ...
LOGIQUE EMETTEURLa logique du fonctionnement à chaque pression des touches estla suivante:
PROGRAMMATION DES EMETTEURSIl est possible mémoriser jusqu'à 48 canaux sur chaque centralede commande. Pour mémoriser les émetteurs lire avec attentionle paragraphe “PROGRAMMATION DES FONCTIONS A TRAVERSDES EMETTEURS DE LA SERIE DUO” ou “PROGRAMMATION DESFONCTIONS A TRAVERS DES EMETTEURS DE LA SERIE ADLER”.
TEMPS DE TRAVAIL DU MOTEURLa centrale arrête le mouvement du moteur après 2 minute. Encas de mauvais fonctionnement du fin course, ce “time out”évite le surchauffe du moteur.
PROGRAMMATION DES FONCTIONS ATRAVERS DES EMETTEURS DE LA SERIE DUO
En utilisant un émetteurde la série DUO, il estpossible modifier lesfonctions de la centralequi contrôle le moteurtubulaire.
DUO est équipé avec undip-switch à 10interrupteurs grâceauquel il est possiblemodifier les fonctionsdésirées : mettre sur ONl'interrupteurcorrespondant à lafonction qu'on veutprogrammer et suivre attentivement le procédé dédié.
ATTENTION: Tous les autres interrupteurs doivent être sur OFF.
DIP FUNCTION
1Mémorisation des émetteurs et sélection de la modalité store
2Mémorisation des émetteurs et sélection de la modalité volets
3 Effacement total de tous les émetteurs mémorisés
4 Programmation de la position supérieure du fin de course
5 Programmation de la position inférieure du fin de course
6 Programmation de la position intermédiaire
7-8-9-10 NON UTILISÉ
Switch 1 : mémorisation des émetteurs etsélection de la modalité store
Pour mémoriser un émetteur TX1 dans un moteur avec unearmoire de commande vierge, procéder comme suit :
ATTENTION : le premier émetteur qu'on mémorise détermine ladirection de mouvement du moteur.
1. N’alimenter que le moteur à programmer2. Régler en position ON le switch 1 de l'émetteur TX13. Seul DUO à canaux multiples: appuyer plusieurs fois la touche SELC de l'émetteur TX1 jusqu'à visualiser le canal désiré.
4. Appuyer et maintenir appuyé (pour 5 secondes environs) la touche PROG de l'émetteur TX1 jusqu'à quand le moteur bouge dans une direction.
5. Relâcher la touche PROG : le moteur s'arrêt.6. Appuyer les touches UP ou DOWN selon la direction dans laquelle le moteur se bougeait avant de s'arrêter :- si le store montait, appuyer sur la touche UP ; direction acquise: la touche UP fait monter le store, la touche DOWN fait descendre le store;- si le store descendait, appuyer sur la touche DOWN; direction acquise: la touche DOWN fait descendre le store, la touche UP fait monter le store.
7. Régler en position OFF le switch 1.
Essayer d'actionner le store et vérifier qu'il marche selon lalogique décrite. Si la logique est inversée, il est nécessaire effacertous les codes mémorisés (voir Switch 3) et répéter les opérationsprécédentes.
18
FRANÇAIS
Pour ajouter un autre émetteur TX2 à la centrale il est nécessaireavoir à disposition une télécommande précédemment mémoriséeet suivre ce procédé:
1. Seul DUO à canaux multiples: appuyer plusieurs fois la touche SELC de l'émetteur TX1 jusqu'à visualiser le canal mémorisé.
2. Seul DUO à canaux multiples: appuyer plusieurs fois la touche SELC du nouvel émetteur TX2 jusqu'à visualiser le canal à mémoriser.
3. Positionner le store à mi-hauteur avec le TX1.4. Régler en position ON le switch 1 de l'émetteur TX1.5. Appuyer et maintenir appuyé, pour 5 secondes environs, la touche PROG du TX1 jusqu'à quand le moteur bouge.
6. Relâcher la touche PROG, le moteur s'arrêt.7. Appuyer la touche UP ou DOWN du TX2 : l'émetteur est mémorisé avec la même logique du TX1.
8. Régler en position OFF le switch 1.
Switch 2 : Mémorisation des émetteurs etsélection de la modalité volets
Pour mémoriser la voie 1 d'un émetteur TX1 dans une centrale 1vierge contrôlant un volet, suivre ce procédé:
ATTENTION: le premier émetteur qu'on mémorise détermine ladirection de mouvement du moteur.
Répéter le procédé suit pour le switch1, en utilisant seulement leswitch 2.
Switch 3 : Effacement total de tous lesémetteurs mémorisés
Pour effacer tous les émetteurs mémorisés dans la centrale, il estnécessaire avoir à disposition une télécommande précédemmentmémorisée et suivre ce procédé :
1. N’alimenter que le moteur à programmer2. Seul DUO à canaux multiples: appuyer plusieurs fois la touche SELC de l'émetteur jusqu'à visualiser le canal mémorisé.
3. Positionner le volet à mi-hauteur.4. Régler le switch 3 de l'émetteur en position ON.5. Appuyer et maintenir appuyé la touche PROG de l'émetteur jusqu'à quand le moteur bouge dans les deux directions pour 1 sec., en indiquant la fin de l'effacement.
6. Relâcher la touche PROG et régler le switch 3 de l'émetteur en position OFF.
Pour effacer tous les codes avec un émetteur non-mémorisésuivre ce procédé :
1. Positionner le volet à mi-hauteur.2. Enlever l'alimentation au système.3. Régler le switch 3 d'un émetteur sur la position ON.4. Appuyer et maintenir appuyée la touche PROG.5. N'alimenter que la centrale sur laquelle on doit effectuer l'effacement : après 1 seconde environ le moteur bouge dans les deux directions en signalant le correct effacement.
6. Relâcher la touche PROG et régler le switch 3 en position OFF.
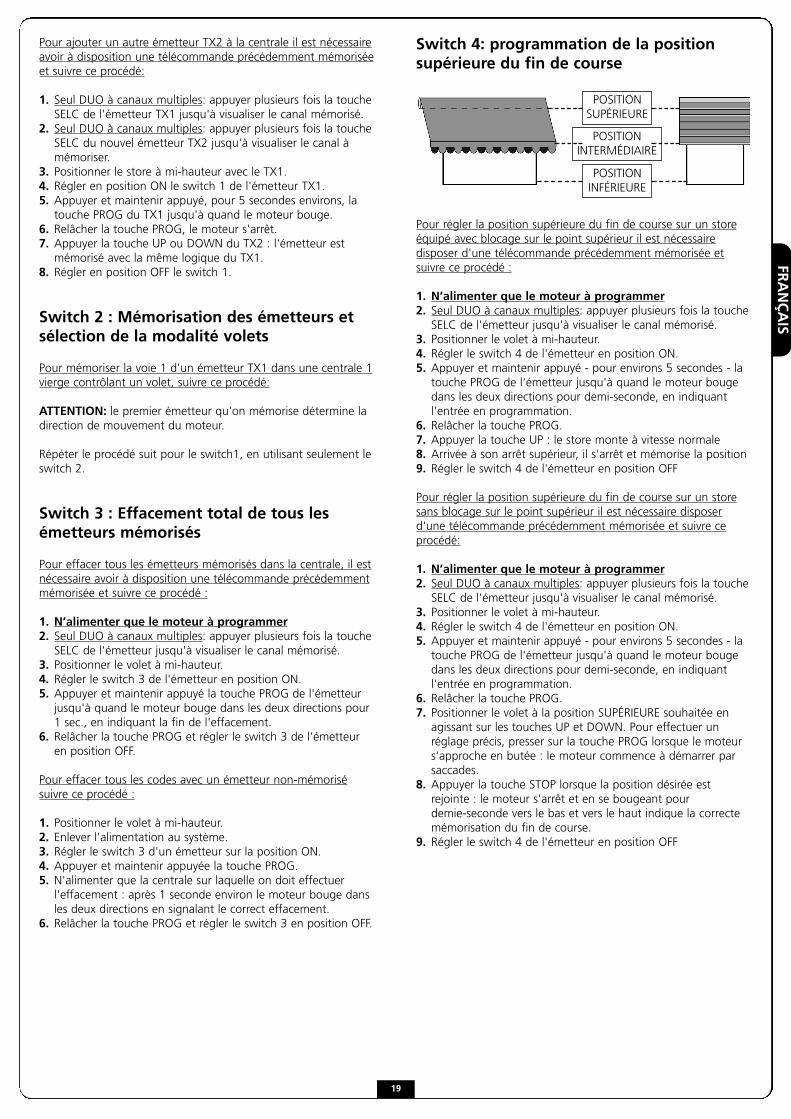
Switch 4: programmation de la positionsupérieure du fin de course
Pour régler la position supérieure du fin de course sur un storeéquipé avec blocage sur le point supérieur il est nécessairedisposer d'une télécommande précédemment mémorisée etsuivre ce procédé :
1. N’alimenter que le moteur à programmer2. Seul DUO à canaux multiples: appuyer plusieurs fois la touche SELC de l'émetteur jusqu'à visualiser le canal mémorisé.
3. Positionner le volet à mi-hauteur.4. Régler le switch 4 de l'émetteur en position ON.5. Appuyer et maintenir appuyé - pour environs 5 secondes - la touche PROG de l'émetteur jusqu'à quand le moteur bouge dans les deux directions pour demi-seconde, en indiquant l'entrée en programmation.
6. Relâcher la touche PROG.7. Appuyer la touche UP : le store monte à vitesse normale8. Arrivée à son arrêt supérieur, il s'arrêt et mémorise la position9. Régler le switch 4 de l'émetteur en position OFF
Pour régler la position supérieure du fin de course sur un storesans blocage sur le point supérieur il est nécessaire disposerd'une télécommande précédemment mémorisée et suivre ceprocédé:
1. N’alimenter que le moteur à programmer2. Seul DUO à canaux multiples: appuyer plusieurs fois la touche SELC de l'émetteur jusqu'à visualiser le canal mémorisé.
3. Positionner le volet à mi-hauteur.4. Régler le switch 4 de l'émetteur en position ON.5. Appuyer et maintenir appuyé - pour environs 5 secondes - la touche PROG de l'émetteur jusqu'à quand le moteur bouge dans les deux directions pour demi-seconde, en indiquant l'entrée en programmation.
6. Relâcher la touche PROG.7. Positionner le volet à la position SUPÉRIEURE souhaitée en agissant sur les touches UP et DOWN. Pour effectuer un réglage précis, presser sur la touche PROG lorsque le moteur s’approche en butée : le moteur commence à démarrer par saccades.
8. Appuyer la touche STOP lorsque la position désirée est rejointe : le moteur s'arrêt et en se bougeant pour demie-seconde vers le bas et vers le haut indique la correcte mémorisation du fin de course.
9. Régler le switch 4 de l'émetteur en position OFF
POSITIONSUPÉRIEURE
POSITIONINTERMÉDIAIRE
POSITIONINFÉRIEURE
19
FRANÇAIS
Switch 5 : Programmation de la positioninférieure du fin de course
Pour régler la position inférieure du fin de course il est nécessairedisposer d'une télécommande précédemment mémorisée etsuivre ce procédé:
1. Seul DUO à canaux multiples: appuyer plusieurs fois la touche SELC de l'émetteur jusqu'à visualiser le canal mémorisé.
2. Positionner le volet à mi-hauteur.3. Régler le switch 5 de l'émetteur en position ON.4. Appuyer et maintenir appuyé - pour environs 5 secondes - la touche PROG de l'émetteur jusqu'à quand le moteur bouge dans les deux directions pour demi-seconde, en indiquant l'entrée en programmation.
5. Relâcher la touche PROG.6. Positionner le volet à la position INFÉRIEURE souhaitée en agissant sur les touches UP et DOWN. Pour effectuer un réglage précis, presser sur la touche PROG lorsque le moteur s’approche en butée : le moteur commence à démarrer par saccades.
7. Appuyer la touche STOP lorsque la position désirée est rejointe : le moteur s'arrêt et en se bougeant pour demie-seconde vers le haut et vers le bas indique la correcte mémorisation du fin de course.
8. Régler le switch 5 de l'émetteur en position OFF
Switch 6 : Programmation de la positionintermédiaire du fin de course
Pour régler la position intermédiaire du fin de course il estnécessaire disposer d'une télécommande précédemmentmémorisée et suivre ce procédé :
1. Seul DUO à canaux multiples: appuyer plusieurs fois la touche SELC de l'émetteur jusqu'à visualiser le canal mémorisé.
2. Positionner le volet à la position intermédiaire désirée par les touches UP, DOWN et STOP
3. Régler le switch 6 de l'émetteur en position ON.4. Appuyer et maintenir appuyé - pour environs 5 secondes - la touche PROG de l'émetteur jusqu'à quand le moteur bouge dans les deux directions pour demi-seconde, en indiquant la mémorisation de la position intermédiaire.
5. Relâcher la touche PROG.6. Régler le switch 6 de l'émetteur en position OFF
Pour positionner le store en position intermédiaire appuyerla touche STOP pour environs 3 secondes (le moteurarrêté): le store bouge jusqu'à rejoindre la positionmémorisée.
Pour effacer la position intermédiaire précédemment mémoriséeil est nécessaire disposer d'une télécommande précédemmentmémorisée et suivre ce procédé :
1. Positionner le volet à mi-hauteur.2. Régler en position ON le switch 6 de l'émetteur3. Appuyer et maintenir appuyé - pour environs 5 secondes - la touche PROG de l'émetteur jusqu'à quand le moteur bouge dans les deux directions pour demi-seconde, en indiquant l'effacement de la position intermédiaire
4. Relâcher la touche PROG5. Régler en position OFF le switch 6 de l'émetteur
PROGRAMMATION DES FONCTIONS A TRAVERS DES EMETTEURS DE LA SERIE ADLEREn utilisant un émetteur de la série ADLER il est possible demodifier les fonctions de l’armoire de commande pilotant lemoteur tubulaire.
Mémorisation RAPIDE des émetteurs
Pour mémoriser les télécommandes sur une armoire decommande vierge pilotant un volet roulant ou un store (NONplissé), suivre la procédure ci-après :
ATTENTION : le premier émetteur que l'on mémorise déterminela direction de mouvement du moteur.
1. N’alimenter que le moteur à programmer2. Presser et maintenir enfoncées les touches UP et DOWN jusqu’à ce que le moteur commence à démarrer en une direction
3. Relâcher les touches : le moteur s’arrête4. Presser sur les touches UP ou DOWN selon la direction dans laquelle le roulant avançait avant de s’arrêter : - si le roulant montait appuyer sur la touche UP ; direction acquise : touche UP fait monter le roulant, touche DOWN fait descendre le roulant
- si le roulant descendait appuyer sur la touche DOWN ; direction acquise : touche DOWN fait descendre le roulant, touche UP fait monter le roulant.
5. Programmation terminée
Pour ajouter d’autres télécommandes, suivre la procéduresuivante :
6. Presser et maintenir enfoncées sur les touches UP et DOWN d’une télécommande déjà mémorisée jusqu’à ce que le moteur commence à démarrer en une direction
7. Relâcher les touches : le moteur s’arrête8. Presser sur la touche UP ou DOWN de la nouvelle télécommande
ATTENTION : Si le store est plissé, effectuer la mémorisation dela première télécommande suivant la procédure « 1.Mémorisation des émetteurs et sélection de la modalité store ».
Programmation AVANCÉE des fonctions Pour effectuer la programmation AVANCÉE des fonctions, il estnécessaire d’enlever le masque de la télécommande et de suivresoigneusement les procédures dédiées aux différentes fonctions.
Chaque fonction est sélectionnable en tapant un code pendant laprocédure de programmation ; ci-après un tableau récapitulatifdes fonctions avec les différents codes de programmation.
UP
STOP
DOWN
20
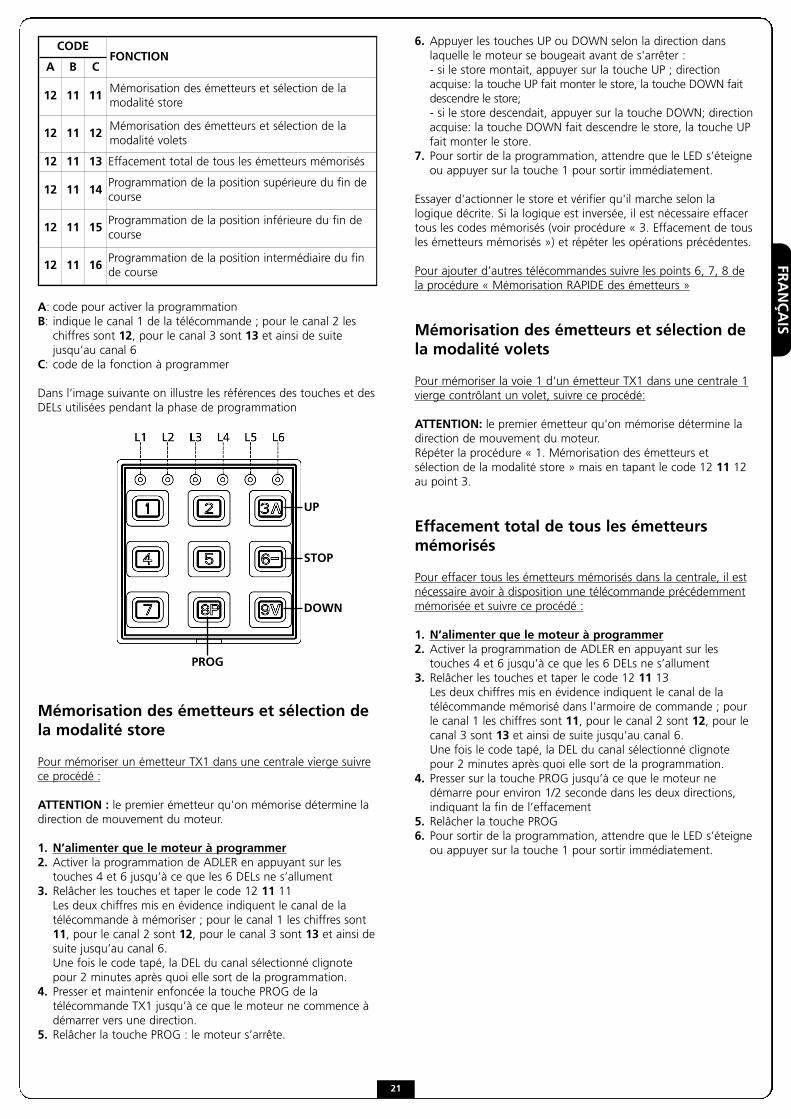
FRANÇAIS
A: code pour activer la programmationB: indique le canal 1 de la télécommande ; pour le canal 2 les chiffres sont 12, pour le canal 3 sont 13 et ainsi de suite jusqu’au canal 6
C: code de la fonction à programmer
Dans l’image suivante on illustre les références des touches et desDELs utilisées pendant la phase de programmation
Mémorisation des émetteurs et sélection dela modalité store
Pour mémoriser un émetteur TX1 dans une centrale vierge suivrece procédé :
ATTENTION : le premier émetteur qu'on mémorise détermine ladirection de mouvement du moteur.
1. N’alimenter que le moteur à programmer2. Activer la programmation de ADLER en appuyant sur les touches 4 et 6 jusqu’à ce que les 6 DELs ne s’allument
3. Relâcher les touches et taper le code 12 11 11Les deux chiffres mis en évidence indiquent le canal de la télécommande à mémoriser ; pour le canal 1 les chiffres sont 11, pour le canal 2 sont 12, pour le canal 3 sont 13 et ainsi de suite jusqu’au canal 6. Une fois le code tapé, la DEL du canal sélectionné clignote pour 2 minutes après quoi elle sort de la programmation.
4. Presser et maintenir enfoncée la touche PROG de la télécommande TX1 jusqu’à ce que le moteur ne commence à démarrer vers une direction.
5. Relâcher la touche PROG : le moteur s’arrête.
6. Appuyer les touches UP ou DOWN selon la direction dans laquelle le moteur se bougeait avant de s'arrêter :- si le store montait, appuyer sur la touche UP ; direction acquise: la touche UP fait monter le store, la touche DOWN fait descendre le store;- si le store descendait, appuyer sur la touche DOWN; direction acquise: la touche DOWN fait descendre le store, la touche UP fait monter le store.
7. Pour sortir de la programmation, attendre que le LED s’éteigne ou appuyer sur la touche 1 pour sortir immédiatement.
Essayer d'actionner le store et vérifier qu'il marche selon lalogique décrite. Si la logique est inversée, il est nécessaire effacertous les codes mémorisés (voir procédure « 3. Effacement de tousles émetteurs mémorisés ») et répéter les opérations précédentes.
Pour ajouter d’autres télécommandes suivre les points 6, 7, 8 dela procédure « Mémorisation RAPIDE des émetteurs »
Mémorisation des émetteurs et sélection dela modalité volets
Pour mémoriser la voie 1 d'un émetteur TX1 dans une centrale 1vierge contrôlant un volet, suivre ce procédé:
ATTENTION: le premier émetteur qu'on mémorise détermine ladirection de mouvement du moteur. Répéter la procédure « 1. Mémorisation des émetteurs etsélection de la modalité store » mais en tapant le code 12 11 12au point 3.
Effacement total de tous les émetteursmémorisés
Pour effacer tous les émetteurs mémorisés dans la centrale, il estnécessaire avoir à disposition une télécommande précédemmentmémorisée et suivre ce procédé :
1. N’alimenter que le moteur à programmer2. Activer la programmation de ADLER en appuyant sur les touches 4 et 6 jusqu’à ce que les 6 DELs ne s’allument
3. Relâcher les touches et taper le code 12 11 13Les deux chiffres mis en évidence indiquent le canal de la télécommande mémorisé dans l’armoire de commande ; pour le canal 1 les chiffres sont 11, pour le canal 2 sont 12, pour le canal 3 sont 13 et ainsi de suite jusqu’au canal 6.Une fois le code tapé, la DEL du canal sélectionné clignote pour 2 minutes après quoi elle sort de la programmation.
4. Presser sur la touche PROG jusqu’à ce que le moteur ne démarre pour environ 1/2 seconde dans les deux directions, indiquant la fin de l’effacement
5. Relâcher la touche PROG 6. Pour sortir de la programmation, attendre que le LED s’éteigne ou appuyer sur la touche 1 pour sortir immédiatement.
UP
STOP
DOWN
PROG
CODEFONCTION
A B C
12 11 11Mémorisation des émetteurs et sélection de lamodalité store
12 11 12Mémorisation des émetteurs et sélection de lamodalité volets
12 11 13 Effacement total de tous les émetteurs mémorisés
12 11 14Programmation de la position supérieure du fin decourse
12 11 15Programmation de la position inférieure du fin decourse
12 11 16Programmation de la position intermédiaire du finde course
21
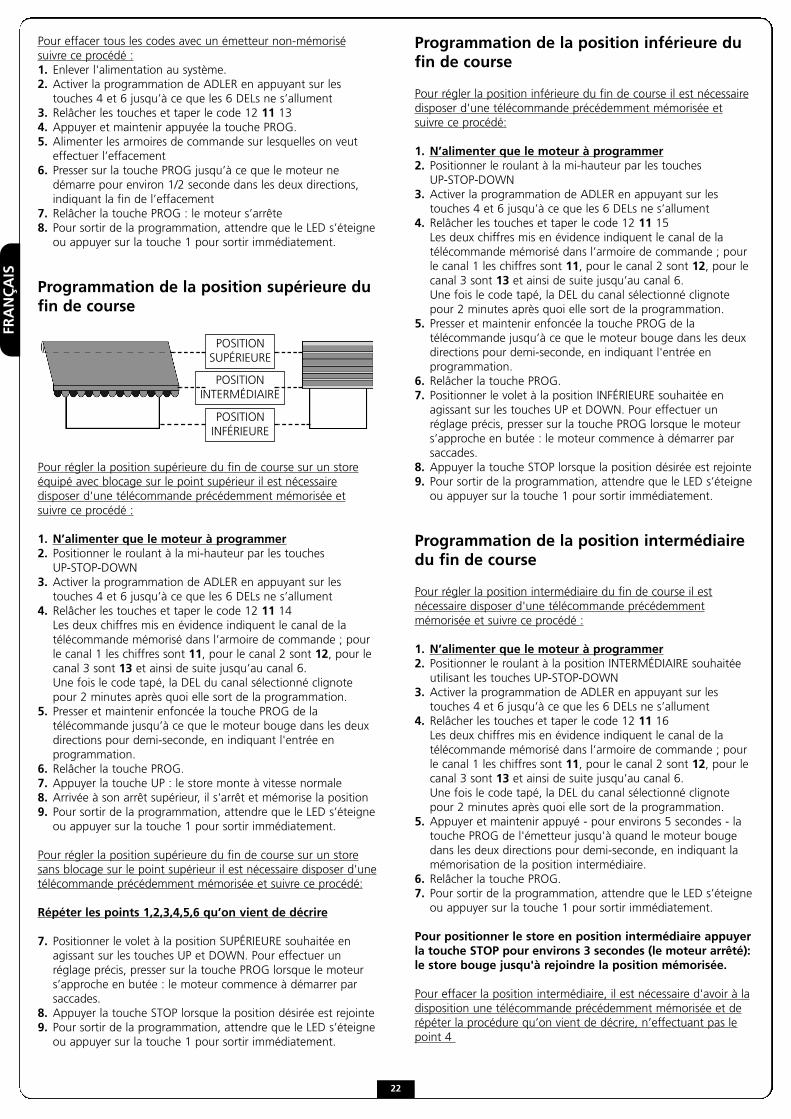
FRANÇAIS
Pour effacer tous les codes avec un émetteur non-mémorisésuivre ce procédé :1. Enlever l'alimentation au système.2. Activer la programmation de ADLER en appuyant sur les touches 4 et 6 jusqu’à ce que les 6 DELs ne s’allument
3. Relâcher les touches et taper le code 12 11 134. Appuyer et maintenir appuyée la touche PROG.5. Alimenter les armoires de commande sur lesquelles on veut effectuer l’effacement
6. Presser sur la touche PROG jusqu’à ce que le moteur ne démarre pour environ 1/2 seconde dans les deux directions, indiquant la fin de l’effacement
7. Relâcher la touche PROG : le moteur s’arrête8. Pour sortir de la programmation, attendre que le LED s’éteigne ou appuyer sur la touche 1 pour sortir immédiatement.
Programmation de la position supérieure dufin de course
Pour régler la position supérieure du fin de course sur un storeéquipé avec blocage sur le point supérieur il est nécessairedisposer d'une télécommande précédemment mémorisée etsuivre ce procédé :
1. N’alimenter que le moteur à programmer2. Positionner le roulant à la mi-hauteur par les touches UP-STOP-DOWN
3. Activer la programmation de ADLER en appuyant sur les touches 4 et 6 jusqu’à ce que les 6 DELs ne s’allument
4. Relâcher les touches et taper le code 12 11 14Les deux chiffres mis en évidence indiquent le canal de la télécommande mémorisé dans l’armoire de commande ; pour le canal 1 les chiffres sont 11, pour le canal 2 sont 12, pour le canal 3 sont 13 et ainsi de suite jusqu’au canal 6.Une fois le code tapé, la DEL du canal sélectionné clignote pour 2 minutes après quoi elle sort de la programmation.
5. Presser et maintenir enfoncée la touche PROG de la télécommande jusqu’à ce que le moteur bouge dans les deux directions pour demi-seconde, en indiquant l'entrée en programmation.
6. Relâcher la touche PROG.7. Appuyer la touche UP : le store monte à vitesse normale8. Arrivée à son arrêt supérieur, il s'arrêt et mémorise la position9. Pour sortir de la programmation, attendre que le LED s’éteigne ou appuyer sur la touche 1 pour sortir immédiatement.
Pour régler la position supérieure du fin de course sur un storesans blocage sur le point supérieur il est nécessaire disposer d'unetélécommande précédemment mémorisée et suivre ce procédé:
Répéter les points 1,2,3,4,5,6 qu’on vient de décrire
7. Positionner le volet à la position SUPÉRIEURE souhaitée en agissant sur les touches UP et DOWN. Pour effectuer un réglage précis, presser sur la touche PROG lorsque le moteur s’approche en butée : le moteur commence à démarrer par saccades.
8. Appuyer la touche STOP lorsque la position désirée est rejointe9. Pour sortir de la programmation, attendre que le LED s’éteigne ou appuyer sur la touche 1 pour sortir immédiatement.
Programmation de la position inférieure dufin de course
Pour régler la position inférieure du fin de course il est nécessairedisposer d'une télécommande précédemment mémorisée etsuivre ce procédé:
1. N’alimenter que le moteur à programmer2. Positionner le roulant à la mi-hauteur par les touches UP-STOP-DOWN
3. Activer la programmation de ADLER en appuyant sur les touches 4 et 6 jusqu’à ce que les 6 DELs ne s’allument
4. Relâcher les touches et taper le code 12 11 15Les deux chiffres mis en évidence indiquent le canal de la télécommande mémorisé dans l’armoire de commande ; pour le canal 1 les chiffres sont 11, pour le canal 2 sont 12, pour le canal 3 sont 13 et ainsi de suite jusqu’au canal 6.Une fois le code tapé, la DEL du canal sélectionné clignote pour 2 minutes après quoi elle sort de la programmation.
5. Presser et maintenir enfoncée la touche PROG de la télécommande jusqu’à ce que le moteur bouge dans les deux directions pour demi-seconde, en indiquant l'entrée en programmation.
6. Relâcher la touche PROG.7. Positionner le volet à la position INFÉRIEURE souhaitée en agissant sur les touches UP et DOWN. Pour effectuer un réglage précis, presser sur la touche PROG lorsque le moteur s’approche en butée : le moteur commence à démarrer par saccades.
8. Appuyer la touche STOP lorsque la position désirée est rejointe9. Pour sortir de la programmation, attendre que le LED s’éteigne ou appuyer sur la touche 1 pour sortir immédiatement.
Programmation de la position intermédiairedu fin de course
Pour régler la position intermédiaire du fin de course il estnécessaire disposer d'une télécommande précédemmentmémorisée et suivre ce procédé :
1. N’alimenter que le moteur à programmer2. Positionner le roulant à la position INTERMÉDIAIRE souhaitée utilisant les touches UP-STOP-DOWN
3. Activer la programmation de ADLER en appuyant sur les touches 4 et 6 jusqu’à ce que les 6 DELs ne s’allument
4. Relâcher les touches et taper le code 12 11 16Les deux chiffres mis en évidence indiquent le canal de la télécommande mémorisé dans l’armoire de commande ; pour le canal 1 les chiffres sont 11, pour le canal 2 sont 12, pour le canal 3 sont 13 et ainsi de suite jusqu’au canal 6.Une fois le code tapé, la DEL du canal sélectionné clignote pour 2 minutes après quoi elle sort de la programmation.
5. Appuyer et maintenir appuyé - pour environs 5 secondes - la touche PROG de l'émetteur jusqu'à quand le moteur bouge dans les deux directions pour demi-seconde, en indiquant la mémorisation de la position intermédiaire.
6. Relâcher la touche PROG.7. Pour sortir de la programmation, attendre que le LED s’éteigne ou appuyer sur la touche 1 pour sortir immédiatement.
Pour positionner le store en position intermédiaire appuyerla touche STOP pour environs 3 secondes (le moteur arrêté):le store bouge jusqu'à rejoindre la position mémorisée.
Pour effacer la position intermédiaire, il est nécessaire d'avoir à ladisposition une télécommande précédemment mémorisée et derépéter la procédure qu’on vient de décrire, n’effectuant pas lepoint 4
POSITIONSUPÉRIEURE
POSITIONINTERMÉDIAIRE
POSITIONINFÉRIEURE
22
ESPAÑOL
GarantíaV2 SPA garantiza los motores tubulares durante sesenta meses desdela fecha de fabricación y los eventuales componentes electrónicosdurante veinticuatro meses desde la fecha de fabricación. La garantía consiste en la reparación o sustitución gratuita de laspartes reconocidas como en la fabricación, a incuestionable juicio deV2 SPA. El material en garantía mandada a la sede de V2 SPA,deberá ser enviado en puerto franco y será reexpedido en puertoasignado. El material sustituido quedará de propiedad de V2 SPA. El coste de la mano de obra queda en todo caso a cargo delcomprador. No se reconoce ninguna indemnización por el período deinoperatividad de la instalación. La intervención no prolonga el plazode duración de la garantía. Queda entendido que la validez de lagarantía está subordinada al respeto de las especificacionesprestacionales de los productos, indicadas en los manuales deinstrucción que se suministra junto con los productos mismos.
La garantía no comprende:• Averías o daños causados por el transporte.• Averías o daños causados por vicios de la instalación eléctrico
e/o descuido, negligencia, inadecuación de la instalación al uso para la que está destinada y en cualquier caso por el uso anómalo.
• Averías o daños debidos a manipulaciones por parte de personal no autorizado o al empleo de piezas de repuesto no originales.
• Defectos causados por agentes químicos o fenómenos atmosféricos.
• El material de consumo.• Las intervenciones por vicios presuntos o las verificaciones a
su comodidad.
Características de los productosLos productos V2 SPA están sujetos a continuas innovaciones ymejoras; por tanto, las características constructivas y la imagen de losmismos, pueden sufrir variaciones incluso sin aviso previo.
Tribunal competenteYa que el contrato es perfeccionado mediante Confirmación dePedido cumplimentada en Racconigi, en caso de controversia legalde cualquiera naturaleza es aplicable el derecho italiano y escompetente el Tribunal de Saluzzo.
ADVERTENCIAS IMPORTANTES• L’instalación debe ser hecha por técnicos especializados que
sepan atenerse a las normas de seguridad vigentes.• Para remplazar el cable de alimentacción del motor, dirigirse
a técnicos especializados• No pinchar y no introducir tornillos por todo el largo del motor.• No poner el motor en contacto con liquidos.• Evitar golpes, aplastamientos y caidas del motor.• Eventuales daños o connexiónes equivocadas anularan la
garantía.
ATENCIÓN:1. Antes de instalar el motor, quite todos los cables no
necesarios e inhabilite los equipos que no sean necesarios para la puesta en movimiento.
2. Para la instalación de cortinas, es necesario mantener una distancia horizontal de al menos 0,4 m entre la parte en movimiento completamente desenrollada y cualquier objeto fijo.
3. El cable de alimentación no debe estar expuesto a la acción directa de los rayos del sol o de la lluvia.
Notas:a) Lea atentamente las instrucciones antes de la instalación.b) Asegúrese de que todos los accesorios sean fijados de modo
que el motor trabaja sin problemas mecánicos. La carga debe ser equilibrada a la potencia del motor.
c) Las conexiones eléctricas deben ser efectuadas por personal técnico especializado y operar en conformidad con las leyes
ATENCIÓN: instrucciones importantes de seguridad. Es importante para la seguridad de las personas seguir estasinstrucciones. Guarde estas instrucciones.
ATENCIÓN: Instrucciones importantes por la seguridad. • Siga todas las instrucciones: una instalación no correcta
puede provocar graves daños.• No permita que los niños jueguen con los mandos fijos. • Mantenga los mandos a distancia fuera del alcance de los niños• Controle frecuentemente la instalación para evitar
desequilibrios y signos de desgaste o daño en los cables y en los muelles.
• No utilice en caso de que sean necesarias reparaciones o regulaciones.
• Las partes en movimiento deben ser instaladas a una altura superior a 2,5 m del suelo o de cualquier otro nivel que permita el acceso.
• El elemento accionador de un botón pulsador debe estar situado directamente cerca del elemento movido pero lejos de partes en movimiento e instalado a una altura mínima de 1,5 m.
• Los mandos fijos deben ser instalados en una posición visible. • El dispositivo no puede ser utilizado en un ambiente exterior.• Prever al comienzo del circuito un secciónador bipolar con
una distancia de abertura por lo meno de 3 mm.• No connectar más de un motor por cada tecla de comando.
DECLARACIÓN DE INCORPORACIÓN PARA LASCASI MÁQUINAS (Directiva 2006/42/CE, Anexo II-B)
El fabricante V2 S.p.A., con sede en Corso Principi di Piemonte 65, 12035, Racconigi (CN), ItaliaDeclara bajo su propia responsabilidad que:
el automatismo modelo: VEO-RFE6-230V, VEO-RFE10-230V, VEO-RFE6-120V, VEO-RFE10-120V
Matrícula y año de construcción: puestos en la placa deidentificación de datosDescripción: Servomotor electromecánico para cortinas de sol ypersianas enrollables
• está destinado a ser incorporado en una cortina de sol / persiana enrollable para constituir una máquina conforme a la Directiva 2006/42/CE. Dicha máquina no podrá ser puesta en servicio antes de ser declarada conforme con las disposiciones de la directiva 2006/42/CE (Anexo II-A)
• es conforme con los requisitos esenciales aplicables de las Directivas:Directiva de Máquinas 2006/42/CE (Anexo I, Capítulo 1)Directiva de baja tensión 2006/95/CEDirectiva de compatibilidad electromagnética 2004/108/CEDirectiva de Radio 99/05/CE
La documentación técnica está a disposición de la autoridadcompetente bajo petición fundada en: V2 S.p.A., Corso Principi di Piemonte 65, 12035, Racconigi (CN), ItaliaLa persona autorizada para firmar la presente declaración deincorporación y a proporcionar la documentación técnica:
Cosimo De FalcoRepresentante legal de V2 S.p.A.Racconigi, a 11/01/2010
23
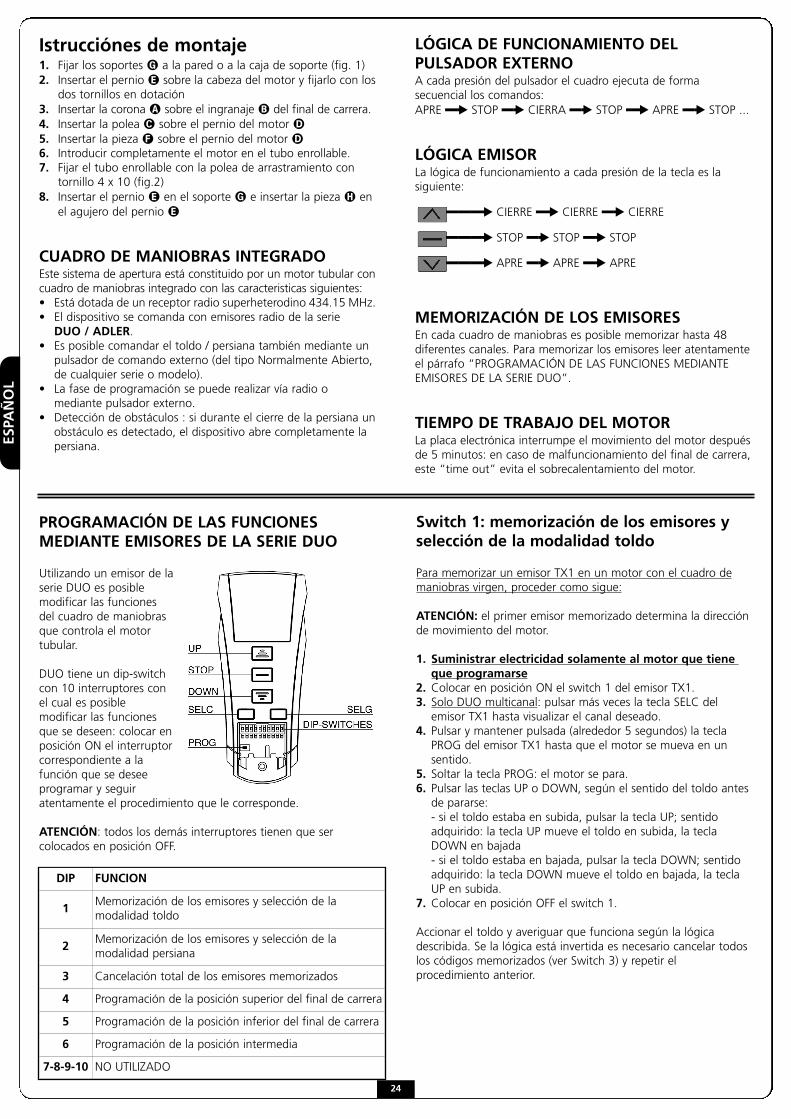
ESPA
ÑOL
Istrucciónes de montaje1. Fijar los soportes � a la pared o a la caja de soporte (fig. 1)2. Insertar el pernio � sobre la cabeza del motor y fijarlo con los
dos tornillos en dotación3. Insertar la corona � sobre el ingranaje � del final de carrera.4. Insertar la polea � sobre el pernio del motor �5. Insertar la pieza � sobre el pernio del motor �6. Introducir completamente el motor en el tubo enrollable.7. Fijar el tubo enrollable con la polea de arrastramiento con
tornillo 4 x 10 (fig.2)8. Insertar el pernio � en el soporte � e insertar la pieza � en
el agujero del pernio �
CUADRO DE MANIOBRAS INTEGRADOEste sistema de apertura está constituido por un motor tubular concuadro de maniobras integrado con las caracteristicas siguientes: • Está dotada de un receptor radio superheterodino 434.15 MHz. • El dispositivo se comanda con emisores radio de la serie
DUO / ADLER. • Es posible comandar el toldo / persiana también mediante un pulsador de comando externo (del tipo Normalmente Abierto, de cualquier serie o modelo).
• La fase de programación se puede realizar vía radio o mediante pulsador externo.
• Detección de obstáculos : si durante el cierre de la persiana un obstáculo es detectado, el dispositivo abre completamente la persiana.
LÓGICA DE FUNCIONAMIENTO DELPULSADOR EXTERNOA cada presión del pulsador el cuadro ejecuta de formasecuencial los comandos:APRE �� STOP �� CIERRA �� STOP �� APRE �� STOP ...
LÓGICA EMISORLa lógica de funcionamiento a cada presión de la tecla es lasiguiente:
MEMORIZACIÓN DE LOS EMISORESEn cada cuadro de maniobras es posible memorizar hasta 48diferentes canales. Para memorizar los emisores leer atentamenteel párrafo “PROGRAMACIÓN DE LAS FUNCIONES MEDIANTEEMISORES DE LA SERIE DUO”.
TIEMPO DE TRABAJO DEL MOTORLa placa electrónica interrumpe el movimiento del motor despuésde 5 minutos: en caso de malfuncionamiento del final de carrera,este “time out” evita el sobrecalentamiento del motor.
PROGRAMACIÓN DE LAS FUNCIONESMEDIANTE EMISORES DE LA SERIE DUO
Utilizando un emisor de laserie DUO es posiblemodificar las funcionesdel cuadro de maniobrasque controla el motortubular.
DUO tiene un dip-switchcon 10 interruptores conel cual es posiblemodificar las funcionesque se deseen: colocar enposición ON el interruptorcorrespondiente a lafunción que se deseeprogramar y seguiratentamente el procedimiento que le corresponde.
ATENCIÓN: todos los demás interruptores tienen que sercolocados en posición OFF.
DIP FUNCION
1Memorización de los emisores y selección de lamodalidad toldo
2Memorización de los emisores y selección de lamodalidad persiana
3 Cancelación total de los emisores memorizados
4 Programación de la posición superior del final de carrera
5 Programación de la posición inferior del final de carrera
6 Programación de la posición intermedia
7-8-9-10 NO UTILIZADO
Switch 1: memorización de los emisores yselección de la modalidad toldo
Para memorizar un emisor TX1 en un motor con el cuadro demaniobras virgen, proceder como sigue:
ATENCIÓN: el primer emisor memorizado determina la direcciónde movimiento del motor.
1. Suministrar electricidad solamente al motor que tiene que programarse
2. Colocar en posición ON el switch 1 del emisor TX1.3. Solo DUO multicanal: pulsar más veces la tecla SELC del emisor TX1 hasta visualizar el canal deseado.
4. Pulsar y mantener pulsada (alrededor 5 segundos) la tecla PROG del emisor TX1 hasta que el motor se mueva en un sentido.
5. Soltar la tecla PROG: el motor se para.6. Pulsar las teclas UP o DOWN, según el sentido del toldo antes de pararse:- si el toldo estaba en subida, pulsar la tecla UP; sentido adquirido: la tecla UP mueve el toldo en subida, la tecla DOWN en bajada- si el toldo estaba en bajada, pulsar la tecla DOWN; sentido adquirido: la tecla DOWN mueve el toldo en bajada, la tecla UP en subida.
7. Colocar en posición OFF el switch 1.
Accionar el toldo y averiguar que funciona según la lógicadescribida. Se la lógica está invertida es necesario cancelar todoslos códigos memorizados (ver Switch 3) y repetir elprocedimiento anterior.
���� CIERRE �� CIERRE �� CIERRE
���� STOP �� STOP �� STOP
���� APRE �� APRE �� APRE
24
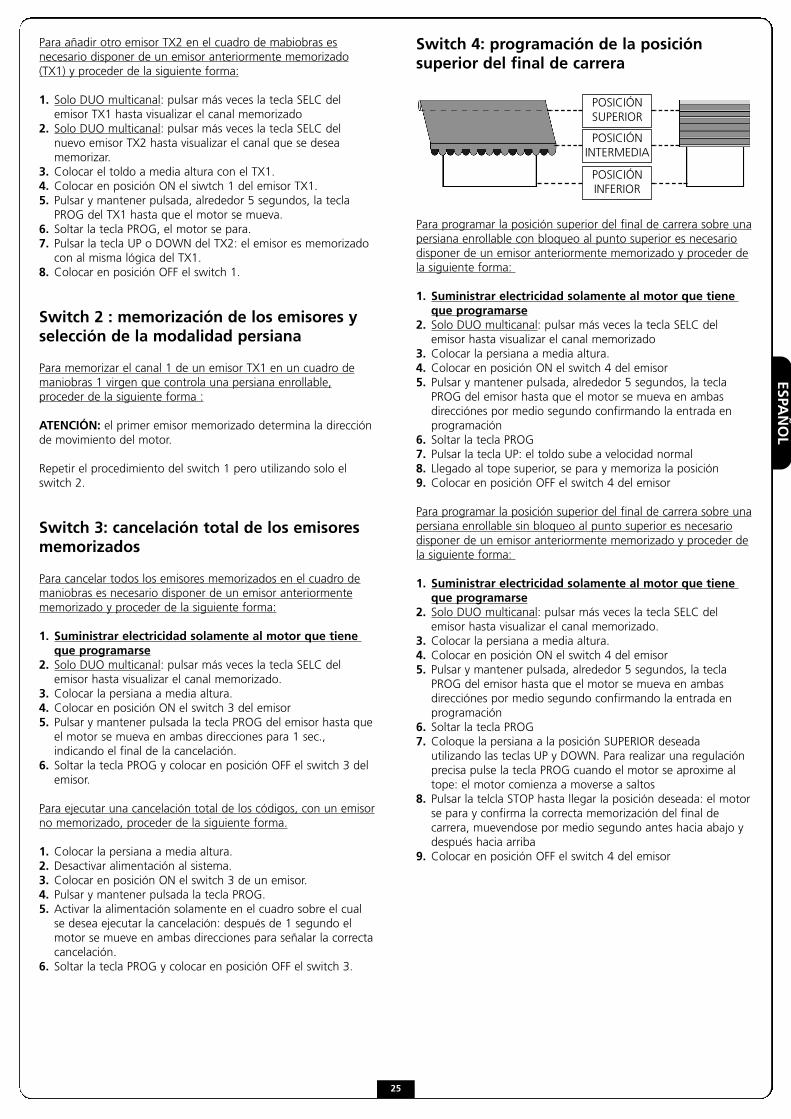
ESPAÑOL
Para añadir otro emisor TX2 en el cuadro de mabiobras esnecesario disponer de un emisor anteriormente memorizado(TX1) y proceder de la siguiente forma:
1. Solo DUO multicanal: pulsar más veces la tecla SELC del emisor TX1 hasta visualizar el canal memorizado
2. Solo DUO multicanal: pulsar más veces la tecla SELC del nuevo emisor TX2 hasta visualizar el canal que se desea memorizar.
3. Colocar el toldo a media altura con el TX1.4. Colocar en posición ON el siwtch 1 del emisor TX1.5. Pulsar y mantener pulsada, alrededor 5 segundos, la tecla PROG del TX1 hasta que el motor se mueva.
6. Soltar la tecla PROG, el motor se para.7. Pulsar la tecla UP o DOWN del TX2: el emisor es memorizado con al misma lógica del TX1.
8. Colocar en posición OFF el switch 1.
Switch 2 : memorización de los emisores yselección de la modalidad persiana
Para memorizar el canal 1 de un emisor TX1 en un cuadro demaniobras 1 virgen que controla una persiana enrollable,proceder de la siguiente forma :
ATENCIÓN: el primer emisor memorizado determina la direcciónde movimiento del motor.
Repetir el procedimiento del switch 1 pero utilizando solo elswitch 2.
Switch 3: cancelación total de los emisoresmemorizados
Para cancelar todos los emisores memorizados en el cuadro demaniobras es necesario disponer de un emisor anteriormentememorizado y proceder de la siguiente forma:
1. Suministrar electricidad solamente al motor que tiene que programarse
2. Solo DUO multicanal: pulsar más veces la tecla SELC del emisor hasta visualizar el canal memorizado.
3. Colocar la persiana a media altura.4. Colocar en posición ON el switch 3 del emisor5. Pulsar y mantener pulsada la tecla PROG del emisor hasta que el motor se mueva en ambas direcciones para 1 sec., indicando el final de la cancelación.
6. Soltar la tecla PROG y colocar en posición OFF el switch 3 del emisor.
Para ejecutar una cancelación total de los códigos, con un emisorno memorizado, proceder de la siguiente forma.
1. Colocar la persiana a media altura.2. Desactivar alimentación al sistema.3. Colocar en posición ON el switch 3 de un emisor.4. Pulsar y mantener pulsada la tecla PROG.5. Activar la alimentación solamente en el cuadro sobre el cual se desea ejecutar la cancelación: después de 1 segundo el motor se mueve en ambas direcciones para señalar la correcta cancelación.
6. Soltar la tecla PROG y colocar en posición OFF el switch 3.
Switch 4: programación de la posiciónsuperior del final de carrera
Para programar la posición superior del final de carrera sobre unapersiana enrollable con bloqueo al punto superior es necesariodisponer de un emisor anteriormente memorizado y proceder dela siguiente forma:
1. Suministrar electricidad solamente al motor que tiene que programarse
2. Solo DUO multicanal: pulsar más veces la tecla SELC del emisor hasta visualizar el canal memorizado
3. Colocar la persiana a media altura.4. Colocar en posición ON el switch 4 del emisor 5. Pulsar y mantener pulsada, alrededor 5 segundos, la tecla PROG del emisor hasta que el motor se mueva en ambas direcciónes por medio segundo confirmando la entrada en programación
6. Soltar la tecla PROG7. Pulsar la tecla UP: el toldo sube a velocidad normal8. Llegado al tope superior, se para y memoriza la posición9. Colocar en posición OFF el switch 4 del emisor
Para programar la posición superior del final de carrera sobre unapersiana enrollable sin bloqueo al punto superior es necesariodisponer de un emisor anteriormente memorizado y proceder dela siguiente forma:
1. Suministrar electricidad solamente al motor que tiene que programarse
2. Solo DUO multicanal: pulsar más veces la tecla SELC del emisor hasta visualizar el canal memorizado.
3. Colocar la persiana a media altura.4. Colocar en posición ON el switch 4 del emisor 5. Pulsar y mantener pulsada, alrededor 5 segundos, la tecla PROG del emisor hasta que el motor se mueva en ambas direcciónes por medio segundo confirmando la entrada en programación
6. Soltar la tecla PROG7. Coloque la persiana a la posición SUPERIOR deseada utilizando las teclas UP y DOWN. Para realizar una regulación precisa pulse la tecla PROG cuando el motor se aproxime al tope: el motor comienza a moverse a saltos
8. Pulsar la telcla STOP hasta llegar la posición deseada: el motor se para y confirma la correcta memorización del final de carrera, muevendose por medio segundo antes hacia abajo y después hacia arriba
9. Colocar en posición OFF el switch 4 del emisor
POSICIÓNSUPERIOR
POSICIÓNINTERMEDIA
POSICIÓNINFERIOR
25

ESPA
ÑOL
Switch 5: programación de la posicióninferior del final de carrera
Para programar la posición inferior del final de carrera esnecesario disponer de un emisor anteriormente memorizado yproceder de la siguiente forma:
1. Solo DUO multicanal: pulsar más veces la tecla SELC del emisor hasta visualizar el canal memorizado.
2. Colocar la persiana a media altura.3. Colocar en posición ON el switch 5 del emisor 4. Pulsar y mantener pulsada, alrededor 5 segundos, la tecla PROG del emisor hasta que el motor se mueva en ambas direcciónes por medio segundo confirmando la entrada en programación
5. Soltar la tecla PROG6. Coloque la persiana a la posición INFERIOR deseada utilizando las teclas UP y DOWN. Para realizar una regulación precisa pulse la tecla PROG cuando el motor se aproxime al tope: el motor comienza a moverse a saltos
7. Pulsar la telcla STOP hasta llegar la posición deseada: el motor se para y confirma la correcta memorización del final de carrera, muevendose por medio segundo antes hacia arriba y después hacia abajo
8. Colocar en posición OFF el switch 5 del emisor
Switch 6: programación de la posiciónintermedia del final de carrera
Para programar la posición intermedia del final de carrera esnecesario disponer de un emisor anteriormente memorizado yproceder de la siguiente forma:
1. Solo DUO multicanal: pulsar más veces la tecla SELC del emisor hasta visualizar el canal memorizado.
2. Colocar el toldo a la altura deseada con las teclas UP, DOWN y STOP
3. Colocar en posición ON el switch 6 del emisor 4. Pulsar y mantener pulsada, alrededor 5 segundos, la tecla PROG del emisor hasta que el motor se mueva en ambas direcciónes por medio segundo confirmando la memorización de la posición intermedia
5. Soltar la tecla PROG6. Colocar en posición OFF el switch 6 del emisor
Para colocar el toldo en posición intermedia pulsar la teclaSTOP alrededor 3 segundos (con el motor detenido) : eltoldo se mueve hasta llegar la posición memorizada
Para cancelar la posición intermedia anteriormente memorizadaes necesario disponer de un emisor anteriormente memorizado yproceder de la siguiente forma:
1. Colocar la persiana a media altura.2. Colocar en posición ON el switch 6 del emisor 3. Pulsar y mantener pulsada, alrededor 5 segundos, la tecla PROG del emisor hasta que el motor se mueva en ambas direcciónes por medio segundo confirmando la cancelación de la posición intermedia
4. Soltar la tecla PROG5. Colocar en posición OFF el switch 6 del emisor
PROGRAMACIÓN DE LAS FUNCIONESMEDIANTE EMISORES DE LA SERIE ADLER Utilizando un emisor de la serie ADLER es posible modificar lasfunciones de la centralita que gobierna el motor tubular.
Memorización RÁPIDA de los emisores
Para memorizar los telecomandos en una centralita virgen quegobierna una veneciana o una cortina (NO de cajón) procedacomo se indica a continuación:
ATENCIÓN: El primer emisor que se memoriza determina elsentido de movimiento del motor.
1. Alimente únicamente la centralita a programar2. Pulse y mantenga presionados las teclas UP y DOWN hasta que el motor se comience a mover en un sentido.
3. Libere las teclas: El motor se detiene4. Pulse las teclas UP o DOWN según la dirección que se mueva la persiana antes de detenerse: - Si la persiana sube pulse la tecla UP, dirección adquirida: la tecla UP hace subir la persiana, la tecla DOWN hace bajar la persiana.
- Si la persiana baja pulse la tecla DOWN, dirección adquirida: la tecla DOWN hace bajar la persiana, la tecla UP hace subir la persiana.
5. Programación concluida.
Para agregar otros telecomandos proceda como se indica acontinuación:6. Pulse y mantenga presionadas las teclas UP y DOWN de un telecomando memorizado hasta que el motor comience a moverse en un sentido.
7. Libere las teclas: El motor se detiene8. Pulse las teclas UP o DOWN del nuevo telecomando.
ATENCIÓN: Si la cortina es de cajón ejecute la memorización delprimer telecomando siguiendo el procedimiento “1.Memorización de los emisores y selección de la modalidad de lacortina”
Programación AVANZADA de las funcionesPara realizar la programación AVANZADA de las funciones esnecesario retirar la máscara del telecomando y seguircuidadosamente los procedimientos correspondientes a lasdiversas funciones.
Toda función es seleccionable introduciendo un código durante elprocedimiento de programación. A continuación se presenta unatabla con el resumen de las funciones con los diversos códigos deprogramación.
UP
STOP
DOWN
26
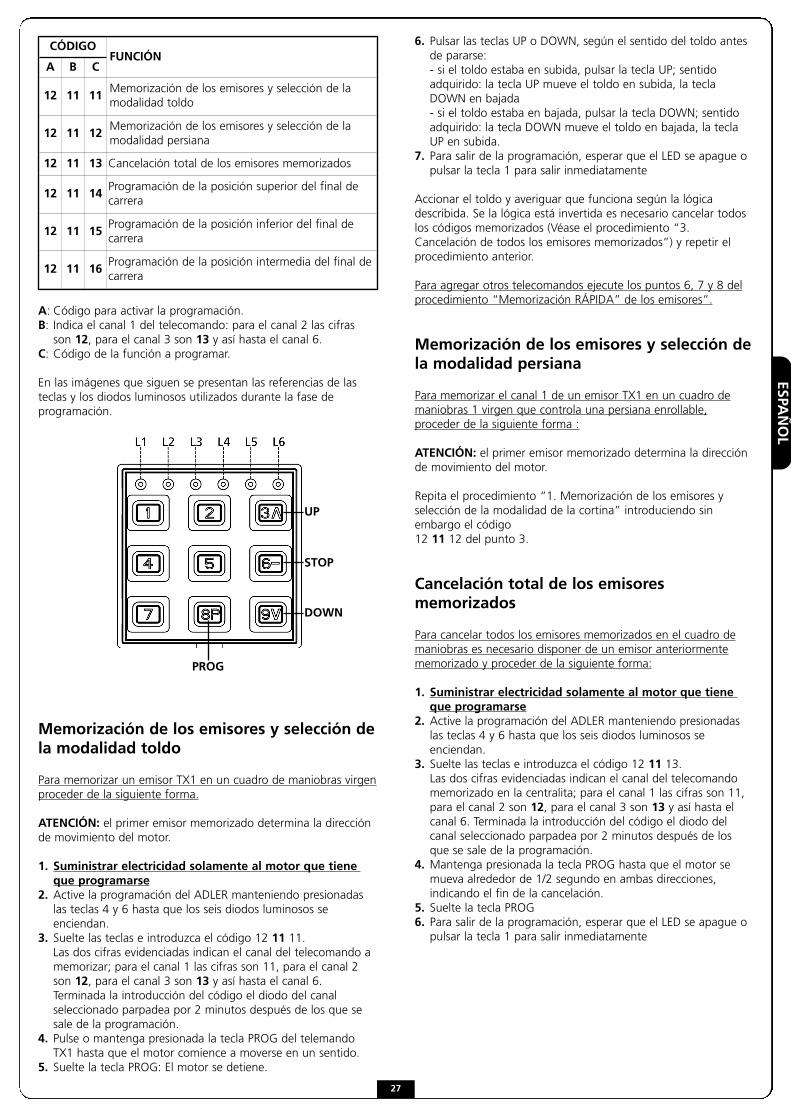
ESPAÑOL
A: Código para activar la programación.B: Indica el canal 1 del telecomando: para el canal 2 las cifras son 12, para el canal 3 son 13 y así hasta el canal 6.
C: Código de la función a programar.
En las imágenes que siguen se presentan las referencias de lasteclas y los diodos luminosos utilizados durante la fase deprogramación.
Memorización de los emisores y selección dela modalidad toldo
Para memorizar un emisor TX1 en un cuadro de maniobras virgenproceder de la siguiente forma.
ATENCIÓN: el primer emisor memorizado determina la direcciónde movimiento del motor.
1. Suministrar electricidad solamente al motor que tiene que programarse
2. Active la programación del ADLER manteniendo presionadas las teclas 4 y 6 hasta que los seis diodos luminosos se enciendan.
3. Suelte las teclas e introduzca el código 12 11 11.Las dos cifras evidenciadas indican el canal del telecomando a memorizar; para el canal 1 las cifras son 11, para el canal 2 son 12, para el canal 3 son 13 y así hasta el canal 6. Terminada la introducción del código el diodo del canal seleccionado parpadea por 2 minutos después de los que se sale de la programación.
4. Pulse o mantenga presionada la tecla PROG del telemando TX1 hasta que el motor comience a moverse en un sentido.
5. Suelte la tecla PROG: El motor se detiene.
6. Pulsar las teclas UP o DOWN, según el sentido del toldo antes de pararse:- si el toldo estaba en subida, pulsar la tecla UP; sentido adquirido: la tecla UP mueve el toldo en subida, la tecla DOWN en bajada- si el toldo estaba en bajada, pulsar la tecla DOWN; sentido adquirido: la tecla DOWN mueve el toldo en bajada, la tecla UP en subida.
7. Para salir de la programación, esperar que el LED se apague o pulsar la tecla 1 para salir inmediatamente
Accionar el toldo y averiguar que funciona según la lógicadescribida. Se la lógica está invertida es necesario cancelar todoslos códigos memorizados (Véase el procedimiento “3.Cancelación de todos los emisores memorizados”) y repetir elprocedimiento anterior.
Para agregar otros telecomandos ejecute los puntos 6, 7 y 8 delprocedimiento “Memorización RÁPIDA” de los emisores”.
Memorización de los emisores y selección dela modalidad persiana
Para memorizar el canal 1 de un emisor TX1 en un cuadro demaniobras 1 virgen que controla una persiana enrollable,proceder de la siguiente forma :
ATENCIÓN: el primer emisor memorizado determina la direcciónde movimiento del motor.
Repita el procedimiento “1. Memorización de los emisores yselección de la modalidad de la cortina” introduciendo sinembargo el código 12 11 12 del punto 3.
Cancelación total de los emisoresmemorizados
Para cancelar todos los emisores memorizados en el cuadro demaniobras es necesario disponer de un emisor anteriormentememorizado y proceder de la siguiente forma:
1. Suministrar electricidad solamente al motor que tiene que programarse
2. Active la programación del ADLER manteniendo presionadas las teclas 4 y 6 hasta que los seis diodos luminosos se enciendan.
3. Suelte las teclas e introduzca el código 12 11 13.Las dos cifras evidenciadas indican el canal del telecomando memorizado en la centralita; para el canal 1 las cifras son 11, para el canal 2 son 12, para el canal 3 son 13 y así hasta el canal 6. Terminada la introducción del código el diodo del canal seleccionado parpadea por 2 minutos después de los que se sale de la programación.
4. Mantenga presionada la tecla PROG hasta que el motor se mueva alrededor de 1/2 segundo en ambas direcciones, indicando el fin de la cancelación.
5. Suelte la tecla PROG6. Para salir de la programación, esperar que el LED se apague o pulsar la tecla 1 para salir inmediatamente
UP
STOP
DOWN
PROG
CÓDIGOFUNCIÓN
A B C
12 11 11Memorización de los emisores y selección de lamodalidad toldo
12 11 12Memorización de los emisores y selección de lamodalidad persiana
12 11 13 Cancelación total de los emisores memorizados
12 11 14Programación de la posición superior del final decarrera
12 11 15Programación de la posición inferior del final decarrera
12 11 16Programación de la posición intermedia del final decarrera
27
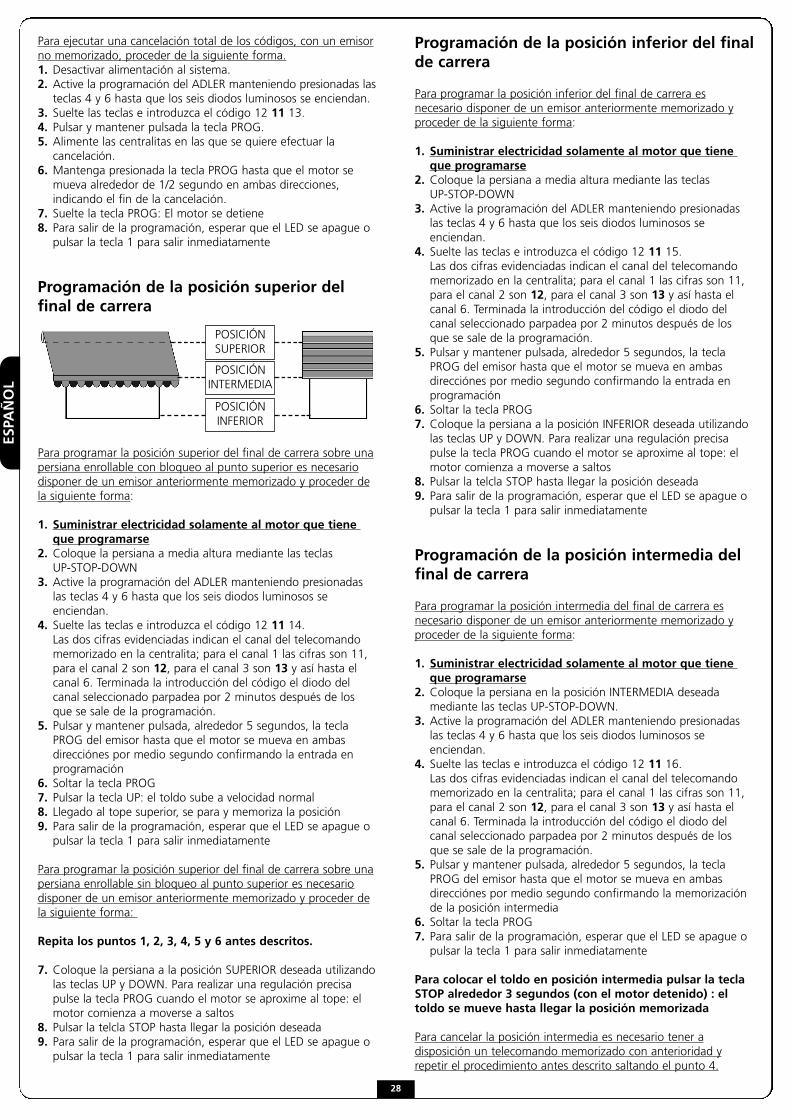
ESPA
ÑOL
Para ejecutar una cancelación total de los códigos, con un emisorno memorizado, proceder de la siguiente forma.1. Desactivar alimentación al sistema.2. Active la programación del ADLER manteniendo presionadas lasteclas 4 y 6 hasta que los seis diodos luminosos se enciendan.
3. Suelte las teclas e introduzca el código 12 11 13.4. Pulsar y mantener pulsada la tecla PROG.5. Alimente las centralitas en las que se quiere efectuar la cancelación.
6. Mantenga presionada la tecla PROG hasta que el motor se mueva alrededor de 1/2 segundo en ambas direcciones, indicando el fin de la cancelación.
7. Suelte la tecla PROG: El motor se detiene8. Para salir de la programación, esperar que el LED se apague o pulsar la tecla 1 para salir inmediatamente
Programación de la posición superior delfinal de carrera
Para programar la posición superior del final de carrera sobre unapersiana enrollable con bloqueo al punto superior es necesariodisponer de un emisor anteriormente memorizado y proceder dela siguiente forma:
1. Suministrar electricidad solamente al motor que tiene que programarse
2. Coloque la persiana a media altura mediante las teclas UP-STOP-DOWN
3. Active la programación del ADLER manteniendo presionadas las teclas 4 y 6 hasta que los seis diodos luminosos se enciendan.
4. Suelte las teclas e introduzca el código 12 11 14.Las dos cifras evidenciadas indican el canal del telecomando memorizado en la centralita; para el canal 1 las cifras son 11, para el canal 2 son 12, para el canal 3 son 13 y así hasta el canal 6. Terminada la introducción del código el diodo del canal seleccionado parpadea por 2 minutos después de los que se sale de la programación.
5. Pulsar y mantener pulsada, alrededor 5 segundos, la tecla PROG del emisor hasta que el motor se mueva en ambas direcciónes por medio segundo confirmando la entrada en programación
6. Soltar la tecla PROG7. Pulsar la tecla UP: el toldo sube a velocidad normal8. Llegado al tope superior, se para y memoriza la posición9. Para salir de la programación, esperar que el LED se apague o pulsar la tecla 1 para salir inmediatamente
Para programar la posición superior del final de carrera sobre unapersiana enrollable sin bloqueo al punto superior es necesariodisponer de un emisor anteriormente memorizado y proceder dela siguiente forma:
Repita los puntos 1, 2, 3, 4, 5 y 6 antes descritos.
7. Coloque la persiana a la posición SUPERIOR deseada utilizando las teclas UP y DOWN. Para realizar una regulación precisa pulse la tecla PROG cuando el motor se aproxime al tope: el motor comienza a moverse a saltos
8. Pulsar la telcla STOP hasta llegar la posición deseada9. Para salir de la programación, esperar que el LED se apague o pulsar la tecla 1 para salir inmediatamente
Programación de la posición inferior del finalde carrera
Para programar la posición inferior del final de carrera esnecesario disponer de un emisor anteriormente memorizado yproceder de la siguiente forma:
1. Suministrar electricidad solamente al motor que tiene que programarse
2. Coloque la persiana a media altura mediante las teclas UP-STOP-DOWN
3. Active la programación del ADLER manteniendo presionadas las teclas 4 y 6 hasta que los seis diodos luminosos se enciendan.
4. Suelte las teclas e introduzca el código 12 11 15.Las dos cifras evidenciadas indican el canal del telecomando memorizado en la centralita; para el canal 1 las cifras son 11, para el canal 2 son 12, para el canal 3 son 13 y así hasta el canal 6. Terminada la introducción del código el diodo del canal seleccionado parpadea por 2 minutos después de los que se sale de la programación.
5. Pulsar y mantener pulsada, alrededor 5 segundos, la tecla PROG del emisor hasta que el motor se mueva en ambas direcciónes por medio segundo confirmando la entrada en programación
6. Soltar la tecla PROG7. Coloque la persiana a la posición INFERIOR deseada utilizando las teclas UP y DOWN. Para realizar una regulación precisa pulse la tecla PROG cuando el motor se aproxime al tope: el motor comienza a moverse a saltos
8. Pulsar la telcla STOP hasta llegar la posición deseada9. Para salir de la programación, esperar que el LED se apague o pulsar la tecla 1 para salir inmediatamente
Programación de la posición intermedia delfinal de carrera
Para programar la posición intermedia del final de carrera esnecesario disponer de un emisor anteriormente memorizado yproceder de la siguiente forma:
1. Suministrar electricidad solamente al motor que tiene que programarse
2. Coloque la persiana en la posición INTERMEDIA deseada mediante las teclas UP-STOP-DOWN.
3. Active la programación del ADLER manteniendo presionadas las teclas 4 y 6 hasta que los seis diodos luminosos se enciendan.
4. Suelte las teclas e introduzca el código 12 11 16.Las dos cifras evidenciadas indican el canal del telecomando memorizado en la centralita; para el canal 1 las cifras son 11, para el canal 2 son 12, para el canal 3 son 13 y así hasta el canal 6. Terminada la introducción del código el diodo del canal seleccionado parpadea por 2 minutos después de los que se sale de la programación.
5. Pulsar y mantener pulsada, alrededor 5 segundos, la tecla PROG del emisor hasta que el motor se mueva en ambas direcciónes por medio segundo confirmando la memorización de la posición intermedia
6. Soltar la tecla PROG7. Para salir de la programación, esperar que el LED se apague o pulsar la tecla 1 para salir inmediatamente
Para colocar el toldo en posición intermedia pulsar la teclaSTOP alrededor 3 segundos (con el motor detenido) : eltoldo se mueve hasta llegar la posición memorizada
Para cancelar la posición intermedia es necesario tener adisposición un telecomando memorizado con anterioridad yrepetir el procedimiento antes descrito saltando el punto 4.
POSICIÓNSUPERIOR
POSICIÓNINTERMEDIA
POSICIÓNINFERIOR
28
DEU
TSCH
GarantieV2 SPA übernimmt für die Rohrmotoren eine Garantie von sechzigMonaten ab Herstellungsdatum und für die elektronischenKomponenten vierundzwanzig Monate ab Herstellungsdatum. Die Garantieleistung beinhaltet die Reparatur oder den kostenlosenUmtausch der Teile, die V2 SPA unanfechtbar als mitHerstellungsfehlern behaftet anerkennt. Das sich in Garantie befindende und an den Sitz von V2 SPAgesendete Teil muss frachtfrei gesendet werden und wird zu Lastendes Empfängers zurückgesendet. Das umgetauschte Material bleibtEigentum von V2 SPA. Die Arbeitskosten gehen auf jeden Fall zu Lasten des Käufers. Für den Zeitraum des Ausfalls der Anlage wird keine Entschädigunggewährt. Der Eingriff beinhaltet keine Verlängerung der Garantiedauer.Es versteht sich, dass die Gültigkeit der Garantie der Befolgung derLeistungsspezifikationen des Produkts unterliegt, die in den mit den besagten Produkten mitgelieferten Betriebshandbüchern enthalten sind.
Von der Garantie sind ausgeschlossen:• Durch Transport verursachte Beschädigungen oder Schäden• Auf Fehler der elektrischen Anlage und/oder Nachlässigkeit,
Unangemessenheit der Anlage für den vorgesehenen Nutzungszweck und auf alle durch unsachgemäße Benutzung zurückzuführende Beschädigungen oder Schäden
• Durch unzulässige Eingriffe seitens nicht autorisiertem Personal oder durch Verwendung von Nichtoriginalersatzteilen verursachte Beschädigungen oder Schäden
• Durch chemische Substanzen oder atmosphärische Einflüsse verursachte Defekte
• Verbrauchsmaterial• Eingriffe wegen vermuteter Fehler oder Gefälligkeitsüberprüfungen
ProdukteigenschaftenDie Produkte der V2 SPA unterliegen ständigen Innovationen und Verbesserungen; Konstruktionseigenschaften und Aussehen derselbenkönnen daher ohne Vorankündigung Veränderungen ausgesetzt sein.
GerichtsstandDa der Vertrag durch die in Racconigi ausgestellteAuftragsbestätigung abgeschlossen wird, kommt im Fall vonrechtlichen Streitigkeiten irgendwelcher Art die italienische Rechtsprechung zur Anwendung, wobei Saluzzo Gerichtsstand ist.
Wichtige Hinweise• Die Montage muss von einem Fachmann ausgeführt werden,
wobei alle geltenden Sicherheitzmassnahmen berücksichtigt werden müssen
• Die elektrische Installation muss gem. der Norm NFC15-100 vollzogen werden
• Bei Ersetzung des Elektrokabels sich an Fachpersonal wenden• Keine Bohrungen oder Schrauben auf der ganzen Länge des
Motors anbringen• Der Motor darf mit keinerlei Flüssigkeiten in Kontakt kommen• Motor vorsichtig handhaben und Stösse, bzw. Schläge etc.
vermeiden• Ein falscher Anschluss kann Defekte oder Schäden verursachen,
worauf keinerlei Garantieansprüche gestellt werden können
ACHTUNG:1. Vor der Installation des Motors alle nicht notwendigen Kabel
entfernen und die für das Anschalten der Bewegung nicht notwendigen Vorrichtungen deaktivieren
2. Für die Installation von Markisen ist es erforderlich, einen horizontalen Abstand von mindestens 0,4 m zwischen dem vollständig ausgerollten beweglichen Teil und irgendeinem festen Gegenstand einzuhalten
3. Das Stromkabel darf nicht direktem Sonnenlicht oder Regen ausgesetzt werden
Hinweise:a) Vor der Installation aufmerksam die Anleitung durchlesenb) Sicherstellen, dass alle Zubehörteile so befestigt sind, dass der
Motor ohne mechanische Probleme läuft. Die Last muss auf die Motorleistung abgestimmt sein
c) Die elektrischen Anschlüsse müssen von qualifiziertem Fachpersonal entsprechend den gesetzlichen Bestimmungen ausgeführt werden
ACHTUNG: Wichtige Sicherheitshinweise. • Für die Sicherheit der Personen ist es wichtig, diese Hinweise
zu befolgen. Speichern Sie diese Hinweise.• Befolgen Sie alle Hinweise: eine nicht korrekte Installation
kann schwere Schäden verursachen• Verhindern Sie, dass Kinder mit den festen Steuerungen spielen• Bewahren Sie die Fernbedienungen für Kinder unzugänglich auf• Kontrollieren Sie häufig die Installation, um Unwuchtigkeiten
und Verschleißzeichen oder Schäden an Kabeln und Federn zu vermeiden
• Nicht benutzen, wenn Reparaturen oder Einstellungen erforderlich sind
• Die beweglichen Teile müssen auf einer Höhe über 2,5 m vom Boden oder von jeder anderen Fläche, die einen Zugang ermöglicht, installiert werden
• Das Stellelement der Taste muss sich direkt am bewegten Element, aber fern von sich in Bewegung befindenden Teilen befinden und auf einer Mindesthöhe von 1,5 m installiert werden
• Die festen Steuerungen müssen in sichtbarer Position installiert werden.
• Die Vorrichtung darf nicht im Freien betrieben werden.• Stromkreis mit einem doppelpoligen Trennschalter versehen,
mit mind. 3mm Abstand zwischen dem Kontakten (Trennschalter oder Stecker und Steckdose, usw.)
• Nur ein Motor pro Schalter anschliessen
INKORPORATIONSERKLÄRUNG FÜRUNVOLLSTÄNDIGE MASCHINEN(Richtlinie 2006/42/EG, Anhang II-B)
Der Hersteller V2 S.p.A., mit Sitz in Corso Principi di Piemonte 65, 12035, Racconigi (CN), ItalienErklärt unter eigener Haftung, dass:
der Automatismus Modell: VEO-RFE6-230V, VEO-RFE10-230V, VEO-RFE6-120V, VEO-RFE10-120V
Seriennummer und Baujahr: auf dem TypenschildBeschreibung: Elektromechanisches Stellglied für Markisen undRollläden
- für die Inkorporation in ein/e Markise / Rollladen bestimmt ist und eine Maschine darstellt gemäß Richtlinie 2006/42/EG.Diese Maschine darf nicht in Betrieb genommen werden bevor sie nicht als den Bestimmungen der Richtlinie 2006/42/EG (Anhang II-A) konform erklärt wird
- konform mit den wesentlichen anwendbaren Bestimmungen der Richtlinien ist:Maschinenrichtlinie 2006/42/EG (Anhang I, Kapitel 1)Niederspannungsrichtlinie 2006/95/EGRichtlinie über elektromagnetische Verträglichkeit 2004/108/EGFunkrichtlinie 99/05/EG
Die technische Dokumentation steht den zuständigen Behörden aufbegründete Anfrage zur Verfügung bei:V2 S.p.A., Corso Principi di Piemonte 65, 12035, Racconigi (CN), ItalienFolgende Person ist autorisiert, die Inkorporationserklärung zuunterzeichnen und die technische Dokumentation zur Verfügung zustellen:
Cosimo De FalcoGesetzlicher Vertreter von V2 S.p.A.Racconigi, den 11/01/2010
29
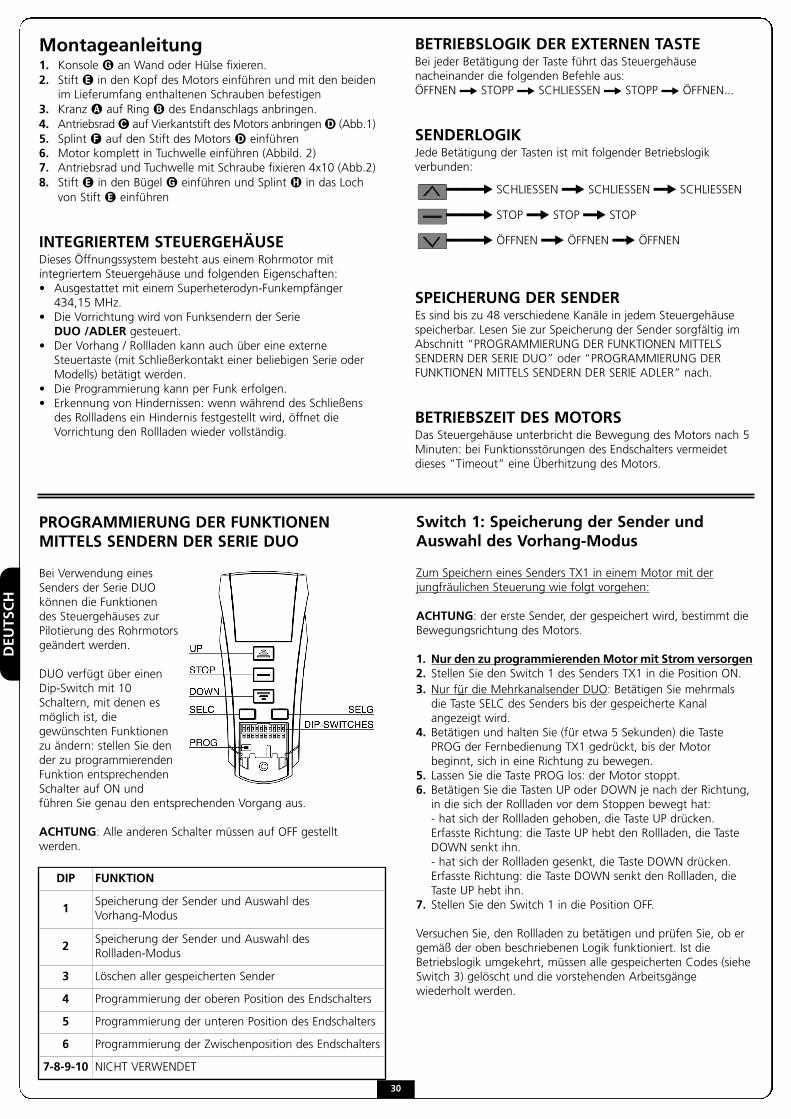
DEU
TSCH
Montageanleitung1. Konsole � an Wand oder Hülse fixieren.2. Stift � in den Kopf des Motors einführen und mit den beiden
im Lieferumfang enthaltenen Schrauben befestigen3. Kranz � auf Ring � des Endanschlags anbringen.4. Antriebsrad � auf Vierkantstift des Motors anbringen � (Abb.1)5. Splint � auf den Stift des Motors � einführen6. Motor komplett in Tuchwelle einführen (Abbild. 2)7. Antriebsrad und Tuchwelle mit Schraube fixieren 4x10 (Abb.2)8. Stift � in den Bügel � einführen und Splint � in das Loch
von Stift � einführen
INTEGRIERTEM STEUERGEHÄUSEDieses Öffnungssystem besteht aus einem Rohrmotor mitintegriertem Steuergehäuse und folgenden Eigenschaften:• Ausgestattet mit einem Superheterodyn-Funkempfänger 434,15 MHz.
• Die Vorrichtung wird von Funksendern der Serie DUO /ADLER gesteuert.
• Der Vorhang / Rollladen kann auch über eine externe Steuertaste (mit Schließerkontakt einer beliebigen Serie oder Modells) betätigt werden.
• Die Programmierung kann per Funk erfolgen.• Erkennung von Hindernissen: wenn während des Schließens des Rollladens ein Hindernis festgestellt wird, öffnet die Vorrichtung den Rollladen wieder vollständig.
���� SCHLIESSEN �� SCHLIESSEN �� SCHLIESSEN
���� STOP �� STOP �� STOP
���� ÖFFNEN �� ÖFFNEN �� ÖFFNEN
BETRIEBSLOGIK DER EXTERNEN TASTEBei jeder Betätigung der Taste führt das Steuergehäusenacheinander die folgenden Befehle aus:ÖFFNEN �� STOPP �� SCHLIESSEN �� STOPP �� ÖFFNEN...
SENDERLOGIKJede Betätigung der Tasten ist mit folgender Betriebslogikverbunden:
SPEICHERUNG DER SENDEREs sind bis zu 48 verschiedene Kanäle in jedem Steuergehäusespeicherbar. Lesen Sie zur Speicherung der Sender sorgfältig imAbschnitt “PROGRAMMIERUNG DER FUNKTIONEN MITTELSSENDERN DER SERIE DUO” oder “PROGRAMMIERUNG DERFUNKTIONEN MITTELS SENDERN DER SERIE ADLER” nach.
BETRIEBSZEIT DES MOTORSDas Steuergehäuse unterbricht die Bewegung des Motors nach 5Minuten: bei Funktionsstörungen des Endschalters vermeidetdieses “Timeout” eine Überhitzung des Motors.
PROGRAMMIERUNG DER FUNKTIONENMITTELS SENDERN DER SERIE DUO
Bei Verwendung einesSenders der Serie DUOkönnen die Funktionendes Steuergehäuses zurPilotierung des Rohrmotorsgeändert werden.
DUO verfügt über einenDip-Switch mit 10Schaltern, mit denen esmöglich ist, diegewünschten Funktionenzu ändern: stellen Sie dender zu programmierendenFunktion entsprechendenSchalter auf ON undführen Sie genau den entsprechenden Vorgang aus.
ACHTUNG: Alle anderen Schalter müssen auf OFF gestelltwerden.
DIP FUNKTION
1Speicherung der Sender und Auswahl des Vorhang-Modus
2Speicherung der Sender und Auswahl des Rollladen-Modus
3 Löschen aller gespeicherten Sender
4 Programmierung der oberen Position des Endschalters
5 Programmierung der unteren Position des Endschalters
6 Programmierung der Zwischenposition des Endschalters
7-8-9-10 NICHT VERWENDET
Switch 1: Speicherung der Sender undAuswahl des Vorhang-Modus
Zum Speichern eines Senders TX1 in einem Motor mit derjungfräulichen Steuerung wie folgt vorgehen:
ACHTUNG: der erste Sender, der gespeichert wird, bestimmt dieBewegungsrichtung des Motors.
1. Nur den zu programmierenden Motor mit Strom versorgen2. Stellen Sie den Switch 1 des Senders TX1 in die Position ON.3. Nur fur die Mehrkanalsender DUO: Betätigen Sie mehrmals die Taste SELC des Senders bis der gespeicherte Kanal angezeigt wird.
4. Betätigen und halten Sie (für etwa 5 Sekunden) die Taste PROG der Fernbedienung TX1 gedrückt, bis der Motor beginnt, sich in eine Richtung zu bewegen.
5. Lassen Sie die Taste PROG los: der Motor stoppt.6. Betätigen Sie die Tasten UP oder DOWN je nach der Richtung, in die sich der Rollladen vor dem Stoppen bewegt hat: - hat sich der Rollladen gehoben, die Taste UP drücken.Erfasste Richtung: die Taste UP hebt den Rollladen, die Taste DOWN senkt ihn.- hat sich der Rollladen gesenkt, die Taste DOWN drücken. Erfasste Richtung: die Taste DOWN senkt den Rollladen, die Taste UP hebt ihn.
7. Stellen Sie den Switch 1 in die Position OFF.
Versuchen Sie, den Rollladen zu betätigen und prüfen Sie, ob ergemäß der oben beschriebenen Logik funktioniert. Ist dieBetriebslogik umgekehrt, müssen alle gespeicherten Codes (sieheSwitch 3) gelöscht und die vorstehenden Arbeitsgängewiederholt werden.
30
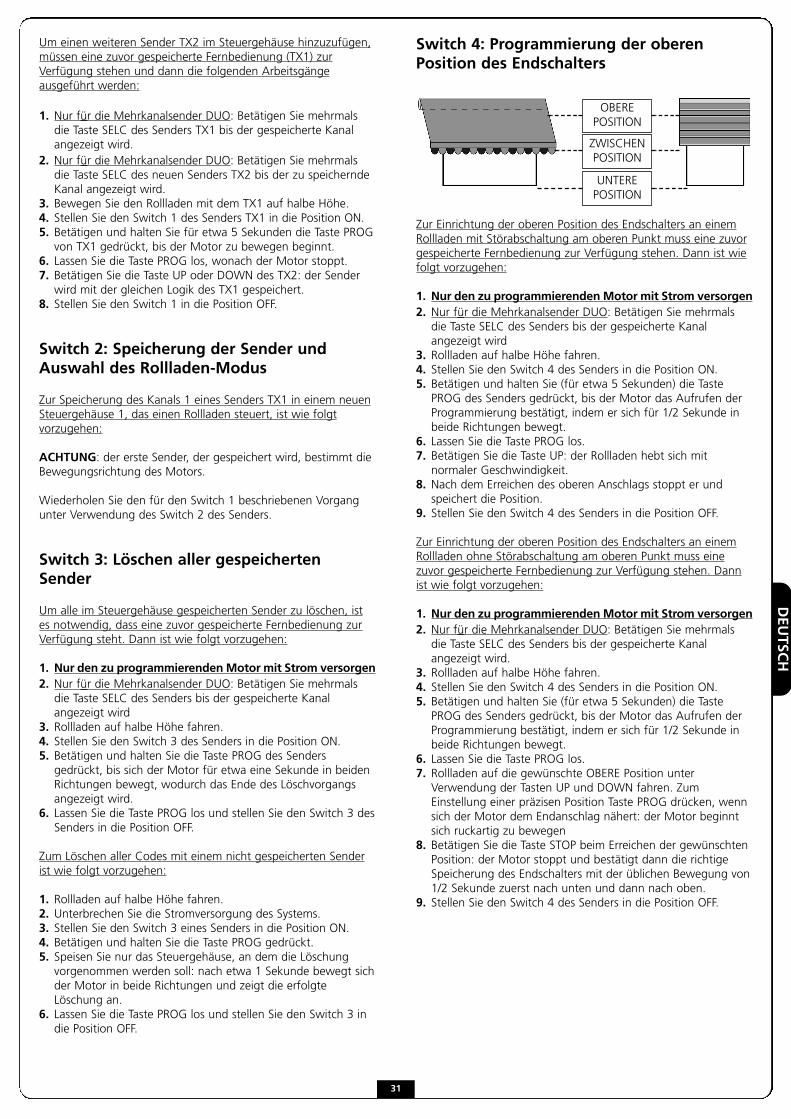
DEU
TSCH
Um einen weiteren Sender TX2 im Steuergehäuse hinzuzufügen,müssen eine zuvor gespeicherte Fernbedienung (TX1) zurVerfügung stehen und dann die folgenden Arbeitsgängeausgeführt werden:
1. Nur fur die Mehrkanalsender DUO: Betätigen Sie mehrmals die Taste SELC des Senders TX1 bis der gespeicherte Kanal angezeigt wird.
2. Nur fur die Mehrkanalsender DUO: Betätigen Sie mehrmals die Taste SELC des neuen Senders TX2 bis der zu speichernde Kanal angezeigt wird.
3. Bewegen Sie den Rollladen mit dem TX1 auf halbe Höhe.4. Stellen Sie den Switch 1 des Senders TX1 in die Position ON.5. Betätigen und halten Sie für etwa 5 Sekunden die Taste PROG von TX1 gedrückt, bis der Motor zu bewegen beginnt.
6. Lassen Sie die Taste PROG los, wonach der Motor stoppt.7. Betätigen Sie die Taste UP oder DOWN des TX2: der Sender wird mit der gleichen Logik des TX1 gespeichert.
8. Stellen Sie den Switch 1 in die Position OFF.
Switch 2: Speicherung der Sender undAuswahl des Rollladen-Modus
Zur Speicherung des Kanals 1 eines Senders TX1 in einem neuenSteuergehäuse 1, das einen Rollladen steuert, ist wie folgtvorzugehen:
ACHTUNG: der erste Sender, der gespeichert wird, bestimmt dieBewegungsrichtung des Motors.
Wiederholen Sie den für den Switch 1 beschriebenen Vorgangunter Verwendung des Switch 2 des Senders.
Switch 3: Löschen aller gespeichertenSender
Um alle im Steuergehäuse gespeicherten Sender zu löschen, istes notwendig, dass eine zuvor gespeicherte Fernbedienung zurVerfügung steht. Dann ist wie folgt vorzugehen:
1. Nur den zu programmierenden Motor mit Strom versorgen2. Nur fur die Mehrkanalsender DUO: Betätigen Sie mehrmals die Taste SELC des Senders bis der gespeicherte Kanal angezeigt wird
3. Rollladen auf halbe Höhe fahren.4. Stellen Sie den Switch 3 des Senders in die Position ON.5. Betätigen und halten Sie die Taste PROG des Senders gedrückt, bis sich der Motor für etwa eine Sekunde in beiden Richtungen bewegt, wodurch das Ende des Löschvorgangs angezeigt wird.
6. Lassen Sie die Taste PROG los und stellen Sie den Switch 3 des Senders in die Position OFF.
Zum Löschen aller Codes mit einem nicht gespeicherten Senderist wie folgt vorzugehen:
1. Rollladen auf halbe Höhe fahren.2. Unterbrechen Sie die Stromversorgung des Systems.3. Stellen Sie den Switch 3 eines Senders in die Position ON.4. Betätigen und halten Sie die Taste PROG gedrückt.5. Speisen Sie nur das Steuergehäuse, an dem die Löschung vorgenommen werden soll: nach etwa 1 Sekunde bewegt sich der Motor in beide Richtungen und zeigt die erfolgte Löschung an.
6. Lassen Sie die Taste PROG los und stellen Sie den Switch 3 in die Position OFF.
Switch 4: Programmierung der oberenPosition des Endschalters
Zur Einrichtung der oberen Position des Endschalters an einemRollladen mit Störabschaltung am oberen Punkt muss eine zuvorgespeicherte Fernbedienung zur Verfügung stehen. Dann ist wiefolgt vorzugehen:
1. Nur den zu programmierenden Motor mit Strom versorgen2. Nur fur die Mehrkanalsender DUO: Betätigen Sie mehrmals die Taste SELC des Senders bis der gespeicherte Kanal angezeigt wird
3. Rollladen auf halbe Höhe fahren.4. Stellen Sie den Switch 4 des Senders in die Position ON.5. Betätigen und halten Sie (für etwa 5 Sekunden) die Taste PROG des Senders gedrückt, bis der Motor das Aufrufen der Programmierung bestätigt, indem er sich für 1/2 Sekunde in beide Richtungen bewegt.
6. Lassen Sie die Taste PROG los.7. Betätigen Sie die Taste UP: der Rollladen hebt sich mit normaler Geschwindigkeit.
8. Nach dem Erreichen des oberen Anschlags stoppt er und speichert die Position.
9. Stellen Sie den Switch 4 des Senders in die Position OFF.
Zur Einrichtung der oberen Position des Endschalters an einemRollladen ohne Störabschaltung am oberen Punkt muss einezuvor gespeicherte Fernbedienung zur Verfügung stehen. Dannist wie folgt vorzugehen:
1. Nur den zu programmierenden Motor mit Strom versorgen2. Nur fur die Mehrkanalsender DUO: Betätigen Sie mehrmals die Taste SELC des Senders bis der gespeicherte Kanal angezeigt wird.
3. Rollladen auf halbe Höhe fahren.4. Stellen Sie den Switch 4 des Senders in die Position ON.5. Betätigen und halten Sie (für etwa 5 Sekunden) die Taste PROG des Senders gedrückt, bis der Motor das Aufrufen der Programmierung bestätigt, indem er sich für 1/2 Sekunde in beide Richtungen bewegt.
6. Lassen Sie die Taste PROG los.7. Rollladen auf die gewünschte OBERE Position unter Verwendung der Tasten UP und DOWN fahren. Zum Einstellung einer präzisen Position Taste PROG drücken, wenn sich der Motor dem Endanschlag nähert: der Motor beginnt sich ruckartig zu bewegen
8. Betätigen Sie die Taste STOP beim Erreichen der gewünschten Position: der Motor stoppt und bestätigt dann die richtige Speicherung des Endschalters mit der üblichen Bewegung von 1/2 Sekunde zuerst nach unten und dann nach oben.
9. Stellen Sie den Switch 4 des Senders in die Position OFF.
OBEREPOSITION
ZWISCHENPOSITION
UNTEREPOSITION
31
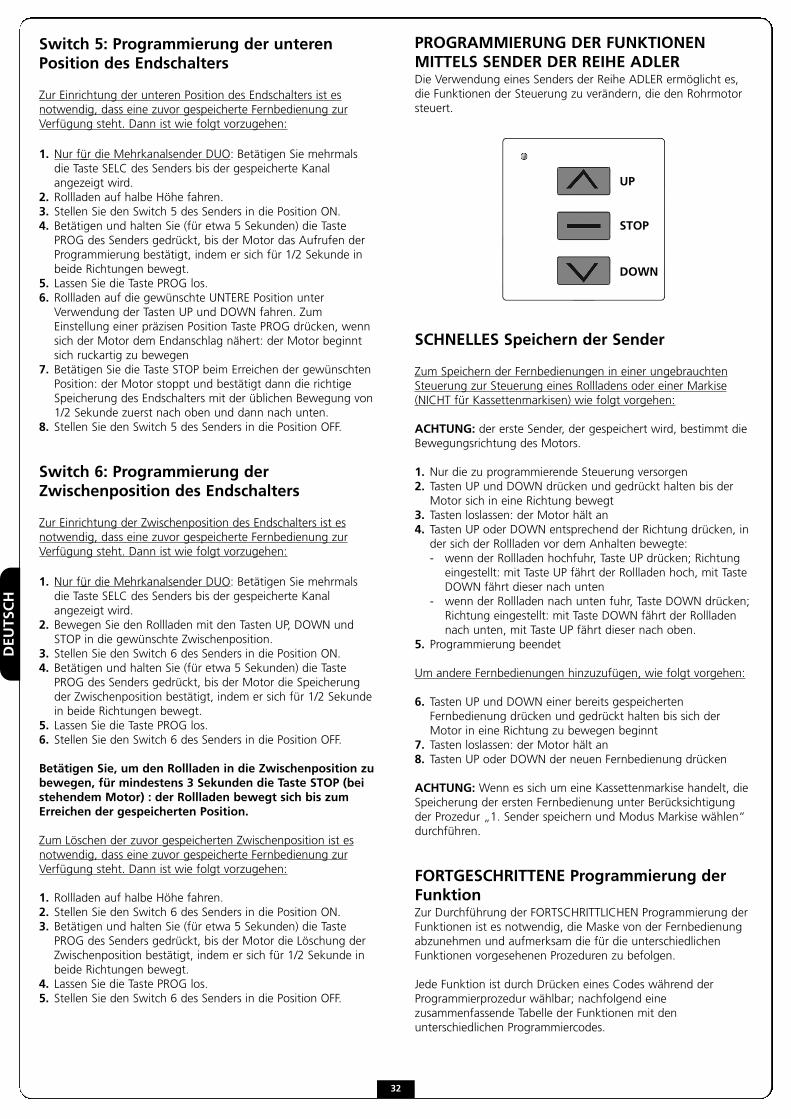
DEU
TSCH
Switch 5: Programmierung der unterenPosition des Endschalters
Zur Einrichtung der unteren Position des Endschalters ist esnotwendig, dass eine zuvor gespeicherte Fernbedienung zurVerfügung steht. Dann ist wie folgt vorzugehen:
1. Nur fur die Mehrkanalsender DUO: Betätigen Sie mehrmals die Taste SELC des Senders bis der gespeicherte Kanal angezeigt wird.
2. Rollladen auf halbe Höhe fahren.3. Stellen Sie den Switch 5 des Senders in die Position ON.4. Betätigen und halten Sie (für etwa 5 Sekunden) die Taste PROG des Senders gedrückt, bis der Motor das Aufrufen der Programmierung bestätigt, indem er sich für 1/2 Sekunde in beide Richtungen bewegt.
5. Lassen Sie die Taste PROG los.6. Rollladen auf die gewünschte UNTERE Position unter Verwendung der Tasten UP und DOWN fahren. Zum Einstellung einer präzisen Position Taste PROG drücken, wenn sich der Motor dem Endanschlag nähert: der Motor beginnt sich ruckartig zu bewegen
7. Betätigen Sie die Taste STOP beim Erreichen der gewünschten Position: der Motor stoppt und bestätigt dann die richtige Speicherung des Endschalters mit der üblichen Bewegung von 1/2 Sekunde zuerst nach oben und dann nach unten.
8. Stellen Sie den Switch 5 des Senders in die Position OFF.
Switch 6: Programmierung derZwischenposition des Endschalters
Zur Einrichtung der Zwischenposition des Endschalters ist esnotwendig, dass eine zuvor gespeicherte Fernbedienung zurVerfügung steht. Dann ist wie folgt vorzugehen:
1. Nur fur die Mehrkanalsender DUO: Betätigen Sie mehrmals die Taste SELC des Senders bis der gespeicherte Kanal angezeigt wird.
2. Bewegen Sie den Rollladen mit den Tasten UP, DOWN und STOP in die gewünschte Zwischenposition.
3. Stellen Sie den Switch 6 des Senders in die Position ON.4. Betätigen und halten Sie (für etwa 5 Sekunden) die Taste PROG des Senders gedrückt, bis der Motor die Speicherung der Zwischenposition bestätigt, indem er sich für 1/2 Sekunde in beide Richtungen bewegt.
5. Lassen Sie die Taste PROG los.6. Stellen Sie den Switch 6 des Senders in die Position OFF.
Betätigen Sie, um den Rollladen in die Zwischenposition zubewegen, für mindestens 3 Sekunden die Taste STOP (beistehendem Motor) : der Rollladen bewegt sich bis zumErreichen der gespeicherten Position.
Zum Löschen der zuvor gespeicherten Zwischenposition ist esnotwendig, dass eine zuvor gespeicherte Fernbedienung zurVerfügung steht. Dann ist wie folgt vorzugehen:
1. Rollladen auf halbe Höhe fahren.2. Stellen Sie den Switch 6 des Senders in die Position ON.3. Betätigen und halten Sie (für etwa 5 Sekunden) die Taste PROG des Senders gedrückt, bis der Motor die Löschung der Zwischenposition bestätigt, indem er sich für 1/2 Sekunde in beide Richtungen bewegt.
4. Lassen Sie die Taste PROG los.5. Stellen Sie den Switch 6 des Senders in die Position OFF.
PROGRAMMIERUNG DER FUNKTIONENMITTELS SENDER DER REIHE ADLERDie Verwendung eines Senders der Reihe ADLER ermöglicht es,die Funktionen der Steuerung zu verändern, die den Rohrmotorsteuert.
SCHNELLES Speichern der Sender
Zum Speichern der Fernbedienungen in einer ungebrauchtenSteuerung zur Steuerung eines Rollladens oder einer Markise(NICHT für Kassettenmarkisen) wie folgt vorgehen:
ACHTUNG: der erste Sender, der gespeichert wird, bestimmt dieBewegungsrichtung des Motors.
1. Nur die zu programmierende Steuerung versorgen2. Tasten UP und DOWN drücken und gedrückt halten bis der Motor sich in eine Richtung bewegt
3. Tasten loslassen: der Motor hält an4. Tasten UP oder DOWN entsprechend der Richtung drücken, in der sich der Rollladen vor dem Anhalten bewegte: - wenn der Rollladen hochfuhr, Taste UP drücken; Richtung eingestellt: mit Taste UP fährt der Rollladen hoch, mit Taste DOWN fährt dieser nach unten
- wenn der Rollladen nach unten fuhr, Taste DOWN drücken; Richtung eingestellt: mit Taste DOWN fährt der Rollladen nach unten, mit Taste UP fährt dieser nach oben.
5. Programmierung beendet
Um andere Fernbedienungen hinzuzufügen, wie folgt vorgehen:
6. Tasten UP und DOWN einer bereits gespeicherten Fernbedienung drücken und gedrückt halten bis sich der Motor in eine Richtung zu bewegen beginnt
7. Tasten loslassen: der Motor hält an8. Tasten UP oder DOWN der neuen Fernbedienung drücken
ACHTUNG: Wenn es sich um eine Kassettenmarkise handelt, dieSpeicherung der ersten Fernbedienung unter Berücksichtigungder Prozedur „1. Sender speichern und Modus Markise wählen“durchführen.
FORTGESCHRITTENE Programmierung derFunktion Zur Durchführung der FORTSCHRITTLICHEN Programmierung derFunktionen ist es notwendig, die Maske von der Fernbedienungabzunehmen und aufmerksam die für die unterschiedlichenFunktionen vorgesehenen Prozeduren zu befolgen.
Jede Funktion ist durch Drücken eines Codes während derProgrammierprozedur wählbar; nachfolgend einezusammenfassende Tabelle der Funktionen mit denunterschiedlichen Programmiercodes.
UP
STOP
DOWN
32
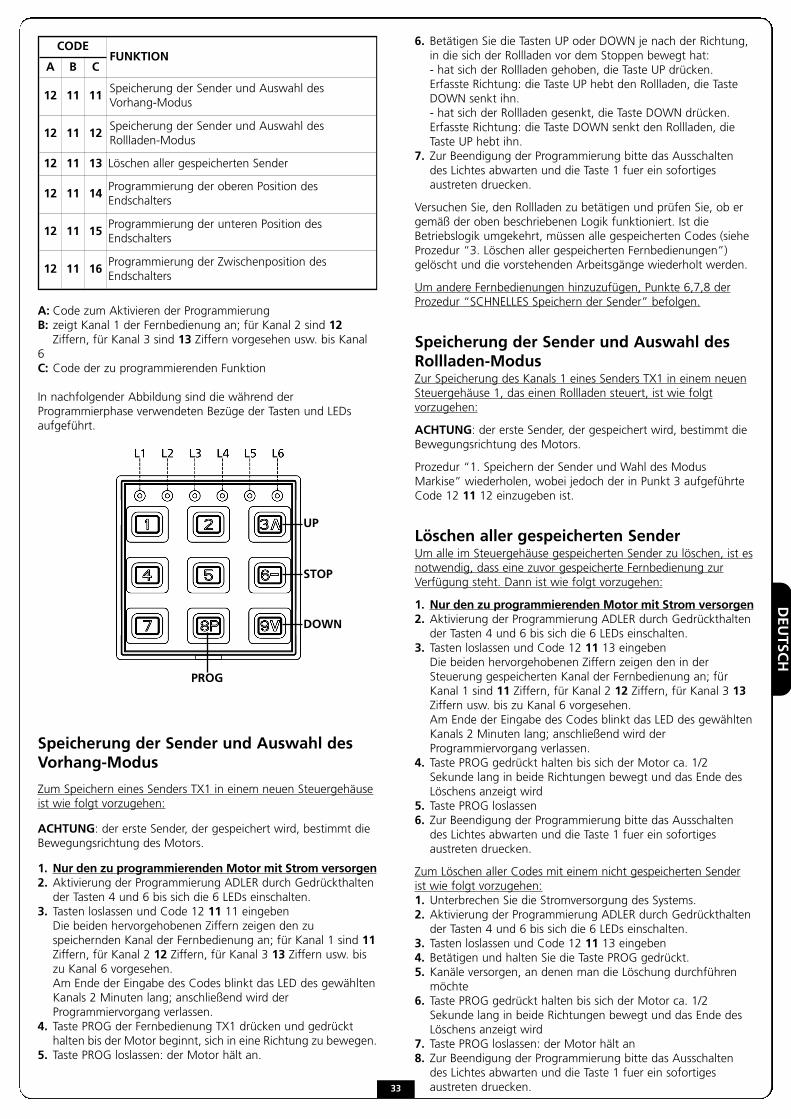
DEU
TSCH
A: Code zum Aktivieren der ProgrammierungB: zeigt Kanal 1 der Fernbedienung an; für Kanal 2 sind 12 Ziffern, für Kanal 3 sind 13 Ziffern vorgesehen usw. bis Kanal
6C: Code der zu programmierenden Funktion
In nachfolgender Abbildung sind die während derProgrammierphase verwendeten Bezüge der Tasten und LEDsaufgeführt.
Speicherung der Sender und Auswahl desVorhang-Modus
Zum Speichern eines Senders TX1 in einem neuen Steuergehäuseist wie folgt vorzugehen:
ACHTUNG: der erste Sender, der gespeichert wird, bestimmt dieBewegungsrichtung des Motors.
1. Nur den zu programmierenden Motor mit Strom versorgen2. Aktivierung der Programmierung ADLER durch Gedrückthalten der Tasten 4 und 6 bis sich die 6 LEDs einschalten.
3. Tasten loslassen und Code 12 11 11 eingeben Die beiden hervorgehobenen Ziffern zeigen den zu speichernden Kanal der Fernbedienung an; für Kanal 1 sind 11Ziffern, für Kanal 2 12 Ziffern, für Kanal 3 13 Ziffern usw. bis zu Kanal 6 vorgesehen.Am Ende der Eingabe des Codes blinkt das LED des gewählten Kanals 2 Minuten lang; anschließend wird der Programmiervorgang verlassen.
4. Taste PROG der Fernbedienung TX1 drücken und gedrückt halten bis der Motor beginnt, sich in eine Richtung zu bewegen.
5. Taste PROG loslassen: der Motor hält an.
6. Betätigen Sie die Tasten UP oder DOWN je nach der Richtung, in die sich der Rollladen vor dem Stoppen bewegt hat: - hat sich der Rollladen gehoben, die Taste UP drücken.Erfasste Richtung: die Taste UP hebt den Rollladen, die Taste DOWN senkt ihn.- hat sich der Rollladen gesenkt, die Taste DOWN drücken. Erfasste Richtung: die Taste DOWN senkt den Rollladen, die Taste UP hebt ihn.
7. Zur Beendigung der Programmierung bitte das Ausschalten des Lichtes abwarten und die Taste 1 fuer ein sofortiges austreten druecken.
Versuchen Sie, den Rollladen zu betätigen und prüfen Sie, ob ergemäß der oben beschriebenen Logik funktioniert. Ist dieBetriebslogik umgekehrt, müssen alle gespeicherten Codes (sieheProzedur “3. Löschen aller gespeicherten Fernbedienungen”)gelöscht und die vorstehenden Arbeitsgänge wiederholt werden.
Um andere Fernbedienungen hinzuzufügen, Punkte 6,7,8 derProzedur “SCHNELLES Speichern der Sender” befolgen.
Speicherung der Sender und Auswahl desRollladen-ModusZur Speicherung des Kanals 1 eines Senders TX1 in einem neuenSteuergehäuse 1, das einen Rollladen steuert, ist wie folgtvorzugehen:
ACHTUNG: der erste Sender, der gespeichert wird, bestimmt dieBewegungsrichtung des Motors.
Prozedur “1. Speichern der Sender und Wahl des ModusMarkise” wiederholen, wobei jedoch der in Punkt 3 aufgeführteCode 12 11 12 einzugeben ist.
Löschen aller gespeicherten SenderUm alle im Steuergehäuse gespeicherten Sender zu löschen, ist esnotwendig, dass eine zuvor gespeicherte Fernbedienung zurVerfügung steht. Dann ist wie folgt vorzugehen:
1. Nur den zu programmierenden Motor mit Strom versorgen2. Aktivierung der Programmierung ADLER durch Gedrückthalten der Tasten 4 und 6 bis sich die 6 LEDs einschalten.
3. Tasten loslassen und Code 12 11 13 eingebenDie beiden hervorgehobenen Ziffern zeigen den in der Steuerung gespeicherten Kanal der Fernbedienung an; für Kanal 1 sind 11 Ziffern, für Kanal 2 12 Ziffern, für Kanal 3 13Ziffern usw. bis zu Kanal 6 vorgesehen.Am Ende der Eingabe des Codes blinkt das LED des gewählten Kanals 2 Minuten lang; anschließend wird der Programmiervorgang verlassen.
4. Taste PROG gedrückt halten bis sich der Motor ca. 1/2 Sekunde lang in beide Richtungen bewegt und das Ende des Löschens anzeigt wird
5. Taste PROG loslassen6. Zur Beendigung der Programmierung bitte das Ausschalten des Lichtes abwarten und die Taste 1 fuer ein sofortiges austreten druecken.
Zum Löschen aller Codes mit einem nicht gespeicherten Senderist wie folgt vorzugehen:1. Unterbrechen Sie die Stromversorgung des Systems.2. Aktivierung der Programmierung ADLER durch Gedrückthalten der Tasten 4 und 6 bis sich die 6 LEDs einschalten.
3. Tasten loslassen und Code 12 11 13 eingeben4. Betätigen und halten Sie die Taste PROG gedrückt.5. Kanäle versorgen, an denen man die Löschung durchführen möchte
6. Taste PROG gedrückt halten bis sich der Motor ca. 1/2 Sekunde lang in beide Richtungen bewegt und das Ende des Löschens anzeigt wird
7. Taste PROG loslassen: der Motor hält an8. Zur Beendigung der Programmierung bitte das Ausschalten des Lichtes abwarten und die Taste 1 fuer ein sofortiges austreten druecken.
UP
STOP
DOWN
PROG
CODEFUNKTION
A B C
12 11 11Speicherung der Sender und Auswahl desVorhang-Modus
12 11 12Speicherung der Sender und Auswahl desRollladen-Modus
12 11 13 Löschen aller gespeicherten Sender
12 11 14Programmierung der oberen Position desEndschalters
12 11 15Programmierung der unteren Position desEndschalters
12 11 16Programmierung der Zwischenposition desEndschalters
33
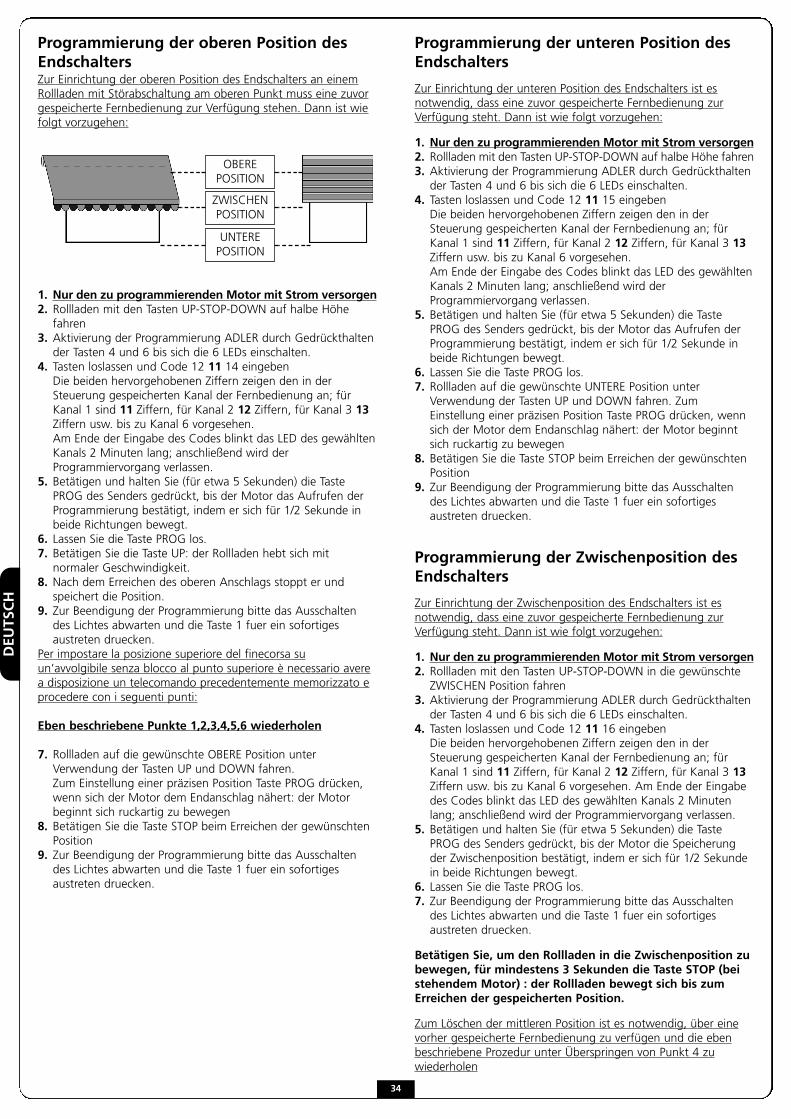
DEU
TSCH
Programmierung der oberen Position desEndschaltersZur Einrichtung der oberen Position des Endschalters an einemRollladen mit Störabschaltung am oberen Punkt muss eine zuvorgespeicherte Fernbedienung zur Verfügung stehen. Dann ist wiefolgt vorzugehen:
1. Nur den zu programmierenden Motor mit Strom versorgen2. Rollladen mit den Tasten UP-STOP-DOWN auf halbe Höhe fahren
3. Aktivierung der Programmierung ADLER durch Gedrückthalten der Tasten 4 und 6 bis sich die 6 LEDs einschalten.
4. Tasten loslassen und Code 12 11 14 eingebenDie beiden hervorgehobenen Ziffern zeigen den in der Steuerung gespeicherten Kanal der Fernbedienung an; für Kanal 1 sind 11 Ziffern, für Kanal 2 12 Ziffern, für Kanal 3 13Ziffern usw. bis zu Kanal 6 vorgesehen.Am Ende der Eingabe des Codes blinkt das LED des gewählten Kanals 2 Minuten lang; anschließend wird der Programmiervorgang verlassen.
5. Betätigen und halten Sie (für etwa 5 Sekunden) die Taste PROG des Senders gedrückt, bis der Motor das Aufrufen der Programmierung bestätigt, indem er sich für 1/2 Sekunde in beide Richtungen bewegt.
6. Lassen Sie die Taste PROG los.7. Betätigen Sie die Taste UP: der Rollladen hebt sich mit normaler Geschwindigkeit.
8. Nach dem Erreichen des oberen Anschlags stoppt er und speichert die Position.
9. Zur Beendigung der Programmierung bitte das Ausschalten des Lichtes abwarten und die Taste 1 fuer ein sofortiges austreten druecken.
Per impostare la posizione superiore del finecorsa suun’avvolgibile senza blocco al punto superiore è necessario averea disposizione un telecomando precedentemente memorizzato eprocedere con i seguenti punti:
Eben beschriebene Punkte 1,2,3,4,5,6 wiederholen
7. Rollladen auf die gewünschte OBERE Position unter Verwendung der Tasten UP und DOWN fahren. Zum Einstellung einer präzisen Position Taste PROG drücken, wenn sich der Motor dem Endanschlag nähert: der Motor beginnt sich ruckartig zu bewegen
8. Betätigen Sie die Taste STOP beim Erreichen der gewünschten Position
9. Zur Beendigung der Programmierung bitte das Ausschalten des Lichtes abwarten und die Taste 1 fuer ein sofortiges austreten druecken.
Programmierung der unteren Position desEndschalters
Zur Einrichtung der unteren Position des Endschalters ist esnotwendig, dass eine zuvor gespeicherte Fernbedienung zurVerfügung steht. Dann ist wie folgt vorzugehen:
1. Nur den zu programmierenden Motor mit Strom versorgen2. Rollladen mit den Tasten UP-STOP-DOWN auf halbe Höhe fahren3. Aktivierung der Programmierung ADLER durch Gedrückthalten der Tasten 4 und 6 bis sich die 6 LEDs einschalten.
4. Tasten loslassen und Code 12 11 15 eingebenDie beiden hervorgehobenen Ziffern zeigen den in der Steuerung gespeicherten Kanal der Fernbedienung an; für Kanal 1 sind 11 Ziffern, für Kanal 2 12 Ziffern, für Kanal 3 13Ziffern usw. bis zu Kanal 6 vorgesehen.Am Ende der Eingabe des Codes blinkt das LED des gewählten Kanals 2 Minuten lang; anschließend wird der Programmiervorgang verlassen.
5. Betätigen und halten Sie (für etwa 5 Sekunden) die Taste PROG des Senders gedrückt, bis der Motor das Aufrufen der Programmierung bestätigt, indem er sich für 1/2 Sekunde in beide Richtungen bewegt.
6. Lassen Sie die Taste PROG los.7. Rollladen auf die gewünschte UNTERE Position unter Verwendung der Tasten UP und DOWN fahren. Zum Einstellung einer präzisen Position Taste PROG drücken, wenn sich der Motor dem Endanschlag nähert: der Motor beginnt sich ruckartig zu bewegen
8. Betätigen Sie die Taste STOP beim Erreichen der gewünschten Position
9. Zur Beendigung der Programmierung bitte das Ausschalten des Lichtes abwarten und die Taste 1 fuer ein sofortiges austreten druecken.
Programmierung der Zwischenposition desEndschalters
Zur Einrichtung der Zwischenposition des Endschalters ist esnotwendig, dass eine zuvor gespeicherte Fernbedienung zurVerfügung steht. Dann ist wie folgt vorzugehen:
1. Nur den zu programmierenden Motor mit Strom versorgen2. Rollladen mit den Tasten UP-STOP-DOWN in die gewünschte ZWISCHEN Position fahren
3. Aktivierung der Programmierung ADLER durch Gedrückthalten der Tasten 4 und 6 bis sich die 6 LEDs einschalten.
4. Tasten loslassen und Code 12 11 16 eingebenDie beiden hervorgehobenen Ziffern zeigen den in der Steuerung gespeicherten Kanal der Fernbedienung an; für Kanal 1 sind 11 Ziffern, für Kanal 2 12 Ziffern, für Kanal 3 13Ziffern usw. bis zu Kanal 6 vorgesehen. Am Ende der Eingabe des Codes blinkt das LED des gewählten Kanals 2 Minuten lang; anschließend wird der Programmiervorgang verlassen.
5. Betätigen und halten Sie (für etwa 5 Sekunden) die Taste PROG des Senders gedrückt, bis der Motor die Speicherung der Zwischenposition bestätigt, indem er sich für 1/2 Sekunde in beide Richtungen bewegt.
6. Lassen Sie die Taste PROG los.7. Zur Beendigung der Programmierung bitte das Ausschalten des Lichtes abwarten und die Taste 1 fuer ein sofortiges austreten druecken.
Betätigen Sie, um den Rollladen in die Zwischenposition zubewegen, für mindestens 3 Sekunden die Taste STOP (beistehendem Motor) : der Rollladen bewegt sich bis zumErreichen der gespeicherten Position.
Zum Löschen der mittleren Position ist es notwendig, über einevorher gespeicherte Fernbedienung zu verfügen und die ebenbeschriebene Prozedur unter Überspringen von Punkt 4 zuwiederholen
OBEREPOSITION
ZWISCHENPOSITION
UNTEREPOSITION
34
NED
ERLA
NDS
GarantieV2 SPA garandeert de buismotoren gedurende zestig maanden vanafde datum van fabricage en de eventuele elektronische componentengedurende vierentwintig maanden vanaf de datumvan fabricage. Degarantie bestaat uit de gratis reparatie of vervanging van de delenmet een erkend fabricagedefect, op grond van het onbetwistbareoordeel van V2 SPA. Het materiaal dat onder garantie naar devestiging van V2 SPA gestuurd wordt, moet portvrij verzondenworden en zal onder rembours teruggezonden worden. Het vervangen materiaal zal eigendom van V2 SPA blijven. De arbeidskosten blijven hoe dan ook ten laste van de koper. Er wordt geen enkele schadevergoeding erkend voor de periode vanonwerkzaamheid van de installatie. De ingreep verlengt de tijdsduurvan de garantie niet. De geldigheid van de garantie blijft onderhevigaan de inachtneming van de specificaties m.b.t. de prestaties van deproducten, die in de handleiding met instructies staan. Dezehandleiding is bij de producten zelf meegeleverd.
De garantie bevat niet:• Afwijkingen of schade veroorzaakt door het transport• Afwijkingen of schade veroorzaakt door fouten van de elektrische
installatie en/of verwaarlozing, nalatigheid, ongeschiktheid van de installatie voor het gebruik waarvoor deze bestemd is en in ieder geval indien veroorzaakt door afwijken gebruik
• Afwijkingen of schade veroorzaakt door het onklaar maken van onderdelen door niet geautoriseerd personeel of door het gebruik van niet originele reserveonderdelen
• Defecten veroorzaakt door chemische agentia of weersomstandigheden
• Het verbruiksmateriaal• De ingrepen wegens vermoedelijke fouten of niet strikt
noodzakelijke controles
Kenmerken van de productenDe producten van V2 SPA zijn onderhevig aan continue innovaties en verbeteringen. De constructiekenmerken en de afbeelding ervan kunnendan ook zonder voorgaande kennisgeving wijzigingen ondergaan.
Competente rechtankAangezien het contract vervolledigd wordt door de Orderbevestigingdie te Racconigi ingevuld wordt, is in geval van een wettelijkecontroverse van ongeacht welke aard het Italiaanse recht van toepassing en is de competente rechtbank de Rechtbank van Saluzzo.
Voorafgaande tips• De installatie dient te gebeuren door een technicus in
overeenstemming met de geldende veiligheidsnormen. Raadpleeg richtlijn NFC15-100 voor de elektrische installatie.
• Doe uitsluitend beroep op bevoegd personeel voor de vervanging van de voedingskabel van de motor.
• De motor nergens niet doorboren, noch er schroeven in aanbrengen.
• Zorg ervoor dat de motor nooit in contact komt met vlo eistoffen.
• Zorg ervoor dat de motor niet wordt ingedrukt of niet op de grond valt.
• Verkeerde handelingen of verkeerde aansluitingen worden niet door de waarborg gedekt.
LET OP:1. Alvorens de motor te installeren, moeten alle onnodige
kabels verwijderd worden en dient men de apparatuur die niet voor de inbewegingstelling nodig is, uit te schakelen
2. Voor de installatie van schermen is het noodzakelijk om een horizontale afstand van minstens 0,4 meter tussen het volledig afgerolde bewegende deel en ongeacht welk vast object te handhaven
3. De voedingskabel mag niet blootgesteld worden aan rechtstreeks zonlicht of regen
Nota’:a) Lees de instructies vóór de installatie met aandacht doorb) Controleer of alle accessoires zo vastgezet zijn dat de motor
zonder mechanische problemen kan werken. De belasting moet afgesteld zijn op het vermogen van de motor
c) De elektrische aansluitingen moeten tot stand gebracht worden door gespecialiseerd technisch personeel dat in overeenstemming met de wetten te werk gaat
LET OP: belangrijke veiligheidsinstructies. Het is belangrijk voor de persoonlijke veiligheid om dezeinstructies in acht te nemen. Bewaar deze instructies.
LET OP: belangrijke veiligheidsinstructies. • Volg alle instructies: een niet correcte installatie kan ernstige
schade berokkenen• Sta kinderen niet toe met de vaste bedieningsorganen te spelen • Houd de afstandsbedieningen buiten het bereik van kinderen• Controleer de installatie vaak om onbalans en slijtage of
beschadiging van kabels en veren te voorkomen• Niet gebruiken indien reparaties of instellingen uitgevoerd
moeten worden• De bewegende delen moeten geïnstalleerd worden op meer
dan 2,5 hoogte van de vloer of van ieder ander vlak dat toegang tot deze delen mogelijk maakt
• Het activeringselement van een knop moet zich rechtstreeks bij het bewogen deel bevinden, maar ver van de bewegende delen, en op een minimumhoogte van 1,5 meter geïnstalleerd worden
VERKLARING VAN INCORPORATIE VOORMACHINES DIE BIJNA MACHINES ZIJN(Richtlijn 2006/42/EG, Bijlage II-B)
De fabrikant V2 S.p.A., gevestigd in Corso Principi di Piemonte 65, 12035, Racconigi (CN), Italiëverklaart op eigen verantwoording dat:
het automatisme model: VEO-RFE6-230V, VEO-RFE10-230V, VEO-RFE6-120V, VEO-RFE10-120V
Serienummer en bouwjaar: die op het gegevensplaatje staanBeschrijving: Elektromechanische actuator voor zonweringen enrolluiken
- bestemd is om te worden opgenomen in een zonwering/rolluik, om een machine te vormen krachtens Richtlijn 2006/42/EG.Deze machine mag niet in dienst gesteld worden voordat zij conform verklaard is met de bepalingen van richtlijn 2006/42/EG (Bijlage II-A)
- conform is met de toepasselijke essentiële vereisten van de Richtlijnen: Machinerichtlijn 2006/42/EG (Bijlage I, Hoofdstuk 1)Richtlijn laagspanning 2006/95/EGRichtlijn elektromagnetische compatibiliteit 2004/108/EGRadiorichtlijn 99/05/EG
De technische documentatie staat ter beschikking van decompetente autoriteit in navolging van een gemotiveerd verzoek datingediend wordt bij:V2 S.p.A., Corso Principi di Piemonte 65, 12035 - Racconigi (CN), ItaliëDegene die geautoriseerd is tot het ondertekenen van dezeverklaring van incorporatie en tot het verstrekken van de technischedocumentatie is:
Cosimo De FalcoRechtsgeldig vertegenwoordiger van V2 S.p.A.Racconigi, 11/01/2010
35
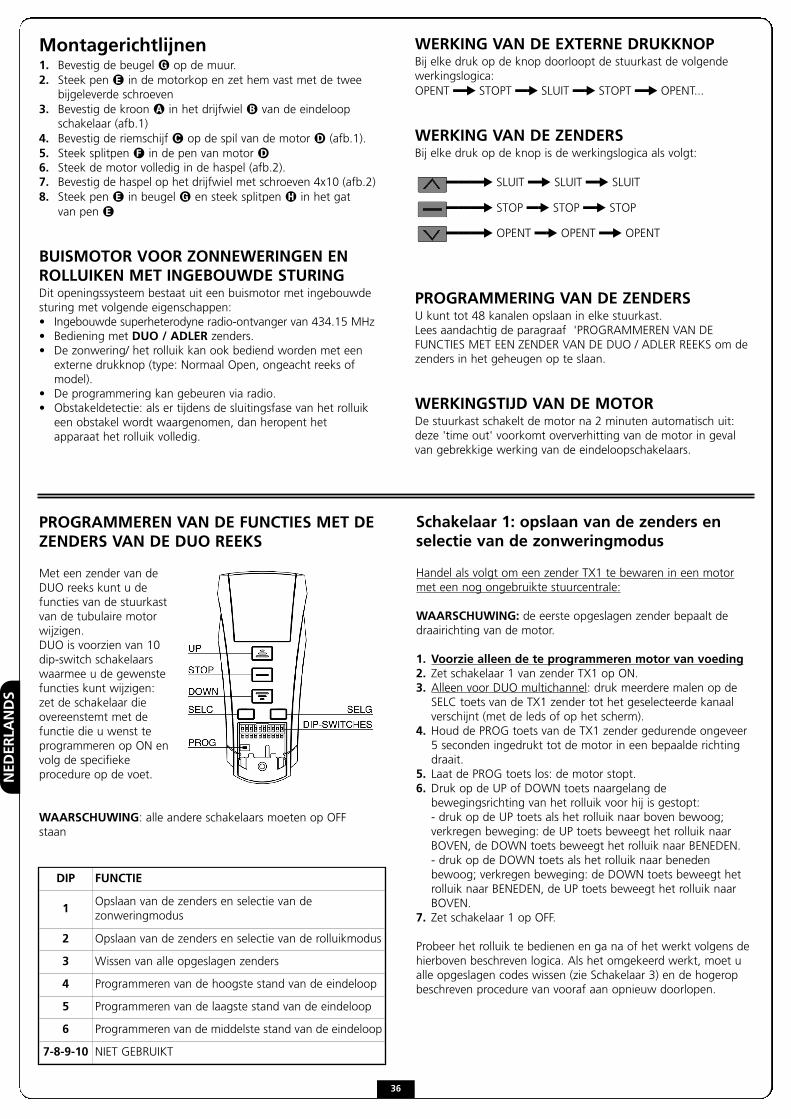
NED
ERLA
NDS
Montagerichtlijnen1. Bevestig de beugel � op de muur. 2. Steek pen � in de motorkop en zet hem vast met de twee
bijgeleverde schroeven3. Bevestig de kroon � in het drijfwiel � van de eindeloop
schakelaar (afb.1)4. Bevestig de riemschijf � op de spil van de motor � (afb.1). 5. Steek splitpen � in de pen van motor �6. Steek de motor volledig in de haspel (afb.2). 7. Bevestig de haspel op het drijfwiel met schroeven 4x10 (afb.2)8. Steek pen � in beugel � en steek splitpen � in het gat
van pen �
BUISMOTOR VOOR ZONNEWERINGEN ENROLLUIKEN MET INGEBOUWDE STURINGDit openingssysteem bestaat uit een buismotor met ingebouwdesturing met volgende eigenschappen:• Ingebouwde superheterodyne radio-ontvanger van 434.15 MHz• Bediening met DUO / ADLER zenders.• De zonwering/ het rolluik kan ook bediend worden met een externe drukknop (type: Normaal Open, ongeacht reeks of model).
• De programmering kan gebeuren via radio.• Obstakeldetectie: als er tijdens de sluitingsfase van het rolluik een obstakel wordt waargenomen, dan heropent het apparaat het rolluik volledig.
WERKING VAN DE EXTERNE DRUKKNOPBij elke druk op de knop doorloopt de stuurkast de volgendewerkingslogica:OPENT �� STOPT �� SLUIT �� STOPT �� OPENT...
WERKING VAN DE ZENDERSBij elke druk op de knop is de werkingslogica als volgt:
PROGRAMMERING VAN DE ZENDERSU kunt tot 48 kanalen opslaan in elke stuurkast.Lees aandachtig de paragraaf 'PROGRAMMEREN VAN DEFUNCTIES MET EEN ZENDER VAN DE DUO / ADLER REEKS om dezenders in het geheugen op te slaan.
WERKINGSTIJD VAN DE MOTORDe stuurkast schakelt de motor na 2 minuten automatisch uit:deze 'time out' voorkomt oververhitting van de motor in gevalvan gebrekkige werking van de eindeloopschakelaars.
PROGRAMMEREN VAN DE FUNCTIES MET DEZENDERS VAN DE DUO REEKS
Met een zender van deDUO reeks kunt u defuncties van de stuurkastvan de tubulaire motorwijzigen.DUO is voorzien van 10dip-switch schakelaarswaarmee u de gewenstefuncties kunt wijzigen:zet de schakelaar dieovereenstemt met defunctie die u wenst teprogrammeren op ON envolg de specifiekeprocedure op de voet.
WAARSCHUWING: alle andere schakelaars moeten op OFFstaan
DIP FUNCTIE
1Opslaan van de zenders en selectie van dezonweringmodus
2 Opslaan van de zenders en selectie van de rolluikmodus
3 Wissen van alle opgeslagen zenders
4 Programmeren van de hoogste stand van de eindeloop
5 Programmeren van de laagste stand van de eindeloop
6 Programmeren van de middelste stand van de eindeloop
7-8-9-10 NIET GEBRUIKT
Schakelaar 1: opslaan van de zenders enselectie van de zonweringmodus
Handel als volgt om een zender TX1 te bewaren in een motormet een nog ongebruikte stuurcentrale:
WAARSCHUWING: de eerste opgeslagen zender bepaalt dedraairichting van de motor.
1. Voorzie alleen de te programmeren motor van voeding2. Zet schakelaar 1 van zender TX1 op ON.3. Alleen voor DUO multichannel: druk meerdere malen op de SELC toets van de TX1 zender tot het geselecteerde kanaal verschijnt (met de leds of op het scherm).
4. Houd de PROG toets van de TX1 zender gedurende ongeveer 5 seconden ingedrukt tot de motor in een bepaalde richting draait.
5. Laat de PROG toets los: de motor stopt.6. Druk op de UP of DOWN toets naargelang de bewegingsrichting van het rolluik voor hij is gestopt:- druk op de UP toets als het rolluik naar boven bewoog; verkregen beweging: de UP toets beweegt het rolluik naar BOVEN, de DOWN toets beweegt het rolluik naar BENEDEN.- druk op de DOWN toets als het rolluik naar beneden bewoog; verkregen beweging: de DOWN toets beweegt het rolluik naar BENEDEN, de UP toets beweegt het rolluik naar BOVEN.
7. Zet schakelaar 1 op OFF.
Probeer het rolluik te bedienen en ga na of het werkt volgens dehierboven beschreven logica. Als het omgekeerd werkt, moet ualle opgeslagen codes wissen (zie Schakelaar 3) en de hogeropbeschreven procedure van vooraf aan opnieuw doorlopen.
���� SLUIT �� SLUIT �� SLUIT
���� STOP �� STOP �� STOP
���� OPENT �� OPENT �� OPENT
36

NED
ERLA
NDS
Om een andere TX2 zender toe te voegen, moet u een voordienopgeslagen afstandsbediening (TX1) gebruiken. Ga hierbij alsvolgt te werk:
1. Alleen voor DUO multichannel: druk meerdere malen op de SELC toets van de TX1 zender tot het gekozen kanaal verschijnt (met de leds of op het scherm).
2. Alleen voor DUO multichannel: druk meerdere malen op de SELC toets van de nieuwe TX2 zender tot het kanaal dat moet worden opgeslagen verschijnt (met de leds of op het scherm).
3. Beweeg het rolluik tot halfweg met TX1.4. Zet schakelaar 1 van de TX1 zender op ON 5. Houd de PROG toets van de TX1 ongeveer 5 seconden ingedrukt tot de motor start.
6. Laat de PROG toets los, de motor stopt.7. Druk op de UP of DOWN toets van de TX2: de zender is opgeslagen volgens dezelfde logica als de TX1.
8. Zet schakelaar 1 op OFF.
Schakelaar 2: opslaan van de zenders enselectie van de rolluikmodus
Ga als volgt te werk om kanaal 1 van een zender TX1 op te slaanin een niet geprogrammeerde stuurkast 1 voor de bediening vaneen rolluik:
WAARSCHUWING: de eerst opgeslagen zender bepaalt dedraairichting van de motor.
Herhaal de hogerop beschreven procedure voor schakelaar 1,maar gebruik dit keer alleen schakelaar 2
Schakelaar 3: wissen van alle opgeslagenzenders
Gebruik een vooraf opgeslagen afstandsbediening om alle in destuurkast opgeslagen zenders te wissen. Ga hierbij als volgt tewerk:
1. Voorzie alleen de te programmeren motor van voeding2. Alleen voor DUO multichannel: druk meerdere malen op de SELC toets van de zender tot het opgeslagen kanaal verschijnt (met de led of op het scherm).
3. Zet het rolluik tot halverwege de hoogte 4. Zet schakelaar 3 van de zender op ON.5. Houd de PROG toets van de zender ingedrukt tot de motor gedurende 1 seconde in beide richtingen draait. De zender is gewist.
6. Laat de PROG toets los en zet schakelaar 3 van de zender op OFF.
Ga als volgt te werk om alle codes te wissen met een nietopgeslagen zender:
1. Zet het rolluik tot halverwege de hoogte.2. Schakel de voeding van het systeem uit.3. Zet schakelaar 3 van de zender op ON.4. Houd de PROG toets ingedrukt.5. Zet alleen de stuurkast waarvan u de codes wil wissen onder spanning: na ongeveer 1 seconde draait de motor in beide richting wat aangeeft dat de codes werden gewist.
6. Laat de PROG toets los en zet schakelaar 3 op OFF.
Schakelaar 4: programmeren van dehoogste stand van de eindeloop
Om de hoogste stand van de eindeloop op een rolluik met eenvergrendeling bovenaan af te stellen moet u gebruik maken vaneen vooraf opgeslagen afstandsbediening. Ga hierbij als volgt tewerk:
1. Voorzie alleen de te programmeren motor van voeding2. Alleen voor DUO multichannel: druk meerdere malen op de SELC toets van de zender tot het opgeslagen kanaal wordt getoond door de leds of op het scherm
3. Zet het rolluik tot halverwege de hoogte 4. Zet schakelaar 4 van de zender op ON 5. Houd de PROG toets van de zender gedurende ongeveer 5 seconden ingedrukt tot de motor gedurende een halve seconde in beide richtingen draait, wat aangeeft dat de motor in de programmeringsmodus staat.
6. Laat de PROG toets los.7. Druk op de UP toets: het rolluik gaat omhoog tegen een normale snelheid.
8. Zodra het rolluik in contact komt met de bovenste eindeloop stopt het en wordt die stand in het geheugen opgeslagen.
9. Zet schakelaar 4 van de zender op OFF.
Om de hoogste stand van de eindeloop op een rolluik zondervergrendeling bovenaan af te stellen, moet u gebruik maken vaneen vooraf opgeslagen afstandsbediening. Ga hierbij als volgt tewerk:
1. Voorzie alleen de te programmeren motor van voeding2. Alleen voor DUO multichannel: druk meerdere malen op de SELC toets van de zender tot het opgeslagen kanaal wordt getoond door de leds of op het scherm.
3. Zet het rolluik tot halverwege de hoogte 4. Zet schakelaar 4 van de zender op ON. 5. Houd de PROG toets van de zender gedurende ongeveer 5 seconden ingedrukt tot de motor gedurende een halve seconde in beide richtingen draait, wat aangeeft dat de motor in de programmeringsmodus staat.
6. Laat de PROG toets los.7. Zet het rolluik in de gewenste BOVEN positie met de toetsen UP en DOWN. Druk voor het uitvoeren van een precieze regeling op de toets PROG wanneer de motor de eindschakelaar nadert. De motor begint zich nu met schokjes voort te bewegen.
8. Druk op de STOP toets zodra de gewenste hoogste stand werd bereikt: de motor stopt en geeft aan dat de eindeloop correct werd opgeslagen door gedurende een halve seconde eerst neerwaarts en vervolgens opwaarts te bewegen.
9. Zet schakelaar 4 van de zender op OFF.
BOVENPOSITIE
MIDDENPOSITIE
ONDERPOSITIE
37
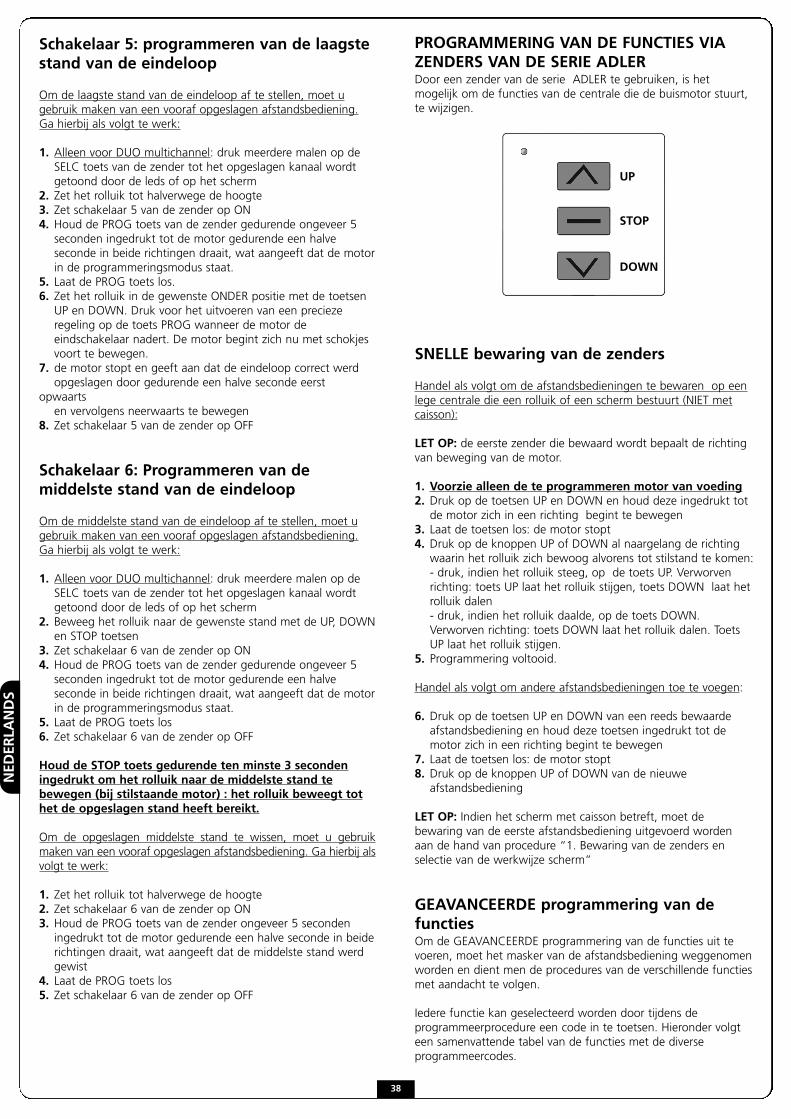
NED
ERLA
NDS
Schakelaar 5: programmeren van de laagstestand van de eindeloop
Om de laagste stand van de eindeloop af te stellen, moet ugebruik maken van een vooraf opgeslagen afstandsbediening.Ga hierbij als volgt te werk:
1. Alleen voor DUO multichannel: druk meerdere malen op de SELC toets van de zender tot het opgeslagen kanaal wordt getoond door de leds of op het scherm
2. Zet het rolluik tot halverwege de hoogte 3. Zet schakelaar 5 van de zender op ON 4. Houd de PROG toets van de zender gedurende ongeveer 5 seconden ingedrukt tot de motor gedurende een halve seconde in beide richtingen draait, wat aangeeft dat de motor in de programmeringsmodus staat.
5. Laat de PROG toets los.6. Zet het rolluik in de gewenste ONDER positie met de toetsen UP en DOWN. Druk voor het uitvoeren van een precieze regeling op de toets PROG wanneer de motor de eindschakelaar nadert. De motor begint zich nu met schokjes voort te bewegen.
7. de motor stopt en geeft aan dat de eindeloop correct werd opgeslagen door gedurende een halve seconde eerst
opwaarts en vervolgens neerwaarts te bewegen
8. Zet schakelaar 5 van de zender op OFF
Schakelaar 6: Programmeren van demiddelste stand van de eindeloop
Om de middelste stand van de eindeloop af te stellen, moet ugebruik maken van een vooraf opgeslagen afstandsbediening.Ga hierbij als volgt te werk:
1. Alleen voor DUO multichannel: druk meerdere malen op de SELC toets van de zender tot het opgeslagen kanaal wordt getoond door de leds of op het scherm
2. Beweeg het rolluik naar de gewenste stand met de UP, DOWN en STOP toetsen
3. Zet schakelaar 6 van de zender op ON 4. Houd de PROG toets van de zender gedurende ongeveer 5 seconden ingedrukt tot de motor gedurende een halve seconde in beide richtingen draait, wat aangeeft dat de motor in de programmeringsmodus staat.
5. Laat de PROG toets los6. Zet schakelaar 6 van de zender op OFF
Houd de STOP toets gedurende ten minste 3 secondeningedrukt om het rolluik naar de middelste stand tebewegen (bij stilstaande motor) : het rolluik beweegt tothet de opgeslagen stand heeft bereikt.
Om de opgeslagen middelste stand te wissen, moet u gebruikmaken van een vooraf opgeslagen afstandsbediening. Ga hierbij alsvolgt te werk:
1. Zet het rolluik tot halverwege de hoogte 2. Zet schakelaar 6 van de zender op ON 3. Houd de PROG toets van de zender ongeveer 5 seconden ingedrukt tot de motor gedurende een halve seconde in beide richtingen draait, wat aangeeft dat de middelste stand werd gewist
4. Laat de PROG toets los5. Zet schakelaar 6 van de zender op OFF
PROGRAMMERING VAN DE FUNCTIES VIAZENDERS VAN DE SERIE ADLERDoor een zender van de serie ADLER te gebruiken, is hetmogelijk om de functies van de centrale die de buismotor stuurt,te wijzigen.
SNELLE bewaring van de zenders
Handel als volgt om de afstandsbedieningen te bewaren op eenlege centrale die een rolluik of een scherm bestuurt (NIET metcaisson):
LET OP: de eerste zender die bewaard wordt bepaalt de richtingvan beweging van de motor.
1. Voorzie alleen de te programmeren motor van voeding2. Druk op de toetsen UP en DOWN en houd deze ingedrukt tot de motor zich in een richting begint te bewegen
3. Laat de toetsen los: de motor stopt4. Druk op de knoppen UP of DOWN al naargelang de richting waarin het rolluik zich bewoog alvorens tot stilstand te komen: - druk, indien het rolluik steeg, op de toets UP. Verworven richting: toets UP laat het rolluik stijgen, toets DOWN laat het rolluik dalen- druk, indien het rolluik daalde, op de toets DOWN. Verworven richting: toets DOWN laat het rolluik dalen. Toets UP laat het rolluik stijgen.
5. Programmering voltooid.
Handel als volgt om andere afstandsbedieningen toe te voegen:
6. Druk op de toetsen UP en DOWN van een reeds bewaarde afstandsbediening en houd deze toetsen ingedrukt tot de motor zich in een richting begint te bewegen
7. Laat de toetsen los: de motor stopt8. Druk op de knoppen UP of DOWN van de nieuwe afstandsbediening
LET OP: Indien het scherm met caisson betreft, moet debewaring van de eerste afstandsbediening uitgevoerd wordenaan de hand van procedure “1. Bewaring van de zenders enselectie van de werkwijze scherm”
GEAVANCEERDE programmering van defuncties Om de GEAVANCEERDE programmering van de functies uit tevoeren, moet het masker van de afstandsbediening weggenomenworden en dient men de procedures van de verschillende functiesmet aandacht te volgen.
Iedere functie kan geselecteerd worden door tijdens deprogrammeerprocedure een code in te toetsen. Hieronder volgteen samenvattende tabel van de functies met de diverseprogrammeercodes.
UP
STOP
DOWN
38

NED
ERLA
NDS
A: code om de programmering te activerenB: duidt op kanaal 1 van de afstandsbediening. Voor kanaal 2 zijn de cijfers 12, voor kanaal 3 zijn het er 13, enzovoorts tot kanaal 6
C: code van de te programmeren functie
Onderstaande afbeelding toont de referenties van de toetsen ende tijdens de programmeerfase gebruikte leds
Opslaan van de zenders en selectie van dezonweringmodus
Ga als volgt te werk om een TX1 zender op te slaan in een nietgeprogrammeerde stuurkast:
WAARSCHUWING: de eerste opgeslagen zender bepaalt dedraairichting van de motor.
1. Voorzie alleen de te programmeren motor van voeding2. Activeer de programmering van ADLERS door de toetsen 4 en 6 ingedrukt te houden tot de 6 leds gaan branden
3. Laat de toetsen los en toets de code 12 11 11 in.De twee geaccentueerde cijfers duiden op het te bewaren kanaal van de afstandsbediening. Voor kanaal 1 zijn de cijfers 11, voor kanaal 2 zijn de cijfers 12, voor kanaal 3 zijn het de cijfers 13 enzovoorts tot kanaal 6. Wanneer het intoetsen van de code klaar is, knippert de led van het geselecteerde kanaal 2 minuten, na het verstrijken waarvan de programmering verlaten wordt.
4. Druk op de toets PROG van de afstandsbediening TX1 en houd de toets ingedrukt tot de motor zich in een richting begint te bewegen.
5. Laat de toets PROG los. De motor komt tot stilstand.
6. Druk op de UP of DOWN toets naargelang de bewegingsrichting van het rolluik voor hij is gestopt:- druk op de UP toets als het rolluik naar boven bewoog; verkregen beweging: de UP toets beweegt het rolluik naar BOVEN, de DOWN toets beweegt het rolluik naar BENEDEN.- druk op de DOWN toets als het rolluik naar beneden bewoog;verkregen beweging: de DOWN toets beweegt het rolluik naar BENEDEN, de UP toets beweegt het rolluik naar BOVEN.
7. Voordat U de programmering beeindigd moet de Led eerst uitgaan, ofwel toets 1 indrukken voor onmiddelijke onderbreking
Probeer het rolluik te bedienen en ga na of het werkt volgens dehierboven beschreven logica. Als het omgekeerd werkt, moet ualle opgeslagen codes wissen (zie procedure “3. Wissen van allebewaarde zenders”) en de hogerop beschreven procedure vanvooraf aan opnieuw doorlopen.
Om andere afstandsbedieningen toe te voegen, dient men depunten 6, 7 en 8 van de procedure “SNELLE bewaring van dezenders” te volgen.
Opslaan van de zenders en selectie van derolluikmodus
Ga als volgt te werk om kanaal 1 van een zender TX1 op te slaanin een niet geprogrammeerde stuurkast 1 voor de bediening vaneen rolluik:
WAARSCHUWING: de eerst opgeslagen zender bepaalt dedraairichting van de motor.
Herhaal procedure “1. Bewaring van de zenders en selectie vande werkwijze scherm” maar voer bij punt 3 de code 12 11 12 in.
Wissen van alle opgeslagen zenders
Gebruik een vooraf opgeslagen afstandsbediening om alle in destuurkast opgeslagen zenders te wissen. Ga hierbij als volgt te werk:
1. Voorzie alleen de te programmeren motor van voeding2. Activeer de programmering van ADLERS door de toetsen 4 en 6 ingedrukt te houden tot de 6 leds gaan branden
3. Laat de toetsen los en toets de code 12 11 13 in.De twee geaccentueerde cijfers duiden op het in de centrale bewaarde kanaal van de afstandsbediening.Voor kanaal 1 zijn de cijfers 11, voor kanaal 2 zijn de cijfers 12, voor kanaal 3 zijn het de cijfers 13 enzovoorts tot kanaal 6. Wanneer het intoetsen van de code klaar is, knippert de led van het geselecteerde kanaal 2 minuten, na het verstrijken waarvan de programmering verlaten wordt.
4. Houd de toets PROG ingedrukt tot de motor zich gedurende circa ½ seconden in beide richtingen beweegt hetgeen aangeeft dat het wissen klaar is.
5. Laat de toets PROG los. 6. Voordat U de programmering beeindigd moet de Led eerst uitgaan, ofwel toets 1 indrukken voor onmiddelijke onderbreking
Ga als volgt te werk om alle codes te wissen met een nietopgeslagen zender:
1. Schakel de voeding van het systeem uit.2. Activeer de programmering van ADLERS door de toetsen 4 en 6 ingedrukt te houden tot de 6 leds gaan branden
3. Laat de toetsen los en toets de code 12 11 13 in.4. Houd de PROG toets ingedrukt.5. Schakel de voeding naar de centrales in waarop men het wissen wenst uit te voeren.
UP
STOP
DOWN
PROG
CODEFUNCTIE
A B C
12 11 11Opslaan van de zenders en selectie van dezonweringmodus
12 11 12Opslaan van de zenders en selectie van derolluikmodus
12 11 13 Wissen van alle opgeslagen zenders
12 11 14Programmeren van de hoogste stand van deeindeloop
12 11 15Programmeren van de laagste stand van deeindeloop
12 11 16Programmeren van de middelste stand van deeindeloop
39
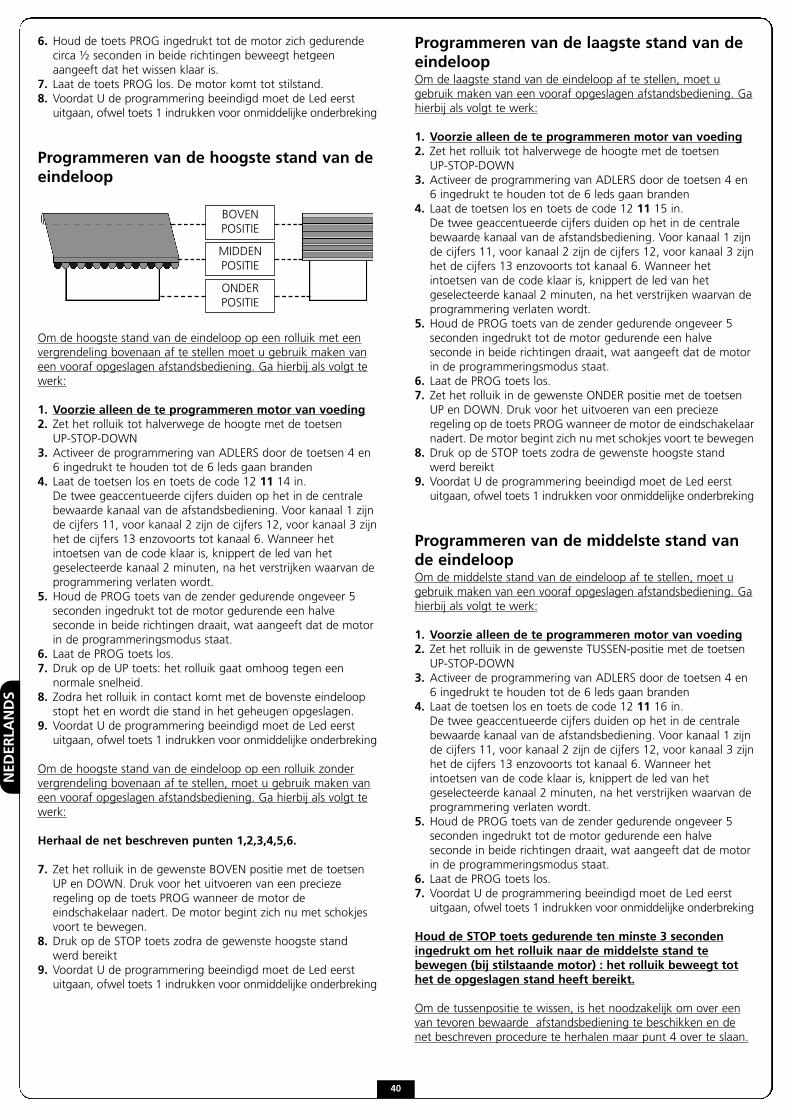
NED
ERLA
NDS
40
6. Houd de toets PROG ingedrukt tot de motor zich gedurende circa ½ seconden in beide richtingen beweegt hetgeen aangeeft dat het wissen klaar is.
7. Laat de toets PROG los. De motor komt tot stilstand.8. Voordat U de programmering beeindigd moet de Led eerst uitgaan, ofwel toets 1 indrukken voor onmiddelijke onderbreking
Programmeren van de hoogste stand van deeindeloop
Om de hoogste stand van de eindeloop op een rolluik met eenvergrendeling bovenaan af te stellen moet u gebruik maken vaneen vooraf opgeslagen afstandsbediening. Ga hierbij als volgt tewerk:
1. Voorzie alleen de te programmeren motor van voeding2. Zet het rolluik tot halverwege de hoogte met de toetsen UP-STOP-DOWN
3. Activeer de programmering van ADLERS door de toetsen 4 en 6 ingedrukt te houden tot de 6 leds gaan branden
4. Laat de toetsen los en toets de code 12 11 14 in.De twee geaccentueerde cijfers duiden op het in de centrale bewaarde kanaal van de afstandsbediening. Voor kanaal 1 zijn de cijfers 11, voor kanaal 2 zijn de cijfers 12, voor kanaal 3 zijn het de cijfers 13 enzovoorts tot kanaal 6. Wanneer het intoetsen van de code klaar is, knippert de led van het geselecteerde kanaal 2 minuten, na het verstrijken waarvan de programmering verlaten wordt.
5. Houd de PROG toets van de zender gedurende ongeveer 5 seconden ingedrukt tot de motor gedurende een halve seconde in beide richtingen draait, wat aangeeft dat de motor in de programmeringsmodus staat.
6. Laat de PROG toets los.7. Druk op de UP toets: het rolluik gaat omhoog tegen een normale snelheid.
8. Zodra het rolluik in contact komt met de bovenste eindeloop stopt het en wordt die stand in het geheugen opgeslagen.
9. Voordat U de programmering beeindigd moet de Led eerst uitgaan, ofwel toets 1 indrukken voor onmiddelijke onderbreking
Om de hoogste stand van de eindeloop op een rolluik zondervergrendeling bovenaan af te stellen, moet u gebruik maken vaneen vooraf opgeslagen afstandsbediening. Ga hierbij als volgt tewerk:
Herhaal de net beschreven punten 1,2,3,4,5,6.
7. Zet het rolluik in de gewenste BOVEN positie met de toetsen UP en DOWN. Druk voor het uitvoeren van een precieze regeling op de toets PROG wanneer de motor de eindschakelaar nadert. De motor begint zich nu met schokjes voort te bewegen.
8. Druk op de STOP toets zodra de gewenste hoogste stand werd bereikt
9. Voordat U de programmering beeindigd moet de Led eerst uitgaan, ofwel toets 1 indrukken voor onmiddelijke onderbreking
Programmeren van de laagste stand van deeindeloopOm de laagste stand van de eindeloop af te stellen, moet ugebruik maken van een vooraf opgeslagen afstandsbediening. Gahierbij als volgt te werk:
1. Voorzie alleen de te programmeren motor van voeding2. Zet het rolluik tot halverwege de hoogte met de toetsen UP-STOP-DOWN
3. Activeer de programmering van ADLERS door de toetsen 4 en 6 ingedrukt te houden tot de 6 leds gaan branden
4. Laat de toetsen los en toets de code 12 11 15 in.De twee geaccentueerde cijfers duiden op het in de centrale bewaarde kanaal van de afstandsbediening. Voor kanaal 1 zijn de cijfers 11, voor kanaal 2 zijn de cijfers 12, voor kanaal 3 zijn het de cijfers 13 enzovoorts tot kanaal 6. Wanneer het intoetsen van de code klaar is, knippert de led van het geselecteerde kanaal 2 minuten, na het verstrijken waarvan de programmering verlaten wordt.
5. Houd de PROG toets van de zender gedurende ongeveer 5 seconden ingedrukt tot de motor gedurende een halve seconde in beide richtingen draait, wat aangeeft dat de motor in de programmeringsmodus staat.
6. Laat de PROG toets los.7. Zet het rolluik in de gewenste ONDER positie met de toetsen UP en DOWN. Druk voor het uitvoeren van een precieze regeling op de toets PROG wanneer de motor de eindschakelaarnadert. De motor begint zich nu met schokjes voort te bewegen
8. Druk op de STOP toets zodra de gewenste hoogste stand werd bereikt
9. Voordat U de programmering beeindigd moet de Led eerst uitgaan, ofwel toets 1 indrukken voor onmiddelijke onderbreking
Programmeren van de middelste stand vande eindeloopOm de middelste stand van de eindeloop af te stellen, moet ugebruik maken van een vooraf opgeslagen afstandsbediening. Gahierbij als volgt te werk:
1. Voorzie alleen de te programmeren motor van voeding2. Zet het rolluik in de gewenste TUSSEN-positie met de toetsen UP-STOP-DOWN
3. Activeer de programmering van ADLERS door de toetsen 4 en 6 ingedrukt te houden tot de 6 leds gaan branden
4. Laat de toetsen los en toets de code 12 11 16 in.De twee geaccentueerde cijfers duiden op het in de centrale bewaarde kanaal van de afstandsbediening. Voor kanaal 1 zijn de cijfers 11, voor kanaal 2 zijn de cijfers 12, voor kanaal 3 zijn het de cijfers 13 enzovoorts tot kanaal 6. Wanneer het intoetsen van de code klaar is, knippert de led van het geselecteerde kanaal 2 minuten, na het verstrijken waarvan de programmering verlaten wordt.
5. Houd de PROG toets van de zender gedurende ongeveer 5 seconden ingedrukt tot de motor gedurende een halve seconde in beide richtingen draait, wat aangeeft dat de motor in de programmeringsmodus staat.
6. Laat de PROG toets los.7. Voordat U de programmering beeindigd moet de Led eerst uitgaan, ofwel toets 1 indrukken voor onmiddelijke onderbreking
Houd de STOP toets gedurende ten minste 3 secondeningedrukt om het rolluik naar de middelste stand tebewegen (bij stilstaande motor) : het rolluik beweegt tothet de opgeslagen stand heeft bereikt.
Om de tussenpositie te wissen, is het noodzakelijk om over eenvan tevoren bewaarde afstandsbediening te beschikken en denet beschreven procedure te herhalen maar punt 4 over te slaan.
BOVENPOSITIE
MIDDENPOSITIE
ONDERPOSITIE