Embed Size (px)
Citation preview
Instructions - Hinweise - Instructies - Istruzioni - Instrucciones CSB801E
Mixeur plongeantHand blender

2
Sommaire
1. Consignes de sécurité . . . . . . . . . . . . . . . . . . . . . . . . . . . . . . . . . . . . . . . . . . . . . . . . . . . . . . . . . . . . . . . . . . . 5
2. introduction . . . . . . . . . . . . . . . . . . . . . . . . . . . . . . . . . . . . . . . . . . . . . . . . . . . . . . . . . . . . . . . . . . . . . . . . . 7
3. Caractéristiques produit . . . . . . . . . . . . . . . . . . . . . . . . . . . . . . . . . . . . . . . . . . . . . . . . . . . . . . . . . . . . . . . . . 7
4. Utilisation . . . . . . . . . . . . . . . . . . . . . . . . . . . . . . . . . . . . . . . . . . . . . . . . . . . . . . . . . . . . . . . . . . . . . . . . . . 8
a. assemblage du mixeur plongeant . . . . . . . . . . . . . . . . . . . . . . . . . . . . . . . . . . . . . . . . . . . . . . . . . . . . . . . . . . 8
b. Utilisation du mixeur plongeant . . . . . . . . . . . . . . . . . . . . . . . . . . . . . . . . . . . . . . . . . . . . . . . . . . . . . . . . . . . 8
c. Utilisation du fouet ballon . . . . . . . . . . . . . . . . . . . . . . . . . . . . . . . . . . . . . . . . . . . . . . . . . . . . . . . . . . . . . . . 8
d. Utilisation des batteurs . . . . . . . . . . . . . . . . . . . . . . . . . . . . . . . . . . . . . . . . . . . . . . . . . . . . . . . . . . . . . . . . . 9
e. Utilisation du hachoir . . . . . . . . . . . . . . . . . . . . . . . . . . . . . . . . . . . . . . . . . . . . . . . . . . . . . . . . . . . . . . . . . . 9
5. L’avis des chefs. . . . . . . . . . . . . . . . . . . . . . . . . . . . . . . . . . . . . . . . . . . . . . . . . . . . . . . . . . . . . . . . . . . . . . . . 11
6. Nettoyage & entretien . . . . . . . . . . . . . . . . . . . . . . . . . . . . . . . . . . . . . . . . . . . . . . . . . . . . . . . . . . . . . . . . . . 11
TaBLe oF CoNTeNTS
1. Safety precautions . . . . . . . . . . . . . . . . . . . . . . . . . . . . . . . . . . . . . . . . . . . . . . . . . . . . . . . . . . . . . . . . . . . . . 12
2. introduction . . . . . . . . . . . . . . . . . . . . . . . . . . . . . . . . . . . . . . . . . . . . . . . . . . . . . . . . . . . . . . . . . . . . . . . . . 13
3. Product features . . . . . . . . . . . . . . . . . . . . . . . . . . . . . . . . . . . . . . . . . . . . . . . . . . . . . . . . . . . . . . . . . . . . . . 13
4. Use . . . . . . . . . . . . . . . . . . . . . . . . . . . . . . . . . . . . . . . . . . . . . . . . . . . . . . . . . . . . . . . . . . . . . . . . . . . . . . . 14
a. assembling the hand blender. . . . . . . . . . . . . . . . . . . . . . . . . . . . . . . . . . . . . . . . . . . . . . . . . . . . . . . . . . . . . 14
b. Use the hand blender . . . . . . . . . . . . . . . . . . . . . . . . . . . . . . . . . . . . . . . . . . . . . . . . . . . . . . . . . . . . . . . . . . 14
c. Using the Balloon Whisk attachment . . . . . . . . . . . . . . . . . . . . . . . . . . . . . . . . . . . . . . . . . . . . . . . . . . . . . . . . 14
d. Using the Beaters . . . . . . . . . . . . . . . . . . . . . . . . . . . . . . . . . . . . . . . . . . . . . . . . . . . . . . . . . . . . . . . . . . . . 15
e. Using the Chopper attachment . . . . . . . . . . . . . . . . . . . . . . . . . . . . . . . . . . . . . . . . . . . . . . . . . . . . . . . . . . . 15
5. advice from the chefs . . . . . . . . . . . . . . . . . . . . . . . . . . . . . . . . . . . . . . . . . . . . . . . . . . . . . . . . . . . . . . . . . . . 17
6. Cleaning and maintenance. . . . . . . . . . . . . . . . . . . . . . . . . . . . . . . . . . . . . . . . . . . . . . . . . . . . . . . . . . . . . . . . 17
3
iNHaLTSVerZeiCHNiS
1. Sicherheitshinweise . . . . . . . . . . . . . . . . . . . . . . . . . . . . . . . . . . . . . . . . . . . . . . . . . . . . . . . . . . . . . . . . . . . . 18
2. einleitung. . . . . . . . . . . . . . . . . . . . . . . . . . . . . . . . . . . . . . . . . . . . . . . . . . . . . . . . . . . . . . . . . . . . . . . . . . . 20
3. eigenschaften des Produkts . . . . . . . . . . . . . . . . . . . . . . . . . . . . . . . . . . . . . . . . . . . . . . . . . . . . . . . . . . . . . . . 20
4. Gebrauch . . . . . . . . . . . . . . . . . . . . . . . . . . . . . . . . . . . . . . . . . . . . . . . . . . . . . . . . . . . . . . . . . . . . . . . . . . . 21
a. moNTaGe DeS TaUCHmiXerS . . . . . . . . . . . . . . . . . . . . . . . . . . . . . . . . . . . . . . . . . . . . . . . . . . . . . . . . . . . . 21
b. GeBraUCH DeS TaUCHmiXerS . . . . . . . . . . . . . . . . . . . . . . . . . . . . . . . . . . . . . . . . . . . . . . . . . . . . . . . . . . . . 21
c. Gebrauch des Ballonschneebesens . . . . . . . . . . . . . . . . . . . . . . . . . . . . . . . . . . . . . . . . . . . . . . . . . . . . . . . 21
d. Gebrauch des rührwerks . . . . . . . . . . . . . . . . . . . . . . . . . . . . . . . . . . . . . . . . . . . . . . . . . . . . . . . . . . . . . . . 22
e. Gebrauch des Hackaufsatzes . . . . . . . . . . . . . . . . . . . . . . . . . . . . . . . . . . . . . . . . . . . . . . . . . . . . . . . . . . . . . 22
5. ratschläge der Chefs. . . . . . . . . . . . . . . . . . . . . . . . . . . . . . . . . . . . . . . . . . . . . . . . . . . . . . . . . . . . . . . . . . . . 24
6. reinigung und Pflege . . . . . . . . . . . . . . . . . . . . . . . . . . . . . . . . . . . . . . . . . . . . . . . . . . . . . . . . . . . . . . . . . . . 24
iNHoUD
1. Veiligheidsadviezen . . . . . . . . . . . . . . . . . . . . . . . . . . . . . . . . . . . . . . . . . . . . . . . . . . . . . . . . . . . . . . . . . . . . 25
2. introductie . . . . . . . . . . . . . . . . . . . . . . . . . . . . . . . . . . . . . . . . . . . . . . . . . . . . . . . . . . . . . . . . . . . . . . . . . . 27
3. Productkenmerken . . . . . . . . . . . . . . . . . . . . . . . . . . . . . . . . . . . . . . . . . . . . . . . . . . . . . . . . . . . . . . . . . . . . 27
4. Gebruiksaanwijzing . . . . . . . . . . . . . . . . . . . . . . . . . . . . . . . . . . . . . . . . . . . . . . . . . . . . . . . . . . . . . . . . . . . . 28
a. montage van de staafmixer . . . . . . . . . . . . . . . . . . . . . . . . . . . . . . . . . . . . . . . . . . . . . . . . . . . . . . . . . . . . . . 28
b. Gebruik van de staafmixer . . . . . . . . . . . . . . . . . . . . . . . . . . . . . . . . . . . . . . . . . . . . . . . . . . . . . . . . . . . . . . . 28
c. Het gebruik van de ballongarde . . . . . . . . . . . . . . . . . . . . . . . . . . . . . . . . . . . . . . . . . . . . . . . . . . . . . . . . . . . 28
d. Het gebruik van de gardes. . . . . . . . . . . . . . . . . . . . . . . . . . . . . . . . . . . . . . . . . . . . . . . . . . . . . . . . . . . . . . . 29
e. Het gebruik van de hakmolen . . . . . . . . . . . . . . . . . . . . . . . . . . . . . . . . . . . . . . . . . . . . . . . . . . . . . . . . . . . . 29
5. De mening van de chefs. . . . . . . . . . . . . . . . . . . . . . . . . . . . . . . . . . . . . . . . . . . . . . . . . . . . . . . . . . . . . . . . . . 31
6. reiniging en onderhoud . . . . . . . . . . . . . . . . . . . . . . . . . . . . . . . . . . . . . . . . . . . . . . . . . . . . . . . . . . . . . . . . . 31

4
iNDiCe
1. istruzionoi di sicurezza . . . . . . . . . . . . . . . . . . . . . . . . . . . . . . . . . . . . . . . . . . . . . . . . . . . . . . . . . . . . . . . . . . 32
2. introduzione . . . . . . . . . . . . . . . . . . . . . . . . . . . . . . . . . . . . . . . . . . . . . . . . . . . . . . . . . . . . . . . . . . . . . . . . . 34
3. Caratteristiche prodotto . . . . . . . . . . . . . . . . . . . . . . . . . . . . . . . . . . . . . . . . . . . . . . . . . . . . . . . . . . . . . . . . . 34
4. istruzioni per l’uso . . . . . . . . . . . . . . . . . . . . . . . . . . . . . . . . . . . . . . . . . . . . . . . . . . . . . . . . . . . . . . . . . . . . . 35
a. assemblaggio del mixer ad immersione . . . . . . . . . . . . . . . . . . . . . . . . . . . . . . . . . . . . . . . . . . . . . . . . . . . . . . 35
b. Utilizzo del mixer ad immersione . . . . . . . . . . . . . . . . . . . . . . . . . . . . . . . . . . . . . . . . . . . . . . . . . . . . . . . . . . 35
c. Utilizzo della frusta a palla . . . . . . . . . . . . . . . . . . . . . . . . . . . . . . . . . . . . . . . . . . . . . . . . . . . . . . . . . . . . . . . 35
d. Utilizzo degli sbattitori . . . . . . . . . . . . . . . . . . . . . . . . . . . . . . . . . . . . . . . . . . . . . . . . . . . . . . . . . . . . . . . . . 36
e. Utilizzo del tritatutto . . . . . . . . . . . . . . . . . . . . . . . . . . . . . . . . . . . . . . . . . . . . . . . . . . . . . . . . . . . . . . . . . . 36
5. il parere degli chef . . . . . . . . . . . . . . . . . . . . . . . . . . . . . . . . . . . . . . . . . . . . . . . . . . . . . . . . . . . . . . . . . . . . . 38
6. Pulizia & manutenzione . . . . . . . . . . . . . . . . . . . . . . . . . . . . . . . . . . . . . . . . . . . . . . . . . . . . . . . . . . . . . . . . . . 38
ÍNDiCe
1. Consignas de seguridad. . . . . . . . . . . . . . . . . . . . . . . . . . . . . . . . . . . . . . . . . . . . . . . . . . . . . . . . . . . . . . . . . . 39
2. introducción . . . . . . . . . . . . . . . . . . . . . . . . . . . . . . . . . . . . . . . . . . . . . . . . . . . . . . . . . . . . . . . . . . . . . . . . . 41
3. Características del producto . . . . . . . . . . . . . . . . . . . . . . . . . . . . . . . . . . . . . . . . . . . . . . . . . . . . . . . . . . . . . . . 41
4. modo de empleo . . . . . . . . . . . . . . . . . . . . . . . . . . . . . . . . . . . . . . . . . . . . . . . . . . . . . . . . . . . . . . . . . . . . . . 42
a. montaje de la batidora de pie . . . . . . . . . . . . . . . . . . . . . . . . . . . . . . . . . . . . . . . . . . . . . . . . . . . . . . . . . . . . . 42
b. Utilización de la batidora de pie . . . . . . . . . . . . . . . . . . . . . . . . . . . . . . . . . . . . . . . . . . . . . . . . . . . . . . . . . . . 42
c. Utilización del brazo de varilla . . . . . . . . . . . . . . . . . . . . . . . . . . . . . . . . . . . . . . . . . . . . . . . . . . . . . . . . . . . . 42
d. Utilización del brazo de doble varilla . . . . . . . . . . . . . . . . . . . . . . . . . . . . . . . . . . . . . . . . . . . . . . . . . . . . . . . . 43
e. Utilización de la picadora . . . . . . . . . . . . . . . . . . . . . . . . . . . . . . . . . . . . . . . . . . . . . . . . . . . . . . . . . . . . . . . 43
5. Sugerencias de los chefs . . . . . . . . . . . . . . . . . . . . . . . . . . . . . . . . . . . . . . . . . . . . . . . . . . . . . . . . . . . . . . . . . 45
6. Limpiar y guardar . . . . . . . . . . . . . . . . . . . . . . . . . . . . . . . . . . . . . . . . . . . . . . . . . . . . . . . . . . . . . . . . . . . . . . 45
5
1. CoNSiGNeS De SeCUriTe
Comme tout appareil électroménager, ce mixeur doit être manipulée avec précaution. Suivre les conseils ci-dessous afin d’éviter tout risque de blessure.
• ATTENTION : Les sachets en polyéthylène qui entourent l’appareil ou l’emballage peuvent être dangereux. Pour éviter tout danger de suffocation, conservez ces sachets hors de la portée de bébés et des enfants. Ces sachets ne sont pas des jouets.
• Ne pas immerger la base de l’appareil dans l’eau ou tout autre liquide.• Eteindre et débrancher l’appareil après utilisation, avant de l’assembler ou de le démonter ou de
le nettoyer. Ne jamais laisser l’appareil branché sans surveillance. Pour débrancher, tirer sur la fiche et jamais sur le cordon.
• Ne jamais placer l’appareil sur ou à proximité d’une source de chaleur.• Ne pas laisser le cordon dépasser du bord du plan de travail et le ranger en l’enroulant sous la base
de l’appareil. Ne pas mettre le cordon en contact avec des surfaces chaudes.• Ne jamais toucher les lames lorsque l’appareil est branché.• Utiliser cet appareil exclusivement en suivant les instructions de ce manuel.• Ne pas surcharger le blender. Si le moteur cale, éteindre et débrancher l’appareil. Retirer une partie
des aliments, puis rallumer.• Ne pas utiliser l’appareil s’il est tombé ou s’il présente des traces apparentes de dommage.• Si le câble d’alimentation est endommagé, il doit être remplacé par le fabricant, son service après
vente ou des personnes de qualification similaire afin d’éviter un danger.• Aucune réparation ne peut être effectuée par l’utilisateur.• Cet appareil peut être utilisé par des enfants âgés de 8 ans et plus et des personnes aux capacités
physiques, sensorielles ou mentales réduites, ou des personnes dénuées d’expérience et de connaissance, si elles ont pu bénéficier d’une surveillance ou d’instructions préalables concernant l’utilisation de l’appareil en toute sécurité et si elles comprennent les risques impliqués. Les enfants ne doivent pas jouer avec l’appareil. Le nettoyage et l’entretien de l’appareil ne peuvent être effectués par des enfants sans surveillance.
• Utiliser cet appareil exclusivement pour l’usage décrit dans cette notice et suivant l’ensemnle des instructions.
• Ne pas utiliser à l’extérieur.• A usage strictement domestique.
6
EQUIPEMENTS ÉLECTRIQUES ET ÉLECTRONIQUES EN FIN DE VIE.
Dans l’intérêt de tous et pour participer activement à l’effort collectif de protection de l’environnement :Ne jetez pas vos produits avec les déchets ménagers.Utilisez les systèmes de reprise et de collecte qui sont mis à votre disposition.Certains matériaux pourront ainsi être recyclés ou valorisés.
7
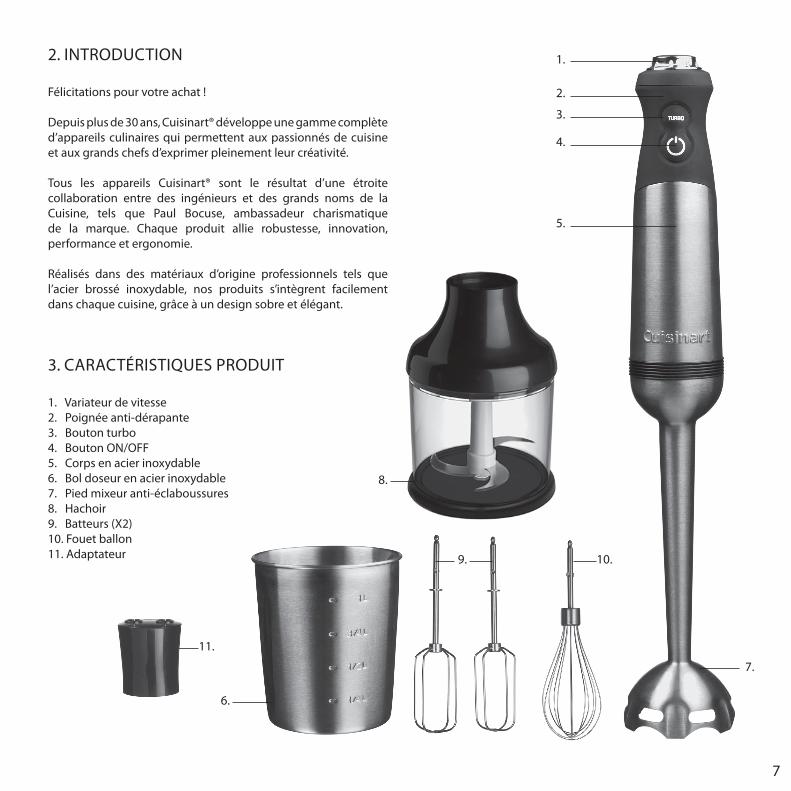
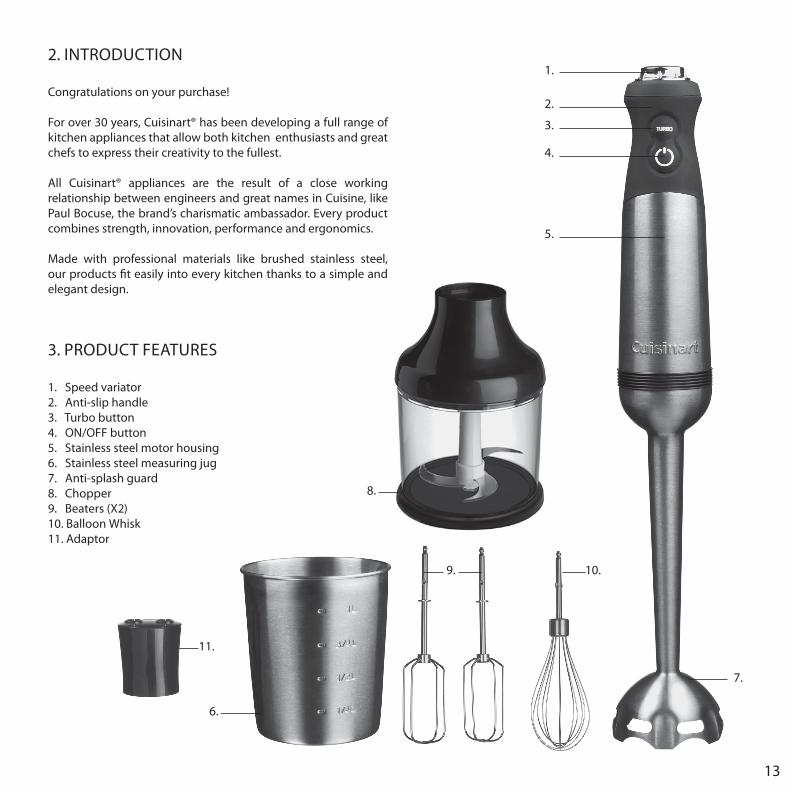
2. iNTroDUCTioN
Félicitations pour votre achat ! Depuis plus de 30 ans, Cuisinart® développe une gamme complète d’appareils culinaires qui permettent aux passionnés de cuisine et aux grands chefs d’exprimer pleinement leur créativité. Tous les appareils Cuisinart® sont le résultat d’une étroite collaboration entre des ingénieurs et des grands noms de la Cuisine, tels que Paul Bocuse, ambassadeur charismatique de la marque. Chaque produit allie robustesse, innovation, performance et ergonomie. réalisés dans des matériaux d’origine professionnels tels que l’acier brossé inoxydable, nos produits s’intègrent facilement dans chaque cuisine, grâce à un design sobre et élégant.
3. CaraCTériSTiqUeS ProDUiT
1. Variateur de vitesse2. Poignée anti-dérapante3. Bouton turbo4. Bouton oN/oFF5. Corps en acier inoxydable6. Bol doseur en acier inoxydable7. Pied mixeur anti-éclaboussures8. Hachoir9. Batteurs (X2)10. Fouet ballon11. adaptateur
4.
5.
1.
3.
2.
6.
7.
9. 10.
11.
8.
8
4. UTiLiSaTioN
Le mixeur plongeant permet de mixer et de mélanger tout en ajoutant un minimum d’air à votre préparation. Il suffit d’effectuer un léger mouvement de haut en bas pour préparer les recettes les plus savoureuses. Pour éviter d’éclabousser, ne retirez jamais le mixeur plongeant de votre préparation pendant son fonctionnement.
A. ASSEMBLAGE DU MIXEUR PLONGEANT
• Pour fixer le pied mixeur, alignez-le sur le corps et faites pivoter dans le sens des aiguilles d’une montre afin de le verrouiller.
• Branchez la prise d’alimentation électrique.
B. UTILISATION DU MIXEUR PLONGEANT
• Placez le mixeur dans la préparation à mixer en vous assurant que la base du pied soit suffisamment immergée.
• Sélectionnez la vitesse minimum, appuyez et tenez enfoncé le bouton oN ( ).
Le mixeur continuera à fonctionner tant que le bouton sera maintenu enfoncé. Pendant le fonctionnement, augmentez la vitesse si nécessaire. • Commencez toujours par utiliser une vitesse faible, tournez
ensuite la bague vers le «+», pour augmenter la vitesse.
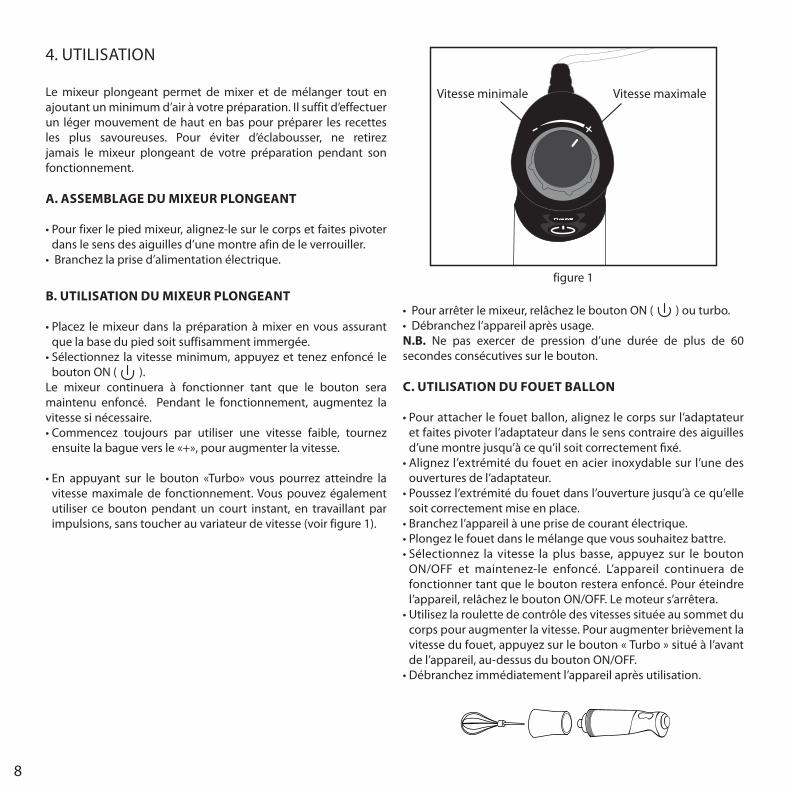
• En appuyant sur le bouton «Turbo» vous pourrez atteindre la vitesse maximale de fonctionnement. Vous pouvez également utiliser ce bouton pendant un court instant, en travaillant par impulsions, sans toucher au variateur de vitesse (voir figure 1).
- +
Vitesse maximaleVitesse minimale
figure 1
• Pour arrêter le mixeur, relâchez le bouton ON ( ) ou turbo.• Débranchez l’appareil après usage. N.B. Ne pas exercer de pression d’une durée de plus de 60 secondes consécutives sur le bouton.
C. UTILISATION DU FOUET BALLON
• Pour attacher le fouet ballon, alignez le corps sur l’adaptateur et faites pivoter l’adaptateur dans le sens contraire des aiguilles d’une montre jusqu’à ce qu’il soit correctement fixé.
• Alignez l’extrémité du fouet en acier inoxydable sur l’une des ouvertures de l’adaptateur.
• Poussez l’extrémité du fouet dans l’ouverture jusqu’à ce qu’elle soit correctement mise en place.
• Branchez l’appareil à une prise de courant électrique. • Plongez le fouet dans le mélange que vous souhaitez battre. • Sélectionnez la vitesse la plus basse, appuyez sur le bouton
oN/oFF et maintenez-le enfoncé. L’appareil continuera de fonctionner tant que le bouton restera enfoncé. Pour éteindre l’appareil, relâchez le bouton ON/OFF. Le moteur s’arrêtera.
• Utilisez la roulette de contrôle des vitesses située au sommet du corps pour augmenter la vitesse. Pour augmenter brièvement la vitesse du fouet, appuyez sur le bouton « Turbo » situé à l’avant de l’appareil, au-dessus du bouton oN/oFF.
• Débranchez immédiatement l’appareil après utilisation.
9
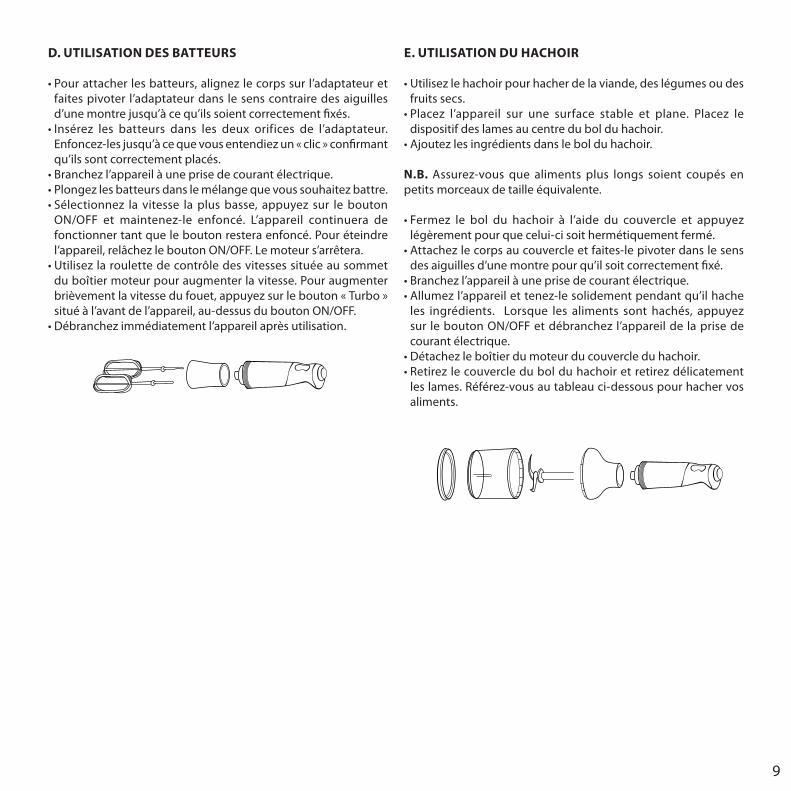
D. UTILISATION DES BATTEURS
• Pour attacher les batteurs, alignez le corps sur l’adaptateur et faites pivoter l’adaptateur dans le sens contraire des aiguilles d’une montre jusqu’à ce qu’ils soient correctement fixés.
• Insérez les batteurs dans les deux orifices de l’adaptateur. Enfoncez-les jusqu’à ce que vous entendiez un « clic » confirmant qu’ils sont correctement placés.
• Branchez l’appareil à une prise de courant électrique. • Plongez les batteurs dans le mélange que vous souhaitez battre. • Sélectionnez la vitesse la plus basse, appuyez sur le bouton
oN/oFF et maintenez-le enfoncé. L’appareil continuera de fonctionner tant que le bouton restera enfoncé. Pour éteindre l’appareil, relâchez le bouton ON/OFF. Le moteur s’arrêtera.
• Utilisez la roulette de contrôle des vitesses située au sommet du boîtier moteur pour augmenter la vitesse. Pour augmenter brièvement la vitesse du fouet, appuyez sur le bouton « Turbo » situé à l’avant de l’appareil, au-dessus du bouton ON/OFF.
• Débranchez immédiatement l’appareil après utilisation.
E. UTILISATION DU HACHOIR
• Utilisez le hachoir pour hacher de la viande, des légumes ou des fruits secs.
• Placez l’appareil sur une surface stable et plane. Placez le dispositif des lames au centre du bol du hachoir.
• Ajoutez les ingrédients dans le bol du hachoir.
N.B. assurez-vous que aliments plus longs soient coupés en petits morceaux de taille équivalente.
• Fermez le bol du hachoir à l’aide du couvercle et appuyez légèrement pour que celui-ci soit hermétiquement fermé.
• Attachez le corps au couvercle et faites-le pivoter dans le sens des aiguilles d’une montre pour qu’il soit correctement fixé.
• Branchez l’appareil à une prise de courant électrique. • Allumez l’appareil et tenez-le solidement pendant qu’il hache
les ingrédients. Lorsque les aliments sont hachés, appuyez sur le bouton oN/oFF et débranchez l’appareil de la prise de courant électrique.
• Détachez le boîtier du moteur du couvercle du hachoir. • Retirez le couvercle du bol du hachoir et retirez délicatement
les lames. référez-vous au tableau ci-dessous pour hacher vos aliments.
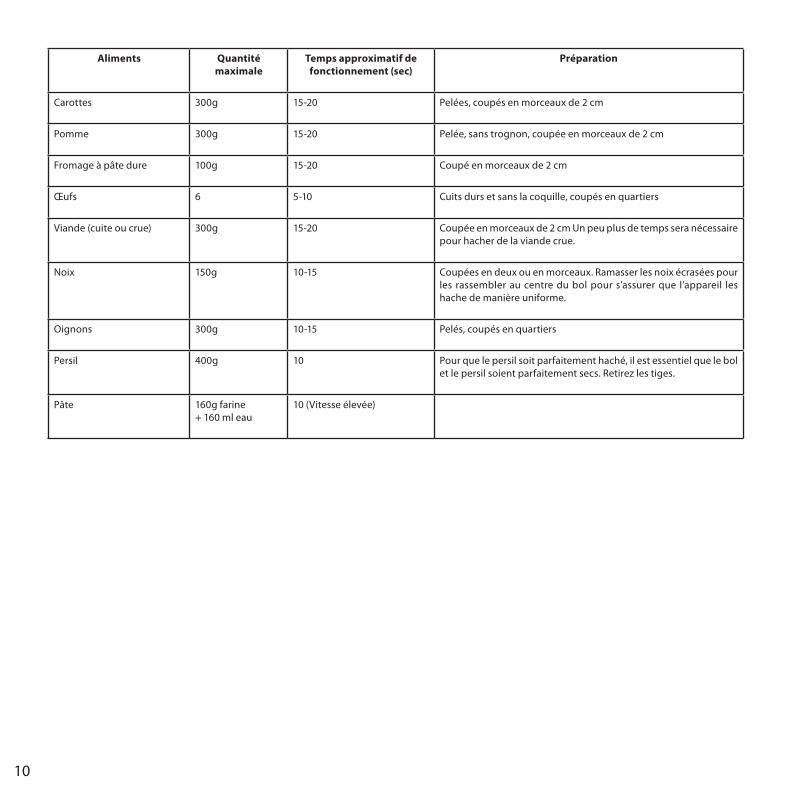
10
Aliments Quantitémaximale
Temps approximatif de fonctionnement (sec)
Préparation
Carottes 300g 15-20 Pelées, coupés en morceaux de 2 cm
Pomme 300g 15-20 Pelée, sans trognon, coupée en morceaux de 2 cm
Fromage à pâte dure 100g 15-20 Coupé en morceaux de 2 cm
Œufs 6 5-10 Cuits durs et sans la coquille, coupés en quartiers
Viande (cuite ou crue) 300g 15-20 Coupée en morceaux de 2 cm Un peu plus de temps sera nécessaire pour hacher de la viande crue.
Noix 150g 10-15 Coupées en deux ou en morceaux. ramasser les noix écrasées pour les rassembler au centre du bol pour s’assurer que l’appareil les hache de manière uniforme.
oignons 300g 10-15 Pelés, coupés en quartiers
Persil 400g 10 Pour que le persil soit parfaitement haché, il est essentiel que le bol et le persil soient parfaitement secs. retirez les tiges.
Pâte 160g farine+ 160 ml eau
10 (Vitesse élevée)

11
5. L’aViS DeS CHeFS
• N’immergez jamais le corps dans l’eau ou dans tout autre liquide. • Le pied mixeur ne doit pas être immergé intégralement, laisser
un espace d’environ 2,5 cm en dessous du corps.• Lorsque vous utilisez le mixeur sur une surface anti-adhérente,
veillez à ne pas abîmer ce revêtement avec le mixeur.• Coupez la plupart des aliments solides en cubes de 2,5 cm afin
de pouvoir les mixer facilement. • Vous pouvez également verser les ingrédients liquides dans le
bol doseur• Pour éviter d’éclabousser, veillez à ce que la base du pied soit
toujours immergée pendant le fonctionnement de l’appareil.• Ne laissez pas le mixeur plongé dans une casserole sur le feu.• Ne placez pas de morceaux de fruits durs, d’os ou tout
autre matériau dur dans vos aliments à mixer. Cela pourrait endommager les lames.
• Le niveau de la préparation va augmenter lorsqu’elle sera mixée, adaptez la quantité de liquide en conséquence.
• Le fait d’ajouter les liquides chauds accélère le mélange des solides avec les liquides.
• Pour les recettes nécessitant de la glace, utilisez de la glace pilée pour obtenir un résultat optimal.
• Effectuez de légers mouvements de haut en bas pour mélanger et incorporer les ingrédients de manière homogène.
• Le mixeur peut également vous servir à faire mousser du lait pour déguster avec votre cappuccino ou latte.
• Utilisez également le mixeur pour accommoder vos jus de viande et vos sauces.
• Pour un résultat optimal lorsque vous ajoutez du céleri à une sauce, utilisez un couteau éplucheur pour retirer les fibres dures du céleri avant de le mixer.
• Le mixeur ne doit pas servir à préparer de la pâte.
6. NeTToYaGe eT eNTreTieN
Nettoyez toujours soigneusement le corps et le pied du mixeur après chaque utilisation. N’immergez jamais le corps dans l’eau ou dans tout autre liquide.
• Débranchez l’appareil. • Retirez le pied mixeur du corps.• Nettoyez le corps à l’aide d’une éponge ou d’un chiffon humide.
N’utilisez pas de produits nettoyants abrasifs qui pourraient rayer la surface.
• Nettoyez le pied mixeur à la main dans de l’eau chaude additionnée d’un détergent doux. manipulez le mixeur avec précaution. Les lames sont coupantes et peuvent blesser.
• Nettoyez le bol doseur dans de l’eau tiède et savonneuse ou au lave-vaisselle.
12
1. SaFeTY PreCaUTioNS
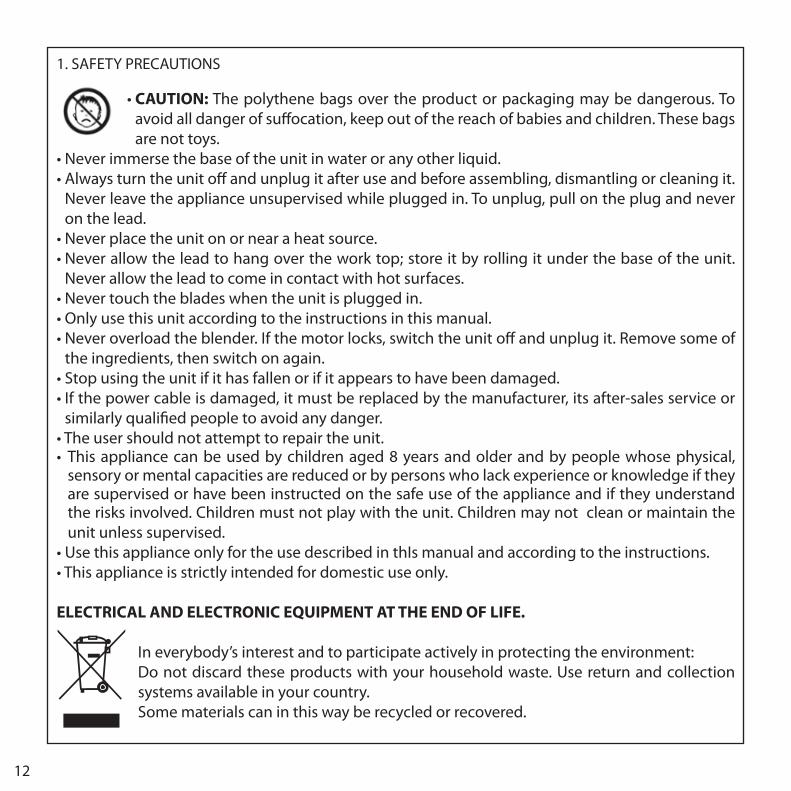
• CAUTION: The polythene bags over the product or packaging may be dangerous. To avoid all danger of suffocation, keep out of the reach of babies and children. These bags are not toys.
• Never immerse the base of the unit in water or any other liquid.• Always turn the unit off and unplug it after use and before assembling, dismantling or cleaning it.
Never leave the appliance unsupervised while plugged in. To unplug, pull on the plug and never on the lead.
• Never place the unit on or near a heat source.• Never allow the lead to hang over the work top; store it by rolling it under the base of the unit.
Never allow the lead to come in contact with hot surfaces.• Never touch the blades when the unit is plugged in.• Only use this unit according to the instructions in this manual.• Never overload the blender. If the motor locks, switch the unit off and unplug it. Remove some of
the ingredients, then switch on again.• Stop using the unit if it has fallen or if it appears to have been damaged.• If the power cable is damaged, it must be replaced by the manufacturer, its after-sales service or
similarly qualified people to avoid any danger.• The user should not attempt to repair the unit.• This appliance can be used by children aged 8 years and older and by people whose physical,
sensory or mental capacities are reduced or by persons who lack experience or knowledge if they are supervised or have been instructed on the safe use of the appliance and if they understand the risks involved. Children must not play with the unit. Children may not clean or maintain the unit unless supervised.
• Use this appliance only for the use described in thIs manual and according to the instructions.• This appliance is strictly intended for domestic use only.
ELECTRICAL AND ELECTRONIC EQUIPMENT AT THE END OF LIFE.
in everybody’s interest and to participate actively in protecting the environment:Do not discard these products with your household waste. Use return and collection systems available in your country.Some materials can in this way be recycled or recovered.
13
2. iNTroDUCTioN
Congratulations on your purchase! For over 30 years, Cuisinart® has been developing a full range of kitchen appliances that allow both kitchen enthusiasts and great chefs to express their creativity to the fullest. all Cuisinart® appliances are the result of a close working relationship between engineers and great names in Cuisine, like Paul Bocuse, the brand’s charismatic ambassador. every product combines strength, innovation, performance and ergonomics. made with professional materials like brushed stainless steel, our products fit easily into every kitchen thanks to a simple and elegant design.
3. ProDUCT FeaTUreS
1. Speed variator2. anti-slip handle3. Turbo button4. oN/oFF button5. Stainless steel motor housing6. Stainless steel measuring jug7. anti-splash guard8. Chopper9. Beaters (X2)10. Balloon Whisk11. adaptor
4.
5.
1.
3.
2.
6.
7.
9. 10.
8.
11.

14
4. USe
The hand blender lets you mix and blend while adding as little air as possible to your preparation. all you need to do is move it slightly up and down to prepare the tastiest of recipes. To prevent splashes, never remove the hand blender from your preparation while it is running.
A. ASSEMBLING THE HAND BLENDER
• To attach the blender shaft, line it up with the body and twist in a clockwise direction to lock into place.
• Plug the unit into the mains.
B. USE THE HAND BLENDER
• Place the blender into the preparation to be mixed while ensuring that the base of the shaft is sufficiently immersed.
• Select the lowest speed, press and hold the ON button ( ). The blender will continue to operate as long as the buttonis pressed. During operation, increase the speed if necessary.• Always begin by using the lowest speed, then turn the ring
toward the ‘+’ to increase the speed.• By pressing the ‘Turbo’ button, you can attain the highest
operating speed. You can also use this button in short bursts during operation, working in pulses, without touching the speed variator (see figure 1).
- +
maximum speedminimum speed
figure 1
• To stop the blender, release the ON ( ) or turbo button.• Unplug the unit after use.N.B. Do not hold the button on for longer than 60 seconds at a time.
C. USING THE BALLOON WHISk ATTACHMENT
• To attach the balloon whisk, align the motor housing with the adaptor and turn the adaptor anti-clockwise to secure into place.
• Align the end of the stainless steel whisk attachment with either opening of the adapter.
• Push end into opening until it locks into position.• Plug into the mains.• Place the appliance into mixture that will be whisked.• With the speed dial set to minimum, press and hold the ON/
oFF button. The appliance will continue to run as long as the switch is pressed in. To turn the appliance off, release the oN/oFF button and the motor will stop.
• Use the variable speed control dial on top of the motor housing to increase the speed. For an extra burst of power, press the “Turbo” button on the front of the housing above the oN/oFF button.
• Unplug immediately after use.
15
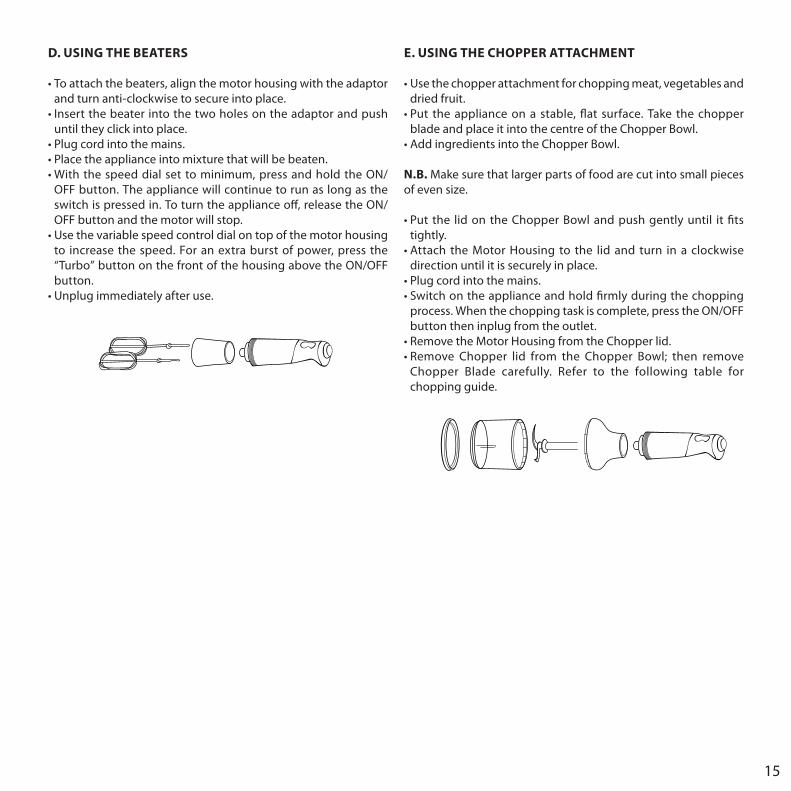
D. USING THE BEATERS
• To attach the beaters, align the motor housing with the adaptor and turn anti-clockwise to secure into place.
• Insert the beater into the two holes on the adaptor and push until they click into place.
• Plug cord into the mains.• Place the appliance into mixture that will be beaten.• With the speed dial set to minimum, press and hold the ON/
oFF button. The appliance will continue to run as long as the switch is pressed in. To turn the appliance off, release the oN/oFF button and the motor will stop.
• Use the variable speed control dial on top of the motor housing to increase the speed. For an extra burst of power, press the “Turbo” button on the front of the housing above the oN/oFF button.
• Unplug immediately after use.
E. USING THE CHOPPER ATTACHMENT
• Use the chopper attachment for chopping meat, vegetables and dried fruit.
• Put the appliance on a stable, flat surface. Take the chopper blade and place it into the centre of the Chopper Bowl.
• Add ingredients into the Chopper Bowl.
N.B. make sure that larger parts of food are cut into small pieces of even size.
• Put the lid on the Chopper Bowl and push gently until it fits tightly.
• Attach the Motor Housing to the lid and turn in a clockwise direction until it is securely in place.
• Plug cord into the mains.• Switch on the appliance and hold firmly during the chopping
process. When the chopping task is complete, press the oN/oFF button then inplug from the outlet.
• Remove the Motor Housing from the Chopper lid.• Remove Chopper lid from the Chopper Bowl; then remove
Chopper Blade carefully. refer to the following table for chopping guide.
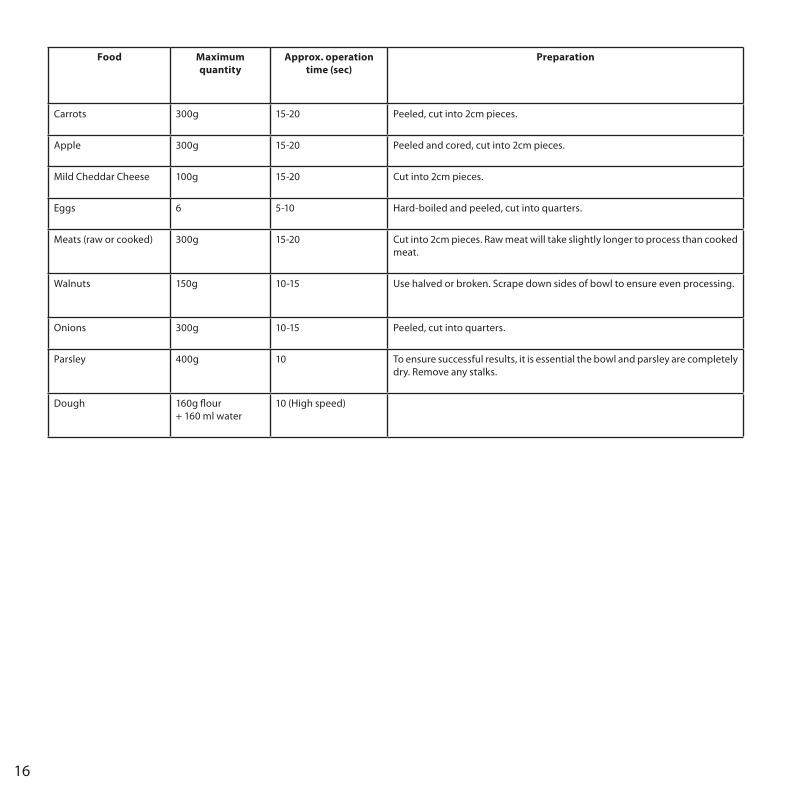
16
Food Maximumquantity
Approx. operation time (sec)
Preparation
Carrots 300g 15-20 Peeled, cut into 2cm pieces.
apple 300g 15-20 Peeled and cored, cut into 2cm pieces.
mild Cheddar Cheese 100g 15-20 Cut into 2cm pieces.
eggs 6 5-10 Hard-boiled and peeled, cut into quarters.
meats (raw or cooked) 300g 15-20 Cut into 2cm pieces. raw meat will take slightly longer to process than cooked meat.
Walnuts 150g 10-15 Use halved or broken. Scrape down sides of bowl to ensure even processing.
onions 300g 10-15 Peeled, cut into quarters.
Parsley 400g 10 To ensure successful results, it is essential the bowl and parsley are completely dry. remove any stalks.
Dough 160g flour+ 160 ml water
10 (High speed)
17
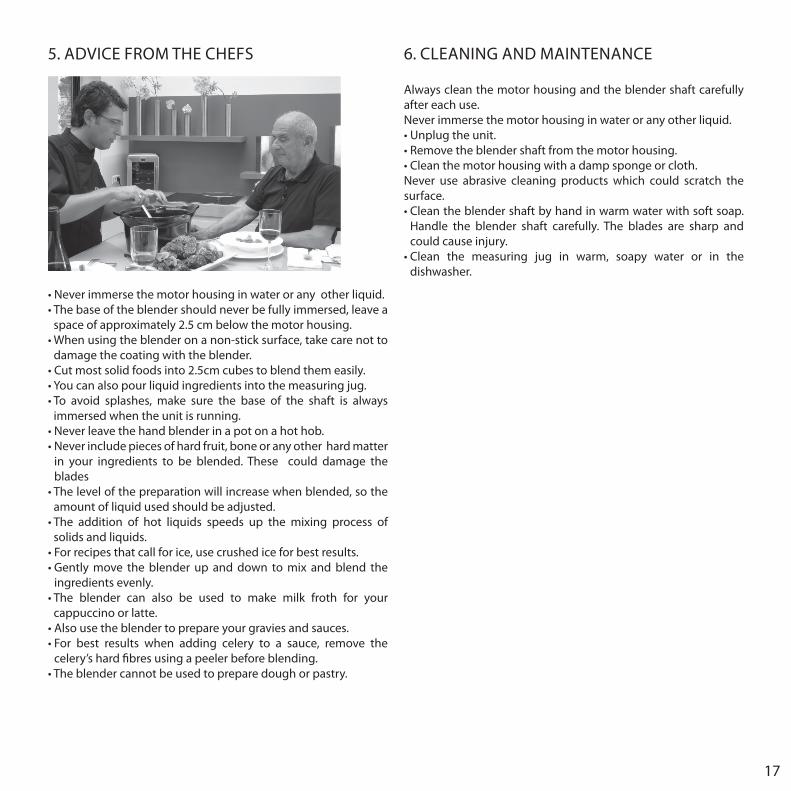
5. aDViCe From THe CHeFS
• Never immerse the motor housing in water or any other liquid.• The base of the blender should never be fully immersed, leave a
space of approximately 2.5 cm below the motor housing.• When using the blender on a non-stick surface, take care not to
damage the coating with the blender.• Cut most solid foods into 2.5cm cubes to blend them easily.• You can also pour liquid ingredients into the measuring jug.• To avoid splashes, make sure the base of the shaft is always
immersed when the unit is running.• Never leave the hand blender in a pot on a hot hob.• Never include pieces of hard fruit, bone or any other hard matter
in your ingredients to be blended. These could damage the blades
• The level of the preparation will increase when blended, so the amount of liquid used should be adjusted.
• The addition of hot liquids speeds up the mixing process of solids and liquids.
• For recipes that call for ice, use crushed ice for best results.• Gently move the blender up and down to mix and blend the
ingredients evenly.• The blender can also be used to make milk froth for your
cappuccino or latte.• Also use the blender to prepare your gravies and sauces.• For best results when adding celery to a sauce, remove the
celery’s hard fibres using a peeler before blending.• The blender cannot be used to prepare dough or pastry.
6. CLeaNiNG aND maiNTeNaNCe
always clean the motor housing and the blender shaft carefully after each use.Never immerse the motor housing in water or any other liquid.• Unplug the unit.• Remove the blender shaft from the motor housing.• Clean the motor housing with a damp sponge or cloth.Never use abrasive cleaning products which could scratch the surface.• Clean the blender shaft by hand in warm water with soft soap.
Handle the blender shaft carefully. The blades are sharp and could cause injury.
• Clean the measuring jug in warm, soapy water or in the dishwasher.
18
1. SiCHerHeiTSHiNWeiSe
• VORSICHT: Die Polyethylenbeutel, die das Produkt oder seine Verpackung enthalten, können gefährlich sein. Um jede erstickungsgefahr zu vermeiden sollten diese Beutel außerhalb der reichweite von Babys oder Kleinkindern aufbewahrt werden. Diese Beutel sind kein Spielzeug.
• Den Sockel des Geräts nicht in Wasser oder andere Flüssigkeiten tauchen.• Nach dem Gebrauch, vor dem Montieren, Auseinander nehmen oder Reinigen des Geräts
immer den Netzstecker ziehen. Nie das Gerät unbeaufsichtigt lassen, wenn es an den Netzstrom angeschlossen ist. Um den Netzstecker zu entfernen, immer am Stecker ziehen und nicht am Kabel.
• Das Gerät nie auf oder in die Nähe einer Hitzequelle stellen.• Lassen Sie das Netzkabel nicht über den Rand der Arbeitsplatte hängen und wickeln Sie es um den
rumpf des Geräts, um es zu verstauen. Nicht mit heißen oberflächen in Berührung bringen.• Nie die Klingen berühren, wenn das Gerät an den Netzstrom angeschlossen ist.• Benutzen Sie dieses Gerät ausschließlich unter Beachtung der Hinweise in dieser Anleitung.• Den Mixer nicht überlasten. Wenn der Motor klemmt, das Gerät ausschalten und den Netzstecker
ziehen. einen Teil der Nahrungsmittel entfernen und danach das Gerät wieder einschalten.• Das Gerät nicht benutzen, wenn es gefallen ist oder offensichtliche Spuren einer Beschädigung
aufweist.• Wenn das Kabel beschädigt ist, muss es durch den Hersteller, seinen Kundendienst oder eine
ähnlich qualifizierte Person ersetzt werden, um jede Gefahr zu vermeiden.• Der Benutzer darf keinerlei Reparaturen selbst durchführen.• Dieses Gerät kann von Kindern ab dem Alter von 8 Jahren verwendet werden, und auch von
Personen mit eingeschränkten physischen, sensoriellen oder mentalen Fähigkeiten oder von Personen ohne jede erfahrungs- oder Kenntnisgrundlage, wenn es unter aufsicht verwendet wird oder wenn sie vorher über den sicheren Gebrauch des Geräts unterrichtet wurden und die mit der Verwendung im Zusammenhang stehenden risiken begreifen. Kinder dürfen nicht mit dem Gerät spielen
• Benutzen Sie dieses Gerät ausschließlich zu dem in dieser Gebrauchsanleitung beschriebenen Zweck und beachten Sie alle anweisungen.
• Dieses Gerät ist ausschließlich für den Hausgebrauch bestimmt.
19
ELEkTRONISCHE ALTGERÄTE
im allgemeinen interesse und als aktive Teilnahme an den gemeinsamen anstrengungen zum Umweltschutz: Werfen Sie ihre Geräte nicht in den Hausmüll.Nutzen Sie die rücknahme- und Sammelsysteme, die ihnen zur Verfügung stehen.Gewisse Werkstoffe können so wieder verwertet oder aufbereitet werden.
20
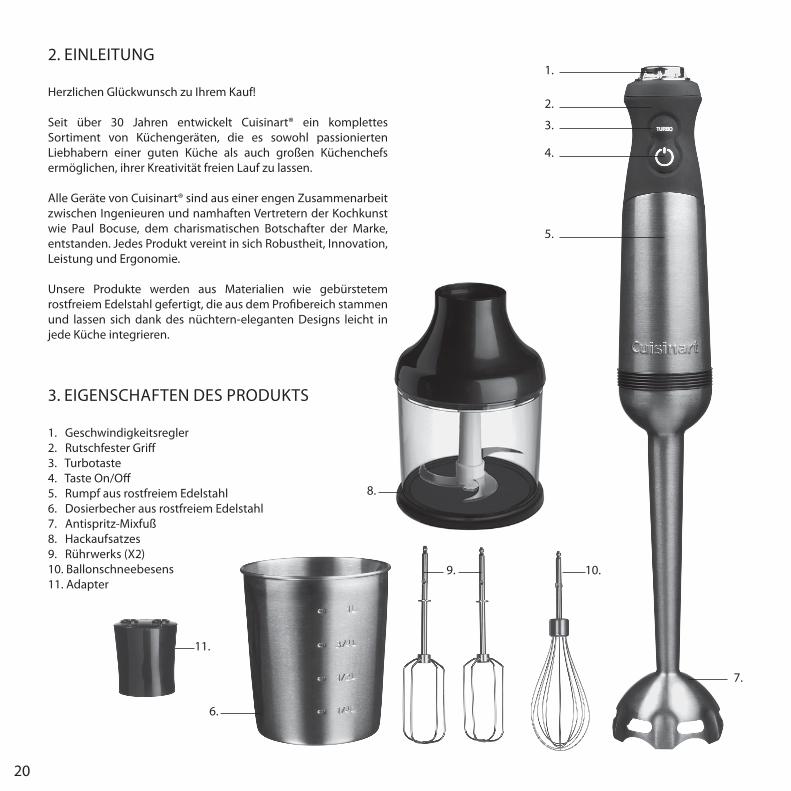
2. eiNLeiTUNG
Herzlichen Glückwunsch zu ihrem Kauf! Seit über 30 Jahren entwickelt Cuisinart® ein komplettes Sortiment von Küchengeräten, die es sowohl passionierten Liebhabern einer guten Küche als auch großen Küchenchefs ermöglichen, ihrer Kreativität freien Lauf zu lassen. alle Geräte von Cuisinart® sind aus einer engen Zusammenarbeit zwischen ingenieuren und namhaften Vertretern der Kochkunst wie Paul Bocuse, dem charismatischen Botschafter der marke, entstanden. Jedes Produkt vereint in sich Robustheit, Innovation, Leistung und ergonomie. Unsere Produkte werden aus materialien wie gebürstetem rostfreiem edelstahl gefertigt, die aus dem Profibereich stammen und lassen sich dank des nüchtern-eleganten Designs leicht in jede Küche integrieren.
3. eiGeNSCHaFTeN DeS ProDUKTS
1. Geschwindigkeitsregler2. rutschfester Griff3. Turbotaste4. Taste on/off5. rumpf aus rostfreiem edelstahl6. Dosierbecher aus rostfreiem edelstahl7. antispritz-mixfuß8. Hackaufsatzes9. rührwerks (X2)10. Ballonschneebesens11. adapter
4.
5.
1.
3.
2.
6.
7.
9. 10.
8.
11.
21
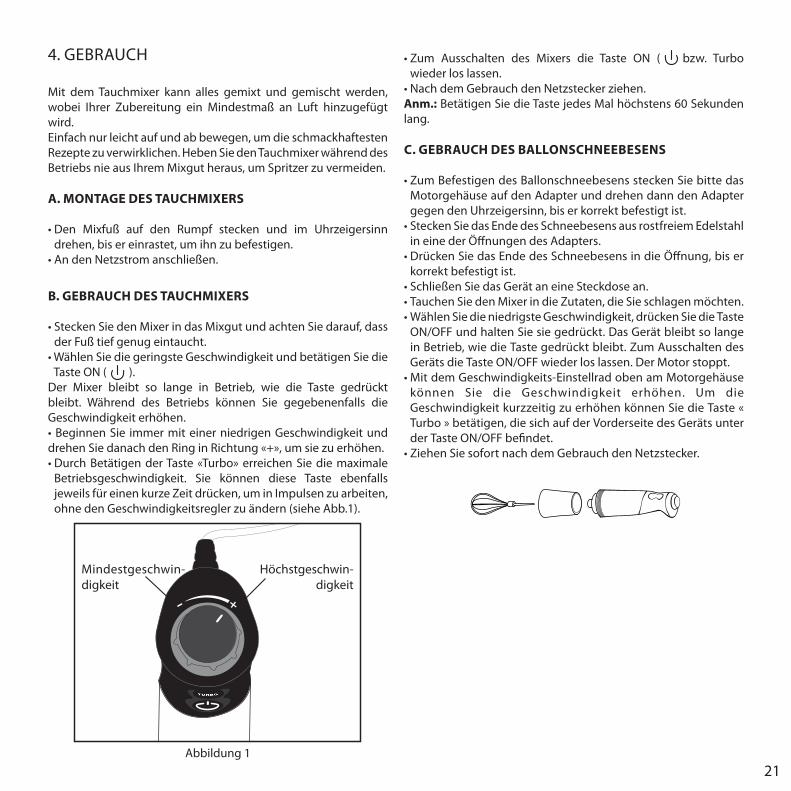
4. GeBraUCH
mit dem Tauchmixer kann alles gemixt und gemischt werden, wobei ihrer Zubereitung ein mindestmaß an Luft hinzugefügt wird.einfach nur leicht auf und ab bewegen, um die schmackhaftesten rezepte zu verwirklichen. Heben Sie den Tauchmixer während des Betriebs nie aus ihrem mixgut heraus, um Spritzer zu vermeiden.
A. MONTAGE DES TAUCHMIXERS
• Den Mixfuß auf den Rumpf stecken und im Uhrzeigersinn drehen, bis er einrastet, um ihn zu befestigen.
• An den Netzstrom anschließen.
B. GEBRAUCH DES TAUCHMIXERS
• Stecken Sie den Mixer in das Mixgut und achten Sie darauf, dass der Fuß tief genug eintaucht.
• Wählen Sie die geringste Geschwindigkeit und betätigen Sie die Taste oN ( ).
Der mixer bleibt so lange in Betrieb, wie die Taste gedrückt bleibt. Während des Betriebs können Sie gegebenenfalls die Geschwindigkeit erhöhen.• Beginnen Sie immer mit einer niedrigen Geschwindigkeit und drehen Sie danach den ring in richtung «+», um sie zu erhöhen.• Durch Betätigen der Taste «Turbo» erreichen Sie die maximale
Betriebsgeschwindigkeit. Sie können diese Taste ebenfalls jeweils für einen kurze Zeit drücken, um in impulsen zu arbeiten, ohne den Geschwindigkeitsregler zu ändern (siehe abb.1).
- +
Höchstgeschwin-digkeit
mindestgeschwin-digkeit
abbildung 1
• Zum Ausschalten des Mixers die Taste ON ( bzw. Turbo wieder los lassen.
• Nach dem Gebrauch den Netzstecker ziehen.Anm.: Betätigen Sie die Taste jedes mal höchstens 60 Sekunden lang.
C. GEBRAUCH DES BALLONSCHNEEBESENS
• Zum Befestigen des Ballonschneebesens stecken Sie bitte das motorgehäuse auf den adapter und drehen dann den adapter gegen den Uhrzeigersinn, bis er korrekt befestigt ist.
• Stecken Sie das Ende des Schneebesens aus rostfreiem Edelstahl in eine der Öffnungen des adapters.
• Drücken Sie das Ende des Schneebesens in die Öffnung, bis er korrekt befestigt ist.
• Schließen Sie das Gerät an eine Steckdose an. • Tauchen Sie den Mixer in die Zutaten, die Sie schlagen möchten. • Wählen Sie die niedrigste Geschwindigkeit, drücken Sie die Taste
oN/oFF und halten Sie sie gedrückt. Das Gerät bleibt so lange in Betrieb, wie die Taste gedrückt bleibt. Zum ausschalten des Geräts die Taste oN/oFF wieder los lassen. Der motor stoppt.
• Mit dem Geschwindigkeits-Einstellrad oben am Motorgehäuse können Sie die Geschwindigkeit erhöhen. Um die Geschwindigkeit kurzzeitig zu erhöhen können Sie die Taste « Turbo » betätigen, die sich auf der Vorderseite des Geräts unter der Taste oN/oFF befindet.
• Ziehen Sie sofort nach dem Gebrauch den Netzstecker.
22
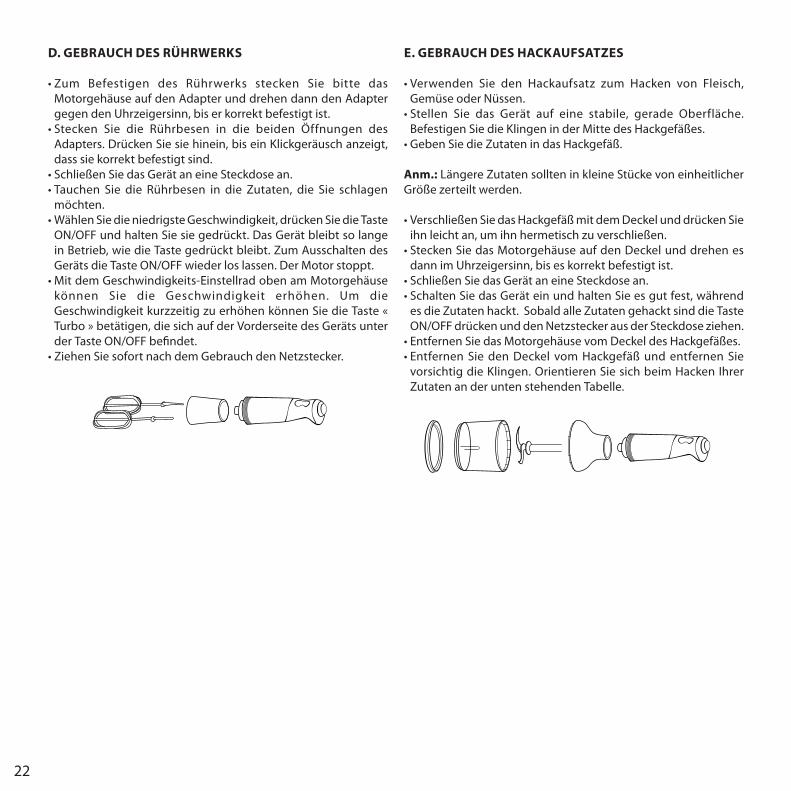
D. GEBRAUCH DES RüHRWERkS
• Zum Befestigen des Rührwerks stecken Sie bitte das motorgehäuse auf den adapter und drehen dann den adapter gegen den Uhrzeigersinn, bis er korrekt befestigt ist.
• Stecken Sie die Rührbesen in die beiden Öffnungen des adapters. Drücken Sie sie hinein, bis ein Klickgeräusch anzeigt, dass sie korrekt befestigt sind.
• Schließen Sie das Gerät an eine Steckdose an. • Tauchen Sie die Rührbesen in die Zutaten, die Sie schlagen
möchten. • Wählen Sie die niedrigste Geschwindigkeit, drücken Sie die Taste
oN/oFF und halten Sie sie gedrückt. Das Gerät bleibt so lange in Betrieb, wie die Taste gedrückt bleibt. Zum ausschalten des Geräts die Taste oN/oFF wieder los lassen. Der motor stoppt.
• Mit dem Geschwindigkeits-Einstellrad oben am Motorgehäuse können Sie die Geschwindigkeit erhöhen. Um die Geschwindigkeit kurzzeitig zu erhöhen können Sie die Taste « Turbo » betätigen, die sich auf der Vorderseite des Geräts unter der Taste oN/oFF befindet.
• Ziehen Sie sofort nach dem Gebrauch den Netzstecker.
E. GEBRAUCH DES HACkAUFSATzES
• Verwenden Sie den Hackaufsatz zum Hacken von Fleisch, Gemüse oder Nüssen.
• Stellen Sie das Gerät auf eine stabile, gerade Oberfläche. Befestigen Sie die Klingen in der mitte des Hackgefäßes.
• Geben Sie die Zutaten in das Hackgefäß.
Anm.: Längere Zutaten sollten in kleine Stücke von einheitlicher Größe zerteilt werden.
• Verschließen Sie das Hackgefäß mit dem Deckel und drücken Sie ihn leicht an, um ihn hermetisch zu verschließen.
• Stecken Sie das Motorgehäuse auf den Deckel und drehen es dann im Uhrzeigersinn, bis es korrekt befestigt ist.
• Schließen Sie das Gerät an eine Steckdose an. • Schalten Sie das Gerät ein und halten Sie es gut fest, während
es die Zutaten hackt. Sobald alle Zutaten gehackt sind die Taste oN/oFF drücken und den Netzstecker aus der Steckdose ziehen.
• Entfernen Sie das Motorgehäuse vom Deckel des Hackgefäßes. • Entfernen Sie den Deckel vom Hackgefäß und entfernen Sie
vorsichtig die Klingen. orientieren Sie sich beim Hacken ihrer Zutaten an der unten stehenden Tabelle.
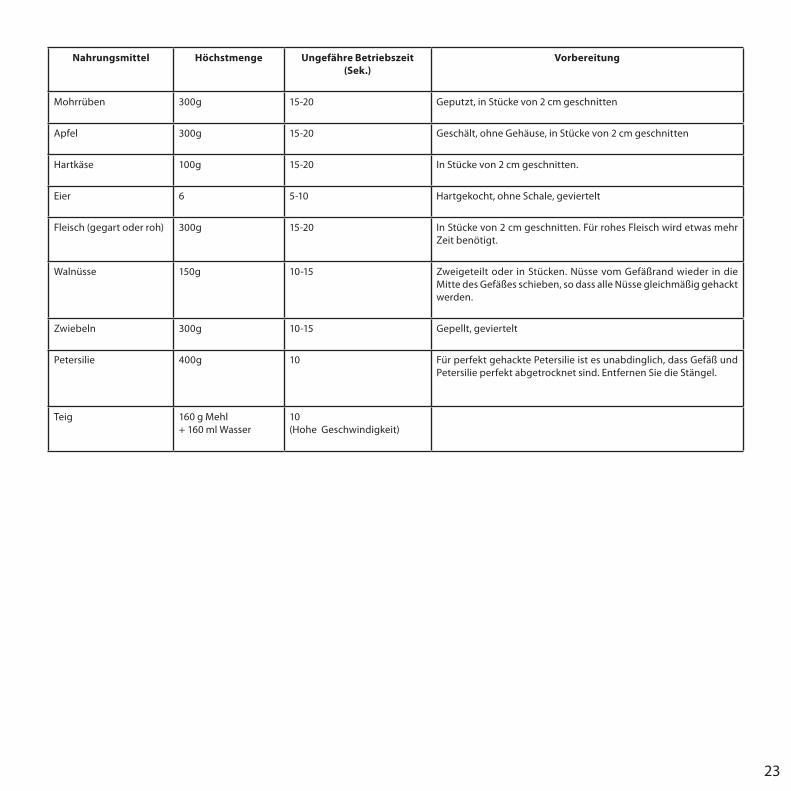
23
Nahrungsmittel Höchstmenge Ungefähre Betriebszeit (Sek.)
Vorbereitung
mohrrüben 300g 15-20 Geputzt, in Stücke von 2 cm geschnitten
apfel 300g 15-20 Geschält, ohne Gehäuse, in Stücke von 2 cm geschnitten
Hartkäse 100g 15-20 in Stücke von 2 cm geschnitten.
eier 6 5-10 Hartgekocht, ohne Schale, geviertelt
Fleisch (gegart oder roh) 300g 15-20 in Stücke von 2 cm geschnitten. Für rohes Fleisch wird etwas mehr Zeit benötigt.
Walnüsse 150g 10-15 Zweigeteilt oder in Stücken. Nüsse vom Gefäßrand wieder in die mitte des Gefäßes schieben, so dass alle Nüsse gleichmäßig gehackt werden.
Zwiebeln 300g 10-15 Gepellt, geviertelt
Petersilie 400g 10 Für perfekt gehackte Petersilie ist es unabdinglich, dass Gefäß und Petersilie perfekt abgetrocknet sind. entfernen Sie die Stängel.
Teig 160 g mehl+ 160 ml Wasser
10(Hohe Geschwindigkeit)
24
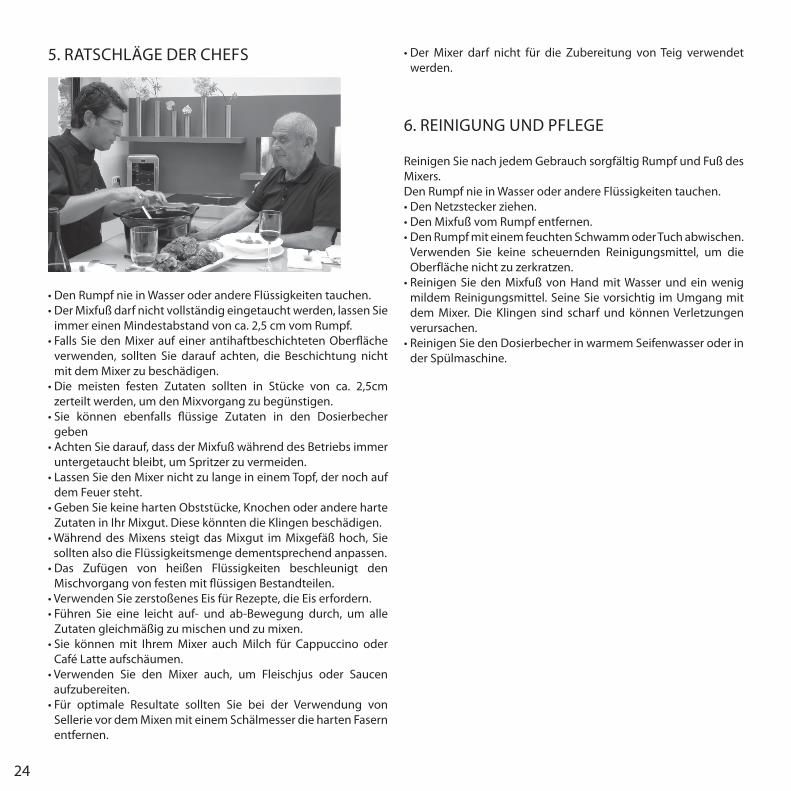
5. raTSCHLÄGe Der CHeFS
• Den Rumpf nie in Wasser oder andere Flüssigkeiten tauchen.• Der Mixfuß darf nicht vollständig eingetaucht werden, lassen Sie
immer einen mindestabstand von ca. 2,5 cm vom rumpf.• Falls Sie den Mixer auf einer antihaftbeschichteten Oberfläche
verwenden, sollten Sie darauf achten, die Beschichtung nicht mit dem mixer zu beschädigen.
• Die meisten festen Zutaten sollten in Stücke von ca. 2,5cm zerteilt werden, um den mixvorgang zu begünstigen.
• Sie können ebenfalls flüssige Zutaten in den Dosierbecher geben
• Achten Sie darauf, dass der Mixfuß während des Betriebs immer untergetaucht bleibt, um Spritzer zu vermeiden.
• Lassen Sie den Mixer nicht zu lange in einem Topf, der noch auf dem Feuer steht.
• Geben Sie keine harten Obststücke, Knochen oder andere harte Zutaten in ihr mixgut. Diese könnten die Klingen beschädigen.
• Während des Mixens steigt das Mixgut im Mixgefäß hoch, Sie sollten also die Flüssigkeitsmenge dementsprechend anpassen.
• Das Zufügen von heißen Flüssigkeiten beschleunigt den mischvorgang von festen mit flüssigen Bestandteilen.
• Verwenden Sie zerstoßenes Eis für Rezepte, die Eis erfordern.• Führen Sie eine leicht auf- und ab-Bewegung durch, um alle
Zutaten gleichmäßig zu mischen und zu mixen.• Sie können mit Ihrem Mixer auch Milch für Cappuccino oder
Café Latte aufschäumen.• Verwenden Sie den Mixer auch, um Fleischjus oder Saucen
aufzubereiten.• Für optimale Resultate sollten Sie bei der Verwendung von
Sellerie vor dem mixen mit einem Schälmesser die harten Fasern entfernen.
• Der Mixer darf nicht für die Zubereitung von Teig verwendet werden.
6. reiNiGUNG UND PFLeGe
reinigen Sie nach jedem Gebrauch sorgfältig rumpf und Fuß des mixers.Den rumpf nie in Wasser oder andere Flüssigkeiten tauchen.• Den Netzstecker ziehen.• Den Mixfuß vom Rumpf entfernen.• Den Rumpf mit einem feuchten Schwamm oder Tuch abwischen.
Verwenden Sie keine scheuernden reinigungsmittel, um die oberfläche nicht zu zerkratzen.
• Reinigen Sie den Mixfuß von Hand mit Wasser und ein wenig mildem reinigungsmittel. Seine Sie vorsichtig im Umgang mit dem mixer. Die Klingen sind scharf und können Verletzungen verursachen.
• Reinigen Sie den Dosierbecher in warmem Seifenwasser oder in der Spülmaschine.
25
1. VeiLiGHeiDSaDVieZeN
• LET OP: De polyethyleenzakjes waar het apparaat in verpakt zit en het andere verpakkingsmateriaal kunnen gevaarlijk zijn. om verstikkingsgevaar te vermijden, deze zakjes buiten het bereik van baby’s en kinderen bewaren, het is geen speelgoed.
• Dompel de body van het apparaat nooit onder water of in een andere vloeistof.• Schakel het apparaat altijd uit haal de stekker uit het stopcontact: na gebruik, voordat u hem in
elkaar zet of uit elkaar haalt en voordat u hem schoon gaat maken. Laat het apparaat nooit zonder toezicht liggen met de stekker nog in het stopcontact. om de stekker uit het stopcontact te halen, altijd aan de stekker zelf trekken en nooit aan het snoer.
• Plaats het apparaat nooit op of in de buurt van een hittebron.• Laat het snoer niet buiten het werkblad hangen en berg het op door het om het apparaat te rollen.
Het snoer niet in contact laten komen met warme oppervlakken.• Nooit de messen aanraken wanneer de stekker in het stopcontact zit.• Gebruik dit apparaat alleen met inachtneming van de aanwijzingen in deze handleiding.• De blender niet overbelasten. Wanneer de motor afslaat, het apparaat uitschakelen en de stekker
uit het stopcontact halen. Verwijder een deel van de voedingsmiddelen, en zet de mixer dan weer aan.
• Het apparaat niet gebruiken wanneer hij gevallen is of wanneer hij duidelijke sporen van schade vertoont.
• Wanneer het snoer beschadigd is, dient dit, voor ieders veiligheid, te worden vervangen door de fabrikant zelf , diens reparatiedienst of door een iemand met de juiste kwalificaties.
• Reparaties mogen niet worden uitgevoerd door de gebruiker zelf. • Dit apparaat kan worden gebruikt door kinderen vanaf 8 jaar, personen met een fysieke, zintuiglijke
of geestelijke beperking, of onervaren en onkundige personen, mits er goed toezicht is of wanneer zij van tevoren instructies hebben gekregen over een veilig gebruik van het apparaat en zij zich bewust zijn van de daarbij behorende risico’s. Laat kinderen niet met het apparaat spelen. Laat kinderen niet zonder toezicht het apparaat schoonmaken of onderhouden.
• Gebruik dit apparaat uitsluitend zoals aangegeven in deze gebruiksaanwijzing en volgens de aanwijzingen.
• Dit apparaat is bedoeld voor huishoudelijk gebruik.
26
ELEkTRISCHE EN ELEkTRONISCHE APPARATUUR AAN HET EINDE VAN HUN LEVENSDUUR
in ieders belang en om een actieve bijdrage te leveren aan het milieu:Gooi oude apparaten niet bij het gewone huishoudelijke afval, maar maak gebruik van de afvalstations en inzamelpunten die uw gemeente u biedt. Sommige materialen kunnen weer hergebruikt worden.
27
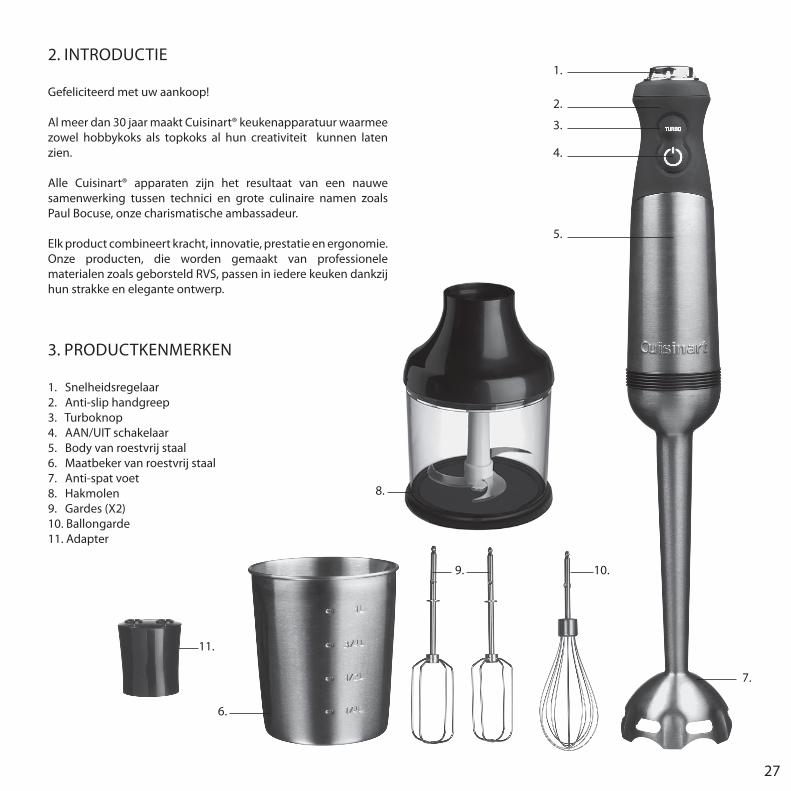
2. iNTroDUCTie
Gefeliciteerd met uw aankoop! al meer dan 30 jaar maakt Cuisinart® keukenapparatuur waarmee zowel hobbykoks als topkoks al hun creativiteit kunnen laten zien. alle Cuisinart® apparaten zijn het resultaat van een nauwe samenwerking tussen technici en grote culinaire namen zoals Paul Bocuse, onze charismatische ambassadeur. elk product combineert kracht, innovatie, prestatie en ergonomie. onze producten, die worden gemaakt van professionele materialen zoals geborsteld rVS, passen in iedere keuken dankzij hun strakke en elegante ontwerp.
3. ProDUCTKeNmerKeN
1. Snelheidsregelaar2. anti-slip handgreep3. Turboknop4. aaN/UiT schakelaar5. Body van roestvrij staal6. maatbeker van roestvrij staal7. anti-spat voet8. Hakmolen 9. Gardes (X2)10. Ballongarde11. adapter
4.
5.
1.
3.
2.
6.
7.
9. 10.
8.
11.
28
4. GeBrUiK
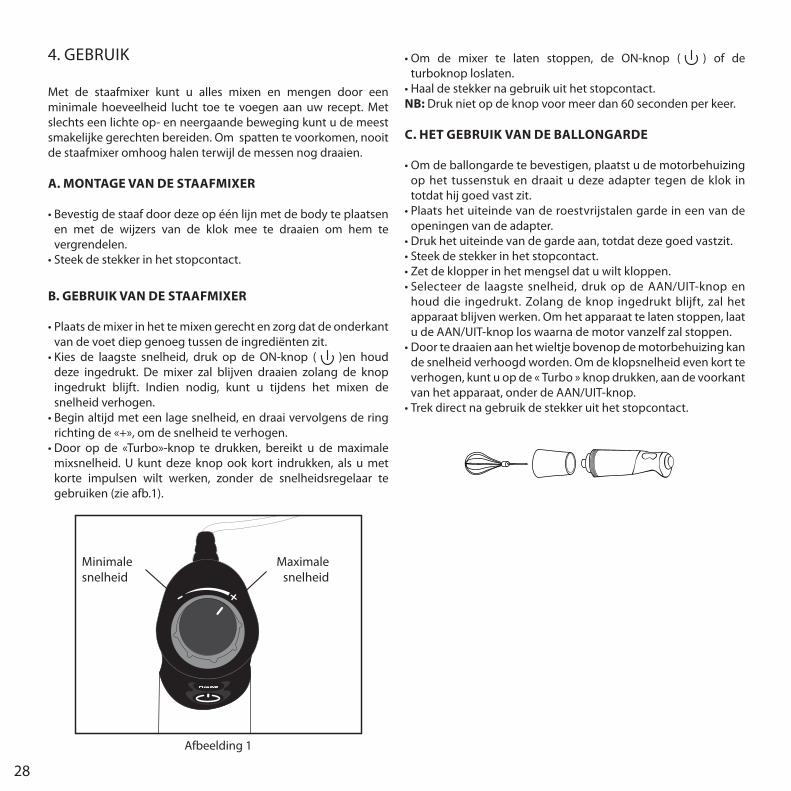
met de staafmixer kunt u alles mixen en mengen door een minimale hoeveelheid lucht toe te voegen aan uw recept. met slechts een lichte op- en neergaande beweging kunt u de meest smakelijke gerechten bereiden. om spatten te voorkomen, nooit de staafmixer omhoog halen terwijl de messen nog draaien.
A. MONTAGE VAN DE STAAFMIXER
• Bevestig de staaf door deze op één lijn met de body te plaatsen en met de wijzers van de klok mee te draaien om hem te vergrendelen.
• Steek de stekker in het stopcontact.
B. GEBRUIk VAN DE STAAFMIXER
• Plaats de mixer in het te mixen gerecht en zorg dat de onderkant van de voet diep genoeg tussen de ingrediënten zit.
• Kies de laagste snelheid, druk op de ON-knop ( )en houd deze ingedrukt. De mixer zal blijven draaien zolang de knop ingedrukt blijft. indien nodig, kunt u tijdens het mixen de snelheid verhogen.
• Begin altijd met een lage snelheid, en draai vervolgens de ring richting de «+», om de snelheid te verhogen.
• Door op de «Turbo»-knop te drukken, bereikt u de maximale mixsnelheid. U kunt deze knop ook kort indrukken, als u met korte impulsen wilt werken, zonder de snelheidsregelaar te gebruiken (zie afb.1).
- +
maximale snelheid
minimale snelheid
afbeelding 1
• Om de mixer te laten stoppen, de ON-knop ( ) of de turboknop loslaten.
• Haal de stekker na gebruik uit het stopcontact.NB: Druk niet op de knop voor meer dan 60 seconden per keer.
C. HET GEBRUIk VAN DE BALLONGARDE
• Om de ballongarde te bevestigen, plaatst u de motorbehuizing op het tussenstuk en draait u deze adapter tegen de klok in totdat hij goed vast zit.
• Plaats het uiteinde van de roestvrijstalen garde in een van de openingen van de adapter.
• Druk het uiteinde van de garde aan, totdat deze goed vastzit. • Steek de stekker in het stopcontact. • Zet de klopper in het mengsel dat u wilt kloppen. • Selecteer de laagste snelheid, druk op de AAN/UIT-knop en
houd die ingedrukt. Zolang de knop ingedrukt blijft, zal het apparaat blijven werken. om het apparaat te laten stoppen, laat u de aaN/UiT-knop los waarna de motor vanzelf zal stoppen.
• Door te draaien aan het wieltje bovenop de motorbehuizing kan de snelheid verhoogd worden. om de klopsnelheid even kort te verhogen, kunt u op de « Turbo » knop drukken, aan de voorkant van het apparaat, onder de aaN/UiT-knop.
• Trek direct na gebruik de stekker uit het stopcontact.
29
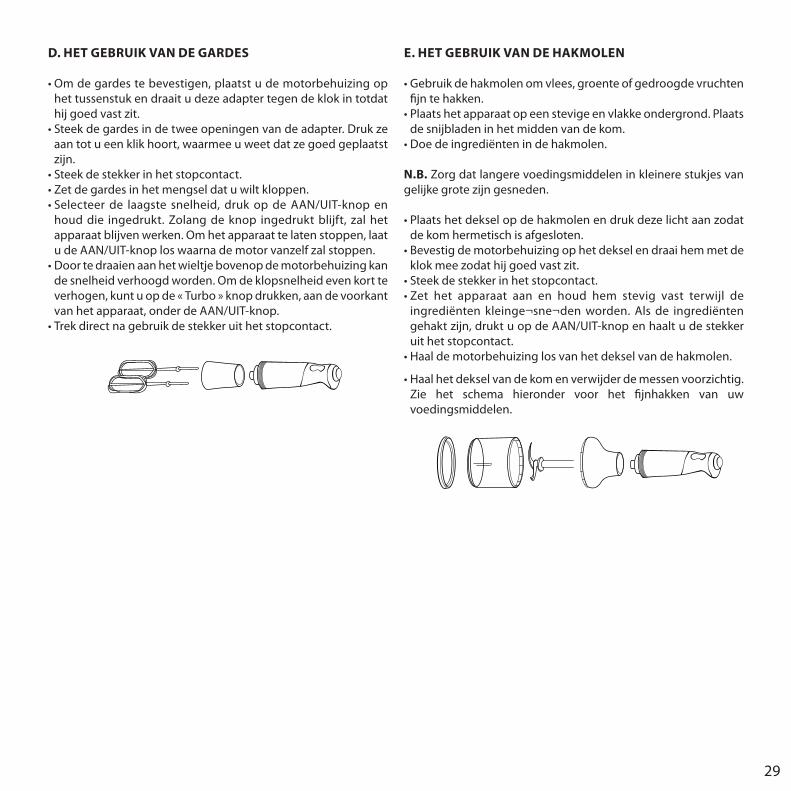
D. HET GEBRUIk VAN DE GARDES
• Om de gardes te bevestigen, plaatst u de motorbehuizing op het tussenstuk en draait u deze adapter tegen de klok in totdat hij goed vast zit.
• Steek de gardes in de twee openingen van de adapter. Druk ze aan tot u een klik hoort, waarmee u weet dat ze goed geplaatst zijn.
• Steek de stekker in het stopcontact. • Zet de gardes in het mengsel dat u wilt kloppen. • Selecteer de laagste snelheid, druk op de AAN/UIT-knop en
houd die ingedrukt. Zolang de knop ingedrukt blijft, zal het apparaat blijven werken. om het apparaat te laten stoppen, laat u de aaN/UiT-knop los waarna de motor vanzelf zal stoppen.
• Door te draaien aan het wieltje bovenop de motorbehuizing kan de snelheid verhoogd worden. om de klopsnelheid even kort te verhogen, kunt u op de « Turbo » knop drukken, aan de voorkant van het apparaat, onder de aaN/UiT-knop.
• Trek direct na gebruik de stekker uit het stopcontact.
E. HET GEBRUIk VAN DE HAkMOLEN
• Gebruik de hakmolen om vlees, groente of gedroogde vruchten fijn te hakken.
• Plaats het apparaat op een stevige en vlakke ondergrond. Plaats de snijbladen in het midden van de kom.
• Doe de ingrediënten in de hakmolen.
N.B. Zorg dat langere voedingsmiddelen in kleinere stukjes van gelijke grote zijn gesneden.
• Plaats het deksel op de hakmolen en druk deze licht aan zodat de kom hermetisch is afgesloten.
• Bevestig de motorbehuizing op het deksel en draai hem met de klok mee zodat hij goed vast zit.
• Steek de stekker in het stopcontact. • Zet het apparaat aan en houd hem stevig vast terwijl de
ingrediënten kleinge¬sne¬den worden. als de ingrediënten gehakt zijn, drukt u op de aaN/UiT-knop en haalt u de stekker uit het stopcontact.
• Haal de motorbehuizing los van het deksel van de hakmolen.
• Haal het deksel van de kom en verwijder de messen voorzichtig. Zie het schema hieronder voor het fijnhakken van uw voedingsmiddelen.
30
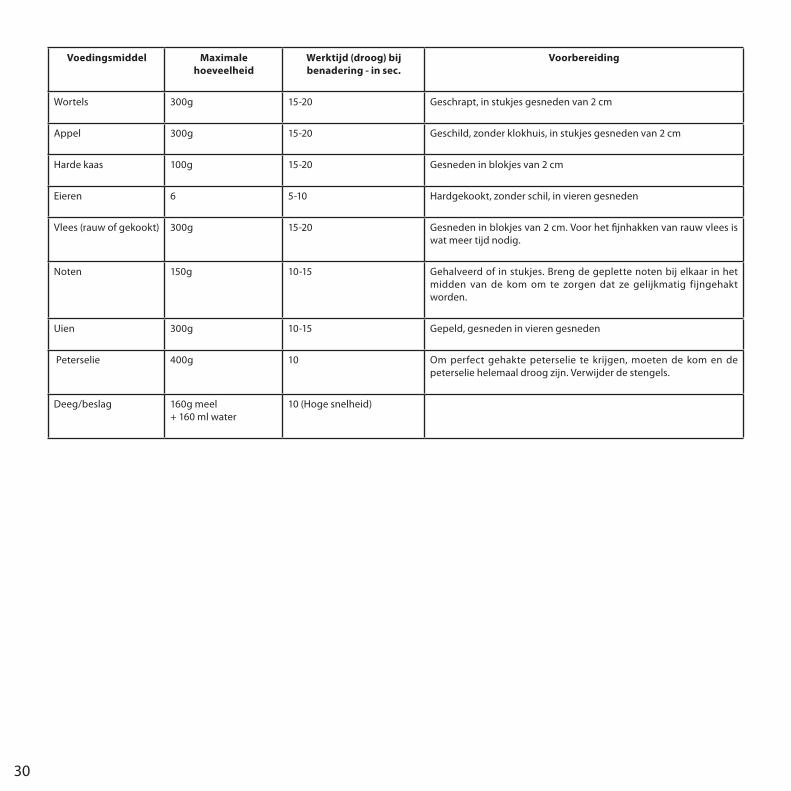
Voedingsmiddel Maximale hoeveelheid
Werktijd (droog) bij benadering - in sec.
Voorbereiding
Wortels 300g 15-20 Geschrapt, in stukjes gesneden van 2 cm
appel 300g 15-20 Geschild, zonder klokhuis, in stukjes gesneden van 2 cm
Harde kaas 100g 15-20 Gesneden in blokjes van 2 cm
eieren 6 5-10 Hardgekookt, zonder schil, in vieren gesneden
Vlees (rauw of gekookt) 300g 15-20 Gesneden in blokjes van 2 cm. Voor het fijnhakken van rauw vlees is wat meer tijd nodig.
Noten 150g 10-15 Gehalveerd of in stukjes. Breng de geplette noten bij elkaar in het midden van de kom om te zorgen dat ze gelijkmatig fijngehakt worden.
Uien 300g 10-15 Gepeld, gesneden in vieren gesneden
Peterselie 400g 10 om perfect gehakte peterselie te krijgen, moeten de kom en de peterselie helemaal droog zijn. Verwijder de stengels.
Deeg/beslag 160g meel+ 160 ml water
10 (Hoge snelheid)
31
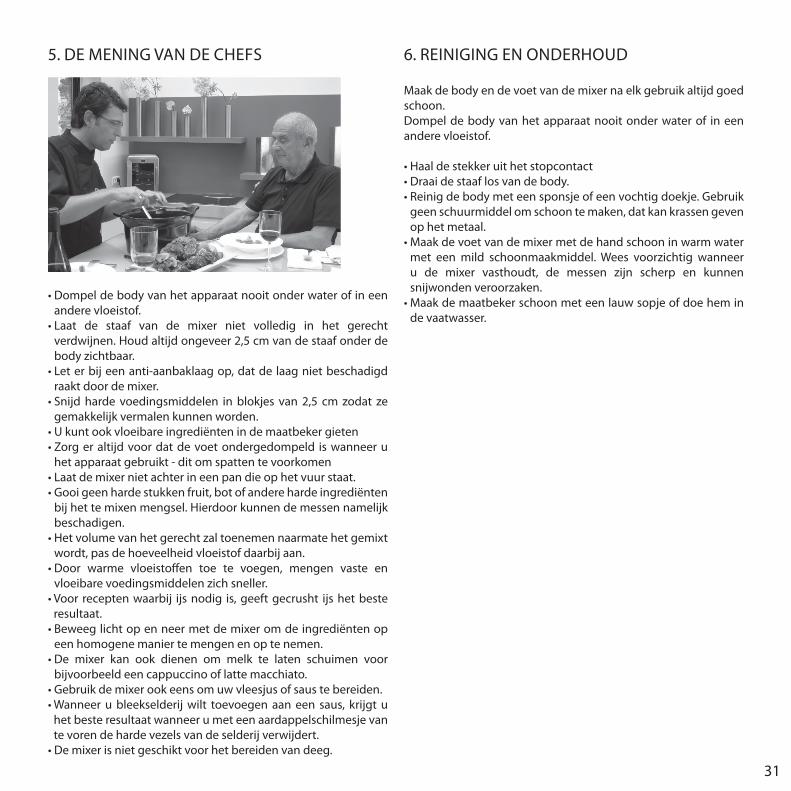
5. De meNiNG VaN De CHeFS
• Dompel de body van het apparaat nooit onder water of in een andere vloeistof.
• Laat de staaf van de mixer niet volledig in het gerecht verdwijnen. Houd altijd ongeveer 2,5 cm van de staaf onder de body zichtbaar.
• Let er bij een anti-aanbaklaag op, dat de laag niet beschadigd raakt door de mixer.
• Snijd harde voedingsmiddelen in blokjes van 2,5 cm zodat ze gemakkelijk vermalen kunnen worden.
• U kunt ook vloeibare ingrediënten in de maatbeker gieten• Zorg er altijd voor dat de voet ondergedompeld is wanneer u
het apparaat gebruikt - dit om spatten te voorkomen• Laat de mixer niet achter in een pan die op het vuur staat.• Gooi geen harde stukken fruit, bot of andere harde ingrediënten
bij het te mixen mengsel. Hierdoor kunnen de messen namelijk beschadigen.
• Het volume van het gerecht zal toenemen naarmate het gemixt wordt, pas de hoeveelheid vloeistof daarbij aan.
• Door warme vloeistoffen toe te voegen, mengen vaste en vloeibare voedingsmiddelen zich sneller.
• Voor recepten waarbij ijs nodig is, geeft gecrusht ijs het beste resultaat.
• Beweeg licht op en neer met de mixer om de ingrediënten op een homogene manier te mengen en op te nemen.
• De mixer kan ook dienen om melk te laten schuimen voor bijvoorbeeld een cappuccino of latte macchiato.
• Gebruik de mixer ook eens om uw vleesjus of saus te bereiden.• Wanneer u bleekselderij wilt toevoegen aan een saus, krijgt u
het beste resultaat wanneer u met een aardappelschilmesje van te voren de harde vezels van de selderij verwijdert.
• De mixer is niet geschikt voor het bereiden van deeg.
6. reiNiGiNG eN oNDerHoUD
maak de body en de voet van de mixer na elk gebruik altijd goed schoon.Dompel de body van het apparaat nooit onder water of in een andere vloeistof.
• Haal de stekker uit het stopcontact• Draai de staaf los van de body.• Reinig de body met een sponsje of een vochtig doekje. Gebruik
geen schuurmiddel om schoon te maken, dat kan krassen geven op het metaal.
• Maak de voet van de mixer met de hand schoon in warm water met een mild schoonmaakmiddel. Wees voorzichtig wanneer u de mixer vasthoudt, de messen zijn scherp en kunnen snijwonden veroorzaken.
• Maak de maatbeker schoon met een lauw sopje of doe hem in de vaatwasser.
32
4. iSTrUZioNi Di SiCUreZZa
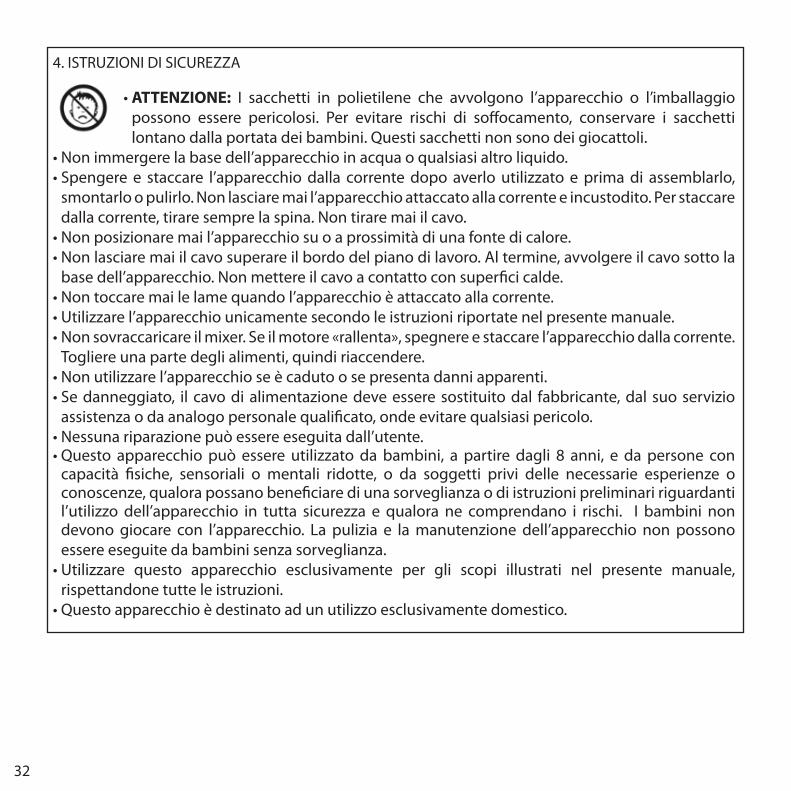
• ATTENzIONE: i sacchetti in polietilene che avvolgono l’apparecchio o l’imballaggio possono essere pericolosi. Per evitare rischi di soffocamento, conservare i sacchetti lontano dalla portata dei bambini. questi sacchetti non sono dei giocattoli.
• Non immergere la base dell’apparecchio in acqua o qualsiasi altro liquido.• Spengere e staccare l’apparecchio dalla corrente dopo averlo utilizzato e prima di assemblarlo,
smontarlo o pulirlo. Non lasciare mai l’apparecchio attaccato alla corrente e incustodito. Per staccare dalla corrente, tirare sempre la spina. Non tirare mai il cavo.
• Non posizionare mai l’apparecchio su o a prossimità di una fonte di calore.• Non lasciare mai il cavo superare il bordo del piano di lavoro. Al termine, avvolgere il cavo sotto la
base dell’apparecchio. Non mettere il cavo a contatto con superfici calde.• Non toccare mai le lame quando l’apparecchio è attaccato alla corrente.• Utilizzare l’apparecchio unicamente secondo le istruzioni riportate nel presente manuale.• Non sovraccaricare il mixer. Se il motore «rallenta», spegnere e staccare l’apparecchio dalla corrente.
Togliere una parte degli alimenti, quindi riaccendere.• Non utilizzare l’apparecchio se è caduto o se presenta danni apparenti.• Se danneggiato, il cavo di alimentazione deve essere sostituito dal fabbricante, dal suo servizio
assistenza o da analogo personale qualificato, onde evitare qualsiasi pericolo. • Nessuna riparazione può essere eseguita dall’utente.• Questo apparecchio può essere utilizzato da bambini, a partire dagli 8 anni, e da persone con
capacità fisiche, sensoriali o mentali ridotte, o da soggetti privi delle necessarie esperienze o conoscenze, qualora possano beneficiare di una sorveglianza o di istruzioni preliminari riguardanti l’utilizzo dell’apparecchio in tutta sicurezza e qualora ne comprendano i rischi. i bambini non devono giocare con l’apparecchio. La pulizia e la manutenzione dell’apparecchio non possono essere eseguite da bambini senza sorveglianza.
• Utilizzare questo apparecchio esclusivamente per gli scopi illustrati nel presente manuale, rispettandone tutte le istruzioni.
• Questo apparecchio è destinato ad un utilizzo esclusivamente domestico.
33
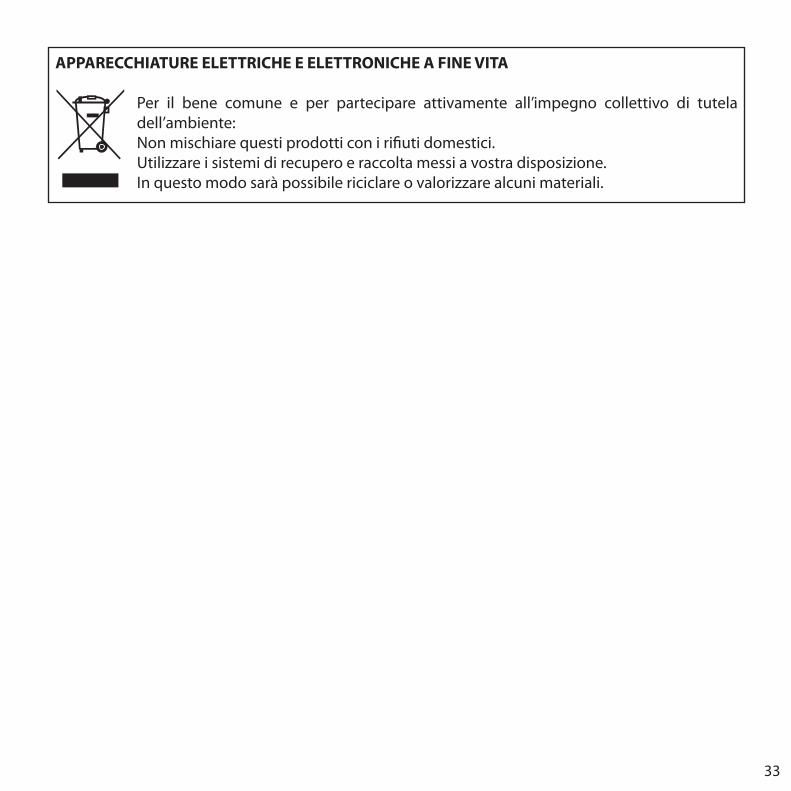
APPARECCHIATURE ELETTRICHE E ELETTRONICHE A FINE VITA
Per il bene comune e per partecipare attivamente all’impegno collettivo di tutela dell’ambiente:Non mischiare questi prodotti con i rifiuti domestici.Utilizzare i sistemi di recupero e raccolta messi a vostra disposizione.In questo modo sarà possibile riciclare o valorizzare alcuni materiali.

34
5. iNTroDUZioNe
Complimenti per l’acquisto! Da oltre 30 anni, Cuisinart® sviluppa una gamma completa di apparecchi che consentono agli appassionati della cucina e ai grandi chef di esprimere al meglio la loro creatività. Tutti gli apparecchi Cuisinart® sono il frutto di una stretta collaborazione fra ingegneri e grandi nomi della Cucina, fra cui Paul Bocuse, ambasciatore carismatico della marca. ogni prodotto unisce in sé robustezza, innovazione, prestazioni e ergonomia. realizzati con materie prime professionali, come l’acciaio spazzolato inossidabile, i nostri prodotti si integrano facilmente in qualsiasi tipo di cucina, grazie a un design sobrio e elegante.
6. CaraTTeriSTiCHe ProDoTTo
1. Variatore di velocità2. manico antisdrucciolo3. Pulsante turbo4. Pulsante oN/oFF5 Corpo in acciaio inossidabile6. recipiente dosatore in acciaio inossidabile7. Braccio mixer antischizzi8. Tritatutto9. Sbattitori (X2)10. Frusta a palla11. adattatore
4.
5.
1.
3.
2.
6.
7.
9. 10.
8.
11.
35
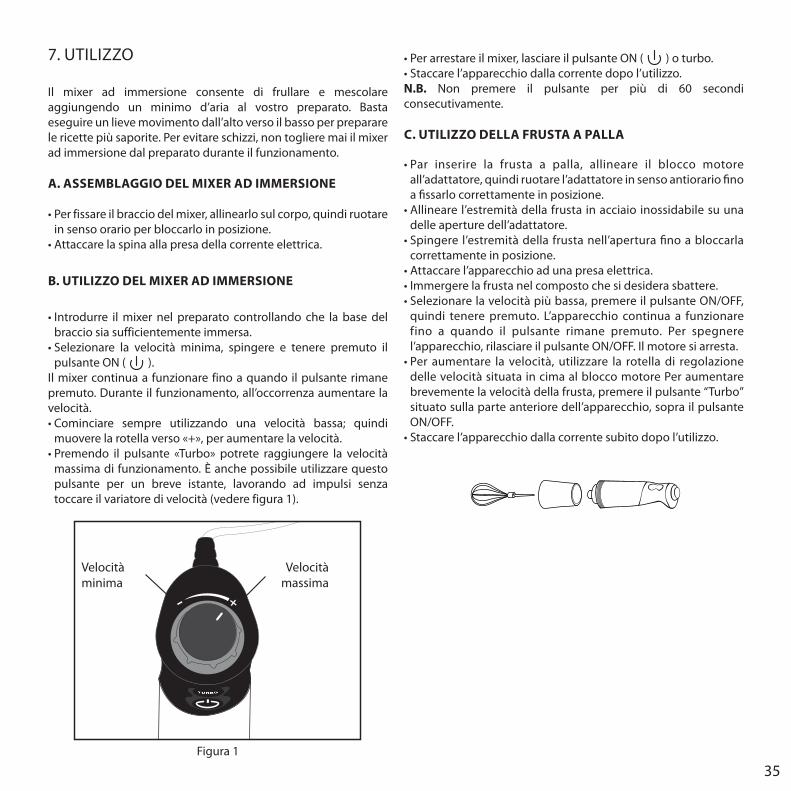
7. UTiLiZZo
il mixer ad immersione consente di frullare e mescolare aggiungendo un minimo d’aria al vostro preparato. Basta eseguire un lieve movimento dall’alto verso il basso per preparare le ricette più saporite. Per evitare schizzi, non togliere mai il mixer ad immersione dal preparato durante il funzionamento.
A. ASSEMBLAGGIO DEL MIXER AD IMMERSIONE
• Per fissare il braccio del mixer, allinearlo sul corpo, quindi ruotare in senso orario per bloccarlo in posizione.
• Attaccare la spina alla presa della corrente elettrica.
B. UTILIzzO DEL MIXER AD IMMERSIONE
• Introdurre il mixer nel preparato controllando che la base del braccio sia sufficientemente immersa.
• Selezionare la velocità minima, spingere e tenere premuto il pulsante oN ( ).
il mixer continua a funzionare fino a quando il pulsante rimane premuto. Durante il funzionamento, all’occorrenza aumentare la velocità.• Cominciare sempre utilizzando una velocità bassa; quindi
muovere la rotella verso «+», per aumentare la velocità.• Premendo il pulsante «Turbo» potrete raggiungere la velocità
massima di funzionamento. È anche possibile utilizzare questo pulsante per un breve istante, lavorando ad impulsi senza toccare il variatore di velocità (vedere figura 1).
- +
Velocità massima
Velocità minima
Figura 1
• Per arrestare il mixer, lasciare il pulsante ON ( ) o turbo.• Staccare l’apparecchio dalla corrente dopo l’utilizzo.N.B. Non premere il pulsante per più di 60 secondi consecutivamente.
C. UTILIzzO DELLA FRUSTA A PALLA
• Par inserire la frusta a palla, allineare il blocco motore all’adattatore, quindi ruotare l’adattatore in senso antiorario fino a fissarlo correttamente in posizione.
• Allineare l’estremità della frusta in acciaio inossidabile su una delle aperture dell’adattatore.
• Spingere l’estremità della frusta nell’apertura fino a bloccarla correttamente in posizione.
• Attaccare l’apparecchio ad una presa elettrica. • Immergere la frusta nel composto che si desidera sbattere. • Selezionare la velocità più bassa, premere il pulsante ON/OFF,
quindi tenere premuto. L’apparecchio continua a funzionare fino a quando il pulsante rimane premuto. Per spegnere l’apparecchio, rilasciare il pulsante oN/oFF. il motore si arresta.
• Per aumentare la velocità, utilizzare la rotella di regolazione delle velocità situata in cima al blocco motore Per aumentare brevemente la velocità della frusta, premere il pulsante “Turbo” situato sulla parte anteriore dell’apparecchio, sopra il pulsante oN/oFF.
• Staccare l’apparecchio dalla corrente subito dopo l’utilizzo.
36
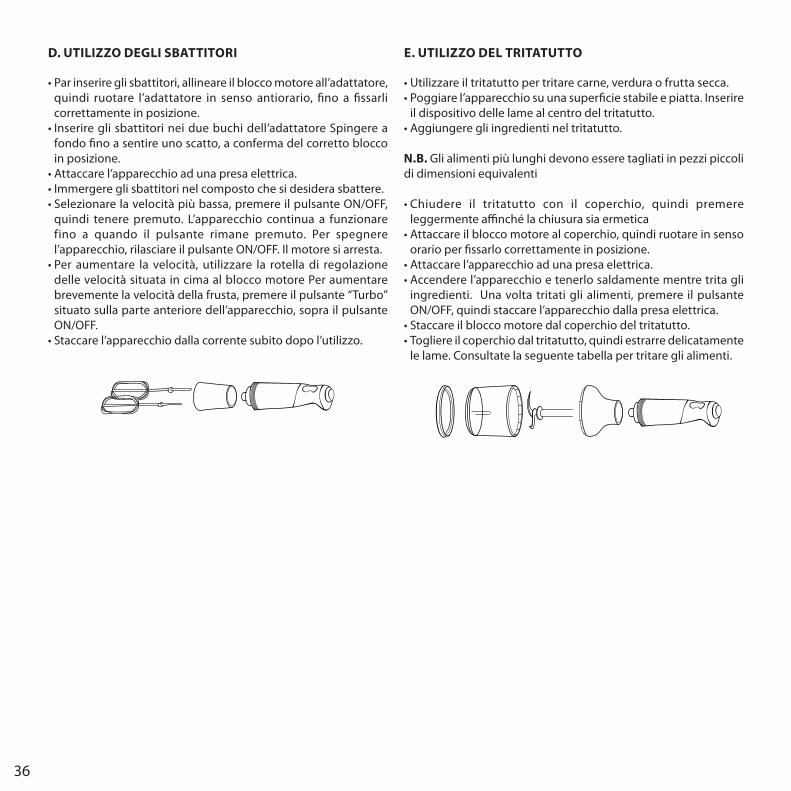
D. UTILIzzO DEGLI SBATTITORI
• Par inserire gli sbattitori, allineare il blocco motore all’adattatore, quindi ruotare l’adattatore in senso antiorario, fino a fissarli correttamente in posizione.
• Inserire gli sbattitori nei due buchi dell’adattatore Spingere a fondo fino a sentire uno scatto, a conferma del corretto blocco in posizione.
• Attaccare l’apparecchio ad una presa elettrica. • Immergere gli sbattitori nel composto che si desidera sbattere. • Selezionare la velocità più bassa, premere il pulsante ON/OFF,
quindi tenere premuto. L’apparecchio continua a funzionare fino a quando il pulsante rimane premuto. Per spegnere l’apparecchio, rilasciare il pulsante oN/oFF. il motore si arresta.
• Per aumentare la velocità, utilizzare la rotella di regolazione delle velocità situata in cima al blocco motore Per aumentare brevemente la velocità della frusta, premere il pulsante “Turbo” situato sulla parte anteriore dell’apparecchio, sopra il pulsante oN/oFF.
• Staccare l’apparecchio dalla corrente subito dopo l’utilizzo.
E. UTILIzzO DEL TRITATUTTO
• Utilizzare il tritatutto per tritare carne, verdura o frutta secca. • Poggiare l’apparecchio su una superficie stabile e piatta. Inserire
il dispositivo delle lame al centro del tritatutto. • Aggiungere gli ingredienti nel tritatutto.
N.B. Gli alimenti più lunghi devono essere tagliati in pezzi piccoli di dimensioni equivalenti
• Chiudere il tritatutto con il coperchio, quindi premere leggermente affinché la chiusura sia ermetica
• Attaccare il blocco motore al coperchio, quindi ruotare in senso orario per fissarlo correttamente in posizione.
• Attaccare l’apparecchio ad una presa elettrica. • Accendere l’apparecchio e tenerlo saldamente mentre trita gli
ingredienti. Una volta tritati gli alimenti, premere il pulsante oN/oFF, quindi staccare l’apparecchio dalla presa elettrica.
• Staccare il blocco motore dal coperchio del tritatutto. • Togliere il coperchio dal tritatutto, quindi estrarre delicatamente
le lame. Consultate la seguente tabella per tritare gli alimenti.
37
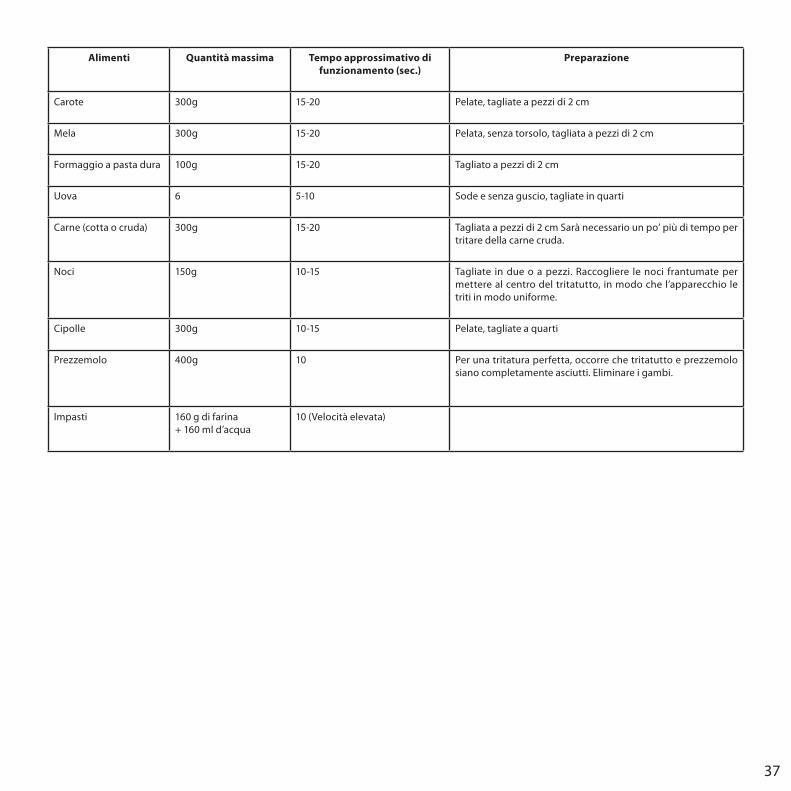
Alimenti Quantità massima Tempo approssimativo di funzionamento (sec.)
Preparazione
Carote 300g 15-20 Pelate, tagliate a pezzi di 2 cm
mela 300g 15-20 Pelata, senza torsolo, tagliata a pezzi di 2 cm
Formaggio a pasta dura 100g 15-20 Tagliato a pezzi di 2 cm
Uova 6 5-10 Sode e senza guscio, tagliate in quarti
Carne (cotta o cruda) 300g 15-20 Tagliata a pezzi di 2 cm Sarà necessario un po’ più di tempo per tritare della carne cruda.
Noci 150g 10-15 Tagliate in due o a pezzi. raccogliere le noci frantumate per mettere al centro del tritatutto, in modo che l’apparecchio le triti in modo uniforme.
Cipolle 300g 10-15 Pelate, tagliate a quarti
Prezzemolo 400g 10 Per una tritatura perfetta, occorre che tritatutto e prezzemolo siano completamente asciutti. eliminare i gambi.
impasti 160 g di farina+ 160 ml d’acqua
10 (Velocità elevata)
38
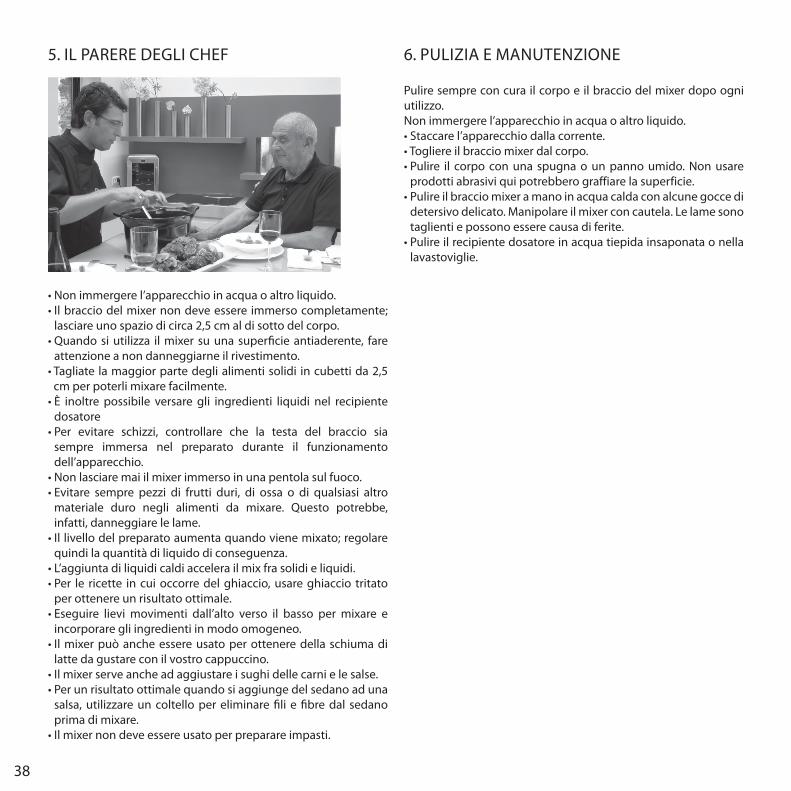
5. iL Parere DeGLi CHeF
• Non immergere l’apparecchio in acqua o altro liquido.• Il braccio del mixer non deve essere immerso completamente;
lasciare uno spazio di circa 2,5 cm al di sotto del corpo.• Quando si utilizza il mixer su una superficie antiaderente, fare
attenzione a non danneggiarne il rivestimento.• Tagliate la maggior parte degli alimenti solidi in cubetti da 2,5
cm per poterli mixare facilmente.• È inoltre possibile versare gli ingredienti liquidi nel recipiente
dosatore• Per evitare schizzi, controllare che la testa del braccio sia
sempre immersa nel preparato durante il funzionamento dell’apparecchio.
• Non lasciare mai il mixer immerso in una pentola sul fuoco.• Evitare sempre pezzi di frutti duri, di ossa o di qualsiasi altro
materiale duro negli alimenti da mixare. questo potrebbe, infatti, danneggiare le lame.
• Il livello del preparato aumenta quando viene mixato; regolare quindi la quantità di liquido di conseguenza.
• L’aggiunta di liquidi caldi accelera il mix fra solidi e liquidi.• Per le ricette in cui occorre del ghiaccio, usare ghiaccio tritato
per ottenere un risultato ottimale.• Eseguire lievi movimenti dall’alto verso il basso per mixare e
incorporare gli ingredienti in modo omogeneo.• Il mixer può anche essere usato per ottenere della schiuma di
latte da gustare con il vostro cappuccino.• Il mixer serve anche ad aggiustare i sughi delle carni e le salse.• Per un risultato ottimale quando si aggiunge del sedano ad una
salsa, utilizzare un coltello per eliminare fili e fibre dal sedano prima di mixare.
• Il mixer non deve essere usato per preparare impasti.
6. PULiZia e maNUTeNZioNe
Pulire sempre con cura il corpo e il braccio del mixer dopo ogni utilizzo.Non immergere l’apparecchio in acqua o altro liquido.• Staccare l’apparecchio dalla corrente.• Togliere il braccio mixer dal corpo.• Pulire il corpo con una spugna o un panno umido. Non usare
prodotti abrasivi qui potrebbero graffiare la superficie.• Pulire il braccio mixer a mano in acqua calda con alcune gocce di
detersivo delicato. manipolare il mixer con cautela. Le lame sono taglienti e possono essere causa di ferite.
• Pulire il recipiente dosatore in acqua tiepida insaponata o nella lavastoviglie.
39
1. CoNSiGNaS De SeGUriDaD
• ATENCIÓN: Las bolsas de polietileno que rodean el aparato o el embalaje pueden ser peligrosas. Para evitar riesgos de asfixia, mantenga estas bolsas fuera del alcance de los bebés y de los niños. Las bolsas no son juguetes.
• No sumerja el cuerpo en agua o en cualquier otro líquido.• Apague y desenchufe el aparato después de usarlo, antes de montarlo o desmontarlo y antes de
limpiarlo. No deje nunca el aparato encendido sin vigilancia. Para desenchufarlo, tire de la clavija, no del cable.
• No coloque el electrodoméstico sobre una fuente de calor o cerca de ella.• No deje que el cable quede colgando del mostrador. Para guardarlo, enróllelo en el cuerpo del
aparato. No coloque el cable en contacto con superficies calientes.• No toque jamás las cuchillas con la batidora enchufada.• Utilice este aparato exclusivamente de acuerdo con las instrucciones de este manual.• No sobrecargue la batidora. Si el motor se cala, apague y desenchufe la batidora. Retire una parte
de los alimentos y vuélvala a encender.• No utilice el electrodoméstico si ha recibido un golpe o presenta señales aparentes de deterioro.• Si el cable de alimentación está dañado, debe sustituirlo el fabricante o su servicio técnico, o bien
una persona de cualificación similar, con el fin de evitar situaciones peligrosas.• El usuario no puede realizar reparación alguna.• Este aparato no está pensado para que lo utilicen personas (incluyendo niños) de capacidad
física, sensorial o mental reducida, o personas sin experiencia y conocimiento suficientes, salvo que cuenten con la supervisión, o con instrucciones previas sobre el funcionamiento del aparato, de una persona responsable de su seguridad. es conveniente vigilar a los niños para evitar que jueguen con este electrodoméstico.
• Este aparato cumple con las exigencias esenciales de las directivas 2004/108/CE (compatibilidad electromagnética) y 2006/95/Ce (seguridad de los electrodomésticos).
• Utilice este aparato exclusivamente para el uso descrito en este libro de instrucciones y de acuerdo con las mismas.
• Esta báscula está destinada a un uso estrictamente doméstico.
40
APARATOS ELÉCTRICOS Y ELECTRÓNICOS AL FINAL DE SU VIDA
en interés de todos, y para participar activamente en los esfuerzos colectivos de protección del medio ambiente:No se deshaga de estos productos junto con la basura doméstica.Utilice los sistemas de recogida que estén a su disposición.De esta forma, algunos materiales podrán recuperarse o reciclarse.
41
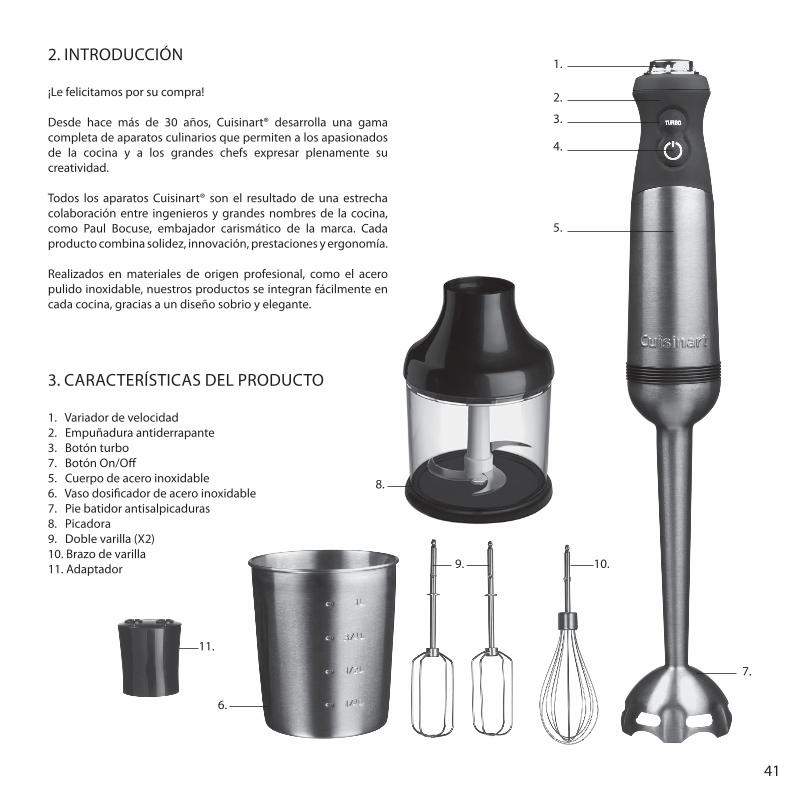
2. iNTroDUCCiÓN
¡Le felicitamos por su compra!
Desde hace más de 30 años, Cuisinart® desarrolla una gama completa de aparatos culinarios que permiten a los apasionados de la cocina y a los grandes chefs expresar plenamente su creatividad.
Todos los aparatos Cuisinart® son el resultado de una estrecha colaboración entre ingenieros y grandes nombres de la cocina, como Paul Bocuse, embajador carismático de la marca. Cada producto combina solidez, innovación, prestaciones y ergonomía.
realizados en materiales de origen profesional, como el acero pulido inoxidable, nuestros productos se integran fácilmente en cada cocina, gracias a un diseño sobrio y elegante.
3. CaraCTerÍSTiCaS DeL ProDUCTo
1. Variador de velocidad2. empuñadura antiderrapante3. Botón turbo7. Botón on/off5. Cuerpo de acero inoxidable6. Vaso dosificador de acero inoxidable7. Pie batidor antisalpicaduras8. Picadora9. Doble varilla (X2)10. Brazo de varilla11. adaptador
4.
5.
1.
3.
2.
6.
7.
9. 10.
8.
11.
42
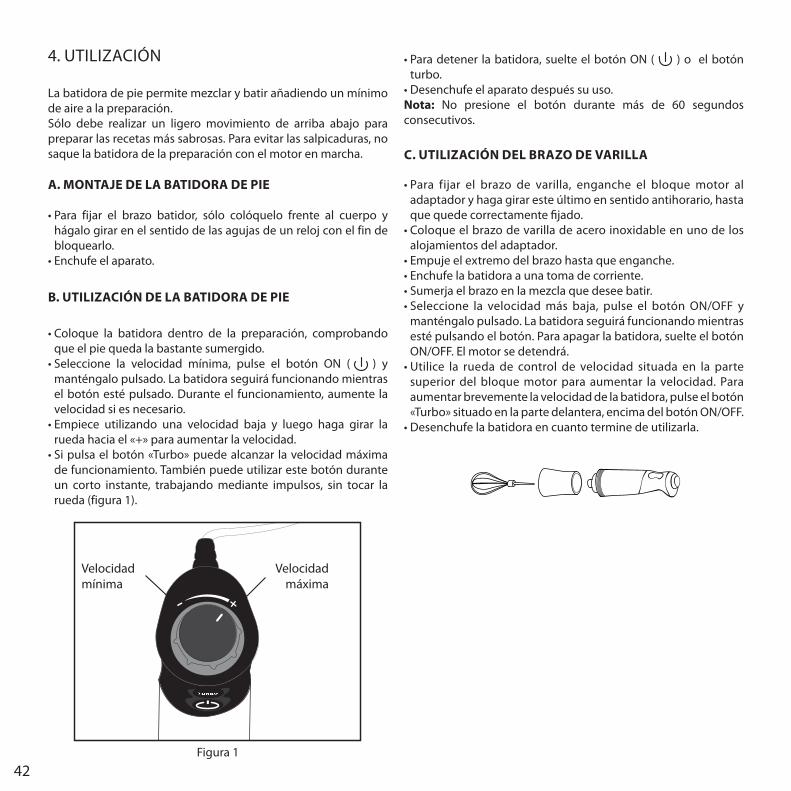
4. UTiLiZaCiÓN
La batidora de pie permite mezclar y batir añadiendo un mínimo de aire a la preparación.Sólo debe realizar un ligero movimiento de arriba abajo para preparar las recetas más sabrosas. Para evitar las salpicaduras, no saque la batidora de la preparación con el motor en marcha.
A. MONTAJE DE LA BATIDORA DE PIE
• Para fijar el brazo batidor, sólo colóquelo frente al cuerpo y hágalo girar en el sentido de las agujas de un reloj con el fin de bloquearlo.
• Enchufe el aparato.
B. UTILIzACIÓN DE LA BATIDORA DE PIE
• Coloque la batidora dentro de la preparación, comprobando que el pie queda la bastante sumergido.
• Seleccione la velocidad mínima, pulse el botón ON ( ) y manténgalo pulsado. La batidora seguirá funcionando mientras el botón esté pulsado. Durante el funcionamiento, aumente la velocidad si es necesario.
• Empiece utilizando una velocidad baja y luego haga girar la rueda hacia el «+» para aumentar la velocidad.
• Si pulsa el botón «Turbo» puede alcanzar la velocidad máxima de funcionamiento. También puede utilizar este botón durante un corto instante, trabajando mediante impulsos, sin tocar la rueda (figura 1).
- +
Velocidad máxima
Velocidad mínima
Figura 1
• Para detener la batidora, suelte el botón ON ( ) o el botón turbo.
• Desenchufe el aparato después su uso. Nota: No presione el botón durante más de 60 segundos consecutivos.
C. UTILIzACIÓN DEL BRAzO DE VARILLA
• Para fijar el brazo de varilla, enganche el bloque motor al adaptador y haga girar este último en sentido antihorario, hasta que quede correctamente fijado.
• Coloque el brazo de varilla de acero inoxidable en uno de los alojamientos del adaptador.
• Empuje el extremo del brazo hasta que enganche. • Enchufe la batidora a una toma de corriente. • Sumerja el brazo en la mezcla que desee batir. • Seleccione la velocidad más baja, pulse el botón ON/OFF y
manténgalo pulsado. La batidora seguirá funcionando mientras esté pulsando el botón. Para apagar la batidora, suelte el botón ON/OFF. El motor se detendrá.
• Utilice la rueda de control de velocidad situada en la parte superior del bloque motor para aumentar la velocidad. Para aumentar brevemente la velocidad de la batidora, pulse el botón «Turbo» situado en la parte delantera, encima del botón oN/oFF.
• Desenchufe la batidora en cuanto termine de utilizarla.

43
D. UTILIzACIÓN DEL BRAzO DE DOBLE VARILLA
• Para fijar los brazos de doble varilla, enganche el bloque motor al adaptador y haga girar este último en sentido antihorario, hasta que queden correctamente fijado.
• Inserte los dos brazos de varilla en los dos alojamientos del adaptador. Empuje hasta que un «clic» confirme que están correctamente encajados.
• Enchufe la batidora a una toma de corriente. • Sumerja el brazo de doble varilla en la mezcla que desee batir. • Seleccione la velocidad más baja, pulse el botón ON/OFF y
manténgalo pulsado. La batidora seguirá funcionando mientras esté pulsando el botón. Para apagar la batidora, suelte el botón ON/OFF. El motor se detendrá.
• Utilice la rueda de control de velocidad situada en la parte superior del bloque motor para aumentar la velocidad. Para aumentar brevemente la velocidad de la batidora, pulse el botón «Turbo» situado en la parte delantera, encima del botón oN/oFF.
• Desenchufe la batidora en cuanto termine de utilizarla.
E. UTILIzACIÓN DE LA PICADORA
• Utilice la picadora para picar carne, verduras o frutos secos. • Coloque el aparato sobre una superficie estable y plana. Coloque
el dispositivo con las cuchillas en el centro del recipiente de la picadora.
• Añada los ingredientes al recipiente de la picadora.
Nota: Los alimentos más grandes deben cortarse en trozos de tamaño similar.
• Cierre el recipiente de la picadora con la tapa y apriete ligeramente para que quede herméticamente cerrado.
• Encaje el bloque motor en la tapa y gire esta última en el sentido horario para que quede correctamente fijada.
• Enchufe la batidora a una toma de corriente. • Encienda el aparato y sujételo con fuerza mientras pica los
ingredientes. Cuando los alimentos estén picados, pulse el botón oN/oFF y desenchufe el aparato.
• Separe el bloque motor de la tapa de la picadora. • Retire la tapa de la picadora y retire con cuidado las cuchillas.
Consulte la tabla siguiente para picar los alimentos.
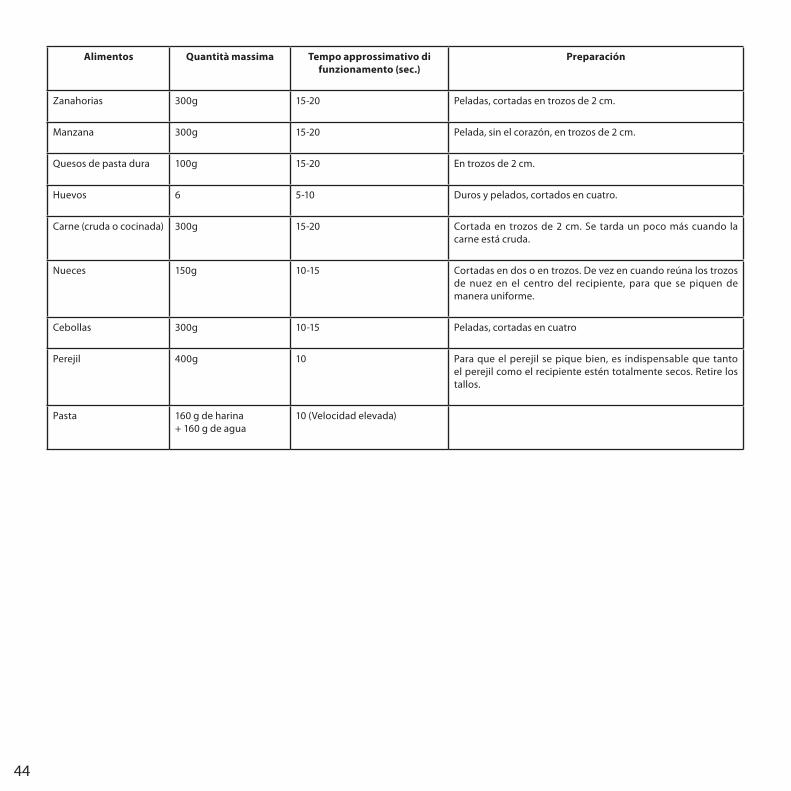
44
Alimentos Quantità massima Tempo approssimativo di funzionamento (sec.)
Preparación
Zanahorias 300g 15-20 Peladas, cortadas en trozos de 2 cm.
manzana 300g 15-20 Pelada, sin el corazón, en trozos de 2 cm.
quesos de pasta dura 100g 15-20 en trozos de 2 cm.
Huevos 6 5-10 Duros y pelados, cortados en cuatro.
Carne (cruda o cocinada) 300g 15-20 Cortada en trozos de 2 cm. Se tarda un poco más cuando la carne está cruda.
Nueces 150g 10-15 Cortadas en dos o en trozos. De vez en cuando reúna los trozos de nuez en el centro del recipiente, para que se piquen de manera uniforme.
Cebollas 300g 10-15 Peladas, cortadas en cuatro
Perejil 400g 10 Para que el perejil se pique bien, es indispensable que tanto el perejil como el recipiente estén totalmente secos. retire los tallos.
Pasta 160 g de harina+ 160 g de agua
10 (Velocidad elevada)
45
5. SUGereNCiaS De LoS CHeFS
• No sumerja nunca el cuerpo en agua ni en ningún líquido.• El brazo nunca debe estar sumergido totalmente, debe dejar un
espacio de unos 2,5 cm debajo del cuerpo.• Cuando utilice la batidora sobre una superficie antiadherente,
tenga cuidado de no estropear el revestimiento con la batidora.• Corte la mayor parte de los alimentos sólidos en cubos de 2,5
cm, para poder batirlos más fácilmente.• También puede echar los alimentos líquidos en el vaso
dosificador • Para evitar salpicaduras, tenga cuidado de que la base del pie
siempre esté sumergida mientras funciona el aparato.• No deje la batidora sumergida en una batidora colocada al
fuego.• No coloque trozos de fruta dura, hueso o cualquier otro material
duro junto con los alimentos que vaya a batir. Podrían dañarse las cuchillas.
• El nivel de la preparación aumentará mientras bate la mezcla, lo que deberá tener en cuenta al calcular la cantidad de líquido.
• El hecho de añadir líquidos calientes acelera la mezcla de los sólidos con los líquidos.
• Para las recetas que necesiten hielo, utilice hielo picado para obtener resultados óptimos.
• Realice ligeros movimientos de arriba abajo para mezclar e incorporar los ingredientes de manera homogénea.
• La batidora también puede servirle para crear espuma en la leche de su capuchino.
• Utilice también la batidora para ligar las salsas de carne.• Para obtener un resultado óptimo cuando añade apio a una
salsa, utilice un cuchillo para retirar las fibras duras del apio antes de picarlo.
• Esta batidora no sirve para preparar masa.
6. LimPieZa Y maNTeNimieNTo
Limpie siempre cuidadosamente el cuerpo y el pie de la batidora después de cada uso.No sumerja nunca el cuerpo en agua ni en ningún líquido.• Desenchufe la batidora• Separe el pie y el cuerpo.• Limpie el cuerpo con ayuda de una esponja o trapo húmedo.
No utilice productos limpiadores abrasivos que pudieran rayar la superficie.
• Limpie el brazo con agua caliente y detergente suave. Trabaje con precaución, las cuchillas están muy afiladas y pueden causar heridas.
• Limpie el vaso dosificador en agua caliente jabonosa o en el lavavajillas.

46

47

IB-12/468A
![P]ZYX]MNT T^ 0 I...Tu n’es pas coupable d’avoir été frappée, d’avoir été violée, menacée, mal traitée. Tu ’es pas coupable d’avoir été manipulée, abusée, trahie](https://img.pdfslide.fr/doc/110x75/5fc4094583047a42527691e5/pzyxmnt-t-0-i-tu-naes-pas-coupable-daavoir-t-frappe-daavoir.jpg)