Embed Size (px)
Citation preview
1
GB
I
E
D
F
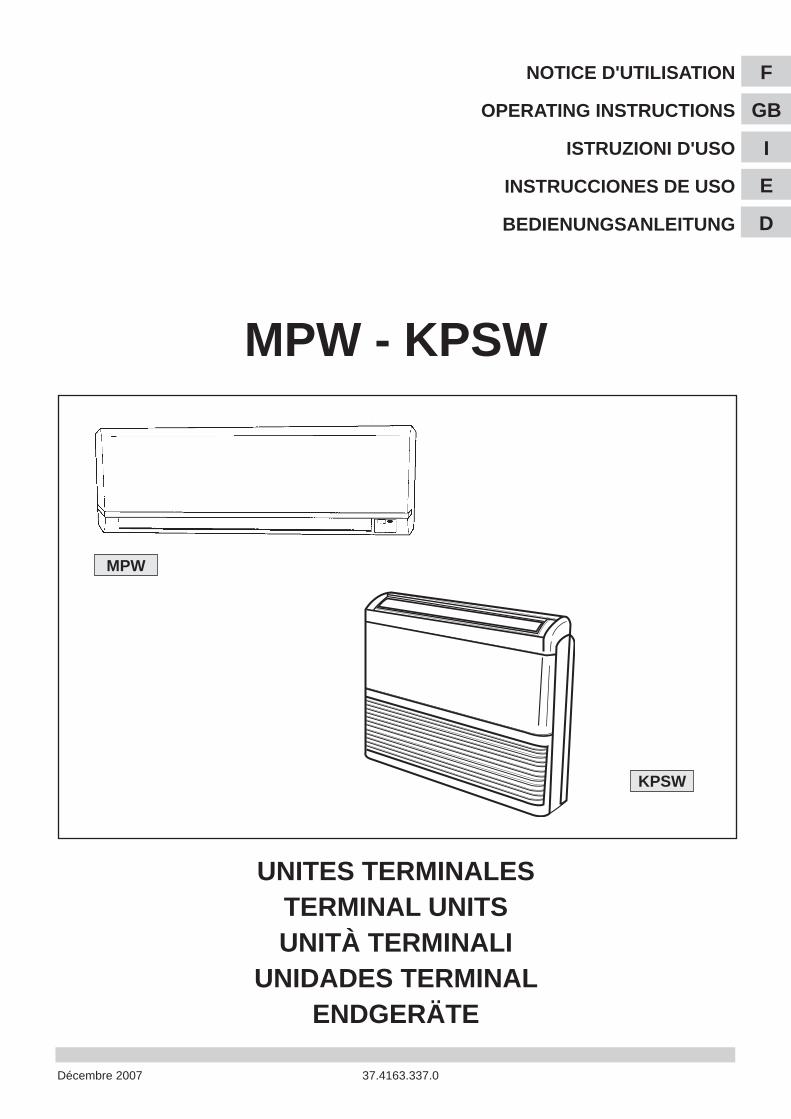
Décembre 2007
NOTICE D'UTILISATION
OPERATING INSTRUCTIONS
ISTRUZIONI D'USO
INSTRUCCIONES DE USO
BEDIENUNGSANLEITUNG
MPW - KPSW
UNITES TERMINALESTERMINAL UNITSUNITÀ TERMINALI
UNIDADES TERMINALENDGERÄTE
KPSW
MPW
37.4163.337.0
2
F
GB
I
E
D
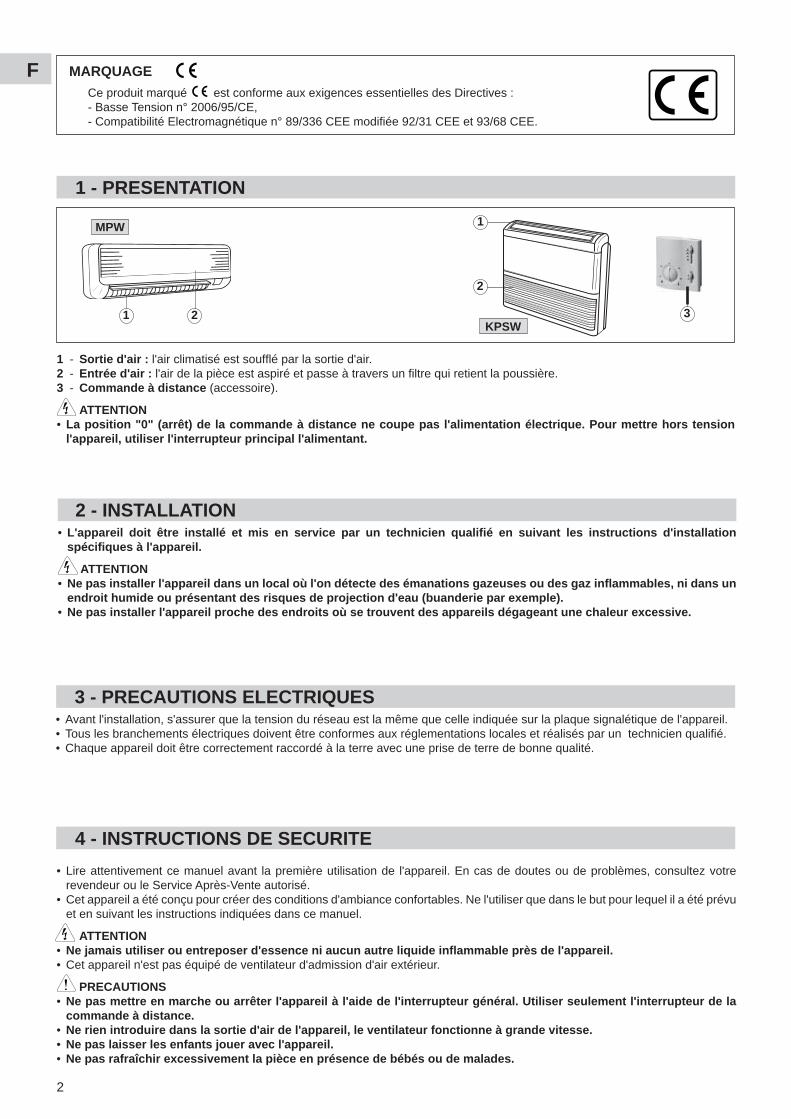
MARQUAGE
Ce produit marqué est conforme aux exigences essentielles des Directives : - Basse Tension n° 2006/95/CE, - Compatibilité Electromagnétique n° 89/336 CEE modifi ée 92/31 CEE et 93/68 CEE.
1 - PRESENTATION
1 - Sortie d'air : l'air climatisé est souffl é par la sortie d'air.2 - Entrée d'air : l'air de la pièce est aspiré et passe à travers un fi ltre qui retient la poussière.3 - Commande à distance (accessoire).
ATTENTION• La position "0" (arrêt) de la commande à distance ne coupe pas l'alimentation électrique. Pour mettre hors tension
l'appareil, utiliser l'interrupteur principal l'alimentant.
2 - INSTALLATION• L'appareil doit être installé et mis en service par un technicien qualifi é en suivant les instructions d'installation
spécifi ques à l'appareil.
ATTENTION• Ne pas installer l'appareil dans un local où l'on détecte des émanations gazeuses ou des gaz infl ammables, ni dans un
endroit humide ou présentant des risques de projection d'eau (buanderie par exemple).• Ne pas installer l'appareil proche des endroits où se trouvent des appareils dégageant une chaleur excessive.
3 - PRECAUTIONS ELECTRIQUES• Avant l'installation, s'assurer que la tension du réseau est la même que celle indiquée sur la plaque signalétique de l'appareil.• Tous les branchements électriques doivent être conformes aux réglementations locales et réalisés par un technicien qualifi é.• Chaque appareil doit être correctement raccordé à la terre avec une prise de terre de bonne qualité.
4 - INSTRUCTIONS DE SECURITE
• Lire attentivement ce manuel avant la première utilisation de l'appareil. En cas de doutes ou de problèmes, consultez votre revendeur ou le Service Après-Vente autorisé.
• Cet appareil a été conçu pour créer des conditions d'ambiance confortables. Ne l'utiliser que dans le but pour lequel il a été prévu et en suivant les instructions indiquées dans ce manuel.
ATTENTION• Ne jamais utiliser ou entreposer d'essence ni aucun autre liquide infl ammable près de l'appareil.• Cet appareil n'est pas équipé de ventilateur d'admission d'air extérieur.
PRECAUTIONS• Ne pas mettre en marche ou arrêter l'appareil à l'aide de l'interrupteur général. Utiliser seulement l'interrupteur de la
commande à distance. • Ne rien introduire dans la sortie d'air de l'appareil, le ventilateur fonctionne à grande vitesse.• Ne pas laisser les enfants jouer avec l'appareil.• Ne pas rafraîchir excessivement la pièce en présence de bébés ou de malades.
1 2
1
2
3
MPW
KPSW
3
GB
I
E
D
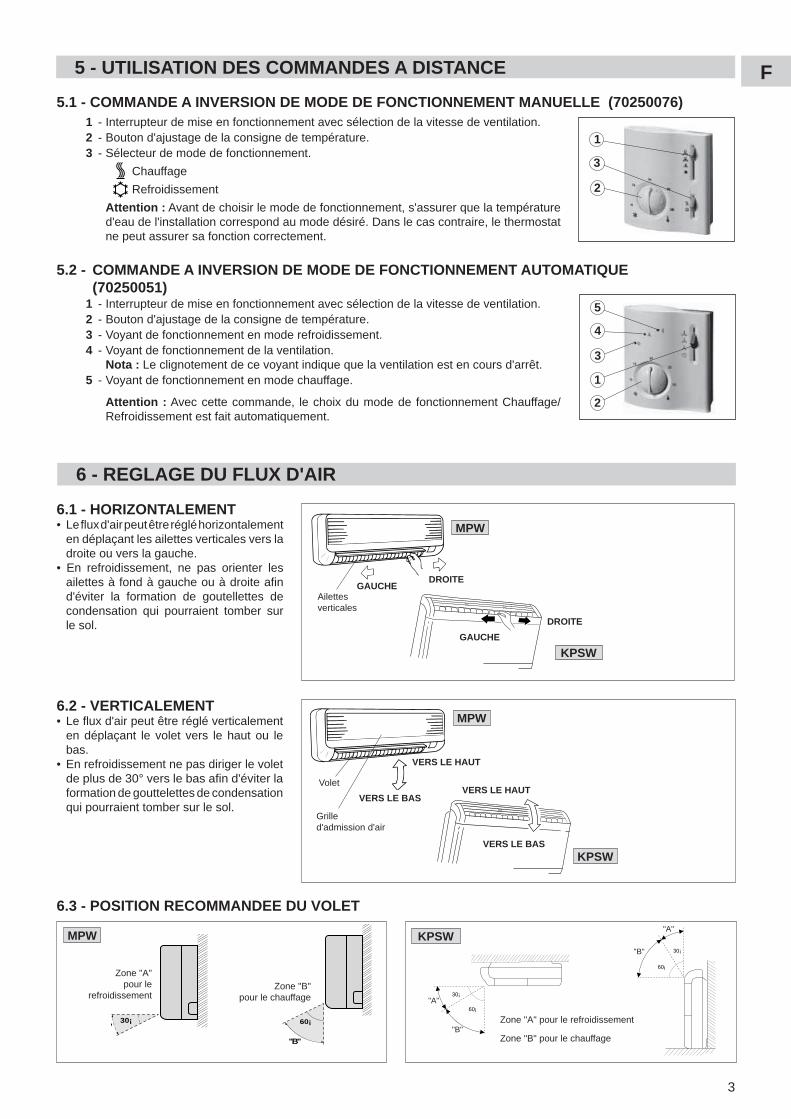
F 5 - UTILISATION DES COMMANDES A DISTANCE
5.1 - COMMANDE A INVERSION DE MODE DE FONCTIONNEMENT MANUELLE (70250076)
1
3
2
5
4
3
1
2
1 - Interrupteur de mise en fonctionnement avec sélection de la vitesse de ventilation. 2 - Bouton d'ajustage de la consigne de température. 3 - Sélecteur de mode de fonctionnement.
Chauffage
Refroidissement
Attention : Avant de choisir le mode de fonctionnement, s'assurer que la température d'eau de l'installation correspond au mode désiré. Dans le cas contraire, le thermostat ne peut assurer sa fonction correctement.
5.2 - COMMANDE A INVERSION DE MODE DE FONCTIONNEMENT AUTOMATIQUE (70250051) 1 - Interrupteur de mise en fonctionnement avec sélection de la vitesse de ventilation. 2 - Bouton d'ajustage de la consigne de température. 3 - Voyant de fonctionnement en mode refroidissement. 4 - Voyant de fonctionnement de la ventilation. Nota : Le clignotement de ce voyant indique que la ventilation est en cours d'arrêt. 5 - Voyant de fonctionnement en mode chauffage.
Attention : Avec cette commande, le choix du mode de fonctionnement Chauffage/Refroidissement est fait automatiquement.
6 - REGLAGE DU FLUX D'AIR
6.1 - HORIZONTALEMENT• Le fl ux d'air peut être réglé horizontalement
en déplaçant les ailettes verticales vers la droite ou vers la gauche.
• En refroidissement, ne pas orienter les ailettes à fond à gauche ou à droite afi n d'éviter la formation de goutellettes de condensation qui pourraient tomber sur le sol.
DROITEGAUCHE
Ailettes verticales
MPW
DROITE
GAUCHE
KPSW
6.2 - VERTICALEMENT• Le fl ux d'air peut être réglé verticalement
en déplaçant le volet vers le haut ou le bas.
• En refroidissement ne pas diriger le volet de plus de 30° vers le bas afi n d'éviter la formation de gouttelettes de condensation qui pourraient tomber sur le sol.
MPW
VERS LE HAUT
Grille d'admission d'air
VERS LE BAS
VoletVERS LE HAUT
VERS LE BASKPSW
6.3 - POSITION RECOMMANDEE DU VOLET
30¡A"
60¡
"B"
Zone "A"pour le
refroidissementZone "B"
pour le chauffage
KPSW
30¡
60¡
30¡
60¡
"B"
"A"
"B"
"A"
Zone "A" pour le refroidissement
Zone "B" pour le chauffage
MPW
4
F
GB
I
E
D Quand on nettoie la grille, faire attention de ne pas modifi er la
position des ailettes en frottant.
PRECAUTIONS• Ne jamais utiliser de dissolvants ni de produits chimiques
puissants. Ne pas nettoyer avec de l'eau très chaude.• Certains bords métalliques et les ailettes de l'échangeur étant
coupants, ils doivent être manipulés avec précaution lors du nettoyage pour éviter les blessures.
• L'échangeur et les autres composants de l'appareil nécessitent un entretien spécifi que régulier réalisé par un technicien qualifi é. Consulter le Service Après-Vente.
En cas de problème d'écoulement des condensats arrêter l'appareil (interrupteur de la commande à distance sur "0").
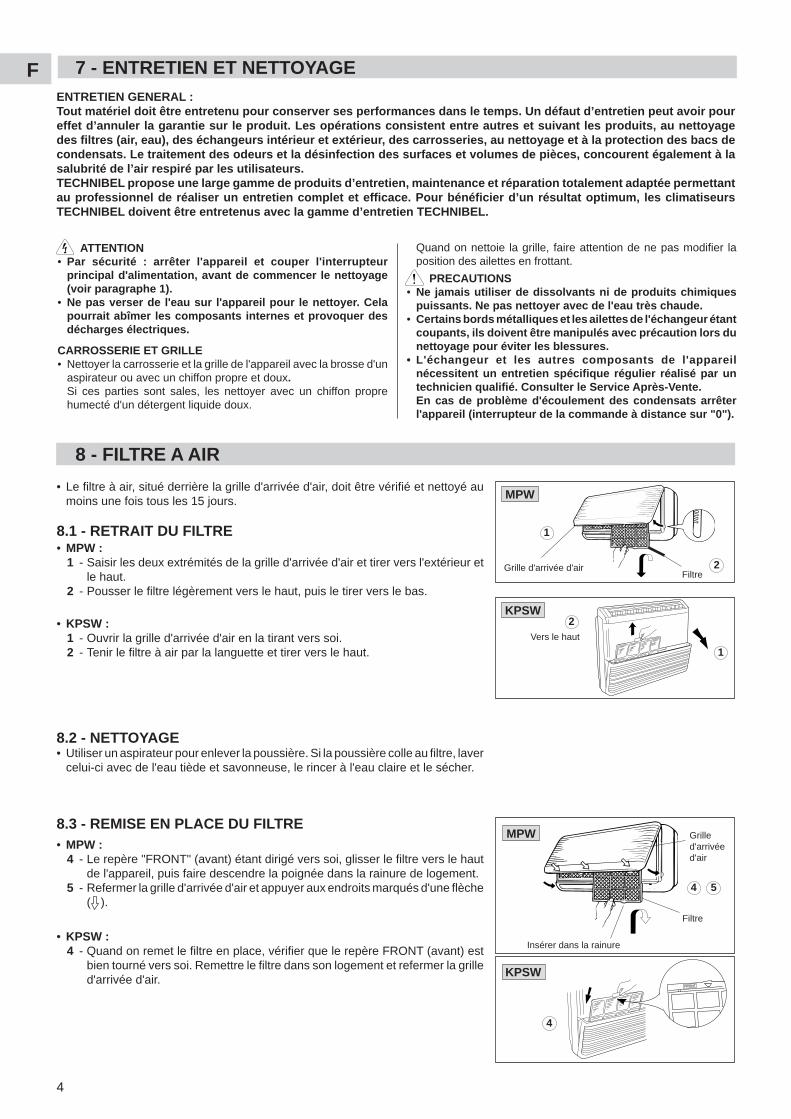
7 - ENTRETIEN ET NETTOYAGE
ATTENTION• Par sécurité : arrêter l'appareil et couper l'interrupteur
principal d'alimentation, avant de commencer le nettoyage (voir paragraphe 1).
• Ne pas verser de l'eau sur l'appareil pour le nettoyer. Cela pourrait abîmer les composants internes et provoquer des décharges électriques.
CARROSSERIE ET GRILLE• Nettoyer la carrosserie et la grille de l'appareil avec la brosse d'un
aspirateur ou avec un chiffon propre et doux. Si ces parties sont sales, les nettoyer avec un chiffon propre
humecté d'un détergent liquide doux.
8 - FILTRE A AIR
8.1 - RETRAIT DU FILTRE• MPW : 1 - Saisir les deux extrémités de la grille d'arrivée d'air et tirer vers l'extérieur et
le haut. 2 - Pousser le fi ltre légèrement vers le haut, puis le tirer vers le bas.
• KPSW : 1 - Ouvrir la grille d'arrivée d'air en la tirant vers soi. 2 - Tenir le fi ltre à air par la languette et tirer vers le haut.
Grille d'arrivée d'airFiltre
MPW
1
2
8.2 - NETTOYAGE• Utiliser un aspirateur pour enlever la poussière. Si la poussière colle au fi ltre, laver
celui-ci avec de l'eau tiède et savonneuse, le rincer à l'eau claire et le sécher.
Grille d'arrivéed'air
Filtre
Insérer dans la rainure
4 5
8.3 - REMISE EN PLACE DU FILTRE• MPW : 4 - Le repère "FRONT" (avant) étant dirigé vers soi, glisser le fi ltre vers le haut
de l'appareil, puis faire descendre la poignée dans la rainure de logement. 5 - Refermer la grille d'arrivée d'air et appuyer aux endroits marqués d'une fl èche
( ).
• KPSW : 4 - Quand on remet le fi ltre en place, vérifi er que le repère FRONT (avant) est
bien tourné vers soi. Remettre le fi ltre dans son logement et refermer la grille d'arrivée d'air.
MPW
KPSWFRONT
4
• Le fi ltre à air, situé derrière la grille d'arrivée d'air, doit être vérifi é et nettoyé au moins une fois tous les 15 jours.
ENTRETIEN GENERAL :Tout matériel doit être entretenu pour conserver ses performances dans le temps. Un défaut d’entretien peut avoir pour effet d’annuler la garantie sur le produit. Les opérations consistent entre autres et suivant les produits, au nettoyage des fi ltres (air, eau), des échangeurs intérieur et extérieur, des carrosseries, au nettoyage et à la protection des bacs de condensats. Le traitement des odeurs et la désinfection des surfaces et volumes de pièces, concourent également à la salubrité de l’air respiré par les utilisateurs.TECHNIBEL propose une large gamme de produits d’entretien, maintenance et réparation totalement adaptée permettant au professionnel de réaliser un entretien complet et effi cace. Pour bénéfi cier d’un résultat optimum, les climatiseurs TECHNIBEL doivent être entretenus avec la gamme d’entretien TECHNIBEL.
KPSW
Vers le haut
1
2
5
GB
I
E
D
FFILTRE A AIR A CHARBON ACTIF (accessoire sur demande)• Le fi ltre doit être monté en plus du fi ltre standard.• Il est formé de deux couches : - la première fonctionne comme fi ltre à haute effi cacité et il retient aussi les petites particules dans l'air, - la deuxième couche est formée de charbon actif qui purifi e l'air des odeurs.
Mise en place du fi ltre à air à charbon actif.
Ressort
Côté arrière fi ltre standard
Filtre à haute éffi cacité avec du charbon actif
MPW
KPSW
• MPW 1 - Ouvrir la grille d'arrivée d'air et enlever les 2 fi ltres qui sont
fournis avec l'unité. 2 - Placer les 2 fi ltres à charbon actif dans la position indiquée
ci contre (indication "FRONT" devant). 3 - Remettre les 2 fi ltres dans leur logement et refermer la
grille.
• KPSW 1 - Ouvrir la grille d'arrivée d'air et extraire le fi ltre qui est fourni
avec l'unité. 2 - Monter les ressorts fournis sur le côté arrière du fi ltre
standard. 3 - Monter sur chaque fi ltre son fi ltre à haute effi cacité; il est
arrêté par le ressort. 4 - Placer le double-fi ltre dans ses glissières et fermer la grille
d'arrivée d'air.
Filtre à charbon actif
9 - CONSEILS POUR LE CONFORT ET L'ECONOMIE DE L'ENERGIE
EVITER :• D'obstruer les grilles d'arrivée et de sortie d'air de l'appareil. Si
elles sont bouchées, l'appareil ne fonctionnera pas de façon satisfaisante et risque d'être endommagé.
• De laisser le soleil pénétrer directement dans la pièce lorsque l'appareil fonctionne en mode "climatisation". Utiliser des persiennes ou des rideaux.
VERIFIER :• Que le fi ltre soit toujours propre. Un fi ltre colmaté amoindrira
les performances de l'appareil.• Que toutes les portes, fenêtres et autres ouvertures soient
fermées pour éviter des infi ltrations d'air non réfrigéré lorsque l'appareil fonctionne en mode "refroidissement".
L'appareil ne fonctionne pas du tout (la ventilation ne démarre jamais).
Refroidissement ou chauffage insuffi sants.
Pour les install lat ions pouvant fonctionner en mode refroidissement ou chauffage :refroidissement ou chauffage excessif ou inexistant.
1 - Coupure de courant.2 - Disjoncteur ou fusible coupé.3 - Tension de ligne trop basse.4 - Le sélecteur est positionné sur "0"
(arrêt).5 - La température de consigne est réglée
trop haut pour le refroidissement ou trop bas pour le chauffage.
1 - Filtre à air sale ou obstrué.2 - Source de chaleur importante ou trop de
monde dans la pièce.3 - Portes et/ou fenêtres ouvertes.
4 - Obstacle devant l'arrivée ou la sortie de l'air.
5 - La température de consigne est réglée trop haut pour le refroidissement ou trop bas pour le chauffage.
6 - Le générateur d'eau froide ou d'eau chaude de l'installation fonctionne mal ou pas du tout.
1 - Le mode de fonctionnement (Chauffage ou refroidissement) du thermostat est inadapté.
2 - Le générateur d'eau froide ou d'eau chaude de l'installation fonctionne mal.
1 - Rétablir l'alimentation.2 - Prendre contact avec le Service Après-
Vente.3 - Consulter votre électricien.4 - Manœuvrer le sélecteur.5 - Régler la température plus basse (ou plus
haute).
1 - Nettoyer le fi ltre à air.2 - Si possible, éliminer la source de
chaleur.3 - Les fermer pour empêcher la pénétration
d'air extérieur.4 - Retirer l'obstacle pour assurer une bonne
circulation d'air.5 - Régler la température plus basse (ou plus
haute).
6 - Vérifi er le fonctionnement du générateur. Prendre contact avec le Service Après-Vente.
1 - Vérifi er la sélection du mode.
2 - Vérifi er le fonctionnement du générateur. Prendre contact avec le service Après-Vente.
PANNES CAUSES POSSIBLES REMEDES
10 - GUIDE DE DEPANNAGE
• Si l'appareil ne fonctionne pas correctement, effectuer les verifi cations suivantes avant d'appeler le Service Après-Vente.• Si le problème persiste, prendre contact avec le Service Après-Vente.
2
F
GB
I
E
D
MARKING
This product marked conforms to the essential requirements of European Directives: - Low voltage no. 2006/95/CE, - Electromagnetic Compatibility no. 89/336 EEC, modifi ed 92/31 and 93/68 EEC.
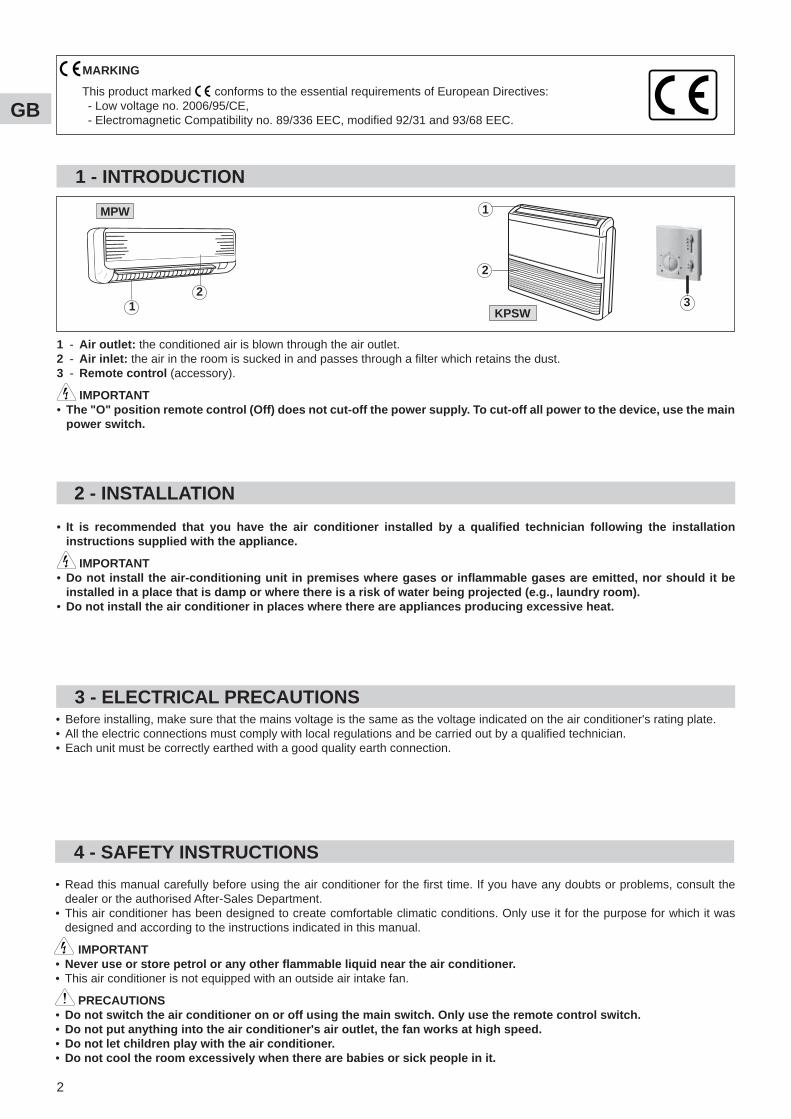
1 - INTRODUCTION
1 - Air outlet: the conditioned air is blown through the air outlet.2 - Air inlet: the air in the room is sucked in and passes through a fi lter which retains the dust.3 - Remote control (accessory).
IMPORTANT• The "O" position remote control (Off) does not cut-off the power supply. To cut-off all power to the device, use the main
power switch.
2 - INSTALLATION
• It is recommended that you have the air conditioner installed by a qualifi ed technician following the installation instructions supplied with the appliance.
IMPORTANT• Do not install the air-conditioning unit in premises where gases or infl ammable gases are emitted, nor should it be
installed in a place that is damp or where there is a risk of water being projected (e.g., laundry room).• Do not install the air conditioner in places where there are appliances producing excessive heat.
3 - ELECTRICAL PRECAUTIONS• Before installing, make sure that the mains voltage is the same as the voltage indicated on the air conditioner's rating plate.• All the electric connections must comply with local regulations and be carried out by a qualifi ed technician.• Each unit must be correctly earthed with a good quality earth connection.
4 - SAFETY INSTRUCTIONS
• Read this manual carefully before using the air conditioner for the fi rst time. If you have any doubts or problems, consult the dealer or the authorised After-Sales Department.
• This air conditioner has been designed to create comfortable climatic conditions. Only use it for the purpose for which it was designed and according to the instructions indicated in this manual.
IMPORTANT• Never use or store petrol or any other fl ammable liquid near the air conditioner.• This air conditioner is not equipped with an outside air intake fan.
PRECAUTIONS• Do not switch the air conditioner on or off using the main switch. Only use the remote control switch. • Do not put anything into the air conditioner's air outlet, the fan works at high speed.• Do not let children play with the air conditioner.• Do not cool the room excessively when there are babies or sick people in it.
32
1
2
1
MPW
KPSW
3
GB
I
E
D
F
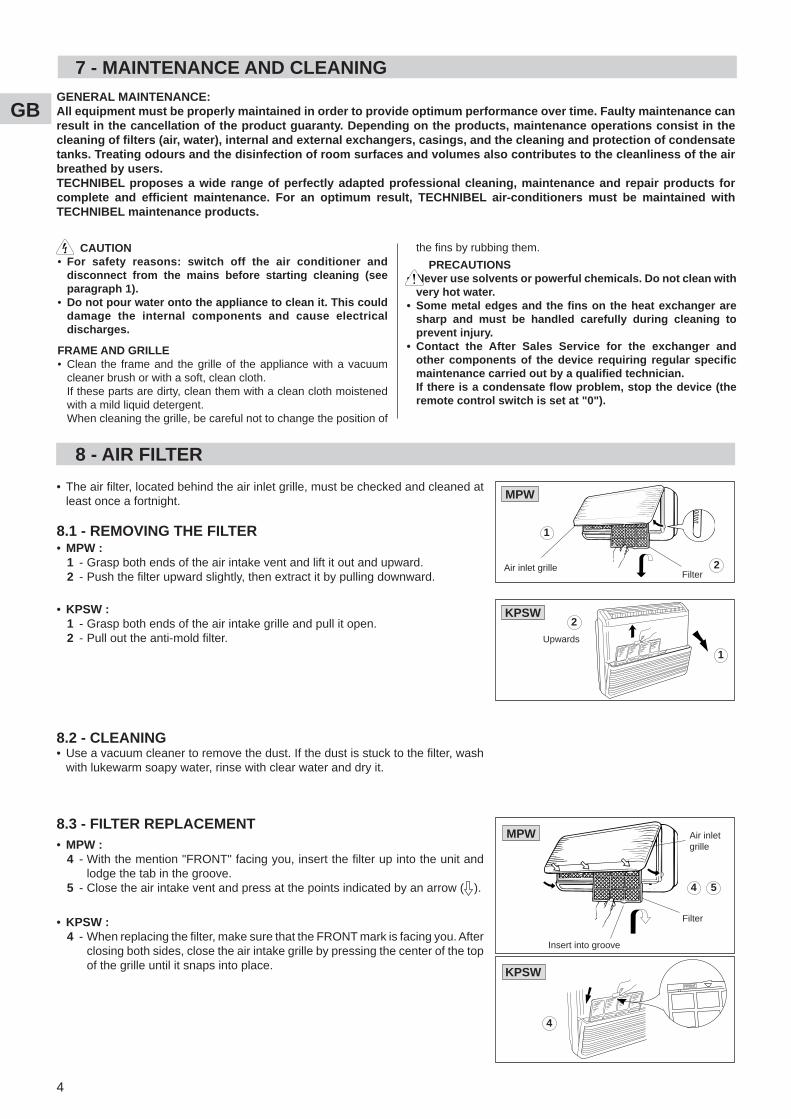
6 - ADJUSTING THE AIR FLOW
6.1 - HORIZONTALLY• The air fl ow can be adjusted horizontally
by moving the vertical fi ns to the right or to the left.
• In cooling operation, do not turn the fi ns completely to the left or right. Doing so may cause condensation to form which could fall to the fl oor.
RIGHTLEFT
Vertical fi ns
MPW
RIGHT
LEFT
6.2 - VERTICALLY• The fl ow of air can be regulated by moving
the fl ap upwards or downwards.• In cooling mode, do not direct the damper
downwards more than 30° so as to avoid the formation of droplets of condensation which could fall on the fl oor.
UPWARDS
Air inlet grilles
DOWNWARDS
DamperUPWARDS
DOWNWARDS
6.3 - RECOMMENDED POSITION FOR THE DAMPER
30¡A"
60¡
"B"
Area "A"for cooling Area "B"
for heating 30¡
60¡
30¡
60¡
"B"
"A"
"B"
"A"
Area "A" for cooling
Area "B" for heating
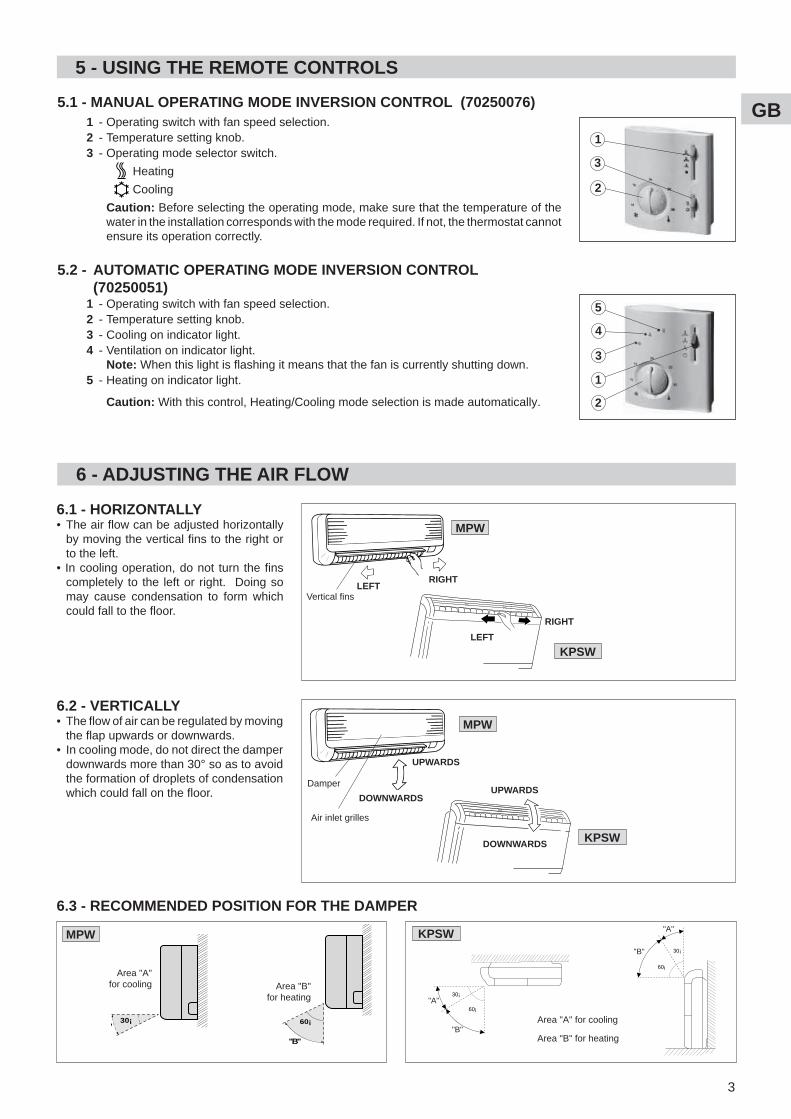
5 - USING THE REMOTE CONTROLS
5.1 - MANUAL OPERATING MODE INVERSION CONTROL (70250076)
1
3
2
5
4
3
1
2
1 - Operating switch with fan speed selection. 2 - Temperature setting knob. 3 - Operating mode selector switch.
Heating
Cooling
Caution: Before selecting the operating mode, make sure that the temperature of the water in the installation corresponds with the mode required. If not, the thermostat cannot ensure its operation correctly.
5.2 - AUTOMATIC OPERATING MODE INVERSION CONTROL (70250051) 1 - Operating switch with fan speed selection. 2 - Temperature setting knob. 3 - Cooling on indicator light. 4 - Ventilation on indicator light. Note: When this light is fl ashing it means that the fan is currently shutting down. 5 - Heating on indicator light.
Caution: With this control, Heating/Cooling mode selection is made automatically.
KPSW
MPW
KPSW
KPSWMPW
4
F
GB
I
E
Dthe fi ns by rubbing them.
PRECAUTIONS• Never use solvents or powerful chemicals. Do not clean with
very hot water.• Some metal edges and the fi ns on the heat exchanger are
sharp and must be handled carefully during cleaning to prevent injury.
• Contact the After Sales Service for the exchanger and other components of the device requiring regular specifi c maintenance carried out by a qualifi ed technician.
If there is a condensate fl ow problem, stop the device (the remote control switch is set at "0").
7 - MAINTENANCE AND CLEANING
CAUTION• For safety reasons: switch off the air conditioner and
disconnect from the mains before starting cleaning (see paragraph 1).
• Do not pour water onto the appliance to clean it. This could damage the internal components and cause electrical discharges.
FRAME AND GRILLE• Clean the frame and the grille of the appliance with a vacuum
cleaner brush or with a soft, clean cloth. If these parts are dirty, clean them with a clean cloth moistened
with a mild liquid detergent. When cleaning the grille, be careful not to change the position of
8 - AIR FILTER
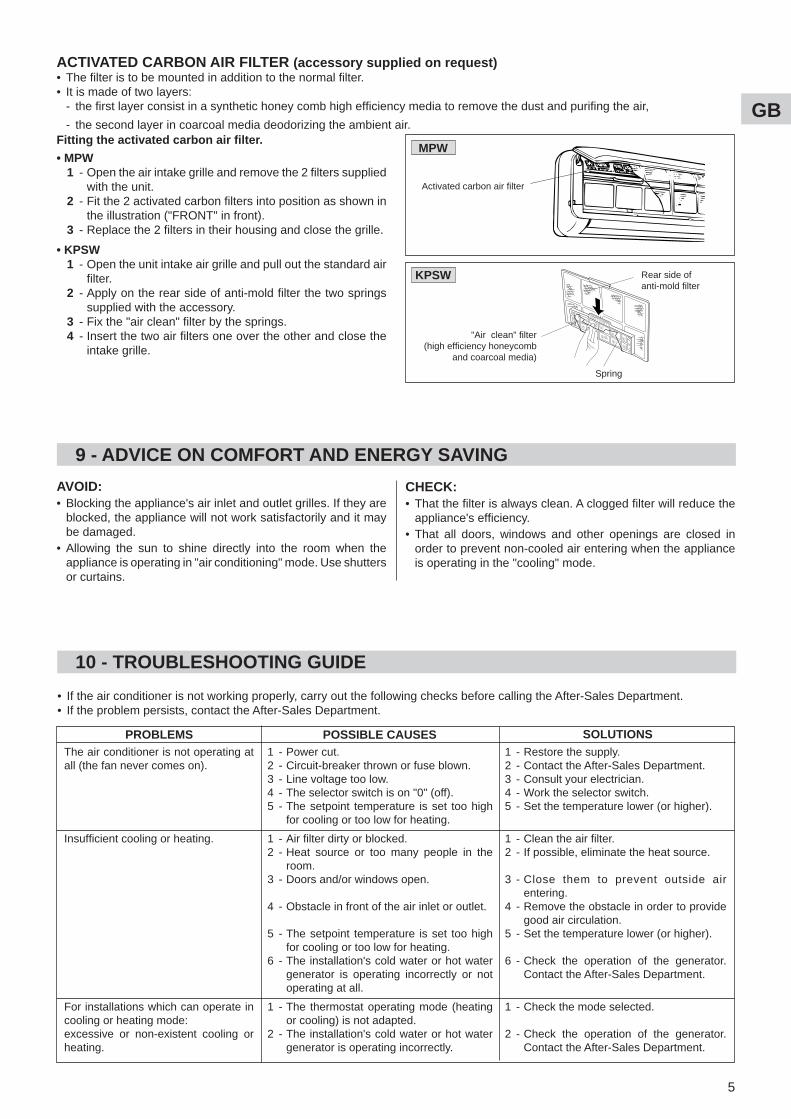
8.1 - REMOVING THE FILTER• MPW : 1 - Grasp both ends of the air intake vent and lift it out and upward. 2 - Push the fi lter upward slightly, then extract it by pulling downward.
• KPSW : 1 - Grasp both ends of the air intake grille and pull it open. 2 - Pull out the anti-mold fi lter.
Air inlet grille
MPW
1
KPSW
Upwards
2
1
8.2 - CLEANING• Use a vacuum cleaner to remove the dust. If the dust is stuck to the fi lter, wash
with lukewarm soapy water, rinse with clear water and dry it.
Air inlet grille
Filter
Insert into groove
4 5
8.3 - FILTER REPLACEMENT• MPW : 4 - With the mention "FRONT" facing you, insert the fi lter up into the unit and
lodge the tab in the groove. 5 - Close the air intake vent and press at the points indicated by an arrow ( ).
• KPSW : 4 - When replacing the fi lter, make sure that the FRONT mark is facing you. After
closing both sides, close the air intake grille by pressing the center of the top of the grille until it snaps into place.
MPW
KPSWFRONT
4
• The air fi lter, located behind the air inlet grille, must be checked and cleaned at least once a fortnight.
GENERAL MAINTENANCE:All equipment must be properly maintained in order to provide optimum performance over time. Faulty maintenance can result in the cancellation of the product guaranty. Depending on the products, maintenance operations consist in the cleaning of fi lters (air, water), internal and external exchangers, casings, and the cleaning and protection of condensate tanks. Treating odours and the disinfection of room surfaces and volumes also contributes to the cleanliness of the air breathed by users.TECHNIBEL proposes a wide range of perfectly adapted professional cleaning, maintenance and repair products for complete and effi cient maintenance. For an optimum result, TECHNIBEL air-conditioners must be maintained with TECHNIBEL maintenance products.
Filter2
5
GB
I
E
D
FACTIVATED CARBON AIR FILTER (accessory supplied on request)• The fi lter is to be mounted in addition to the normal fi lter.• It is made of two layers: - the fi rst layer consist in a synthetic honey comb high effi ciency media to remove the dust and purifi ng the air,
- the second layer in coarcoal media deodorizing the ambient air.
Spring
Rear side ofanti-mold fi lter
"Air clean" fi lter (high effi ciency honeycomb
and coarcoal media)
MPW
KPSW
Fitting the activated carbon air fi lter.
• MPW 1 - Open the air intake grille and remove the 2 fi lters supplied
with the unit. 2 - Fit the 2 activated carbon fi lters into position as shown in
the illustration ("FRONT" in front). 3 - Replace the 2 fi lters in their housing and close the grille.
• KPSW 1 - Open the unit intake air grille and pull out the standard air
fi lter. 2 - Apply on the rear side of anti-mold fi lter the two springs
supplied with the accessory. 3 - Fix the "air clean" fi lter by the springs. 4 - Insert the two air fi lters one over the other and close the
intake grille.
Activated carbon air fi lter
9 - ADVICE ON COMFORT AND ENERGY SAVING
AVOID:• Blocking the appliance's air inlet and outlet grilles. If they are
blocked, the appliance will not work satisfactorily and it may be damaged.
• Allowing the sun to shine directly into the room when the appliance is operating in "air conditioning" mode. Use shutters or curtains.
CHECK:• That the fi lter is always clean. A clogged fi lter will reduce the
appliance's effi ciency.• That all doors, windows and other openings are closed in
order to prevent non-cooled air entering when the appliance is operating in the "cooling" mode.
The air conditioner is not operating at all (the fan never comes on).
Insuffi cient cooling or heating.
For installations which can operate in cooling or heating mode:excessive or non-existent cooling or heating.
1 - Power cut.2 - Circuit-breaker thrown or fuse blown.3 - Line voltage too low.4 - The selector switch is on "0" (off).5 - The setpoint temperature is set too high
for cooling or too low for heating.
1 - Air fi lter dirty or blocked.2 - Heat source or too many people in the
room.3 - Doors and/or windows open.
4 - Obstacle in front of the air inlet or outlet.
5 - The setpoint temperature is set too high for cooling or too low for heating.
6 - The installation's cold water or hot water generator is operating incorrectly or not operating at all.
1 - The thermostat operating mode (heating or cooling) is not adapted.
2 - The installation's cold water or hot water generator is operating incorrectly.
1 - Restore the supply.2 - Contact the After-Sales Department.3 - Consult your electrician.4 - Work the selector switch.5 - Set the temperature lower (or higher).
1 - Clean the air fi lter.2 - If possible, eliminate the heat source.
3 - Close them to prevent outside air entering.
4 - Remove the obstacle in order to provide good air circulation.
5 - Set the temperature lower (or higher).
6 - Check the operation of the generator. Contact the After-Sales Department.
1 - Check the mode selected.
2 - Check the operation of the generator. Contact the After-Sales Department.
PROBLEMS POSSIBLE CAUSES SOLUTIONS
10 - TROUBLESHOOTING GUIDE
• If the air conditioner is not working properly, carry out the following checks before calling the After-Sales Department.• If the problem persists, contact the After-Sales Department.
2
F
GB
I
E
D
MARCATURA
Questo prodotto marcato é conforme ai requisiti essenziali delle Direttive : - Bassa Tensione n. 2006/95/CE, - Compatibilità Elettromagnetica n. 89/336 CEE modifi cata 92/31 CEE e 93/68 CEE.
1 - PRESENTAZIONE
1 - Uscita d'aria : l'aria climatizzata viene soffi ata attraverso l'uscita d'aria.2 - Entrata d'aria : l'aria della stanza viene aspirata e passa attraverso un fi ltro che trattiene la polvere.3 - Comando a distanza (accessorio).
ATTENZIONE• La posizione "0" (arresto) del comando a distanza non comporta l'interruzione dell'alimentazione elettrica. Per isolare
completamente l'apparecchio, utilizzare l'interruttore di alimentazione principale.
2 - INSTALLAZIONE• Si raccomanda di far installare il condizionatore da un tecnico qualifi cato e di seguire le istruzioni fornite insieme
all'apparecchio.
ATTENZIONE• Non installare il condizionatore in locali in cui sia stata verifi cata la presenza di sostanze gassose o di gas infi ammabili,
né in locali umidi e in cui c'è il rischio di proiezioni d'acqua (ad esempio lavanderie).• Non installare il condizionatore in luoghi in cui si trovano apparecchi che sprigionano un calore eccessivo.
3 - PRECAUZIONI ELETTRICHE• Prima di procedere all'installazione, assicurarsi che la tensione di rete corrisponda a quella indicata sulla piastrina segnaletica
del condizionatore.• I collegamenti elettrici devono essere conformi alle norme locali vigenti ed essere effettuati da personale qualifi cato.• Ciascuna unità deve essere correttamente collegata al suolo con una presa di terra di buona qualità.
4 - ISTRUZIONI DI SICUREZZA• Leggere attentamente questo manuale prima di usare il condizionatore per la prima volta. Se dovessero sorgere dubbi o problemi,
consultare il proprio rivenditore o il Servizio Assistenza Clienti autorizzato.• Questo condizionatore è stato ideato per creare condizioni climatiche confortevoli. Esso deve essere utilizzato unicamente allo
scopo per cui è stato costruito, seguendo le istruzioni riportate nel manuale.
ATTENZIONE• Far attenzione a non usare mai, né a mettere vicino al condizionatore della benzina o qualsiasi altro liquido
infi ammabile.• Questo apparecchio non è dotato di un ventilatore di ammissione d'aria dall'esterno.
PRECAUZIONI• Per avviare o arrestare il climatizzatore non usare l'interruttore generale ma servirsi unicamente del pulsante del comando
a distanza. • Non introdurre alcun oggetto all'uscita d'aria del climatizzatore, il ventilatore funziona ad alta velocità.• Non lasciar giocare i bambini con il climatizzatore.• Non rinfrescare troppo la stanza in presenza di bambini piccoli o di persone malate.
2
1
2
31
MPW
KPSW
3
GB
I
E
D
F 5 - USO DEI COMANDI A DISTANZA
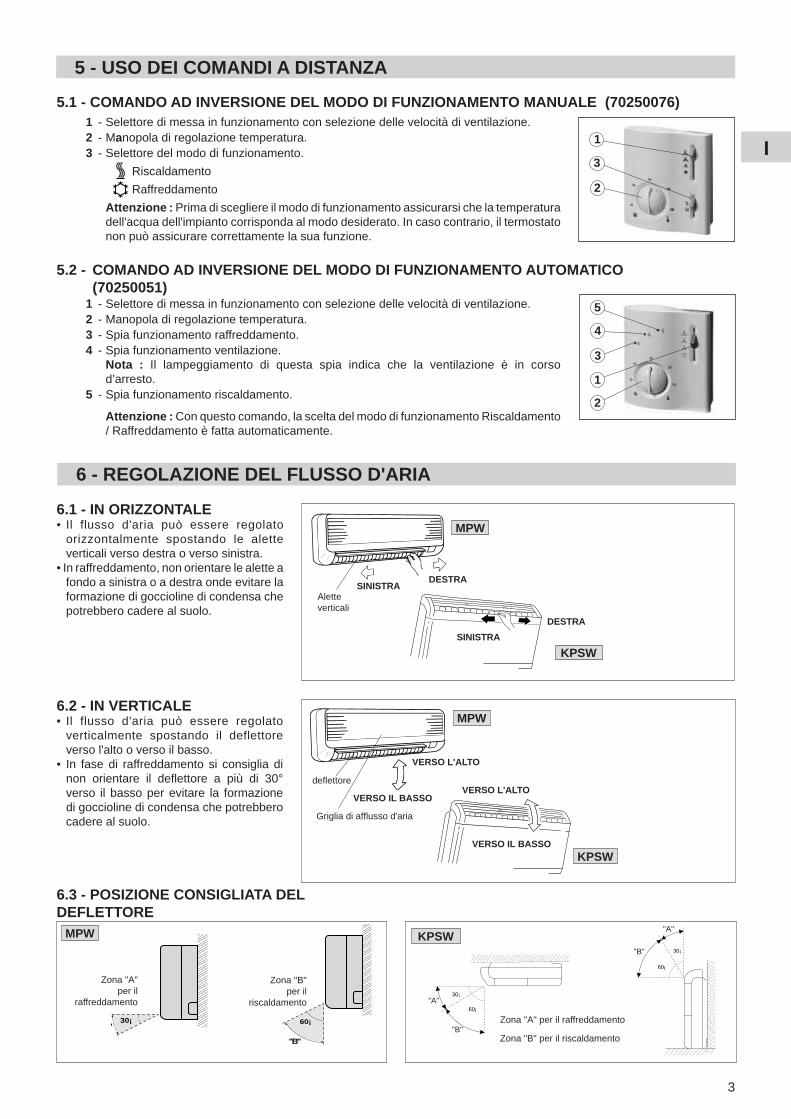
5.1 - COMANDO AD INVERSIONE DEL MODO DI FUNZIONAMENTO MANUALE (70250076)
1
3
2
5
4
3
1
2
1 - Selettore di messa in funzionamento con selezione delle velocità di ventilazione. 2 - Manopola di regolazione temperatura. 3 - Selettore del modo di funzionamento.
Riscaldamento
Raffreddamento
Attenzione : Prima di scegliere il modo di funzionamento assicurarsi che la temperatura dell'acqua dell'impianto corrisponda al modo desiderato. In caso contrario, il termostato non può assicurare correttamente la sua funzione.
5.2 - COMANDO AD INVERSIONE DEL MODO DI FUNZIONAMENTO AUTOMATICO (70250051) 1 - Selettore di messa in funzionamento con selezione delle velocità di ventilazione. 2 - Manopola di regolazione temperatura. 3 - Spia funzionamento raffreddamento. 4 - Spia funzionamento ventilazione. Nota : Il lampeggiamento di questa spia indica che la ventilazione è in corso
d’arresto. 5 - Spia funzionamento riscaldamento.
Attenzione : Con questo comando, la scelta del modo di funzionamento Riscaldamento / Raffreddamento è fatta automaticamente.
6 - REGOLAZIONE DEL FLUSSO D'ARIA
6.1 - IN ORIZZONTALE• Il flusso d'aria può essere regolato
orizzontalmente spostando le alette verticali verso destra o verso sinistra.
• In raffreddamento, non orientare le alette a fondo a sinistra o a destra onde evitare la formazione di goccioline di condensa che potrebbero cadere al suolo.
DESTRASINISTRA
Alette verticali
MPW
DESTRA
SINISTRA
KPSW
6.2 - IN VERTICALE• Il flusso d'aria può essere regolato
verticalmente spostando il deflettore verso l'alto o verso il basso.
• In fase di raffreddamento si consiglia di non orientare il defl ettore a più di 30° verso il basso per evitare la formazione di goccioline di condensa che potrebbero cadere al suolo.
MPW
VERSO L'ALTO
Griglia di affl usso d'aria
VERSO IL BASSO
defl ettoreVERSO L'ALTO
VERSO IL BASSOKPSW
6.3 - POSIZIONE CONSIGLIATA DEL DEFLETTORE
30¡A"
60¡
"B"
Zona "A"per il
raffreddamento
Zona "B"per il
riscaldamento
KPSW
30¡
60¡
30¡
60¡
"B"
"A"
"B"
"A"
Zona "A" per il raffreddamento
Zona "B" per il riscaldamento
MPW
4
F
GB
I
E
D Nel pulire la griglia, fare attenzione che strofi nando non venga
modifi cata la posizione delle alette.
PRECAUZIONI• Non utilizzare mai solventi o prodotti chimici troppo forti. Per pulire
non usare acqua eccessivamente calda.• Poiché alcuni bordi metallici e le alette dello scambiatore sono
taglienti, durante la pulizia manipolarli con cautela per evitare di ferirsi.
• Lo scambiatore e gli altri elementi dell'apparecchio devono essere sottoposti a una manutenzione periodica specifi ca, eseguita da un tecnico qualifi cato. Contattare il Servizio di assistenza tecnica.
In caso di problema di scorrimento della condensa arrestare l'apparecchio (interruttore del comando a distanza su "0").
7 - MANUTENZIONE E PULIZIA
ATTENZIONE• Per precauzione: prima di cominciare le operazioni di
pulizia, arrestare il climatizzatore e disinserire l'interruttore principale dell'alimentazione (vedere paragrafo 1).
• Nel pulire l'apparecchio, non versarvi sopra dell'acqua che potrebbe danneggiare i componenti interni e provocare delle scariche elettriche.
CARROZZERIA E GRIGLIA• Per pulire la carrozzeria e la griglia dell'apparecchio usare la
spazzola di un aspirapolvere oppure un panno morbido e pulito. Se queste parti sono molto sporche, utilizzare un panno inumidito
con un detergente liquido delicato.
8 - FILTRO A ARIA
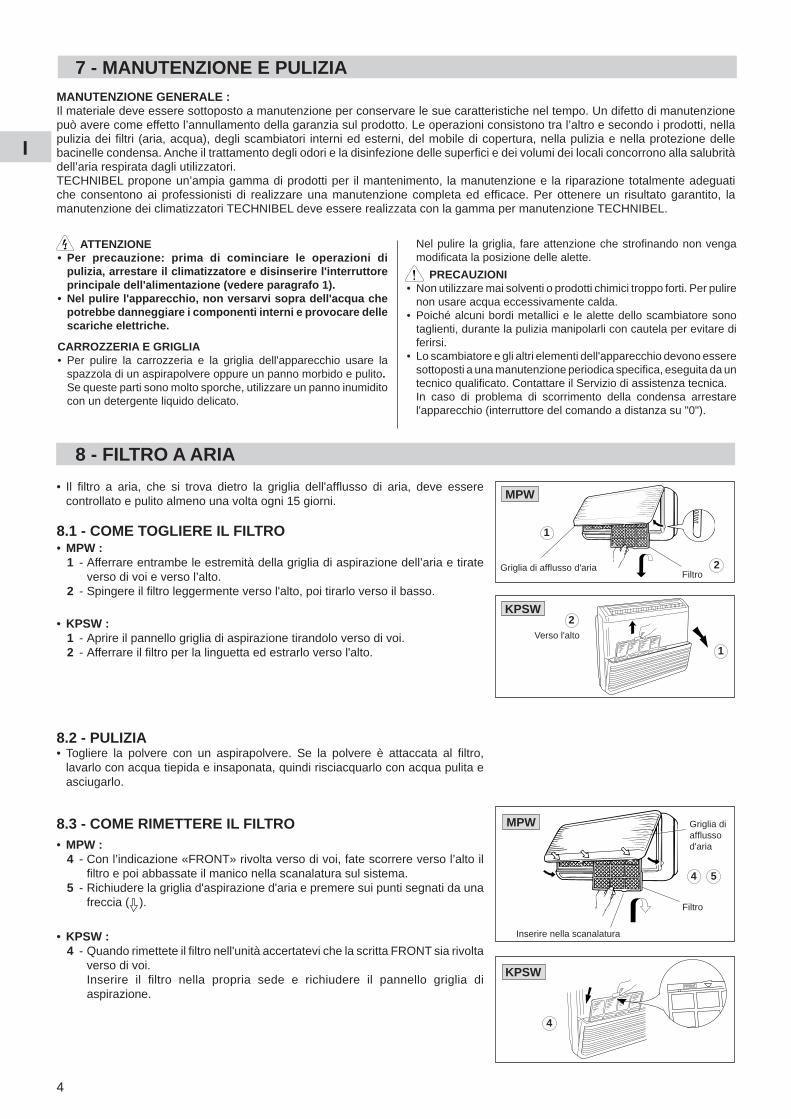
8.1 - COME TOGLIERE IL FILTRO• MPW : 1 - Afferrare entrambe le estremità della griglia di aspirazione dell’aria e tirate
verso di voi e verso l’alto. 2 - Spingere il fi ltro leggermente verso l'alto, poi tirarlo verso il basso.
• KPSW : 1 - Aprire il pannello griglia di aspirazione tirandolo verso di voi. 2 - Afferrare il fi ltro per la linguetta ed estrarlo verso l'alto.
Griglia di affl usso d'ariaFiltro
MPW
1
2
KPSW
Verso l'alto
1
8.2 - PULIZIA• Togliere la polvere con un aspirapolvere. Se la polvere è attaccata al fi ltro,
lavarlo con acqua tiepida e insaponata, quindi risciacquarlo con acqua pulita e asciugarlo.
Griglia di affl usso d'aria
Filtro
Inserire nella scanalatura
4 5
8.3 - COME RIMETTERE IL FILTRO• MPW : 4 - Con l’indicazione «FRONT» rivolta verso di voi, fate scorrere verso l’alto il
fi ltro e poi abbassate il manico nella scanalatura sul sistema. 5 - Richiudere la griglia d'aspirazione d'aria e premere sui punti segnati da una
freccia ( ).
• KPSW : 4 - Quando rimettete il fi ltro nell'unità accertatevi che la scritta FRONT sia rivolta
verso di voi. Inserire il fi ltro nella propria sede e richiudere il pannello griglia di
aspirazione.
MPW
KPSWFRONT
4
• Il fi ltro a aria, che si trova dietro la griglia dell'affl usso di aria, deve essere controllato e pulito almeno una volta ogni 15 giorni.
MANUTENZIONE GENERALE :Il materiale deve essere sottoposto a manutenzione per conservare le sue caratteristiche nel tempo. Un difetto di manutenzione può avere come effetto l’annullamento della garanzia sul prodotto. Le operazioni consistono tra l’altro e secondo i prodotti, nella pulizia dei fi ltri (aria, acqua), degli scambiatori interni ed esterni, del mobile di copertura, nella pulizia e nella protezione delle bacinelle condensa. Anche il trattamento degli odori e la disinfezione delle superfi ci e dei volumi dei locali concorrono alla salubrità dell’aria respirata dagli utilizzatori.TECHNIBEL propone un’ampia gamma di prodotti per il mantenimento, la manutenzione e la riparazione totalmente adeguati che consentono ai professionisti di realizzare una manutenzione completa ed effi cace. Per ottenere un risultato garantito, la manutenzione dei climatizzatori TECHNIBEL deve essere realizzata con la gamma per manutenzione TECHNIBEL.
2
5
GB
I
E
D
FFILTRO ARIA A CARBONE ATTIVO (fornito come accessorio)• Il fi ltro va applicato in aggiunta al fi ltro standard.• È formato da due strati : - il primo ha la funzione di fi ltro ad alta effi cienza e trattiene anche le particelle molto piccole presenti nell'aria, - il secondo strato é formato da un composto di carbone attivo che purifi ca l'aria dagli odori.
Come applicare il fi ltro a carbone attivo.
Molletta
Lato posteriorefi ltro standard
Filtro ad alta effi cienza con strato di
carbone attivo
MPW
KPSW
• MPW 1 - Aprire la griglia d’aspirazione aria e togliere i 2 fi ltri che
sono forniti con l’unità. 2 - Collocare i 2 fi ltri a carbone attivo nella posizione indicata
qui di fi anco (indicazione "FRONT" davanti). 3 - Rimettere i 2 fi ltri aria nella loro sede e richiudere la
griglia.
• KPSW 1 - Aprire il pannello griglia di aspirazione ed estrarre il fi ltro
in dotazione dell'unità. 2 - Applicare sul lato posteriore del fi ltro standard le mollette
fornite nel kit. 3 - Applicare su ogni fi ltro il relativo set "fi ltro alta effi cienza"
che sarà trattenuto dalla molletta. 4 - Inserire il doppio fi ltro nelle relative guide e chiudere il
pannello griglia di aspirazione.
Filtro ad aria a carbone attivo
9 - CONSIGLI PER IL COMFORT E IL RISPARMIO ENERGETICO
EVITARE :• Di ostruire le griglie di mandata e aspirazione dell’unità,
se queste sono ostruite l’unità non lavora correttamente e potrebbe danneggiarsi.
• L’irraggiamento diretto in ambiente usando tende parasole esterne oppure tirando le tende interne.
CONTROLLARE :• Che il fi ltro sia sempre pulito. Un fi ltro sporco diminuisce il
rendimento dell'apparecchio.• Che porte, fi nestre e altre aperture siano chiuse per evitare
infiltrazioni d'aria non refrigerata mentre l'apparecchio funziona in modo "raffreddamento".
Il climatizzatore non accenna a funzionare (la ventilazione non si avvia).
Raffreddamento o riscaldamento insuffi ciente.
Per impianti che possono funzionare i n m o d o r a f f r e d d a m e n t o o riscaldamento:raffreddamento o riscaldamento ec-cessivo o inesistente.
1- Interruzione di corrente.2 - Disgiuntore o fusibile disinseriti.3 - Tensione di linea troppo bassa.4 - Il selettore si trova in posizione "0"
(arresto).5 - Taratura del termostato troppo alta
(raffreddamento) o troppo bassa (riscaldamento).
1 - Filtro aria sporco o ostruito.2 - Fonte di calore o stanza sovraffollata.3 - Porte e/o fi nestre aperte.
4 - Ostruzione in prossimità della ripresa o della mandata d’aria.
5 - La temperatura d’istruzione è regolata troppo alta per il raffreddamento o troppo bassa per il riscaldamento.
6 - Il generatore di acqua fredda o di acqua calda dell'impianto funziona male o non funziona affatto.
1 - Il modo di funzionamento (Riscaldamento o raffreddamento) del termostato è inadatto.
2 - Il generatore di acqua freddao di acqua calda dell'impianto funziona male.
1 - Ripristinare l'alimentazione.2 - Contattare il Servizio Assistenza Clienti.3 - Consultare l'elettricista di fi ducia.4 - Manovrare il selettore.5 - Regolare la temperatura a valori più bassi
(o più alti).
1 - Pulire il fi ltro aria.2 - Se possibile, eliminare la fonte di calore.3 - Chiuderle per impedire che entri aria
dall'esterno.4 - Rimuovere l'ostacolo per assicurare una
buona circolazione dell'aria.5 - Regolare la temperatura a valori più bassi
(o più alti).6 - Control lare i l funzionamento del
generatore. Contattare il Servizio Assistenza Clienti.
1 - Verifi care la selezione del modo.
2 - Control lare i l funzionamento del generatore. Contattare il Servizio Assistenza Clienti.
GUASTI POSSIBILI CAUSE RIMEDI
10 - GUIDA ALLA RIPARAZIONE
• Se il climatizzatore non funziona correttamente, si consiglia di eseguire le seguenti verifi che prima di rivolgersi al Servizio Assistenza Clienti.
• Se il problema persiste, contattare il Servizio Assistenza Clienti.
2
F
GB
I
E
D
MARCAJE
Este producto marcado está en conformidad con las exigencias esenciales de las Directivas : - Baja Tensión n° 2006/95/CE, - Compatibilidad Electromagnetica n° 89/336 CEE modifi cada 92/31 CEE y 93/68 CEE.
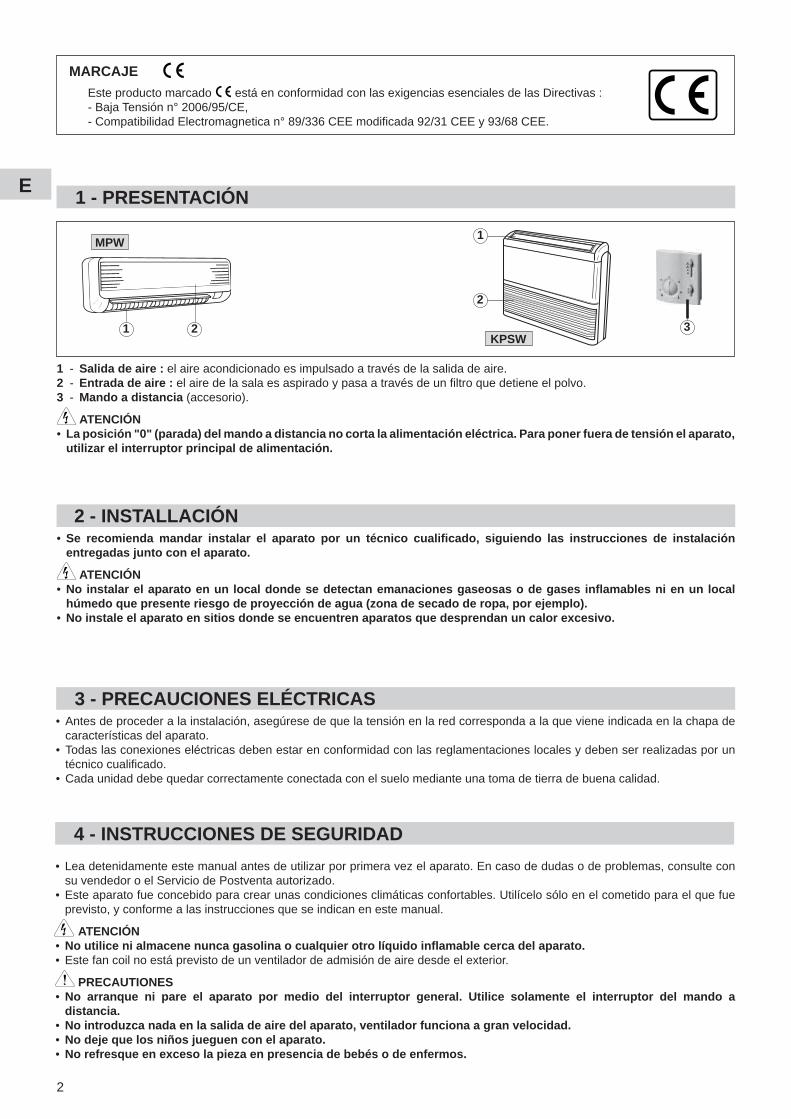
1 - PRESENTACIÓN
1 - Salida de aire : el aire acondicionado es impulsado a través de la salida de aire.2 - Entrada de aire : el aire de la sala es aspirado y pasa a través de un fi ltro que detiene el polvo.3 - Mando a distancia (accesorio).
ATENCIÓN• La posición "0" (parada) del mando a distancia no corta la alimentación eléctrica. Para poner fuera de tensión el aparato,
utilizar el interruptor principal de alimentación.
2 - INSTALLACIÓN• Se recomienda mandar instalar el aparato por un técnico cualifi cado, siguiendo las instrucciones de instalación
entregadas junto con el aparato.
ATENCIÓN• No instalar el aparato en un local donde se detectan emanaciones gaseosas o de gases infl amables ni en un local
húmedo que presente riesgo de proyección de agua (zona de secado de ropa, por ejemplo).• No instale el aparato en sitios donde se encuentren aparatos que desprendan un calor excesivo.
3 - PRECAUCIONES ELÉCTRICAS• Antes de proceder a la instalación, asegúrese de que la tensión en la red corresponda a la que viene indicada en la chapa de
características del aparato.• Todas las conexiones eléctricas deben estar en conformidad con las reglamentaciones locales y deben ser realizadas por un
técnico cualifi cado.• Cada unidad debe quedar correctamente conectada con el suelo mediante una toma de tierra de buena calidad.
4 - INSTRUCCIONES DE SEGURIDAD
• Lea detenidamente este manual antes de utilizar por primera vez el aparato. En caso de dudas o de problemas, consulte con su vendedor o el Servicio de Postventa autorizado.
• Este aparato fue concebido para crear unas condiciones climáticas confortables. Utilícelo sólo en el cometido para el que fue previsto, y conforme a las instrucciones que se indican en este manual.
ATENCIÓN• No utilice ni almacene nunca gasolina o cualquier otro líquido infl amable cerca del aparato.• Este fan coil no está previsto de un ventilador de admisión de aire desde el exterior.
PRECAUTIONES• No arranque ni pare el aparato por medio del interruptor general. Utilice solamente el interruptor del mando a
distancia. • No introduzca nada en la salida de aire del aparato, ventilador funciona a gran velocidad.• No deje que los niños jueguen con el aparato.• No refresque en exceso la pieza en presencia de bebés o de enfermos.
1 2
1
2
3
MPW
KPSW
3
GB
I
E
D
F 5 - UTILIZACIÓN DE LOS MANDOS A DISTANCIA
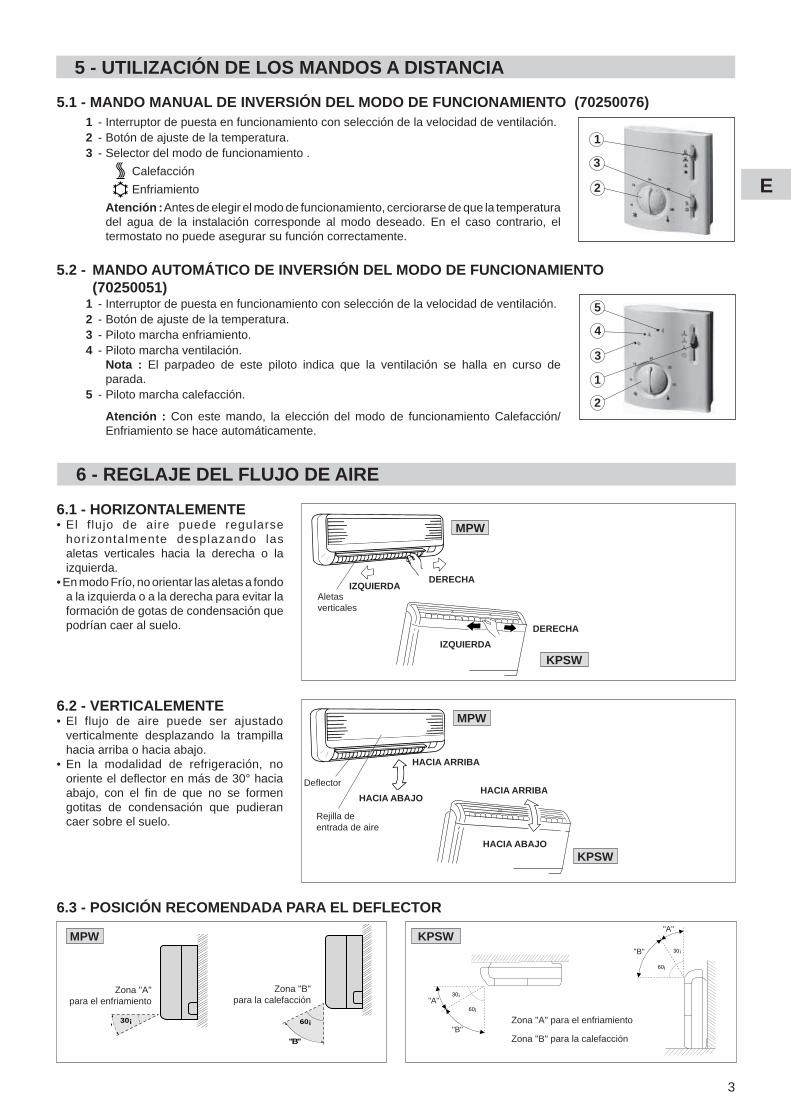
5.1 - MANDO MANUAL DE INVERSIÓN DEL MODO DE FUNCIONAMIENTO (70250076)
1
3
2
5
4
3
1
2
1 - Interruptor de puesta en funcionamiento con selección de la velocidad de ventilación. 2 - Botón de ajuste de la temperatura. 3 - Selector del modo de funcionamiento .
Calefacción
Enfriamiento
Atención : Antes de elegir el modo de funcionamiento, cerciorarse de que la temperatura del agua de la instalación corresponde al modo deseado. En el caso contrario, el termostato no puede asegurar su función correctamente.
5.2 - MANDO AUTOMÁTICO DE INVERSIÓN DEL MODO DE FUNCIONAMIENTO (70250051) 1 - Interruptor de puesta en funcionamiento con selección de la velocidad de ventilación. 2 - Botón de ajuste de la temperatura. 3 - Piloto marcha enfriamiento. 4 - Piloto marcha ventilación. Nota : El parpadeo de este piloto indica que la ventilación se halla en curso de
parada. 5 - Piloto marcha calefacción.
Atención : Con este mando, la elección del modo de funcionamiento Calefacción/Enfriamiento se hace automáticamente.
6 - REGLAJE DEL FLUJO DE AIRE
6.1 - HORIZONTALEMENTE• El f lujo de aire puede regularse
horizontalmente desplazando las aletas verticales hacia la derecha o la izquierda.
• En modo Frío, no orientar las aletas a fondo a la izquierda o a la derecha para evitar la formación de gotas de condensación que podrían caer al suelo.
DERECHAIZQUIERDA
Aletas verticales
MPW
DERECHA
IZQUIERDA
KPSW
6.2 - VERTICALEMENTE• El flujo de aire puede ser ajustado
verticalmente desplazando la trampilla hacia arriba o hacia abajo.
• En la modalidad de refrigeración, no oriente el defl ector en más de 30° hacia abajo, con el fi n de que no se formen gotitas de condensación que pudieran caer sobre el suelo.
MPW
HACIA ARRIBA
Rejilla de entrada de aire
HACIA ABAJO
Defl ectorHACIA ARRIBA
HACIA ABAJOKPSW
6.3 - POSICIÓN RECOMENDADA PARA EL DEFLECTOR
30¡A"
60¡
"B"
Zona "A"para el enfriamiento
Zona "B"para la calefacción
KPSW
30¡
60¡
30¡
60¡
"B"
"A"
"B"
"A"
Zona "A" para el enfriamiento
Zona "B" para la calefacción
MPW
4
F
GB
I
E
D Durante la limpieza, cuídese de no modifi car la posición de las
aletas al restregar la rejilla.
PRECAUTIONES• No use nunca disolventes ni productos químicos potentes.
No limpie con agua muy caliente.• Al ser cortantes algunos bordes metálicos y las aletas
del intercambiador, deben manejarse con cuidado en las operaciones de limpieza, so pena de provocar heridas.
• El intercambiador y los demás componentes del aparato necesitan un mantenimiento específi co regular realizado por un técnico cualifi cado. Consultar con el servicio post-venta.
En caso de problemas de evacuación de condensados, parar el aparato (interruptor del mando a distancia en "0").
7 - MANTENIMIENTO Y LIMPIEZA
ATENCIÓN• Como medida de seguridad: pare el aparato de aire y corte
la alimentación por medio del interruptor principal, antes de proceder a la limpieza (véase § 1).
• No vierta agua sobre el aparato para limpiarlo, lo que podría deteriorar los componentes internos y provocar descargas eléctricas.
CHAPA Y REJILLA• Limpie la chapa y la rejilla del aparato con el cepillo de un aspirador
o con un paño limpio y suave. De estar sucios estos elementos, límpielos con un paño limpio
humedecido en una solución detergente suave.
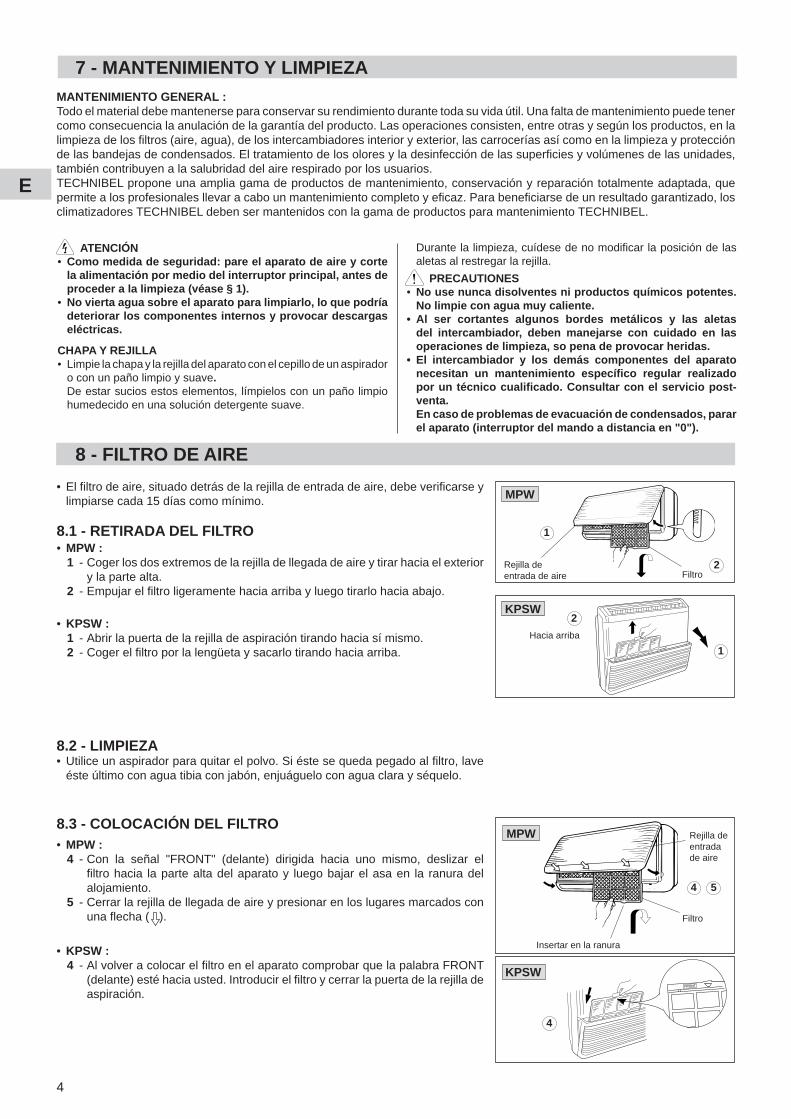
8 - FILTRO DE AIRE
8.1 - RETIRADA DEL FILTRO• MPW : 1 - Coger los dos extremos de la rejilla de llegada de aire y tirar hacia el exterior
y la parte alta. 2 - Empujar el fi ltro ligeramente hacia arriba y luego tirarlo hacia abajo.
• KPSW : 1 - Abrir la puerta de la rejilla de aspiración tirando hacia sí mismo. 2 - Coger el fi ltro por la lengüeta y sacarlo tirando hacia arriba.
Rejilla de entrada de aire Filtro
MPW
1
2
KPSW
Hacia arriba
2
1
8.2 - LIMPIEZA• Utilice un aspirador para quitar el polvo. Si éste se queda pegado al fi ltro, lave
éste último con agua tibia con jabón, enjuáguelo con agua clara y séquelo.
Rejilla de entrada de aire
Filtro
Insertar en la ranura
4 5
MPW
KPSWFRONT
4
• El fi ltro de aire, situado detrás de la rejilla de entrada de aire, debe verifi carse y limpiarse cada 15 días como mínimo.
MANTENIMIENTO GENERAL :Todo el material debe mantenerse para conservar su rendimiento durante toda su vida útil. Una falta de mantenimiento puede tener como consecuencia la anulación de la garantía del producto. Las operaciones consisten, entre otras y según los productos, en la limpieza de los fi ltros (aire, agua), de los intercambiadores interior y exterior, las carrocerías así como en la limpieza y protección de las bandejas de condensados. El tratamiento de los olores y la desinfección de las superfi cies y volúmenes de las unidades, también contribuyen a la salubridad del aire respirado por los usuarios.TECHNIBEL propone una amplia gama de productos de mantenimiento, conservación y reparación totalmente adaptada, que permite a los profesionales llevar a cabo un mantenimiento completo y efi caz. Para benefi ciarse de un resultado garantizado, los climatizadores TECHNIBEL deben ser mantenidos con la gama de productos para mantenimiento TECHNIBEL.
8.3 - COLOCACIÓN DEL FILTRO• MPW : 4 - Con la señal "FRONT" (delante) dirigida hacia uno mismo, deslizar el
fi ltro hacia la parte alta del aparato y luego bajar el asa en la ranura del alojamiento.
5 - Cerrar la rejilla de llegada de aire y presionar en los lugares marcados con una fl echa ( ).
• KPSW : 4 - Al volver a colocar el fi ltro en el aparato comprobar que la palabra FRONT
(delante) esté hacia usted. Introducir el fi ltro y cerrar la puerta de la rejilla de aspiración.
5
GB
I
E
D
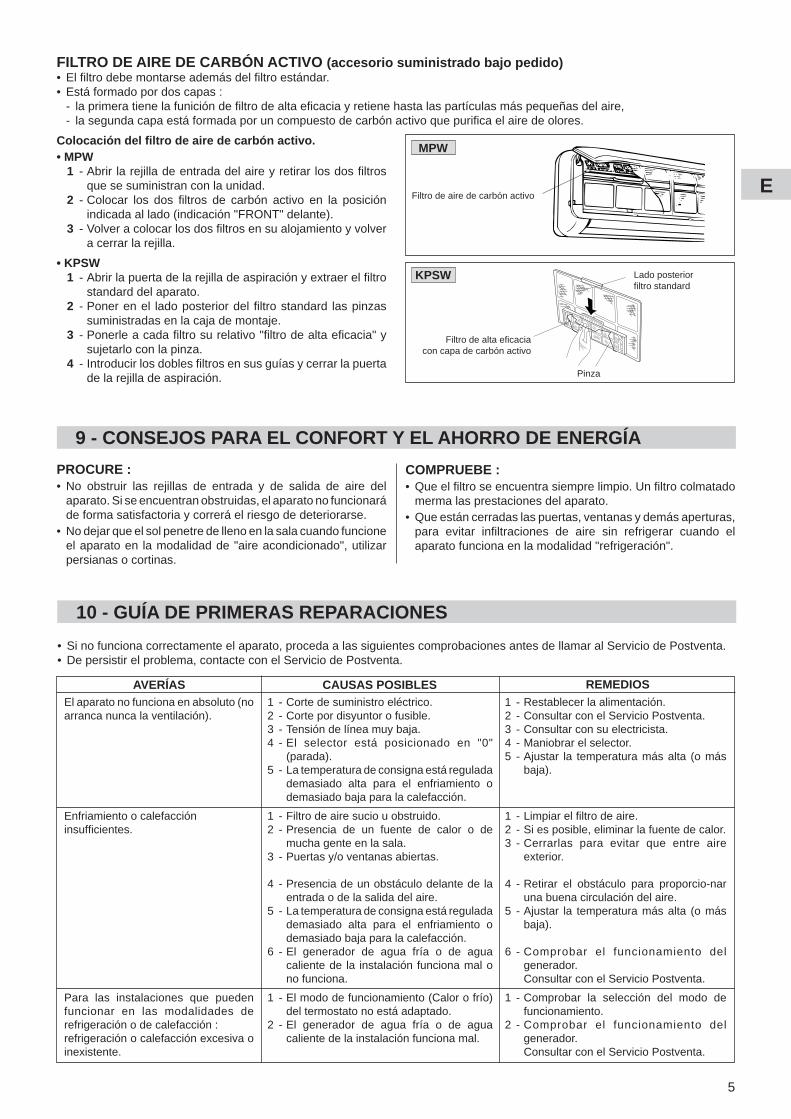
FFILTRO DE AIRE DE CARBÓN ACTIVO (accesorio suministrado bajo pedido)• El fi ltro debe montarse además del fi ltro estándar.• Está formado por dos capas : - la primera tiene la funición de fi ltro de alta efi cacia y retiene hasta las partículas más pequeñas del aire, - la segunda capa está formada por un compuesto de carbón activo que purifi ca el aire de olores.
Colocación del fi ltro de aire de carbón activo.
Pinza
Lado posteriorfi ltro standard
Filtro de alta efi cacia con capa de carbón activo
MPW
KPSW
• MPW 1 - Abrir la rejilla de entrada del aire y retirar los dos fi ltros
que se suministran con la unidad. 2 - Colocar los dos fi ltros de carbón activo en la posición
indicada al lado (indicación "FRONT" delante). 3 - Volver a colocar los dos fi ltros en su alojamiento y volver
a cerrar la rejilla.
• KPSW 1 - Abrir la puerta de la rejilla de aspiración y extraer el fi ltro
standard del aparato. 2 - Poner en el lado posterior del fi ltro standard las pinzas
suministradas en la caja de montaje. 3 - Ponerle a cada fi ltro su relativo "fi ltro de alta efi cacia" y
sujetarlo con la pinza. 4 - Introducir los dobles fi ltros en sus guías y cerrar la puerta
de la rejilla de aspiración.
Filtro de aire de carbón activo
9 - CONSEJOS PARA EL CONFORT Y EL AHORRO DE ENERGÍA
PROCURE :• No obstruir las rejillas de entrada y de salida de aire del
aparato. Si se encuentran obstruidas, el aparato no funcionará de forma satisfactoria y correrá el riesgo de deteriorarse.
• No dejar que el sol penetre de lleno en la sala cuando funcione el aparato en la modalidad de "aire acondicionado", utilizar persianas o cortinas.
COMPRUEBE :• Que el fi ltro se encuentra siempre limpio. Un fi ltro colmatado
merma las prestaciones del aparato.• Que están cerradas las puertas, ventanas y demás aperturas,
para evitar infi ltraciones de aire sin refrigerar cuando el aparato funciona en la modalidad "refrigeración".
El aparato no funciona en absoluto (no arranca nunca la ventilación).
Enfriamiento o calefacción insuffi cientes.
Para las instalaciones que pueden funcionar en las modalidades de refrigeración o de calefacción :refrigeración o calefacción excesiva o inexistente.
1 - Corte de suministro eléctrico.2 - Corte por disyuntor o fusible.3 - Tensión de línea muy baja.4 - El selector está posicionado en "0"
(parada).5 - La temperatura de consigna está regulada
demasiado alta para el enfriamiento o demasiado baja para la calefacción.
1 - Filtro de aire sucio u obstruido.2 - Presencia de un fuente de calor o de
mucha gente en la sala.3 - Puertas y/o ventanas abiertas.
4 - Presencia de un obstáculo delante de la entrada o de la salida del aire.
5 - La temperatura de consigna está regulada demasiado alta para el enfriamiento o demasiado baja para la calefacción.
6 - El generador de agua fría o de agua caliente de la instalación funciona mal o no funciona.
1 - El modo de funcionamiento (Calor o frío) del termostato no está adaptado.
2 - El generador de agua fría o de agua caliente de la instalación funciona mal.
1 - Restablecer la alimentación.2 - Consultar con el Servicio Postventa.3 - Consultar con su electricista.4 - Maniobrar el selector.5 - Ajustar la temperatura más alta (o más
baja).
1 - Limpiar el fi ltro de aire.2 - Si es posible, eliminar la fuente de calor.3 - Cerrarlas para evitar que entre aire
exterior.
4 - Retirar el obstáculo para proporcio-nar una buena circulación del aire.
5 - Ajustar la temperatura más alta (o más baja).
6 - Comprobar el funcionamiento del generador.
Consultar con el Servicio Postventa.
1 - Comprobar la selección del modo de funcionamiento.
2 - Comprobar el funcionamiento del generador.
Consultar con el Servicio Postventa.
AVERÍAS CAUSAS POSIBLES REMEDIOS
10 - GUÍA DE PRIMERAS REPARACIONES
• Si no funciona correctamente el aparato, proceda a las siguientes comprobaciones antes de llamar al Servicio de Postventa.• De persistir el problema, contacte con el Servicio de Postventa.
2
F
GB
I
E
D
BEZEICHNUNG
Dieses Gerät trägt das Kennzeichen und entspricht den wesentlichen Bestimmungen der EG-Richtlinien : - Niederspannungsrichtlinie 2006/95/CE - Elektromagnetische Verträglichkeit 89/336 EWG, i. d. Fassung 92/31 und 93/68 EWG.
1 - PRÄSENTATION
1 - Luftauslaß : die klimatisierte Luft tritt durch den Luftauslaß aus.2 - Lufteinlaß : die Raumluft wird über den Lufteinlaß angesaugt und durch den Filter geleitet, der den Staub auffängt.3 - Weggebauten Steuerung (Zubehör).
ACHTUNG• Die Stromversorgung wird in der Schalterstellung "0" (Aus) des weggebauten Steuerung nicht unterbrochen. Zum
vollständigen Abschalten des Gerätes den Hauptschalter, über welchen das Gerät versorgt wird, abschalten.
2 - AUFSTELLUNGSORT• Es wird empfohlen, die Klimaanlage durch einen qualifi zierten Techniker installieren zu lassen, wobei die mit dem Gerät
mitgelieferten Installationshinweise zu beachten sind.
ACHTUNG• Das Klimagerät weder in Räumen mit Anlagen mit brennbaren Gasen aufstellen, noch in Räumen mit feuchter Umgebung
oder mit Spritzwasserrisiko aufstellen (z.B. Wäscherei).• Die Klimaanlage darf nicht in Räumen installiert werden, in denen sich Geräte mit starker Wärmeentwicklung
3 - ELEKTRISCHE VORSICHTSMASSNAHMEN• Vor der Installation der Klimaanlage muß überprüft werden, ob die Netzspannung mit der auf dem Typenschild des Gerätes
angegebenen Spannung übereinstimmt.• Sämtliche elektrischen Anschlüsse müssen entsprechend den örtlich geltenden Vorschriften von einer Fachkraft vorgenommen
werden.• Jede Einheit muß mit Hilfe einer Erdverbindung guter Qualität ordnungsgemäß geerdet werden.
4 - SICHERHEITSHINWEISE• Vor der ersten Benutzung der Klimaanlage das vorliegende Handbuch aufmerksam lesen. Konsultieren Sie in Zweifelsfällen oder
bei auftretenden Problemen Ihren Vertragshändler oder die zugelassene Kundendienststelle.• Die Klimaanlage dient zur Erzeugung eines angenehmen Raumklimas. Verwenden Sie das Gerät ausschließlich zu dem Zweck,
für den es vorgesehen ist, und beachten Sie die Hinweise des vorliegenden Handbuches.
ACHTUNG• Benzin oder andere feuergefährliche Flüssigkeiten dürfen keinesfalls in der Umgebung der Klimaanlage verwendet oder
gelagert werden.• Diese Klimaanlage ist nicht mit einem Ventilator ausgestattet, der eine Luftzufuhr von außen gewährleistet.
VORSICHTSMASSNAHMEN• Die Klimaanlage nicht mit Hilfe des Hauptschalters ein- bzw. ausschalten. Nur den Schalter der weggebauten Steuerung
benutzen. • Nichts in den Luftauslaß des Gerätes einführen, Lüfter dreht sich mit hoher Geschwindigkeit• Kinder sind von der Klimaanlage fernzuhalten.• Eine übermäßige Raumkühlung vermeiden, wenn sich Kleinkinder oder Kranke im Raum aufhalten.
1 2
1
2
3
MPW
KPSW
3
GB
I
E
D
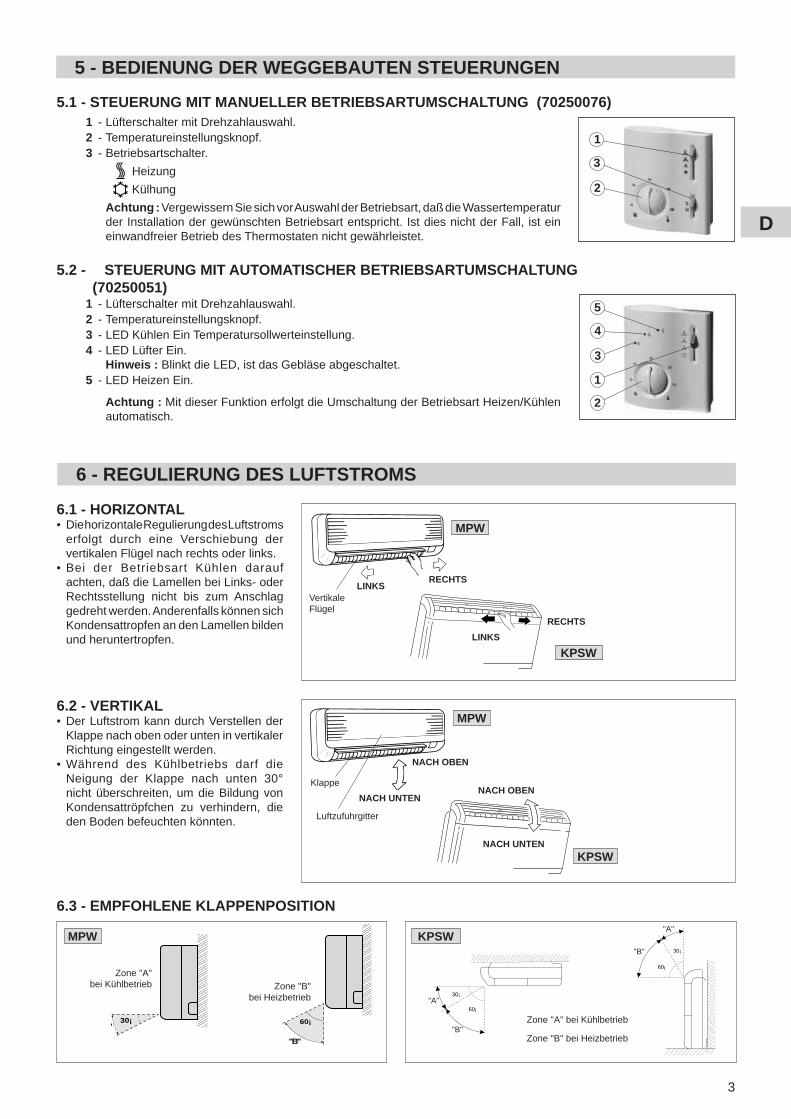
F 5 - BEDIENUNG DER WEGGEBAUTEN STEUERUNGEN
5.1 - STEUERUNG MIT MANUELLER BETRIEBSARTUMSCHALTUNG (70250076)
1
3
2
5
4
3
1
2
1 - Lüfterschalter mit Drehzahlauswahl. 2 - Temperatureinstellungsknopf. 3 - Betriebsartschalter.
Heizung
Külhung
Achtung : Vergewissern Sie sich vor Auswahl der Betriebsart, daß die Wassertemperatur der Installation der gewünschten Betriebsart entspricht. Ist dies nicht der Fall, ist ein einwandfreier Betrieb des Thermostaten nicht gewährleistet.
5.2 - STEUERUNG MIT AUTOMATISCHER BETRIEBSARTUMSCHALTUNG (70250051) 1 - Lüfterschalter mit Drehzahlauswahl. 2 - Temperatureinstellungsknopf. 3 - LED Kühlen Ein Temperatursollwerteinstellung. 4 - LED Lüfter Ein. Hinweis : Blinkt die LED, ist das Gebläse abgeschaltet. 5 - LED Heizen Ein.
Achtung : Mit dieser Funktion erfolgt die Umschaltung der Betriebsart Heizen/Kühlen automatisch.
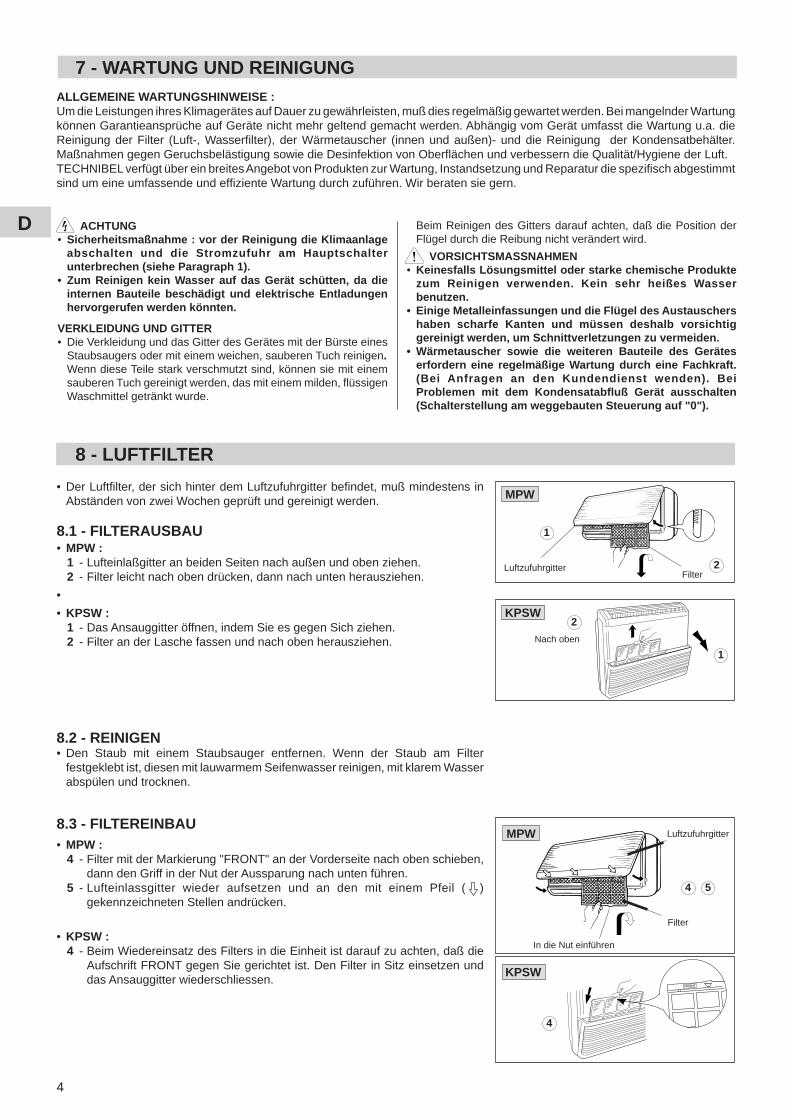
6 - REGULIERUNG DES LUFTSTROMS
6.1 - HORIZONTAL• Die horizontale Regulierung des Luftstroms
erfolgt durch eine Verschiebung der vertikalen Flügel nach rechts oder links.
• Bei der Betriebsart Kühlen darauf achten, daß die Lamellen bei Links- oder Rechtsstellung nicht bis zum Anschlag gedreht werden. Anderenfalls können sich Kondensattropfen an den Lamellen bilden und heruntertropfen.
RECHTSLINKS
Vertikale Flügel
MPW
RECHTS
LINKS
KPSW
6.2 - VERTIKAL• Der Luftstrom kann durch Verstellen der
Klappe nach oben oder unten in vertikaler Richtung eingestellt werden.
• Während des Kühlbetriebs darf die Neigung der Klappe nach unten 30° nicht überschreiten, um die Bildung von Kondensattröpfchen zu verhindern, die den Boden befeuchten könnten.
MPW
NACH OBEN
Luftzufuhrgitter
NACH UNTEN
KlappeNACH OBEN
NACH UNTENKPSW
6.3 - EMPFOHLENE KLAPPENPOSITION
30¡A"
60¡
"B"
Zone "A"bei Kühlbetrieb Zone "B"
bei Heizbetrieb
KPSW
30¡
60¡
30¡
60¡
"B"
"A"
"B"
"A"
Zone "A" bei Kühlbetrieb
Zone "B" bei Heizbetrieb
MPW
4
F
GB
I
E
D Beim Reinigen des Gitters darauf achten, daß die Position der Flügel durch die Reibung nicht verändert wird.
VORSICHTSMASSNAHMEN• Keinesfalls Lösungsmittel oder starke chemische Produkte
zum Reinigen verwenden. Kein sehr heißes Wasser benutzen.
• Einige Metalleinfassungen und die Flügel des Austauschers haben scharfe Kanten und müssen deshalb vorsichtig gereinigt werden, um Schnittverletzungen zu vermeiden.
• Wärmetauscher sowie die weiteren Bauteile des Gerätes erfordern eine regelmäßige Wartung durch eine Fachkraft. (Bei Anfragen an den Kundendienst wenden). Bei Problemen mit dem Kondensatabfl uß Gerät ausschalten (Schalterstellung am weggebauten Steuerung auf "0").
7 - WARTUNG UND REINIGUNG
ACHTUNG• Sicherheitsmaßnahme : vor der Reinigung die Klimaanlage
abschalten und die Stromzufuhr am Hauptschalter unterbrechen (siehe Paragraph 1).
• Zum Reinigen kein Wasser auf das Gerät schütten, da die internen Bauteile beschädigt und elektrische Entladungen hervorgerufen werden könnten.
VERKLEIDUNG UND GITTER• Die Verkleidung und das Gitter des Gerätes mit der Bürste eines
Staubsaugers oder mit einem weichen, sauberen Tuch reinigen. Wenn diese Teile stark verschmutzt sind, können sie mit einem
sauberen Tuch gereinigt werden, das mit einem milden, fl üssigen Waschmittel getränkt wurde.
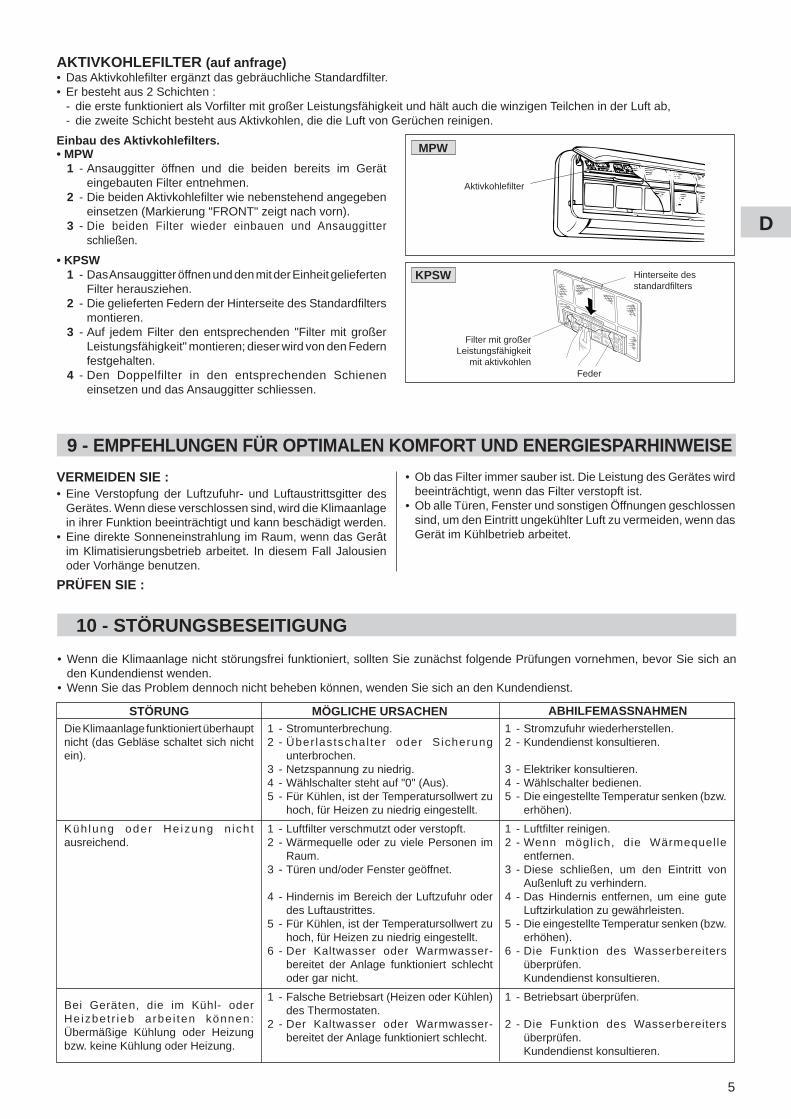
8 - LUFTFILTER
8.1 - FILTERAUSBAU• MPW : 1 - Lufteinlaßgitter an beiden Seiten nach außen und oben ziehen. 2 - Filter leicht nach oben drücken, dann nach unten herausziehen.
•
• KPSW : 1 - Das Ansauggitter öffnen, indem Sie es gegen Sich ziehen. 2 - Filter an der Lasche fassen und nach oben herausziehen.
LuftzufuhrgitterFilter
MPW
1
2
KPSW
Nach oben
2
1
8.2 - REINIGEN• Den Staub mit einem Staubsauger entfernen. Wenn der Staub am Filter
festgeklebt ist, diesen mit lauwarmem Seifenwasser reinigen, mit klarem Wasser abspülen und trocknen.
Luftzufuhrgitter
Filter
In die Nut einführen
4 5
8.3 - FILTEREINBAU• MPW : 4 - Filter mit der Markierung "FRONT" an der Vorderseite nach oben schieben,
dann den Griff in der Nut der Aussparung nach unten führen. 5 - Lufteinlassgitter wieder aufsetzen und an den mit einem Pfeil ( )
gekennzeichneten Stellen andrücken.
• KPSW : 4 - Beim Wiedereinsatz des Filters in die Einheit ist darauf zu achten, daß die
Aufschrift FRONT gegen Sie gerichtet ist. Den Filter in Sitz einsetzen und das Ansauggitter wiederschliessen.
MPW
KPSWFRONT
4
• Der Luftfi lter, der sich hinter dem Luftzufuhrgitter befi ndet, muß mindestens in Abständen von zwei Wochen geprüft und gereinigt werden.
ALLGEMEINE WARTUNGSHINWEISE :Um die Leistungen ihres Klimagerätes auf Dauer zu gewährleisten, muß dies regelmäßig gewartet werden. Bei mangelnder Wartung können Garantieansprüche auf Geräte nicht mehr geltend gemacht werden. Abhängig vom Gerät umfasst die Wartung u.a. die Reinigung der Filter (Luft-, Wasserfi lter), der Wärmetauscher (innen und außen)- und die Reinigung der Kondensatbehälter. Maßnahmen gegen Geruchsbelästigung sowie die Desinfektion von Oberfl ächen und verbessern die Qualität/Hygiene der Luft.TECHNIBEL verfügt über ein breites Angebot von Produkten zur Wartung, Instandsetzung und Reparatur die spezifi sch abgestimmt sind um eine umfassende und effi ziente Wartung durch zuführen. Wir beraten sie gern.
5
GB
I
E
D
FAKTIVKOHLEFILTER (auf anfrage)• Das Aktivkohlefi lter ergänzt das gebräuchliche Standardfi lter.• Er besteht aus 2 Schichten : - die erste funktioniert als Vorfi lter mit großer Leistungsfähigkeit und hält auch die winzigen Teilchen in der Luft ab, - die zweite Schicht besteht aus Aktivkohlen, die die Luft von Gerüchen reinigen.
Einbau des Aktivkohlefi lters.
Feder
Hinterseite des standardfi lters
Filter mit großer Leistungsfähigkeit
mit aktivkohlen
MPW
KPSW
• MPW 1 - Ansauggitter öffnen und die beiden bereits im Gerät
eingebauten Filter entnehmen. 2 - Die beiden Aktivkohlefi lter wie nebenstehend angegeben
einsetzen (Markierung "FRONT" zeigt nach vorn). 3 - Die beiden Filter wieder einbauen und Ansauggitter
schließen.
• KPSW 1 - Das Ansauggitter öffnen und den mit der Einheit gelieferten
Filter herausziehen. 2 - Die gelieferten Federn der Hinterseite des Standardfi lters
montieren. 3 - Auf jedem Filter den entsprechenden "Filter mit großer
Leistungsfähigkeit" montieren; dieser wird von den Federn festgehalten.
4 - Den Doppelfilter in den entsprechenden Schienen einsetzen und das Ansauggitter schliessen.
Aktivkohlefi lter
9 - EMPFEHLUNGEN FÜR OPTIMALEN KOMFORT UND ENERGIESPARHINWEISE
VERMEIDEN SIE :• Eine Verstopfung der Luftzufuhr- und Luftaustrittsgitter des
Gerätes. Wenn diese verschlossen sind, wird die Klimaanlage in ihrer Funktion beeinträchtigt und kann beschädigt werden.
• Eine direkte Sonneneinstrahlung im Raum, wenn das Gerât im Klimatisierungsbetrieb arbeitet. In diesem Fall Jalousien oder Vorhänge benutzen.
PRÜFEN SIE :
• Ob das Filter immer sauber ist. Die Leistung des Gerätes wird beeinträchtigt, wenn das Filter verstopft ist.
• Ob alle Türen, Fenster und sonstigen Öffnungen geschlossen sind, um den Eintritt ungekühlter Luft zu vermeiden, wenn das Gerät im Kühlbetrieb arbeitet.
Die Klimaanlage funktioniert überhaupt nicht (das Gebläse schaltet sich nicht ein).
Küh lung oder He izung n ich t ausreichend.
Bei Geräten, die im Kühl- oder Heizbet r ieb arbe i ten können: Übermäßige Kühlung oder Heizung bzw. keine Kühlung oder Heizung.
1 - Stromunterbrechung.2 - Über lastschal ter oder Sicherung
unterbrochen.3 - Netzspannung zu niedrig.4 - Wählschalter steht auf "0" (Aus).5 - Für Kühlen, ist der Temperatursollwert zu
hoch, für Heizen zu niedrig eingestellt.
1 - Luftfi lter verschmutzt oder verstopft.2 - Wärmequelle oder zu viele Personen im
Raum.3 - Türen und/oder Fenster geöffnet.
4 - Hindernis im Bereich der Luftzufuhr oder des Luftaustrittes.
5 - Für Kühlen, ist der Temperatursollwert zu hoch, für Heizen zu niedrig eingestellt.
6 - Der Kaltwasser oder Warmwasser-bereitet der Anlage funktioniert schlecht oder gar nicht.
1 - Falsche Betriebsart (Heizen oder Kühlen) des Thermostaten.
2 - Der Kaltwasser oder Warmwasser-bereitet der Anlage funktioniert schlecht.
1 - Stromzufuhr wiederherstellen.2 - Kundendienst konsultieren.
3 - Elektriker konsultieren.4 - Wählschalter bedienen.5 - Die eingestellte Temperatur senken (bzw.
erhöhen).
1 - Luftfi lter reinigen.2 - Wenn möglich, die Wärmequelle
entfernen.3 - Diese schließen, um den Eintritt von
Außenluft zu verhindern.4 - Das Hindernis entfernen, um eine gute
Luftzirkulation zu gewährleisten.5 - Die eingestellte Temperatur senken (bzw.
erhöhen).6 - Die Funktion des Wasserbereiters
überprüfen. Kundendienst konsultieren.
1 - Betriebsart überprüfen.
2 - Die Funktion des Wasserbereiters überprüfen.
Kundendienst konsultieren.
STÖRUNG MÖGLICHE URSACHEN ABHILFEMASSNAHMEN
10 - STÖRUNGSBESEITIGUNG
• Wenn die Klimaanlage nicht störungsfrei funktioniert, sollten Sie zunächst folgende Prüfungen vornehmen, bevor Sie sich an den Kundendienst wenden.
• Wenn Sie das Problem dennoch nicht beheben können, wenden Sie sich an den Kundendienst.
22
I
GB
F
D
E
AVERTISSEMENT POUR L’ELIMINATION CORRECT DU PRODUIT AUX TERMES DE LA DIRECTIVE EUROPEENNE 2002/96/CEAu terme de son utilisation cet équipement ne doit pas être éliminé avec les ordures ménagères.Le produit doit être remis à l’un des centres de collecte sélective locaux ou auprès des revendeurs assurant ce service.Eliminer séparément un équipement électrique et électronique permet d’éviter des potentielles retombées négatives pour l’environnement et la santé humaine dérivant d’une élimination incorrect et permet de récupérer les matériaux qui le com-posent dans le but d’une économie importante en termes d’énergie et de ressources.Pour rappeler l’obligation d’éliminer séparément ces équipements, le produit porte le symbole d’un caisson à ordures barré.
INFORMATION FOR CORRECT DISPOSAL OF THE PRODUCT IN ACCORDANCE WITH THE EUROPEAN DIRECTIVE 2002/96/ECAt the end of its working life this equipment must not be disposed of as an household waste.It must be taken to special local community waste collection centres or to a dealer providing this service.Disposing of an electrical and electronic equipment separately avoids possible negative effects on the environment and human health deriving from an inappropriate disposal and enables its components to be recovered and recycled to obtain significant savings in energy and resources.In order to underline the duty to dispose of this equipment separately, the product is marked with a crossed-out dustbin.
INFORMAZIONE PER IL CORRETTO SMALTIMENTO DEL PRODOTTO AI SENSI DELLA DIRETTIVA EUROPEA 2002/96/CEAlla fine della sua vita utile questo apparecchio non deve essere smaltito insieme ai rifiuti domestici.Deve essere consegnato presso appositi centri di raccolta differenziata oppure presso i rivenditori che forniscono questo servizio.Smaltire separatamente un apparecchio elettrico ed elettronico consente di evitare possibili effetti negativi sull’ambiente e sulla salute umana derivanti da uno smaltimento inadeguato e permette di recuperare e riciclare i materiali di cui è com-posto, con importanti risparmi di energia e risorse.Per sottolineare l’obbligo di smaltire separatamente queste apparecchiature, sul prodotto è riportato il simbolo del casso-netto barrato.Lo smaltimento abusivo del prodotto da parte dell’utente comporta l’applicazione delle sanzioni amministrative di cui al D.Lgs. n. 22/1997 (articolo 50 e successivi).
ADVERTENCIA PARA LA ELIMINACIÓN CORRECTA DEL PRODUCTO SEGÚN ESTABLECE LA DIRECTIVA EUROPEA 2002/96/CEAl final de su vida útil, este equipo no debe eliminarse junto a los desechos domésticos.Debe entregarse a centros específicos de recogida diferenciada locales o a distribuidores que facilitan este servicio.Eliminar por separado un equipo eléctrico y electrónico significa evitar posibles consecuencias negativas para el medio ambiente y la salud derivadas de una eliminación inadecuada y permite reciclar los materiales que lo componen, obte-niendo asi un ahorro importante de energía y recursos.Para subrayar la obligación de eliminar por separado estos equipos, en el producto aparece un contenedor de basura tachado.
HINWEIS FÜR DIE KORREKTE ENTSORGUNG DES PRODUKTS IN ÜBEREINSTIMMUNG MIT DER EUROPÄISCHEN RICHTLINIE 2002/96/EGAm Ende seiner Nutzzeit darf dieses Gerät nicht zusammen mit dem Hausmüll beseitigt werden.Es darf zu den örtlichen Sammelstellen oder zu den Fachhändlern, die einen Rücknahmeservice anbieten, gebracht werden.Die getrennte Entsorgung eines elektrischen und elektronischen Gerätes vermeidet mögliche negative Auswirkungen auf die Umwelt und die menschliche Gesundheit, die durch eine nicht vorschrichtsmäßige Entsorgung bedingt ist. Zudem ermöglicht wird die Wiederverwertung der Materialen, aus denen sich das Gerät zusammensetzt, was wiederum eine bedeutende Einsparung an Energie und Ressourcen mit sich bringtZur Erinnerung an die Verpflichtung, die diese Geräte getrennt zu beseitigen, ist das Produkt mit einer durchgestrichen Mülltonne gekennzeichnet.

23

24
R.D. 28 Reyrieux BP 131 - 01601 Trévoux CEDEX FranceTél. 04.74.00.92.92 - Fax 04.74.00.42.00
R.C.S. Bourg-en-Bresse B 759 200 728
In order to carry on a constant improvement, our products can be modified without prior notice.Per garantire un costante miglioramento dei nostri prodotti, ci riserviamo di modificarli senza preavviso.
Par souci d’amélioration constante, nos produits peuvent être modifiés sans préavis.Unsere Produkte werden laufend verbessert und können Vorankündigung abgeändert Werden.En el interés de mejoras constantes, nuestros productos pueden modificarse sin aviso prévio.
prin
ted
in it
aly