Embed Size (px)
Citation preview
www.acova.fr
NOTICE D’UTILISATION INSTRUCTION FOR USE
Z 2 3 0 1 0 - 0 3
Z23010-03
3
FR
Z23010-03
1 Présentation1.1 Introduction 2
1.2 Avertissements 2 1.3 Présentation de votre sèche-serviettes 4
2 Installation de votre sèche-serviettes
2.1 Avertissements 5
2.2 Choix de l’emplacement 7
2.3 Raccordement de l’appareil 7
3 Installation de votre thermostat3.1 Choix de l’emplacement 8
3.2 Caractéristiques techniques du thermostat d’ambiance 83.3 Installation 9
4 Utilisation de votre sèche-serviettes mixte4.1 Utilisation en chauffage central 10
4.2 Utilisation en chauffage électrique 10
5 Utilisation de votre thermostat5.1 Présentation 12
5.2 Activation et remplacement des piles 12
5.3 Mise à l’heure 13
5.4 Modes de fonctionnement 13
6 Fonctions avancées
6.1 Correction de la mesure de la température ambiante 19
6.2 Choix de l’affichage de la température 19
6.3 Test infrarouge 20
6.4 Retour aux réglages initiaux 20
7 Conseils d’entretien et dépannage
7.1 Opérations d’entretien courant 21
7.2 Test de chauffe 21
7.3 Résolution des problèmes 21
8 Services et garantie 23
FRANÇAIS 1
ENGLISH 25
4 5
FR FR
Z23010-03 Z23010-03
1. Présentation
1.1 Introduction
Madame, Monsieur,
Nous vous remercions d’avoir choisi ce sèche-serviettes.Élaboré avec le plus grand soin selon notre charte qualité, nous vous en sou-
haitons une entière satisfaction. Pour profiter pleinement de toutes ses possibilités, nous vous invitons à lire attentivement cette notice et à la conserver à proximité de votre appareil.
Merci de votre confiance.
1.2 Avertissements
MISE EN GARDE : Pour éviter tout danger pourles très jeunes enfants, il est recommandé d’instal-ler cet appareil de façon telle que le barreauchauffant le plus bas soit au moins à 600 mm au-dessus du sol. Attention surface très chaude. Caution, hot surface.
ATTENTION - Certaines parties de ce produit peuvent devenir très chaudes et provoquer des brûlures. Il faut prêter une attention particulière en présence d’enfants et de personnes vulnérables.
Il convient de maintenir à distance les enfants de moins de 3 ans, à moins qu’ils ne soient sous une surveillance continue.
Les enfants âgés entre 3 ans et 8 ans doivent unique-ment mettre l’appareil en marche ou à l’arrêt, à condition que ce dernier ait été placé ou installé dans une position normale prévue et que ces enfants disposent d’une sur-veillance ou aient reçu des instructions quant à l’utilisation de l’appareil en toute sécurité et en comprennent bien les dangers potentiels. Les enfants âgés entre 3 ans et 8 ans
ne doivent ni brancher, ni régler ni nettoyer l’appareil, et ni réaliser l’entretien de l’utilisateur.
Cet appareil peut être utilisé par des enfants âgés d’au moins 8 ans et par des personnes ayant des capacités physiques, sensorielles ou mentales réduites ou dénuées d’expérience ou de connaissance, s’ils (si elles) sont cor-rectement surveillé(e)s ou si des instructions relatives à l’utilisation de l’appareil en toute sécurité leur ont été don-nées et si les risques encourus ont été appréhendés. Les enfants ne doivent pas jouer avec l’appareil. Le nettoyage et l’entretien par l’usager ne doivent pas être effectués par des enfants sans surveillance.
Le radiateur sèche-serviettes doit être utilisé conformé-ment à l’usage auquel il est destiné et non comme console, chaise, jeu, échelle…
Cet appareil ne doit être branché ou raccordé, selon les règles et normes en application, que par une personne habilitée.
L’alimentation électrique doit être protégée par un dispositif différentiel résiduel de courant assigné au plus égal à 30 mA, notamment dans le cas d’une installation dans un local contenant une baignoire ou une douche.
Il est protégé contre les projections d’eau et peut être installé dans les volumes 2 et 3 (voir chapitre 2.1), sous réserve que les dispositifs de commande électrique ne puissent être touchés par une personne utilisant la baignoire ou la douche. Il ne doit pas être raccordé à une borne de terre.
IMPORTANT Si le câble d’alimentation est endommagé, il doit être remplacé par le fabricant, son service après-vente ou des personnes de qualification similaire afin d’éviter un danger.
IMPORTANT L’appareil de chauffage ne doit pas être placé juste en dessous d’une prise de courant.
6 7
FR FR
Z23010-03 Z23010-03
2. Installation de votre sèche-serviettes
2.1 Avertissements
Le câble souple monté d’origine est destiné à être relié au réseau par l’intermédiaire d’un boîtier de connexion qui devra être placé derrière l’appareil, sans interposition d’une fiche prise de courant.
Dans une cuisine ou une salle de bains, le boîtier de connexion sera placé au moins à 25 cm du sol.
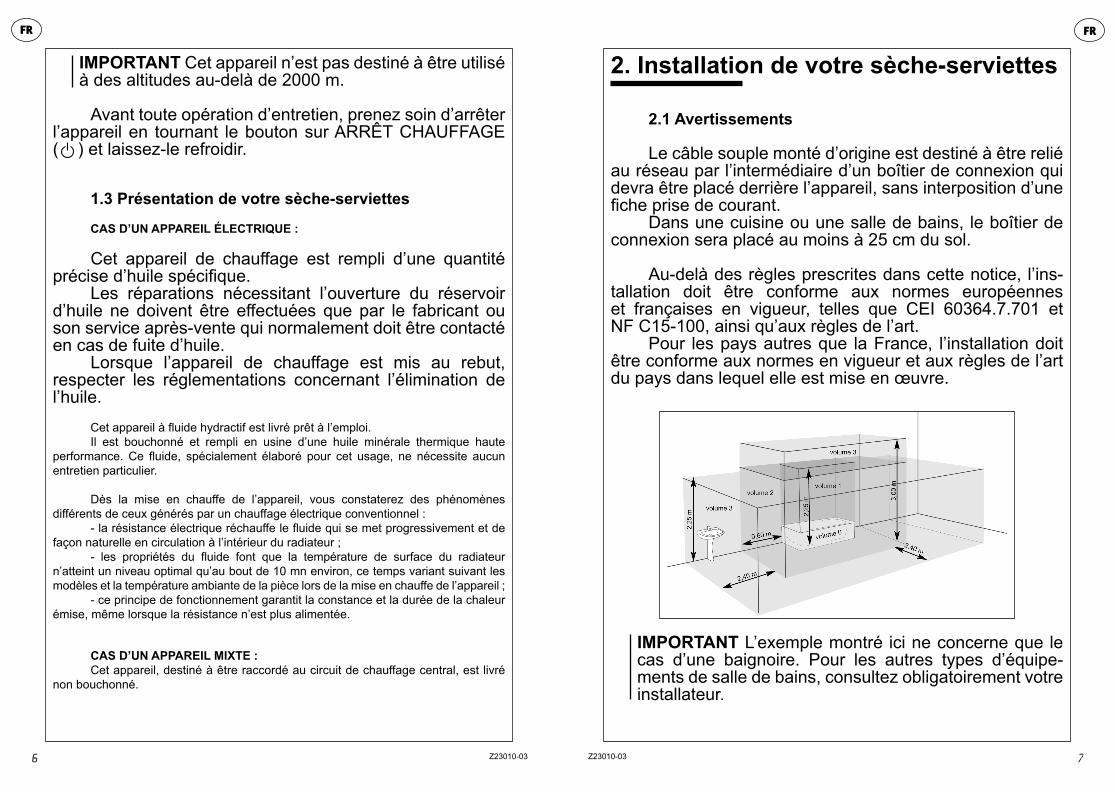
Au-delà des règles prescrites dans cette notice, l’ins-tallation doit être conforme aux normes européennes et françaises en vigueur, telles que CEI 60364.7.701 et NF C15-100, ainsi qu’aux règles de l’art.
Pour les pays autres que la France, l’installation doit être conforme aux normes en vigueur et aux règles de l’art du pays dans lequel elle est mise en œuvre.
IMPORTANT L’exemple montré ici ne concerne que le cas d’une baignoire. Pour les autres types d’équipe-ments de salle de bains, consultez obligatoirement votre installateur.
IMPORTANT Cet appareil n’est pas destiné à être utiliséà des altitudes au-delà de 2000 m.
Avant toute opération d’entretien, prenez soin d’arrêter l’appareil en tournant le bouton sur ARRÊT CHAUFFAGE ( ) et laissez-le refroidir.
1.3 Présentation de votre sèche-serviettes
CAS D’UN APPAREIL ÉLECTRIQUE :
Cet appareil de chauffage est rempli d’une quantité précise d’huile spécifique.
Les réparations nécessitant l’ouverture du réservoir d’huile ne doivent être effectuées que par le fabricant ou son service après-vente qui normalement doit être contacté en cas de fuite d’huile.
Lorsque l’appareil de chauffage est mis au rebut, respecter les réglementations concernant l’élimination de l’huile.
Cet appareil à fluide hydractif est livré prêt à l’emploi.Il est bouchonné et rempli en usine d’une huile minérale thermique haute
performance. Ce fluide, spécialement élaboré pour cet usage, ne nécessite aucun entretien particulier.
Dès la mise en chauffe de l’appareil, vous constaterez des phénomènes différents de ceux générés par un chauffage électrique conventionnel :
- la résistance électrique réchauffe le fluide qui se met progressivement et de façon naturelle en circulation à l’intérieur du radiateur ;
- les propriétés du fluide font que la température de surface du radiateur n’atteint un niveau optimal qu’au bout de 10 mn environ, ce temps variant suivant les modèles et la température ambiante de la pièce lors de la mise en chauffe de l’appareil ;
- ce principe de fonctionnement garantit la constance et la durée de la chaleur émise, même lorsque la résistance n’est plus alimentée.
CAS D’UN APPAREIL MIXTE :Cet appareil, destiné à être raccordé au circuit de chauffage central, est livré
non bouchonné.
8 9
FR FR
Z23010-03 Z23010-03
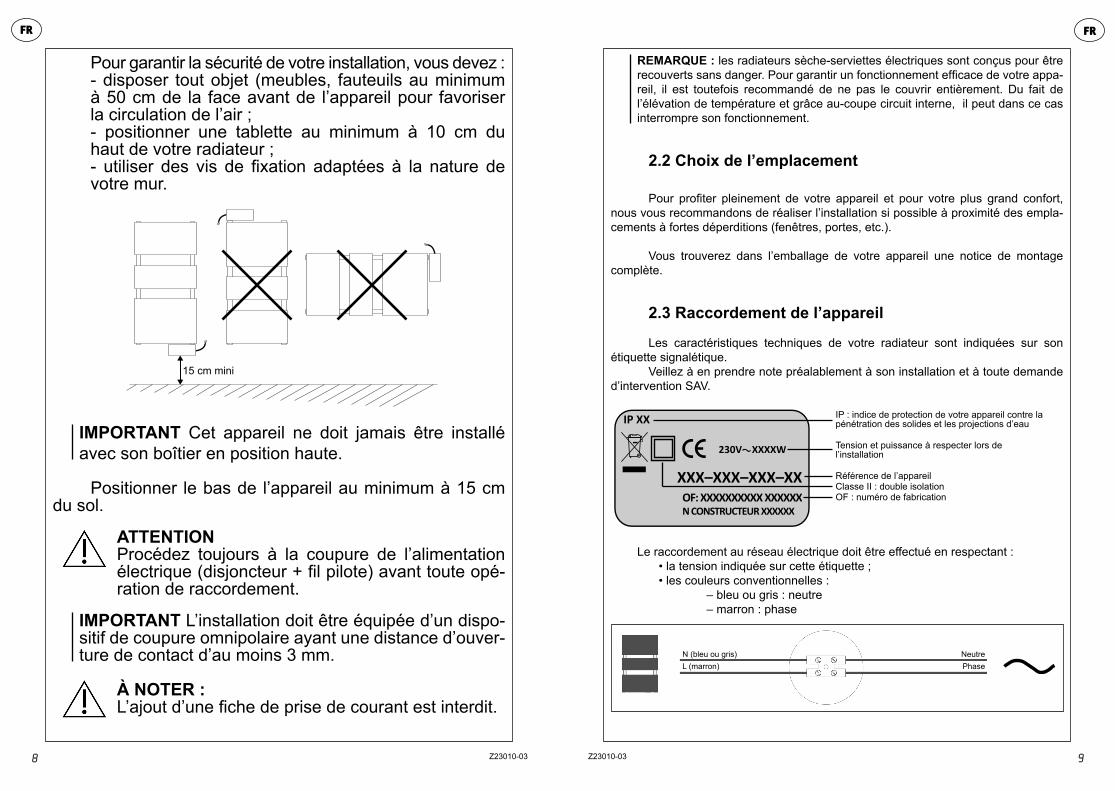
Pour garantir la sécurité de votre installation, vous devez :- disposer tout objet (meubles, fauteuils au minimum à 50 cm de la face avant de l’appareil pour favoriser la circulation de l’air ;- positionner une tablette au minimum à 10 cm du haut de votre radiateur ;- utiliser des vis de fixation adaptées à la nature de votre mur.
IMPORTANT Cet appareil ne doit jamais être installé avec son boîtier en position haute.
Positionner le bas de l’appareil au minimum à 15 cm du sol.
ATTENTIONProcédez toujours à la coupure de l’alimentation électrique (disjoncteur + fil pilote) avant toute opé-ration de raccordement.
IMPORTANT L’installation doit être équipée d’un dispo-sitif de coupure omnipolaire ayant une distance d’ouver-ture de contact d’au moins 3 mm.
À NOTER :L’ajout d’une fiche de prise de courant est interdit.
15 cm mini
REMARQUE : les radiateurs sèche-serviettes électriques sont conçus pour être recouverts sans danger. Pour garantir un fonctionnement efficace de votre appa-reil, il est toutefois recommandé de ne pas le couvrir entièrement. Du fait de l’élévation de température et grâce au-coupe circuit interne, il peut dans ce cas interrompre son fonctionnement.
2.2 Choix de l’emplacement
Pour profiter pleinement de votre appareil et pour votre plus grand confort, nous vous recommandons de réaliser l’installation si possible à proximité des empla-cements à fortes déperditions (fenêtres, portes, etc.).
Vous trouverez dans l’emballage de votre appareil une notice de montage complète.
2.3 Raccordement de l’appareil
Les caractéristiques techniques de votre radiateur sont indiquées sur son étiquette signalétique.
Veillez à en prendre note préalablement à son installation et à toute demande d’intervention SAV.
Le raccordement au réseau électrique doit être effectué en respectant : • la tension indiquée sur cette étiquette ; • les couleurs conventionnelles : – bleu ou gris : neutre – marron : phase
IP : indice de protection de votre appareil contre la pénétration des solides et les projections d’eau
Tension et puissance à respecter lors del’installation
Référence de l’appareilClasse II : double isolationOF : numéro de fabrication
IP XX
XXX–XXX–XXX–XX
230V XXXXW
OF: XXXXXXXXXX XXXXXXN CONSTRUCTEUR XXXXXX
PhaseNeutre
L (marron)N (bleu ou gris)

10 11
FR FR
Z23010-03 Z23010-03
3. Installation de votre thermostat
3.1 Choix de l’emplacement
Pour réguler votre appareil, le thermostat doit mesurer la température ambiante la plus représentative possible de votre pièce.
Le thermostat doit être situé impérativement dans la pièce où se trouve votre sèche-serviettes. Il doit se trouver en visée directe et à une distance de 10 mètres maximum sans obstacle (mur, meuble, etc.) pour assurer une bonne réception du signal infrarouge.
Sous certaines conditions le signal peut être réfléchi par les surfaces claires et lisses (carrelages).
Avant toute fixation définitive assurez-vous qu’aucun objet ne perturbera la transmission entre l’émetteur et le récepteur de votre sèche-serviettes et réalisez un test infrarouge (voir chapitre 6.3).
La sonde de mesure de la température étant située dans le boîtier du thermos-tat d’ambiance, vous devez placer celui-ci :
– sur un mur ou posé sur une étagère ou un meuble accessible à une hauteur de 1,50 m environ ;– à l’abri des sources de chaleur (lumière, influence du soleil, etc.) et descourants d’air (fenêtre, porte, ventilation) ;– en évitant tout mur en contact avec l’extérieur ou avec une pièce non chauf-fée (garage, etc.).
Fixé au mur
Mini 20 cm
Hauteurenviron 1,50 m
Posé sur un meuble
3.2 Caractéristiques techniques du thermostat d’ambiance
- Alimentation par 2 piles alcalines 1,5V type LR03 ou AAA (fournies), autono-mie supérieure à 2 ans en utilisation normale,
- Dispositif de télécommande à portée infrarouge de 10 mètres en champ libre, à angle d’émission de 50°
- Température de fonctionnement : 0°C à + 40°C
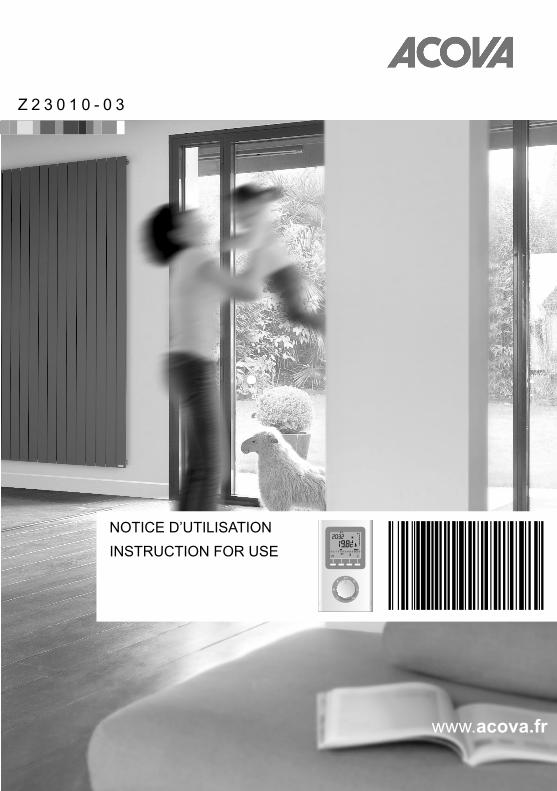
3.3 Installation
Vous pouvez au choix positionner votre thermostat sur son socle (fourni) ou le fixer à un mur de la pièce.
3.3.1 Fixation murale
Soulevez le capot à l’aide d’un tournevis (A). Enlevez les piles livrées avec l’appareil.
Fixez le thermostat à l’aide de vis et de chevilles ou sur une boîte d’encastrement (B : entraxe de 60 mm).
Remettez les piles en place en respectant leur polarité.Pour une première utilisation, retirez la languette
d’activation (voir chapitre 5.2).
3.3.2 Fixation sur socle
En utilisant le support fourni, vous pouvez poser l’émetteur sur un meuble.
A
B
1
2
+ -
- +
12 13
FR FR
Z23010-03 Z23010-03
4. Utilisation de votre sèche-serviettes mixte
IMPORTANT Cet appareil a été conçu pour être utilisé distinctement en mode chauffage central ou en mode électrique. Chaque utilisation requiert des dispositions particulières, spécifiques et précises. Une exploitation anormale peut entraîner la détérioration de la résistance suite à des températures de fluide excessives, en parti-culier dans le cas d’une utilisation simultanée en mode électrique et chauffage central.Tout usage inapproprié entraînera l’annulation de la garantie contractuelle.
4.1 Utilisation en chauffage central
Le thermostat doit être en position ARRÊT CHAUFFAGE .Le robinet d’alimentation doit être ouvert pour laisser passer l’eau du chauffage
central.Nous vous conseillons de couper l’alimentation électrique du radiateur grâce à
un coupe-circuit.
4.2 Utilisation en chauffage électrique
A. Lors de l’utilisation du radiateur sèche-serviettes mixte en « fonction élec-trique », fermer uniquement le robinet d’alimentation et NE JAMAIS FERMER LE RETOUR pour permettre l’expansion du fluide vers l’installation.
ATTENTIONLa fermeture du retour peut entrainer la destruction du corps de chauffe suite à une pression supérieure à la pression d’utilisation.
B. S’assurer que l’appareil est correctement rempli d’eau en ouvrant le purgeur situé en partie haute. Le refermer si l’eau sort régulièrement, prévoir pour cette opéra-tion une éponge et un petit récipient.
Si la pression n’est pas suffisante pour permettre la purge du corps de chauffe :• remplir le chauffage central d’eau jusqu’à la pression indiquée sur votre
manomètre,
• demander conseil à votre installateur chauffagiste,• prévenir la société d’exploitation (en chauffage collectif).
C. Pour la mise en marche, procéder comme pour un appareil sèche-serviettes électrique.
Si l’installation du chauffage central est pourvue d’une pompe de circulation indépendante de la chaudière, IL EST IMPÉRATIF DE L’ARRÊTER (risque de siphon-ner le corps de chauffe dans le cas d’une étanchéité imparfaite des raccords).
IMPORTANT La mise sous tension de l’appareil doit s’effectuer uniquement si celui-ci est correctement rempli d’eau (sous risque d’annulation de la garantie).
IMPORTANT Ce radiateur est équipé d’une résistance possédant un coupe- circuit intégré et un fusible. Son utilisation sans eau entraînera la détériora-tion définitive du fusible et par conséquent celle de la résistance : cet incident, « non couvert par la garantie constructeur », nécessitera impérativement son échange. L’utilisation du radiateur partiellement rempli d’eau entraînera la coupure du coupe-circuit thermique. Ce dernier maintiendra un fonctionnement alterné tant que le corps de chauffe n’est pas correctement rempli.
Si vous constatez que la partie électrique de votre sèche-serviettes est activée, et que celui-ci ne chauffe plus malgré une demande du thermostat ou une marche forcée, procédez aux manœuvres suivantes :
1) Assurez-vous que votre radiateur est correctement rempli d’eau (voir para-graphe B).
2) Positionnez l’émetteur sur ARRÊT CHAUFFAGE et arrêtez la fonction élec-trique pendant 30 à 60 minutes. Cette opération est nécessaire pour désamorcer la sécurité thermique.
3) Positionnez le thermostat sur le mode désiré.
14 15
FR FR
Z23010-03 Z23010-03
5. Utilisation de votre thermostat
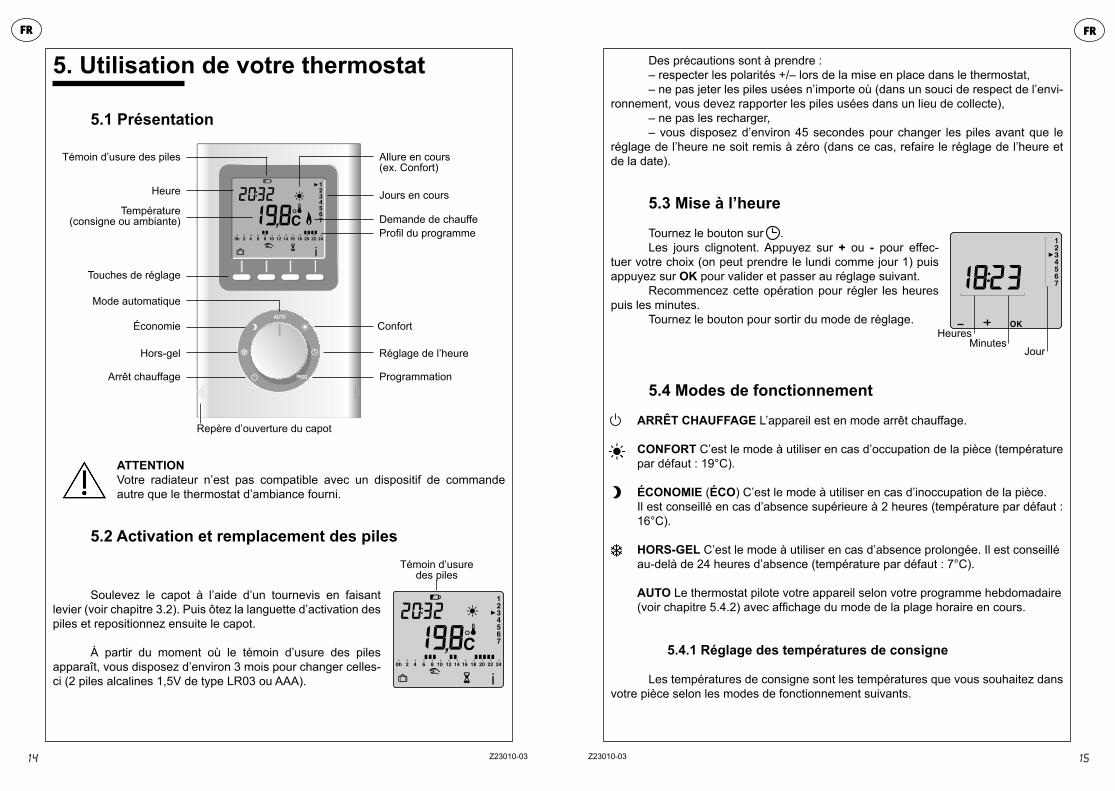
5.1 Présentation
ATTENTIONVotre radiateur n’est pas compatible avec un dispositif de commande autre que le thermostat d’ambiance fourni.
5.2 Activation et remplacement des piles
Soulevez le capot à l’aide d’un tournevis en faisant levier (voir chapitre 3.2). Puis ôtez la languette d’activation des piles et repositionnez ensuite le capot.
À partir du moment où le témoin d’usure des piles apparaît, vous disposez d’environ 3 mois pour changer celles-ci (2 piles alcalines 1,5V de type LR03 ou AAA).
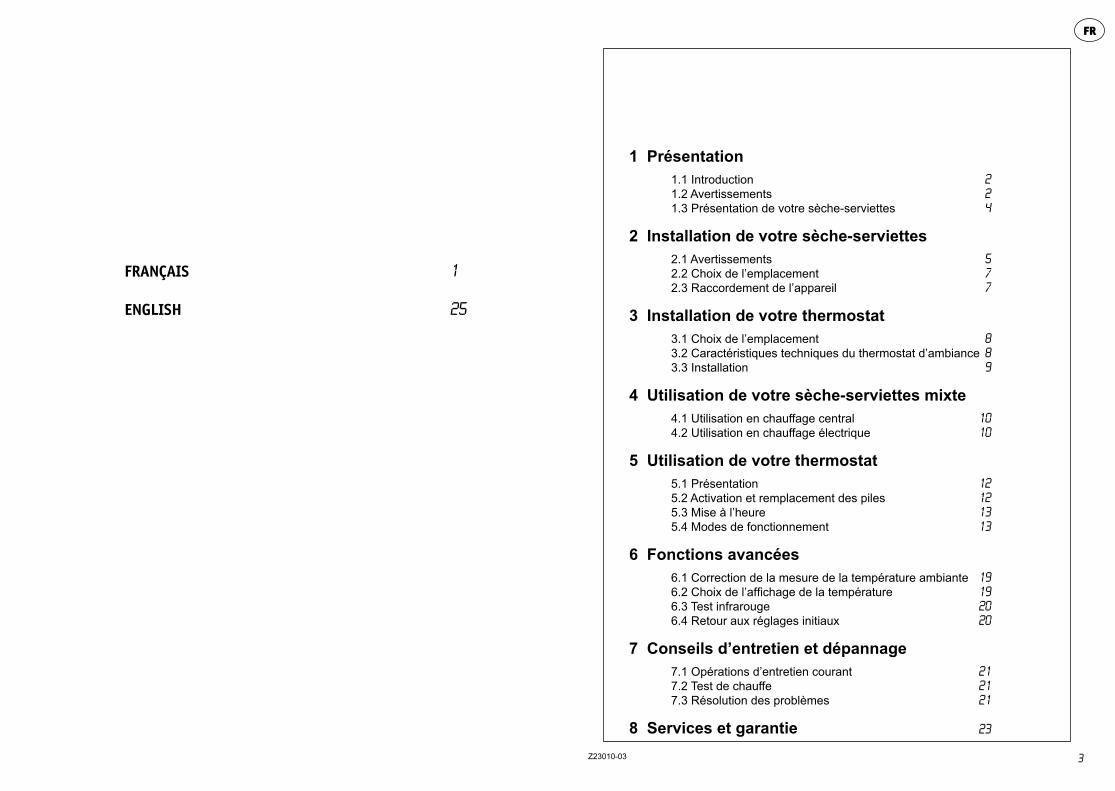
Heure
Témoin d’usure des piles
Jours en cours
Demande de chauffeProfil du programme
Confort
Réglage de l’heure
Programmation
Repère d’ouverture du capot
Température(consigne ou ambiante)
Touches de réglage
Mode automatique
Économie
Hors-gel
Arrêt chauffage
Allure en cours (ex. Confort)
Témoin d’usuredes piles
Des précautions sont à prendre :– respecter les polarités +/– lors de la mise en place dans le thermostat,– ne pas jeter les piles usées n’importe où (dans un souci de respect de l’envi-
ronnement, vous devez rapporter les piles usées dans un lieu de collecte),– ne pas les recharger,– vous disposez d’environ 45 secondes pour changer les piles avant que le
réglage de l’heure ne soit remis à zéro (dans ce cas, refaire le réglage de l’heure et de la date).
5.3 Mise à l’heure
Tournez le bouton sur .Les jours clignotent. Appuyez sur + ou - pour effec-
tuer votre choix (on peut prendre le lundi comme jour 1) puis appuyez sur OK pour valider et passer au réglage suivant.
Recommencez cette opération pour régler les heures puis les minutes.
Tournez le bouton pour sortir du mode de réglage.
5.4 Modes de fonctionnement
ARRÊT CHAUFFAGE L’appareil est en mode arrêt chauffage.
CONFORT C’est le mode à utiliser en cas d’occupation de la pièce (température par défaut : 19°C).
ÉCONOMIE (ÉCO) C’est le mode à utiliser en cas d’inoccupation de la pièce.Il est conseillé en cas d’absence supérieure à 2 heures (température par défaut : 16°C).
HORS-GEL C’est le mode à utiliser en cas d’absence prolongée. Il est conseilléau-delà de 24 heures d’absence (température par défaut : 7°C).
AUTO Le thermostat pilote votre appareil selon votre programme hebdomadaire(voir chapitre 5.4.2) avec affichage du mode de la plage horaire en cours.
5.4.1 Réglage des températures de consigne
Les températures de consigne sont les températures que vous souhaitez dans votre pièce selon les modes de fonctionnement suivants.
HeuresMinutes
Jour
16 17
FR FR
Z23010-03 Z23010-03
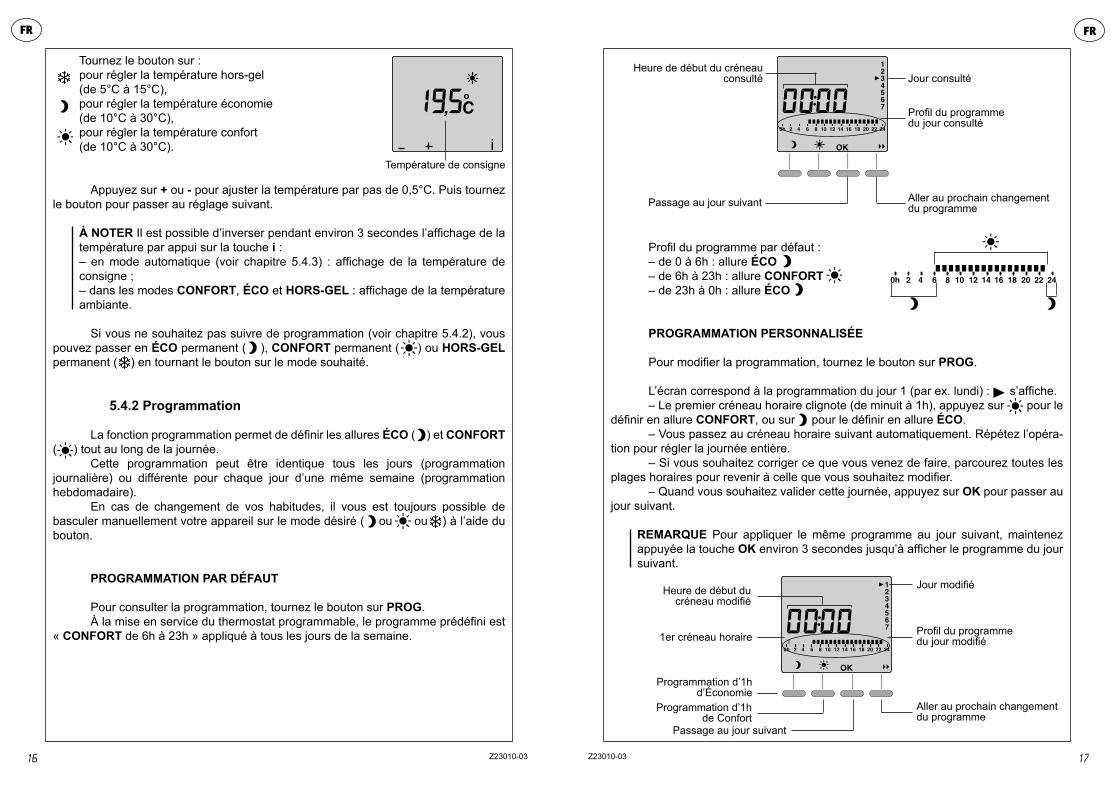
Tournez le bouton sur :pour régler la température hors-gel(de 5°C à 15°C),pour régler la température économie(de 10°C à 30°C),pour régler la température confort(de 10°C à 30°C).
Appuyez sur + ou - pour ajuster la température par pas de 0,5°C. Puis tournez le bouton pour passer au réglage suivant.
À NOTER Il est possible d’inverser pendant environ 3 secondes l’affichage de la température par appui sur la touche i :– en mode automatique (voir chapitre 5.4.3) : affichage de la température de consigne ;– dans les modes CONFORT, ÉCO et HORS-GEL : affichage de la température ambiante.
Si vous ne souhaitez pas suivre de programmation (voir chapitre 5.4.2), vous pouvez passer en ÉCO permanent ( ), CONFORT permanent ( ) ou HORS-GEL permanent ( ) en tournant le bouton sur le mode souhaité.
5.4.2 Programmation
La fonction programmation permet de définir les allures ÉCO ( ) et CONFORT ( ) tout au long de la journée.
Cette programmation peut être identique tous les jours (programmation journalière) ou différente pour chaque jour d’une même semaine (programmation hebdomadaire).
En cas de changement de vos habitudes, il vous est toujours possible de basculer manuellement votre appareil sur le mode désiré ( ou ou ) à l’aide du bouton.
PROGRAMMATION PAR DÉFAUT
Pour consulter la programmation, tournez le bouton sur PROG.À la mise en service du thermostat programmable, le programme prédéfini est
« CONFORT de 6h à 23h » appliqué à tous les jours de la semaine.
Température de consigne
Profil du programme par défaut :– de 0 à 6h : allure ÉCO– de 6h à 23h : allure CONFORT– de 23h à 0h : allure ÉCO
PROGRAMMATION PERSONNALISÉE
Pour modifier la programmation, tournez le bouton sur PROG.
L’écran correspond à la programmation du jour 1 (par ex. lundi) : s’affiche.– Le premier créneau horaire clignote (de minuit à 1h), appuyez sur pour le
définir en allure CONFORT, ou sur pour le définir en allure ÉCO.– Vous passez au créneau horaire suivant automatiquement. Répétez l’opéra-
tion pour régler la journée entière.– Si vous souhaitez corriger ce que vous venez de faire, parcourez toutes les
plages horaires pour revenir à celle que vous souhaitez modifier.– Quand vous souhaitez valider cette journée, appuyez sur OK pour passer au
jour suivant.
REMARQUE Pour appliquer le même programme au jour suivant, maintenez appuyée la touche OK environ 3 secondes jusqu’à afficher le programme du jour suivant.
Programmation d’1h d’Économie
Programmation d’1hde Confort
Passage au jour suivant
Aller au prochain changement du programme
Jour modifié
Profil du programmedu jour modifié
Heure de début ducréneau modifié
1er créneau horaire
Heure de début du créneau consulté
Passage au jour suivant
Jour consulté
Profil du programmedu jour consulté
Aller au prochain changementdu programme
18 19
FR FR
Z23010-03 Z23010-03
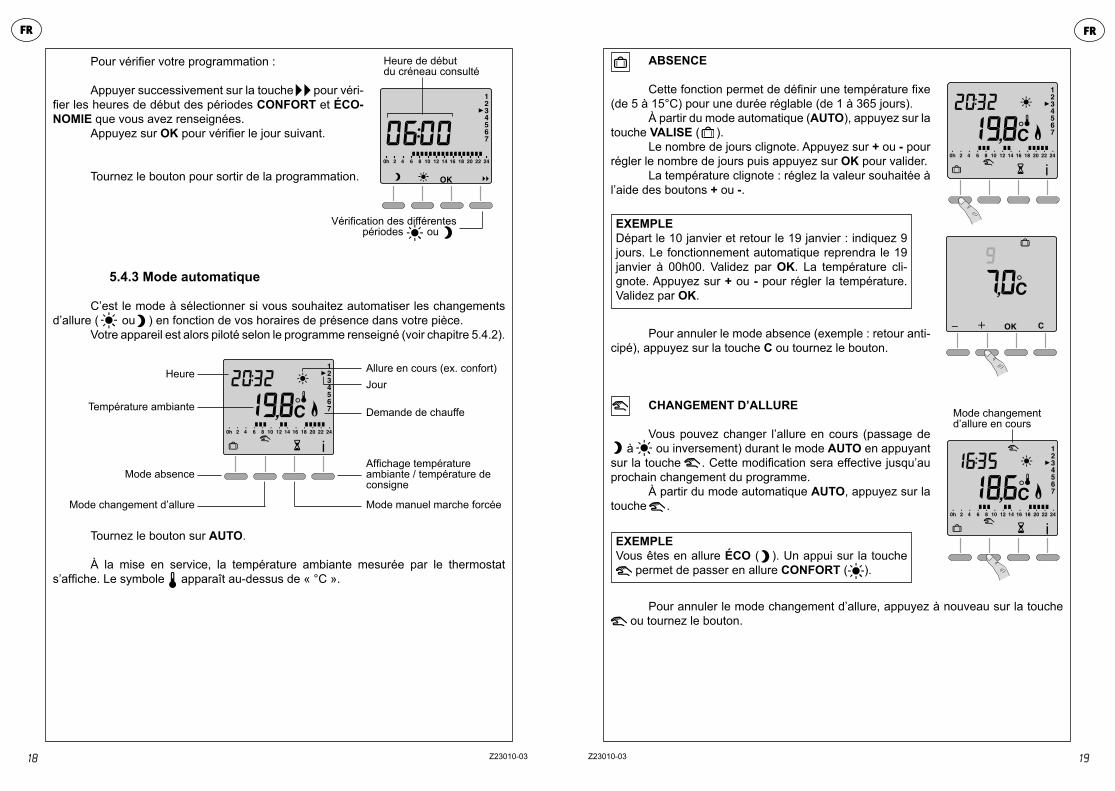
Pour vérifier votre programmation :
Appuyer successivement sur la touche pour véri-fier les heures de début des périodes CONFORT et ÉCO-NOMIE que vous avez renseignées.
Appuyez sur OK pour vérifier le jour suivant.
Tournez le bouton pour sortir de la programmation.
5.4.3 Mode automatique
C’est le mode à sélectionner si vous souhaitez automatiser les changements d’allure ( ou ) en fonction de vos horaires de présence dans votre pièce.
Votre appareil est alors piloté selon le programme renseigné (voir chapitre 5.4.2).
Tournez le bouton sur AUTO.
À la mise en service, la température ambiante mesurée par le thermostat s’affiche. Le symbole apparaît au-dessus de « °C ».
Vérification des différentes périodes ou
Affichage température ambiante / température de consigne
Allure en cours (ex. confort)Jour
Heure de débutdu créneau consulté
Demande de chauffe
Mode manuel marche forcée
Heure
Température ambiante
Mode absence
Mode changement d’allure
ABSENCE
Cette fonction permet de définir une température fixe (de 5 à 15°C) pour une durée réglable (de 1 à 365 jours).
À partir du mode automatique (AUTO), appuyez sur la touche VALISE ( ).
Le nombre de jours clignote. Appuyez sur + ou - pour régler le nombre de jours puis appuyez sur OK pour valider.
La température clignote : réglez la valeur souhaitée à l’aide des boutons + ou -.
Pour annuler le mode absence (exemple : retour anti-cipé), appuyez sur la touche C ou tournez le bouton.
CHANGEMENT D’ALLURE
Vous pouvez changer l’allure en cours (passage de à ou inversement) durant le mode AUTO en appuyant sur la touche . Cette modification sera effective jusqu’au prochain changement du programme.
À partir du mode automatique AUTO, appuyez sur la touche .
Pour annuler le mode changement d’allure, appuyez à nouveau sur la touche ou tournez le bouton.
EXEMPLEDépart le 10 janvier et retour le 19 janvier : indiquez 9 jours. Le fonctionnement automatique reprendra le 19 janvier à 00h00. Validez par OK. La température cli-gnote. Appuyez sur + ou - pour régler la température. Validez par OK.
EXEMPLEVous êtes en allure ÉCO ( ). Un appui sur la touche
permet de passer en allure CONFORT ( ).
Mode changement d’allure en cours

20 21
FR FR
Z23010-03 Z23010-03
BOOST MANUEL
La touche permet la chauffe ininterrompue à pleine puissance de votre appareil pour une durée réglable de 30 minutes à 4 heures (marche forcée).
À partir du mode automatique AUTO, appuyez sur la touche .
La durée du mode manuel clignote. Appuyez sur + ou - pour régler la durée souhaitée par pas de 30 minutes. Validez par OK.
Le temps restant défile alors. Vous pouvez inter-rompre à tout moment ce mode manuel par appui sur la touche C.
5.4.4 Mode arrêt chauffage
Pour mettre en arrêt chauffage le radiateur (en été, par exemple), tournez le bouton sur . Le thermostat affiche la température ambiante mesurée.
Mode manuel en cours
Température ambiante
Arrêt chauffage
6. Fonctions avancées (pour utilisateurs avertis)
Tournez le bouton sur ARRÊT CHAUFFAGE ( ) et appuyez 5 secondes sur la touche de droite jusqu’à afficher H600 x:xx (numéro de version de la télécommande).
Appuyez sur OK. L’écran affiche CF01.
6.1 Correction de la mesure de la température ambiante (CF01)
À l’aide des touches + ou -, vous pouvez ajuster de +/- 4°C la température ambiante mesurée par le thermostat en cas de décalage avec la température constatée dans la pièce.
Appuyez sur + ou - pour effectuer votre réglage puis sur OK pour valider et passer au menu suivant.
6.2 Choix de l’affichage de la température en mode AUTO (CF02)
Cette fonction vous permet de visualiser au choix soit la température ambiante mesurée par votre thermostat, soit la température de consigne.
Appuyez sur + ou - pour effectuer votre choix puis sur OK pour valider et passer au menu suivant.
0 : affichage permanent de la température ambiante1 : affichage permanent de la température de consigne
5 sec.
22 23
FR FR
Z23010-03 Z23010-03
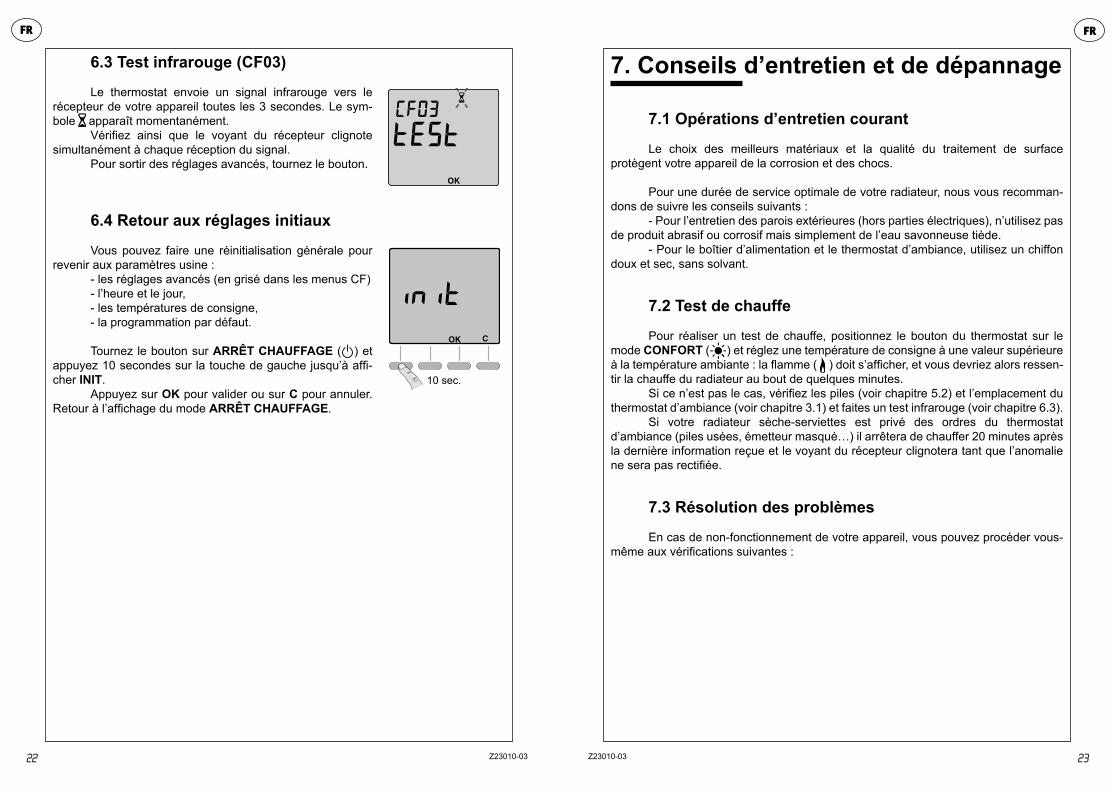
6.3 Test infrarouge (CF03)
Le thermostat envoie un signal infrarouge vers le récepteur de votre appareil toutes les 3 secondes. Le sym-bole apparaît momentanément.
Vérifiez ainsi que le voyant du récepteur clignote simultanément à chaque réception du signal.
Pour sortir des réglages avancés, tournez le bouton.
6.4 Retour aux réglages initiaux
Vous pouvez faire une réinitialisation générale pour revenir aux paramètres usine :
- les réglages avancés (en grisé dans les menus CF)- l’heure et le jour,- les températures de consigne,- la programmation par défaut.
Tournez le bouton sur ARRÊT CHAUFFAGE ( ) et appuyez 10 secondes sur la touche de gauche jusqu’à affi-cher INIT.
Appuyez sur OK pour valider ou sur C pour annuler. Retour à l’affichage du mode ARRÊT CHAUFFAGE.
10 sec.
7. Conseils d’entretien et de dépannage
7.1 Opérations d’entretien courant
Le choix des meilleurs matériaux et la qualité du traitement de surface protègent votre appareil de la corrosion et des chocs.
Pour une durée de service optimale de votre radiateur, nous vous recomman-dons de suivre les conseils suivants :
- Pour l’entretien des parois extérieures (hors parties électriques), n’utilisez pas de produit abrasif ou corrosif mais simplement de l’eau savonneuse tiède.
- Pour le boîtier d’alimentation et le thermostat d’ambiance, utilisez un chiffon doux et sec, sans solvant.
7.2 Test de chauffe
Pour réaliser un test de chauffe, positionnez le bouton du thermostat sur le mode CONFORT ( ) et réglez une température de consigne à une valeur supérieure à la température ambiante : la flamme ( ) doit s’afficher, et vous devriez alors ressen-tir la chauffe du radiateur au bout de quelques minutes.
Si ce n’est pas le cas, vérifiez les piles (voir chapitre 5.2) et l’emplacement du thermostat d’ambiance (voir chapitre 3.1) et faites un test infrarouge (voir chapitre 6.3).
Si votre radiateur sèche-serviettes est privé des ordres du thermostat d’ambiance (piles usées, émetteur masqué…) il arrêtera de chauffer 20 minutes après la dernière information reçue et le voyant du récepteur clignotera tant que l’anomalie ne sera pas rectifiée.
7.3 Résolution des problèmes
En cas de non-fonctionnement de votre appareil, vous pouvez procéder vous-même aux vérifications suivantes :
24 25
FR FR
Z23010-03 Z23010-03
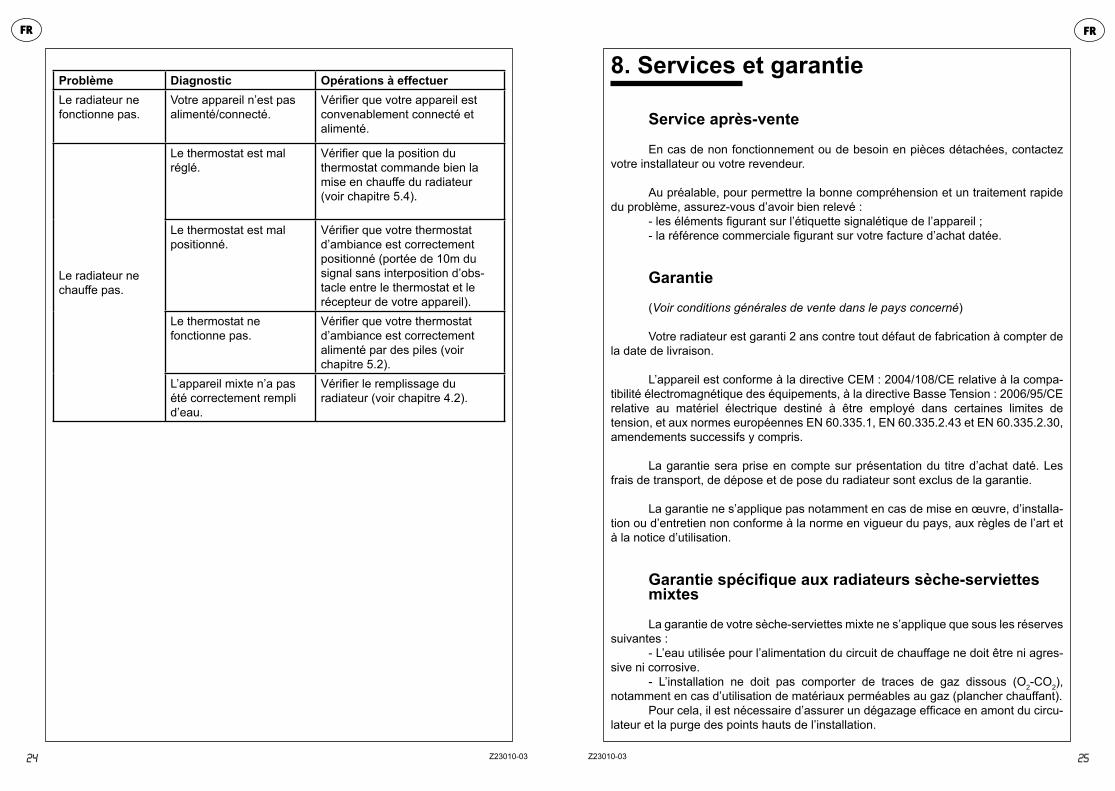
Problème Diagnostic Opérations à effectuerLe radiateur ne fonctionne pas.
Votre appareil n’est pas alimenté/connecté.
Vérifier que votre appareil est convenablement connecté et alimenté.
Le radiateur ne chauffe pas.
Le thermostat est mal réglé.
Vérifier que la position duthermostat commande bien la mise en chauffe du radiateur(voir chapitre 5.4).
Le thermostat est mal positionné.
Vérifier que votre thermostat d’ambiance est correctement positionné (portée de 10m dusignal sans interposition d’obs-tacle entre le thermostat et le récepteur de votre appareil).
Le thermostat nefonctionne pas.
Vérifier que votre thermostat d’ambiance est correctementalimenté par des piles (voirchapitre 5.2).
L’appareil mixte n’a pas été correctement rempli d’eau.
Vérifier le remplissage duradiateur (voir chapitre 4.2).
8. Services et garantie
Service après-vente
En cas de non fonctionnement ou de besoin en pièces détachées, contactez votre installateur ou votre revendeur.
Au préalable, pour permettre la bonne compréhension et un traitement rapide du problème, assurez-vous d’avoir bien relevé :
- les éléments figurant sur l’étiquette signalétique de l’appareil ;- la référence commerciale figurant sur votre facture d’achat datée.
Garantie
(Voir conditions générales de vente dans le pays concerné)
Votre radiateur est garanti 2 ans contre tout défaut de fabrication à compter de la date de livraison.
L’appareil est conforme à la directive CEM : 2004/108/CE relative à la compa-tibilité électromagnétique des équipements, à la directive Basse Tension : 2006/95/CE relative au matériel électrique destiné à être employé dans certaines limites de tension, et aux normes européennes EN 60.335.1, EN 60.335.2.43 et EN 60.335.2.30, amendements successifs y compris.
La garantie sera prise en compte sur présentation du titre d’achat daté. Les frais de transport, de dépose et de pose du radiateur sont exclus de la garantie.
La garantie ne s’applique pas notamment en cas de mise en œuvre, d’installa-tion ou d’entretien non conforme à la norme en vigueur du pays, aux règles de l’art et à la notice d’utilisation.
Garantie spécifique aux radiateurs sèche-serviettes mixtes
La garantie de votre sèche-serviettes mixte ne s’applique que sous les réserves suivantes :
- L’eau utilisée pour l’alimentation du circuit de chauffage ne doit être ni agres-sive ni corrosive.
- L’installation ne doit pas comporter de traces de gaz dissous (O2-CO2), notamment en cas d’utilisation de matériaux perméables au gaz (plancher chauffant).
Pour cela, il est nécessaire d’assurer un dégazage efficace en amont du circu-lateur et la purge des points hauts de l’installation.
27
EN
Z23010-0326
FR
Z23010-03
Règlementations environnementales
RoHS : conforme à la directive 2011/65/UEDEEE : conforme à la directive 2002/96/CE
Traitement des appareils électriques et électroniques en fin de vie. Ce symbole indique que ce produit ne doit pas être traité avec les déchets ménagers. Il doit être remis à un point de collecte approprié qui se chargera de son recyclage. En s’assurant que ce produit est bien mis au rebut de manière correcte, vous aiderez à prévenir les conséquences négatives potentielles pour l’environnement et la santé humaine.
1 Overview1.1 Introduction 26
1.2 Warnings 26 1.3 Overview of your towel radiator 28
2 Installing your appliance
2.1 Warnings 29
2.2 Positioning your appliance 31
2.3 Connecting the appliance 31
3 Installing your thermostat3.1 Positioning the room thermostat 32
3.2 Technical specifications of the room thermostat 33
3.3 Installation 33
4 Using your dual-energy towel radiator4.1 Using the radiator as part of a central heating system 344.2 Electric heating mode 34
5 Using your thermostat5.1 Overview 36
5.2 Activating and replacing the batteries 36
5.3 Setting the time 37
5.4 Operating modes 37
6 Advanced functions6.1 Adjusting the room temperature measurement 43
6.2 Selecting the temperature displayed in Auto mode 43
6.3 Infrared signal test 44
6.4 Restoring the factory settings 44
7 Maintenance and troubleshooting7.1 Routine maintenance operations 45
7.2 Heating test 45
7.3 Troubleshooting 45
8 Services and guarantee 47
28 29
EN EN
Z23010-03 Z23010-03
1. Overview
1.1 Introduction
Dear customer,
Thank you for choosing this towel radiator.This product has been manufactured in accordance with our stringent quality
requirements to give you total satisfaction. To get the most out of your radiator, we advise you to read these instructions carefully and keep them to hand.
Thank you for your purchase.
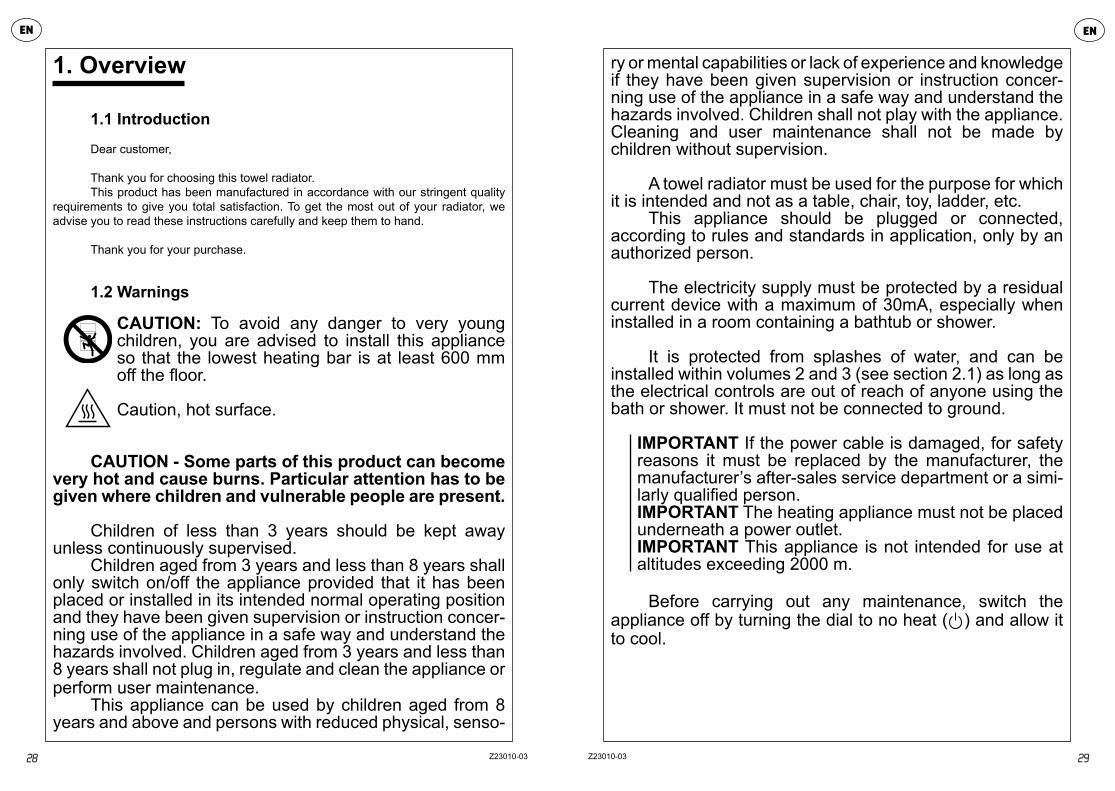
1.2 Warnings
CAUTION: To avoid any danger to very young children, you are advised to install this applianceso that the lowest heating bar is at least 600 mm off the floor.
Caution, hot surface.
CAUTION - Some parts of this product can become very hot and cause burns. Particular attention has to be given where children and vulnerable people are present.
Children of less than 3 years should be kept away unless continuously supervised.
Children aged from 3 years and less than 8 years shall only switch on/off the appliance provided that it has been placed or installed in its intended normal operating position and they have been given supervision or instruction concer-ning use of the appliance in a safe way and understand the hazards involved. Children aged from 3 years and less than 8 years shall not plug in, regulate and clean the appliance or perform user maintenance.
This appliance can be used by children aged from 8 years and above and persons with reduced physical, senso-
ry or mental capabilities or lack of experience and knowledge if they have been given supervision or instruction concer-ning use of the appliance in a safe way and understand the hazards involved. Children shall not play with the appliance. Cleaning and user maintenance shall not be made by children without supervision.
A towel radiator must be used for the purpose for which it is intended and not as a table, chair, toy, ladder, etc.
This appliance should be plugged or connected, according to rules and standards in application, only by an authorized person.
The electricity supply must be protected by a residual current device with a maximum of 30mA, especially when installed in a room containing a bathtub or shower.
It is protected from splashes of water, and can be installed within volumes 2 and 3 (see section 2.1) as long as the electrical controls are out of reach of anyone using the bath or shower. It must not be connected to ground.
IMPORTANT If the power cable is damaged, for safety reasons it must be replaced by the manufacturer, the manufacturer’s after-sales service department or a simi-larly qualified person.IMPORTANT The heating appliance must not be placed underneath a power outlet.IMPORTANT This appliance is not intended for use ataltitudes exceeding 2000 m.
Before carrying out any maintenance, switch the appliance off by turning the dial to no heat ( ) and allow it to cool.
30 31
EN EN
Z23010-03 Z23010-03
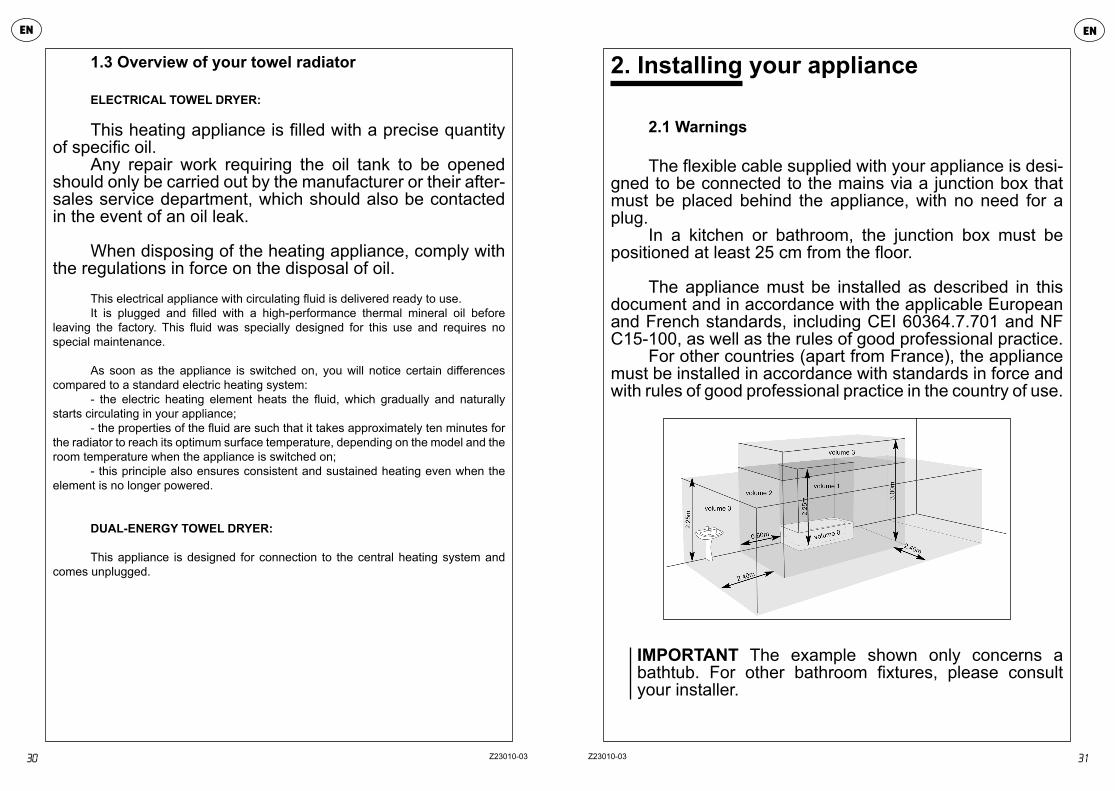
2. Installing your appliance
2.1 Warnings
The flexible cable supplied with your appliance is desi-gned to be connected to the mains via a junction box that must be placed behind the appliance, with no need for a plug.
In a kitchen or bathroom, the junction box must be positioned at least 25 cm from the floor.
The appliance must be installed as described in this document and in accordance with the applicable European and French standards, including CEI 60364.7.701 and NF C15-100, as well as the rules of good professional practice.
For other countries (apart from France), the appliance must be installed in accordance with standards in force and with rules of good professional practice in the country of use.
IMPORTANT The example shown only concerns a bathtub. For other bathroom fixtures, please consult your installer.
1.3 Overview of your towel radiator
ELECTRICAL TOWEL DRYER:
This heating appliance is filled with a precise quantity of specific oil.
Any repair work requiring the oil tank to be opened should only be carried out by the manufacturer or their after-sales service department, which should also be contacted in the event of an oil leak.
When disposing of the heating appliance, comply with the regulations in force on the disposal of oil.
This electrical appliance with circulating fluid is delivered ready to use.It is plugged and filled with a high-performance thermal mineral oil before
leaving the factory. This fluid was specially designed for this use and requires no special maintenance.
As soon as the appliance is switched on, you will notice certain differences compared to a standard electric heating system:
- the electric heating element heats the fluid, which gradually and naturally starts circulating in your appliance;
- the properties of the fluid are such that it takes approximately ten minutes for the radiator to reach its optimum surface temperature, depending on the model and the room temperature when the appliance is switched on;
- this principle also ensures consistent and sustained heating even when the element is no longer powered.
DUAL-ENERGY TOWEL DRYER:
This appliance is designed for connection to the central heating system and comes unplugged.
32 33
EN EN
Z23010-03 Z23010-03
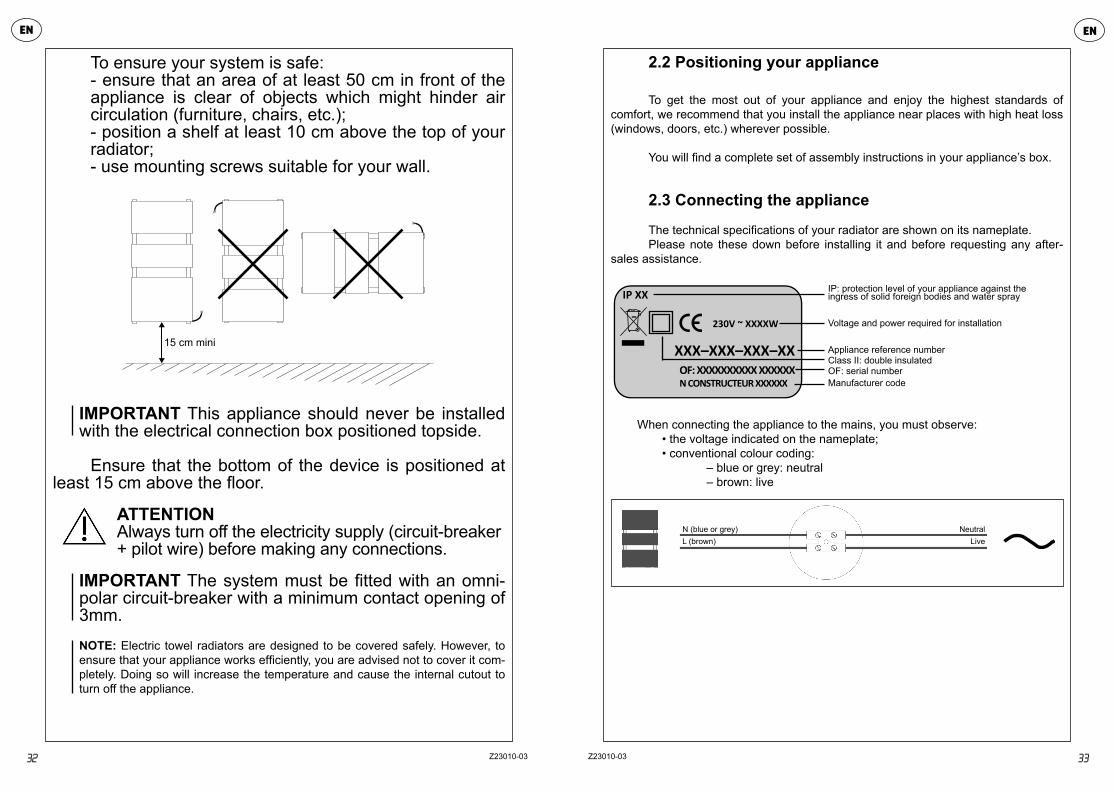
To ensure your system is safe:- ensure that an area of at least 50 cm in front of the appliance is clear of objects which might hinder air circulation (furniture, chairs, etc.);- position a shelf at least 10 cm above the top of your radiator;- use mounting screws suitable for your wall.
IMPORTANT This appliance should never be installed with the electrical connection box positioned topside.
Ensure that the bottom of the device is positioned at least 15 cm above the floor.
ATTENTIONAlways turn off the electricity supply (circuit-breaker + pilot wire) before making any connections.
IMPORTANT The system must be fitted with an omni-polar circuit-breaker with a minimum contact opening of 3mm.NOTE: Electric towel radiators are designed to be covered safely. However, to ensure that your appliance works efficiently, you are advised not to cover it com-pletely. Doing so will increase the temperature and cause the internal cutout to turn off the appliance.
15 cm mini
2.2 Positioning your appliance
To get the most out of your appliance and enjoy the highest standards of comfort, we recommend that you install the appliance near places with high heat loss (windows, doors, etc.) wherever possible.
You will find a complete set of assembly instructions in your appliance’s box.
2.3 Connecting the appliance
The technical specifications of your radiator are shown on its nameplate.Please note these down before installing it and before requesting any after-
sales assistance.
When connecting the appliance to the mains, you must observe: • the voltage indicated on the nameplate; • conventional colour coding: – blue or grey: neutral – brown: live
IP: protection level of your appliance against the ingress of solid foreign bodies and water spray
Voltage and power required for installation
Appliance reference numberClass II: double insulatedOF: serial numberManufacturer code
IP XX
XXX–XXX–XXX–XX
230V ~ XXXXW
OF: XXXXXXXXXX XXXXXXN CONSTRUCTEUR XXXXXX
LiveNeutral
L (brown)N (blue or grey)

34 35
EN EN
Z23010-03 Z23010-03
3. Installing your thermostat
3.1 Positioning the room thermostat
For effective control of your appliance, the thermostat must be able to measure the most representative ambient temperature in your room.
To ensure that the infrared signal is correctly received, the thermostat must be located in the same room as your towel radiator. It must be no more than 10 m away from the radiator in direct line of sight uninterrupted by any obstacle (wall, furniture, etc.).
Under certain conditions, the signal can be reflected off smooth shiny surfaces (such as tiles).
Before installing the thermostat permanently, check for objects likely to disrupt signals between the transmitter and the receiver on the towel radiator, and carry out an infrared signal test (see section 6.3).
The temperature sensor is located inside the room thermostat unit. Therefore, the room thermostat should be:
- mounted on a wall or placed on a shelf or an accessible piece of furniture at a height of approximately 1.50 m- protected from sources of heat (light, sunlight, etc.) and draughts (windows, doors, fans)- and should not be placed on an exterior wall or a wall adjoining an unheated room (garage etc.).
Wall mounted
20 cm min
Approximate height 1.50 m
On a piece of furniture
3.2 Technical specifications of the room thermostat
- Powered by 2x1.5 V alkaline batteries, type LR03 or AAA (supplied), battery life over 2 years under normal use.
- Remote control device with a free-field infrared signal range of 10 metres and 50° beam angle.
- Operating temperature: 0°C to +40°C.
3.3 Installation
The thermostat can either be stood on the stand supplied or mounted on a wall.
3.3.1 Wall mounting
Remove the cover using a screwdriver (A ). Re-move the batteries supplied with the device.
Secure the thermostat to the wall using screws and wall plugs or place in an electrical mounting box (B: centre to centre distance 60 mm).
Replace the batteries, ensuring the correct polarity.For a first use, remove the battery insulation tab (see
chapter 5.2).
3.3.2 Using the stand
You can place the transmitter on a piece of furniture using the stand supplied.
A
B
1
2
+ -
- +
36 37
EN EN
Z23010-03 Z23010-03
4. Using your dual-energy towel radiator
IMPORTANT This appliance was designed to be used either in central heating mode or in electric mode. Each mode of use has its own particular, specific and precise requirements. Failure to comply with these requirements may cause the radiator fluid to overheat, resulting in deterioration of the resistance, particularly when the radiator is operated in both central heating and electric modes simultaneously.Inappropriate use of the radiator will invalidate the guarantee.
4.1 Using the radiator as part of a central heating system
The thermostat must be switched to NO HEAT ( ) and the supply valve must be open to let water from the central heating system pass through the radiator.
We recommend that you install a circuit breaker to disconnect the radiator from the electricity supply.
4.2 Electric heating mode
A. When the dual-energy towel radiator is used in "electric mode", close the supply valve only. The return valve SHOULD NEVER BE CLOSED as it needs to be open to allow the fluid to expand into the central heating system.
WARNINGClosing the return valve may cause excessive pressure build-up, resulting in destruction of the heating body.
B. Ensure that the appliance is adequately filled with water by opening the bleed valve at the top of the appliance. Close it again if there is a steady flow of water (have a sponge and small receptacle available when carrying out this operation).
If the pressure is not high enough to bleed the radiator, you should:• top up the central heating system with water until the pressure indicated on your pressure gauge is achieved,• consult your central heating engineer,• inform the operator (for collective heating systems).
C. To start the appliance, follow the same procedure as for an electric towel radiator.
If the central heating system is equipped with a circulation pump which is inde-pendent of the boiler, the pump MUST BE TURNED OFF (there is a risk that water will be siphoned away from the radiator if connections are not perfectly watertight).
IMPORTANT The appliance should only be connected to the power supply when adequately filled with water (failure to do so may invalidate the guarantee).
IMPORTANT This radiator is equipped with a resistance with a built-in circuit breaker and fuse. Using the radiator without water will permanently damage the fuse and therefore the heating element. If this occurs, the heating element must be replaced. This is "not covered by the manufacturer’s guarantee". Using the radiator when only partially filled with water will trip the thermal circuit breaker. It will continue to trip periodically as long as the heating body is not properly filled.
If you notice that your towel radiator no longer heats up when in electric mode, despite a command from the thermostat or when in Boost mode:
1) Check that your radiator is adequately filled with water (see paragraph B).2) Turn the transmitter to NO HEAT and stop operation in electric mode for 30
to 60 minutes to disable the thermal safety system.3) Set the transmitter to the required mode.
38 39
EN EN
Z23010-03 Z23010-03
5. Using your thermostat
5.1 Overview
CAUTIONYour radiator is not compatible with any control unit other than the room thermostat supplied.
5.2 Activating and replacing the batteries
Lever off the cover using a screwdriver (see chapter 3.2). Remove the battery insulation tab and replace the cover.
When the low battery symbol appears, you have approximately three months to change the batteries (2x1.5V alkaline batteries of type LR03 or AAA).
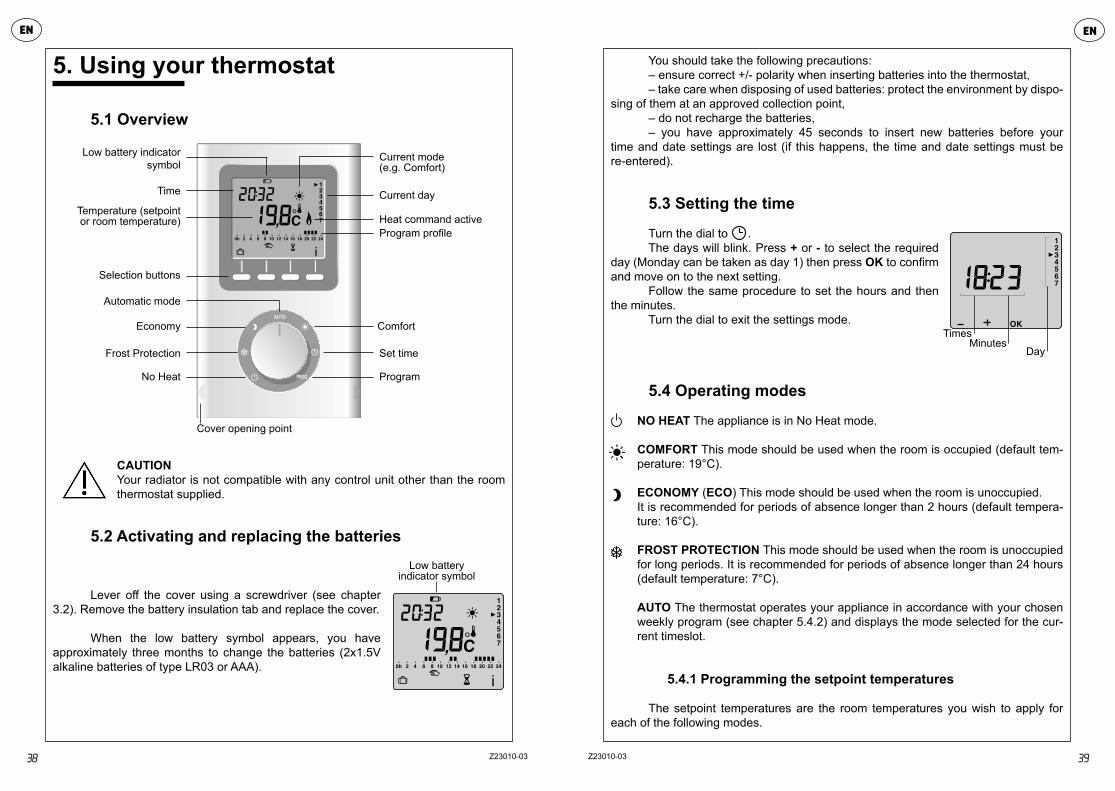
Time
Low battery indicator symbol
Current day
Heat command activeProgram profile
Comfort
Set time
Program
Cover opening point
Temperature (setpoint or room temperature)
Selection buttons
Automatic mode
Economy
Frost Protection
No Heat
Current mode (e.g. Comfort)
Low batteryindicator symbol
You should take the following precautions:– ensure correct +/- polarity when inserting batteries into the thermostat,– take care when disposing of used batteries: protect the environment by dispo-
sing of them at an approved collection point,– do not recharge the batteries,– you have approximately 45 seconds to insert new batteries before your
time and date settings are lost (if this happens, the time and date settings must be re-entered).
5.3 Setting the time
Turn the dial to .The days will blink. Press + or - to select the required
day (Monday can be taken as day 1) then press OK to confirm and move on to the next setting.
Follow the same procedure to set the hours and then the minutes.
Turn the dial to exit the settings mode.
5.4 Operating modes
NO HEAT The appliance is in No Heat mode.
COMFORT This mode should be used when the room is occupied (default tem-perature: 19°C).
ECONOMY (ECO) This mode should be used when the room is unoccupied.It is recommended for periods of absence longer than 2 hours (default tempera-ture: 16°C).
FROST PROTECTION This mode should be used when the room is unoccupied for long periods. It is recommended for periods of absence longer than 24 hours (default temperature: 7°C).
AUTO The thermostat operates your appliance in accordance with your chosen weekly program (see chapter 5.4.2) and displays the mode selected for the cur-rent timeslot.
5.4.1 Programming the setpoint temperatures
The setpoint temperatures are the room temperatures you wish to apply for each of the following modes.
TimesMinutes
Day
40 41
EN EN
Z23010-03 Z23010-03
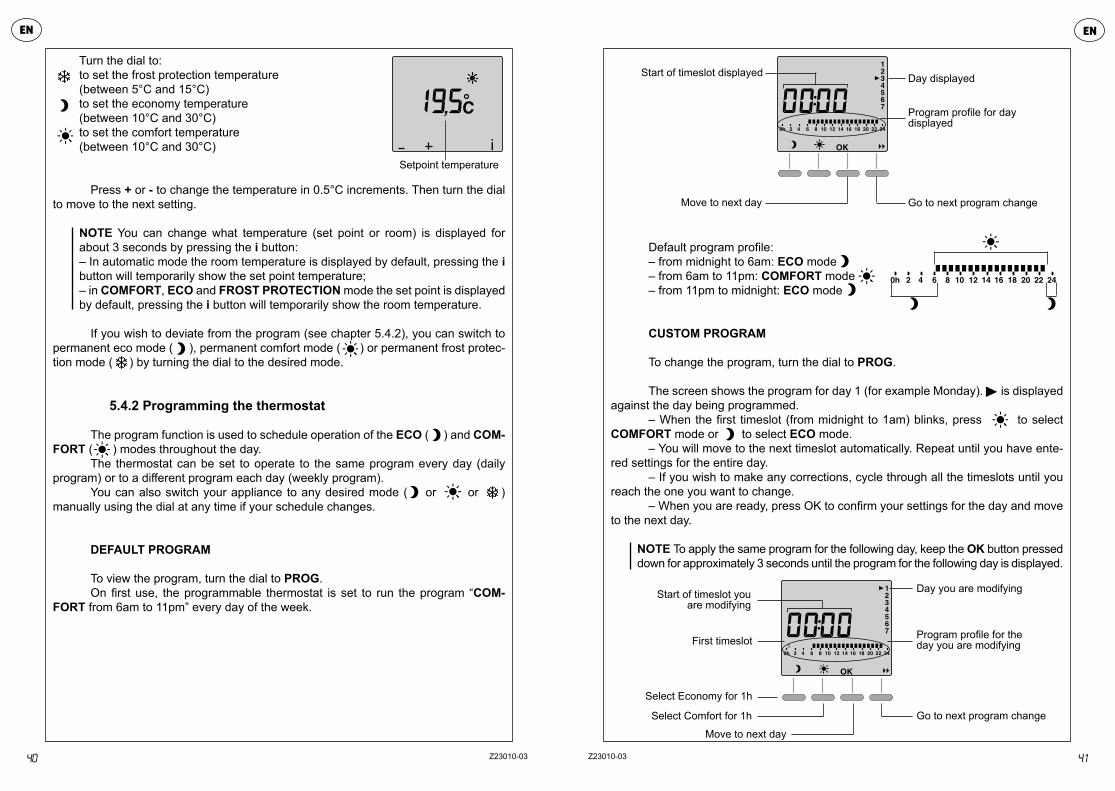
Turn the dial to:to set the frost protection temperature (between 5°C and 15°C)to set the economy temperature (between 10°C and 30°C)to set the comfort temperature (between 10°C and 30°C)
Press + or - to change the temperature in 0.5°C increments. Then turn the dial to move to the next setting.
NOTE You can change what temperature (set point or room) is displayed for about 3 seconds by pressing the i button:– In automatic mode the room temperature is displayed by default, pressing the i button will temporarily show the set point temperature;– in COMFORT, ECO and FROST PROTECTION mode the set point is displayed by default, pressing the i button will temporarily show the room temperature.
If you wish to deviate from the program (see chapter 5.4.2), you can switch to permanent eco mode ( ), permanent comfort mode ( ) or permanent frost protec-tion mode ( ) by turning the dial to the desired mode.
5.4.2 Programming the thermostat
The program function is used to schedule operation of the ECO ( ) and COM-FORT ( ) modes throughout the day.
The thermostat can be set to operate to the same program every day (daily program) or to a different program each day (weekly program).
You can also switch your appliance to any desired mode ( or or ) manually using the dial at any time if your schedule changes.
DEFAULT PROGRAM
To view the program, turn the dial to PROG.On first use, the programmable thermostat is set to run the program “COM-
FORT from 6am to 11pm” every day of the week.
Setpoint temperature
Default program profile:– from midnight to 6am: ECO mode– from 6am to 11pm: COMFORT mode– from 11pm to midnight: ECO mode
CUSTOM PROGRAM
To change the program, turn the dial to PROG.
The screen shows the program for day 1 (for example Monday). is displayed against the day being programmed.
– When the first timeslot (from midnight to 1am) blinks, press to select COMFORT mode or to select ECO mode.
– You will move to the next timeslot automatically. Repeat until you have ente-red settings for the entire day.
– If you wish to make any corrections, cycle through all the timeslots until you reach the one you want to change.
– When you are ready, press OK to confirm your settings for the day and move to the next day.
NOTE To apply the same program for the following day, keep the OK button pressed down for approximately 3 seconds until the program for the following day is displayed.
Select Economy for 1h
Select Comfort for 1h
Move to next day
Go to next program change
Day you are modifying
Program profile for the day you are modifying
Start of timeslot youare modifying
First timeslot
Start of timeslot displayed
Move to next day
Day displayed
Program profile for day displayed
Go to next program change
42 43
EN EN
Z23010-03 Z23010-03
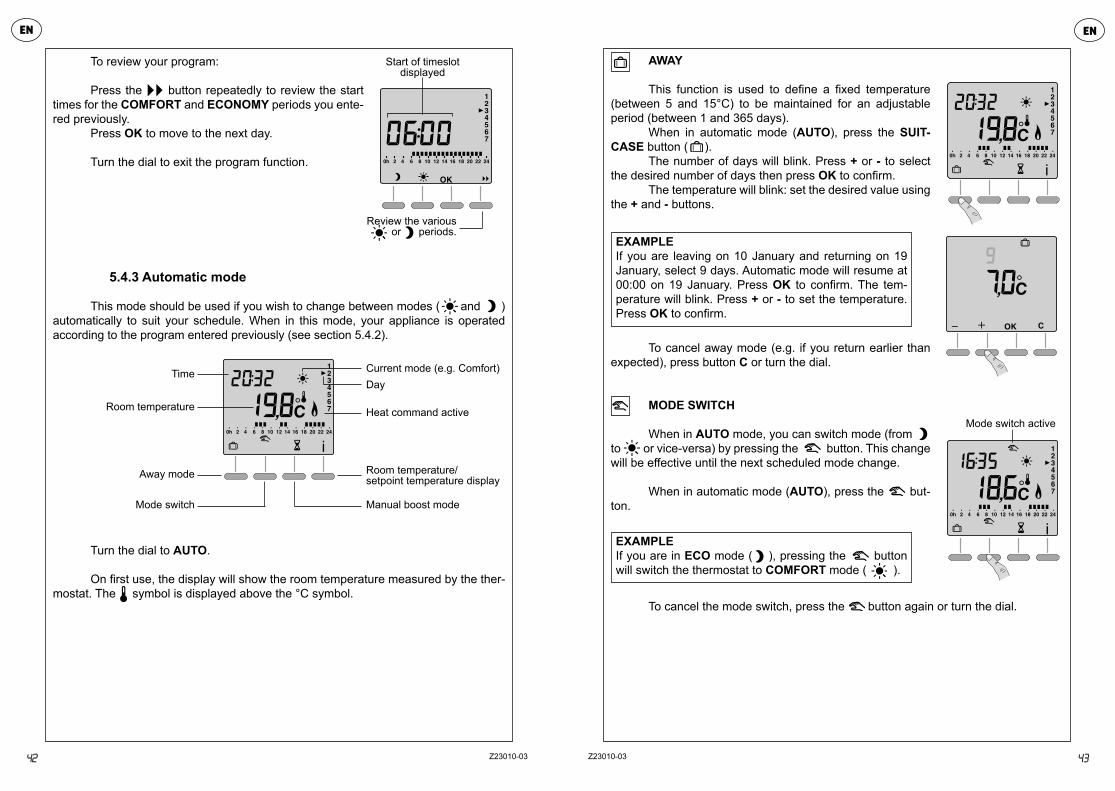
To review your program:
Press the button repeatedly to review the start times for the COMFORT and ECONOMY periods you ente-red previously.
Press OK to move to the next day.
Turn the dial to exit the program function.
5.4.3 Automatic mode
This mode should be used if you wish to change between modes ( and ) automatically to suit your schedule. When in this mode, your appliance is operated according to the program entered previously (see section 5.4.2).
Turn the dial to AUTO.
On first use, the display will show the room temperature measured by the ther-mostat. The symbol is displayed above the °C symbol.
Review the variousor periods.
Room temperature/setpoint temperature display
Current mode (e.g. Comfort)Day
Start of timeslotdisplayed
Heat command active
Manual boost mode
Time
Room temperature
Away mode
Mode switch
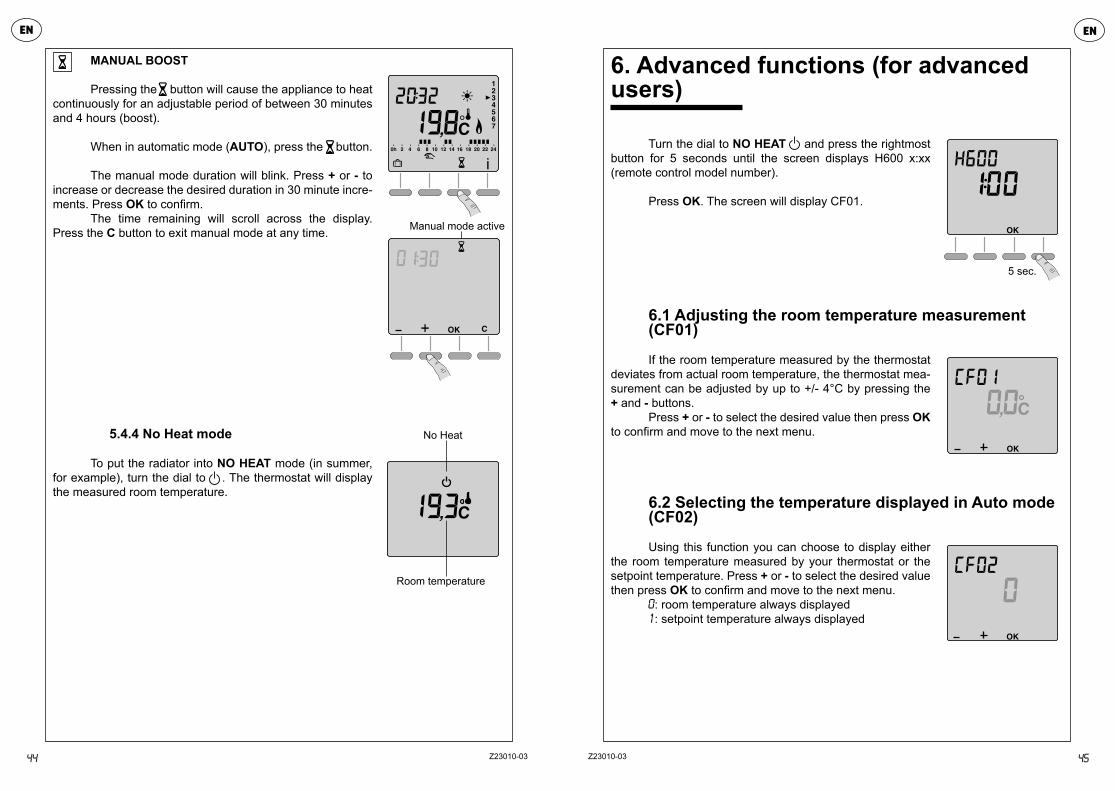
AWAY
This function is used to define a fixed temperature (between 5 and 15°C) to be maintained for an adjustable period (between 1 and 365 days).
When in automatic mode (AUTO), press the SUIT-CASE button ( ).
The number of days will blink. Press + or - to select the desired number of days then press OK to confirm.
The temperature will blink: set the desired value using the + and - buttons.
To cancel away mode (e.g. if you return earlier than expected), press button C or turn the dial.
MODE SWITCH
When in AUTO mode, you can switch mode (from to or vice-versa) by pressing the button. This change will be effective until the next scheduled mode change.
When in automatic mode (AUTO), press the but-ton.
To cancel the mode switch, press the button again or turn the dial.
EXAMPLEIf you are leaving on 10 January and returning on 19 January, select 9 days. Automatic mode will resume at 00:00 on 19 January. Press OK to confirm. The tem-perature will blink. Press + or - to set the temperature. Press OK to confirm.
EXAMPLEIf you are in ECO mode ( ), pressing the button will switch the thermostat to COMFORT mode ( ).
Mode switch active
44 45
EN EN
Z23010-03 Z23010-03
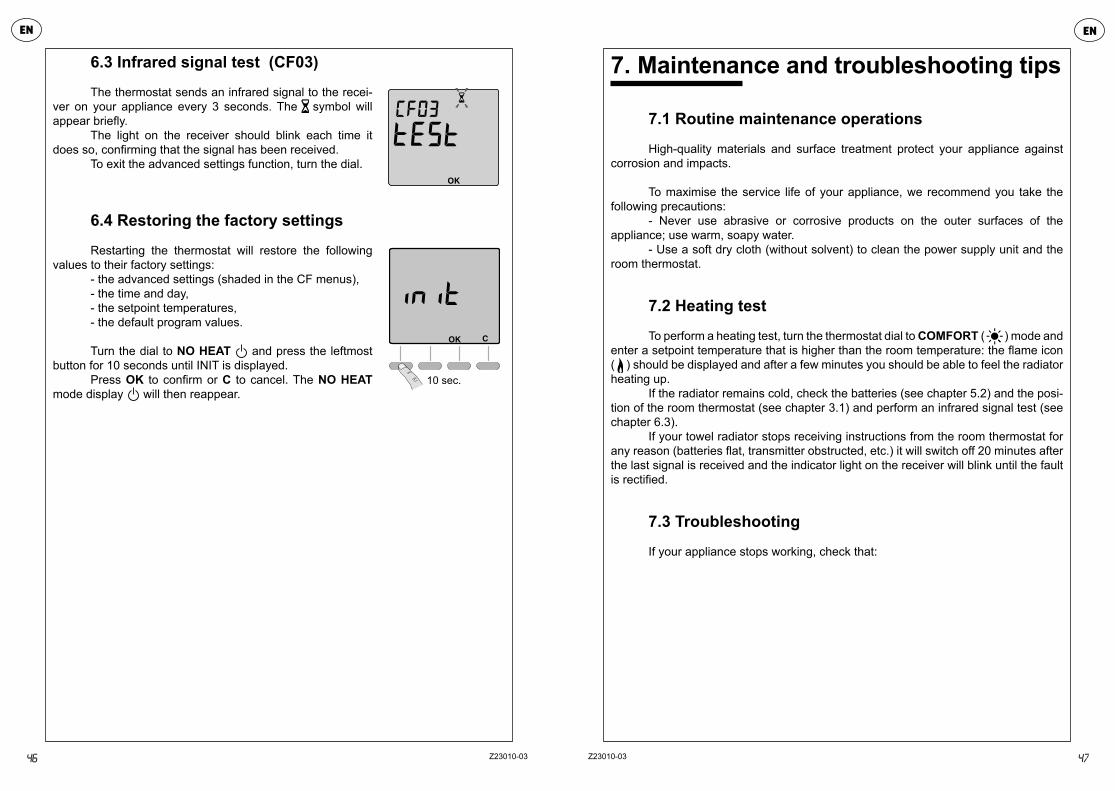
MANUAL BOOST
Pressing the button will cause the appliance to heat continuously for an adjustable period of between 30 minutes and 4 hours (boost).
When in automatic mode (AUTO), press the button.
The manual mode duration will blink. Press + or - to increase or decrease the desired duration in 30 minute incre-ments. Press OK to confirm.
The time remaining will scroll across the display. Press the C button to exit manual mode at any time.
5.4.4 No Heat mode
To put the radiator into NO HEAT mode (in summer, for example), turn the dial to . The thermostat will display the measured room temperature.
Manual mode active
Room temperature
No Heat
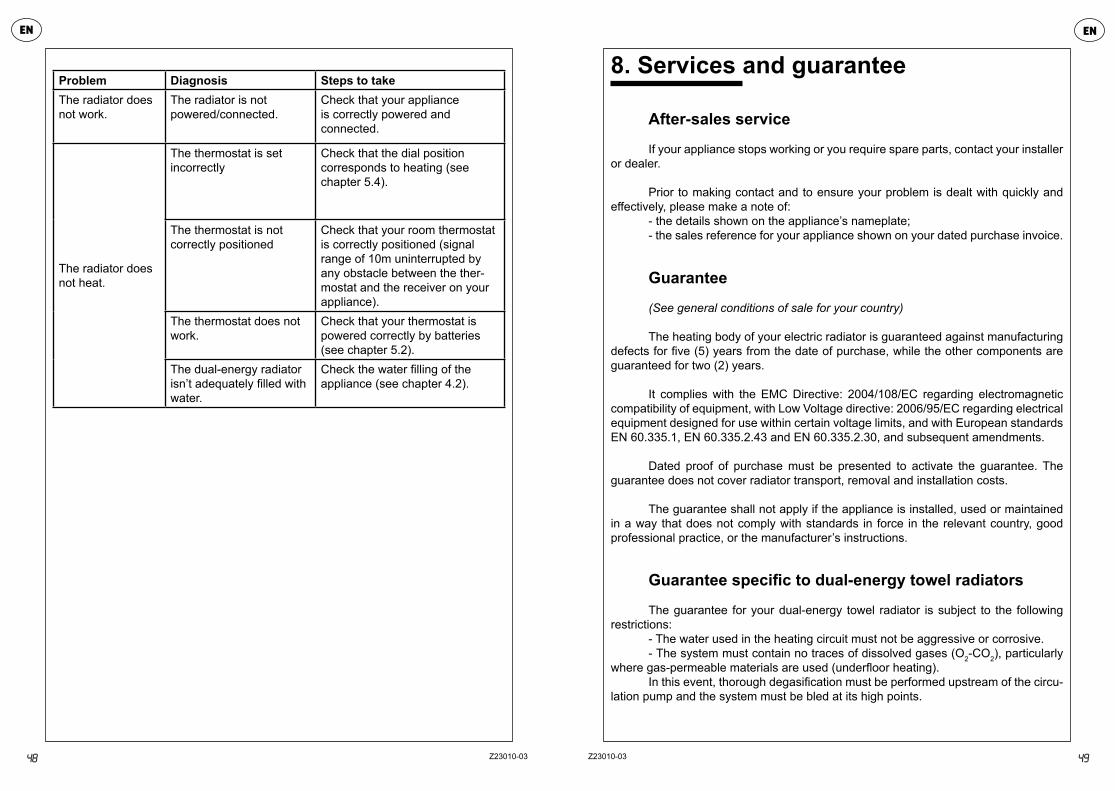
6. Advanced functions (for advanced users)
Turn the dial to NO HEAT and press the rightmost button for 5 seconds until the screen displays H600 x:xx (remote control model number).
Press OK. The screen will display CF01.
6.1 Adjusting the room temperature measurement (CF01)
If the room temperature measured by the thermostat deviates from actual room temperature, the thermostat mea-surement can be adjusted by up to +/- 4°C by pressing the + and - buttons.
Press + or - to select the desired value then press OK to confirm and move to the next menu.
6.2 Selecting the temperature displayed in Auto mode (CF02)
Using this function you can choose to display either the room temperature measured by your thermostat or the setpoint temperature. Press + or - to select the desired value then press OK to confirm and move to the next menu.
0: room temperature always displayed1: setpoint temperature always displayed
5 sec.
46 47
EN EN
Z23010-03 Z23010-03
6.3 Infrared signal test (CF03)
The thermostat sends an infrared signal to the recei-ver on your appliance every 3 seconds. The symbol will appear briefly.
The light on the receiver should blink each time it does so, confirming that the signal has been received.
To exit the advanced settings function, turn the dial.
6.4 Restoring the factory settings
Restarting the thermostat will restore the following values to their factory settings:
- the advanced settings (shaded in the CF menus),- the time and day,- the setpoint temperatures,- the default program values.
Turn the dial to NO HEAT and press the leftmost button for 10 seconds until INIT is displayed.
Press OK to confirm or C to cancel. The NO HEAT mode display will then reappear.
10 sec.
7. Maintenance and troubleshooting tips
7.1 Routine maintenance operations
High-quality materials and surface treatment protect your appliance against corrosion and impacts.
To maximise the service life of your appliance, we recommend you take the following precautions:
- Never use abrasive or corrosive products on the outer surfaces of the appliance; use warm, soapy water.
- Use a soft dry cloth (without solvent) to clean the power supply unit and the room thermostat.
7.2 Heating test
To perform a heating test, turn the thermostat dial to COMFORT ( ) mode and enter a setpoint temperature that is higher than the room temperature: the flame icon ( ) should be displayed and after a few minutes you should be able to feel the radiator heating up.
If the radiator remains cold, check the batteries (see chapter 5.2) and the posi-tion of the room thermostat (see chapter 3.1) and perform an infrared signal test (see chapter 6.3).
If your towel radiator stops receiving instructions from the room thermostat for any reason (batteries flat, transmitter obstructed, etc.) it will switch off 20 minutes after the last signal is received and the indicator light on the receiver will blink until the fault is rectified.
7.3 Troubleshooting
If your appliance stops working, check that:
48 49
EN EN
Z23010-03 Z23010-03
Problem Diagnosis Steps to takeThe radiator does not work.
The radiator is notpowered/connected.
Check that your applianceis correctly powered andconnected.
The radiator does not heat.
The thermostat is set incorrectly
Check that the dial positioncorresponds to heating (see chapter 5.4).
The thermostat is not correctly positioned
Check that your room thermostat is correctly positioned (signal range of 10m uninterrupted by any obstacle between the ther-mostat and the receiver on your appliance).
The thermostat does not work.
Check that your thermostat is powered correctly by batteries (see chapter 5.2).
The dual-energy radiator isn’t adequately filled with water.
Check the water filling of the appliance (see chapter 4.2).
8. Services and guarantee
After-sales service
If your appliance stops working or you require spare parts, contact your installer or dealer.
Prior to making contact and to ensure your problem is dealt with quickly and effectively, please make a note of:
- the details shown on the appliance’s nameplate;- the sales reference for your appliance shown on your dated purchase invoice.
Guarantee
(See general conditions of sale for your country)
The heating body of your electric radiator is guaranteed against manufacturing defects for five (5) years from the date of purchase, while the other components are guaranteed for two (2) years.
It complies with the EMC Directive: 2004/108/EC regarding electromagnetic compatibility of equipment, with Low Voltage directive: 2006/95/EC regarding electrical equipment designed for use within certain voltage limits, and with European standards EN 60.335.1, EN 60.335.2.43 and EN 60.335.2.30, and subsequent amendments.
Dated proof of purchase must be presented to activate the guarantee. The guarantee does not cover radiator transport, removal and installation costs.
The guarantee shall not apply if the appliance is installed, used or maintained in a way that does not comply with standards in force in the relevant country, good professional practice, or the manufacturer’s instructions.
Guarantee specific to dual-energy towel radiators
The guarantee for your dual-energy towel radiator is subject to the following restrictions:
- The water used in the heating circuit must not be aggressive or corrosive.- The system must contain no traces of dissolved gases (O2-CO2), particularly
where gas-permeable materials are used (underfloor heating).In this event, thorough degasification must be performed upstream of the circu-
lation pump and the system must be bled at its high points.
50
EN
Z23010-03
Environmental regulations
RoHS: complies with Directive 2011/65/EUWEEE: complies with Directive 2002/96/EC
Disposal of end-of-life electrical and electronic appliances. This symbol indicates that this product should not be disposed of with household waste. It must be taken to a suitable collection point to be recycled. By disposing of this product correctly, you will help prevent potential negative consequences for the environment and human health.

www.acova.fr