Embed Size (px)
Citation preview
GE Monogram®
Owner’s Manual
ZDI15 and ZDIS15 Automatic Icemaker
monogram.com
Consumer Information
Icemaker
2
Introduction Your new Monogram icemaker makes an eloquent statement of style, convenience and kitchen planning flexibility. Whether you chose it for its purity of design or the assiduousattention to detail, you’ll find that your Monogram icemaker’s superior blend of form and function will delight you for years to come.
The information on the following pages will help you operate and maintain your icemaker properly.
If you have any other questions---in the USA, please call the GE Answer Center® 800.626.2000.In Canada, please call 1.888.880.3030.
Contents Care and Cleaning . . . . . . . . . . . . . . . . . . 13–16Consumer Services . . . . . . . . . . . . . . . . . . . . . 23Controls and Features . . . . . . . . . . . . . . . . 10–11Important Phone Numbers . . . . . . . . . . . . . . 23Model and Serial Numbers . . . . . . . . . . . . . . . 2Operating Instructions . . . . . . . . . . . . . . . . . . 12Preparation . . . . . . . . . . . . . . . . . . . . . . . . . . . 17
Problem Solver . . . . . . . . . . . . . . . . . . . . . . . . 20Product Registration . . . . . . . . . . . . . . . . . . 2, 22Repair Service . . . . . . . . . . . . . . . . . . . . . . . . . . 3Reversing the Door Swing . . . . . . . . . . . . 18–19Safety Instructions . . . . . . . . . . . . . . . . . . . . . 4–9Warranty . . . . . . . . . . . . . . . . . . . . . . .Back Cover
Before using youricemaker
Read this manual carefully. It is intended to help you operate and maintain your newicemaker properly.
Keep it handy for answers to your questions.
If you don’t understand something or needmore help, call in the USA:
GE Answer Center®
800.626.200024 hours a day, 7 days a week
In Canada, call 1.888.880.3030
Write down themodel &serialnumbers
You’ll find them on a label on the left wall of the ice storage bin.
These numbers are also on the ConsumerProduct Ownership Registration Card packedseparately with your icemaker.
Before sending in this card, please write thesenumbers here:
Model Number
Serial Number
Use these numbers in any correspondence orservice calls concerning your icemaker.
3
If youreceived adamagedicemaker
Immediately contact the dealer (or builder)that sold you the icemaker.
If you need service
To obtain service, see the Consumer Servicespage in the back of this manual.
We’re proud of our service and want you to bepleased. If for some reason you are not happywith the service you receive, follow these steps.
For customers in the USA:
FIRST, contact the people who serviced yourappliance. Explain why you are not pleased. In most cases, this will solve the problem.
NEXT, if you are still not pleased, write all thedetails---including your phone number---to:
Manager, Customer RelationsGE AppliancesAppliance ParkLouisville, KY 40225
For customers in Canada:
FIRST, contact the people who serviced yourappliance. Explain why you are not pleased. In most cases, this will solve the problem.
NEXT, if you are still not pleased, write all thedetails---including your phone number---to:
Manager, Customer RelationsCamco Inc.1 Factory Lane, Suite 310Moncton, N.B. E1C 9M3
IMPORTANT SAFETY INSTRUCTIONS
READ AND SAVE THESE INSTRUCTIONSBefore it is used, the icemaker must beproperly installed and located as described inthis manual.
WARNING–To reduce the risk of fire,electrical shock or injury when using youricemaker, follow basic precautions includingthe following:
• Never allow children to operate, play with, or crawl inside the icemaker.
• Never clean icemaker parts with flammablefluids. The fumes can create a fire hazard or explosion.
• Do not store or use gasoline or otherflammable vapors and liquids in the vicinityof this or any other appliance. The fumescan create a fire hazard or explosion.
• Be sure your icemaker is properly installedand grounded by a qualified technician inaccordance with the Installation Instructions.
• Do not attempt to repair or replace any part of your icemaker unless it is specificallyrecommended in this manual. All otherservicing should be referred to a qualifiedtechnician.
• Unplug the icemaker or disconnect powerbefore cleaning, servicing or changing thelight bulb. Failure to do so can result indeath or electrical shock.
• It is your responsibility to be sure youricemaker:
– has been installed where it is protected fromthe elements.
– is located so that the front is not blocked torestrict incoming or discharge air flow.
– is connected only to the proper kind ofoutlet, with the correct electric supply andgrounding. A 115 volt, 60 Hz., 15 amp fusedelectrical supply is required.
NOTE: Time delay fuse or circuit breaker is recommended.
– is not used by anyone unable to operate it properly.
– is used only to do what icemakers aredesigned to do.
– is properly maintained.
4
IMPORTANTES INSTRUCTIONS DE SÉCURITÉ
LIRE ET CONSERVER CES INSTRUCTIONSAvant son utilisation, la machine à glaçons doitêtre bien installée et située selon la descriptiondans ce manuel.
AVERTISSEMENT : Pour réduire lesrisques d’incendie, de choc électrique ou deblessure lors de l’utilisation de la machine àglaçons, suivre les précautions fondamentales,y compris les suivantes :
• Ne jamais laisser les enfants utiliser, employercomme jouet ou pénétrer dans la machine à glaçons.
• Ne jamais nettoyer les pièces de la machine àglaçons avec des fluides inflammables. Lesémanations peuvent créer un risque d’incendieou d’explosion.
• Ne pas entreposer ni utiliser de l’essence oud’autres vapeurs et liquides inflammables dans le voisinage de cet appareil ménager ou de toutautre appareil. Les émanations peuvent créer unrisque d’incendie ou d’explosion.
• S’assurer que la machine à glaçons est bieninstallée et reliée à la terre par un technicienqualifié, et conformément aux instructionsd’installation.
• Ne pas essayer de réparer ou de remplacer unepièce de votre machine à glaçons à moins derecommandations spécifiques dans ce manuel.Tout autre besoin de service doit être soumis àun technicien qualifié.
• Débrancher la machine à glaçons ou déconnecterle courant électrique avant de la nettoyer, del’entretenir ou de changer l’ampoule d’éclairage.L’omission d’observer ces précautions peutcauser un décès ou un choc électrique.
• Vous avez la responsabilité de vous assurer quela machine à glaçons :
– a été installée où elle est protégée contre lesintempéries .
– est située de sorte que le devant n’est pasobstruée pour restreindre l’arrivée ou lasortie du courant d’air.
– est connectée seulement au type appropriéde prise de courant avec une alimentationélectrique correcte et une liaison à la terre.Une alimentation électrique de 115 V, 60Hz, et fusible de 15 A est requise.
REMARQUE : Les fusibles temporisés oudisjoncteurs de circuit sont recommandés.
– n’est pas utilisée par quiconque ne peutfaire fonctionner l’appareil d’une manièreappropriée.
– est utilisée seulement pour accomplir ce que les machines à glaçons sont destinéesà fournir.
– est soumise à un entretien approprié.
5
HOW TO CONNECT ELECTRICITYDo not, under any circumstances, cut orremove the third (ground) prong from thepower cord. For personal safety, this appliancemust be properly grounded.
The power cord of this appliance is equippedwith a 3-prong (grounding) plug which mateswith a standard 3-prong (grounding) walloutlet to minimize the possibility of electricshock hazard from this appliance.
Have the wall outlet and circuit checked by aqualified electrician to make sure the outlet isproperly grounded.
Where a standard 2-prong wall outlet isencountered, it is your personal responsibilityand obligation to have it replaced with aproperly grounded 3-prong wall outlet.
The icemaker should always be plugged into its own individual electrical outlet which has avoltage rating that matches the rating plate.This provides the best performance and alsoprevents overloading house wiring circuitswhich could cause a fire hazard fromoverheated wires.
Never unplug your icemaker by pulling on thepower cord. Always grip plug firmly and pullstraight out from the outlet.
Repair or replace immediately all power cordsthat have become frayed or otherwisedamaged. Do not use a cord that shows cracksor abrasion damage along its length or ateither end.
When moving the icemaker, be careful not to roll over or damage the power cord.
6
RACCORDEMENT ÉLECTRIQUENe coupez ni retirez en aucun cas la troisièmebroche (mise à la terre) de la fiche du cordond’alimentation. Pour votre sécurité, cetappareil doit être correctement mis à la terre.
Le cordon d’alimentation de cet appareil estmuni d’une fiche à 3 broches (mise à la terre)qui se branche dans une prise mural ordinaireà 3 alvéoles (mise à la terre) pour réduire auminimum les risques du chocs électriques.
Faites examiner la prise de courant et le circuitpar un électricien qualifié pour vous assurerque la prise est correctement mise à la terre.
Si la prise murale est du type standard à 2alvéoles, il vous incombe de la faire remplacerpar une prise à 3 alvéoles correctement mise à la terre.
La machine à glaçons doit toujours êtrebranché dans sa propre prise de courant, dont la tension nominale est identique à celle indiquée sur la plaque signalétique.
Cette précaution est recommandée pourgarantir un rendement optimum et éviter une surcharge des circuits électriques de larésidence, ce qui pourrait créer un risqued’incendie par surschauffe des fils.
Ne débranchez jamais la machine à glaçons en tirant le cordon d’alimentation. Saisissezfermement la fiche du cordon et tirez droitpour la retirer de la prise.
Réparez ou remplacez immédiatement toutcordon effiloché ou endommagé. N’utilisezpas un cordon fendillé ou présentant dessignes d’usure.
Lorsque vous déplacez votre machine àglaçons du mur, faites attention de ne pas lafaire rouler sur le cordon d’alimentation afinde ne pas l’endommager.
7
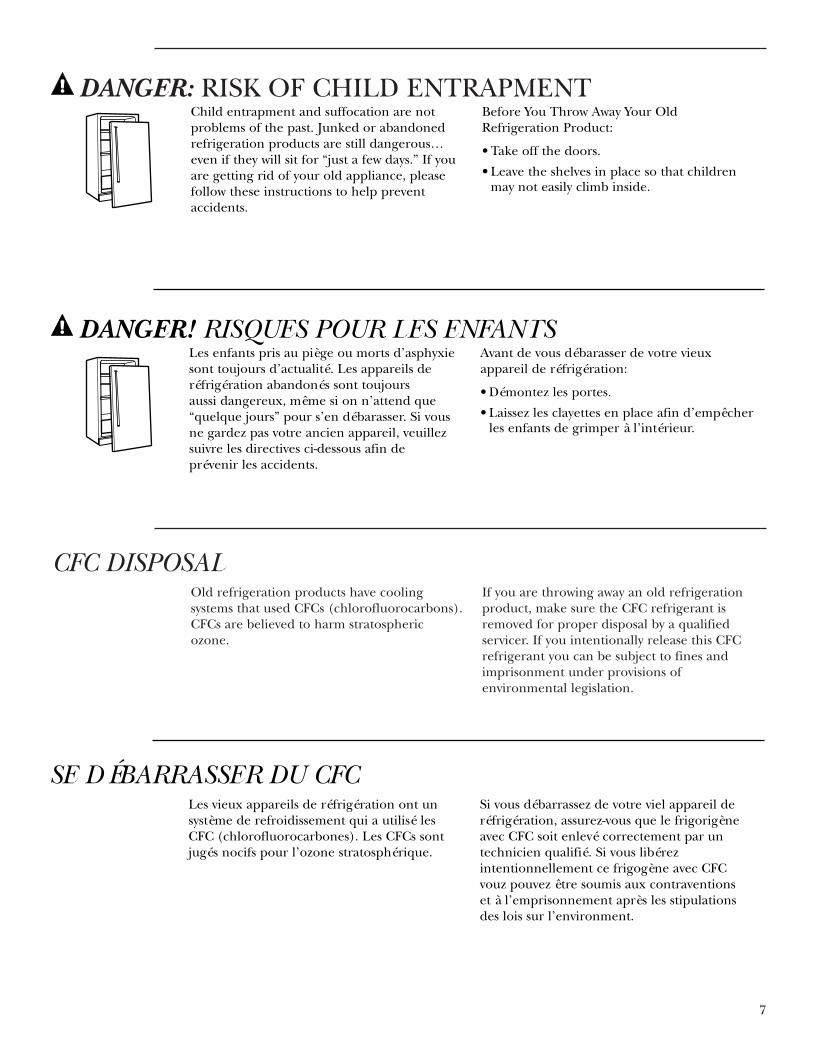
CFC DISPOSALOld refrigeration products have coolingsystems that used CFCs (chlorofluorocarbons).CFCs are believed to harm stratosphericozone.
If you are throwing away an old refrigerationproduct, make sure the CFC refrigerant isremoved for proper disposal by a qualifiedservicer. If you intentionally release this CFCrefrigerant you can be subject to fines andimprisonment under provisions ofenvironmental legislation.
DANGER: RISK OF CHILD ENTRAPMENTChild entrapment and suffocation are notproblems of the past. Junked or abandonedrefrigeration products are still dangerous…even if they will sit for “just a few days.” If youare getting rid of your old appliance, pleasefollow these instructions to help preventaccidents.
Before You Throw Away Your OldRefrigeration Product:
• Take off the doors.
• Leave the shelves in place so that childrenmay not easily climb inside.
DANGER! RISQUES POUR LES ENFANTSLes enfants pris au piège ou morts d’asphyxiesont toujours d’actualité. Les appareils de réfrigération abandonés sont toujours aussi dangereux, même si on n’attend que“quelque jours” pour s’en débarasser. Si vousne gardez pas votre ancien appareil, veuillezsuivre les directives ci-dessous afin de prévenir les accidents.
Avant de vous débarasser de votre vieuxappareil de réfrigération:
• Démontez les portes.
• Laissez les clayettes en place afin d’empêcherles enfants de grimper à l’intérieur.
SE DÉBARRASSER DU CFCLes vieux appareils de réfrigération ont unsystème de refroidissement qui a utilisé lesCFC (chlorofluorocarbones). Les CFCs sontjugés nocifs pour l’ozone stratosphérique.
Si vous débarrassez de votre viel appareil deréfrigération, assurez-vous que le frigorigèneavec CFC soit enlevé correctement par untechnicien qualifié. Si vous libérezintentionnellement ce frigogène avec CFCvouz pouvez être soumis aux contraventions et à l’emprisonnement après les stipulationsdes lois sur l’environment.
USE OF EXTENSION CORDSBecause of potential safety hazards undercertain conditions, we strongly recommendagainst the use of an extension cord.
However, if you must use an extension cord, itis absolutely necessary that it be a UL-listed (inthe United States) or a CSA-listed (in Canada),
3-wire grounding type appliance extensioncord having a grounding type plug and outletand that the electrical rating of the cord be 15 amperes (minimum) and 120 volts.
8
CORDONS PROLONGATEURSNous vous recommandons fortement de ne pas utíliser de cordons prolongateurs à causedes risques potentiels qu’ils présentent danscertaines conditions.
Toutefois si vous décidez d’utiliser tout de même un cordon prolongateur, il est
absolument nécessaire qu’il s’agisse d’uncordon à 3 fils avec mise à la terre pourappareils électroménagers homologué UL(aux États-Unis) ou homologué CSA (auCanada), pourvu d’une fiche et d’une prise mises à la terre de 15 ampères (minimum) et de 120 volts.
SAVE THESE INSTRUCTIONS
USE OF ADAPTER PLUGS (Adapter plugs not permitted in Canada)
However, if you must use an adapter, wherelocal codes permit, a temporary connectionmay be made to a properly grounded 2-prongwall outlet by use of a UL-listed adapteravailable at most local hardware stores.
The larger slot in the adapter must be alignedwith the larger slot in the wall outlet to provideproper polarity in the connection of the power cord.
When disconnecting the power cord from theadapter, always hold the adapter in place withone hand while pulling the power cord plugwith the other hand. If this is not done, the
adapter ground terminal is very likely to breakwith repeated use.
If the adapter ground terminal breaks, DONOT USE the refrigerator until a properground has been established.
Attaching the adapter ground terminal to awall outlet cover screw does not ground theappliance unless the cover screw is metal, andnot insulated, and the wall outlet is groundedthrough the house wiring. You should have thecircuit checked by a qualified electrician tomake sure the outlet is properly grounded.
Because of potential safety hazards under certain conditions, we strongly recommend against the use of an adapter plug.
9
CONSERVEZ CES DIRECTIVES
FICHE D’ADAPTATION (Fiches d’adaptation non permises au Canada)
Toutefois, si vous décidez d’utiliser tout demême une fiche d’adaptation, vous pouvezeffectuer un raccordement temporaire, si lescodes locaux le permettent, dans une prise de courant à 2 alvéoles adéquatement mise à la terre en utilisant une fiche d’adaptationhomologuée UL, en vente dans la plupart des quincailleries.
La fente la plus longue de la fiche doit êtrealignée avec la fente la plus longue de la prisemurale afin d’assurer la polarité appropriéepour le branchement du cordond’alimentation.
Lorsque vous débranchez le cordond’alimentation de la fiche d’adaptation,saisissez toujours la fiche d’une main pendantque vous tirez sur la fiche du cordon
d’alimentation de l’autre. Sinon, la borne demise à la terre de la fiche d’adaptation risquede casser avec le temps.
Si la borne de mise à la terre de la fiche casse,N’UTILISEZ PAS l’appareil tant qu’une mise à la terre adéquate n’aura pas été rétablie.
Le fait de fixer la borne de mise à la terre dela fiche d’adaptation à la plaque de la prise decourant n’assure pas automatiquement la miseà la terre de l’appareil. Il faut que la vis soit enmétal, non isolée, et que la prise de courantsoit mise à la terre par l’entremise du câblagede résidence. Faites vérifier le circuit par unélectricien qualifié pour vous assurer que laprise est adéquatement mise à la terre.
Nous vous recommandons fortement de ne pas utiliser une fiche d’adaptation à cause des risques potentielsqu’elle présente dans certaines circonstances.
10
Controls and Features
Icemaker
Removepackaging
IMPORTANT: Do not remove any permanentinstruction labels inside your icemaker or theTech Sheet that is fastened behind the loweraccess panel.
• Remove tape and any labels from youricemaker before using (except the model
and serial number label).
To remove any remaining tape or glue, rub the area briskly with your thumb. Tape or glueresidue can also be easily removed by rubbinga small amount of liquid dish soap over theadhesive with your fingers. Wipe with warmwater and dry.
• Do not use sharp instruments, rubbingalcohol, flammable fluids or abrasive cleaners to remove tape or glue. Theseproducts can damage the surface of youricemaker. For more information, see theImportant Safety Instructions section.
Set controls 1. To start the normal ice making cycle, select ON.
2. To stop icemaker operation, select OFF.
NOTE: The CLEAN setting is used wheneversolutions are circulated through the icemakerfor cleaning. Only the water pump operates at this setting. See the Care and Cleaning section.
Clean beforeusing
After you remove all of the packagingmaterials, clean the inside of your icemakerbefore using it.
See the cleaning instructions in the Care andCleaning section.
Controls and Features
Icemaker
11
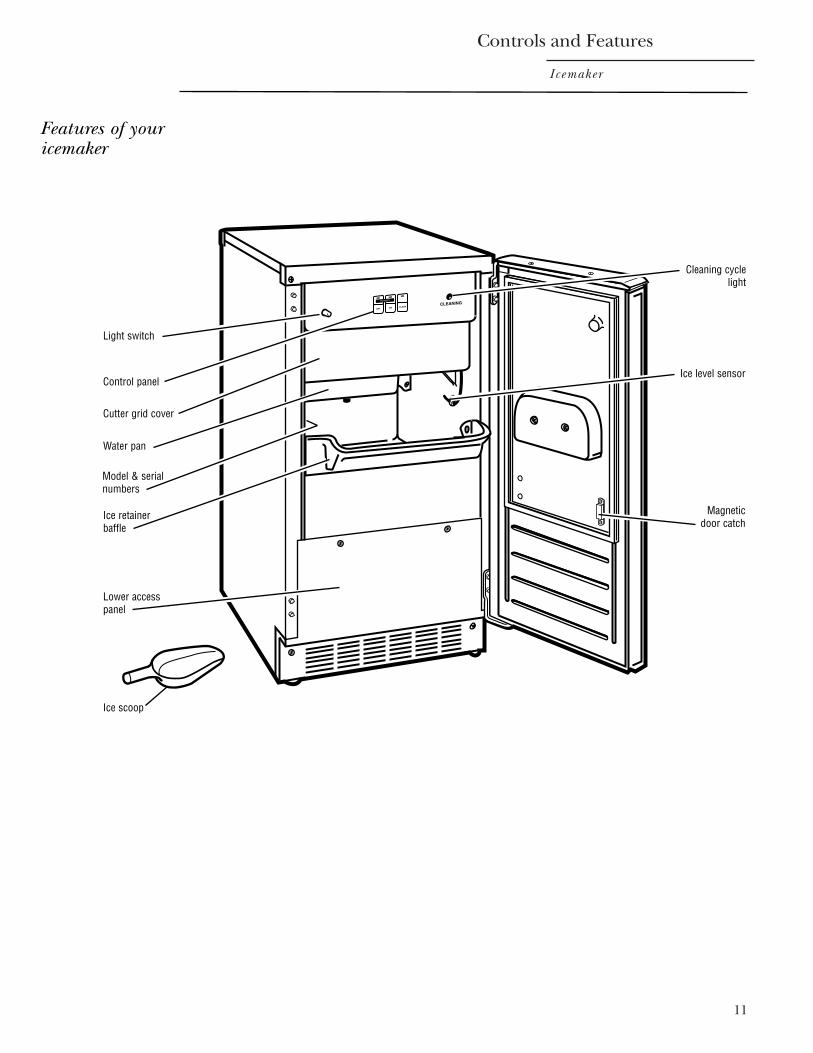
Features of youricemaker
Light switch
Control panel
Cutter grid cover
Water pan
Model & serialnumbers
Ice retainerbaffle
Lower accesspanel
Ice level sensor
Magneticdoor catch
Ice scoop
Cleaning cyclelight
12
Operating Instructions
Icemaker
How youricemakerworks
When you first start your icemaker, the waterpan will fill and the system will rinse itselfbefore starting to make ice. The rinsingprocess takes about five minutes.
Under normal operating conditions, the icemaker will cycle at preset temperatures. The ice level sensor located in the ice storagebin will monitor the ice levels.
IMPORTANT
• If the water supply to the icemaker is turned off, be sure to set the icemakercontrol to OFF.
• The icemaker is designed to make clear icefrom the majority of water sources on a dailybasis. If your results are unsatisfactory, yourwater may need to be filtered or treated.
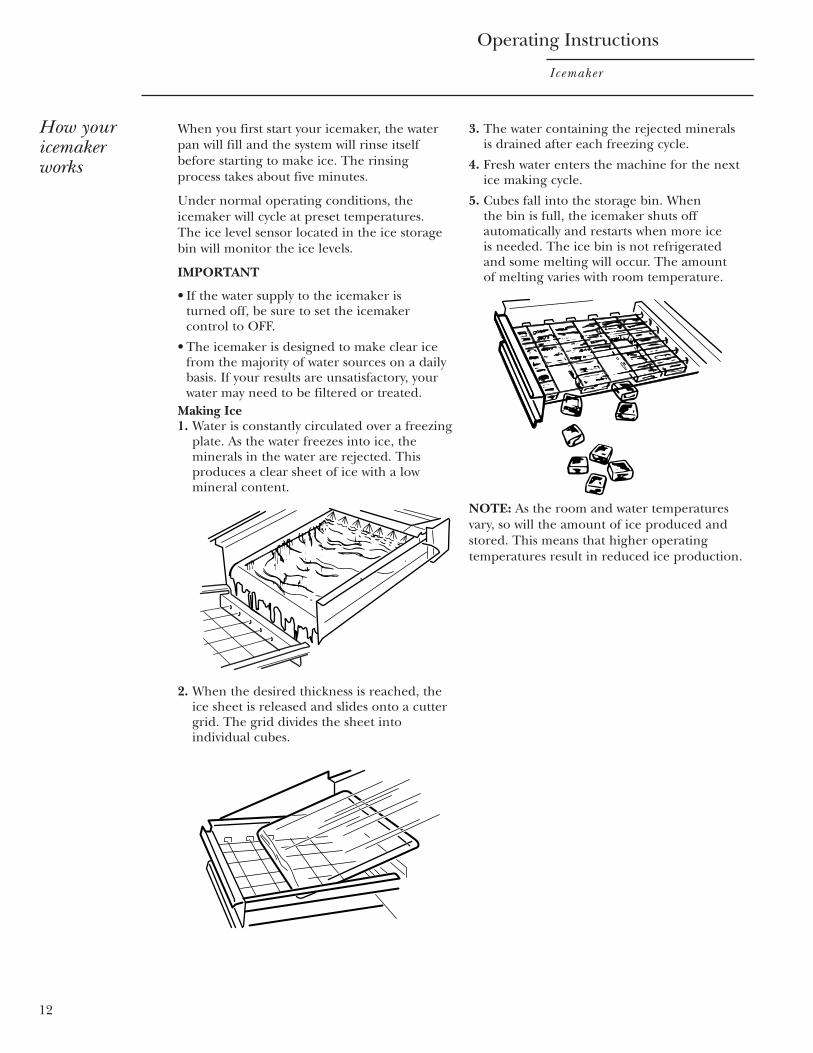
Making Ice1. Water is constantly circulated over a freezing
plate. As the water freezes into ice, theminerals in the water are rejected. Thisproduces a clear sheet of ice with a lowmineral content.
2. When the desired thickness is reached, theice sheet is released and slides onto a cuttergrid. The grid divides the sheet intoindividual cubes.
3. The water containing the rejected mineralsis drained after each freezing cycle.
4. Fresh water enters the machine for the nextice making cycle.
5. Cubes fall into the storage bin. When the bin is full, the icemaker shuts offautomatically and restarts when more ice is needed. The ice bin is not refrigeratedand some melting will occur. The amount of melting varies with room temperature.
NOTE: As the room and water temperaturesvary, so will the amount of ice produced andstored. This means that higher operatingtemperatures result in reduced ice production.
Icemakersystem
1. Push the selector switch to OFF.
2. Wait 5 to 10 minutes for the ice to fall intothe storage bin. Remove all ice from thestorage bin.
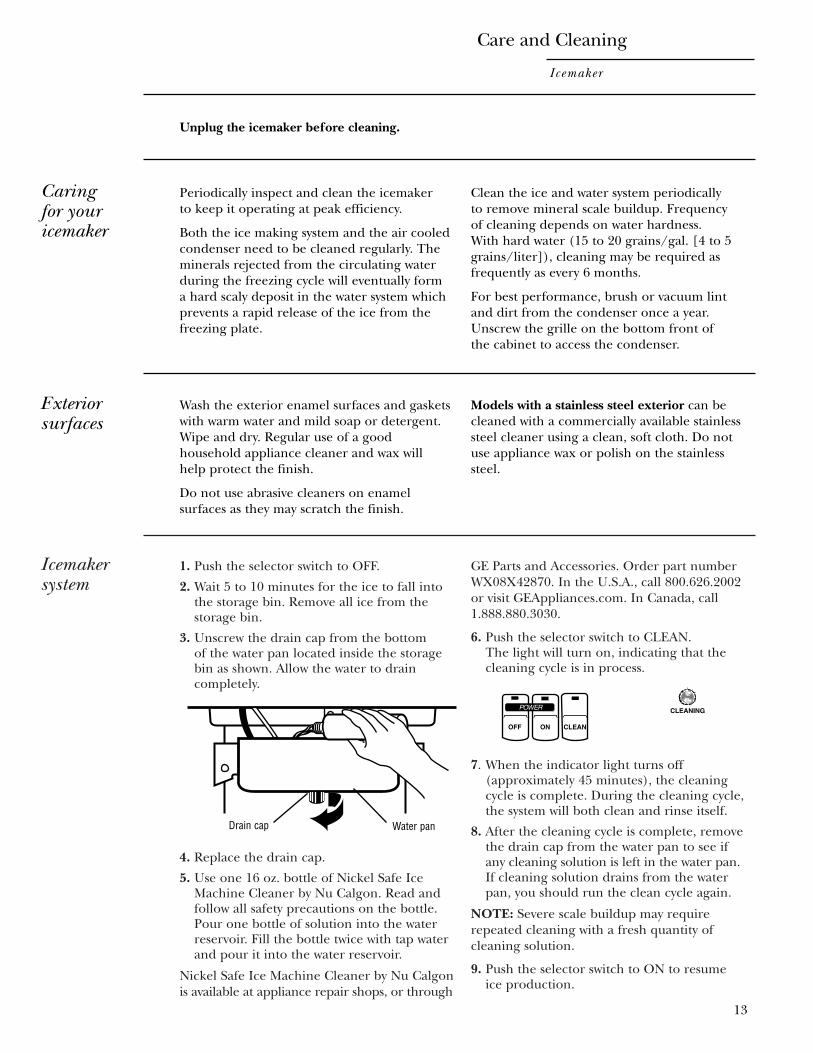
3. Unscrew the drain cap from the bottom of the water pan located inside the storagebin as shown. Allow the water to draincompletely.
4. Replace the drain cap.
5. Use one 16 oz. bottle of Nickel Safe IceMachine Cleaner by Nu Calgon. Read andfollow all safety precautions on the bottle.Pour one bottle of solution into the waterreservoir. Fill the bottle twice with tap waterand pour it into the water reservoir.
Nickel Safe Ice Machine Cleaner by Nu Calgonis available at appliance repair shops, or through
GE Parts and Accessories. Order part numberWX08X42870. In the U.S.A., call 800.626.2002or visit GEAppliances.com. In Canada, call1.888.880.3030.
6. Push the selector switch to CLEAN. The light will turn on, indicating that thecleaning cycle is in process.
7. When the indicator light turns off(approximately 45 minutes), the cleaningcycle is complete. During the cleaning cycle,the system will both clean and rinse itself.
8. After the cleaning cycle is complete, removethe drain cap from the water pan to see ifany cleaning solution is left in the water pan.If cleaning solution drains from the waterpan, you should run the clean cycle again.
NOTE: Severe scale buildup may requirerepeated cleaning with a fresh quantity ofcleaning solution.
9. Push the selector switch to ON to resume ice production.
Water panDrain cap
13
Care and Cleaning
Icemaker
Caringfor youricemaker
Periodically inspect and clean the icemaker to keep it operating at peak efficiency.
Both the ice making system and the air cooledcondenser need to be cleaned regularly. Theminerals rejected from the circulating waterduring the freezing cycle will eventually form a hard scaly deposit in the water system whichprevents a rapid release of the ice from thefreezing plate.
Clean the ice and water system periodically to remove mineral scale buildup. Frequency of cleaning depends on water hardness. With hard water (15 to 20 grains/gal. [4 to 5grains/liter]), cleaning may be required asfrequently as every 6 months.
For best performance, brush or vacuum lintand dirt from the condenser once a year.Unscrew the grille on the bottom front of the cabinet to access the condenser.
Unplug the icemaker before cleaning.
Exteriorsurfaces
Wash the exterior enamel surfaces and gasketswith warm water and mild soap or detergent.Wipe and dry. Regular use of a goodhousehold appliance cleaner and wax willhelp protect the finish.
Do not use abrasive cleaners on enamelsurfaces as they may scratch the finish.
Models with a stainless steel exterior can becleaned with a commercially available stainlesssteel cleaner using a clean, soft cloth. Do notuse appliance wax or polish on the stainlesssteel.
14
Care and Cleaning
Icemaker
Condenser A dirty or clogged condenser:
• Prevents proper airflow.
• Reduces ice making capacity.
• Causes higher than recommended operatingtemperatures which may lead to componentfailure.
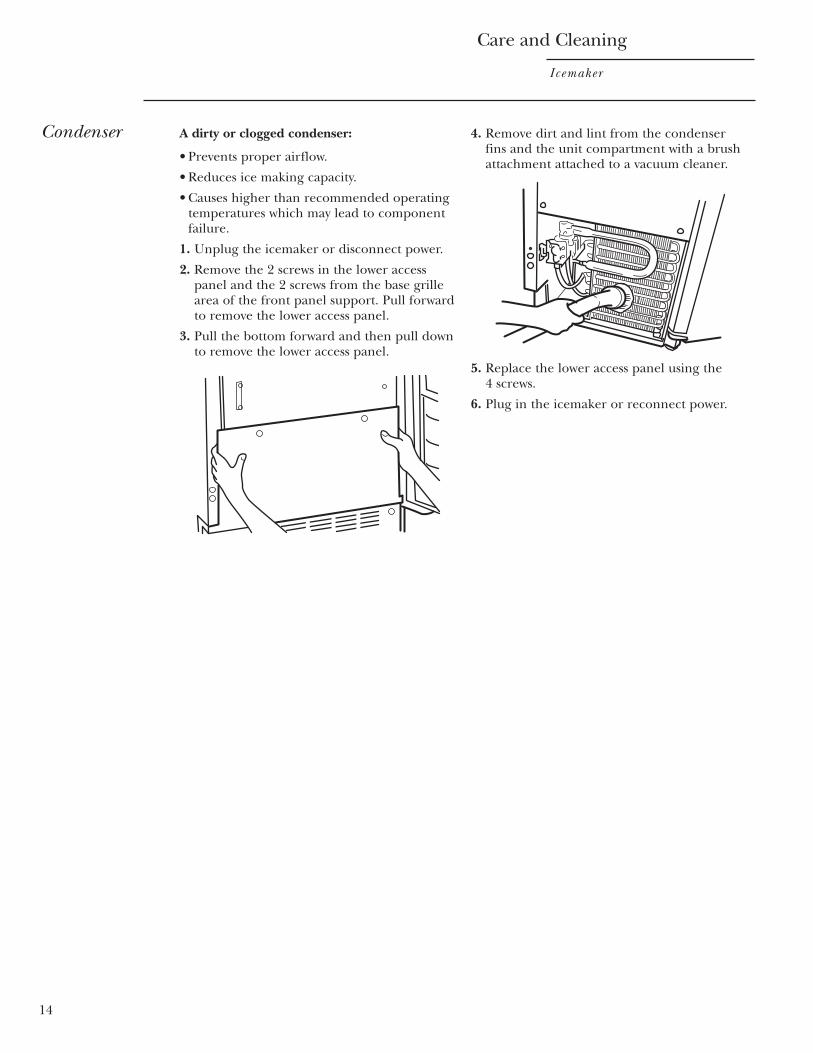
1. Unplug the icemaker or disconnect power.
2. Remove the 2 screws in the lower accesspanel and the 2 screws from the base grillearea of the front panel support. Pull forwardto remove the lower access panel.
3. Pull the bottom forward and then pull downto remove the lower access panel.
4. Remove dirt and lint from the condenserfins and the unit compartment with a brushattachment attached to a vacuum cleaner.
5. Replace the lower access panel using the 4 screws.
6. Plug in the icemaker or reconnect power.

15
Care and Cleaning
Icemaker
Interior 1. Unplug the icemaker or disconnect power.
2. Open the storage bin door and remove anyice that is in the bin.
3. Remove the drain cap from the water panand drain thoroughly. Replace the draincap.
4. Remove the three screws that hold thecutter grid cover in place.
5. Unplug the wiring harness from the left sideof the cutter grid.
6. Unplug the ice level sensor from the rightside of the cutter grid. Pull the ice levelsensor down and forward away from thecutter grid.
7. Remove the right-hand screw and loosen theleft-hand screw. Lift the cutter grid up andout over the left-hand screw.
NOTE: Make sure the plastic spacer from theright-hand side of the cutter grid bracket stayswith the cutter grid.
8. Remove the two screws that hold the waterpan in place. Push down with one hand on
the front of the pan while pulling forward on the bottom back side.
9. The cutter grid, exterior of hoses, waterpan, storage bin, door gasket and ice scoopshould be cleaned with mild soap ordetergent and warm water. Rinse in cleanwater. Then clean the same parts with asolution of 1 tablespoon (15 mL) ofhousehold bleach in 1 gallon (3.8 L) warm water. Rinse again thoroughly in clean water.
NOTE: Do not remove hoses. Do not washplastic parts in dishwasher. They cannotwithstand high temperatures.
10. Wash only the outside of the plastic hoseswith mild soap or detergent and warmwater. Rinse with clean water.
11. Replace water pan by pushing back on thebottom with one hand while pushing upand back on the top. Secure the water panby replacing both screws.
12. Check the following:
• Drain cap from the water pan is in place.
• Hose from the water pan is inserted into the storage bin drain opening.
13. Slide the cutter grid back into place andsecure it by replacing the right-hand screwand tightening the left-hand screw.Reconnect the electrical and ice levelsensor harnesses.
14. Replace the cutter grid cover with threescrews.
15. Plug in the icemaker or reconnect power.
16. Reset the controls. See the Set controlssection.
Cuttergrid cover
OFF ON CLEAN
Screws
Wiringharness
Cuttergrid
Ice levelsensor
Screw
Plasticspacer
Screw
16
Care and Cleaning
Icemaker
Light bulbreplacement
The icemaker has a light bulb in the top of thestorage bin. To replace it, open the bin doorand follow these instructions:
1. Unplug the icemaker or disconnect power.
2. Remove the 3 screws that hold the cuttergrid cover in place. Reach behind thecontrol panel and pull the light bulb down.
3. Replace with a 12-volt wedge base-type bulb(automotive #917). Locate the light bulbreceptacle at the top behind the controlpanel. Align the flat edge of the light bulbwith the receptacle and snap the bulb into place.
4. Replace the cutter grid cover with the 3 screws.
5. Plug in the icemaker or reconnect power.
Vacationand moving
To shut down the icemaker:
1. Unplug the icemaker or disconnect power.
2. Remove all ice from the storage bin.
3. Shut off the water supply.
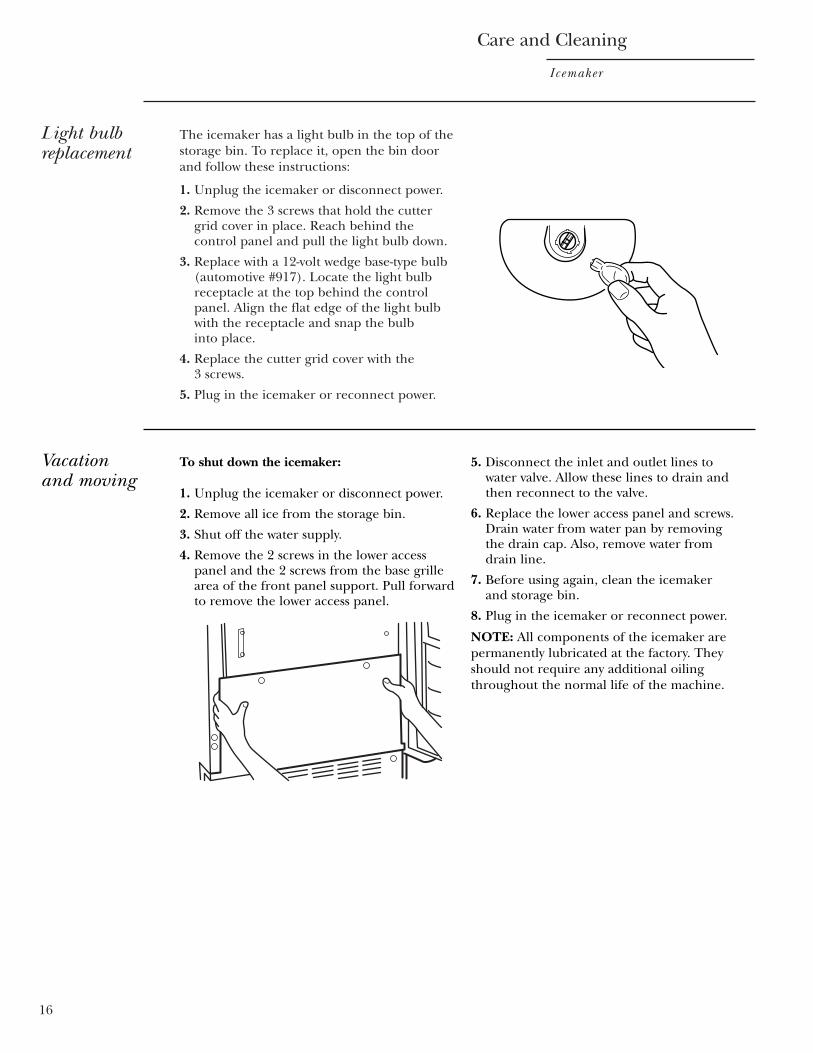
4. Remove the 2 screws in the lower accesspanel and the 2 screws from the base grillearea of the front panel support. Pull forwardto remove the lower access panel.
5. Disconnect the inlet and outlet lines towater valve. Allow these lines to drain andthen reconnect to the valve.
6. Replace the lower access panel and screws.Drain water from water pan by removing the drain cap. Also, remove water fromdrain line.
7. Before using again, clean the icemaker and storage bin.
8. Plug in the icemaker or reconnect power.
NOTE: All components of the icemaker arepermanently lubricated at the factory. Theyshould not require any additional oilingthroughout the normal life of the machine.
17
Preparation
Icemaker
Frontleveling legs
Your icemaker has 2 adjustable leveling legs tohelp you steady the product and make sure itis level.
1. Place a carpenter’s level on top of the icemaker to make sure it is level from frontto back and side to side.
2. Lift the top front of the icemaker to locatethe leveling screws that are on the bottomfront.
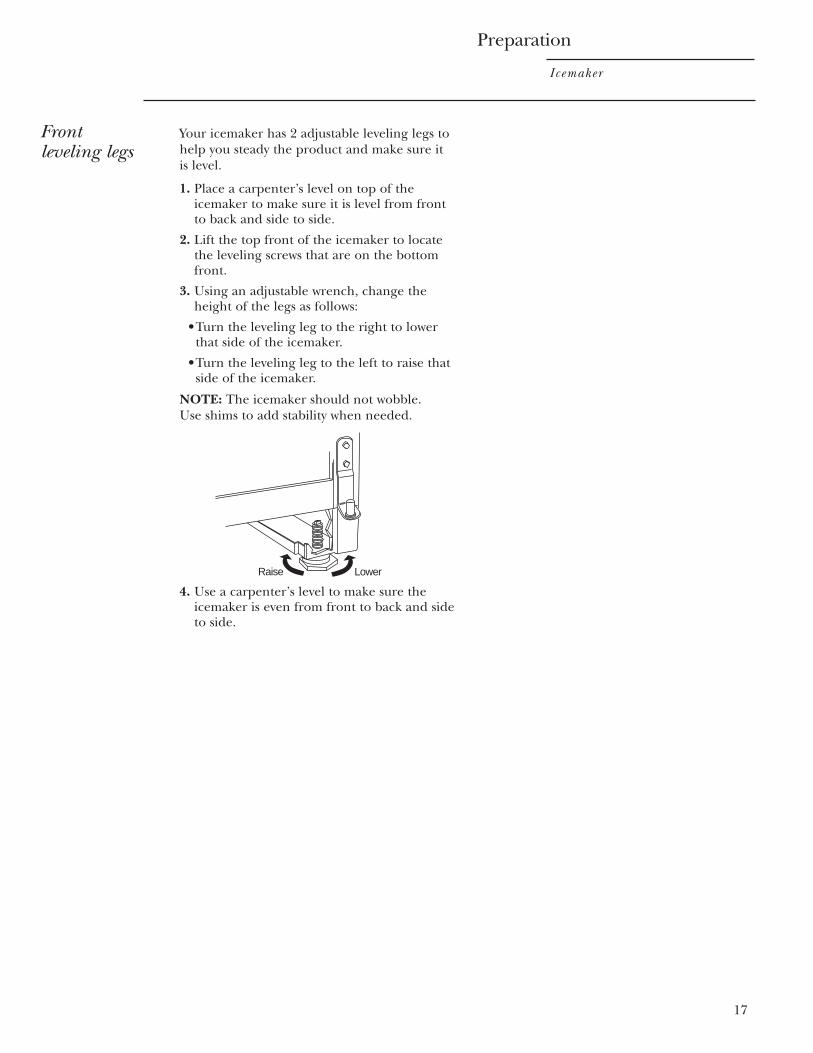
3. Using an adjustable wrench, change theheight of the legs as follows:
•Turn the leveling leg to the right to lower that side of the icemaker.
•Turn the leveling leg to the left to raise that side of the icemaker.
NOTE: The icemaker should not wobble. Use shims to add stability when needed.
4. Use a carpenter’s level to make sure theicemaker is even from front to back and sideto side.
Raise Lower

18
Reversing the Door Swing
Icemaker
To reverse the door
TOOLS NEEDED: 5⁄16″ wrench, 1⁄4″ wrench, flat putty knife, Phillips screwdriver
Parts Supplied:
Parts Identification: (For Reference Only)
IMPORTANT: Before you begin, unplug theicemaker or disconnect power.
To remove door from hinges:
1. Remove the handle screws and lift off thehandle (on some models). Keep the partstogether and set them aside.
2. Remove the hinge pin from the top hinge.
3. Lift the door off of the bottom hinge. Place the hinge pin back into the top hinge.
4. Reverse the door endcaps as follows:
•Remove the screws and endcaps from the door, top and bottom.
•Place the top endcap on the bottom of the opposite side of the door with the long flat side facing the door front.
•Place the bottom endcap on the top of the opposite side of the door with the long flat side facing the door front.
5. Set the door aside.
To reverse the hinges:
1. Using a flat putty knife, remove the plugbuttons from the screw holes opposite of thedoor hinges, top and bottom. Set aside.
2. Remove the two screws holding the tophinge. Turn the hinge upside down so thatthe hinge pin points up. Place the hinge onthe opposite side at the bottom of the door.
3. Remove the plastic hinge sleeve from the“old” bottom hinge and replace it on thenew bottom hinge pin.
4. Remove the bottom hinge. Turn the hingeupside down so that the hinge pin pointsdown. Place the hinge on the opposite sideat the top of the door.
5. Push the plug buttons into the original screw holes.
6. Remove the top hinge pin.
Four plug buttons
Hinge Pin
5/16″ Hex Head Hinge Screw
Handle Screw
Endcap Screw
Hinge Pin
Hinge Sleeve/Door Stop
Hinge
Plugs
Hex Head Hinge Screw
Plugs
Hinge Sleeve/Door Stop
Hex HeadHinge Screw
Hinge PinHinge
Top Hinge
Bottom Hinge
Top Hinge Bottom Hinge
Reversing the Door Swing
Icemaker
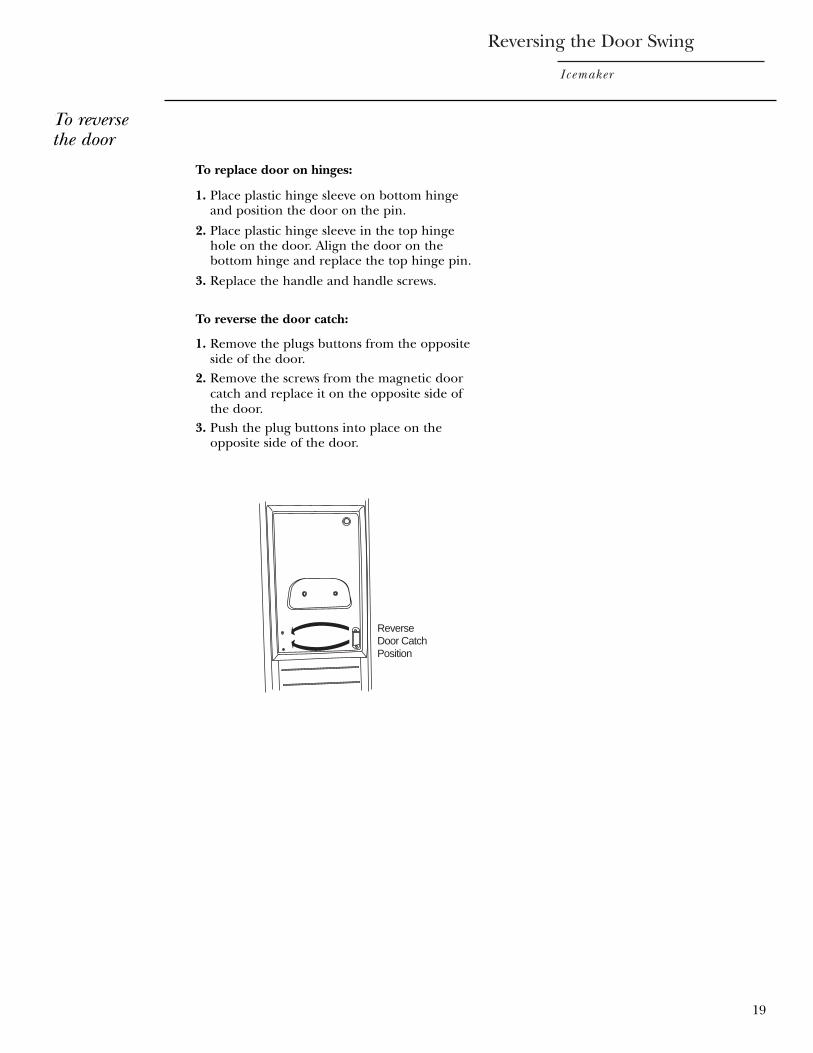
To replace door on hinges:
1. Place plastic hinge sleeve on bottom hingeand position the door on the pin.
2. Place plastic hinge sleeve in the top hingehole on the door. Align the door on thebottom hinge and replace the top hinge pin.
3. Replace the handle and handle screws.
To reverse the door catch:
1. Remove the plugs buttons from the oppositeside of the door.
2. Remove the screws from the magnetic doorcatch and replace it on the opposite side ofthe door.
3. Push the plug buttons into place on theopposite side of the door.
19
ReverseDoor CatchPosition
To reverse the door
The Problem Solver
Icemaker
20
Questions?
Use thisproblem solver!
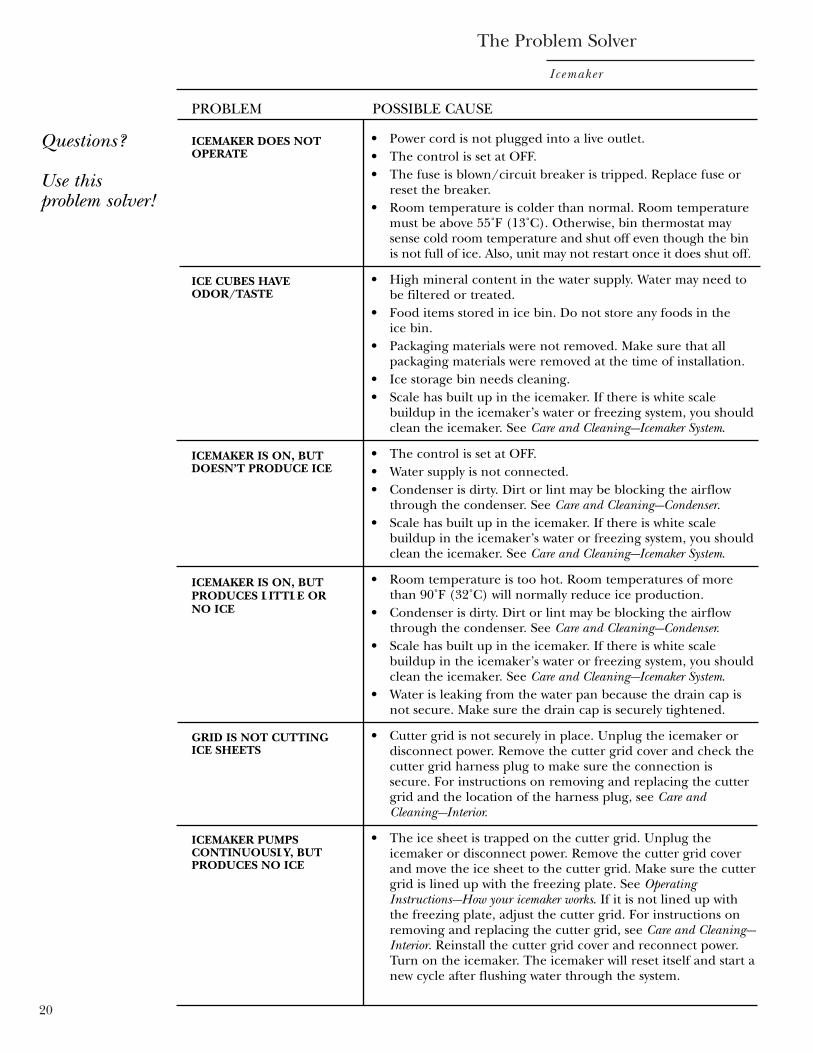
GRID IS NOT CUTTING ICE SHEETS
ICEMAKER PUMPSCONTINUOUSLY, BUTPRODUCES NO ICE
• Power cord is not plugged into a live outlet.• The control is set at OFF.• The fuse is blown/circuit breaker is tripped. Replace fuse or
reset the breaker.• Room temperature is colder than normal. Room temperature
must be above 55˚F (13˚C). Otherwise, bin thermostat maysense cold room temperature and shut off even though the binis not full of ice. Also, unit may not restart once it does shut off.
• High mineral content in the water supply. Water may need tobe filtered or treated.
• Food items stored in ice bin. Do not store any foods in the ice bin.
• Packaging materials were not removed. Make sure that allpackaging materials were removed at the time of installation.
• Ice storage bin needs cleaning.• Scale has built up in the icemaker. If there is white scale
buildup in the icemaker’s water or freezing system, you shouldclean the icemaker. See Care and Cleaning---Icemaker System.
• The control is set at OFF.• Water supply is not connected.• Condenser is dirty. Dirt or lint may be blocking the airflow
through the condenser. See Care and Cleaning---Condenser.• Scale has built up in the icemaker. If there is white scale
buildup in the icemaker’s water or freezing system, you shouldclean the icemaker. See Care and Cleaning---Icemaker System.
• Room temperature is too hot. Room temperatures of morethan 90˚F (32˚C) will normally reduce ice production.
• Condenser is dirty. Dirt or lint may be blocking the airflowthrough the condenser. See Care and Cleaning---Condenser.
• Scale has built up in the icemaker. If there is white scalebuildup in the icemaker’s water or freezing system, you shouldclean the icemaker. See Care and Cleaning---Icemaker System.
• Water is leaking from the water pan because the drain cap isnot secure. Make sure the drain cap is securely tightened.
• Cutter grid is not securely in place. Unplug the icemaker ordisconnect power. Remove the cutter grid cover and check thecutter grid harness plug to make sure the connection issecure. For instructions on removing and replacing the cuttergrid and the location of the harness plug, see Care andCleaning---Interior.
• The ice sheet is trapped on the cutter grid. Unplug theicemaker or disconnect power. Remove the cutter grid coverand move the ice sheet to the cutter grid. Make sure the cuttergrid is lined up with the freezing plate. See OperatingInstructions---How your icemaker works. If it is not lined up withthe freezing plate, adjust the cutter grid. For instructions onremoving and replacing the cutter grid, see Care and Cleaning---Interior. Reinstall the cutter grid cover and reconnect power.Turn on the icemaker. The icemaker will reset itself and start anew cycle after flushing water through the system.
PROBLEM POSSIBLE CAUSE
ICEMAKER DOES NOTOPERATE
ICE CUBES HAVEODOR/TASTE
ICEMAKER IS ON, BUTDOESN’T PRODUCE ICE
ICEMAKER IS ON, BUTPRODUCES LITTLE ORNO ICE
21
General Electric CompanyWarranty Registration DepartmentP.O. Box 32150Louisville, KY 40232-2150
Place1st ClassLetterStampHere
GE Appliances
Consumer ProductOwnership RegistrationImportant Mail Today

22
Consumer Product Ownership RegistrationDear Customer:Thank you for purchasing our product and thank you for placing your confidence in us. We are proud to have you as a customer!
Follow these three steps to protect your new appliance investment:
1Complete and mail your Consumer Product OwnershipRegistration today. Have the peace of mind of knowing we can contact you in the unlikely event of a safety modification. 2
After completing thisregistration, write yourmodel and serial numbersin this manual. You will needthis information shouldyou require service. Theservice number in theUSA: 800.444.1845. In Canada, call:1.888.880.3030.
3Read your “Owner’sManual” carefully. It will help you operate your newappliance properly.
Important: To ensure that your product is registered, mail the separate product registration card. If the separate product registration card is missing, fold and mail the form below. No envelope is needed.
Consumer Product Ownership RegistrationProduct Model Serial
IcemakerImportant
Today!
First Name
Apt. #
StreetAddress
City
Last Name
ZipCodeState
Date PlacedIn Use
Month Day YearPhoneNumber
TAPE CLOSED
FOLD HERE
Mr. l Ms. l Mrs. l Miss l
General Electric CompanyLouisville, KY 40225
Monogram®
✄✄
✄
monogram.com
23
Consumer Services
Icemaker
With the purchase of your new Monogram appliance, receive theassurance that if you ever need information or assistance from GE,we’ll be there. All you have to do is call---toll- free!
GE AnswerCenter®
In the USA:800.626.2000
Whatever your question about any Monogram major appliance, GE Answer Center®
information service is available to help. Your call---and your question---will be answeredpromptly and courteously. And you can call any time. GE Answer Center® service is open 24 hours a day, 7 days a week.
OR
Visit our Website at: monogram.com
In Canada, call 1.888.880.3030.
In-Home RepairService
In the USA:800.444.1845
In Canada:1.888.880.3030
A GE consumer service professional will provide expert repair service, scheduled at a timethat’s convenient for you. Many GE Consumer Service company-operated locations offeryou service today or tomorrow, or at your convenience (7:00 a.m. to 7:00 p.m. weekdays,9:00 a.m. to 2:00 p.m. Saturdays). Our factory-trained technicians know your applianceinside and out---so most repairs can be handled in just one visit.
Service Contracts
In the USA:800.626.2224
In Canada:1.888.880.3030
You can have the secure feeling that GE Consumer Service will still be there after yourwarranty expires. Purchase a GE contract while your warranty is still in effect and you’llreceive a substantial discount. With a multiple-year contract, you’re assured of future service at today’s prices.
Parts andAccessories
In the USA:800.626.2002
In Canada:1.888.880.3030
Individuals qualified to service their own appliances can have parts or accessories sent directlyto their home. The GE parts system provides access to over 47,000 parts…and all GE GenuineRenewal Parts are fully warranted. VISA, MasterCard and Discover cards are accepted.
User maintenance instructions contained in this manual cover procedures intended to beperformed by any user. Other servicing generally should be referred to qualified servicepersonnel. Caution must be exercised, since improper servicing may cause unsafe operation.
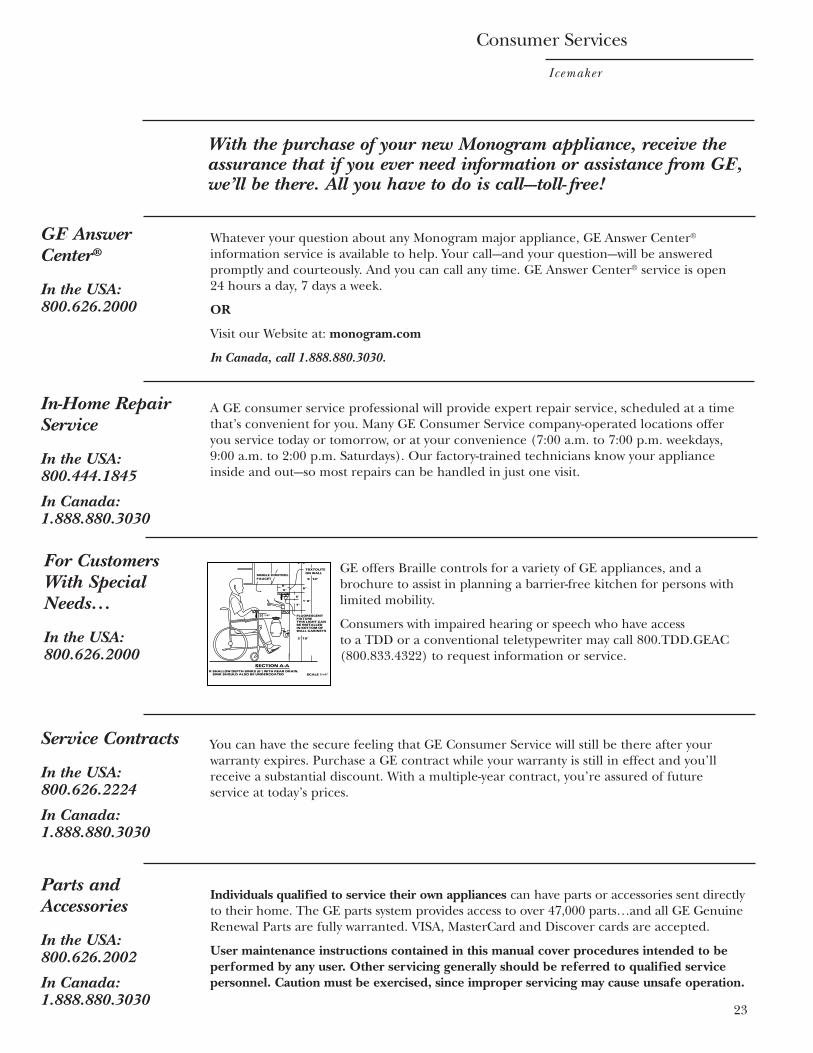
For CustomersWith SpecialNeeds…
In the USA:800.626.2000
GE offers Braille controls for a variety of GE appliances, and abrochure to assist in planning a barrier-free kitchen for persons withlimited mobility.
Consumers with impaired hearing or speech who have access to a TDD or a conventional teletypewriter may call 800.TDD.GEAC(800.833.4322) to request information or service.

Warranty
Icemaker
YOUR MONOGRAM ICEMAKER WARRANTYStaple sales slip or cancelled check here. Proof of original purchasedate is needed to obtain service under warranty.
WHAT ISCOVEREDFrom the Date of the OriginalPurchase
FULL ONE-YEAR WARRANTYFor one year from date of original purchase, we will provide, free of charge, parts and servicelabor in your home to repair or replace any part of the icemaker that fails because of amanufacturing defect.
FULL FIVE-YEAR WARRANTY
For five years from date of original purchase, we will provide, free of charge, parts and servicelabor in your home to repair or replace any part of the sealed icemaking system (the compressor,condenser, evaporator and all connecting tubing) that fails because of a manufacturing defect.
This warranty is extended to the original purchaser and any succeeding owner for productspurchased for ordinary home use in the 48 mainland states, Hawaii and Washington, D.C. orCanada. In Alaska, the warranty is the same except that it is LIMITED because you must pay toship the product to the service shop or for the service technician’s travel costs to your home.
All warranty service will be provided by our Factory Service Centers or by our authorizedCustomer Care® servicers during normal working hours.
Should your appliance need service, during warranty period or beyond, in the U.S.A., call 800.444.1845. In Canada: 888.880.3030.
Some states/provinces do not allow the exclusion or limitation of incidental or consequentialdamages, so the above limitation or exclusion may not apply to you. This warranty gives youspecific legal rights, and you may also have other rights which vary from state to state/provinceto province. To know what your legal rights are in your state/province, consult your local orstate/provincial consumer affairs office or your state’s Attorney General.
Warrantor: General Electric Company. If further help is needed concerning this warranty,write: Manager---Customer Relations, GE Appliances, Louisville, KY 40225
WHAT IS NOTCOVERED
• Service trips to your home to teach you howto use the product.
• Replacement of house fuses or resetting of circuit breakers.
• Damage to the product caused by accident,fire, floods or acts of God.
• Failure of the product if it is used for other than its intended purpose or usedcommercially.
• Improper installation.
If you have an installation problem, contactyour dealer or installer. You are responsiblefor providing adequate electrical, plumbingand other connecting facilities.
• Incidental or consequential damage causedby possible defects with this appliance.
General Electric CompanyLouisville, KY 40225
Monogram®
Printed in the United States
Part No. 2217244Pub No. 49-60027-112-01 JR