Embed Size (px)
Citation preview
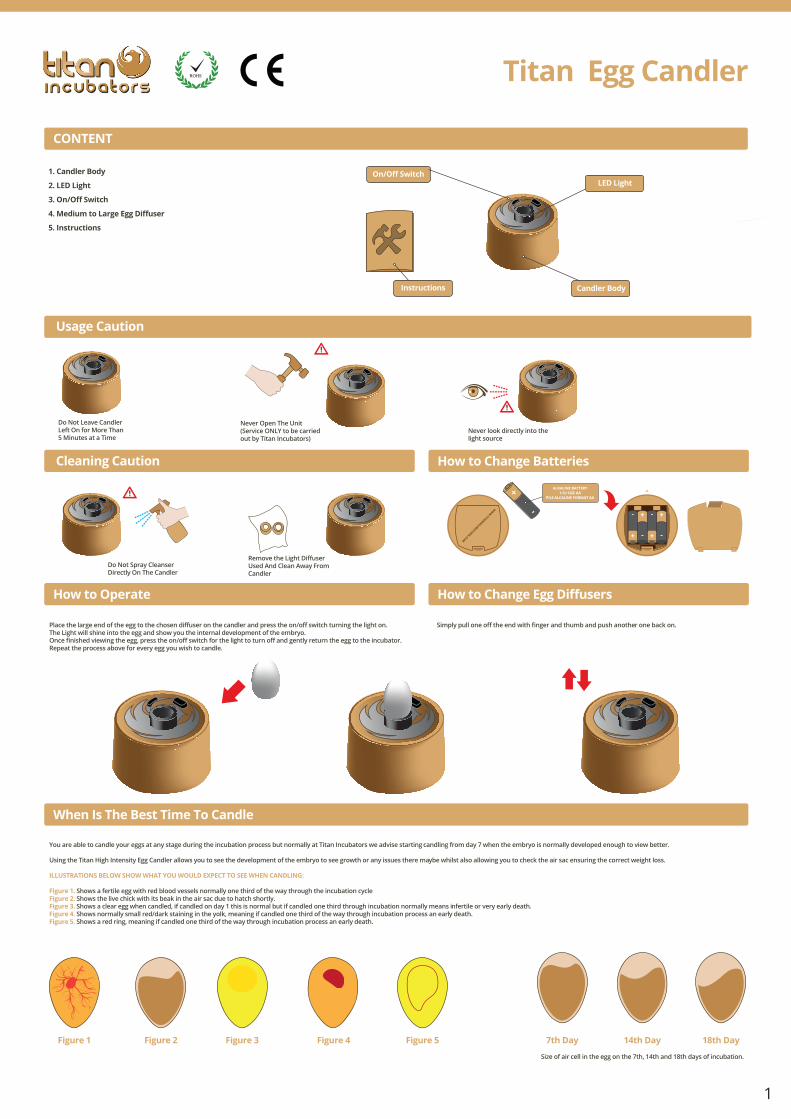
CONTENT
1. Candler Body
2. LED Light
3. On/Off Switch
4. Medium to Large Egg Diffuser
5. Instructions
How to Operate
Cleaning Caution
Place the large end of the egg to the chosen diffuser on the candler and press the on/off switch turning the light on.The Light will shine into the egg and show you the internal development of the embryo.Once finished viewing the egg, press the on/off switch for the light to turn off and gently return the egg to the incubator.Repeat the process above for every egg you wish to candle.
How to Change Egg Diffusers
How to Chаnge Batteries
Simply pull one off the end with finger and thumb and push another one back on.
When Is The Best Time To Candle
You are able to candle your eggs at any stage during the incubation process but normally at Titan Incubators we advise starting candling from day 7 when the embryo is normally developed enough to view better.
Using the Titan High Intensity Egg Candler allows you to see the development of the embryo to see growth or any issues there maybe whilst also allowing you to check the air sac ensuring the correct weight loss.
ILLUSTRATIONS BELOW SHOW WHAT YOU WOULD EXPECT TO SEE WHEN CANDLING:
Figure 1. Shows a fertile egg with red blood vessels normally one third of the way through the incubation cycleFigure 2. Shows the live chick with its beak in the air sac due to hatch shortly.Figure 3. Shows a clear egg when candled, if candled on day 1 this is normal but if candled one third through incubation normally means infertile or very early death.Figure 4. Shows normally small red/dark staining in the yolk, meaning if candled one third of the way through incubation process an early death.Figure 5. Shows a red ring, meaning if candled one third of the way through incubation process an early death.
7th DayFigure 1 Figure 2 Figure 3 Figure 4 Figure 5 14th Day
Size of air cell in the egg on the 7th, 14th and 18th days of incubation.
18th Day
Candler Body
LED Light
Instructions
Usage Caution
Titan Egg Candler
On/Off Switch
Never look directly into the light source
Never Open The Unit(Service ONLY to be carried out by Titan Incubators)
Do Not Leave Candler Left On for More Than 5 Minutes at a Time
Do Not Spray Cleanser Directly On The Candler
Remove the Light Diffuser Used And Clean Away From Candler
ALKALINE BATTERY1.5V SIZE AA
PILE ALCALINE FORMAT AA
WWW.TITANINCUBATORS.COM
1

INHALT
1. Schierlampen-Körper
2. LED Licht
3. Ein/Aus Schalter
4. Mittlerer Diffuser Ei Großer bis
5 Bedienungsanleitung.
Wie bedient sie wird
Vorsichtig Reinigen
Platzieren
Wenn
wollen. untersuchen Sie welches Ei jedem mit Vorgang obigen den Sie Wiederholen Inkubator. den in vorsichtig wieder Ei das Sie platzieren und auszuschalten
Licht das um erneut Schalter Ein/Aus den Sie drücken sind, fertig Eies des betrachten dem mit Sie erkennen.
Embryos des Entwicklung die Inneren im können Sie und leuchten Ei das in wird Licht Das einzuschalten. Licht das um Schalter Ein/Aus den Sie drücken und Schierlampe der usorffDi den auf Eies des Ende breite das Sie
Wie gewechselt Diffusor Ei der wird
Wie gewechselt Batterien die werden
Ziehen auf. wieder
anderen den Sie drücken und ab Daumen und Finger mit einfach ihn Sie
Wann Schieren/Durchleuchten Zum Zeit Beste Die Ist
Sie Schieren/Durchleuchten. zu erkennen,
zu Entwicklung seine um ist genug groß Embryo der wenn 7, Tag ab empfehlen IncubatorsTitan bei Wir Schieren/Durchleuchten. Inkubationsprozess dem während Zeitpunkt jedem zu Eier Ihre können
Mit stellen. sicher Gewichtsverlust korrekten den
und überprüfen Luftsack den auch Sie können So gibt. Wachstum dem mit Probleme irgendwelche es ob feststellen und sehen, Embryos des Entwicklung die Sie können Schierlampe, Hellen Extra Titan der
DIE :KÖNNTEN SEHEN SCHIEREN BEIM SIE WAS ZEIGEN, ABBILDUNGEN FOLGENDEN
AbbildungAbbildungAbbildung
Abbildung
Abbildung Embryos. des Tod frühen den wurde, geschiert Inkubations-Zykluses des Drittel einem etwa nach wenn bedeutet das Ring, roten einen Zeigt 5. Embryos. des Tod
frühen den wurde, geschiert Inkubations-Zykluses des Drittel einem etwa nach wenn bedeutet das Dotter, im Färbung rot/dunkle etwas normalerweise Zeigt 4. ist. abgestorben früh sehr Embryo der oder war, befruchtet nicht entweder es
das es bedeutet dann aussieht, so Inkubations-Zykluses des Drittel einem etwa nach jedoch es Falls schieren. Tag ersten am dieses Sie wenn Ei, klares ein Zeigt 3. schlüpfen. dem vor kurz Luftsack im Schnabel dem mit Küken lebende das Zeigt 2.
Inkubations-Zykluses des Drittel einem etwa nach Blutgefäßen roten mit Ei befruchtetes ein Zeigt 1.
.7 Tag Abbildung 1 Abbildung 2 Abbildung 3 Abbildung 4 Abbildung 5 .14 Tag
Größe Inkubation. der Tag 18. und 14. 7., am Ei im Luftsack des
.18 Tag
Schierlampen-Körper
LED L chti
VorsichtigWEN Verwenden
Verwenden
Titan ierE Schierlampe
Bedienungsanleitung
Ein/Aus Schalter
Blickenin Lichtstrahl den
direkt niemals Sie Öffnen
(Service Incubators) Titan
durch NUR Gerät Das Niemals Sie Lassen
Länger Eingeschaltet
Minuten 5 als Niemals Schierlampe Die Sie
Schierlampe Die Auf Reiniger
Keinen Sie SprühenDirekt
Entfernen
Und
Der Schierlampe Entfernung Einiger
In Ihn Sie Reinigen usorffDi Benutzten
Den Sie
ALKALINE-BATTERIE1,5VALKALINE
AAFORMAT STABBATTERIEN
AA GRÖSSE
WWW.TITANINCUBATORS.COM
�
Figure 1 Figure 2 Figure 3 Figure 4 Figure 5
WWW.TITANINCUBATORS.COM
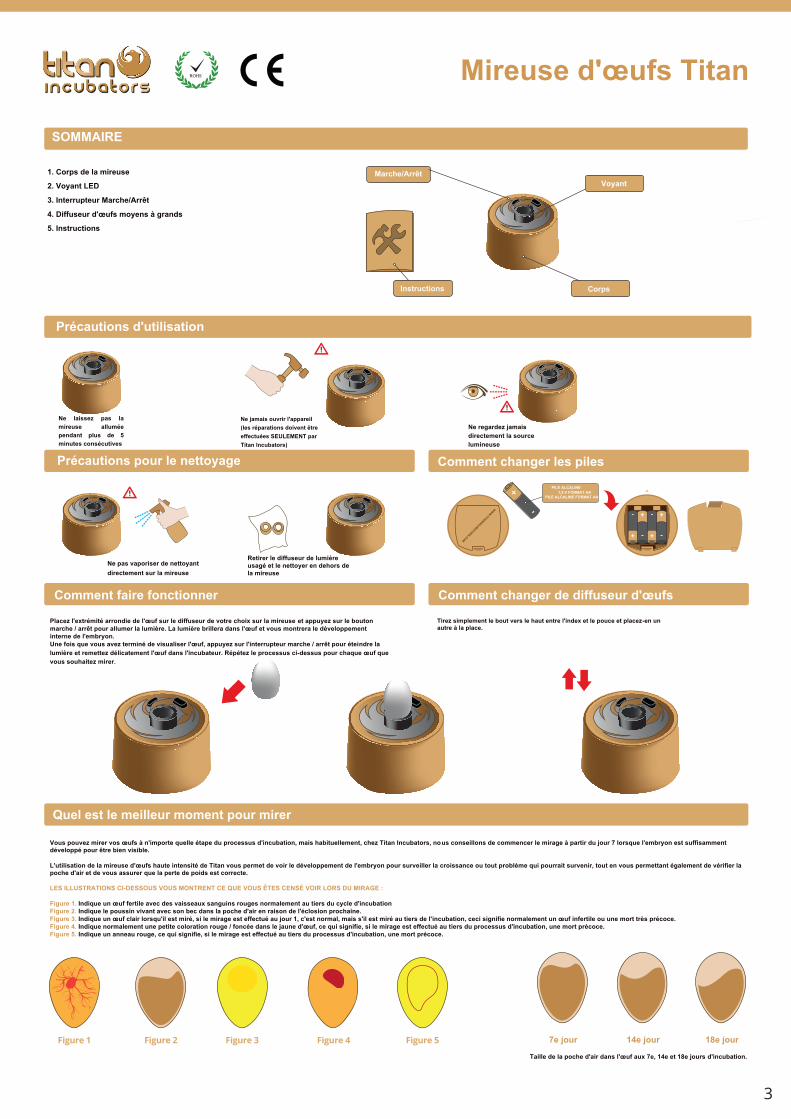
Mireuse d'œufs Titan
SOMMAIRE
1. Corps de la mireuse
2. Voyant LED
3. Interrupteur Marche/Arrêt
4. Diffuseur d'œufs moyens à grands
5. Instructions
Marche/ArrêtVoyant
Instructions Corps
Précautions d'utilisation
Ne laissez pas la mireuse allumée pendant plus de 5 minutes consécutives
Ne jamais ouvrir l'appareil (les réparations doivent être effectuées SEULEMENT par Titan Incubators)
Ne regardez jamais directement la source lumineuse
Précautions pour le nettoyage Comment changer les piles
Comment faire fonctionner Comment changer de diffuseur d'œufs
Ne pas vaporiser de nettoyantdirectement sur la mireuse
Retirer le diffuseur de lumière usagé et le nettoyer en dehors de la mireuse
PILE ALCALINE1,5 V FORMAT AA
PILE ALCALINE FORMAT AA
Placez l'extrémité arrondie de l'œuf sur le diffuseur de votre choix sur la mireuse et appuyez sur le bouton marche / arrêt pour allumer la lumière. La lumière brillera dans l'œuf et vous montrera le développement interne de l'embryon. Une fois que vous avez terminé de visualiser l'œuf, appuyez sur l'interrupteur marche / arrêt pour éteindre la lumière et remettez délicatement l'œuf dans l'incubateur. Répétez le processus ci-dessus pour chaque œuf que vous souhaitez mirer.
Tirez simplement le bout vers le haut entre l'index et le pouce et placez-en un autre à la place.
Quel est le meilleur moment pour mirer Vous pouvez mirer vos œufs à n'importe quelle étape du processus d'incubation, mais habituellement, chez Titan Incubators, nous conseillons de commencer le mirage à partir du jour 7 lorsque l'embryon est suffisamment développé pour être bien visible. L'utilisation de la mireuse d'œufs haute intensité de Titan vous permet de voir le développement de l'embryon pour surveiller la croissance ou tout problème qui pourrait survenir, tout en vous permettant également de vérifier la poche d'air et de vous assurer que la perte de poids est correcte. LES ILLUSTRATIONS CI-DESSOUS VOUS MONTRENT CE QUE VOUS ÊTES CENSÉ VOIR LORS DU MIRAGE : Figure 1. Indique un œuf fertile avec des vaisseaux sanguins rouges normalement au tiers du cycle d'incubation Figure 2. Indique le poussin vivant avec son bec dans la poche d'air en raison de l'éclosion prochaine. Figure 3. Indique un œuf clair lorsqu'il est miré, si le mirage est effectué au jour 1, c'est normal, mais s'il est miré au tiers de l'incubation, ceci signifie normalement un œuf infertile ou une mort très précoce. Figure 4. Indique normalement une petite coloration rouge / foncée dans le jaune d'œuf, ce qui signifie, si le mirage est effectué au tiers du processus d'incubation, une mort précoce. Figure 5. Indique un anneau rouge, ce qui signifie, si le mirage est effectué au tiers du processus d'incubation, une mort précoce.
7e jour 14e jour 18e jour
Taille de la poche d'air dans l'œuf aux 7e, 14e et 18e jours d'incubation.
2
INHALT
1. Schierlampen-Körper
2. LED Licht
3. Ein/Aus Schalter
4. Mittlerer Diffuser Ei Großer bis
5 Bedienungsanleitung.
Wie bedient sie wird
Vorsichtig Reinigen
Platzieren
Wenn
wollen. untersuchen Sie welches Ei jedem mit Vorgang obigen den Sie Wiederholen Inkubator. den in vorsichtig wieder Ei das Sie platzieren und auszuschalten
Licht das um erneut Schalter Ein/Aus den Sie drücken sind, fertig Eies des betrachten dem mit Sie erkennen.
Embryos des Entwicklung die Inneren im können Sie und leuchten Ei das in wird Licht Das einzuschalten. Licht das um Schalter Ein/Aus den Sie drücken und Schierlampe der usorffDi den auf Eies des Ende breite das Sie
Wie gewechselt Diffusor Ei der wird
Wie gewechselt Batterien die werden
Ziehen auf. wieder
anderen den Sie drücken und ab Daumen und Finger mit einfach ihn Sie
Wann Schieren/Durchleuchten Zum Zeit Beste Die Ist
Sie Schieren/Durchleuchten. zu erkennen,
zu Entwicklung seine um ist genug groß Embryo der wenn 7, Tag ab empfehlen IncubatorsTitan bei Wir Schieren/Durchleuchten. Inkubationsprozess dem während Zeitpunkt jedem zu Eier Ihre können
Mit stellen. sicher Gewichtsverlust korrekten den
und überprüfen Luftsack den auch Sie können So gibt. Wachstum dem mit Probleme irgendwelche es ob feststellen und sehen, Embryos des Entwicklung die Sie können Schierlampe, Hellen Extra Titan der
DIE :KÖNNTEN SEHEN SCHIEREN BEIM SIE WAS ZEIGEN, ABBILDUNGEN FOLGENDEN
AbbildungAbbildungAbbildung
Abbildung
Abbildung Embryos. des Tod frühen den wurde, geschiert Inkubations-Zykluses des Drittel einem etwa nach wenn bedeutet das Ring, roten einen Zeigt 5. Embryos. des Tod
frühen den wurde, geschiert Inkubations-Zykluses des Drittel einem etwa nach wenn bedeutet das Dotter, im Färbung rot/dunkle etwas normalerweise Zeigt 4. ist. abgestorben früh sehr Embryo der oder war, befruchtet nicht entweder es
das es bedeutet dann aussieht, so Inkubations-Zykluses des Drittel einem etwa nach jedoch es Falls schieren. Tag ersten am dieses Sie wenn Ei, klares ein Zeigt 3. schlüpfen. dem vor kurz Luftsack im Schnabel dem mit Küken lebende das Zeigt 2.
Inkubations-Zykluses des Drittel einem etwa nach Blutgefäßen roten mit Ei befruchtetes ein Zeigt 1.
.7 Tag Abbildung 1 Abbildung 2 Abbildung 3 Abbildung 4 Abbildung 5 .14 Tag
Größe Inkubation. der Tag 18. und 14. 7., am Ei im Luftsack des
.18 Tag
Schierlampen-Körper
LED L chti
VorsichtigWEN Verwenden
Verwenden
Titan ierE Schierlampe
Bedienungsanleitung
Ein/Aus Schalter
Blickenin Lichtstrahl den
direkt niemals Sie Öffnen
(Service Incubators) Titan
durch NUR Gerät Das Niemals Sie Lassen
Länger Eingeschaltet
Minuten 5 als Niemals Schierlampe Die Sie
Schierlampe Die Auf Reiniger
Keinen Sie SprühenDirekt
Entfernen
Und
Der Schierlampe Entfernung Einiger
In Ihn Sie Reinigen usorffDi Benutzten
Den Sie
ALKALINE-BATTERIE1,5VALKALINE
AAFORMAT STABBATTERIEN
AA GRÖSSE
WWW.TITANINCUBATORS.COM
�
Figure 1 Figure 2 Figure 3 Figure 4 Figure 5
WWW.TITANINCUBATORS.COM
Mireuse d'œufs Titan
SOMMAIRE
1. Corps de la mireuse
2. Voyant LED
3. Interrupteur Marche/Arrêt
4. Diffuseur d'œufs moyens à grands
5. Instructions
Marche/ArrêtVoyant
Instructions Corps
Précautions d'utilisation
Ne laissez pas la mireuse allumée pendant plus de 5 minutes consécutives
Ne jamais ouvrir l'appareil (les réparations doivent être effectuées SEULEMENT par Titan Incubators)
Ne regardez jamais directement la source lumineuse
Précautions pour le nettoyage Comment changer les piles
Comment faire fonctionner Comment changer de diffuseur d'œufs
Ne pas vaporiser de nettoyantdirectement sur la mireuse
Retirer le diffuseur de lumière usagé et le nettoyer en dehors de la mireuse
PILE ALCALINE1,5 V FORMAT AA
PILE ALCALINE FORMAT AA
Placez l'extrémité arrondie de l'œuf sur le diffuseur de votre choix sur la mireuse et appuyez sur le bouton marche / arrêt pour allumer la lumière. La lumière brillera dans l'œuf et vous montrera le développement interne de l'embryon. Une fois que vous avez terminé de visualiser l'œuf, appuyez sur l'interrupteur marche / arrêt pour éteindre la lumière et remettez délicatement l'œuf dans l'incubateur. Répétez le processus ci-dessus pour chaque œuf que vous souhaitez mirer.
Tirez simplement le bout vers le haut entre l'index et le pouce et placez-en un autre à la place.
Quel est le meilleur moment pour mirer Vous pouvez mirer vos œufs à n'importe quelle étape du processus d'incubation, mais habituellement, chez Titan Incubators, nous conseillons de commencer le mirage à partir du jour 7 lorsque l'embryon est suffisamment développé pour être bien visible. L'utilisation de la mireuse d'œufs haute intensité de Titan vous permet de voir le développement de l'embryon pour surveiller la croissance ou tout problème qui pourrait survenir, tout en vous permettant également de vérifier la poche d'air et de vous assurer que la perte de poids est correcte. LES ILLUSTRATIONS CI-DESSOUS VOUS MONTRENT CE QUE VOUS ÊTES CENSÉ VOIR LORS DU MIRAGE : Figure 1. Indique un œuf fertile avec des vaisseaux sanguins rouges normalement au tiers du cycle d'incubation Figure 2. Indique le poussin vivant avec son bec dans la poche d'air en raison de l'éclosion prochaine. Figure 3. Indique un œuf clair lorsqu'il est miré, si le mirage est effectué au jour 1, c'est normal, mais s'il est miré au tiers de l'incubation, ceci signifie normalement un œuf infertile ou une mort très précoce. Figure 4. Indique normalement une petite coloration rouge / foncée dans le jaune d'œuf, ce qui signifie, si le mirage est effectué au tiers du processus d'incubation, une mort précoce. Figure 5. Indique un anneau rouge, ce qui signifie, si le mirage est effectué au tiers du processus d'incubation, une mort précoce.
7e jour 14e jour 18e jour
Taille de la poche d'air dans l'œuf aux 7e, 14e et 18e jours d'incubation.
3

CONTENUTO
1. Corpo dello sperauova
2. Luce LED
3. Interruttore On/Off
4. Diffusore per uova Medie / Grandi
5. Istruzioni
Come utilizzare lo sperauova
Precauzioni per la pulizia
Come cambiare il diffusore
Come sostituire le Batterie
Quando è il momento migliore per esaminare le uova
Figura 1. Mostra un uovo fertile con vasi sanguigni rossi, di solito ad un terzo del ciclo di incubazioneFigura 2. Mostra il pulcino vivo con il suo becco nel sacco d'aria a poco tempo dalla schiusaFigura 3. Figura 4.Figura 5. Mostra un anello rosso, se si verifica ad un terzo del ciclo di incubazione di solito significa morte precoce
Figura 1 Figura 2 Figura 3 Figura 4 Figura 5
Corpo Sperauova
Luce LED
Istruzioni
Precauzioni d'uso
Interruttore On/Off
ALKALINE BATTERY1.5V SIZE AA
PILE ALCALINE FORMAT AA
WWW.TITANINCUBATORS.COM
Sperauova Titan
Non lasciare lo sperauovaacceso per più di 5 minuticonsecutivamente
Non aprire mai l'unità(La manutenzione può esserefatta SOLO da Titan Incubators)
Non guardare mai direttamentela fonte di luce
Non spruzzare detergentedirettamente sullo sperauova
Rimuovere il diffusore usatoe pulirlo separatamentedallo sperauova
Estrarre semplicemente un diffusore con pollice e indice e spingere dentro l'altro.Posizionare la parte larga dell'uovo sul diffusore prescelto e premere il pulsante On/Off per accendere la luce.La luce illuminerà l'uovo mostrandovi lo sviluppo dell'embrione.Dopo aver terminato di esaminare l'uovo, premere l'interruttore per spegnere la luce e riporre accuratamentel'uovo nell'incubatrice. Ripetere la procedura per ogni uovo che desiderate esaminare.
Potete esaminare le vostre uova in qualsiasi momento durante il processo di incubazione, ma di solito Titan Incubators consiglia di iniziare l'esaminazione dal settimo giorno quando solitamente l'embrione è abbastanza sviluppatoper una buona visione. L'utilizzo dello sperauova con luce intensa di Titan vi permette di vedere lo sviluppo dell'embrione, di vedere il presentarsi di qualsiasi problema possa verificarsi e vi permette anche di controllare la sacca d'aria,per assicurare la corretta perdita di peso.
LE ILLUSTRAZIONI SOTTO MOSTRANO QUELLO CHE DOVRESTE VEDERE QUANDO ESAMINATE LE UOVA:
Mostra un uovo trasparente alla vista, situazione normale se si verifica il primo giorno, ma se si verifica ad un terzo del ciclo di incubazione di solito significa uovo infertile o morte precoce Mostra macchie rosse/scure normali nel tuorlo, se si verifica ad un terzo del ciclo di incubazione di solito significa morte precoce
7.mo giorno 14.mo giorno 18.mo giorno
Dimensione della cella d'aria nell'uovo il 7.mo, 14.mo e 18.mo giorno di incubazione.
4
CONTENUTO
1. Corpo dello sperauova
2. Luce LED
3. Interruttore On/Off
4. Diffusore per uova Medie / Grandi
5. Istruzioni
Come utilizzare lo sperauova
Precauzioni per la pulizia
Come cambiare il diffusore
Come sostituire le Batterie
Quando è il momento migliore per esaminare le uova
Figura 1. Mostra un uovo fertile con vasi sanguigni rossi, di solito ad un terzo del ciclo di incubazioneFigura 2. Mostra il pulcino vivo con il suo becco nel sacco d'aria a poco tempo dalla schiusaFigura 3. Figura 4.Figura 5. Mostra un anello rosso, se si verifica ad un terzo del ciclo di incubazione di solito significa morte precoce
Figura 1 Figura 2 Figura 3 Figura 4 Figura 5
Corpo Sperauova
Luce LED
Istruzioni
Precauzioni d'uso
Interruttore On/Off
ALKALINE BATTERY1.5V SIZE AA
PILE ALCALINE FORMAT AA
WWW.TITANINCUBATORS.COM
Sperauova Titan
Non lasciare lo sperauovaacceso per più di 5 minuticonsecutivamente
Non aprire mai l'unità(La manutenzione può esserefatta SOLO da Titan Incubators)
Non guardare mai direttamentela fonte di luce
Non spruzzare detergentedirettamente sullo sperauova
Rimuovere il diffusore usatoe pulirlo separatamentedallo sperauova
Estrarre semplicemente un diffusore con pollice e indice e spingere dentro l'altro.Posizionare la parte larga dell'uovo sul diffusore prescelto e premere il pulsante On/Off per accendere la luce.La luce illuminerà l'uovo mostrandovi lo sviluppo dell'embrione.Dopo aver terminato di esaminare l'uovo, premere l'interruttore per spegnere la luce e riporre accuratamentel'uovo nell'incubatrice. Ripetere la procedura per ogni uovo che desiderate esaminare.
Potete esaminare le vostre uova in qualsiasi momento durante il processo di incubazione, ma di solito Titan Incubators consiglia di iniziare l'esaminazione dal settimo giorno quando solitamente l'embrione è abbastanza sviluppatoper una buona visione. L'utilizzo dello sperauova con luce intensa di Titan vi permette di vedere lo sviluppo dell'embrione, di vedere il presentarsi di qualsiasi problema possa verificarsi e vi permette anche di controllare la sacca d'aria,per assicurare la corretta perdita di peso.
LE ILLUSTRAZIONI SOTTO MOSTRANO QUELLO CHE DOVRESTE VEDERE QUANDO ESAMINATE LE UOVA:
Mostra un uovo trasparente alla vista, situazione normale se si verifica il primo giorno, ma se si verifica ad un terzo del ciclo di incubazione di solito significa uovo infertile o morte precoce Mostra macchie rosse/scure normali nel tuorlo, se si verifica ad un terzo del ciclo di incubazione di solito significa morte precoce
7.mo giorno 14.mo giorno 18.mo giorno
Dimensione della cella d'aria nell'uovo il 7.mo, 14.mo e 18.mo giorno di incubazione.
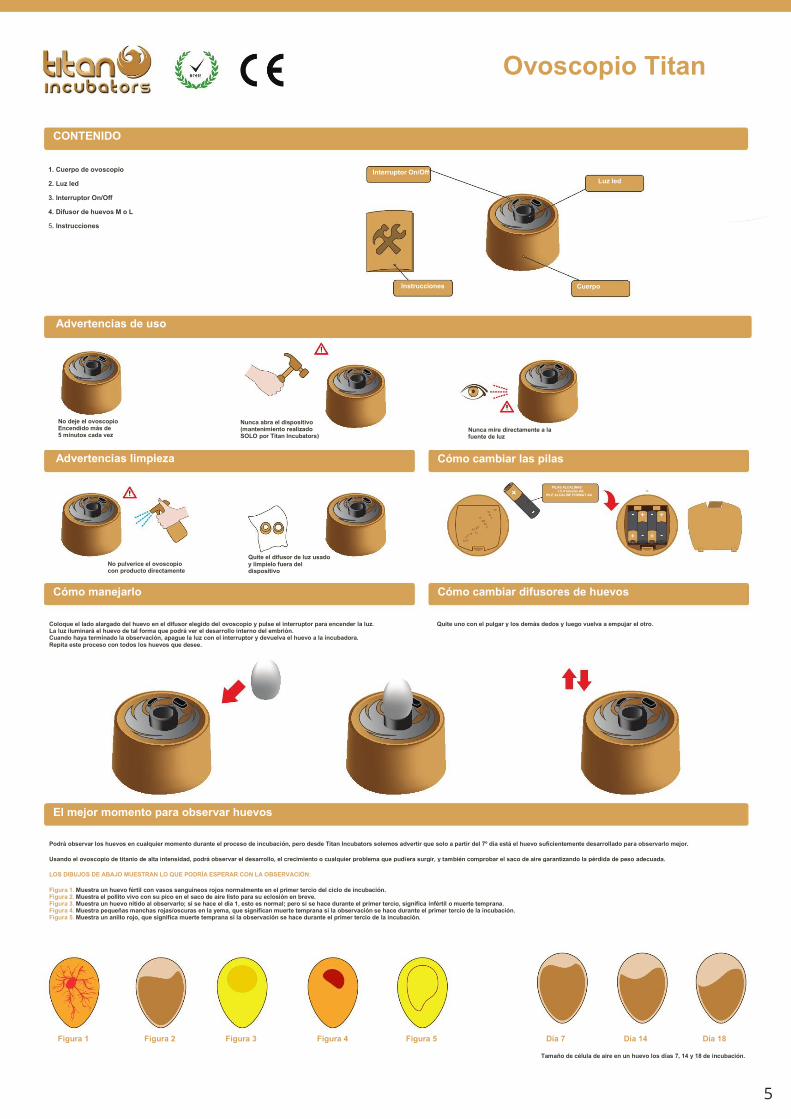
Ovoscopio Titan
CONTENIDO
1. Cuerpo de ovoscopio 2. Luz led 3. Interruptor On/Off 4. Difusor de huevos M o L 5. Instrucciones
Interruptor On/Off Luz led
Instrucciones Cuerpo
Advertencias de uso
No deje el ovoscopio Encendido más de 5 minutos cada vez
Nunca abra el dispositivo (mantenimiento realizado SOLO por Titan Incubators) Nunca mire directamente a la
fuente de luz Advertencias limpieza Cómo cambiar las pilas
PILAS ALCALINAS 1.5 V tamaño AA PILE ALCALINE FORMAT AA
W W W .T IT
AN IN C U B AT
O R S. C O M
No pulverice el ovoscopio con producto directamente
Quite el difusor de luz usado y límpielo fuera del dispositivo
Cómo manejarlo
Coloque el lado alargado del huevo en el difusor elegido del ovoscopio y pulse el interruptor para encender la luz. La luz iluminará el huevo de tal forma que podrá ver el desarrollo interno del embrión. Cuando haya terminado la observación, apague la luz con el interruptor y devuelva el huevo a la incubadora. Repita este proceso con todos los huevos que desee.
Cómo cambiar difusores de huevos
Quite uno con el pulgar y los demás dedos y luego vuelva a empujar el otro.
El mejor momento para observar huevos
Podrá observar los huevos en cualquier momento durante el proceso de incubación, pero desde Titan Incubators solemos advertir que solo a partir del 7º día está el huevo suficientemente desarrollado para observarlo mejor. Usando el ovoscopio de titanio de alta intensidad, podrá observar el desarrollo, el crecimiento o cualquier problema que pudiera surgir, y también comprobar el saco de aire garantizando la pérdida de peso adecuada. LOS DIBUJOS DE ABAJO MUESTRAN LO QUE PODRÍA ESPERAR CON LA OBSERVACIÓN: Figura 1. Muestra un huevo fértil con vasos sanguíneos rojos normalmente en el primer tercio del ciclo de incubación. Figura 2. Muestra el pollito vivo con su pico en el saco de aire listo para su eclosión en breve. Figura 3. Muestra un huevo nítido al observarlo; si se hace el día 1, esto es normal; pero si se hace durante el primer tercio, significa infértil o muerte temprana. Figura 4. Muestra pequeñas manchas rojas/oscuras en la yema, que significan muerte temprana si la observación se hace durante el primer tercio de la incubación. Figura 5. Muestra un anillo rojo, que significa muerte temprana si la observación se hace durante el primer tercio de la incubación.
Figura 1 Figura 2 Figura 3 Figura 4 Figura 5 Día 7 Día 14 Día 18 Tamaño de célula de aire en un huevo los días 7, 14 y 18 de incubación.
5

6

CONTENT
1. Candler Body
2. LED Light
3. On/Off Switch
4. Medium to Large Egg Diffuser
5. Instructions
How to Operate
Cleaning Caution
Place the large end of the egg to the chosen diffuser on the candler and press the on/off switch turning the light on.The Light will shine into the egg and show you the internal development of the embryo.Once finished viewing the egg, press the on/off switch for the light to turn off and gently return the egg to the incubator.Repeat the process above for every egg you wish to candle.
How to Change Egg Diffusers
How to Chаnge Batteries
Simply pull one off the end with finger and thumb and push another one back on.
When Is The Best Time To Candle
You are able to candle your eggs at any stage during the incubation process but normally at Titan Incubators we advise starting candling from day 7 when the embryo is normally developed enough to view better.
Using the Titan High Intensity Egg Candler allows you to see the development of the embryo to see growth or any issues there maybe whilst also allowing you to check the air sac ensuring the correct weight loss.
ILLUSTRATIONS BELOW SHOW WHAT YOU WOULD EXPECT TO SEE WHEN CANDLING:
Figure 1. Shows a fertile egg with red blood vessels normally one third of the way through the incubation cycleFigure 2. Shows the live chick with its beak in the air sac due to hatch shortly.Figure 3. Shows a clear egg when candled, if candled on day 1 this is normal but if candled one third through incubation normally means infertile or very early death.Figure 4. Shows normally small red/dark staining in the yolk, meaning if candled one third of the way through incubation process an early death.Figure 5. Shows a red ring, meaning if candled one third of the way through incubation process an early death.
7th DayFigure 1 Figure 2 Figure 3 Figure 4 Figure 5 14th Day
Size of air cell in the egg on the 7th, 14th and 18th days of incubation.
18th Day
Candler Body
LED Light
Instructions
Usage Caution
Titan Egg Candler
On/Off Switch
Never look directly into the light source
Never Open The Unit(Service ONLY to be carried out by Titan Incubators)
Do Not Leave Candler Left On for More Than 5 Minutes at a Time
Do Not Spray Cleanser Directly On The Candler
Remove the Light Diffuser Used And Clean Away From Candler
ALKALINE BATTERY1.5V SIZE AA
PILE ALCALINE FORMAT AA
WWW.TITANINCUBATORS.COM
7

CONTENT
1. Candler Body
2. LED Light
3. On/Off Switch
4. Medium to Large Egg Diffuser
5. Instructions
How to Operate
Cleaning Caution
Place the large end of the egg to the chosen diffuser on the candler and press the on/off switch turning the light on.The Light will shine into the egg and show you the internal development of the embryo.Once finished viewing the egg, press the on/off switch for the light to turn off and gently return the egg to the incubator.Repeat the process above for every egg you wish to candle.
How to Change Egg Diffusers
How to Chаnge Batteries
Simply pull one off the end with finger and thumb and push another one back on.
When Is The Best Time To Candle
You are able to candle your eggs at any stage during the incubation process but normally at Titan Incubators we advise starting candling from day 7 when the embryo is normally developed enough to view better.
Using the Titan High Intensity Egg Candler allows you to see the development of the embryo to see growth or any issues there maybe whilst also allowing you to check the air sac ensuring the correct weight loss.
ILLUSTRATIONS BELOW SHOW WHAT YOU WOULD EXPECT TO SEE WHEN CANDLING:
Figure 1. Shows a fertile egg with red blood vessels normally one third of the way through the incubation cycleFigure 2. Shows the live chick with its beak in the air sac due to hatch shortly.Figure 3. Shows a clear egg when candled, if candled on day 1 this is normal but if candled one third through incubation normally means infertile or very early death.Figure 4. Shows normally small red/dark staining in the yolk, meaning if candled one third of the way through incubation process an early death.Figure 5. Shows a red ring, meaning if candled one third of the way through incubation process an early death.
7th DayFigure 1 Figure 2 Figure 3 Figure 4 Figure 5 14th Day
Size of air cell in the egg on the 7th, 14th and 18th days of incubation.
18th Day
Candler Body
LED Light
Instructions
Usage Caution
Titan Egg Candler
On/Off Switch
Never look directly into the light source
Never Open The Unit(Service ONLY to be carried out by Titan Incubators)
Do Not Leave Candler Left On for More Than 5 Minutes at a Time
Do Not Spray Cleanser Directly On The Candler
Remove the Light Diffuser Used And Clean Away From Candler
ALKALINE BATTERY1.5V SIZE AA
PILE ALCALINE FORMAT AA
WWW.TITANINCUBATORS.COM
Titan Incubators, Isaacs, Ashton Road, Minety, Wiltshire, SN16 9QP
Tel :- 08000096270
email :- [email protected]
8